Python in Practice: Create Better Programs Using Concurrency, Libraries, and Patterns (2014)
Chapter 6. High-Level Networking in Python
The Python standard library has excellent support for networking all the way from low to high level. Low-level support is provided by modules such as socket, ssl, asyncore, and asynchat, and mid-level support by, for example, the socketserver module. Higher-level support is provided by the many modules that support various Internet protocols, including, most notably, the http and urllib modules.
There are also a number of third-party modules that support networking, including Pyro4 (Python remote objects; packages.python.org/Pyro4), PyZMQ (Python bindings for the C-based 0MQ library; zeromq.github.com/pyzmq), and Twisted (twistedmatrix.com). For those interested only in HTTP and HTTPS, the third-party requests package (python-requests.org) should be easy to use.
In this chapter, we will look at two modules that provide support for high-level networking: the xmlrpc module from the standard library (XML Remote Procedure Call) and the third-party RPyC module (Remote Python Call; rpyc.sourceforge.net). Both of these modules insulate us from a lot of low- and mid-level details, and are powerful yet convenient to use.
This chapter presents one server, and two clients, for both xmlrpc and RPyC. The servers and clients do essentially the same jobs, so that we can easily compare the two approaches. The servers are concerned with managing meter readings (e.g., for utility meters), and the clients are used by human meter readers to request meters to read and to provide readings or reasons why a reading could not be taken.
The most important difference between the examples is that the xmlrpc server is nonconcurrent, whereas the RPyC server is concurrent. As we will see, these implementation differences have a significant impact on how we manage the data for which the servers are responsible.
To keep the servers as simple as possible, we have separated out the management of meter readings into a separate module (the nonconcurrent Meter.py and the concurrency-supporting MeterMT.py). Another advantage of this separation is that it makes it easy to see how to replace the meter module with a custom module that manages quite different data, and therefore makes the clients and servers much easier to adapt for other purposes.
6.1. Writing XML-RPC Applications
Doing network communications using low-level protocols means that for each piece of data we want to pass, we must package up the data, send it, unpack it at the other end, and finally perform some operation in response to the sent data. This process can quickly become tedious and error-prone. One solution is to use a remote procedure call (RPC) library. This allows us to simply send a function name and arguments (e.g., strings, numbers, dates) and leaves the burden of packing, sending, unpacking, and performing the operation (i.e., calling the function) to the RPC library. A popular standardized RPC protocol is XML-RPC. Libraries that implement this protocol encode the data (i.e., function names and their arguments) in XML format and use HTTP as a transport mechanism.
Python’s standard library includes the xmlrpc.server and xmlrpc.client modules, which provide support for the protocol. The protocol itself is programming-language neutral, so even if we write an XML-RPC server in Python, it will be accessible to XML-RPC clients written in any language that supports the protocol. It is also possible to write XML-RPC clients in Python that connect to XML-RPC servers written in other languages.
The xmlrpc module allows us to use some Python-specific extensions—for example, to pass Python objects—but doing so means that only Python clients and servers can be used. This section’s example does not take advantage of this feature.
A lighter-weight alternative to XML-RPC is JSON-RPC. This provides the same broad functionality but uses a much leaner data format (i.e., it usually has far fewer bytes of overhead that need to be sent over the network). Python’s library includes the json module for encoding and decoding Python data into or from JSON but does not provide JSON-RPC client or server modules. However, there are many third-party Python JSON-RPC modules available (en.wikipedia.org/wiki/JSON-RPC). Another alternative, for when we have only Python clients and servers, is to use RPyC, as we will see in the next section (§6.2, ![]() 219).
219).
6.1.1. A Data Wrapper
The data that we want the clients and servers to handle is encapsulated by the Meter.py module. This module provides a Manager class that stores meter readings and provides methods for meter readers to login, acquire jobs, and submit results. This module could easily be substituted with another one to manage entirely different data.
class Manager:
SessionId = 0
UsernameForSessionId = {}
ReadingForMeter = {}
The SessionID is used to provide every successful login with a unique session ID.
The class also keeps two static dictionaries: one with session ID keys and user-name values, the other with meter number keys and meter reading values.
None of this static data needs to be thread-safe, because the xmlrpc server is not concurrent. The MeterMT.py version of this module supports concurrency, and we will review how it differs from Meter.py in the next section’s first subsection (§6.2.1, ![]() 220).
220).
In a more realistic context, the data is likely to be stored in a DBM file or in a database, either of which could easily be substituted for the meter data dictionary used here.
def login(self, username, password):
name = name_for_credentials(username, password)
if name is None:
raise Error("Invalid username or password")
Manager.SessionId += 1
sessionId = Manager.SessionId
Manager.UsernameForSessionId[sessionId] = username
return sessionId, name
We want meter readers to login with a username and password before we allow them to acquire jobs or submit results.
If the username and password are correct, we return a unique session ID for the user and the user’s real name (e.g., to display in the user interface). Each successful login is given a unique session ID and added to the UsernameForSessionId dictionary. All the other methods require a valid session ID.
_User = collections.namedtuple("User", "username sha256")
def name_for_credentials(username, password):
sha = hashlib.sha256()
sha.update(password.encode("utf-8"))
user = _User(username, sha.hexdigest())
return _Users.get(user)
When this function is called, it computes the SHA-256 hash of the given password, and if the username and the hash match an entry in the module’s private _Users dictionary (not shown), it returns the corresponding actual name; otherwise, it returns None.
The _Users dictionary has _User keys consisting of a username (e.g., carol), an SHA-256 hash of the user’s password, and real name values (e.g., “Carol Dent”). This means that no actual passwords are stored.*
*The approach used here is still not secure. To make it secure we would need to add a unique “salt” text to each password so that identical passwords didn’t produce the same hash value. A better alternative is to use the third-party passlib package (code.google.com/p/passlib).
def get_job(self, sessionId):
self._username_for_sessionid(sessionId)
while True: # Create fake meter
kind = random.choice("GE")
meter = "{}{}".format(kind, random.randint(40000,
99999 if kind == "G" else 999999))
if meter not in Manager.ReadingForMeter:
Manager.ReadingForMeter[meter] = None
return meter
Once the meter reader has logged in, they can call this method to get the number of a meter for them to read. The method begins by checking that the session ID is valid; if it isn’t, the _username_for_sessionid() method will raise a Meter.Error exception.
We don’t actually have a database of meters to read, so instead we create a fake meter whenever a meter reader asks for a job. We do this by creating a meter number (e.g., “E350718” or “G72168”) and then inserting it into the ReadingForMeter dictionary with a reading of None as soon as we create a fake meter that isn’t already in the dictionary.
def _username_for_sessionid(self, sessionId):
try:
return Manager.UsernameForSessionId[sessionId]
except KeyError:
raise Error("Invalid session ID")
This method either returns the username for the given session ID or, in effect, converts a generic KeyError for an invalid session ID into a custom Meter.Error.
It is often better to use a custom exception rather than a built-in one, because then we can catch those exceptions we expect to get and not accidentally catch more generic ones that, had they not been caught, would have revealed errors in our code’s logic.
def submit_reading(self, sessionId, meter, when, reading, reason=""):
if isinstance(when, xmlrpc.client.DateTime):
when = datetime.datetime.strptime(when.value,
"%Y%m%dT%H:%M:%S")
if (not isinstance(reading, int) or reading < 0) and not reason:
raise Error("Invalid reading")
if meter not in Manager.ReadingForMeter:
raise Error("Invalid meter ID")
username = self._username_for_sessionid(sessionId)
reading = Reading(when, reading, reason, username)
Manager.ReadingForMeter[meter] = reading
return True
This method accepts a session ID, a meter number (e.g., “G72168”), the date and time when the reading took place, the reading value (a positive integer or -1 if no reading was obtained), and the reason why a reading couldn’t be taken (which is a nonempty string for unsuccessful readings).
We can set the XML-RPC server to use built-in Python types, but this isn’t done by default (and we haven’t done it), because the XML-RPC protocol is language neutral. This means that our XML-RPC server could serve clients that are written in any language that supports XML-RPC, not just Python clients. The downside of not using Python types is that date/time objects get passed as xmlrpc.client.DateTimes rather than as datetime.datetimes, so we must convert these to datetime.datetimes. (An alternative would be to pass them as ISO-8601-format date/time strings.)
Once we have prepared and checked the data, we retrieve the username for the meter reader whose session ID was passed in, and use this to create a Meter.Reading object. This is simply a named tuple:
Reading = collections.namedtuple("Reading", "when reading reason username")
At the end, we set the meter’s reading. We return True (rather than the default of None), since, by default, the xmlrpc.server module doesn’t support None, and we want to keep our server language neutral. (RPyC can cope with any Python return value.)
def get_status(self, sessionId):
username = self._username_for_sessionid(sessionId)
count = total = 0
for reading in Manager.ReadingForMeter.values():
if reading is not None:
total += 1
if reading.username == username:
count += 1
return count, total
After a meter reader has submitted a reading, they might want to know what their status is; that is, how many readings they have made and the total number of readings the server has handled since it started. This method calculates these numbers and returns them.
def _dump(file=sys.stdout):
for meter, reading in sorted(Manager.ReadingForMeter.items()):
if reading is not None:
print("{}={}@{}[{}]{}".format(meter, reading.reading,
reading.when.isoformat()[:16], reading.reason,
reading.username), file=file)
This method is provided purely for debugging so that we can check that all the meter readings we have done were actually stored correctly.
The features that the Meter.Manager provides—a login() method, and methods to get and set data—are typical of a data-wrapping class that a server might use. It should be straightforward to replace this class with one for completely different data, while still using basically the same clients and servers shown in this chapter. The only caveat is that if we were to use concurrent servers, we must use locks or thread-safe classes for any shared data, as we will see later (§6.2.1, ![]() 220).
220).
6.1.2. Writing XML-RPC Servers
Thanks to the xmlrpc.server module, writing custom XML-RPC servers is very easy. The code in this subsection is quoted from meterserver-rpc.py.
def main():
host, port, notify = handle_commandline()
manager, server = setup(host, port)
print("Meter server startup at {} on {}:{}{}".format(
datetime.datetime.now().isoformat()[:19], host, port, PATH))
try:
if notify:
with open(notify, "wb") as file:
file.write(b"\n")
server.serve_forever()
except KeyboardInterrupt:
print("\rMeter server shutdown at {}".format(
datetime.datetime.now().isoformat()[:19]))
manager._dump()
This function gets the hostname and port number, creates a Meter.Manager and an xmlrpc.server.SimpleXMLRPCServer, and starts serving.
If the notify variable holds a filename, the server creates the file and writes a single newline to it. The notify filename is not used when the server is started manually, but as we will see later on (§6.1.3.2, ![]() 214), if the server is started by a GUI client, the client passes the server a notify filename. The GUI client then waits until the file has been created—at which point the client knows that the server is up and running—and then the client deletes the file and commences communication with the server.
214), if the server is started by a GUI client, the client passes the server a notify filename. The GUI client then waits until the file has been created—at which point the client knows that the server is up and running—and then the client deletes the file and commences communication with the server.
The server can be stopped by entering Ctrl+C or by sending it an INT signal (e.g., kill -2 pid on Linux), which the Python interpreter transforms into a Keyboard-Interrupt. If the server is stopped in this way, we make the manager dump its readings for inspection. (This is the only reason this function needs access to the manager instance.)
HOST = "localhost"
PORT = 11002
def handle_commandline():
parser = argparse.ArgumentParser(conflict_handler="resolve")
parser.add_argument("-h", "--host", default=HOST,
help="hostname [default %(default)s]")
parser.add_argument("-p", "--port", default=PORT, type=int,
help="port number [default %(default)d]")
parser.add_argument("--notify", help="specify a notification file")
args = parser.parse_args()
return args.host, args.port, args.notify
This function is only quoted because it uses -h (and --host) as options for setting the hostname. By default, the argparse module reserves the -h (and --help) options to tell it to display the command-line help and then terminate. We want to take over the use of -h (but leave --help), and we do this by setting the argument parser’s conflict handler.
Unfortunately, when argparse was ported to Python 3, the old Python 2–style % formatting was retained rather than being replaced with Python 3’s str.format() braces. In view of this, when we want to include default values in help text, we must write %(default)t where t is the value’s type (d for decimal integer, f for floating-point, s for string).
def setup(host, port):
manager = Meter.Manager()
server = xmlrpc.server.SimpleXMLRPCServer((host, port),
requestHandler=RequestHandler, logRequests=False)
server.register_introspection_functions()
for method in (manager.login, manager.get_job, manager.submit_reading,
manager.get_status):
server.register_function(method)
return manager, server
This function is used to create the data (i.e., meter) manager and the server. The resister_introspection_functions() method makes three introspection functions available to clients: system.listMethods(), system.methodHelp(), andsystem.methodSignature(). (These aren’t used by the meter XML-RPC clients but might be needed for debugging more complex clients.) Each of the manager methods we want clients to have access to must be registered with the server, and this is easily accomplished using theregister_function() method. (See the “Bound and Unbound Methods” sidebar, 63 ![]() .)
.)
PATH = "/meter"
class RequestHandler(xmlrpc.server.SimpleXMLRPCRequestHandler):
rpc_paths = (PATH,)
The meter server doesn’t need to do any special request handling, so we have created the most basic request handler possible: one that inherits xmlrpc.server.SimpleXMLRPCRequestHandler and that has a unique path to identify meter server requests.
Now that we have created a server, we can create clients to access it.
6.1.3. Writing XML-RPC Clients
In this subsection, we will review two different clients: one console based that assumes that the server is already running, and the other a GUI client that will use a running server or will start up its own server if there isn’t one running already.
6.1.3.1. A Console XML-RPC Client
Before we dive into the code, let’s look at a typical interactive console session. The meterserver-rpc.py server must have been started before this interaction took place.
$ ./meterclient-rpc.py
Username [carol]:
Password:
Welcome, Carol Dent, to Meter RPC
Reading for meter G5248: 5983
Accepted: you have read 1 out of 18 readings
Reading for meter G72168: 2980q
Invalid reading
Reading for meter G72168: 29801
Accepted: you have read 2 out of 21 readings
Reading for meter E445691:
Reason for meter E445691: Couldn't find the meter
Accepted: you have read 3 out of 26 readings
Reading for meter E432365: 87712
Accepted: you have read 4 out of 28 readings
Reading for meter G40447:
Reason for meter G40447:
$
User Carol starts up a meter client. She’s prompted to enter her username or press Enter to accept the default (shown in square brackets), so she presses Enter. She is then prompted to enter her password, which she does without any echo. The server recognizes her and welcomes her giving her full name. The client then asks the server for a meter to read and prompts Carol to enter a reading. If she enters a number, it is passed to the server and will normally be accepted. If she makes a mistake (as she does with the second reading), or if the reading is invalid for some other reason, she is notified and prompted to enter the reading again. Whenever a reading (or reason) is accepted, she is told how many readings she has made this session and how many readings have been made in total this session (i.e., including the readings made by other people who are using the server at the same time). If she presses Enter without entering a reading, she is prompted to type in a reason why she can’t give a reading. And if she doesn’t enter a reading or a reason, the client terminates.
def main():
host, port = handle_commandline()
username, password = login()
if username is not None:
try:
manager = xmlrpc.client.ServerProxy("http://{}:{}{}".format(
host, port, PATH))
sessionId, name = manager.login(username, password)
print("Welcome, {}, to Meter RPC".format(name))
interact(manager, sessionId)
except xmlrpc.client.Fault as err:
print(err)
except ConnectionError as err:
print("Error: Is the meter server running? {}".format(err))
This function begins by getting the server’s host name and port number (or their defaults) and then obtains the user’s username and password. It then creates a proxy (manager) for the Meter.Manager instance used by the server. (We discussed the Proxy Pattern earlier; §2.7, 67 ![]() .)
.)
Once the proxy manager has been created, we use the proxy to login and then begin interacting with the server. If no server is running, we will get a ConnectionError exception (or a socket.error prior to Python 3.3).
def login():
loginName = getpass.getuser()
username = input("Username [{}]: ".format(loginName))
if not username:
username = loginName
password = getpass.getpass()
if not password:
return None, None
return username, password
The getpass module’s getuser() function returns the username for the currently logged-in user, and we use this as the default username. The getpass() function prompts for a password and does not echo the reply. Both input() and getpass.getpass() return strings without trailing newlines.
def interact(manager, sessionId):
accepted = True
while True:
if accepted:
meter = manager.get_job(sessionId)
if not meter:
print("All jobs done")
break
accepted, reading, reason = get_reading(meter)
if not accepted:
continue
if (not reading or reading == -1) and not reason:
break
accepted = submit(manager, sessionId, meter, reading, reason)
If the login is successful, this function is called to handle the client–server interaction. This consists of repeatedly acquiring a job from the server (i.e., a meter to read), getting a reading or reason from the user, and submitting the data to the server, until the user enters neither a reading nor a reason.
def get_reading(meter):
reading = input("Reading for meter {}: ".format(meter))
if reading:
try:
return True, int(reading), ""
except ValueError:
print("Invalid reading")
return False, 0, ""
else:
return True, -1, input("Reason for meter {}: ".format(meter))
This function must handle three cases: the user enters a valid (i.e., integer) reading, or the user enters an invalid reading, or the user doesn’t enter a reading at all. If no reading is entered, the user either enters a reason or no reason (in the latter case signifying that they have finished).
def submit(manager, sessionId, meter, reading, reason):
try:
now = datetime.datetime.now()
manager.submit_reading(sessionId, meter, now, reading, reason)
count, total = manager.get_status(sessionId)
print("Accepted: you have read {} out of {} readings".format(
count, total))
return True
except (xmlrpc.client.Fault, ConnectionError) as err:
print(err)
return False
Whenever a reading or reason has been obtained, this function is used to submit it to the server via the proxied manager. Once the reading or reason has been submitted, the function asks for the status (i.e., how many readings has this user submitted; how many readings have been submitted in total since the server started).
The client code is longer than the server code but very straightforward. And since we are using XML-RPC, the client could be written in any language that supports the protocol. It is also possible to write clients that use different user interface technologies, such as Urwid (excess.org/urwid) for Unix console user interfaces or a GUI toolkit like Tkinter.
6.1.3.2. A GUI XML-RPC Client
Tkinter GUI programming is introduced in Chapter 7, so those unfamiliar with Tkinter might prefer to read that chapter first and then return here. In this subsubsection, we will focus on only those aspects of the GUI meter-rpc.pyw program that are concerned with interacting with the meter server. The program is shown in Figure 6.1.
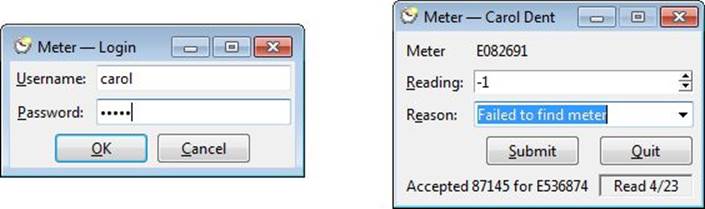
Figure 6.1 The Meter XML-RPC GUI application’s login and main windows on Windows
class Window(ttk.Frame):
def __init__(self, master):
super().__init__(master, padding=PAD)
self.serverPid = None
self.create_variables()
self.create_ui()
self.statusText.set("Ready...")
self.countsText.set("Read 0/0")
self.master.after(100, self.login)
When the main window is created, we set a server PID (Process ID) of None and call the login() method 100 milliseconds after the main window has been constructed. This allows Tkinter time to paint the main window, and before the user has a chance to interact with it, an application modal login window is created. An application modal window is the only window that the user can interact with for a given application. This means that although the user can see the main window, they cannot use it until they have logged in and the modal login window has gone away.
class Result:
def __init__(self):
self.username = None
self.password = None
self.ok = False
This tiny class (from MeterLogin.py) is used to hold the results of the user’s interaction with the modal login dialog window. By passing a reference to a Result instance to the dialog, we can ensure that we are able to access what the user entered even after the dialog has been closed and deleted.
def login(self):
result = MeterLogin.Result()
dialog = MeterLogin.Window(self, result)
if result.ok and self.connect(result.username, result.password):
self.get_job()
else:
self.close()
This method creates a result object and then creates an application modal login dialog window. The MeterLogin.Window() call shows the login window and blocks until the window is closed. As long as this window is shown, the user cannot interact with any other application window, so they must either enter a username and password and click OK or cancel by clicking Cancel.
Once the user has clicked one of the buttons, the window is closed (and deleted). If the user clicked OK (which is only possible if they entered a nonempty user-name and a nonempty password), an attempt to connect to the server is made and the first job obtained. If the user canceled the login or the connection failed, the main window is closed (and deleted), and the application is terminated.
def connect(self, username, password):
try:
self.manager = xmlrpc.client.ServerProxy("http://{}:{}{}"
.format(HOST, PORT, PATH))
name = self.login_to_server(username, password)
self.master.title("Meter \u2014 {}".format(name))
return True
except (ConnectionError, xmlrpc.client.Fault) as err:
self.handle_error(err)
return False
As soon as the user has entered their username and password, this method is called. It begins by creating a proxy to the server’s Meter.Manager instance and then attempts to login. After this, it changes the application’s title to the application’s name, an em-dash (—, Unicode code pointU+2014), and the user’s name, and returns True.
If an error occurs, a message box is popped up with the error text and False is returned.
def login_to_server(self, username, password):
try:
self.sessionId, name = self.manager.login(username, password)
except ConnectionError:
self.start_server()
self.sessionId, name = self.manager.login(username, password)
return name
If a meter server is already running, the initial connection attempt will succeed and the session ID and user’s name will be obtained. However, if the attempt to login fails due to a ConnectionError, the application assumes that the server isn’t running and tries to start it, and then tries to login a second time. If the second attempt fails, the ConnectionError is propagated to the caller (self.login()), which catches it and presents the user with an error message box, after which the application terminates.
SERVER = os.path.join(os.path.dirname(os.path.realpath(__file__)),
"meterserver-rpc.py")
This constant sets the server’s name with its full path. It assumes that the server is in the same directory as the GUI client. Of course, it is more common for a client to be on one machine and a server on another. However, some applications are created in two separate parts—a server and a client—that are expected to be on the same machine.
The two-part application design is useful when we want to completely isolate an application’s functionality from its user interface. This approach has the downsides that two executables must be supplied rather than one, and there is some networking overhead, but this shouldn’t be noticeable by the user if the client and server are on the same machine. The upsides are that the client and server can be developed independently, and that it is much easier to port such applications to new platforms, since the server can be written using platform-independent code, and the porting work can focus almost entirely on the client. It also means that new user-interface technologies can be taken advantage of (e.g., a new GUI toolkit) purely by porting the client. Another potential benefit is for finer-grained security; for example, the server can be made to run with specific and limited permissions, while the client can be run with the user’s permissions.
def start_server(self):
filename = os.path.join(tempfile.gettempdir(),
"M{}.$$$".format(random.randint(1000, 9999)))
self.serverPid = subprocess.Popen([sys.executable, SERVER,
"--host", HOST, "--port", str(PORT), "--notify",
filename]).pid
print("Starting the server...")
self.wait_for_server(filename)
The server is started using the subprocess.Popen() function. This particular usage means that the subprocess (i.e., the server) is started without blocking.
If we were executing a normal program (i.e., a subprocess) that we expected to terminate, we could wait for it to finish. But here we must start a server that won’t terminate until our client does, so waiting isn’t possible. Furthermore, we need to give the server a chance to start up, since we can’t attempt to login until it is running. Our solution here is simple: we create a pseudo-random filename and start the server, passing the filename as its notify argument. We can then wait for the server to start up and create the notify file to let the client know that the server is ready.
def wait_for_server(self, filename):
tries = 100
while tries:
if os.path.exists(filename):
os.remove(filename)
break
time.sleep(0.1) # Give the server a chance to start
tries -= 1
else:
self.handle_error("Failed to start the RPC Meter Server")
This method blocks (i.e., freezes) the user interface for up to ten seconds (100 tries × 0.1 seconds), although in practice the wait is almost always a fraction of a second. As soon as the server creates the notify file, the client deletes the file and resumes event processing; in this case, attempting to log the user in using the credentials they gave, and then showing the main window ready for them to enter meter readings. If the server fails to start, the while loop will finish without a break, and its else clause will be executed.
Polling is not ideal, especially in a GUI application, but since we want a cross-platform solution and the application cannot work without the server being available, this represents the simplest reasonable approach we can take.
def get_job(self):
try:
meter = self.manager.get_job(self.sessionId)
if not meter:
messagebox.showinfo("Meter \u2014 Finished",
"All jobs done", parent=self)
self.close()
self.meter.set(meter)
self.readingSpinbox.focus()
except (xmlrpc.client.Fault, ConnectionError) as err:
self.handle_error(err)
Once the login to the server has succeeded (with the server started by the application, if necessary, as part of this process), this method is called to get the first job. The self.meter variable is of type tkinter.StringVar and is associated with the label that shows the meter number.
def submit(self, event=None):
if self.submitButton.instate((tk.DISABLED,)):
return
meter = self.meter.get()
reading = self.reading.get()
reading = int(reading) if reading else -1
reason = self.reason.get()
if reading > -1 or (reading == -1 and reason and reason != "Read"):
try:
self.manager.submit_reading(self.sessionId, meter,
datetime.datetime.now(), reading, reason)
self.after_submit(meter, reading, reason)
except (xmlrpc.client.Fault, ConnectionError) as err:
self.handle_error(err)
This method is called whenever the user clicks the Submit button—something that the application allows only if the reading is nonzero or the reason nonempty. The meter, reading (as an int), and reason are all obtained from the user interface widgets and then submitted to the server via the proxied manager. If the submitted reading is accepted, the after_submit() method is called; otherwise, the error is passed to the handle_error() method.
def after_submit(self, meter, reading, reason):
count, total = self.manager.get_status(self.sessionId)
self.statusText.set("Accepted {} for {}".format(
reading if reading != -1 else reason, meter))
self.countsText.set("Read {}/{}".format(count, total))
self.reading.set(-1)
self.reason.set("")
self.get_job()
This method asks the proxied manager for the current status and updates the status and counts labels. It also resets the reading and reason and asks the manager for the next job.
def handle_error(self, err):
if isinstance(err, xmlrpc.client.Fault):
err = err.faultString
messagebox.showinfo("Meter \u2014 Error",
"{}\nIs the server still running?\n"
"Try Quitting and restarting.".format(err), parent=self)
If an error occurs, this method is called. It displays the error in an application modal message box with a single OK button.
def close(self, event=None):
if self.serverPid is not None:
print("Stopping the server...")
os.kill(self.serverPid, signal.SIGINT)
self.serverPid = None
self.quit()
When the user closes the application, we check whether the application started the meter server itself or used an already running server. In the former case, the application cleanly terminates the server by sending it an interrupt (which Python will turn into a KeyboardInterruptexception).
The os.kill() function sends a signal (one of the signal module’s constants) to the program with the given process ID. The function is Unix-only for Python 3.1 but works on both Unix and Windows from Python 3.2.
The console client, meterclient-rpc.py, is around 100 lines. The GUI client, meter-rpc.pyw, is around 250 lines (plus about another 100 for the MeterLogin.py login dialog window). Both are easy to use and highly portable, and, thanks to Tkinter’s theme support, the GUI client looks native on both OS X and Windows.
6.2. Writing RPyC Applications
If we are writing Python servers and Python clients, instead of using a verbose protocol like XML-RPC, we can use a Python-specific protocol. There are many packages that offer Python-to-Python remote procedure call, but for this section we will use RPyC (rpyc.sourceforge.net). This module offers two modes of use: the older “classic” and the newer “service-based”. We will use the service-based approach.
By default, RPyC servers are concurrent, so we cannot use the nonconcurrent data wrapper (Meter.py) from the previous section (§6.1.1, 205 ![]() ). Instead, we will use a new MeterMT.py module. This introduces two new classes, ThreadSafeDict and _MeterDict, and has a modified Manager class that makes use of these dictionaries rather than standard dicts.
). Instead, we will use a new MeterMT.py module. This introduces two new classes, ThreadSafeDict and _MeterDict, and has a modified Manager class that makes use of these dictionaries rather than standard dicts.
6.2.1. A Thread-Safe Data Wrapper
The MeterMT module contains a concurrency-supporting Manager class as well as two thread-safe dictionaries. We will begin by looking at the Manager class’s static data and the methods where it differs from the original Meter.Manager class we saw in the previous section.
class Manager:
SessionId = 0
SessionIdLock = threading.Lock()
UsernameForSessionId = ThreadSafeDict()
ReadingForMeter = _MeterDict()
To support concurrency, the MeterMT.Manager class must use locks to serialize access to its static data. For session IDs we use a lock directly, but for the two dictionaries we use custom thread-safe dictionaries that we will review shortly.
def login(self, username, password):
name = name_for_credentials(username, password)
if name is None:
raise Error("Invalid username or password")
with Manager.SessionIdLock:
Manager.SessionId += 1
sessionId = Manager.SessionId
Manager.UsernameForSessionId[sessionId] = username
return sessionId, name
This method differs from the original only in that we increment and assign the static session ID within the context of a lock. Without the lock, it would be possible for, say, thread A to increment the session ID, then for thread B to increment it, and then for threads A and B to both read the same double-incremented value, rather than each getting a unique session ID.
def get_status(self, sessionId):
username = self._username_for_sessionid(sessionId)
return Manager.ReadingForMeter.status(username)
This method now passes almost all of its work onto a custom _MeterDict.status() method, which we will review further on.
def get_job(self, sessionId):
self._username_for_sessionid(sessionId)
while True: # Create fake meter
kind = random.choice("GE")
meter = "{}{}".format(kind, random.randint(40000,
99999 if kind == "G" else 999999))
if Manager.ReadingForMeter.insert_if_missing(meter):
return meter
It is the last couple of lines of this method that differ from before. We want to check if the fake meter is in the dictionary, and if it isn’t, we want to insert it into the dictionary with an initial reading value of None. This will ensure that it cannot be reused. Before, we did the check and insertion as two separate statements, but we cannot do that in a concurrent context, because it is possible that one or more other threads will execute between the two statements. So, now, we pass on the work to a custom _MeterDict.insert_if_missing() method that returns whether the insertion took place.
def submit_reading(self, sessionId, meter, when, reading,
reason=""):
if (not isinstance(reading, int) or reading < 0) and not reason:
raise Error("Invalid reading")
if meter not in Manager.ReadingForMeter:
raise Error("Invalid meter ID")
username = self._username_for_sessionid(sessionId)
reading = Reading(when, reading, reason, username)
Manager.ReadingForMeter[meter] = reading
This is very similar to the XML-RPC version, only now we don’t have to convert the when date/time value, and we don’t need to return True, since an implicit return of None is perfectly acceptable to RPyC.
6.2.1.1. A Simple Thread-Safe Dictionary
If we are using CPython (the standard version of Python implemented in C), in theory, the GIL (Global Interpreter Lock) makes dicts seem thread-safe, because the Python interpreter can only execute on one thread at a time (no matter how many cores we have), so individual method calls execute as atomic actions. However, this doesn’t help when we need to call two or more dict methods as a single atomic action. And in any case, we should not rely on this implementation detail; after all, other Python implementations (e.g., Jython and IronPython) don’t have a GIL, so their dict methods cannot be assumed to execute atomically.
If we want a genuinely thread-safe dictionary, we must use a third-party one or create one ourselves. Creating one isn’t difficult, since we can take an existing dict and provide access to it via our own thread-safe methods. In this subsection, we will review the ThreadSafeDict, a thread-safe dictionary that provides a subset of the dict interface that is sufficient to provide meter dictionaries.
class ThreadSafeDict:
def __init__(self, *args, **kwargs):
self._dict = dict(*args, **kwargs)
self._lock = threading.Lock()
The ThreadSafeDict aggregates a dict and a threading.Lock. We didn’t want to inherit dict, since we want to mediate all accesses to self._dict so that they are always serialized (i.e., so that only one thread can ever access the self._dict at a time).
def copy(self):
with self._lock:
return self.__class__(**self._dict)
Python locks support the context manager protocol, so locking is simply a matter of using a with statement, confident that the lock will be released when it isn’t needed, even in the face of exceptions.
The with self._lock statement will block if any other thread holds the lock and will only continue into the body of the block once the lock has been acquired; that is, when no other threads hold the lock. This is why it is important to do as little as possible as quickly as possible in the context of a lock. In this particular case, the operation is expensive, but there isn’t any nice solution.
If a class implements a copy() method, the method is expected to return a copy of the instance it is called on. We could not return self._dict.copy(), since that produces a plain dict. Returning ThreadSafeDict(**self._dict) would have worked, except that it always returns a ThreadSafeDict, even from a subclass instance (unless the subclass reimplemented the copy() method). The code we have used here works both for ThreadSafeDicts and for subclasses. (See the “Sequence and Mapping Unpacking” sidebar, 13 ![]() .)
.)
def get(self, key, default=None):
with self._lock:
return self._dict.get(key, default)
This method provides a faithful thread-safe implementation of the dict.get() method.
def __getitem__(self, key):
with self._lock:
return self._dict[key]
This special method provides support for accessing dictionary values by key; that is, value = d[key].
def __setitem__(self, key, value):
with self._lock:
self._dict[key] = value
This special method provides support for inserting items into the dictionary or changing an existing item’s value using the syntax, d[key] = value.
def __delitem__(self, key):
with self._lock:
del self._dict[key]
Here is the special method that supports the del statement; that is, del d[key].
def __contains__(self, key):
with self._lock:
return key in self._dict
This special method returns True if the dictionary has an item with the given key; otherwise, it returns False. It is used via the in keyword; for example, if k in d: ....
def __len__(self):
with self._lock:
return len(self._dict)
This special method returns the number of items in the dictionary. It supports the built-in len() function; for example, count = len(d).
The ThreadSafeDict does not provide the dict methods clear(), fromkeys(), items(), keys(), pop(), popitem(), setdefault(), update(), and values(). Most of these methods should be straightforward to implement. However, for the methods that return views (e.g., items(), keys(), and values()) special care is required. The simplest and safest approach is not to implement them at all. An alternative is to have them return a copy of their data as a list (e.g., keys() could be implemented with a body of with self._lock: return list(self._dict.keys())). For large dictionaries, this could use a lot of memory, and, of course, such a method would block other threads from accessing the dictionary while it is executing.
Another approach to creating a thread-safe dictionary would be to create a plain dictionary in one thread. If we were careful to write to this dictionary only in the thread in which it was created (or to use a lock and only write to it in threads that held its lock), we could then provide read-only (i.e., thread-safe) views of this dictionary to other threads using the types.MappingProxyType class introduced in Python 3.3.
6.2.1.2. The Meter Dictionary Subclass
Rather than using a plain ThreadSafeDict for the meter readings dictionary (meter number keys, reading values), we have created a private _MeterDict subclass that adds two new methods.
class _MeterDict(ThreadSafeDict):
def insert_if_missing(self, key, value=None):
with self._lock:
if key not in self._dict:
self._dict[key] = value
return True
return False
This method inserts the given key and value into the dictionary and returns True, or, if the key (i.e., the fake meter number) is already in the dictionary, does nothing and returns False. This is to make sure that every job request is for a new and unique meter.
The code that the insert_if_missing() method executes is essentially:
if meter not in ReadingForMeter: # WRONG!
ReadingForMeter[key] = None
The ReadingForMeter is a _MeterDict instance and so inherits all the Thread-SafeDict class’s functionality. Even though the ReadingForMeter.__contains__() method (for in) and the ReadingForMeter.__setitem__ () method (for []) are both thread-safe, the code shown here is not thread-safe. This is because a different thread could access the ReadingForMeter dictionary after the if statement but before the assignment. The solution is to execute both operations in the context of the same lock, and this is exactly what theinsert_if_missing() method does.
def status(self, username):
count = total = 0
with self._lock:
for reading in self._dict.values():
if reading is not None:
total += 1
if reading.username == username:
count += 1
return count, total
This is a potentially expensive method, since it iterates over all the underlying dictionary’s values within the context of a lock. An alternative would be to have just one statement inside the context—values = self._dict.values()—and to do the iteration afterwards (i.e., outside the context of the lock). Whether it is faster to copy the items inside a lock and then process the copied items without a lock, or to process the items inside a lock, depends on circumstances. The only way to know for sure, of course, is to profile both approaches in realistic contexts.
6.2.2. Writing RPyC Servers
We saw earlier that it is easy to create an XML-RPC server using the xmlrpc.server module (§6.1.2, 208 ![]() ). It is just as easy—although different—to create an RPyC server.
). It is just as easy—although different—to create an RPyC server.
import datetime
import threading
import rpyc
import sys
import MeterMT
PORT = 11003
Manager = MeterMT.Manager()
Here is the start of meterserver-rpyc.py. We import a couple of standard library modules, then the rpyc module, and then our thread-safe MeterMT module. We have set a fixed port number, although this could easily be changed by using a command-line option and the argparsemodule as we did for the XML-RPC version. And we have created a single instance of a MeterMT.Manager. This instance will be shared by the RPyC server’s threads.
if __name__ == "__main__":
import rpyc.utils.server
print("Meter server startup at {}".format(
datetime.datetime.now().isoformat()[:19]))
server = rpyc.utils.server.ThreadedServer(MeterService, port=PORT)
thread = threading.Thread(target=server.start)
thread.start()
try:
if len(sys.argv) > 1: # Notify if called by a GUI client
with open(sys.argv[1], "wb") as file:
file.write(b"\n")
thread.join()
except KeyboardInterrupt:
pass
server.close()
print("\rMeter server shutdown at {}".format(
datetime.datetime.now().isoformat()[:19]))
MeterMT.Manager._dump()
This is the end of the server program. We import the RPyC server module and announce the startup. Then we create an instance of a threaded server and pass it a MeterService class. The server will create instances of this class as needed; we will review the class in a moment.
Once the server has been created, we could then simply write server.start() and finish there. This would start the server and leave it to run “forever”. However, we want the user to be able to stop the server with Ctrl+C (or an INT signal) and for the server to print out the meter readings when it is stopped.
To achieve this, we start the server in its own thread—from which it will create a thread pool to manage incoming connections—and then block waiting for the server’s thread to finish (by using thread.join()). If the server is interrupted, we catch and ignore the exception and close the server. The close() call will block until every server thread has finished its current connection. Then we announce the server’s shutdown and print the meter readings that were submitted to the server.
If the server is started by a GUI client, we expect the client to pass a notify filename as the server’s sole argument. If a notify argument is present, we create the file and write a newline to it to notify the client that the server is up and running.
When using service mode, an RPyC server takes an rpyc.Service subclass that it can then use as a class factory to produce instances of the service. (Factories were discussed in Chapter 1; §1.1, 5 ![]() , and §1.3, 17
, and §1.3, 17 ![]() .) We have created the MeterService class as a thin wrapper around the MeterMT.Manager instance created at the start of the program.
.) We have created the MeterService class as a thin wrapper around the MeterMT.Manager instance created at the start of the program.
class MeterService(rpyc.Service):
def on_connect(self):
pass
def on_disconnect(self):
pass
Whenever a connection is made to a service, the service’s on_connect() method is called. And, similarly, when a connection finishes, the on_disconnect() method is called. We don’t need to do anything in either of these cases, so we have created them as “do nothing” methods. It is perfectly acceptable not to implement these methods at all if they aren’t needed; they are included here purely to show their signatures.
exposed_login = Manager.login
exposed_get_status = Manager.get_status
exposed_get_job = Manager.get_job
A service can expose methods (or classes and other objects) to clients. Any class or method whose name begins with exposed_ is available for clients to access, and in the case of methods they can call the method with or without this prefix. For example, a meter RPyC client could callexposed_login() or login().
For the exposed_login(), exposed_get_status(), and exposed_get_job() methods, we simply set them to the corresponding methods in the program’s meter-manager instance.
def exposed_submit_reading(self, sessionId, meter, when, reading,
reason=""):
when = datetime.datetime.strptime(str(when)[:19],
"%Y-%m-%d %H:%M:%S")
Manager.submit_reading(sessionId, meter, when, reading, reason)
For this method, we have provided a thin wrapper over the meter-manager method. The reason is that the when variable is passed as an RPyC netref-wrapped datetime.datetime rather than as a pure datetime.datetime. In most cases this wouldn’t matter, but here we want to store actual datetime.datetimes in the meter dictionary rather than references to remote (i.e., client-side) date-time.datetimes. So, we convert the wrapped date/time to an ISO 8601 date/time string and parse that into a server-side datetime.datetime, which we then pass to the MeterMT.Manager.submit_reading() method.
The code shown in this subsection is the complete RPyC meter server and would be a few lines shorter if we dropped the on_connect() and on_disconnect() methods.
6.2.3. Writing RPyC Clients
Creating RPyC clients is very similar to creating XML-RPC clients, so in this subsection, we will only review the differences between the two kinds.
6.2.3.1. A Console RPyC Client
Just like the XML-RPC client, the RPyC client requires that the server is started and stopped separately and will only work when a server is running.
The code for the meterclient-rpyc.py program is almost the same as that for the meterclient-rpc.py client we saw earlier (§6.1.3.1, 210 ![]() ). Only the main() and submit() functions are different.
). Only the main() and submit() functions are different.
def main():
username, password = login()
if username is not None:
try:
service = rpyc.connect(HOST, PORT)
manager = service.root
sessionId, name = manager.login(username, password)
print("Welcome, {}, to Meter RPYC".format(name))
interact(manager, sessionId)
except ConnectionError as err:
print("Error: Is the meter server running? {}".format(err))
The first difference is that we have used a hard-coded hostname and port number. Naturally, we could easily make these configurable, as we did with the XML-RPC client. The second difference is that instead of creating a proxied manager and then connecting, we begin by connecting to a service-providing server. In this case, the server provides only one service (MeterService), and this we can use as a meter-manager proxy. All the other code—the meter-manager login, getting jobs, submitting readings, and getting status—uses the same code as before, with one exception: the submit() function catches different exceptions from those caught by the XML-RPC client.
Synchronizing hostnames and port numbers can be tedious, especially if a conflict forces us to use a different port number from the one we normally use. This problem can be avoided by using a registry server. This requires us to run the registry_server.py server that is supplied with RPyC somewhere on our network. RPyC servers automatically look for this server when they start up, and if they find it, they register their services with it. Then, instead of clients using rpyc.connect(host, port), they can use rpyc.connect_by_service(service); for example,rpyc.connect_by_service("Meter").
6.2.3.2. A GUI RPyC Client
The GUI RPyC client, meter-rpyc.pyw, is shown in Figure 6.2. In fact, the RPyC and XML-RPyC GUI clients are visually indistinguishable when run on the same platform.
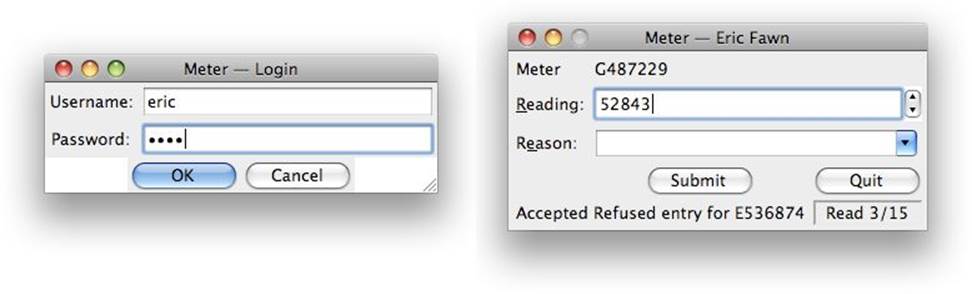
Figure 6.2 The Meter RPyC GUI application’s login and main windows on OS X
Creating a GUI RPyC client that uses Tkinter and will automatically use an existing meter server, or will start up a server if necessary, can be done with almost the same code as we used for the GUI XML-RPC client. In fact, the difference only amounts to a couple of changed methods, a different import, some slightly changed constants, and some different exceptions in except clauses.
def connect(self, username, password):
try:
self.service = rpyc.connect(HOST, PORT)
except ConnectionError:
filename = os.path.join(tempfile.gettempdir(),
"M{}.$$$".format(random.randint(1000, 9999)))
self.serverPid = subprocess.Popen([sys.executable, SERVER,
filename]).pid
self.wait_for_server(filename)
try:
self.service = rpyc.connect(HOST, PORT)
except ConnectionError:
self.handle_error("Failed to start the RPYC Meter server")
return False
self.manager = self.service.root
return self.login_to_server(username, password)
Once the login dialog window has been used to obtain the user’s username and password, this method is called to connect to the server and log the user in with the meter manager.
If the connection fails, we assume that the server isn’t running and try to start it, passing it a notify filename. The server is started without blocking (i.e., asynchronously), but we must wait until the server is running before trying to connect to it. The wait_for_server() method is almost identical to the one we saw earlier (217 ![]() ), except that this version raises a ConnectionError rather than calling handle_error() itself. If the connection is made, we acquire a proxied meter manager and try to log the user into the meter server.
), except that this version raises a ConnectionError rather than calling handle_error() itself. If the connection is made, we acquire a proxied meter manager and try to log the user into the meter server.
def login_to_server(self, username, password):
try:
self.sessionId, name = self.manager.login(username, password)
self.master.title("Meter \u2014 {}".format(name))
return True
except rpyc.core.vinegar.GenericException as err:
self.handle_error(err)
return False
If the user’s credentials are acceptable, we set the session ID and put their name in the application’s title bar. If the login fails, we return False, and this will result in the application terminating (and terminating the server too, if the server was started by the GUI application).
None of the examples in this chapter use encryption, so eavesdroppers could potentially read the client–server network traffic. This may not matter at all for applications that don’t transfer private data, or that execute both client and server on the same machine, or where clients and server are safely behind a firewall, or where encrypted network connections are used. But if encryption is required, it is perfectly possible to achieve. For XML-RPC, one approach is to use the third-party PyCrypto package (www.dlitz.net/software/pycrypto) to encrypt all data that is sent over the network. Another approach is to use Transport Layer Security (“secure sockets”), which is supported by Python’s ssl module. For RPyC, it is much easier to achieve security, since support for it is built in. RPyC can use SSL with keys and certificates, or a much simpler SSH (Secure Shell) tunneling approach.
Python’s excellent networking support covers everything from low to high level. The standard library includes modules for all the most popular high-level protocols, including FTP for file transfers; POP3, IMAP4, and SMTP for email; HTTP and HTTPS for web traffic; and, of course, TCP/IP and other low-level socket protocols. Python’s mid-level socketserver module can be used as the basis for creating servers, although support for higher-level servers is also provided; for example, the smtpd module for creating email servers, the http.server module for web servers, and the xmlrpc.server module we saw in this chapter for XML-RPC servers.
Many third-party networking modules are also available, particularly for web frameworks that support Python’s Web Server Gateway Interface (WSGI; see www.python.org/dev/peps/pep-3333). For more about third-party Python web frameworks seewiki.python.org/moin/WebFrameworks, and for more about web servers see wiki.python.org/moin/WebServers.
All materials on the site are licensed Creative Commons Attribution-Sharealike 3.0 Unported CC BY-SA 3.0 & GNU Free Documentation License (GFDL)
If you are the copyright holder of any material contained on our site and intend to remove it, please contact our site administrator for approval.
© 2016-2026 All site design rights belong to S.Y.A.