Python in Practice: Create Better Programs Using Concurrency, Libraries, and Patterns (2014)
Chapter 7. Graphical User Interfaces with Python and Tkinter
Well-designed graphical user interface (GUI) applications can present users with the most attractive, innovative, and easy-to-use interfaces. And the more sophisticated the application, the more it can benefit from a custom GUI, especially if the GUI includes application-specific custom widgets.* By comparison, web applications can be very confusing, with the browser’s menus and toolbars in addition to the web application’s widgets. And until the HTML5 canvas is widely available, web applications have very limited means of presenting custom widgets. Furthermore, web applications cannot compete with native applications for performance.
*Windows GUI programmers often use the terms “control”, “container”, or “form” when describing a GUI object. In this book, we use the generic term widget, adopted from Unix GUI programming.
Smartphone users are increasingly able to interact with their apps using voice control, but for desktops, laptops, and tablets, the choices are still primarily between conventional GUI applications controlled by mouse and keyboard or voice, and touch-controlled applications. At the time of this writing, almost every touch-controlled device uses proprietary libraries and requires the use of specific languages and tools. Fortunately, the third-party, open-source Kivy library (kivy.org) is designed to provide Python support for developing cross-platform, touch-based applications to address this problem. Of course, this doesn’t change the fact that most touch-based interfaces are designed for machines with limited processing power and small screens, and which may allow the user to see only one application at a time.
Desktop and power users want to take full advantage of their big screens and powerful processors, and this is still best done with conventional GUI applications. Furthermore, voice control—as provided by modern versions of Windows, for example—is designed to work with existing GUI applications. And just as Python command-line programs can be used cross-platform, so can Python GUI programs, providing we use an appropriate GUI toolkit. There are several such toolkits to choose from. Here is a brief overview of the four main ones, all of which have been ported to Python 3 and work at the very least on Linux, OS X, and Windows, with native look and feel.
• PyGtk and PyGObject: PyGtk (www.pygtk.org) is stable and successful. However, development ceased in 2011 in favor of a successor technology called PyGObject (live.gnome.org/PyGObject). Unfortunately, at the time of this writing, PyGObject cannot be considered cross-platform, since all the development effort appears to be confined to Unix-based systems.
• PyQt4 and PySide: PyQt4 (www.riverbankcomputing.co.uk) provides Pythonic bindings for the Qt 4 GUI application development framework (qtproject.org). PySide (www.pyside.org) is a more recent project that is highly compatible with PyQt4 and has a more liberal license. PyQt4 is probably the most stable and mature cross-platform Python GUI toolkit available.* (Both PyQt and PySide are expected to have versions that support Qt 5 in 2013.)
*Disclosure: the author was once Qt’s documentation manager and has written a book about PyQt4 programming: Rapid GUI Programming with Python and Qt (see the Selected Bibliography, ![]() 287).
287).
• Tkinter: Tkinter provides bindings to the Tcl/Tk GUI toolkit (www.tcl.tk). Python 3 is normally supplied with Tcl/Tk 8.5, although this should change to Tcl/Tk 8.6 with Python 3.4 or a later Python version. Unlike the other toolkits mentioned here, Tkinter is very basic, with no built-in support for toolbars, dock windows, or status bars (although all of these can be created). Also, while the other toolkits automatically work with many platform-specific features—such as OS X’s universal menu bar—Tkinter (at least with Tcl/Tk 8.5) requires programmers to account for many platform differences themselves. Tkinter’s chief virtues are that it is supplied with Python as standard, and that it is a very small package compared to the other toolkits.
• wxPython: wxPython (www.wxpython.org) provides bindings to the wxWid-gets toolkit (www.wxwidgets.org). Although wxPython has been around for many years, a significant rewrite has been undertaken for the port to Python 3, and the results should be available by the time this book is published.
Except for PyGObject, the toolkits listed above provide all that is necessary to create cross-platform GUI applications with Python. If we care about only a specific platform, there are almost certainly Python bindings available to the platform-specific GUI libraries (seewiki.python.org/moin/GuiProgramming), or we can use a platform-specific Python interpreter such as Jython or IronPython. If we want to do 3D graphics, we can usually do so within one of the GUI toolkits. Alternatively, we can use PyGame (www.pygame.org), or, if our needs are simpler, we can use one of the Python OpenGL bindings directly—as we will see in the next chapter.
Since Tkinter is supplied as standard, we can create GUI applications that we can easily deploy (even bundling Python and Tcl/Tk with the application itself if necessary; see, for example, cx-freeze.sourceforge.net). Such applications are more attractive and easier to use than command-line programs and are often more acceptable to users, particularly on OS X and Windows.
This chapter presents three example applications: a tiny “hello world” application, a small currency converter, and the more substantial Gravitate game. Gravitate can be thought of as a TileFall/SameGame variant where the tiles gravitate to the center to fill empty space rather than falling and shifting left. The Gravitate application illustrates how to create a main-window–style Tkinter application with some of the modern accoutrements, such as menus, dialogs, and a status bar. We will review a couple of Gravitate’s dialogs in §7.2.2 (![]() 244), and we will review Gravitate’s main-window infrastructure in §7.3 (
244), and we will review Gravitate’s main-window infrastructure in §7.3 (![]() 253).
253).
7.1. Introduction to Tkinter
GUI programming is no more difficult than any other specialized kind of programming and has the potential reward of producing applications that look professional and that people enjoy using.
Note, though, that the subject of GUI programming is so substantive that we cannot explore it in any real depth in a single chapter; it would need at least an entire book for that. What we can do, however, is review some of the key aspects of writing GUI programs and, in particular, how to fill some of the gaps in Tkinter’s facilities. First, though, we will begin with the classic “hello world” program, in this case hello.pyw, shown running in Figure 7.1.

Figure 7.1 The dialog-style Hello application on Linux, OS X, and Windows
import tkinter as tk
import tkinter.ttk as ttk
class Window(ttk.Frame):
def __init__(self, master=None):
super().__init__(master) # Creates self.master
helloLabel = ttk.Label(self, text="Hello Tkinter!")
quitButton = ttk.Button(self, text="Quit", command=self.quit)
helloLabel.pack()
quitButton.pack()
self.pack()
window = Window() # Implicitly creates tk.Tk object
window.master.title("Hello")
window.master.mainloop()
The code quoted above is the entire hello.pyw application’s code. Many Tkinter programmers import all the Tkinter names (e.g., from tkinter import *), but we prefer to use namespaces (albeit the shortened ones, tk and ttk) so that we are clear about where everything comes from. (Incidentally, the ttk module is a wrapper around the official Ttk “Tile” Tcl/Tk extension.) We could have simply done the first import and used a tkinter.Frame rather than tkinter.ttk.Frame, and so on, but the tkinter.ttk versions provide support for themes, so using these is preferable, especially on OS X and Windows.
Most of the plain tkinter widgets also have themed tkinter.ttk versions. The plain and themed widgets don’t always have the same interfaces, and there are some contexts where only a plain widget can be used, so it is important to read the documentation. (We recommend the documentation at www.tcl.tk for those who can understand Tcl/Tk code; otherwise, we recommend www.tkdocs.com, which shows examples in Python and some other languages, and also infohost.nmt.edu/tcc/help/pubs/tkinter/web, which provides a useful Tkinter tutorial/reference.) There are also several tkinter.ttk-themed widgets for which there are no plain equivalents; for example, tkinter.ttk.Combobox, tkinter.ttk.Notebook, and tkinter.ttk.Treeview.
The style of GUI programming we use in this book is to create one class per window, normally in its own module. For a top-level window (i.e., an application’s main window), it is usual to inherit from tkinter.Toplevel or tkinter.ttk.Frame, as we have done here. Tkinter maintains an ownership hierarchy of parent and child widgets (sometimes called masters and slaves). By and large we don’t have to worry about this, so long as we call the built-in super() function in the __init__() method of any class we create that inherits a widget.
Creating most GUI applications follows a standard pattern: create one or more window classes, one of which is the application’s main window. For each window class, create the window’s variables (there are none in hello.pyw), create the widgets, lay out the widgets, and specify methods to be called in response to events (e.g., mouse clicks, key presses, timeouts). In this case, we associate the user clicking the quitButton with the inherited tkinter.ttk.Frame.quit() method that will close the window, and since this is the application’s only top-level window, this will then cleanly terminate the application. Once all the window classes are ready, the final step is to create an application object (done implicitly in this example) and start off the GUI event loop. The event loop was illustrated in an earlier chapter (Figure 4.8; 167 ![]() ).
).
Naturally, most GUI applications are much longer and more complicated than hello.pyw. However, their window classes normally follow the same pattern as described here, only they usually create far more widgets and associate far more events.
It is common in most modern GUI toolkits to use layouts rather than hard-coded sizes and positions for widgets. This makes it possible for widgets to automatically expand or shrink to most neatly accommodate their contents (e.g., a label or button’s text), even if the contents change, while keeping their position relative to all the other widgets. Using layouts also saves programmers from having to do lots of tedious calculations.
Tkinter provides three layout managers: place (hard-coded positions; rarely used), pack (position widgets around a notional central cavity), and grid (arrange widgets in a grid of rows and columns; the most popular). In this example, we packed the label and the button one after the other and then packed the entire window. Packing is fine for very simple windows like this one, but grid is the easiest to use, as we will see in later examples.
GUI applications fall into two broad camps: dialog style and main-window style. The former are windows that have no menus or toolbars, instead being controlled through buttons, comboboxes, and the like. Using dialog style is ideal for applications that need only a simple user interface, such as small utilities, media players, and some games. Main-window–style applications usually have menus and toolbars above a central area, and a status bar at the bottom. They may also have dock windows. Main windows are ideal for more complex applications and often have menu options or toolbar buttons that result in dialogs being popped up. We will look at both kinds of application, starting with dialog style, since almost everything we learn about them also applies to the dialogs used by main-window–style applications.
7.2. Creating Dialogs with Tkinter
Dialogs have four possible modalities and varying levels of intelligence. Here is a brief summary of the modalities, after which we discuss intelligence.
• Global Modal: A global modal window is one that blocks the entire user interface—including all other applications—and only allows interactions with itself. Users cannot switch applications or do anything except interact with the window. The two common use cases are the dialog for logging into a computer at start up and the dialog for unlocking a password-protected screensaver. Application programmers should never use global modal windows because a bug could result in the entire machine becoming unusable.
• Application Modal: Application modal windows prevent users from interacting with any other window in the application. But users can still context switch to other applications. Modal windows are easier to program than modeless windows, since the user can’t change the application’s state behind the programmer’s back. However, some users find them inconvenient.
• Window Modal: Window modal windows are very similar to application modal windows, except that rather than preventing interaction with any other application window, they prevent interaction with any other application window in the same window hierarchy. This is useful, for example, if the user opens two top-level document windows, since we wouldn’t want their use of a dialog in one of those windows to prevent them from interacting with the other window.
• Modeless: Modeless dialogs do not block interaction with any other window either in their application or any other application. Modeless dialogs are potentially much more challenging for programmers to create than modal dialogs. This is because a modeless dialog must be able to cope with the user interacting with other application windows and possibly changing the state that the modeless dialog depends on.
Global modal windows are said to have global grab in Tcl/Tk terminology. Application and window modal windows (commonly simply called “modal windows”) are said to have local grab. In Tkinter on OS X, some modal windows appear as sheets.
A dumb dialog is typically one that presents some widgets to the user and provides what the user entered back to the application. Such dialogs have no application-specific knowledge. A typical example is an application-login dialog that just accepts a username and password that it then passes to the application. (We saw an example of such a dialog being used in the previous chapter; §6.1.3.2, 214 ![]() . The code is in MeterLogin.py.)
. The code is in MeterLogin.py.)
A smart dialog is one that embodies some level of knowledge of the application and may even be passed references to application variables or data structures so that it can work directly on the application’s data.
Modal dialogs can be dumb or smart, or somewhere on the continuum between. A fairly smart modal dialog is typically one that understands enough about the application to provide validation, not just per data item it presents for editing, but for combinations of data items. For example, a reasonably intelligent dialog for entering a start and end date would not accept an end date that was earlier than the start date.
Modeless dialogs are almost always smart. They typically come in two flavors: apply/close and live. Apply/close dialogs allow users to interact with widgets and then click an Apply button to see the results in the application’s main window. Live dialogs apply changes as the user interacts with the dialog’s widgets; these are quite common on OS X. Smarter modeless dialogs offer undo/redo or a Default button (to reset the widgets to the application’s default values) and maybe a Revert button (to reset the widgets to the values they held when the dialog was first invoked). Modeless dialogs can be dumb if they just provide information, such as a Help dialog. These typically just have a Close button.
Modeless dialogs are particularly useful when changing colors, fonts, formats, or templates, since they allow us to see the effects of each change and to then make another change, and another. Using a modal dialog in such cases means that we must open the dialog, do our changes, accept the dialog, and then repeat this cycle for every change until we were happy with the results.
A dialog-style application’s main window is essentially a modeless dialog. Main-window–style applications usually have both modal and modeless dialogs that pop up in response to the user choosing particular menu options or clicking particular toolbar buttons.
7.2.1. Creating a Dialog-Style Application
In this subsection, we will review a very simple, yet useful, dialog-style application that does currency conversions. The source code is in the currency directory, and the application is shown in Figure 7.2.

Figure 7.2 The dialog-style Currency application on OS X and Windows
The application has two comboboxes listing currency names (and currency identifiers), a spinbox for entering an amount, and a label that shows the value of the amount converted from the top currency to the bottom currency.
The application’s code is distributed over three Python files: currency.pyw, which is the program we execute; Main.py, which provides the Main.Window class; and Rates.py, which provides the Rates.get() function that was discussed in an earlier chapter (§1.5, 26 ![]() ). In addition, there are two icons, currency/images/icon_16x16.gif and currency/images/icon_32x32.gif, which provide icons for the application on Linux and Windows.
). In addition, there are two icons, currency/images/icon_16x16.gif and currency/images/icon_32x32.gif, which provide icons for the application on Linux and Windows.
Python GUI applications can use the standard .py extension, but on OS X and Windows the .pyw extension is often associated with a different Python interpreter (e.g., pythonw.exe rather than python.exe). This interpreter allows the application to be run without starting up a console window, and so is much nicer for users. For programmers, though, it is best to execute Python GUI applications from inside a console using the standard Python interpreter, since this will allow any sys.stdout and sys.stderr output to be visible as an aid to debugging.
7.2.1.1. The Currency Application’s main() Function
Especially for large programs, it is best to have a very small “executable” module and for all the rest of the code to be in separate .py module files (no matter how big or small they are). On fast modern machines this may appear to make no difference the first time the program is run, but on that first run all the .py module files (except for the “executable” one) are byte-compiled into .pyc files. The second and subsequent times the program is run, Python will use the .pyc files (except where a .py file has changed), so startup times will be faster than the first time.
The currency application’s executable currency.pyw file contains one small function, main().
def main():
application = tk.Tk()
application.title("Currency")
TkUtil.set_application_icons(application, os.path.join(
os.path.dirname(os.path.realpath(__file__)), "images"))
Main.Window(application)
application.mainloop()
The function begins by creating the Tkinter “application object”. This is really a normally invisible top-level window that serves as the application’s ultimate parent (or master or root) widget. In the hello.pyw application, we implicitly let Tkinter create this for us, but it is normally best to create it ourselves so that we can then apply application-wide settings. Here, for example, we set the application’s title to “Currency”.
The book’s examples are supplied with the TkUtil module, which includes some built-in convenience functions to support Tkinter programming, plus some modules that we will discuss as we encounter them. Here, we use the TkUtil.set_application_icons() function.
With the title and icons set (although the icons are ignored on OS X), we create an instance of the application’s main window, passing it the application object as parent (or master), and then start the GUI event loop. The application will terminate when the event loop terminates; for example, if we call tkinter.Tk.quit().
def set_application_icons(application, path):
icon32 = tk.PhotoImage(file=os.path.join(path, "icon_32x32.gif"))
icon16 = tk.PhotoImage(file=os.path.join(path, "icon_16x16.gif"))
application.tk.call("wm", "iconphoto", application, "-default", icon32,
icon16)
For completeness, here is the TkUtil.set_application_icons() function. The tk.PhotoImage class can load a pixmap image in PGM, PPM, or GIF format. (Support for PNG format is expected to be added in Tcl/Tk 8.6.) Having created the two images, we call thetkinter.Tk.tk.call() function and in effect send it a Tcl/Tk command. Going this low-level should be avoided if possible, but is sometimes necessary where Tkinter doesn’t bind the functionality we need.
7.2.1.2. The Currency Application’s Main.Window Class
The currency application’s main window follows the pattern we described earlier, and this pattern is clearly visible in the calls made in the class’s __init__() method. All this subsubsection’s code is quoted from currency/Main.py.
class Window(ttk.Frame):
def __init__(self, master=None):
super().__init__(master, padding=2)
self.create_variables()
self.create_widgets()
self.create_layout()
self.create_bindings()
self.currencyFromCombobox.focus()
self.after(10, self.get_rates)
It is essential to call the built-in super() function when we initialize a class that inherits a widget. Here, we not only pass in the master (i.e., the tk.Tk “application object” from the application’s main() function), but also a padding value of 2 pixels. This padding provides a margin between the application window’s inner border and the widgets laid out inside it.
Next, we create the window’s (i.e., the application’s) variables and widgets, and lay out the widgets. Then, we create the event bindings, after which we give the keyboard focus to the top combobox ready for the user to change the initial currency. Finally, we call the inherited Tkinterafter() method, which takes a time in milliseconds and a callable that it will call after at least that many milliseconds have passed.
Since we download the rates from the Internet, they might take several seconds to arrive. But we want to ensure that the application is visible straight away (otherwise the user might think it didn’t start and may try to start it again). So, we defer getting the rates until the application has had enough time to display itself.
def create_variables(self):
self.currencyFrom = tk.StringVar()
self.currencyTo = tk.StringVar()
self.amount = tk.StringVar()
self.rates = {}
The tkinter.StringVars are variables that hold strings and that can be associated with widgets. Thus, when a StringVar’s string is changed, that change is automatically reflected in any associated widget, and vice versa. We could have made the self.amount atkinter.IntVar, but since Tcl/Tk operates almost entirely in terms of strings internally, it is often more convenient to use strings when working with it, even for numbers. The rates is a dict with currency name keys and conversion rate values.
Spinbox = ttk.Spinbox if hasattr(ttk, "Spinbox") else tk.Spinbox
The tkinter.ttk.Spinbox widget was not added to Python 3’s Tkinter but will hopefully arrive with Python 3.4. This snippet of code allows us to take advantage of it if it is available, with the fallback of a non-themed spinbox. Their interfaces are not the same, so care must be taken to use only those features that are common to both.
def create_widgets(self):
self.currencyFromCombobox = ttk.Combobox(self,
textvariable=self.currencyFrom)
self.currencyToCombobox = ttk.Combobox(self,
textvariable=self.currencyTo)
self.amountSpinbox = Spinbox(self, textvariable=self.amount,
from_=1.0, to=10e6, validate="all", format="%0.2f",
width=8)
self.amountSpinbox.config(validatecommand=(
self.amountSpinbox.register(self.validate), "%P"))
self.resultLabel = ttk.Label(self)
Every widget should be created with a parent (or master), except for the tk.Tk object, which is usually the window or frame that the widget will be laid out inside. Here, we create two comboboxes and associate each one with its own StringVar.
We also create a spinbox, also associated with a StringVar, with a minimum and maximum set. The spinbox’s width is in characters; the format uses old-style Python 2 % formatting (equivalent to a str.format() format string of "{:0.2f}"); and the validate argument says to validate whenever the spinbox’s value is changed, whether by the user entering numbers or using the spin buttons. Once the spinbox has been created, we register a validation callable. This callable will be called with an argument that corresponds to the given format ("%P"); this is a Tcl/Tk format string, not a Python one. Incidentally, the spinbox’s value is automatically set to its minimum (from_) value (in this case, 1.0) if no other value is explicitly set.
Finally, we create the label that will display the calculated amount. We don’t give it any initial text.
def validate(self, number):
return TkUtil.validate_spinbox_float(self.amountSpinbox, number)
This is the validation callable we registered with the spinbox. In this context, the Tcl/Tk "%P" format signifies the spinbox’s text. So, whenever the spinbox’s value is changed, this method is called with the spinbox’s text. The actual validation is passed on to a generic convenience function in the TkUtil module.
def validate_spinbox_float(spinbox, number=None):
if number is None:
number = spinbox.get()
if number == "":
return True
try:
x = float(number)
if float(spinbox.cget("from")) <= x <= float(spinbox.cget("to")):
return True
except ValueError:
pass
return False
This function expects to be passed a spinbox and a number value (as a string or None). If no value is passed, the function gets the spinbox’s text itself. It returns True (i.e., “valid”) for an empty spinbox to allow the user to delete the spinbox’s value and start typing a new number from scratch. Otherwise, it tries to convert the text into a floating-point number and checks that it is in the spinbox’s range.
All Tkinter widgets have a config() method that takes one or more key=value arguments to set widget attributes, and a cget() method that takes a key argument and returns the associated attribute value. They also have a configure() method that is just an alias for config().
def create_layout(self):
padWE = dict(sticky=(tk.W, tk.E), padx="0.5m", pady="0.5m")
self.currencyFromCombobox.grid(row=0, column=0, **padWE)
self.amountSpinbox.grid(row=0, column=1, **padWE)
self.currencyToCombobox.grid(row=1, column=0, **padWE)
self.resultLabel.grid(row=1, column=1, **padWE)
self.grid(row=0, column=0, sticky=(tk.N, tk.S, tk.E, tk.W))
self.columnconfigure(0, weight=2)
self.columnconfigure(1, weight=1)
self.master.columnconfigure(0, weight=1)
self.master.rowconfigure(0, weight=1)
self.master.minsize(150, 40)
This method creates the layout shown in Figure 7.3. Each widget is put in a specific grid position and made “sticky” in the West and East directions, meaning that it will stretch or shrink horizontally as the window is resized but will not change height. The widgets are also padded by 0.5 mm (millimeters) in the x and y directions, so each widget is surrounded by 0.5 mm of empty space. (See the “Sequence and Mapping Unpacking” sidebar, 13 ![]() .)
.)

Figure 7.3 The Currency application’s main window’s layout
Once the widgets have been laid out, the window itself is laid out in a grid consisting of a single cell that will shrink or stretch in all directions (North, South, East, West). Then, the columns are configured with weights: these are stretch factors. So, in this case, if the window is expanded horizontally, for every extra pixel of width given to the spinbox and label, the comboboxes will get an extra two pixels of width. Nonzero weights are also given to the window’s single grid cell itself; this makes the window’s contents resizable. And, finally, the window is given a sensible minimum size; otherwise, the user would be able to shrink it down to almost nothing.
def create_bindings(self):
self.currencyFromCombobox.bind("<<ComboboxSelected>>",
self.calculate)
self.currencyToCombobox.bind("<<ComboboxSelected>>",
self.calculate)
self.amountSpinbox.bind("<Return>", self.calculate)
self.master.bind("<Escape>", lambda event: self.quit())
This method is used to bind events to actions. Here, we are concerned with two kinds of events: “virtual events”, which are custom events that some widgets produce, and “real events”, which represent things happening in the user interface, such as a key press or the window being resized. Virtual events are signified by giving their name in double angle brackets, and real events by giving their name in single angle brackets.
Whenever a combobox’s selected value changes, it adds a <<ComboboxSelected>> virtual event to the event loop’s queue of events. For both comboboxes, we have chosen to bind this event to a self.calculate() method that will recalculate the currency conversion. For the spinbox, we only force a recalculation if the user presses Enter or Return. And if the user presses Esc, we terminate the application by calling the inherited tkinter.ttk.Frame.quit() method.
def calculate(self, event=None):
fromCurrency = self.currencyFrom.get()
toCurrency = self.currencyTo.get()
amount = self.amount.get()
if fromCurrency and toCurrency and amount:
amount = ((self.rates[fromCurrency] / self.rates[toCurrency]) *
float(amount))
self.resultLabel.config(text="{:,.2f}".format(amount))
This method obtains the two currencies to be used and the amount to convert and then performs the conversion. At the end, it sets the result label’s text to the converted amount using commas as a thousands separator, and showing two digits after the decimal point.
def get_rates(self):
try:
self.rates = Rates.get()
self.populate_comboboxes()
except urllib.error.URLError as err:
messagebox.showerror("Currency \u2014 Error", str(err),
parent=self)
self.quit()
This method is called using a timer to give the window a chance to paint itself. It gets a dictionary of rates (currency name keys, conversion factor values) and populates the comboboxes accordingly. If the rates could not be obtained, an error message box is popped up, and after the user closes the message box (e.g., by clicking OK), the application is terminated.
The tkinter.messagebox.showerror() function takes a window-title text, a message text, and optionally a parent (which if given, the message box will center itself over). Since Python 3 files use UTF-8 encoding, we could have used a literal em dash (—), but the book’s monospaced font doesn’t have this character, so we have used the Unicode escape instead.
def populate_comboboxes(self):
currencies = sorted(self.rates.keys())
for combobox in (self.currencyFromCombobox,
self.currencyToCombobox):
combobox.state(("readonly",))
combobox.config(values=currencies)
TkUtil.set_combobox_item(self.currencyFromCombobox, "USD", True)
TkUtil.set_combobox_item(self.currencyToCombobox, "GBP", True)
self.calculate()
This method populates the comboboxes with the currency names in alphabetical order. The comboboxes are set to be read-only. We then attempt to set the top spinbox’s currency to U.S. dollars and the bottom one’s to British Pounds. Finally, we call self.calculate() to set an initial conversion value.
Every Tkinter themed widget has a state() method for setting one or more states and an instate() method for checking whether the widget is in a particular state. The most commonly used states are "disabled", "readonly", and "selected".
def set_combobox_item(combobox, text, fuzzy=False):
for index, value in enumerate(combobox.cget("values")):
if (fuzzy and text in value) or (value == text):
combobox.current(index)
return
combobox.current(0 if len(combobox.cget("values")) else -1)
This generic function is in the TkUtil module. It attempts to set the given combobox’s value to the entry that has the given text—or to the entry that contains the given text if fuzzy is True.
This simple but useful currency application is around 200 lines of code (not including standard library modules or the book’s TkUtil module). It is quite common for small GUI utilities to need a lot more code than their command-line equivalents, but the disparity rapidly diminishes with more complex and sophisticated applications.
7.2.2. Creating Application Dialogs
Creating stand-alone dialog-style applications is straightforward and convenient for small utilities, media players, and for some games. But for more complex applications, it is usual to have a main window and supporting dialogs. In this subsection, we will see how to create a modal dialog and a modeless dialog.
There is no difference between modal and modeless dialogs when it comes to widgets, layouts, and bindings. However, whereas modal dialogs typically assign what the user entered to variables, modeless dialogs normally call application methods or change application data in response to user interactions. Furthermore, modal dialogs block when they are invoked, whereas modeless dialogs don’t, and our code must account for this important difference.
7.2.2.1. Creating Modal Dialogs
In this subsubsection, we will review the Gravitate application’s Preferences dialog. The dialog’s code is in gravitate/Preferences.py, and the dialog is shown in Figure 7.4.
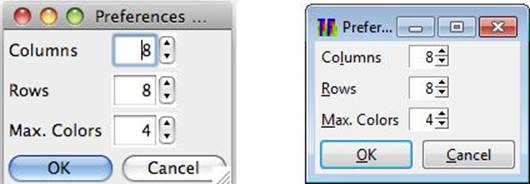
Figure 7.4 The Gravitate application’s modal Preferences dialog on OS X and Windows
On Linux and Windows, when the user clicks Gravitate’s File→Preferences menu option, the Main.Window.preferences() method is invoked, and this causes the modal Preferences dialog to appear. On OS X the user must click the application menu’s Preferences option or press ![]() , in accordance with OS X conventions. (Unfortunately, though, we must handle both these cases ourselves, as we will see in §7.3.2.1,
, in accordance with OS X conventions. (Unfortunately, though, we must handle both these cases ourselves, as we will see in §7.3.2.1, ![]() 258.)
258.)
def preferences(self):
Preferences.Window(self, self.board)
self.master.focus()
This is the main-window method that invokes the Preferences dialog. The dialog is a smart dialog, so rather than pass it some values and then, if the user clicks OK, update the application’s state, we pass it an application object directly—in this case the self.board of type Board, atkinter.Canvas subclass for showing 2D graphics.
The method creates a new Preferences dialog window. This call results in the dialog being shown and blocks (since the dialog is modal) until the user clicks OK or Cancel. We don’t have to do any further work here, because the dialog itself is smart enough to update the Board object if the user clicks OK. After the dialog is closed, all we do is make sure that the main window has the keyboard focus.
Tkinter comes with the tkinter.simpledialog module that provides a couple of base classes for creating custom dialogs, and some ready-made convenience functions for popping up dialogs to get single values from the user, such as tkinter.simpledialog.askfloat(). The ready-made dialogs provide some builtin hooks to make it as easy as possible to inherit them and to customize them with our own widgets. However, at the time of this writing, they hadn’t been updated in a long time and didn’t use the themed widgets. In view of this, the book’s examples come with a TkUtil/Dialog.py module that provides a base class for themed custom dialogs and that works in a similar way to the tkinter.simpledialog.Dialog, and which also provides some convenience functions, such as TkUtil.Dialog.get_float().
All the book’s dialogs use the TkUtil module rather than tkinter.simpledialog, so as to take advantage of the themed widgets that give Tkinter a native look and feel on OS X and Windows.
class Window(TkUtil.Dialog.Dialog):
def __init__(self, master, board):
self.board = board
super().__init__(master, "Preferences \u2014 {}".format(APPNAME),
TkUtil.Dialog.OK_BUTTON|TkUtil.Dialog.CANCEL_BUTTON)
The dialog takes a parent (master) and a Board instance. This instance will be used to provide the initial values for the dialog’s widgets, and if the user clicks OK, will be given the widget values that the user has set before the dialog destroys itself. The APPNAME constant (not shown) holds the string "Gravitate".
Classes that inherit TkUtil.Dialog.Dialog must provide a body() method that will create the dialog’s widgets but not its buttons: the base class does that. It should also provide an apply() method that will be called only if the user accepts the dialog (i.e., clicks OK or Yes, depending on which “accept” button has been specified). It is also possible to create an initialize() method and a validate() method, but they aren’t needed for this example.
def body(self, master):
self.create_variables()
self.create_widgets(master)
self.create_layout()
self.create_bindings()
return self.frame, self.columnsSpinbox
This method must create the dialog’s variables, lay out the dialog’s widgets, and provide event bindings (excluding the buttons and their bindings). It must return either the widget that contains all the widgets we have created (typically a frame), or that widget plus the widget to which the initial keyboard focus should be given. Here, we return the frame where we have put all of our widgets and the first spinbox as the initial keyboard focus widget.
def create_variables(self):
self.columns = tk.StringVar()
self.columns.set(self.board.columns)
self.rows = tk.StringVar()
self.rows.set(self.board.rows)
self.maxColors = tk.StringVar()
self.maxColors.set(self.board.maxColors)
This dialog is very simple, since it uses only labels and spinboxes. For every spinbox, we create a tkinter.StringVar to associate with it and initialize the StringVar’s value with the corresponding value in the passed in Board instance. It might seem more natural to usetkinter.IntVars, but internally Tcl/Tk really uses only strings, so StringVars are often a better choice.
def create_widgets(self, master):
self.frame = ttk.Frame(master)
self.columnsLabel = TkUtil.Label(self.frame, text="Columns",
underline=2)
self.columnsSpinbox = Spinbox(self.frame,
textvariable=self.columns, from_=Board.MIN_COLUMNS,
to=Board.MAX_COLUMNS, width=3, justify=tk.RIGHT,
validate="all")
self.columnsSpinbox.config(validatecommand=(
self.columnsSpinbox.register(self.validate_int),
"columnsSpinbox", "%P"))
...
This method is used to create the widgets. We begin by creating an outer frame that we can return as the parent (i.e., containing) widget for all the other widgets we create. The frame’s parent must be the one given it by the dialog; all the other widgets we create must have the frame (or a child of the frame) as their parent.
We have shown the code only for the columns widgets, since the rows and maximum colors code is structurally identical. In each case, we create a label and a spinbox, and each spinbox is associated with its corresponding StringVar. The width attribute is the number of characters wide the spinbox should be.
Incidentally, to avoid the inconvenience of having to write, say, underline=-1 if TkUtil.mac() else 0 when creating the labels, we have used TkUtil.Labels instead of tkinter.ttk.Labels.
class Label(ttk.Label):
def __init__(self, *args, **kwargs):
super().__init__(*args, **kwargs)
if mac():
self.config(underline=-1)
This tiny class allows us to set the underlined letter to indicate a keyboard shortcut and not have to worry about whether the code is executed on OS X, since in that case the underlining will have been disabled by setting a value of -1. The TkUtil/__init__.py module also hasButton, Checkbutton, and Radiobutton classes, all with the same __init__() method as the one shown here.
def validate_int(self, spinboxName, number):
return TkUtil.validate_spinbox_int(getattr(self, spinboxName),
number)
We discussed how to validate spinboxes and the TkUtil.validate_spinbox_float() function earlier (241 ![]() ). The only difference between the validate_int() method used here and the validate() method used earlier (apart from their names and that we do integer validation here) is that here, we parameterize by the spinbox to validate, whereas the earlier example used a specific spinbox.
). The only difference between the validate_int() method used here and the validate() method used earlier (apart from their names and that we do integer validation here) is that here, we parameterize by the spinbox to validate, whereas the earlier example used a specific spinbox.
The registered validation function was given two strings: the first the name of the relevant spinbox and the second a Tcl/Tk format string. These are passed to the validation function when validation takes place, and Tcl/Tk parses them. In the case of the spinbox name, Tcl/Tk does nothing, but it replaces the "%P" with the string value of the spinbox. The TkUtil.validate_spinbox_int() function requires a spinbox widget and a string value as its arguments. So, here, we use the built-in getattr() function, passing it the dialog (self) and the name of the attribute we want (spinboxName), and getting back a reference to the relevant spinbox widget.
def create_layout(self):
padW = dict(sticky=tk.W, padx=PAD, pady=PAD)
padWE = dict(sticky=(tk.W, tk.E), padx=PAD, pady=PAD)
self.columnsLabel.grid(row=0, column=0, **padW)
self.columnsSpinbox.grid(row=0, column=1, **padWE)
self.rowsLabel.grid(row=1, column=0, **padW)
self.rowsSpinbox.grid(row=1, column=1, **padWE)
self.maxColorsLabel.grid(row=2, column=0, **padW)
self.maxColorsSpinbox.grid(row=2, column=1, **padWE)
This method creates the layout illustrated in Figure 7.5. It is very simple, because it grids all the labels to align left (sticky=tk.W, i.e., West) and all the spinboxes to fill all the available horizontal space, while padding all the widgets with 0.75 mm (the PAD constant, not shown) of space. (See the “Sequence and Mapping Unpacking” sidebar, 13 ![]() .)
.)
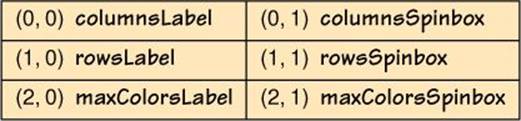
Figure 7.5 The Gravitate application’s Preferences dialog’s body’s layout
def create_bindings(self):
if not TkUtil.mac():
self.bind("<Alt-l>", lambda *args: self.columnsSpinbox.focus())
self.bind("<Alt-r>", lambda *args: self.rowsSpinbox.focus())
self.bind("<Alt-m>",
lambda *args: self.maxColorsSpinbox.focus())
For non-OS X platforms, we want to provide users with the ability to navigate between the spinboxes and click the buttons using keyboard shortcuts. For example, if the user presses Alt+R, the rows spinbox will be given the keyboard focus. We don’t have to do this for the buttons, since the base class takes care of them.
def apply(self):
columns = int(self.columns.get())
rows = int(self.rows.get())
maxColors = int(self.maxColors.get())
newGame = (columns != self.board.columns or
rows != self.board.rows or
maxColors != self.board.maxColors)
if newGame:
self.board.columns = columns
self.board.rows = rows
self.board.maxColors = maxColors
self.board.new_game()
This method is called only if the user clicks the dialog’s “accept” button (OK or Yes). We retrieve the StringVar values and convert them to ints (which should always succeed). Then we assign them to the Board instance’s corresponding attributes. If any of the values has changed, we start a new game, so as to account for the change.
In large, complex applications it might require quite a lot of navigation—clicking menu options and invoking dialogs within dialogs—before we reach a dialog we want to test. To make testing easier, it is often helpful to add an if __name__ == "__main__": statement at the end of a module that contains a window class, and to put in it code that will invoke the dialog for testing purposes. Here is the code inside such a statement for the gravitate/Preferences.py module.
def close(event):
application.quit()
application = tk.Tk()
scoreText = tk.StringVar()
board = Board.Board(application, print, scoreText)
window = Window(application, board)
application.bind("<Escape>", close)
board.bind("<Escape>", close)
application.mainloop()
print(board.columns, board.rows, board.maxColors)
We begin by creating a tiny function that will terminate the application. Then we create the normally hidden (but visible in this case) tk.Tk object that serves as the application’s ultimate parent. We bind the Esc key to the close() function so that the user can easily close the window.
The Board instance is normally passed to the dialog by the calling main window, but since we are executing the dialog stand-alone here, we must create such an instance ourselves.
Next, we create the dialog, which will block until the user clicks OK or Cancel. Of course, the dialog only actually appears once the event loop begins. And once the dialog has been closed, we print out the values of the Board attributes that the dialog can change. If the user clicked OK, these should reflect any changes the user made in the dialog; otherwise, they should all have their original values.
7.2.2.2. Creating Modeless Dialogs
In this subsubsection, we will review the Gravitate application’s modeless Help dialog, shown in Figure 7.6.
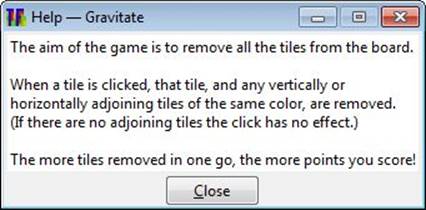
Figure 7.6 The Gravitate application’s modeless Help dialog on Windows
As mentioned earlier, for widgets, layouts, and event bindings, there are no differences between modal and modeless dialogs. What makes the two kinds distinct is that when a modeless dialog is shown it does not block (whereas a modal one does), so the caller (e.g., the main window) continues to execute its event loop and can be interacted with. We will begin by looking at the code that invokes the dialog, and then at the dialog’s code.
def help(self, event=None):
if self.helpDialog is None:
self.helpDialog = Help.Window(self)
else:
self.helpDialog.deiconify()
This is the Main.Window.help() method. The Main.Window keeps an instance variable (self.helpDialog) that is set to None in the __init__() method (not shown). The first time the user invokes the Help dialog, the dialog is created and passed the main window as its parent. The act of creating the widget causes it to pop up over the main window, but because the dialog is modeless, the main window’s event loop resumes, and the user can interact with both the dialog and the main window.
On the second and subsequent times that the user invokes the Help dialog, we already have a reference to it, so we merely show it again (using tkinter.Toplevel.deiconify()). This works because when the user closes the dialog, instead of destroying itself, the dialog merely hides. Creating, showing, and hiding a dialog the first time it is used, and then showing and hiding it on subsequent uses, is much faster than creating, showing, and then destroying it every time it is needed. Also, hiding a dialog preserves its state between uses.
class Window(tk.Toplevel):
def __init__(self, master):
super().__init__(master)
self.withdraw()
self.title("Help \u2014 {}".format(APPNAME))
self.create_ui()
self.reposition()
self.resizable(False, False)
self.deiconify()
if self.winfo_viewable():
self.transient(master)
self.wait_visibility()
Modeless dialogs usually inherit tkinter.ttk.Frame or tkinter.Toplevel, as we have done here. The dialog takes a parent (master). The tkinter.Toplevel.withdraw() call immediately hides the window (before the user even sees it) to ensure that there is no flickering while the window is being created.
Next, we set the window’s title to “Help — Gravitate” and then create the dialog’s widgets. Since the help text is so short, we have set the dialog to be nonre-sizable and leave Tkinter to make it just the right size to show the help text and the Close button. If we had lots of help text, we could have used a tkinter.Text subclass with scrollbars and made the dialog resizable.
Once all the widgets have been created and laid out, we call tkinter.Toplevel.deiconify() to show the window. If the window is viewable (i.e., shown by the system’s window manager)—as it should be—we notify Tkinter that this window is transient in relation to its parent. This notification provides a hint to the window system that the transient window might soon go away to help optimize re-painting what is revealed when it is hidden or destroyed.
The tkinter.Toplevel.wait_visibility() call at the end blocks (for too short a time for the user to notice) until the window is visible. By default, tkinter.Top-level windows are modeless, but if we add two extra statements after the last one, we can make the window modal. These statements are self.grab_set() and self.wait_window(self). The first statement restricts the application’s focus (“grab” in Tk/Tcl terminology) to this window, thus making it modal. The second statement blocks until the window is closed. We didn’t see either of these commands when we discussed modal dialogs, because it is a standard pattern to create a modal dialog by inheriting tkinter.simpledialog.Dialog (or in this book, TkUtil.Dialog), both of which have these two statements.
The user can now interact with this window, with the application’s main window, and with any of the application’s other modeless windows that happen to be visible.
def create_ui(self):
self.helpLabel = ttk.Label(self, text=_TEXT, background="white")
self.closeButton = TkUtil.Button(self, text="Close", underline=0)
self.helpLabel.pack(anchor=tk.N, expand=True, fill=tk.BOTH,
padx=PAD, pady=PAD)
self.closeButton.pack(anchor=tk.S)
self.protocol("WM_DELETE_WINDOW", self.close)
if not TkUtil.mac():
self.bind("<Alt-c>", self.close)
self.bind("<Escape>", self.close)
self.bind("<Expose>", self.reposition)
The window’s user interface is so simple that we have created it all in this one method. First, we create the label to show the help text (in the _TEXT constant, not shown) and then the Close button. We have used a TkUtil.Button (derived from tkinter.ttk.Button) so that the underline is correctly ignored on OS X. (We saw a TkUtil.Label subclass that is almost identical to TkUtil.Button earlier; 247 ![]() .)
.)
With only two widgets, it makes sense to use the simplest layout manager, so, here, we pack the label to the top of the window, set it to be able to grow in both directions, and pack the button at the bottom.
If we aren’t on OS X, we add a keyboard accelerator of Alt+C for the Close button, and on all platforms we bind Esc to close the window.
Since the modeless dialog window is hidden and shown rather than destroyed and recreated, it is possible that the user shows the help window, then closes (i.e., hides) it, then moves the main window, and then shows the help window again. It is perfectly reasonable to leave the help window wherever it was first shown (or wherever the user last moved it). However, since the help text is so short, it seems to make more sense to reposition it every time it is shown. This is achieved by binding the <Expose> event (which occurs whenever a window must repaint itself) to a customreposition() method.
def reposition(self, event=None):
if self.master is not None:
self.geometry("+{}+{}".format(self.master.winfo_rootx() + 50,
self.master.winfo_rooty() + 50))
This method moves the window to the same position as its master (i.e., the main window), but offset 50 pixels right and down.
In theory, we don’t need to call this method explicitly in the __init__() method, but by doing so, we ensure that the window is correctly positioned before it is shown. This avoids the window suddenly jumping into position after it first appears, since when it is shown, it is already in the right place.
def close(self, event=None):
self.withdraw()
If the dialog window is closed—whether by the user pressing Esc or Alt+C, clicking the Close button, or clicking the × close button—this method is called. The method simply hides the window rather than destroying it. The window can be shown again by callingtkinter.Toplevel.deiconify() on it.
7.3. Creating Main-Window Applications with Tkinter
In this section, we will study how to create those aspects of the Gravitate main-window–style application that are most generic. The application is shown in Figure 7.7 (![]() 254), and the game is described in the “Gravitate” sidebar (
254), and the game is described in the “Gravitate” sidebar (![]() 254). The user interface has some of the standard elements that users would expect, such as a menu bar, a central widget, a status bar, and dialogs. Tkinter provides support for menus out of the box, but we must create the central widget and status bar ourselves. It should be straightforward to adapt the Gravitate application’s code to create other main-window–style applications, by changing the widget in the central area and changing the menus and status bar, but keeping the same overall infrastructure.
254). The user interface has some of the standard elements that users would expect, such as a menu bar, a central widget, a status bar, and dialogs. Tkinter provides support for menus out of the box, but we must create the central widget and status bar ourselves. It should be straightforward to adapt the Gravitate application’s code to create other main-window–style applications, by changing the widget in the central area and changing the menus and status bar, but keeping the same overall infrastructure.
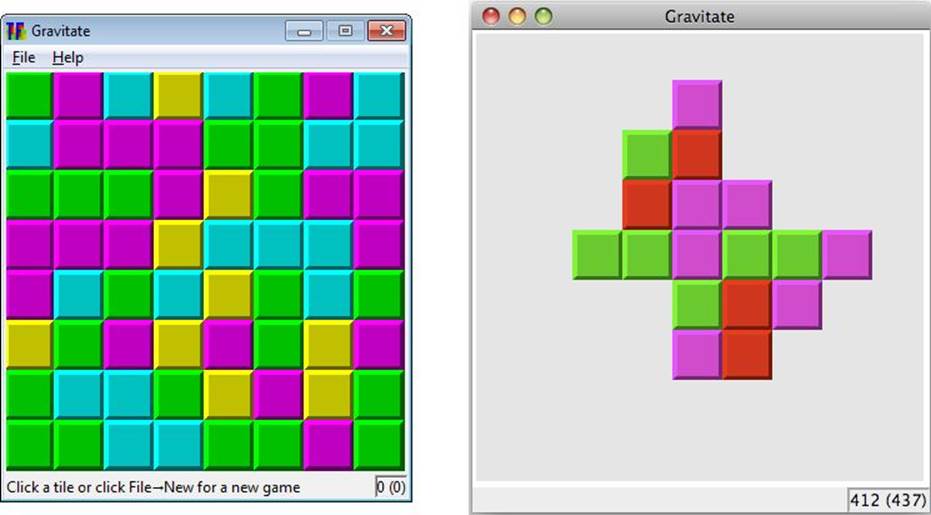
Figure 7.7 The Gravitate application on Windows and OS X
Gravitate consists of seven Python files and nine icon images. The application’s “executable” is gravitate/gravitate.pyw, and the main window is in gravitate/Main.py. These are supported by three dialog windows: gravitate/About.py, which we won’t cover;gravitate/Help.py, which we covered in the previous section (§7.2.2.2, 250 ![]() ); and gravitate/Preferences.py, which we covered earlier (§7.2.2.1, 245
); and gravitate/Preferences.py, which we covered earlier (§7.2.2.1, 245 ![]() ). The main window’s central area is occupied by a Board from gravitate/Board.py, a subclass oftkinter.Canvas (and which we don’t have the space to cover).
). The main window’s central area is occupied by a Board from gravitate/Board.py, a subclass oftkinter.Canvas (and which we don’t have the space to cover).
![]() Gravitate
Gravitate
The aim of the game is to remove all the tiles from the board. When a tile is clicked, that tile and any vertically or horizontally adjoining tiles of the same color are removed. (If there are no adjoining tiles the click has no effect.) The more tiles removed in one go, the more points are scored.
Gravitate’s logic is a similar to Tile Fall or the Same Game. The key difference between Gravitate and the other two is that when tiles are removed in Tile Fall or the Same Game, tiles fall down and shift left to fill any gaps, whereas with Gravitate, tiles “gravitate” toward the center of the board.
The book’s examples include three versions of Gravitate. The first version is in directory gravitate and is described in this section. The second version is in directory gravitate2: this has the same game logic as the first version, and in addition features a hidable/showable toolbar and a more sophisticated Preferences dialog that provides additional options, such as a choice of tile shapes and a zoom factor to show larger or smaller tiles. Also, gravitate2 remembers the high score between sessions and can be played using the keyboard as well as the mouse, navigating with the arrow keys and removing by pressing the spacebar. The third version is three-dimensional and is covered in Chapter 8 (§8.2, ![]() 272). There’s also an online version at www.qtrac.eu/gravitate.html.
272). There’s also an online version at www.qtrac.eu/gravitate.html.
def main():
application = tk.Tk()
application.withdraw()
application.title(APPNAME)
application.option_add("*tearOff", False)
TkUtil.set_application_icons(application, os.path.join(
os.path.dirname(os.path.realpath(__file__)), "images"))
window = Main.Window(application)
application.protocol("WM_DELETE_WINDOW", window.close)
application.deiconify()
application.mainloop()
This is the gravitate/gravitate.pyw file’s main() function. It creates the normally hidden top-level tkinter.Tk object and then immediately hides the application to avoid flicker while the main window is being created. By default, Tkinter has tear-off menus (a throwback to the ancient Motif GUI); we switch the feature off, since no modern GUI uses them. Next, we set the application’s icons using a function we discussed earlier (239 ![]() ). Then, we create the application’s main window, and we tell Tkinter that if the application’s × close button is clicked, it must call the Main.Window.close() method. Finally, we show the application (or rather, add an event to the event loop to schedule it to be shown) and then start off the application’s event loop. At this point the application will appear.
). Then, we create the application’s main window, and we tell Tkinter that if the application’s × close button is clicked, it must call the Main.Window.close() method. Finally, we show the application (or rather, add an event to the event loop to schedule it to be shown) and then start off the application’s event loop. At this point the application will appear.
7.3.1. Creating a Main Window
Tkinter main windows are, in principle, no different from dialogs. In practice, though, main windows normally have a menu bar and a status bar, often have toolbars, and sometimes have dock windows. They also usually have one central widget—a text editor, a table (e.g., for a spreadsheet), or a graphic (e.g., for a game or simulation or visualization). For Gravitate, we have a menu bar, a graphics central widget, and a status bar.
class Window(ttk.Frame):
def __init__(self, master):
super().__init__(master, padding=PAD)
self.create_variables()
self.create_images()
self.create_ui()
The Gravitate Main.Window class derives from tkinter.ttk.Frame and passes on most of its work to the base class and to three helper methods.
def create_variables(self):
self.images = {}
self.statusText = tk.StringVar()
self.scoreText = tk.StringVar()
self.helpDialog = None
The status bar’s transient text messages are stored in self.statusText, and the permanent score (and high score) indicator’s text is stored in self.scoreText. The Help dialog is initially set to None; this was discussed earlier (§7.2.2.2, 250 ![]() ).
).
It is very common for GUI applications to display icons beside menu options, and icons are essential for toolbar buttons. For the Gravitate game, we have put all the icon images in the gravitate/images subdirectory and have defined a set of constants for their names (e.g., the NEWconstant is set to the "New" string). When the Main.Window is created, it calls a custom create_images() method to load all the necessary images as the values of the self.images dictionary. It is essential that we keep references to images loaded by Tkinter; otherwise, they will be garbage collected (and disappear).
def create_images(self):
imagePath = os.path.join(os.path.dirname(
os.path.realpath(__file__)), "images")
for name in (NEW, CLOSE, PREFERENCES, HELP, ABOUT):
self.images[name] = tk.PhotoImage(
file=os.path.join(imagePath, name + "_16x16.gif"))
We have chosen to use 16 × 16 pixel images in menus, so for each action constant (NEW, CLOSE, and so on), we load the appropriate images.
The built-in __file__ constant holds the filename including its path. We use os.path.realpath() to get the absolute path and eliminate “..” components and symbolic links, then we extract just the directory portion (i.e., dropping the filename) and combine this with "images" to get the path to the application’s images subdirectory.
def create_ui(self):
self.create_board()
self.create_menubar()
self.create_statusbar()
self.create_bindings()
self.master.resizable(False, False)
Thanks to our ruthless approach to refactoring, this method hands off its work to helper methods. And then, when the user interface is complete, it sets the window to be nonresizable. After all, it doesn’t make sense for the user to resize when the tiles are a fixed size. (The Gravitate 2 application also doesn’t allow user resizing, but it does allow users to change the tile size and resizes the window accordingly on the user’s behalf.)
def create_board(self):
self.board = Board.Board(self.master, self.set_status_text,
self.scoreText)
self.board.update_score()
self.board.pack(fill=tk.BOTH, expand=True)
This method creates a Board instance (a tkinter.Canvas subclass) and passes it the self.set_status_text() method so that it can display transient messages in the main window’s status bar, and the self.scoreText so that it can update the score (and high score).
Once the board has been created, we call its update_score() method to get “0 (0)” displayed in the permanent score indicator. We also pack the board into the main window, telling it to expand in both directions.
def create_bindings(self):
modifier = TkUtil.key_modifier()
self.master.bind("<{}-n>".format(modifier), self.board.new_game)
self.master.bind("<{}-q>".format(modifier), self.close)
self.master.bind("<F1>", self.help)
Here, we provide three keyboard shortcuts: Ctrl+N (or ![]() N) to start a new game, Ctrl+Q (or
N) to start a new game, Ctrl+Q (or ![]() Q) to quit, and F1 to pop up (or show, if hidden), the modeless help window. The TkUtil.key_modifier() method returns the platform-appropriate shortcut modifier name ("Control" or"Command").
Q) to quit, and F1 to pop up (or show, if hidden), the modeless help window. The TkUtil.key_modifier() method returns the platform-appropriate shortcut modifier name ("Control" or"Command").
7.3.2. Creating Menus
Tkinter shows menus beneath window title bars on Linux and Windows, as is traditional. But on OS X, Tkinter integrates menus into the single OS X menu at the top of the screen. However, as we will see, we must help Tkinter with this integration.
Menus and submenus are instances of tkinter.Menu. One menu must be created as a top-level window’s menu bar (e.g., as the main window’s menu bar), and all the other menus as children of the menu bar menu.
def create_menubar(self):
self.menubar = tk.Menu(self.master)
self.master.config(menu=self.menubar)
self.create_file_menu()
self.create_help_menu()
Here, we create a new empty menu as the child of the window and set the window’s menu attribute (i.e., its menu bar) to be this menu (self.menubar). We then add submenus to the menu bar; in this case, just two, both of which we will review in the following subsubsections.
7.3.2.1. Creating a File Menu
Most main-window–style applications have a file menu with options to create a new document, open an existing document, save the current document, and quit the application. However, for games, many of these options aren’t needed, so for the Gravitate application we only provide a couple of them, as can be seen in Figure 7.8.
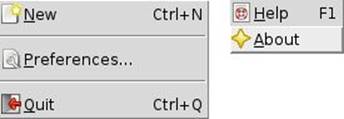
Figure 7.8 The Gravitate application’s menus on Linux
def create_file_menu(self):
modifier = TkUtil.menu_modifier()
fileMenu = tk.Menu(self.menubar, name="apple")
fileMenu.add_command(label=NEW, underline=0,
command=self.board.new_game, compound=tk.LEFT,
image=self.images[NEW], accelerator=modifier + "+N")
if TkUtil.mac():
self.master.createcommand("exit", self.close)
self.master.createcommand("::tk::mac::ShowPreferences",
self.preferences)
else:
fileMenu.add_separator()
fileMenu.add_command(label=PREFERENCES + ELLIPSIS, underline=0,
command=self.preferences,
image=self.images[PREFERENCES], compound=tk.LEFT)
fileMenu.add_separator()
fileMenu.add_command(label="Quit", underline=0,
command=self.close, compound=tk.LEFT,
image=self.images[CLOSE],
accelerator=modifier + "+Q")
self.menubar.add_cascade(label="File", underline=0,
menu=fileMenu)
This method is used to create the file menu. Constants are written in all upper-case, and unless shown otherwise, hold strings of the same name; for example, NEW is a constant holding the string "New".
The method begins by getting the modifier to use for keyboard accelerators (![]() on OS X, Ctrl on Linux and Windows). Then it creates the file menu as a child of the window’s menu bar. The name given to this menu ("apple") tells Tkinter that on OS X, this menu should be integrated with (i.e., is) the application’s application menu; it is ignored on other platforms.
on OS X, Ctrl on Linux and Windows). Then it creates the file menu as a child of the window’s menu bar. The name given to this menu ("apple") tells Tkinter that on OS X, this menu should be integrated with (i.e., is) the application’s application menu; it is ignored on other platforms.
Menu options are added using the tkinter.Menu.add_command(), tkinter.Menu.add_checkbutton(), and tkinter.Menu.add_radiobutton() methods, although we use only the first of these for Gravitate. Separators are added withtkinter.add_separator(). The underline attribute is ignored on OS X, and on Windows, underlines are only visible if set to be so or if the Alt key is held down. For each menu option, we specify its label text, its underline, the command to execute when the menu option is invoked, and the menu’s icon (the image attribute). The compound attribute says how to handle icons and text: tk.LEFT means show both, with the icon on the left. We also set an accelerator key; for example, for File→New, the user can press Ctrl+N on Linux and Windows, or ![]() N on OS X.
N on OS X.
On OS X, the current application’s Preferences and Quit menu options are shown in the application menu (to the right of the apple menu, after which comes the application’s file menu). To integrate with OS X, we use the tkinter.Tk.createcommand() method to associate the Tcl/Tk ::tk::mac::ShowPreferences and exit commands with Gravitate’s corresponding methods. For other platforms, we add both Preferences and Quit as normal menu options.
Once the file menu has been fully populated, we add it as a cascade (i.e., submenu) of the menu bar.
def menu_modifier():
return "Command" if mac() else "Ctrl"
This tiny function from TkUtil/__init__.py is used for the text in menus. The word "Command" is treated specially on OS X and appears as the ![]() symbol.
symbol.
7.3.2.2. Creating a Help Menu
The application’s help menu has only two options: Help and About. However, OS X handles both of these differently from Linux and Windows, so our code must account for the differences.
def create_help_menu(self):
helpMenu = tk.Menu(self.menubar, name="help")
if TkUtil.mac():
self.master.createcommand("tkAboutDialog", self.about)
self.master.createcommand("::tk::mac::ShowHelp", self.help)
else:
helpMenu.add_command(label=HELP, underline=0,
command=self.help, image=self.images[HELP],
compound=tk.LEFT, accelerator="F1")
helpMenu.add_command(label=ABOUT, underline=0,
command=self.about, image=self.images[ABOUT],
compound=tk.LEFT)
self.menubar.add_cascade(label=HELP, underline=0,
menu=helpMenu)
We begin by creating the help menu with a name of "help". The name is ignored on Linux and Windows but ensures that, on OS X, the menu is properly integrated with the system’s help menu. If we are on an OS X system, we use the tkinter.Tk.createcommand() method to associate the Tcl/Tk tkAboutDialog and ::tk::mac::ShowHelp commands with the appropriate Gravitate methods. On other platforms, we create the Help and About menu options in the conventional way.
7.3.3. Creating a Status Bar with Indicators
The Gravitate application has a typical status bar that shows transient text messages on the left and has a permanent status indicator on the right. Figure 7.7 (254 ![]() ) shows the status indicator and (in the left-hand screenshot) a transient message.
) shows the status indicator and (in the left-hand screenshot) a transient message.
def create_statusbar(self):
statusBar = ttk.Frame(self.master)
statusLabel = ttk.Label(statusBar, textvariable=self.statusText)
statusLabel.grid(column=0, row=0, sticky=(tk.W, tk.E))
scoreLabel = ttk.Label(statusBar, textvariable=self.scoreText,
relief=tk.SUNKEN)
scoreLabel.grid(column=1, row=0)
statusBar.columnconfigure(0, weight=1)
statusBar.pack(side=tk.BOTTOM, fill=tk.X)
self.set_status_text("Click a tile or click File→New for a new "
"game")
To create a status bar, we begin by creating a frame. Then we add a label and associate the label with the self.statusText (of type StringVar). We can now set the status text by setting the self.statusText’s text, although in practice we will call a method instead. We also add one permanent status indicator: a label that displays the score (and high score) and that is associated with the self.scoreText.
We grid the two labels inside the status bar frame and make the statusLabel (for showing transient messages) occupy as much of the width as is available. We pack the status bar frame itself at the bottom of the main window and make it stretch horizontally to occupy the full width of the window. At the end, we set an initial transient message using a custom set_status_text() method.
def set_status_text(self, text):
self.statusText.set(text)
self.master.after(SHOW_TIME, lambda: self.statusText.set(""))
This method sets the text of the self.statusText to the given text (which could be empty) and then clears the text after SHOW_TIME milliseconds (5 seconds in this example).
Although we have put only labels into the status bar, there is no reason why we couldn’t add other widgets—comboboxes, spinboxes, or buttons, for example.
There has been only enough space in this chapter to show some basic Tkinter use. Since Python adopted Tcl/Tk 8.5 (the first version to use theming), Tkinter has become much more attractive, as it now supports the native look and feel on OS X and Windows. Tkinter contains some very powerful and flexible widgets, most notably the tkinter.Text widget, which can be used for editing and presenting styled and formatted text, and the tkinter.Canvas widget, for 2D graphics (and used by Gravitate and Gravitate 2). Three other very useful widgets aretkinter.ttk.Treeview, for showing tables or trees of items, tkinter.ttk.Notebook, for showing tabs (used in Gravitate 2’s Preferences dialog), and tkinter.ttk.Panedwindow, for providing splitters.
Although Tkinter doesn’t provide some of the high-level features that other GUI toolkits provide, as we have seen, it is straightforward to create status bars with transient message areas and permanent status indicators. Tkinter’s menus are more sophisticated than were needed in this chapter, supporting submenus, subsubmenus, and so on, as well as checkable (checkbox- and radiobutton-style) menu options. And it is also quite straightforward to create context menus.
In terms of modern features that we might want, the most obviously missing are toolbars. These are pretty easy to create, although it does take some care to make them hidable and showable, and to make them automatically lay themselves out to account for window resizing. Another modern feature that many applications benefit from is dock windows. It is possible to create dock windows that can be hidden or shown, dragged from one dock area to another, and even floated free.
The book’s examples include two applications that are not covered in this chapter due to lack of space: texteditor and texteditor2, the latter shown in Figure 7.9 (![]() 262). Both applications demonstrate how to implement showable/hidable toolbars that automatically lay themselves out, submenus, checkbox- and radiobutton-style menu options, context menus, and a recent files list. They both also have an extension dialog, shown in Figure 7.10 (
262). Both applications demonstrate how to implement showable/hidable toolbars that automatically lay themselves out, submenus, checkbox- and radiobutton-style menu options, context menus, and a recent files list. They both also have an extension dialog, shown in Figure 7.10 (![]() 262). They also show how to use the tkinter.Text widget and how to interact with the clipboard. In addition,texteditor2 illustrates how to implement dock windows (although floating them free doesn’t work correctly on OS X).
262). They also show how to use the tkinter.Text widget and how to interact with the clipboard. In addition,texteditor2 illustrates how to implement dock windows (although floating them free doesn’t work correctly on OS X).
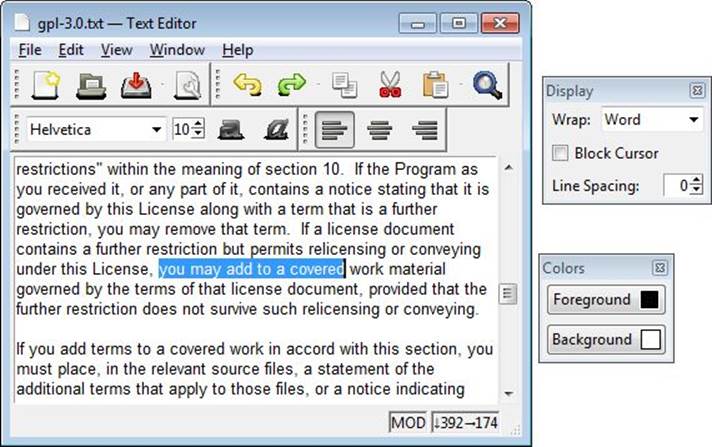
Figure 7.9 The Text Editor 2 application on Windows
Figure 7.10 The Text Editor applications’ extension dialog on Windows
Clearly, Tkinter requires more effort to provide fundamental infrastructure than most other GUI toolkits. However, Tkinter does not impose many limitations, and if we create the necessary infrastructure (e.g., for toolbars and dock windows) with enough care, we can reuse the infrastructure in all of our applications. Tkinter is very stable and comes standard with Python, so it is ideal for creating easy-to-deploy GUI applications.
All materials on the site are licensed Creative Commons Attribution-Sharealike 3.0 Unported CC BY-SA 3.0 & GNU Free Documentation License (GFDL)
If you are the copyright holder of any material contained on our site and intend to remove it, please contact our site administrator for approval.
© 2016-2026 All site design rights belong to S.Y.A.