CCNP Security FIREWALL 642-618 Official Cert Guide (2012)
Chapter 9. Inspecting Traffic
This chapter covers the following topics:
• Understanding the Modular Policy Framework: This section provides an overview of a flexible and organized method you can use to configure security policies for a variety of Cisco ASA features.
• Configuring the MPF: This section explains the modular approach to configuring and enforcing security policies. Traffic can be matched with one type of policy module and acted on within another policy module. The whole hierarchy of policies is then applied to firewall interfaces and traffic inspection.
• Configuring a Policy for Inspecting OSI Layers 3 and 4: This section explains how you can leverage the MPF to define security policies that operate on Layer 3 (IP header) and Layer 4 (UDP or TCP header) information.
• Configuring Dynamic Protocol Inspection: This section covers the ASA inspection engines that can be used to inspect protocols that use a fixed control port to set up subsequent connections on ports that are determined dynamically.
• Configuring a Policy for Inspecting OSI Layers 5–7: This section explains how to use the MPF to define security policies that inspect and analyze application traffic.
• Detecting and Filtering Botnet Traffic: This section explains how an ASA can be configured to detect malicious botnet traffic as it occurs.
• Using Threat Detection: This section covers the threat detection feature that can be used to gather statistics about network objects and to discover abnormal activity that might be related to security attacks.
A Cisco Adaptive Security Appliance (ASA) can maintain the state of connections passing through it in order to provide effective security. Connection state involves parameters such as address translation, connection direction and flow, and limits on the connection itself. In addition, an ASA must be able to inspect various protocols as they pass through, so that the protocols themselves meet criteria defined in the security policies.
Traffic inspection can be one of the most complex functions to perform and configure. This chapter covers the tools and features you can use to configure a variety of inspection policies, with an emphasis on the Modular Policy Framework (MPF).
“Do I Know This Already?” Quiz
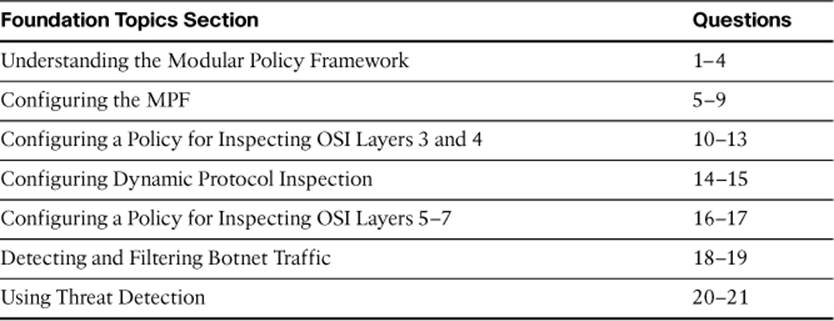
The “Do I Know This Already?” quiz allows you to assess whether you should read this entire chapter thoroughly or jump to the “Exam Preparation Tasks” section. If you are in doubt about your answers to these questions or your own assessment of your knowledge of the topics, read the entire chapter. Table 9-1 lists the major headings in this chapter and their corresponding “Do I Know This Already?” quiz questions. You can find the answers in Appendix A, “Answers to the ‘Do I Know This Already?’ Quizzes.”
Table 9-1. “Do I Know This Already?” Section-to-Question Mapping
Caution
The goal of self-assessment is to gauge your mastery of the topics in this chapter. If you do not know the answer to a question or are only partially sure of the answer, you should mark that question as wrong for purposes of the self-assessment. Giving yourself credit for an answer you correctly guess skews your self-assessment results and might provide you with a false sense of security.
1. Which one of the following should be applied to one or more ASA interfaces to implement a security policy?
a. A class map
b. A policy map
c. A service policy
d. An access policy
2. Which one of the following contains the actions that are taken to enforce a security policy?
a. A class map
b. A policy map
c. A service policy
d. An access policy
3. Which one of the following contains definitions of traffic flows that should be identified so that an action can be taken?
a. A class map
b. A policy map
c. A service policy
d. An access policy
4. Which one of the following is the name of the default security policy that is applied to all ASA interfaces?
a. global_policy
b. default_policy
c. policy_all
d. inspection_default
5. When using the Modular Policy Framework to build a security policy, which one of the following should you configure first from the CLI?
a. A class map
b. A policy map
c. A service policy
d. An access policy
6. To make configuration changes to the default global security policy, which one of the following commands should be entered?
a. ciscoasa(config)# service-policy global_policy global
b. ciscoasa(config)# global_policy
c. ciscoasa(config)# policy-map global_policy
d. ciscoasa(config)# class-map global_policy
7. In a class map, which one of the following command keywords should you use to classify traffic?
a. ciscoasa(config-cmap)# classify
b. ciscoasa(config-cmap)# permit
c. ciscoasa(config-cmap)# match
d. ciscoasa(config-cmap)# access-list
8. Suppose you enter the service-policy p1 global command to apply a policy map to all ASA interfaces. Then you enter the service-policy p2 global command to apply a second policy map to all interfaces. Which of the following describes the correct outcome?
a. Neither command will be accepted; it isn’t possible to apply policy maps globally.
b. Policy p1 will be applied globally, but p2 will not; only one global policy is supported.
c. Policy p2 will overwrite policy p1.
d. Both policy maps will be applied to all interfaces.
9. Refer to the following figure. Which policy has been applied to the inside and outside ASA interfaces?
a. Policy p1
b. Policy anything
c. Policy voice
d. Policy global_policy
10. By default, how long will an ASA permit an idle TCP connection to stay open? (Hint: set connection timeout tcp)
a. Unlimited time
b. 30 seconds
c. 1 minute
d. 1 hour
11. Which one of the following commands can be used to configure the TCP Intercept feature to limit the number of embryonic TCP connections to a total of ten for a traffic class?
a. set connection embryonic-conn-max 10
b. tcp-intercept embryonic 10
c. embryonic tcp 10
d. set connection timeout embryonic 10
12. Which one of the following policy map configuration commands should be used to detect defunct idle TCP connections?
a. ciscoasa(config-pmap-c)# set connection tcp
b. ciscoasa(config-pmap-c)# set connection idle
c. ciscoasa(config-pmap-c)# set connection dcd
d. ciscoasa(config-pmap-c)# set connection tcp detect
13. Suppose you want to configure a security policy to clear the TCP options field in TCP packets. Which one of the following represents the most appropriate ASA feature and initial configuration command that you could use?
a. TCP Intercept; tcp-intercept
b. TCP Normalizer; tcp-map
c. TCP Verifier; tcp-verify
d. TCP Guard; tcp-guard
14. Consider the following configuration:
ciscoasa(config)# class-map M1
ciscoasa(config-cmap)# match port tcp eq 8080
ciscoasa(config-cmap)# exit
ciscoasa(config)# policy-map global_policy
ciscoasa(config-pmap)# class M1
ciscoasa(config-pmap-c)# inspect http
ciscoasa(config-pmap-c)# exit
Which one of the following is a correct statement?
a. HTTP will be inspected on TCP port 80 only.
b. HTTP will be inspected on a nonstandard port.
c. No HTTP traffic will be inspected because class M1 matches TCP port 8080, while the inspect http command uses TCP port 80.
d. Only traffic with source TCP port 8080 will be inspected.
15. The established command is used for what one purpose?
a. To inspect only TCP connections that are fully open and established
b. To permit traffic from hosts that are known on a whitelist
c. To inspect a custom dynamic protocol
d. To permit return traffic from an outbound connection
16. Which of the following answers correctly describes inspection of ICMP traffic? (Choose all that apply.)
a. It isn’t possible because ICMP is a stateless protocol.
b. ICMP can be inspected with the inspect icmp command.
c. ICMP connections stay open for 30 seconds before being closed.
d. ICMP connections stay open until the first reply is received.
17. Which one of the following partial commands can be used to minimize the HTTP protocol during inspection?
a. match not request method get
b. minimize request method
c. no match http
d. match http protocol-violation
18. Which of the following are valid sources of information for the Botnet Traffic Filtering databases?
a. A statically configured whitelist
b. A statically configured blacklist
c. A dynamic database downloaded from Cisco
d. A dynamic database downloaded from flash memory
19. Which one of the following command keywords is used to configure Botnet Traffic Filtering?
a. ciscoasa(config)# botnet-filter
b. ciscoasa(config)# attack-filter
c. ciscoasa(config)# traffic-filter
d. ciscoasa(config)# dynamic-filter
20. Which one of the following sources of information does the threat detection feature use?
a. A dynamic database downloaded from Cisco
b. A blacklist that you can configure
c. Statistics collected from network activity
d. A database of IPS signatures
21. Which one of the following ASA features can actively shun attacking hosts?
a. Basic threat detection
b. Advanced threat detection
c. Aggressive threat detection
d. Scanning threat detection
Foundation Topics
A Cisco ASA offers many robust traffic inspection features that you can leverage to secure a network in a variety of ways. The key to using these features lies in understanding the modular approach to configuring security policies. This chapter begins by introducing the Modular Policy Framework of configuration, and then builds on that foundation by covering inspection engines and other, more specific inspection features.
Understanding the Modular Policy Framework
Chapter 8, “Controlling Access Through the ASA,” covered interface access control lists (ACL) and how you can use them to control access through an ASA. With ACLs alone, packets are permitted or denied based on the information that can be found in the packet headers. Although that approach does offer granular control over things such as source and destination addresses and Layers 3 and 4 protocols and port numbers, it still treats all types of traffic identically once the packets are permitted or denied.
A robust security appliance should also be able to identify specific traffic flows and apply the appropriate security policies to them. For example, suppose you need to prioritize one type of traffic flow over another. You might also need to examine specific application protocols with a deep packet inspection, to make sure that hosts are using the protocols correctly. Sometimes, you might want to funnel certain traffic flows through an intrusion prevention system (IPS) process to detect and prevent any malicious activity. Functions such as these are not possible with simple interface ACLs.
Fortunately, the ASA offers much more flexibility through its Modular Policy Framework (MPF). In a nutshell, the MPF provides an organized and scalable means of defining inspection policies for network traffic flows. With the MPF feature, you can define a set of policies that identifies traffic and then takes some specific actions on it. The MPF doesn’t replace the use of ACLs—it simply augments ACLs with additional functionality.
The MPF concept might be confusing at first, especially when you begin trying to configure it or reverse engineer it for the first time. Think of the MPF as a set of three nested items:

• Service policy: An entire set of policies that is applied to one or all ASA interfaces, configured with the service-policy command
• Policy map: Where an action is taken on matched traffic, configured with the policy-map command
• Class map: Where specific traffic flows are identified or classified, configured with the class-map command
Because the MPF is designed to be modular, a service policy can contain one or more policy maps, which can, in turn, contain one or more class maps. As well, any class maps you define can be referenced in multiple policy maps and service policies.
To get an idea of the MPF structure, you can look at the policies that are configured by default in an ASA. First, you can use the show running-config service-policy command to see which service policies have been defined and applied to the ASA interfaces. Example 9-1 shows a default service policy that refers to something called global_policy, which has been applied globally to all ASA interfaces. A service policy always references a policy map—the next level down in the MPF hierarchy.
Example 9-1. Displaying the Default Service Policies
ciscoasa# show running-config service-policy
service-policy global_policy global
ciscoasa#
Now you know that the name of the policy map is global_policy, but what does it do? Next, you can look for the policy map configuration to find out. Use the show running-config policy-map global_policy command to display its contents, as shown in Example 9-2.
Example 9-2. Displaying a Policy Map Configuration
ciscoasa# show running-config policy-map global_policy
!
policy-map global_policy
class inspection_default
inspect dns preset_dns_map
inspect ftp
inspect h323 h225
inspect h323 ras
inspect rsh
inspect rtsp
inspect esmtp
inspect sqlnet
inspect skinny
inspect sunrpc
inspect xdmcp
inspect sip
inspect netbios
inspect tftp
inspect ip-options
!
ciscoasa#
Notice how the policy map named global_policy begins with a class command and then contains a long list of inspect commands. A policy map must always classify or identify traffic first and then take some action on it. The class command references a class map that does the actual traffic classification, while the inspect commands define each of the actions that must be taken on the matching traffic.
The individual commands shown in Example 9-2 are covered later in this chapter. For now, just notice that the ASA is classifying traffic on all of its interfaces and subjecting that traffic to a variety of robust inspection engines.
One more thing—what sort of traffic is being classified in the policy map? To find out, you need to look at the configuration of a class map called inspection_default. You can do that by using the show running-config class-map inspection_default command, as demonstrated in Example 9-3.
Example 9-3. Displaying a Class Map Configuration
ciscoasa# show running-config class-map inspection_default
!
class-map inspection_default
match default-inspection-traffic
!
ciscoasa#
The class map contains a single match command that identifies the appropriate traffic. Although there are many match commands that can be used, the match default-inspection-traffic command identifies a default list of protocols and port numbers—traffic that would commonly be inspected in most networks. The entire set of match commands is covered in the “Configuring the MPF” section in this chapter.
The default MPF configuration shown in Examples 9-1 through 9-3 forms the simple hierarchy shown in Example 9-4. The service policy references a single policy map, which references a single class map. Keep in mind that you can leverage the MPF to create much more robust or complex policy configurations, where a list of policy maps can use multiple class maps and actions to treat many different traffic flows in unique ways.
Example 9-4. Simple Hierarchy of the Default MPF Configuration
service-policy pmap1
policy-map pmap1
class cmap1
action ...
class-map cmap1
match ...
Cisco Adaptive Security Device Manager (ASDM) displays the MPF in a much simpler fashion. To view the MPF configuration, navigate to Configuration > Firewall > Service Policy Rules. Figure 9-1 shows the default ASA MPF configuration. You can see evidence of a global policy (applied to all interfaces), a name inspection_default, a match any-any condition, a service called default-inspections, and a list of 15 inspection actions. However, you don’t see the underlying concept of service policy, policy maps, and class maps.

Figure 9-1. Displaying the MPF Configuration in ASDM
You can also click the Diagram button at the top of the Service Policy Rules window to display a functional diagram of any highlighted MPF policy. In Figure 9-1, the diagram for the default policy is shown at the bottom of the window. A global policy is shown for the ASA, along with any-to-any traffic matching and default-inspection service.
Note
The CLI and ASDM provide two different views of the same MPF configuration. The FIREWALL exam blueprint does not specify which user interface you might have to use to configure or verify MPF on the exam. Therefore, you should be sure to understand both perspectives.
Configuring the MPF
The default MPF configuration takes care of several common functions, but you have to add to the configuration to leverage the full potential. The MPF is a bit of a double-edged sword. On one hand, it is a very versatile means of defining robust security policies. On the other hand, it is so versatile that it can be confusing to configure.
As you begin to configure your security policies, you should outline the complete policy structure as a list of the individual policies. Be sure to show how the default global policy fits into the whole picture. To see what policies are already in place, you can display the running configuration or use the show commands that were presented in the previous section to find individual portions of the policies.
You can configure security policies by modifying an existing policy map or by creating a new one. Policy maps are applied to ASA interfaces by referencing them in service policies. Each interface can have only one service policy specifically applied to it; in addition, one global policy can be applied to all interfaces.
Exactly what can you configure in a policy map? Remember that a policy map consists of a series of actions that is taken on matched traffic. The following list describes the actions that an ASA can take on traffic it encounters:
• Apply application inspection engines: You can tailor the stateful inspection process that is performed on a specific type of traffic. Different sets of traffic can be inspected differently.
• Set connection limits: The ASA can control the volume of UDP and TCP connections that are initiated for matched traffic.
• Adjust TCP parameters: Values carried in the TCP header can be inspected, changed, or normalized to conform to configured limits in very specific ways. This can be done differently for each set of traffic identified.
• Limit management traffic: Connections that terminate on the ASA itself can be limited, just like other types of connections that pass through the ASA. Configuring limits on management traffic can help prevent unnecessary strain on the ASA’s CPU.
• Send traffic to a Security Services Module (SSM): Specific traffic can be diverted to an embedded Advanced Inspection and Prevention (AIP) module or an embedded Content Security and Control (CSC) module.
• Limit the bandwidth used: You can tailor traffic policers to limit the bandwidth used by predefined sets of traffic. For example, mission-critical applications might be allowed to use any available bandwidth, whereas peer-to-peer file sharing applications are limited to a small portion of interface bandwidth.
• Provide priority handling: Specific types of traffic can be given priority over other types as packets are sent out an interface. This allows time-critical applications to receive premium service as those packets are inspected and passed through the ASA.
It might seem intuitive to start configuring the actions first. Keep in mind that each action in a policy map must be performed on traffic that has matched some condition. Therefore, you have to define the matching condition first, then the action. In a sense, you will have to work backwards, so planning the security policies ahead of time often makes the process less confusing.
As a rule, remember the following security policy building blocks and their functions:
• Class map: Which traffic will be matched?
• Policy map: What action will be taken on each class of traffic?
• Service policy: Where will the policy map be applied?
Figure 9-2 shows how the MPF building blocks all fit together and build upon each other to make up a single service policy.
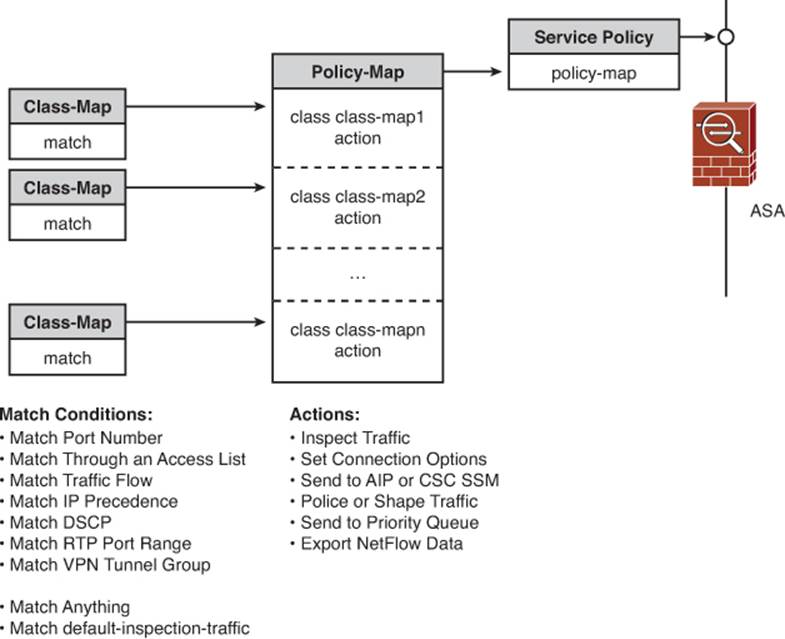
Figure 9-2. MPF Organization and Structure
While the MPF offers a general framework for creating security policies, you can construct policies for specific purposes—often based on the content of the traffic being inspected. You can configure security policies according to the following broad categories:
• OSI Layers 3 and 4: Match and take action based on information found in the Layer 3 and 4 headers, such as IP address, protocol, and port numbers
• OSI Layers 5–7: Match and take action on traffic flows, based on information found in the application layer content of packets
• Management traffic: Match and take action on traffic that terminates on the ASA itself, rather than passing through the ASA
Each of these categories is covered in subsequent sections.
Configuring a Policy for Inspecting OSI Layers 3 and 4
With the MPF, you can configure a class map that identifies a specific type of traffic according to parameters found in OSI Layers 3 and 4, or the IP and UDP packet headers or TCP packet headers, respectively. You can apply that class map to a policy map that can take action on the matching traffic.
You can use the following steps to configure a security policy:
Step 1. Define a Layers 3–4 class map.
Step 2. Define a Layers 3–4 policy map.
Step 3. Apply the policy map to the appropriate interfaces.
The sections that follow examine each step of configuring a security policy in more detail, beginning with the CLI and ending with ASDM. Be aware that the configuration order is somewhat different between the two methods.
Step 1: Define a Layers 3–4 Class Map
As traffic moves through an ASA, it can be identified or classified according to the matching conditions defined in a class map. You can configure multiple class maps to identify several different classes of traffic, if needed. Then a different policy can be applied to each traffic class.
First, identify the class map with the class-map command, as follows:
ciscoasa(config)# class-map class_map_name
ciscoasa(config-cmap)# description text
Give the class map an arbitrary name as class_map_name, and then use the description command to describe the purpose of the class map. If the class map does not already exist, a new one will be created.
Next, choose one of the following ways to match or classify the Layers 3–4 traffic:
• All traffic: All packets passing through an ASA interface
• Default traffic: Packets that belong to a predefined set of protocols and port numbers
• Traffic flow: Packets destined for a unique IP address, where the policy action will be applied on a per-flow basis
• Destination port: Packets being sent to a destination port number or range of port numbers
• Access list: Packets that are permitted by an access list, matched according to protocol, IP addresses, and port numbers
• QoS values: Packets that contain up to four matching IP precedence values or up to eight matching Differentiated Services Code Point (DSCP) values
• RTP port range: Real-time Transport Protocol (RTP) packets that fall within a range of UDP port numbers
• VPN group: Packets that pass through a specific VPN tunnel group name
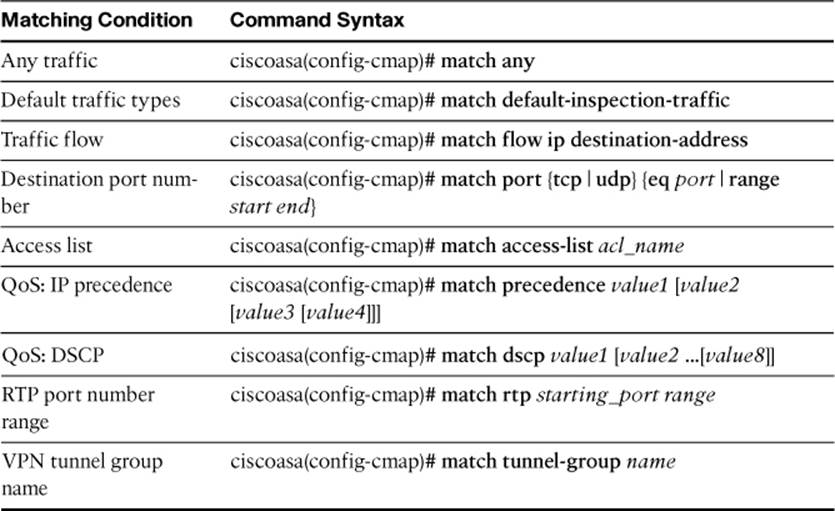
Choose the corresponding match command from Table 9-2 and enter it as the matching condition. You can define only one matching condition in a class map. End the class map configuration by entering the exit command.
Table 9-2. Match Commands Used in a Class Map
Note
The match tunnel-group command is one exception—it can accept one additional match flow ip command to match individual traffic flows within a VPN tunnel.
Example 9-5 shows the commands that can be used to configure three different class maps:
• A class map named anything that matches against any traffic
• A class map named voice that matches against RTP port numbers 2000 through 2100
• A class map named data-center that matches against destination addresses in the 10.100.0.0/16 subnet
Example 9-5. Configuring Three Class Maps
ciscoasa(config)# class-map anything
ciscoasa(config-cmap)# match any
ciscoasa(config-cmap)# exit
!
ciscoasa(config)# class-map voice
ciscoasa(config-cmap)# match rtp 2000 100
ciscoasa(config-cmap)# exit
!
ciscoasa(config)# access-list extended dc permit ip any 10.100.0.0 255.255.0.0
ciscoasa(config)# class-map data-center
ciscoasa(config-cmap)# match access-list dc
ciscoasa(config-cmap)# exit
Step 2: Define a Layers 3–4 Policy Map
Security policies are defined in a policy map as a sequence of match-action pairs. Each security policy references a class map to match traffic, followed by one or more actions to take on the matched traffic.
First, identify the policy map with the policy-map command, as follows:
ciscoasa(config)# policy-map policy_map_name
ciscoasa(config-pmap)# description text
Give the policy map an arbitrary name as policy_map_name, and then use the description command to describe the purpose of the policy map.
Next, use the class command to identify a class map that will be used to match or classify traffic, as follows:
ciscoasa(config-pmap)# class {class_map_name | class-default}
You can use the class-default keyword to use the default class map. This is a handy way to identify all the traffic that hasn’t been classified in any other class map. The class-default class map is automatically configured by default, and contains only the match any command. Therefore, this class map should be the last one defined in a policy.
Next, choose an action to take on any traffic that is matched or classified by the class map. The following list summarizes the actions that are possible; each of them, except for NetFlow data export, is covered in a different section or chapter in this book, as noted.
• Set connection limits: Covered in the “Tuning Basic Layer 3–4 Connection Limits” section in this chapter
• Adjust TCP options: Covered in the “Inspecting TCP Parameters with the TCP Normalizer” section in this chapter
• Inspect the traffic with an application inspection engine: Covered in the “Configuring Dynamic Protocol Inspection” section in this chapter
• Inspect the traffic with an intrusion prevention system (IPS) or Content Security and Control (CSC) module: Covered in Chapter 15, “Integrating ASA Service Modules”
• Police or shape the traffic to control the bandwidth used: Covered in Chapter 11, “Handling Traffic”
• Give the traffic priority handling through the ASA: Covered in Chapter 11
• Export information about the traffic as NetFlow export data
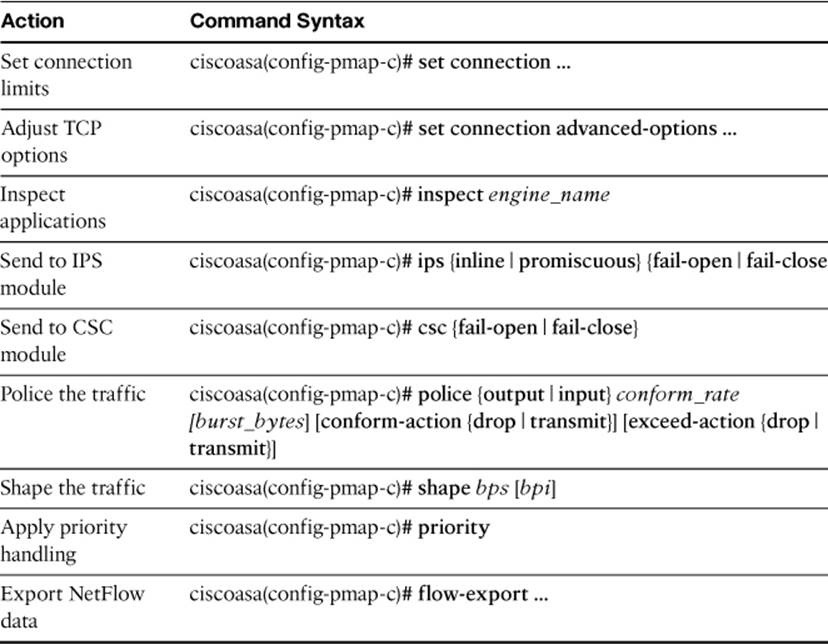
Choose the corresponding command from Table 9-3 to enter into the policy map. Some of the commands in the table are abbreviated because of their complexity, but are covered in their entirety in other sections or chapters. You should be able to get a good idea of the possible actions and their command keywords here, without getting lost in more complex functions.
Table 9-3. Actions to Take on Traffic Matched by a Class Map
You can enter more than one action for any given security policy in a policy map. In other words, after you enter the class command to reference a class map, you can enter any number of action commands to be performed on the matching traffic.
Note
Be aware that the actions might not be carried out in exactly the same order you enter them in the configuration. If multiple actions are found in a security policy, they are performed in the following order:
1. QoS policing of ingress traffic
2. Set connection limits and TCP options
3. Send traffic to the CSC module
4. Application inspection
5. Send traffic to the IPS module
6. QoS policing of egress traffic
7. QoS priority handling
8. QoS traffic shaping
Remember that you can add another security policy to a policy map by simply configuring another class command followed by one or more action commands. In this fashion, you can build up a whole list of match-action policies, each taking some specific action on a different type of traffic. As well, you can add new policies to an existing policy map as needed in the future.
As an example, a policy map named p1 is configured in Example 9-6. Three security policies are configured within the policy map, each referencing a class map configured in Example 9-5. The three policies can be described as follows:
1. Match any traffic with class map anything, and then set some connection volume parameters and subject the traffic to some application inspection engines.
2. Match RTP traffic with class map voice, and then flag the resulting traffic for priority handling.
3. Match traffic destined for the data center with class map data-center, and then set connection timeout parameters.
Example 9-6. Configuring a Policy Map with Three Security Policies
ciscoasa(config)# policy-map p1
ciscoasa(config-pmap)# class anything
ciscoasa(config-pmap-c)# set connection ...
ciscoasa(config-pmap-c)# inspect ...
ciscoasa(config-pmap-c)# class voice
ciscoasa(config-pmap-c)# priority
ciscoasa(config-pmap-c)# exit
ciscoasa(config-pmap)# class data-center
ciscoasa(config-pmap-c)# set connection timeout ...
ciscoasa(config-pmap)# exit
What happens if a certain type of traffic ends up matching multiple class maps within a policy map? For instance, packets that are destined for the data center will be matched by class map data-center in the third security policy in Example 9-6. However, that same traffic can also be matched by class map anything in the first security policy.
When multiple matches occur, the ASA will make sure that each type of action is performed only once. For the data center traffic scenario with Example 9-6, the ASA would perform the set connection and inspect actions found in the first security policy. The set connection timeout action in the third security policy would also be performed because it is unique and different from the set connection in the first policy. If the third policy also had a similar set connection or inspect action, then that action would be skipped.
Also keep in mind that the ASA will not duplicate actions taken on traffic that falls within the same traffic flow, as long as the traffic is either UDP, TCP, or ICMP, and is subject to stateful inspection. This becomes important when similar security policies are applied on multiple interfaces, where packets from the same traffic flow pass through two different interfaces: one on ingress and another on egress. If identical actions are configured on two interfaces, only the first action that is encountered is performed.
When you have entered the final security policy in the policy map, use the exit command to end the policy map configuration.
Step 3: Apply the Policy Map to the Appropriate Interfaces
The entire policy map is applied to one or all ASA interfaces, where the classifications and actions are carried out. Use the following command to define a service policy that binds a policy map to an interface:
ciscoasa(config)# service-policy policy_map_name {global | interface if_name}
You can use the global keyword to apply the policy map globally, to all ASA interfaces. The ASA supports only one global service policy. Remember that a global service policy is configured by default. Therefore, you cannot add a second global service policy; you can edit the existing one or you can remove it and add a different one in its place.
In Example 9-7, the policy map named p1, configured in Example 9-6, is applied as a service policy to the outside ASA interface.
Example 9-7. Applying a Policy Map as a Service Policy
ciscoasa(config)# service-policy p1 interface outside
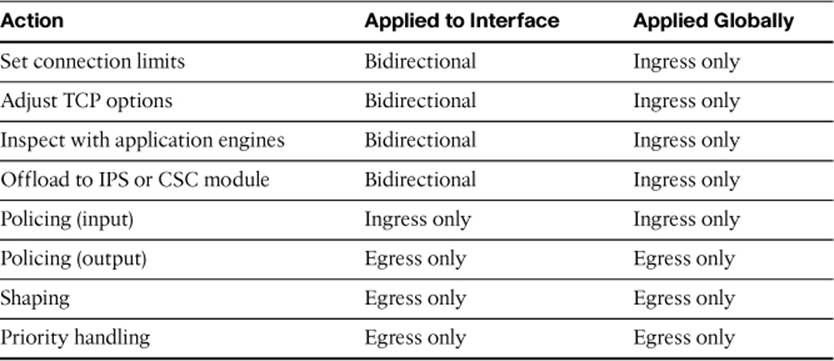
The actions taken in a policy map (and the service policy that references it) can be limited to a specific traffic direction, depending on how the service policy is applied. Table 9-4 lists the traffic directions that are affected by each type of action. Notice that most actions can act on traffic in both the ingress and egress direction when the service policy is applied to a single interface, but only in the ingress direction if applied globally. Actions related to QoS functions (policing, shaping, and priority handling) are the exceptions, controlling traffic in only one direction—usually traffic leaving the ASA.
Table 9-4. Traffic Directions Affected by Policy Map Actions
Creating a Security Policy in ASDM
Notice how the Layers 3–4 service policy configuration unfolds in three distinct steps using the CLI: class map, policy map, and then service policy. In contrast, ASDM integrates all three steps into one smooth process. The CLI functions are all present, but ASDM provides a layer of abstraction.
To create a new service policy, navigate to Configuration > Firewall > Service Policy Rules. Select the ASA interface where the service policy will be applied and enter a name for the policy map. In Figure 9-3, the service policy is applied to the outside interface and is associated with policy map p1, following the same scenario presented in Examples 9-5 through 9-7.
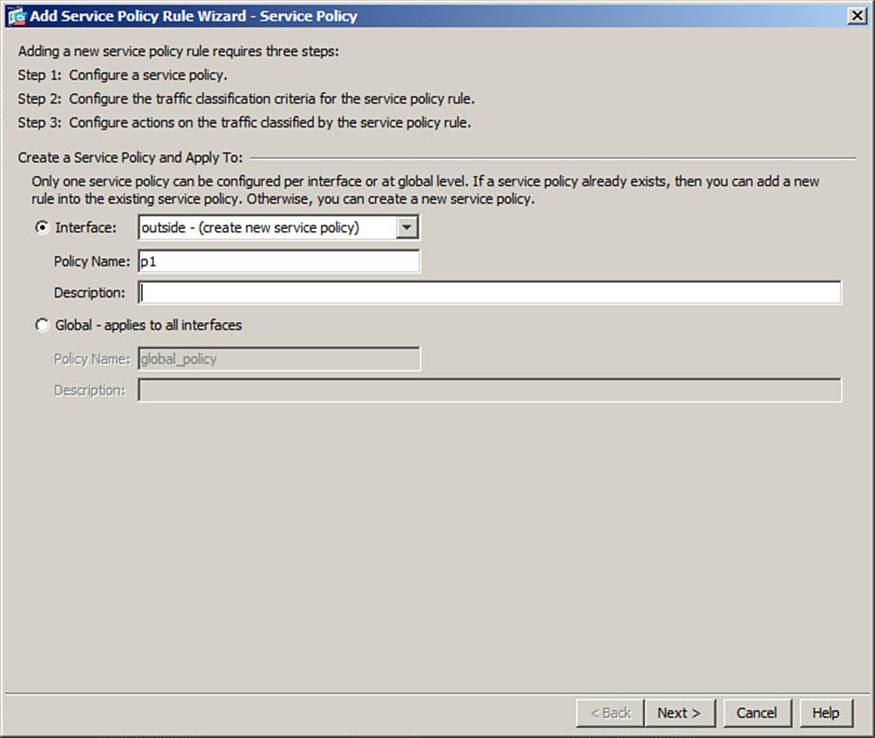
Figure 9-3. Configuring a New Service Policy in ASDM
Click the Next button to move on to define matching conditions. In Figure 9-4, the first security policy of Example 9-5 is defined—a new traffic class (class map) called anything is created. In the Traffic Match Criteria area, the Any Traffic check box is checked.

Figure 9-4. Defining Traffic Classification Criteria in ASDM
Click the Next button to define the actions that will be taken on the classified or matched traffic. ASDM organizes actions into Protocol Inspection, Connection Settings, QoS, and NetFlow tabs. In Figure 9-5, the first action configured is to set a TCP connection timeout limit of 30 minutes.

Figure 9-5. Configuring a Security Policy Action in ASDM
Because you can define multiple actions in a policy map, you can also click a different tab in the Rule Actions dialog box and identify further actions there. Following the scenario in Example 9-6, Figure 9-6 shows the Protocol Inspection tab with HTTP inspection checked to create a second action. After you define all the actions for the traffic class, click the Finish button.
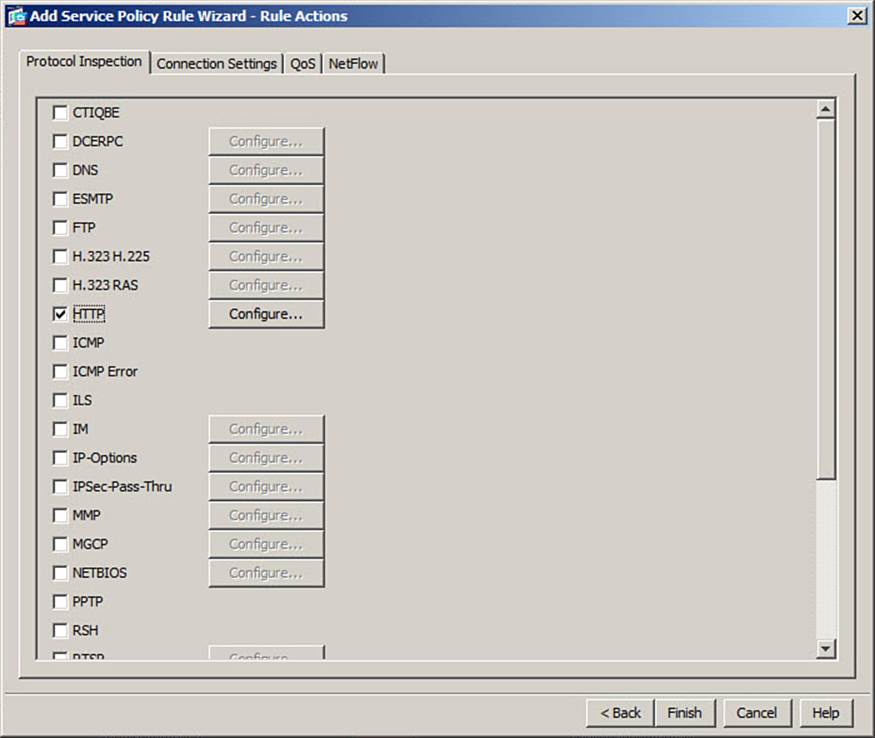
Figure 9-6. Configuring a Second Rule Action in ASDM
Once you finish configuring a service policy rule, ASDM will display it in a summary list of all service policy rules. Figure 9-7 shows the newly created rule named anything under the outside interface policy p1, along with the global policy named inspection_default. From this list, you can verify the interface, the rule name, the matching conditions (source and destination addresses and service port numbers), and a list of actions to be taken.
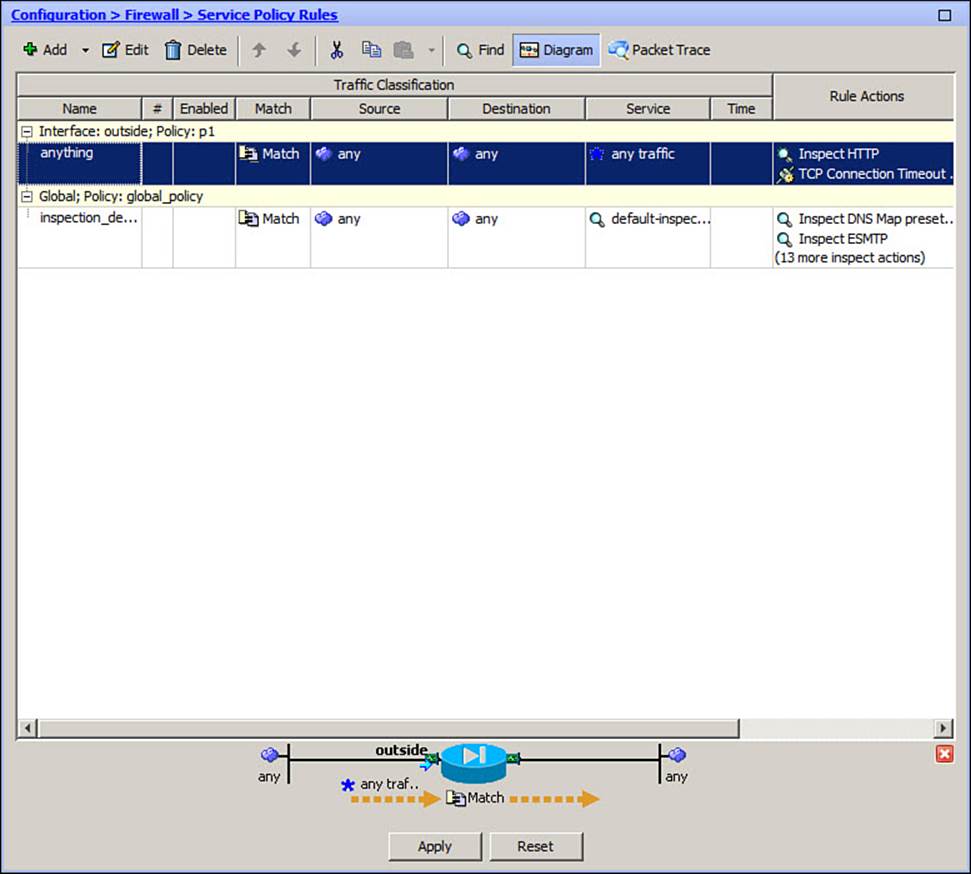
Figure 9-7. Viewing a Summary of Service Policy Rules in ASDM
Notice that only the first security policy from Examples 9-5 through 9-7 has been configured in Figure 9-7. To configure the remaining two policies, click the Add button and repeat the service policy rule process. The interface and policy should be identical to the values used in the previous rule configuration. Figure 9-8 shows the final service policy rule configuration, complete with all three policies from the scenario.
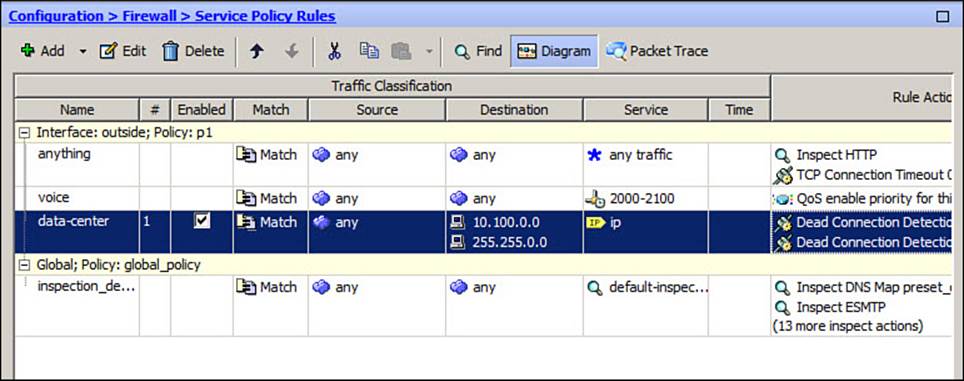
Figure 9-8. Service Policy Rules
Notice that the third service policy rule, which is selected in Figure 9-8, has a check box in the Enabled column. This is because the rule has been configured with an access list as a matching condition. The access list has been configured with a single entry, permitting traffic destined for the 10.100.0.0/16 subnet. Like any access list, it could be expanded to include other entries. ASDM shows each line of the access list with its own check box so that you can make each entry active (enabled) or inactive.
Finally, you can use ASDM to verify that a service policy rule is configured correctly. Begin by selecting a rule from the list. Then, above the rule list, select Packet Trace instead of Diagram. A Packet Tracer window will appear, as shown in Figure 9-9. ASDM will simulate traffic passing into an interface and through the service policy rule you have selected.
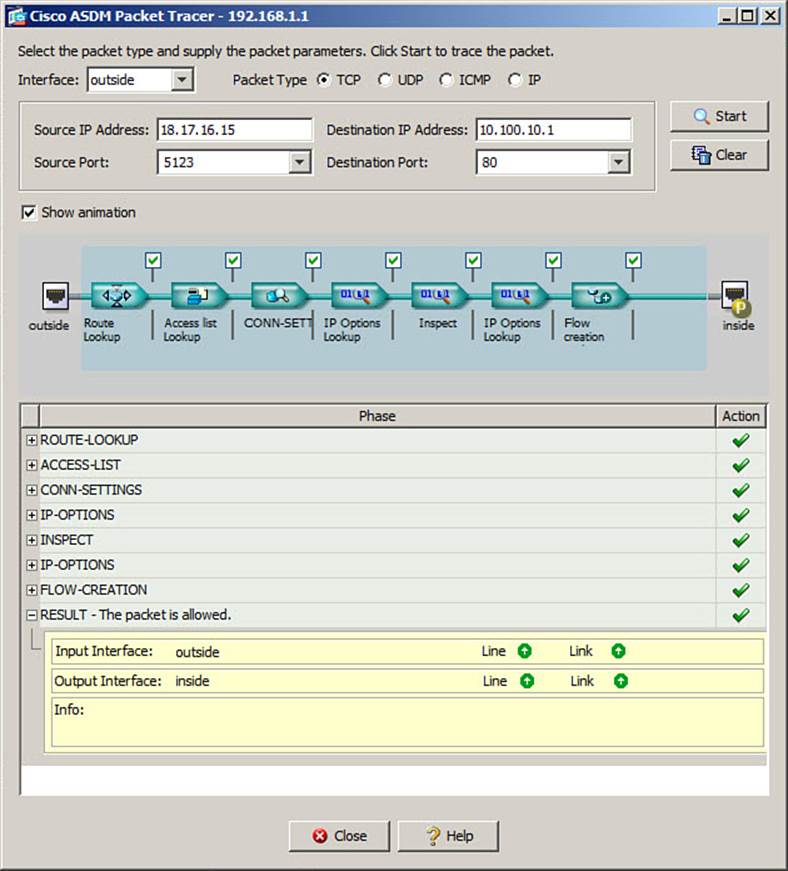
Figure 9-9. Verifying a Service Policy Rule Operation with the ASDM Packet Tracer
You can specify the protocol and source and destination addresses of the simulated packet. Once you are ready to begin the test, click the Start button.
ASDM will show what happens to the packet at every step of the ASA’s inspection processes. In Figure 9-9, the test packet uses TCP port 80 and has a destination address of 10.100.10.1, which should trigger one of the security policy rules that have been configured. Packet Tracer shows the results of a route lookup, an access list lookup, connection settings, IP options lookup, an application inspection engine, another IP options lookup, and a flow creation process. These are all normal processes that could be encountered, although only some of them are actually configured in the service policy rule. A check mark beside each process indicates that the packet has successfully been handled.
Tuning Basic Layers 3–4 Connection Limits
As an ASA inspects traffic, it can also impose limits on the Layers 3–4 connections that form. The following two basic types of connection limits are available:
• Connection timeouts: The duration of TCP connections in various states
• Connection volumes: The number of simultaneous connections
You can configure both types of connection limits with the set connection command, as an action within a policy map. The subsequent keywords and options determine the specific connection limit that will be applied.
Connection time limits are set globally with the timeout configuration command. However, you can set TCP connection timeout limits that will be applied to only the connections that are matched within a policy map by using the following policy map action command:
ciscoasa(config-pmap-c)# set connection timeout [embryonic {hh:mm:ss | 0}]
[half-closed {hh:mm:ss | 0}] [tcp {hh:mm:ss | 0} [dcd [retry_interval
[max_retries]]
Table 9-5 provides details of each type of connection timeout and its associated keyword. With most of the timeout keywords, you can give a specific amount of time as hh:mm:ss (24-hour format) or as 0 for an unlimited amount of time.
Table 9-5. TCP Connection Timeout Limit Options
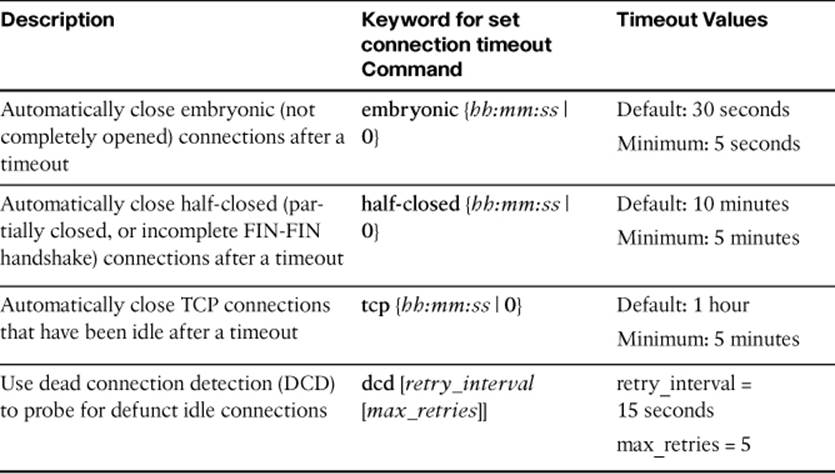
With the tcp keyword, the firewall will identify any TCP connection that has been idle for longer than the timeout value, and will automatically close it. Although this is a handy housekeeping function, it will close any TCP connection that has been idle more than a fixed amount of time.
Some TCP connections can remain idle for an extended period of time, but still be valid. For example, suppose the TCP idle timeout is set to 5 minutes. A Telnet session through the firewall to a host could very easily stay idle for more than 5 minutes, while the user answered a telephone call or got up to do something else. Closing idle, but valid, connections would become a nuisance to the end users.
Instead, you can use the tcp and dcd keywords together to add some intelligence into the whole TCP connection timeout process. Once a TCP connection has been idle for the tcp timeout duration, the ASA will begin to actively send probes to the client and server to see whether they are still responsive. The probes are used to stimulate the hosts to answer; if they both answer, the connection must still be valid and should not be closed for being idle.
DCD probes are sent at retry_interval seconds. If no response is received, the probes are resent for max_retries times. If there still is no response at that point, the connection is presumed to be idle and is automatically closed.
Note
A DCD probe is just a minimum size packet with the ACK bit set, using the same IP addresses and TCP ports that the actual TCP connection uses. In this way, the client and server each think it is simply answering a TCP ACK sent by its peer. No data changes hands, other than basic acknowledgments.
By default, an ASA will allow an unlimited number of simultaneous UDP and TCP connections to be built to and from specific hosts. Because hosts cannot support an unlimited number of connections without exhausting their resources, you can use the following forms of the set connectionpolicy map configuration command as an action to limit the volume or number of connections that can be built:
ciscoasa(config-pmap-c)# set connection [conn-max n] [embryonic-conn-max n]
[per-client-embryonic-max n] [per-client-max n]
The connection volume limits configured in a policy map with set connection are very similar to the limits set in address translation commands such as static and nat. If connection limits are configured with both methods, and a traffic flow applies to both conditions, the lower connection limit will be enforced.
Table 9-6 shows each type of connection volume limit and its associated keyword.
Table 9-6. Connection Volume Limit Options
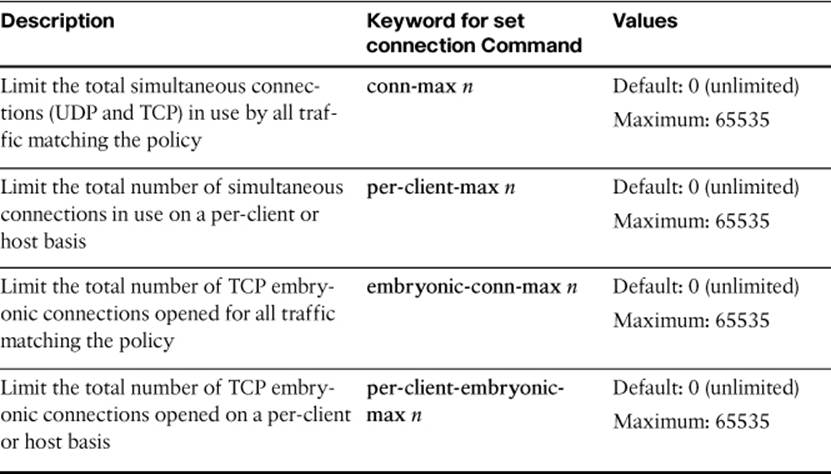
With the conn-max and per-client-max options, when the maximum number of connections is reached, the ASA will begin dropping any new connections.
The embryonic-conn-max and per-client-embryonic-max options limit TCP connections that are only partially open. This can happen when a host initiates a TCP connection with a SYN handshake, but is waiting on the rest of the three-way handshake (SYN-ACK and ACK) to be completed. Sometimes, this happens under normal conditions, but it can be exploited as a SYN attack, where an attacking host initiates multiple TCP connections toward a target host, but uses spoofed source addresses. The target host will try to respond to the spoofed source addresses with the next stage of handshaking, but the TCP connections will never open properly. As a result, the target host can become overwhelmed with embryonic connections that exhaust its resources.
The ASA can help alleviate this attack. As soon as one of the embryonic connection limits is reached, the ASA will begin intercepting new TCP connections and acting as a proxy for the target host. This is known as the TCP Intercept feature. The ASA will respond to the initial SYN on the target host’s behalf, but will return a “SYN cookie” as the TCP sequence number. The cookie is a hash that is computed from the TCP and IP header information and a secret password known only to the ASA. If the TCP connection is legitimate and a source host actually answers with the final handshake, the ASA can recognize the incremented sequence number. Otherwise, the ASA can freely ignore any further attempts to initiate more connections without impacting the target host.
An ASA can also apply the following two connection controls that are not related to connection volume or limits:
• TTL decrementing
• Randomize initial sequence number
IP packets carry a time-to-live (TTL) field that serves as a counter for the number of router hops that have been traversed. Normally, the TTL value begins with a high number and is decremented by each router along the network path. An ASA, however, does not by default decrement the TTL value of packets it handles. Because the TTL value remains unchanged, hosts in the network are not able to see an ASA as a router hop in traceroute packets. In effect, this keeps the ASA somewhat invisible.
You can configure the ASA to “uncloak” itself and decrement the TTL value for specific types of traffic. First, match the traffic with a class map, and then enter the following command as an action in a policy map:
ciscoasa(config-pmap-c)# set connection decrement-ttl
When a new TCP connection is negotiated between two hosts, an initial sequence number (ISN) is used as a starting point for TCP connection sequence numbers. Ideally, the ISN should be a random number so that it can never be predicted and leveraged in TCP spoofing attacks. In practice, the ISN can sometimes be predicted based on the behavior of certain host TCP stacks, giving malicious users a foothold to hijack the connection.
By default, an ASA will compute a random ISN for each new TCP connection that is negotiated through it. Random ISN generation occurs only for connections that are initiated by hosts located on the more secure interface of the ASA. Because the ASA sits in the middle of the two negotiating hosts, it can intercept the proposed ISN and substitute its own random number.
Sometimes, you might not want an ASA to change the ISNs of certain TCP connections. For example, if a protocol or application computes an authentication or hash code based on TCP packets as they leave a host, altering the ISN along the way will cause the packet authentication to fail at the destination host. You can disable random ISN generation on an ASA by entering the following command as an action in a policy map:
ciscoasa(config-pmap-c)# set connection random-sequence-number {enable | disable}
You can also configure connection limits in ASDM. First, either create a new service policy rule or edit an existing one. Define a matching condition, and then click the Connection Settings tab in the Rule Actions dialog box, as shown in Figure 9-10. The TCP connection timeouts are presented in the lower-left quadrant of the dialog box, while the connection volume limits are located in the upper-left quadrant. You can also enable the TCP random sequence number function by checking the box in the upper-right area of the dialog box.

Figure 9-10. Configuring TCP Connection Timeout Limits in ASDM
Inspecting TCP Parameters with the TCP Normalizer
An ASA can inspect individual packets containing TCP segments to make sure that they conform to the TCP protocol specification. Any packets that do not are “normalized” or changed so that they do conform. You can leverage the TCP normalizer feature to prevent malformed packets or packets that are crafted to evade stateful inspection from reaching protected hosts.
The TCP normalizer has many TCP parameters that you can configure, each defined in a TCP map. You can invoke the TCP normalizer through the MPF by matching traffic with a class map and then referencing the TCP map in a set connection advanced-options tcp-map command within a policy map.
To configure the TCP normalizer, begin by defining a TCP map with the following command:
ciscoasa(config)# tcp-map tcp-map-name
The TCP map will act as a template for modifying various options in the TCP header of matched packets. You can enter one or more of the TCP normalizer actions listed in Table 9-7 as part of the TCP map configuration.
Table 9-7. TCP Normalizer Actions
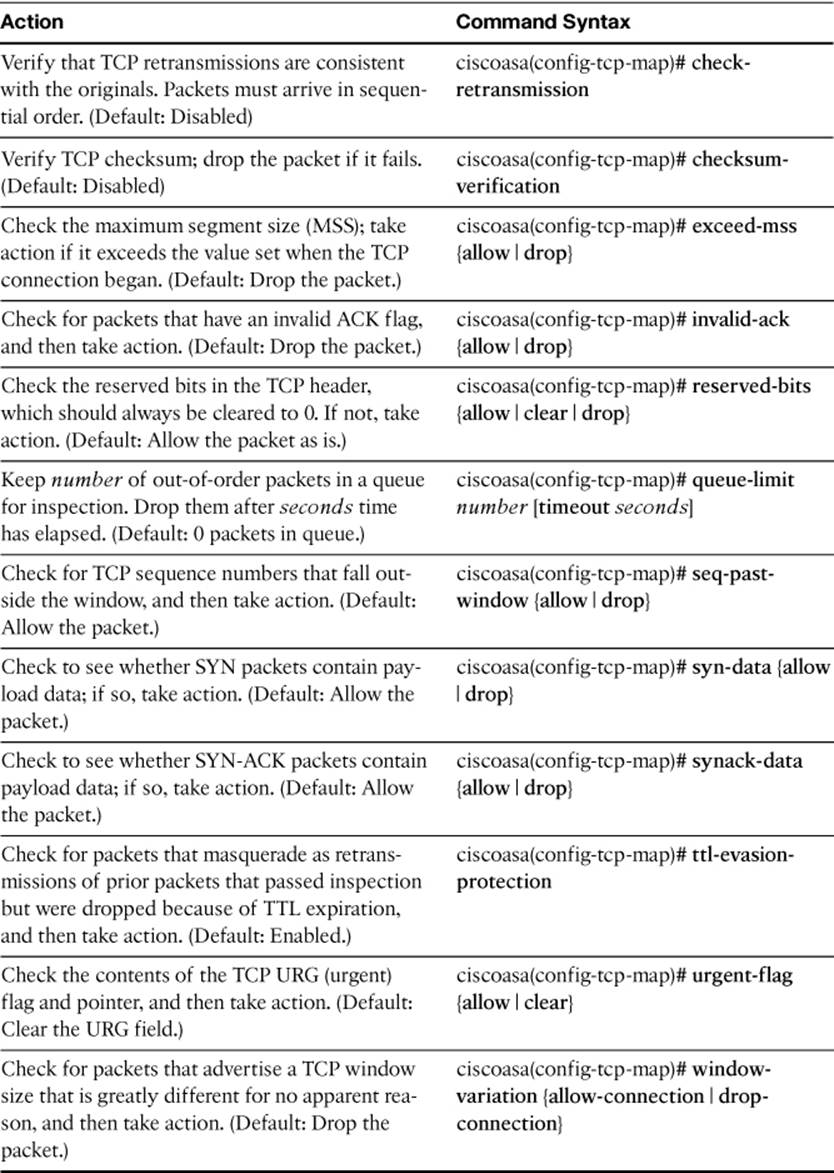
The TCP normalizer can also inspect the contents of the TCP options field to make sure that they conform to limits you set in the TCP map. You can enter one or more of the commands listed in Table 9-8.
Table 9-8. TCP Normalizer Actions on the TCP Options Field
With so many TCP parameters to inspect and so many different tcp-map commands available, should you memorize them all for the exam? Probably not, but you should at least become familiar with the basic functions that are at your disposal.
Along the same lines, you might experiment with a command or its settings and then forget what the default configuration is. You can return any of the TCP normalizer commands to the default by entering the default keyword followed by the normalizer command keyword. For example, if you entered the reserved-bits clear command, but you can’t remember if the default should be allow, clear, or drop, simply enter default reserved-bits instead.
Once you configure a TCP map, you can configure the TCP normalizer by defining a service policy using the MPF. Be sure to match the traffic that will be normalized by defining a class map. Reference the class map in a policy map, and then define the policy action with the following command:
ciscoasa(config-pmap-c)# set connection advanced-options tcp-map-name
Use Example 9-8 as a guideline for your MPF configuration.
Example 9-8. MPF Structure for the TCP Normalizer
ciscoasa(config)# class-map class_map_name
ciscoasa(config-cmap)# match condition
ciscoasa(config-cmap)# exit
ciscoasa(config)# policy-map policy_map_name
ciscoasa(config-pmap)# class class_map_name
ciscoasa(config-pmap-c)# set connection advanced-options tcp-map
ciscoasa(config-pmap-c)# exit
ciscoasa(config-pmap)# exit
ciscoasa(config)# service-policy policy_map_name interface interface
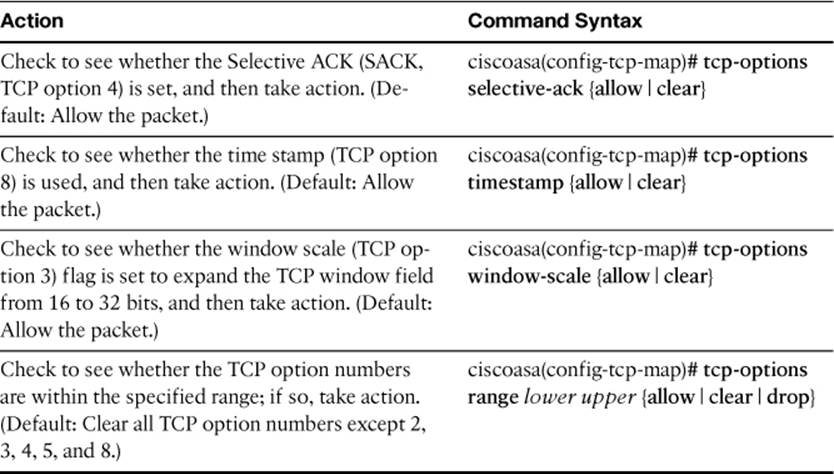
As a sample exercise, suppose you need to configure an ASA to support a protocol that uses a specific TCP options value. A common scenario is with authenticated BGP connections, where two routers use TCP option 19 to negotiate an MD5 hash value exchange in order to peer. If the TCP option field is cleared, the BGP authentication will never take place.
Example 9-9 lists the configuration commands that can be used to allow TCP option 19 between peers 192.168.10.10 and 192.168.20.20. The TCP map TCP-BGP allows option 19 to remain intact. Access list ACL-BGP matches against BGP packets (TCP port 179) between the routers, in both directions. Class map BGP references the access list to match the BGP traffic. Policy map MyPolicy references the class map to match the traffic and leverages the TCP normalizer through the TCP map.
Example 9-9. Commands Used to Configure the TCP Normalizer
ciscoasa(config)# tcp-map TCP-BGP
ciscoasa(config-tcp-map)# tcp-options range 19 19 allow
ciscoasa(config-tcp-map)# exit
!
ciscoasa(config)# access-list ACL-BGP permit tcp host 192.168.10.10 host
192.168.20.20 eq 179
ciscoasa(config)# access-list ACL-BGP permit tcp host 192.168.20.20 host
192.168.10.10 eq 179
!
ciscoasa(config)# class-map BGP
ciscoasa(config-cmap)# match access-list ACL-BGP
ciscoasa(config-cmap)# exit
!
ciscoasa(config)# policy-map MyPolicy
ciscoasa(config-pmap)# class BGP
ciscoasa(config-pmap-c)# set connection advanced-options TCP-BGP
ciscoasa(config-pmap-c)# exit
ciscoasa(config-pmap)# exit
ciscoasa(config)# service-policy MyPolicy interface outside
By default, an ASA will inspect TCP packets and apply the default TCP normalizer actions to it. In some rare cases, you might need to exempt some TCP traffic from the stateful inspection and modification. For example, a traffic flow might be routed asymmetrically, where packets in one direction flow through an ASA, but packets in the other direction do not. In that case, the ASA will not be able to maintain its stateful inspection because it cannot see all of the TCP traffic that is occurring in both directions.
You can allow some traffic to bypass the TCP normalizer by matching it with a class map and entering the following command as an action in the policy map:
ciscoasa(config-pmap-c)# set connection advanced-options tcp-state-bypass
Be aware that this command also exempts the traffic from other important inspection processes—not just the TCP normalizer. You should configure TCP state bypass only when absolutely necessary.
You can also use ASDM to configure the TCP normalizer. First, either create a new service policy rule or edit an existing one. Specify the ASA interface where the service policy will be applied, and then define the traffic matching condition. For the rule action, click the Connection Settingstab. In the TCP Normalization area, check the Use TCP Map check box. To create a new TCP map, click the New button. All of the default values will be shown in the Add TCP Map dialog box; edit any values and click OK. Figure 9-11 shows how the scenario from Example 9-9 can be configured.
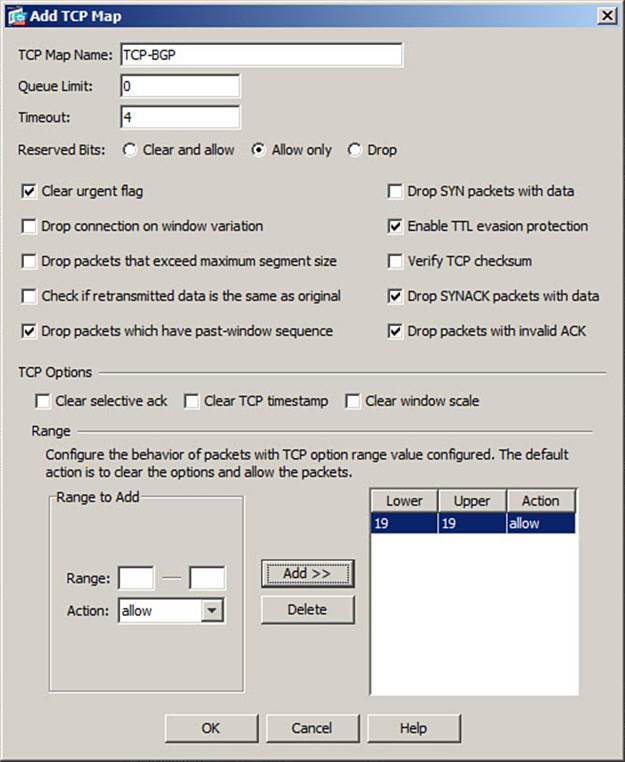
Figure 9-11. Configuring the TCP Normalizer Scenario of Example 9-6 in ASDM
After you configure the TCP map, it will be referenced in the TCP Normalizer area of the Connection Settings tab in the Rule Actions dialog box, as shown in Figure 9-12.

Figure 9-12. Using ASDM to Reference a TCP Map in the TCP Normalizer
Configuring ICMP Inspection
Internet Control Message Protocol (ICMP) is used in a variety of ways to test and exchange network parameters between devices. For example, the ping “application” can be used to send echo requests from one host to another; the target host is expected to return echo replies. This tests the hosts’ livelihood and the network’s connectivity.
By default, ICMP traffic is denied passage from a lower-security ASA interface to one with a higher security level. To permit ICMP traffic, you could add a permit icmp any any access list rule that is applied to the outside interface. Such a broad rule might also permit open access for misuse of ICMP and abuse of protected hosts.
A better solution is to enable the ICMP inspector. ICMP is not a stateful protocol at all, but the ASA can infer enough information to make it seem stateful. The ICMP inspector can selectively (and automatically) open a “connection” to permit return traffic based on the original outbound requests. It will permit only one response to return for every request that is sent out. The ICMP sequence numbers must also match between a request and a reply packet. With “stateful” ICMP inspection, the ICMP connections and xlate entries can be quickly torn down as soon as the appropriate reply is received.
You can enable ICMP inspection as an action within a policy map by using the inspect icmp command. By default, the ICMP inspector does not permit any ICMP error packets to return. This is because an ICMP error message can be sent from an address other than the original ICMP target. In the CLI, you can use the inspect icmp error command to enable ICMP error processing as part of ICMP inspection.
Example 9-10 shows how ICMP and ICMP error inspection can be enabled globally, within the global_policy policy map.
Example 9-10. Enabling ICMP and ICMP Error Inspection Globally
ciscoasa(config)# policy-map global_policy
ciscoasa(config-pmap)# class inspection_default
ciscoasa(config-pmap-c)# inspect icmp
ciscoasa(config-pmap-c)# inspect icmp error
ciscoasa(config-pmap-c)# exit
ciscoasa(config-pmap)# exit
ciscoasa(config)#
You can also control ICMP inspection from within ASDM. Navigate to Configuration > Firewall > Service Policy Rules, then select a service policy to edit or create. Select the Rule Actions tab, then select the Protocol Inspection tab, where you can use the ICMP and ICMP Error checkboxes as shown in Figure 9-13.
Figure 9-13. Configuring ICMP Inspection in ASDM
Configuring Dynamic Protocol Inspection
An ASA inherently inspects UDP and TCP packets to make sure that some form of connection state is followed. These two types of protocol inspection are enabled by default and cannot be disabled.
With UDP, sessions are not negotiated between two hosts. As such, packets might not necessarily be sent in both directions in a predictable fashion. Therefore, the ASA keeps track of the sessions in its connection table by monitoring the source and destination UDP port numbers. UDP “connections” simply age out after they become idle for a fixed amount of time (default 2 minutes). DNS “connections” are not subject to this timeout, as they are handled by a separate inspection engine.
In contrast, TCP is connection-based, so the ASA can follow the source and destination port numbers, as well as other information in the TCP packet headers, to inspect for proper TCP connection use. The TCP normalizer adds additional control over the TCP header information.
Many protocols and applications don’t simply stick with a consistent source and destination port number throughout the lifetime of their TCP connections. Instead, the initial connection serves as a control session by which additional sessions are set up. The additional sessions use different port numbers that are negotiated dynamically.
To effectively inspect the entire session between two hosts, the ASA must inspect the original control connection and understand the underlying protocol so that it can learn when new connections are being negotiated and then inspect them in turn. This process moves beyond simple UDP or TCP header inspection, to look further into the UDP or TCP packet payloads to understand their contents. This is commonly called deep packet inspection (DPI), and is implemented with individual dynamic protocol inspectors or inspection engines.
Protocol inspectors are enabled and configured within a policy map or an ASDM service policy rule configuration. As with any MPF definition, traffic must first be matched or classified and then have some action applied to it. To apply a protocol inspector as the policy action, you can use the inspect command. Example 9-11 shows the basic MPF structure that you can follow. Notice that the inspect command is followed by the name of a specific protocol inspector.
Example 9-11. MPF Structure for Protocol Inspection
ciscoasa(config)# class-map class_map_name
ciscoasa(config-cmap)# match condition
ciscoasa(config-cmap)# exit
ciscoasa(config)# policy-map policy_map_name
ciscoasa(config-pmap)# class class_map_name
ciscoasa(config-pmap-c)# inspect inspect_name [options]
ciscoasa(config-pmap-c)# exit
ciscoasa(config-pmap)# exit
ciscoasa(config)# service-policy policy_map_name interface interface
The ASA platform offers 26 unique dynamic protocol inspectors. Of those, 15 of them are enabled by default and applied to all traffic passing through the device. This is done in a policy map called global_policy, which is applied in a global service policy to all ASA interfaces. First, the class map inspection_default is used to match against all traffic on the default well-known port numbers, and then the various inspectors are invoked using the inspect commands. Statistics from this default configuration can be displayed with the show service-policy command, as shown inExample 9-12.
Example 9-12. Displaying the Activity of the Default Dynamic Protocol Inspectors
ciscoasa# show service-policy
Global policy:
Service-policy: global_policy
Class-map: inspection_default
Inspect: dns preset_dns_map, packet 0, drop 0, reset-drop 0
Inspect: ftp, packet 0, drop 0, reset-drop 0
Inspect: h323 h225 _default_h323_map, packet 0, drop 0, reset-drop 0
tcp-proxy: bytes in buffer 0, bytes dropped 0
Inspect: h323 ras _default_h323_map, packet 0, drop 0, reset-drop 0
Inspect: rsh, packet 0, drop 0, reset-drop 0
Inspect: rtsp, packet 0, drop 0, reset-drop 0
tcp-proxy: bytes in buffer 0, bytes dropped 0
Inspect: esmtp _default_esmtp_map, packet 0, drop 0, reset-drop 0
Inspect: sqlnet, packet 0, drop 0, reset-drop 0
Inspect: skinny, packet 0, drop 0, reset-drop 0
tcp-proxy: bytes in buffer 0, bytes dropped 0
Inspect: sunrpc, packet 0, drop 0, reset-drop 0
tcp-proxy: bytes in buffer 0, bytes dropped 0
Inspect: xdmcp, packet 0, drop 0, reset-drop 0
Inspect: sip, packet 0, drop 0, reset-drop 0
tcp-proxy: bytes in buffer 0, bytes dropped 0
Inspect: netbios, packet 0, drop 0, reset-drop 0
Inspect: tftp, packet 0, drop 0, reset-drop 0
Inspect: ip-options _default_ip_options_map, packet 0, drop 0, reset-drop 0
To see the concise configuration commands, however, you need to focus on the global_policy policy map. You can use the show running-config policy-map global_policy command, as shown in Example 9-13.
Example 9-13. Displaying the Default Dynamic Protocol Inspector Configuration
ciscoasa# show running-config policy-map global_policy
!
policy-map global_policy
class inspection_default
inspect dns preset_dns_map
inspect ftp
inspect h323 h225
inspect h323 ras
inspect rshD
inspect rtsp
inspect esmtp
inspect sqlnet
inspect skinny
inspect sunrpc
inspect xdmcp
inspect sip
inspect netbios
inspect tftp
inspect ip-options
!
ciscoasa#
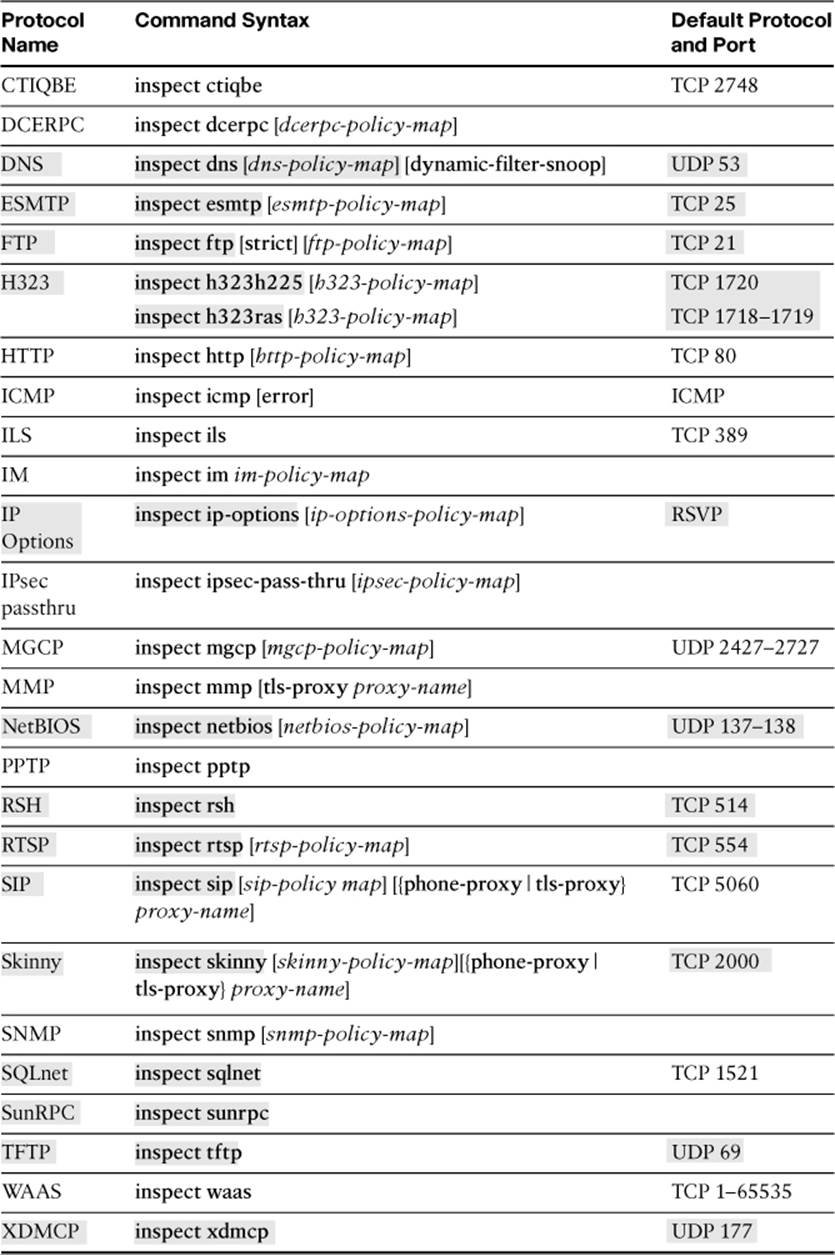
You can configure a dynamic protocol inspector by using one of the commands listed in Table 9-9. The inspectors that are enabled by default are shown in shaded text. Notice how some inspector commands end with an option that references a special type of policy map, while others do not. In general, the commands without the policy-map option are dynamic protocol inspectors. Most of the commands with a policy map are application layer inspectors and are described in subsequent sections in this chapter.
Table 9-9. Dynamic Protocol Inspectors and Command Syntax
You can configure an inspector as part of your own policy map, to inspect only certain matched traffic on a specific interface. To do that, configure a policy map, reference a class map, and then enter the appropriate inspect command as the policy action. In Example 9-14, the HTTP inspector has been configured as an action to inspect only the traffic destined for the 172.16.1.0/24 subnet on TCP port 80. A custom class map called CMAP_HTTP matches the traffic, while the policy map called MYPOLICY applies the HTTP inspector to the traffic.
Example 9-14. Configuring HTTP Inspection for Specific Traffic on an Interface
ciscoasa(config)# access-list MYHTTP extended permit tcp any 172.16.1.0
255.255.255.0 eq www
ciscoasa(config)# class-map CMAP_HTTP
ciscoasa(config-cmap)# match access-list MYHTTP
ciscoasa(config-cmap)# exit
ciscoasa(config)# policy-map MYPOLICY
ciscoasa(config-pmap)# class CMAP_HTTP
ciscoasa(config-pmap-c)# inspect http
ciscoasa(config-pmap-c)# exit
ciscoasa(config-pmap)# exit
ciscoasa(config)# service-policy MYPOLICY interface outside
A more common scenario is to configure an inspector as part of the global policy to inspect all traffic passing through the ASA on any interface. To do this, you can simply make changes to the global_policy policy map that is configured by default. As an example, the commands listed inExample 9-15 can be used to enable HTTP inspection on a global basis. The class inspection_default command is also configured by default, but you will have to enter it again as the matching condition before you can configure an inspector as a policy action.
Example 9-15. Configuring Global HTTP Inspection
ciscoasa(config)# policy-map global_policy
ciscoasa(config-pmap)# class inspection_default
ciscoasa(config-pmap-c)# inspect http
You can also use ASDM to configure dynamic protocol inspectors. Navigate to Configuration > Firewall > Service Policy Rules. To configure the scenario presented in Example 9-15, select the global policy and inspection_default, and then click Edit. Next, click the Rule Actions tab and then the Protocol Inspection tab. Check the HTTP check box, as shown in Figure 9-14, and then click the OK button.
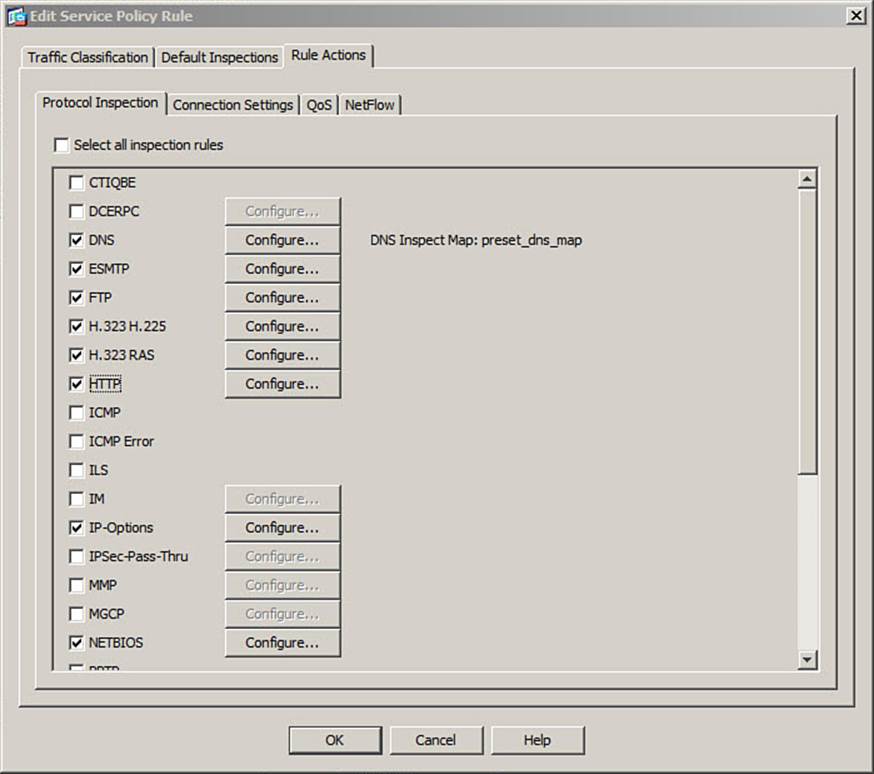
Figure 9-14. Using ASDM to Configure Example 9-11
Notice that Table 9-9 lists a default protocol and port number for each dynamic protocol inspector. The ASA will use that protocol and port to eavesdrop on control sessions. If your environment uses an application that is configured for a nondefault or nonstandard port number, you can define additional command session ports for the ASA to use.
First, define a class map that will be used to match traffic on the new, nonstandard port number. In the class map, use the match port command along with the protocol and port number. Next, configure the policy map and reference your new class map, followed by the appropriate inspectcommand.
Suppose you need to configure HTTP inspection for servers that use TCP port 8080. Example 9-16 lists the commands you can use. Class map CMAP_NEW_HTTP is configured to match against TCP port 8080. In the global policy map global_policy, the class map is referenced just prior to the inspect http command.
Now suppose the commands in Example 9-16 are entered after those in Example 9-15. Which HTTP inspector will be active? Actually, both of them will be active within the global_policy policy map. One instance of the inspect http command follows the inspection_default class map, which uses the default TCP port 80. The other instance follows the CMAP_NEW_HTTP class map, which matches TCP port 8080.
Example 9-16. Configuring HTTP Inspection on a Nonstandard Port
ciscoasa(config)# class-map CMAP_NEW_HTTP
ciscoasa(config-cmap)# match port tcp eq 8080
ciscoasa(config-cmap)# exit
ciscoasa(config)# policy-map global_policy
ciscoasa(config-pmap)# class CMAP_NEW_HTTP
ciscoasa(config-pmap-c)# inspect http
ciscoasa(config-pmap-c)# exit
You can also use ASDM to accomplish the same results. As an example, suppose you want to configure the scenario from Example 9-16. Navigate to Configuration > Firewall > Service Policy Rules. Select the policy line that shows Global; Policy; global_policy, and then click Add to add a new policy rule into the global default policy.
In the first Add Service Policy Rule Wizard window, make sure to click the Global - Applies to All Interfaces radio button, as shown in Figure 9-15. Click Next.
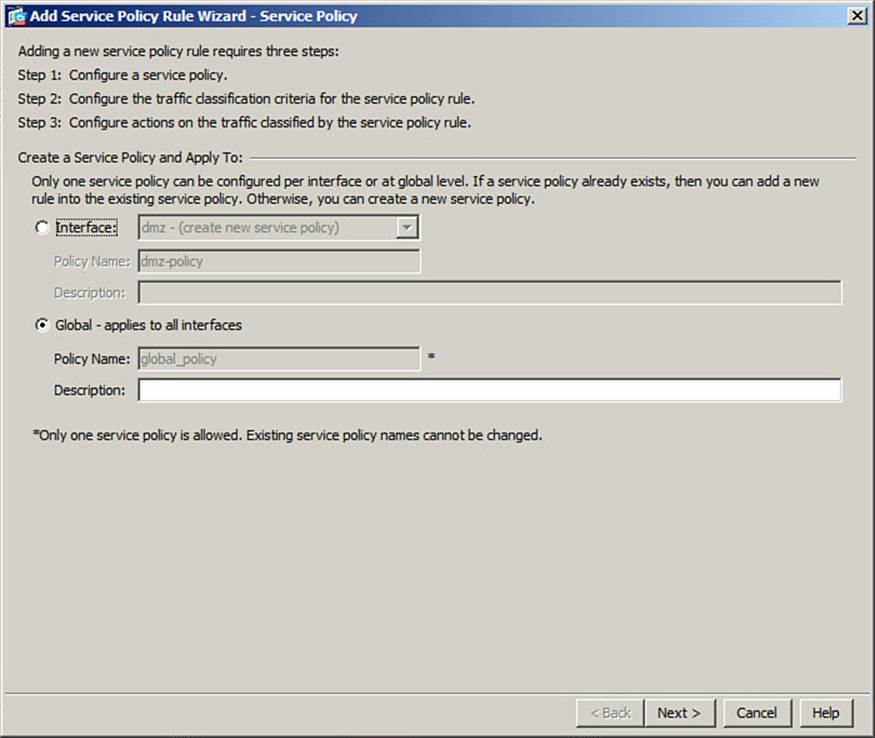
Figure 9-15. Building Example 9-12 in ASDM
Next, select Create a New Traffic Class that will match against the nonstandard HTTP traffic, and then give the class a name. In Figure 9-16, the new class is called CMAP_NEW_HTTP. Choose TCP or UDP Destination Port as the match criteria. Click the Next button.
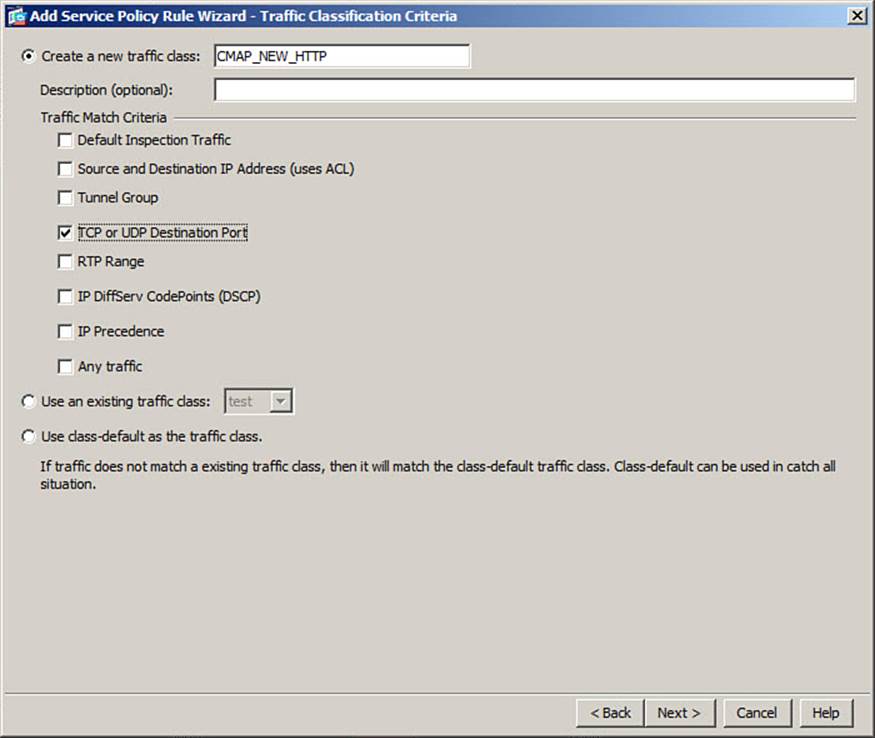
Figure 9-16. Defining a Matching Criteria for the Nonstandard HTTP Traffic
Next, specify the protocol and destination port where the ASA should expect to find the control sessions for the nonstandard protocol. In Figure 9-17, TCP port 8080 is entered. Click the Next button.
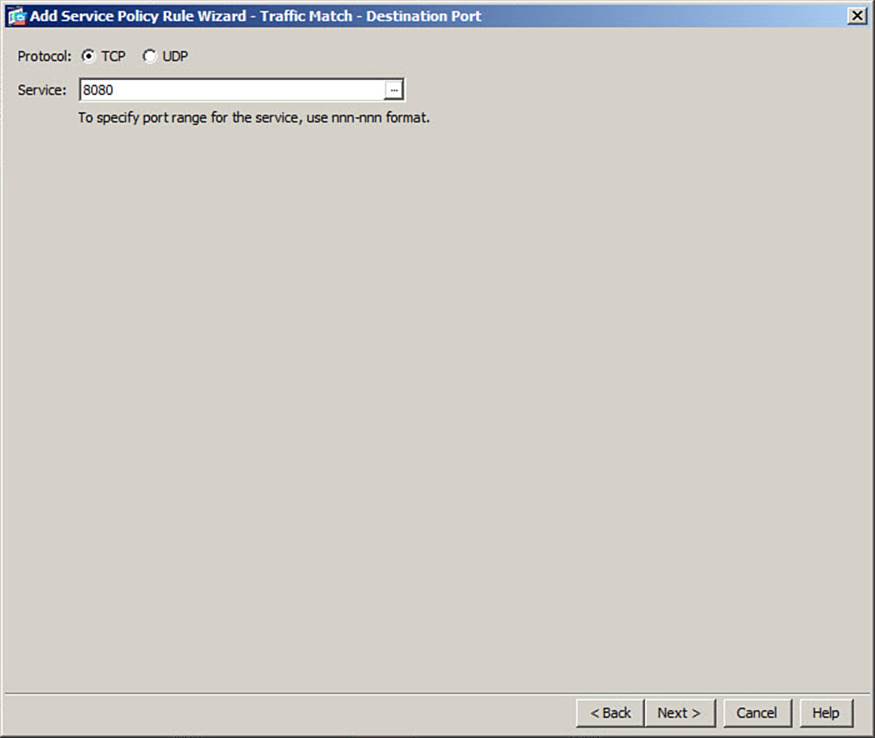
Figure 9-17. Specifying the Nonstandard Protocol and Destination Port Number
Finally, choose the dynamic protocol inspector that will be used for traffic that uses the nonstandard port. In Figure 9-18, only the HTTP inspector is chosen. Click the Finish button to complete the service policy configuration.

Figure 9-18. Selecting the Dynamic Protocol Inspector
Configuring Custom Protocol Inspection
Suppose you need to configure an ASA to support a dynamic application that is not included in the list of stock dynamic protocol inspectors. The application uses a control session with a predictable destination port to negotiate and maintain subsequent connections on dynamic port numbers. Because the ASA doesn’t have a protocol inspector that can interpret the underlying session negotiation, it isn’t able to permit the additional connections as they occur dynamically.
One solution is to add a rule to an access list that permits traffic between the two hosts that are using the application. First, you would have to permit packets that are destined for the control session protocol and port number. What about any other sessions that are dynamically negotiated? You might add an access list rule to permit each subsequent session, if you know each protocol and port number ahead of time. If not, your access list rule would need to be more general to encompass every possible port number.
As an example, suppose the client machines are located in the 10.10.0.0/16 subnet on the outside ASA interface, while the server is located at 192.168.1.100 on the inside interface. The application always uses TCP port 4001 for its control session. Other dynamic sessions can use any UDP port between 4000 and 5000.
A naive approach might be to create an access list rule that will permit any inbound traffic to reach the 192.l68.1.100 server, as demonstrated here:
ciscoasa(config)# access-list OUTSIDE extended permit ip any host 192.168.1.100
Such a rule might make quick work of setting up the server access, but it also leaves the server exposed. The access rule doesn’t limit the inbound traffic at all; rather, it opens TCP port 4001, as well as any other nonessential UDP and TCP port—from any address on the outside public network! Malicious hosts might try to leverage the unhindered access.
As an alternative, suppose you used the commands listed in Example 9-17 to tighten security to the server. This time, the outside clients have been identified in the access list, along with the control port (TCP 4001) and every possible dynamic port (UDP 4000–5000) that might be used.
Example 9-17. Better Approach to Permitting Access for a Dynamic Protocol
ciscoasa(config)# access-list OUTSIDE extended permit tcp 10.10.0.0 255.255.0.0
host 192.168.1.100 eq 4001
ciscoasa(config)# access-list OUTSIDE extended permit udp 10.10.0.0 255.255.0.0
host 192.168.1.100 range 4000 5000
ciscoasa(config)# access-group OUTSIDE in interface outside
An even better approach is to leverage the established command to track a known control port and open “pinholes,” or temporary rules that allow access on other dynamic ports. As long as the control port is established as expected, the ASA will automatically create rules for subsequent sessions between the same source and destination addresses used in the control session.
You can use the following command to configure an established rule for a dynamic protocol:
ciscoasa(config)# established protocol dest_port [src_port] [permitto protocol
port [-port]] [permitfrom protocol port [-port]]
You must identify the protocol (either TCP or UDP) and destination port used for the control connection, although the source port is optional. Next, identify the protocol and destination port or port range that any subsequent connections might use. If you add the permitfrom keyword, you can also specify a source protocol and port, if needed. Example 9-18 lists the commands that are necessary to configure a more secure approach to permitting access for a dynamic protocol.
Example 9-18. Secure Approach to Permitting Access for a Dynamic Protocol
ciscoasa(config)# established tcp 4001 permitto udp 4000-5000
ciscoasa(config)# access-list OUTSIDE extended permit tcp 10.10.0.0 255.255.0.0
host 192.168.1.100 eq 4001
ciscoasa(config)# access-group OUTSIDE in interface outside
Configuring a Policy for Inspecting OSI Layers 5–7
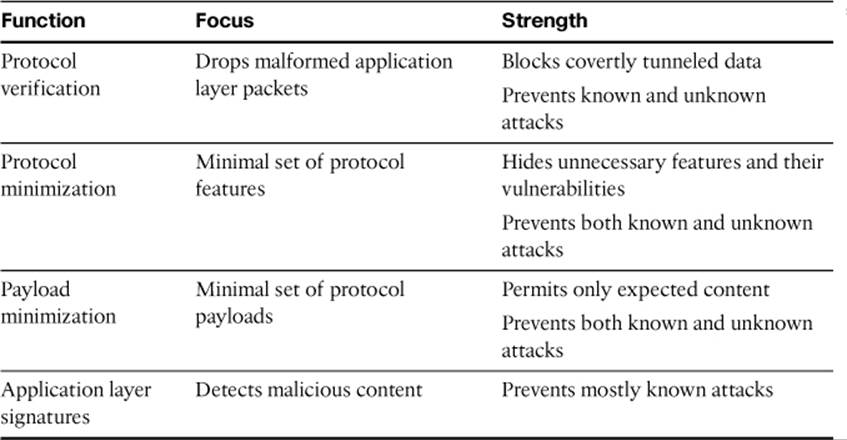
With the ASA MPF structure, you can also configure policies that can be used for inspecting application traffic at OSI Layers 5 through 7. The ASA offers a suite of application inspectors that can provide a variety of security measures. Because applications can be complex and intricate, a security appliance should be able to analyze and limit various aspects of the application traffic to form an overall security policy. An ASA can do just that by leveraging the four key functions listed in Table 9-10 as part of its application inspection and control (AIC) features.
Table 9-10. Approaches to Application Inspection and Control
Before you consider implementing any of the application layer inspection features, you should spend time gathering information about the applications that are used in your network environment. Applications can be complex in nature, so you should understand the impact that any inspection might have on the enterprise and its users.
Sometimes, it is tempting to blindly configure or tune an application inspection without much forethought. Then, once some users or applications begin to have issues communicating, you might be pressured to disable the inspection completely. Doing so might make the users happy, but it might also leave your network vulnerable.
Most environments use the HTTP, FTP, DNS, and Extended Simple Mail Transfer Protocol (ESMTP) application protocols, where the clients and servers are located on opposing sides of an ASA. The application traffic must pass through the firewall, allowing you to leverage the corresponding application protocol inspectors. Because these protocols are the most common and are covered in the FIREWALL v1.0 course, they are covered in detail in this chapter. Other application protocol inspectors that are not covered include DCE RPC, H.323, IM, MGCP, NetBIOS, RTSP, SIP, Skinny, and SNMP.
Configuring HTTP Inspection
HTTP is a protocol that is used between clients and servers. Basically, clients send HTTP requests and servers send HTTP responses. An ASA can inspect the HTTP traffic and apply very granular controls or security policies that you can configure. The HTTP inspector is very versatile and can match against a long list of protocol parameters and regular expressions.
With HTTP inspection, the ASA must sit between the client and server. As you prepare to configure HTTP inspection policies, consider what you want to be protected—the client or the server. For example, if a web server is located on the inside, secure interface of the ASA and the clients are located outside on the public Internet, then you will be protecting the server. If inside clients are connecting to outside web servers, then you will want to protect the clients.
Because the HTTP inspector is so versatile and has so many possible options to configure, you should try to break your HTTP security policies down into the four basic approaches listed previously in Table 9-10. The following list should help you organize the policies into configuration tasks, based on the approaches. An example is provided to help put each approach into context; the configuration of each example is also shown in this chapter.
• Protocol verification: Drop any HTTP sessions that do not adhere to the protocol specification. This function has very few user-configurable options; it is usually enabled or disabled (the default).
• Protocol minimization: Allow only specific features of the HTTP protocol to be passed on to the protected client or server. When configuring, block everything that is not an acceptable action with the “match not” condition; everything else will be permitted.
For example, suppose you want to minimize the possible HTTP requests that can reach a protected server. Only the GET request should be allowed. In this case, if the request “matches not” GET, then drop it.
• Payload minimization: Allow only specific payloads inside HTTP packets to be delivered to the protected client or server. When configuring, block everything that is not an acceptable value with the “match not” condition; everything else will be inherently permitted.
For example, suppose you want to minimize the possible HTTP payloads that can be serviced by a protected server. Only requests involving a URI that begins with /customer should be allowed. In this case, if the URI “matches not” the regular expression /customer, then drop it.
• Application layer signatures: Identify and drop known bad HTTP payloads. When configuring, block specific content with the “match” condition. Regular expressions are often used to match content.
As an example, suppose that GET requests that include an external link to http:// or https:// should be blocked. In this case, you could configure a regular expression to match against http:// or https:// in the HTTP request header arguments and drop those connections.
Although the four security approaches might seem distinct and logical, putting them into practice isn’t always straightforward. The ASA HTTP inspector can match against a long list of parameters, but there is no clear distinction as to which parameter belongs to which approach. For example, should the HTTP request method be used to minimize the HTTP protocol, minimize the HTTP payload, or recognize an HTTP signature? There is no clear-cut answer.
Rather than worry about memorizing long lists of HTTP parameters and how they fit into security policy configuration, try to keep things simple. Be sure to know the four security approaches, as Cisco plainly uses them in the FIREWALL course. Also, become familiar with the following two concepts:
• Minimization: Identify an HTTP parameter that is needed and approved, and then drop everything else. In effect, you are letting the protected host take care of only a minimal set of acceptable operations, while the ASA filters every other type of operation that might be leveraged for an attack.
• Application signature: Identify a specific “bad” HTTP operation or parameter and drop it. In effect, you are creating a blacklist of undesirable things; everything else will be permitted.
Configuring HTTP Inspection Policy Maps Using the CLI
You can use the CLI to configure an HTTP inspection policy map that is applied to the HTTP inspector process. The policy map can use various matching criteria to detect conditions within HTTP connections. In case of a match, the HTTP connections can be dropped, reset, or logged.
You can use the following steps to build and apply an HTTP inspection policy map:
Step 1. Define the HTTP inspection policy map.
Step 2. Configure HTTP protocol verification.
Step 3. Configure a minimization or signature detection, along with an action.
Step 4. Apply the HTTP inspection policy map.
Step 1: Define the HTTP Inspection Policy Map
Use the following command to define and name the policy map:
ciscoasa(config)# policy-map type inspect http http_map_name
As an example, suppose you need to define an HTTP inspection policy map called HTTP_MAP_1. You could enter the following command:
ciscoasa(config)# policy-map type inspect http HTTP_MAP_1
Step 2: Configure HTTP Protocol Verification
You can use the following command sequence to verify that HTTP connections are adhering to the protocol definitions. The ASA can drop, log, or reset violating connections.
ciscoasa(config-pmap)# parameters
ciscoasa(config-pmap-p)# protocol-violation [action {drop-connection [log] | log |
reset}]
Continuing from the command entered in Step 1, you could enter the following commands to enable protocol verification and to drop and log violating HTTP connections:
ciscoasa(config-pmap)# parameters
ciscoasa(config-pmap-p)# protocol-violation action drop-connection log
ciscoasa(config-pmap-p)# exit
Step 3: Configure a Minimization or Signature Detection, Along with an Action
You can define any protocol or payload minimization or HTTP signature by choosing a matching criteria from Table 9-11 and entering the corresponding command. The match command will match against exactly the parameters you enter, while the match not command will match against anything other than the parameters you enter.
Table 9-11. Configuration Commands for Matching Against HTTP Content

You can build up a set of inspection policies by configuring multiple match and action pairs in a single HTTP inspection policy map. The matches are not necessarily tried in the order that you enter them; the ASA has a predetermined order that it uses internally. If a match command drops or resets an HTTP connection, then no further matches are checked. Otherwise, an HTTP packet can be matched by subsequent match commands in the policy map.
Next, use Table 9-12 to choose an action that the ASA should take on the matched HTTP connection. When connections are dropped or reset, you can also add the log keyword to generate a logging message to record the action.
Table 9-12. HTTP Match Action Commands

Suppose you need to add a security policy to minimize the HTTP protocol. Only the HTTP request GET method will be permitted, while other request methods will be dropped. Continuing with the configuration from Step 2, you could use the following commands to define the policy:
ciscoasa(config-pmap)# match not request method get
ciscoasa(config-pmap-c)# drop-connection
An inspection policy map can be made up of match-action pairs—a single match command and a corresponding action in each pair. In some scenarios, you might need to match against multiple conditions for a single action. You can accomplish that by defining an HTTP inspect class map that contains nothing but matching conditions, as follows:
ciscoasa(config)# class-map type inspect http [match-all | match-any] cmap_name
ciscoasa(config-cmap)# match [not] {request | response | req-resp} ...
ciscoasa(config-cmap)# match [not] {request | response | req-resp} ...
ciscoasa(config-cmap)# exit
To match against any of the match commands, as a logical OR operation, define the class map with the match-any keyword. To match against all of the match commands, as a logical AND operation, use the match-all keyword instead.
You can then reference the class map in the HTTP inspect policy map with the class command, followed by an action, using the following command syntax:
ciscoasa(config)# policy-map type inspect http pmap_name
ciscoasa(config-pmap)# class cmap_name
ciscoasa(config-pmap-c)# {drop-connection [log] | log | reset [log]}
ciscoasa(config-pmap-c)# exit
As an example, suppose you need to define a class map called MY_HTTP_CLASS that will be used to ultimately drop any HTTP connection that is neither an HTTP GET request nor an HTTP POLL request. Example 9-19 shows the necessary class map and policy map configuration commands.
Example 9-19. Defining an HTTP Inspect Class Map with Multiple Matching Criteria
ciscoasa(config)# class-map type inspect http match-all MY_HTTP_CLASS
ciscoasa(config-cmap)# match [not] request method get
ciscoasa(config-cmap)# match [not] request method poll
ciscoasa(config-cmap)# exit
ciscoasa(config)# policy-map type inspect http HTTP_MAP_1
ciscoasa(config-pmap)# class MY_HTTP_CLASS
ciscoasa(config-pmap-c)# drop-connection
ciscoasa(config-pmap-c)# exit
Some of the match commands listed in Table 9-11 have the capability to match against regular expressions found within text fields in HTTP content. Regular expressions, also known as regex, can be defined in two ways:
• As a single regular expression configured with the following command:
ciscoasa(config)# regex regex_name regular_expression
• As a group of regular expressions configured as a class map with the following commands:
ciscoasa(config)# class-map type regex match-any regex_cmap_name
ciscoasa(config-cmap)# match regex regex_name
The class map consists of one or more match regex commands, each referencing a single regular expression configured with the regex command.
Within a regex command, you can define the actual regular expression as a string of up to 100 characters. You can use regular characters in the regular_expression string to match text literally, and you can include special metacharacters to match text in a more abstract way. Table 9-13 lists the metacharacters that you can use, along with their names and functions.
Table 9-13. Regular Expression Metacharacters
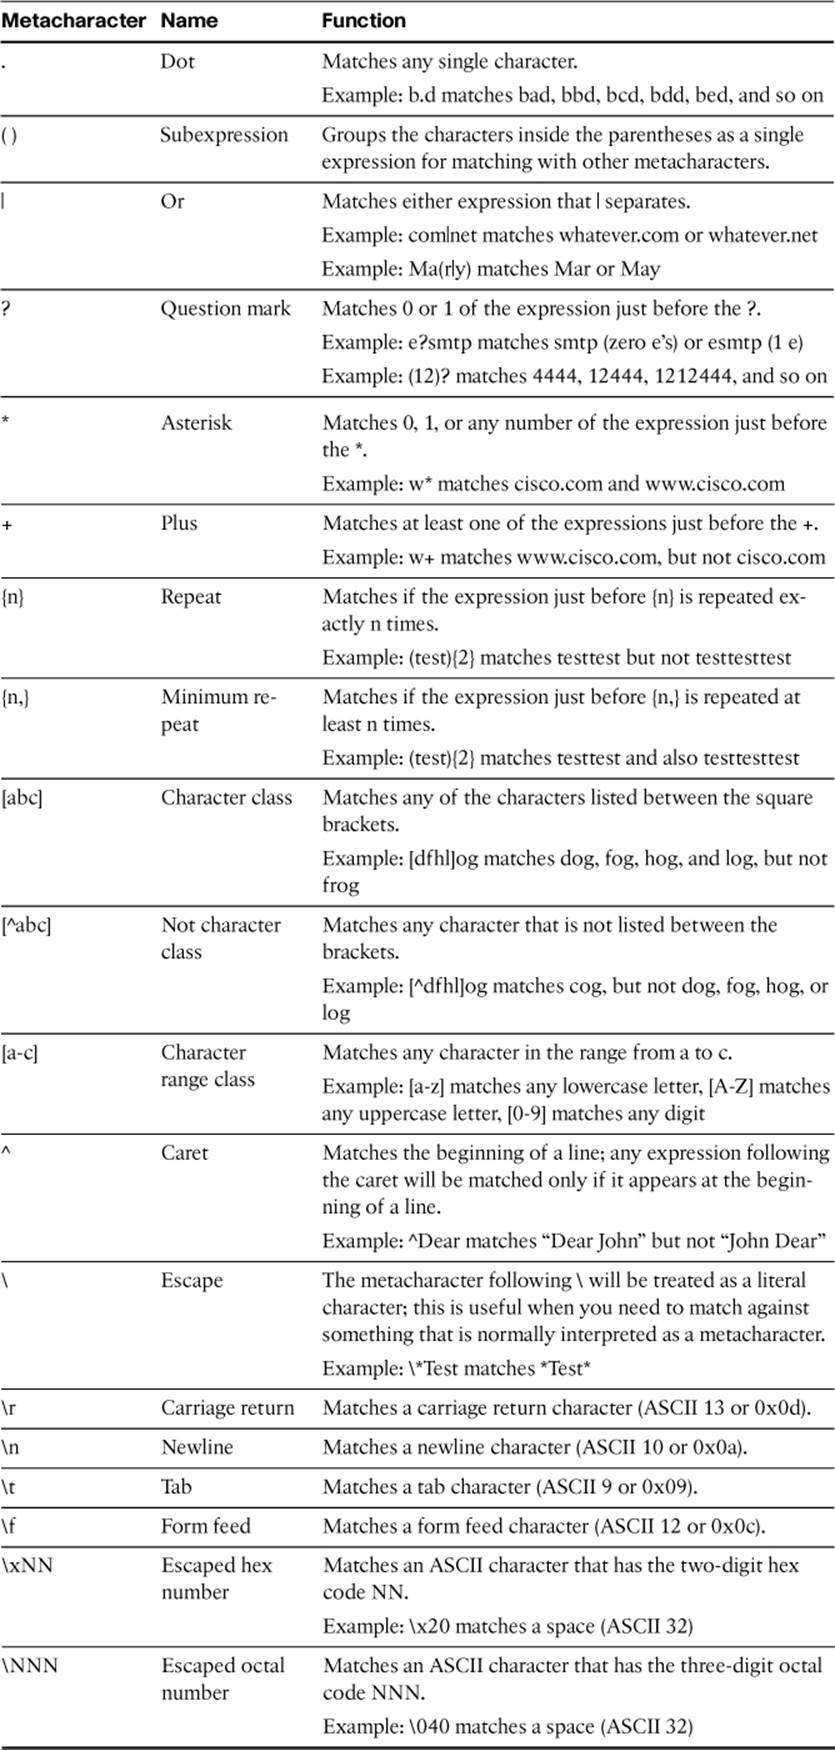
Suppose you would like to configure an HTTP inspection policy that minimizes the HTTP payload by dropping any connection that does not contain a URI that begins with the string “/customer”. You could use the commands listed in Example 9-20 to define a regular expression called Customer-URI and apply it in the HTTP_MAP_1 policy map.
Example 9-20. Configuring a Regular Expression to Match “/customer”
ciscoasa(config)# regex Customer-URI ^/customer
ciscoasa(config)# policy-map type inspect http HTTP_MAP_1
ciscoasa(config-pmap)# match not request uri regex Customer-URI
ciscoasa(config-pmap-c)# drop-connection
ciscoasa(config-pmap-c)# exit
In addition, suppose you need to define a policy that detects HTTP GET requests that include request arguments that contain links to external sites—most likely for malicious purposes. You could define two regular expressions that match against “http://” and “https://”, respectively, and then reference them in a regex class map. Example 9-21 lists the configuration commands needed for this approach.
Example 9-21. Configuring Regular Expressions to Match “http://” or “https://”
ciscoasa(config)# regex Embedded-link1 http://
ciscoasa(config)# regex Embedded-link2 https://
ciscoasa(config)# class-map type regex match-any Embedded-link
ciscoasa(config-cmap)# match regex Embedded-link1
ciscoasa(config-cmap)# match regex Embedded-link2
ciscoasa(config-cmap)# exit
ciscoasa(config)# policy-map type inspect http HTTP_MAP_1
ciscoasa(config-pmap)# match request args regex class Embedded-link
ciscoasa(config-pmap-c)# drop-connection
ciscoasa(config-pmap-c)# exit
However, because both strings begin with “http”, you could use a single regex command instead to match either string. The letter s can appear zero or one time in either string, so you could use the ? metacharacter immediately after the “s” in the regex. Example 9-22 lists the commands needed for this approach.
Example 9-22. Using a Single Regex to Match “http://” or “https://”
ciscoasa(config)# regex Embedded-link https?://
ciscoasa(config)# policy-map type inspect http HTTP_MAP_1
ciscoasa(config-pmap)# match request args regex Embedded-link
ciscoasa(config-pmap-c)# drop-connection
ciscoasa(config-pmap-c)# exit
Regular expressions can be difficult to formulate, especially when metacharacters are used. You can experiment with a regular expression from the regular EXEC level prompt, without having to make any configuration changes first. Use the following command to test a regular expression:
ciscoasa# test regex input_text regular_expression
Enter some sample input text, as if the ASA is searching through a URI or some other text field. Then enter the regular expression you want to test. If the input text or regular expression contains any spaces, be sure to surround the text string with quotation marks.
The ASA will return the result of the regular expression match. In Example 9-23, the regex https?:// is tested against the text string https://shadycontent.com/toolz and is successful. Remember that a failed match doesn’t necessarily indicate that your regular expression is incorrect or poorly formed—your regular expression needs correcting only if it produces results that don’t match your expectations.
Example 9-23. Testing a Regular Expression Before Configuration
ciscoasa# test regex https://shadycontent.com/toolz https?://
INFO: Regular expression match succeeded.
ciscoasa#
Note
In Example 9-23, the ? metacharacter is used in the regular expression. Because the test regex command is used in the EXEC mode, the ASA will try to interpret the question mark as a request for context-based help. If you need to use a question mark in a test, you must enter theCtrl-v escape sequence prior to ? so that it can be used as a regular text character.
Step 4: Apply the HTTP Inspection Policy Map
After you configure an HTTP inspection policy map, you apply it to an HTTP inspection within a service policy rule using the following command syntax:
ciscoasa(config-pmap-c)# inspect http http-map-name
Any traffic that is classified or matched by the service policy rule will be sent through the customized inspection. In Example 9-24, IP traffic from any host to servers located in the 10.1.1.0/24 subnet will be subject to HTTP inspection. The shaded line shows how the inspection policy map HTTP_MAP_1 is applied to the HTTP inspector.
Example 9-24. Applying an HTTP Inspection Policy Map
ciscoasa(config)# access-list SERVERS extended permit ip any 10.1.1.0 255.255.255.0
ciscoasa(config)# class-map c1
ciscoasa(config-cmap)# match access-list SERVERS
ciscoasa(config-cmap)# exit
ciscoasa(config)# policy-map p1
ciscoasa(config-pmap)# class c1
ciscoasa(config-pmap-c)# inspect http HTTP_MAP_1
ciscoasa(config-pmap-c)# exit
ciscoasa(config-pmap)# exit
ciscoasa(config)# service-policy p1 interface outside
You can define multiple policies within a regular policy map, each matching a different subset of traffic and each configured to use HTTP inspection with a unique set of HTTP inspection policies. In this case, each inspect http command would reference a different HTTP inspection policy map.
Configuring HTTP Inspection Policy Maps Using ASDM
You can also use ASDM to configure an HTTP inspection policy map. ASDM can be a more user-friendly alternative because the large number of parameters and options are presented in an organized fashion. Navigate to Configuration > Firewall > Objects > Inspect Maps and selectHTTP.
As with the CLI configuration, you can accomplish the ASDM configuration with the following steps:
Step 1. Define the HTTP inspection policy map.
Step 2. Configure HTTP protocol verification.
Step 3. Configure a minimization or signature detection, along with an action.
Step 4. Apply the HTTP inspection policy map.
The sections that follow provide more information about each step of configuring the HTTP inspection policy maps using ASDM.
Step 1: Define the HTTP Inspection Policy Map
Click the Add button to add a new inspection policy map. Enter an arbitrary name for the map, as well as an optional description. Figure 9-19 shows a new policy map called HTTP_MAP_1.
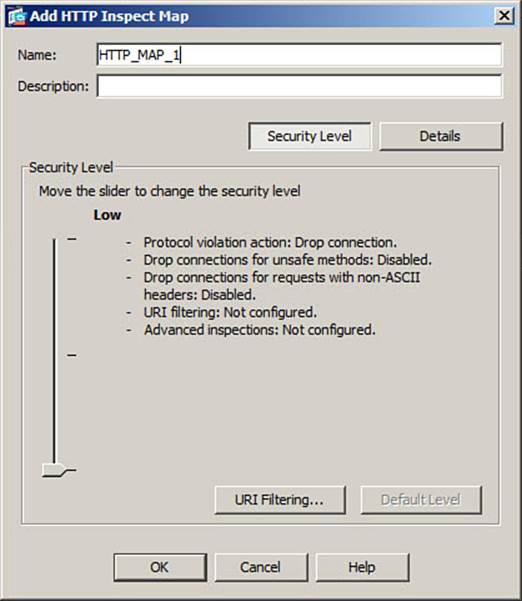
Figure 9-19. Adding a New HTTP Inspect Map in ASDM
The Add HTTP Inspect Map dialog box initially shows a Security Level slider that you can use to quickly set up some basic HTTP inspection parameters. By sliding the pointer up or down, you can choose between the following security levels:
• Low: Enables HTTP protocol verification only
• Medium: Allows only the HTTP GET, HEAD, and POST request methods; enables HTTP protocol verification
• High: Allows only the HTTP GET and HEAD request methods; enables HTTP protocol verification; drops HTTP connections that contain non-ASCII HTTP headers
Step 2: Configure HTTP Protocol Verification
To define detailed HTTP security policies, click the Details button. This also changes the bottom portion of the dialog box to display the Parameters tab. You can enable protocol verification by checking the Check for Protocol Violations check box, as shown in Figure 9-20. You can choose the action to take on a connection that violates the HTTP protocol, as well as specify any logging for an audit trail.
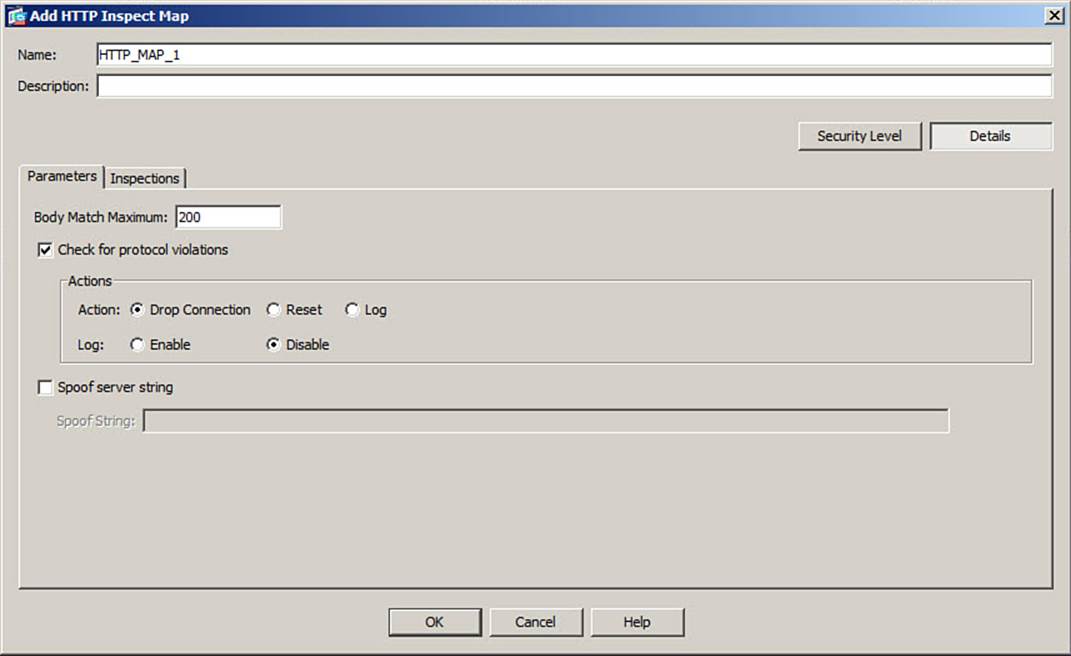
Figure 9-20. Enabling HTTP Protocol Verification in ASDM
Don’t click the OK button yet, because you need to stay in the same dialog box to define further inspection policies.
Step 3: Configure a Minimization or Signature Detection, Along with an Action
Click the Inspections tab to see a list of any HTTP inspection policies that have been configured, as shown in Figure 9-21.
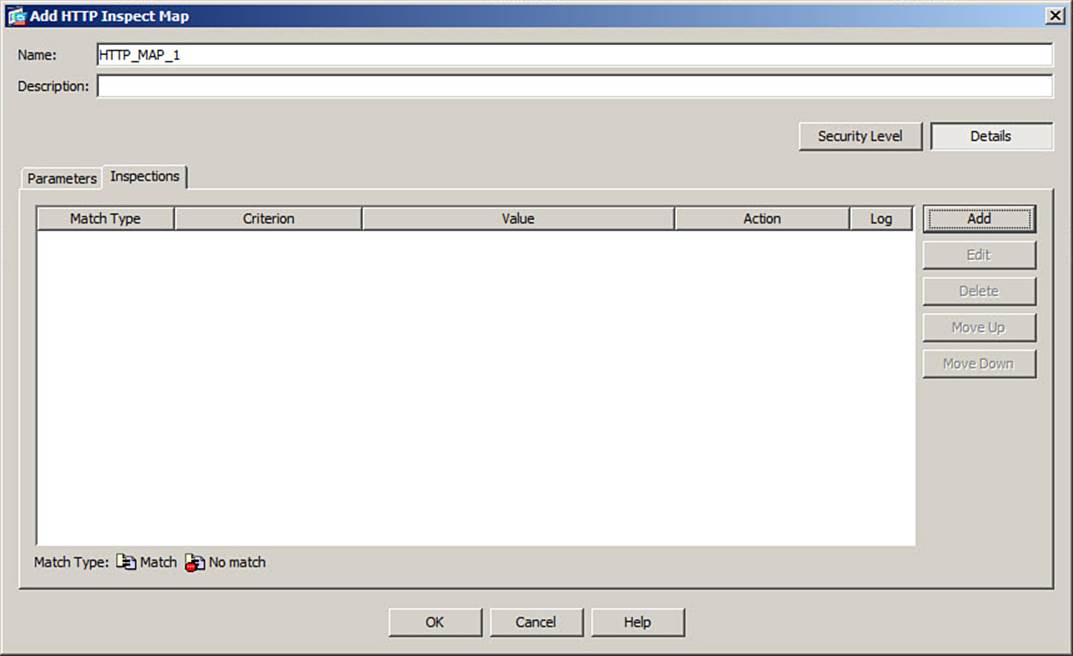
Figure 9-21. Viewing a List of the Current HTTP Inspection Policies in ASDM
To add a new inspection, click the Add button. In the Add HTTP Inspect dialog box, click the Single Match radio button to define a single matching condition. Then click Match or No Match and choose a criterion type from the Criterion drop-down list. The options displayed in the Value section will change depending on the criterion you select. At the bottom of the dialog box, choose the actions that will be taken on the matching HTTP connection. Click the OK button to add the new inspection to the HTTP inspection policy map.
As an example, suppose only the HTTP_GET request method is to be permitted; all other request methods should be dropped. As shown in Figure 9-22, click No Match, choose the criterion RequestMethod, and choose a value of get. In other words, if a client sends anything other than a GET request, the connection will be dropped.
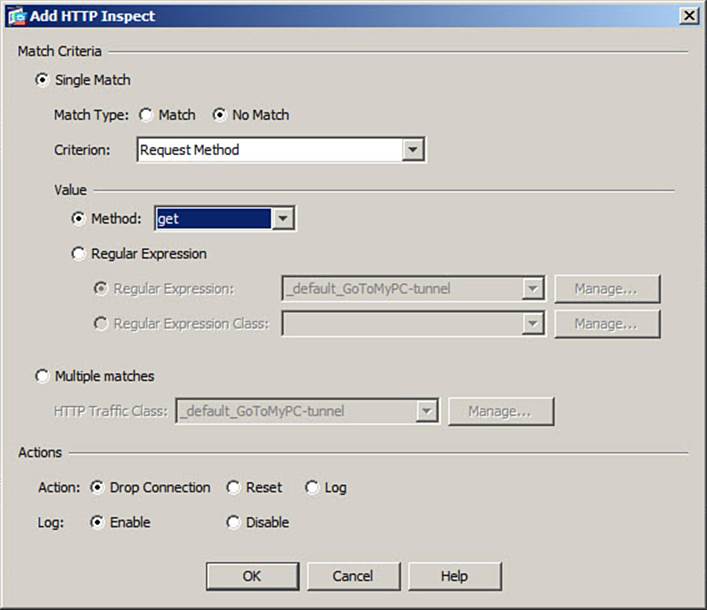
Figure 9-22. Defining a Protocol Minimization Policy in ASDM
As an alternative, you might need an HTTP inspection map policy that requires multiple matching conditions. As an example, suppose you would like to drop any connection that is not an HTTP GET request and is not an HTTP POLL request.
Rather than a single match, you would click the Multiple Matches radio button in the Add HTTP Inspect dialog box, as shown in Figure 9-23, to define an HTTP inspect class map that will contain the list of matching criteria. ASDM will display a list of preconfigured class maps next to the HTTP Traffic Class field. You can also configure your own class map by clicking the Manage button.

Figure 9-23. Using an HTTP Inspect Class Map to Define Multiple Matching Criteria
ASDM will display a list of all preconfigured HTTP class maps, as shown in Figure 9-24. To create a new class map, click the Add button.
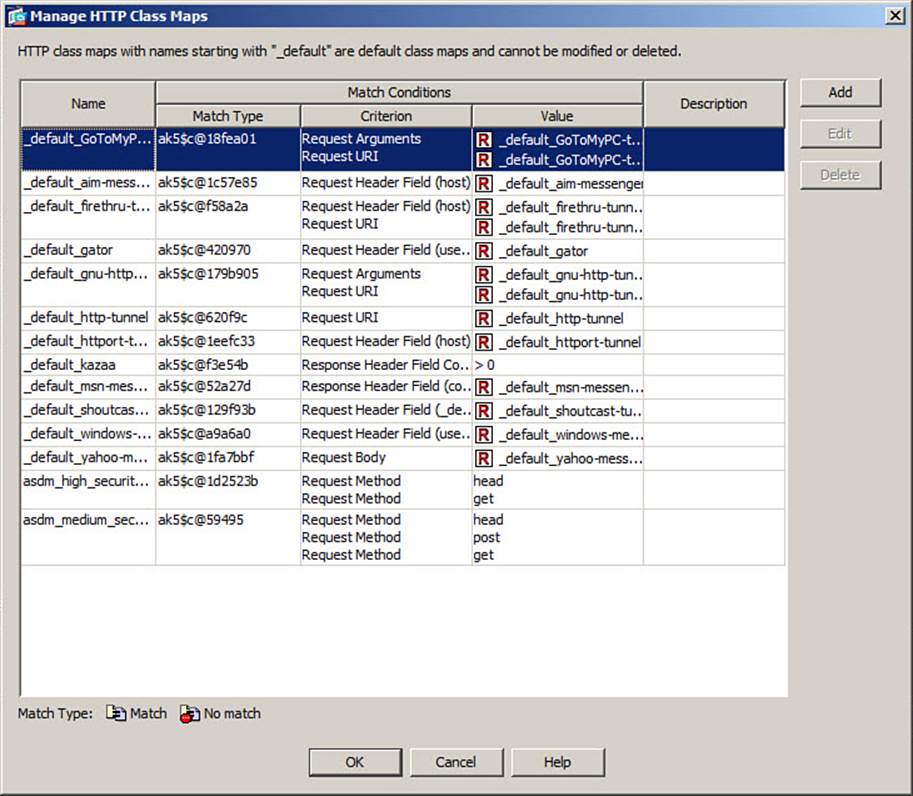
Figure 9-24. Selecting an HTTP Class Map
The Add HTTP Traffic Class Map dialog box will appear. Give the new class map a name. In Figure 9-25, the class map has been named MY_HTTP_CLASS. Click the Add button to add a matching criterion. Notice that the Match Option in the Add HTTP Traffic Class Map dialog box can be set to Match All or Match Any. For the example scenario, Match All has been selected to match against both of the criterion in the class map.
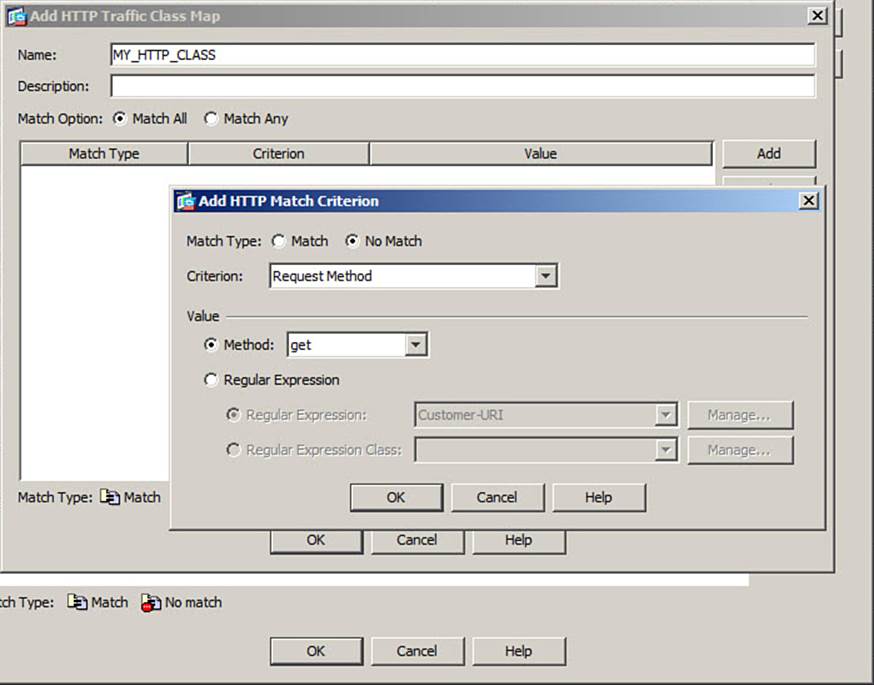
Figure 9-25. Defining a Matching Criterion in an HTTP Class Map
In the Add HTTP Match Criterion dialog box, you can define the matching criterion and value as before. The first criterion is defined as anything but (No Match) the HTTP request method get. Click the OK button to add the match criterion to the list in the class map.
Next, click the Add button in the Add HTTP Traffic Class Map dialog box to define the second matching criterion. In Figure 9-26, the No Match option for the HTTP request method POLL has been selected. Click OK to add the match criterion, and then click OK in the Add HTTP Traffic Class Map dialog box to complete the class map configuration.
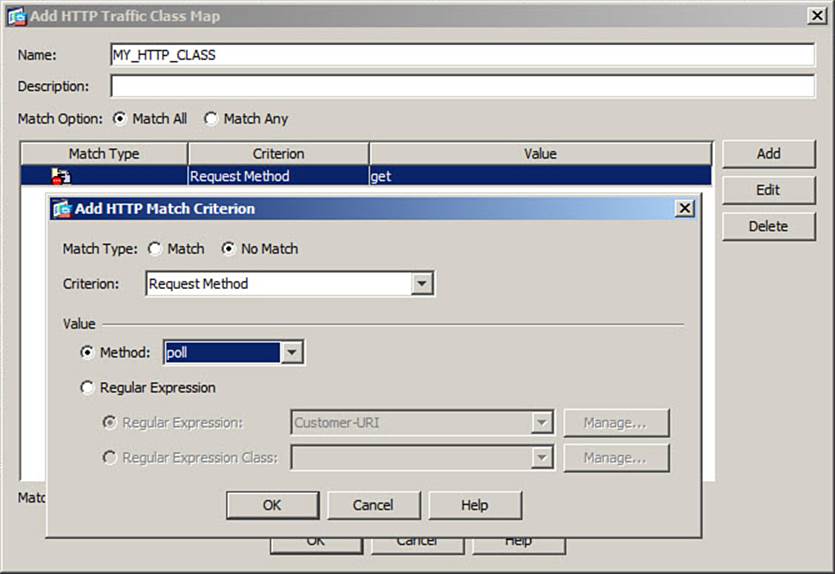
Figure 9-26. Defining a Second Matching Criterion in an HTTP Class Map
Click OK in the Manage HTTP Class Maps to end the class map configuration. In the Add HTTP Inspect dialog box, as shown in Figure 9-27, choose the new class map (MY_HTTP_CLASS), choose the Drop Connection action, and click OK.

Figure 9-27. Completing the HTTP Inspect Class Map Configuration
Some of the matching criteria have the capability to match against regular expressions found within text fields in HTTP content. This can be useful for HTTP payload minimization or HTTP signature detection.
As an example, suppose you need to drop any HTTP connection that does not contain a URI that begins with the string “/customer”. In Figure 9-28, a new HTTP inspection has been added. The match criteria is set to a Single Match condition based on the HTTP RequestURI field. Under Value, a regular expression must be used to match against the text string. Because no default regular expression exists for the string “/customer”, one must be created. To do this, click the Manage button.
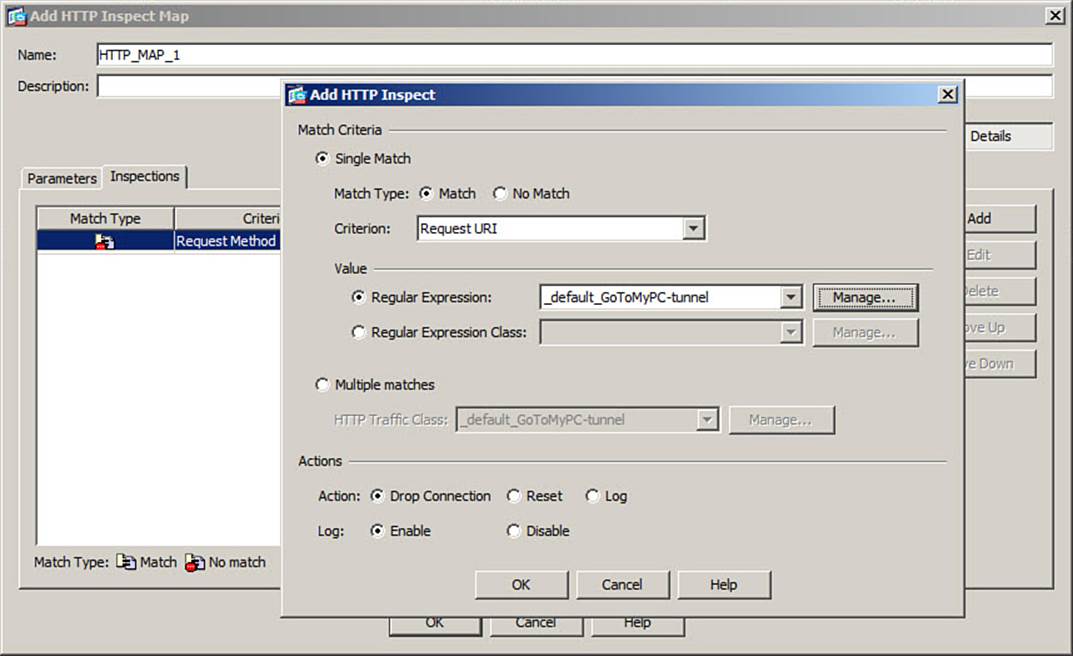
Figure 9-28. Adding an HTTP Payload Minimization Policy in ASDM
The Manage Regular Expressions dialog box will open and list all available regular expressions that can be used for matching. To create a new one, click the Add button. Enter a name for the new regular expression, as shown in Figure 9-29, and then click the Build button to build and test the expression interactively.
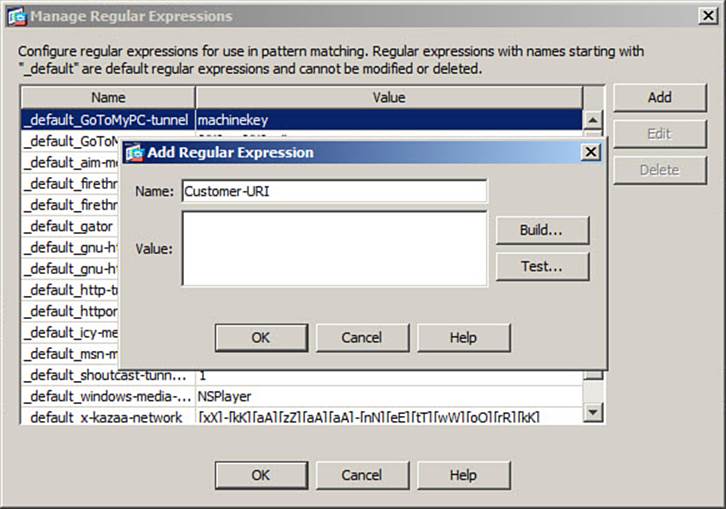
Figure 9-29. Adding a New Regular Expression in ASDM
In the Build Regular Expression dialog box, you can specify pieces or snippets of text that will be used to build an entire regular expression string. After you build a snippet, click the Append Snippet button to add it to the final regular expression string. In Figure 9-30, the character string “/customer” has been entered.
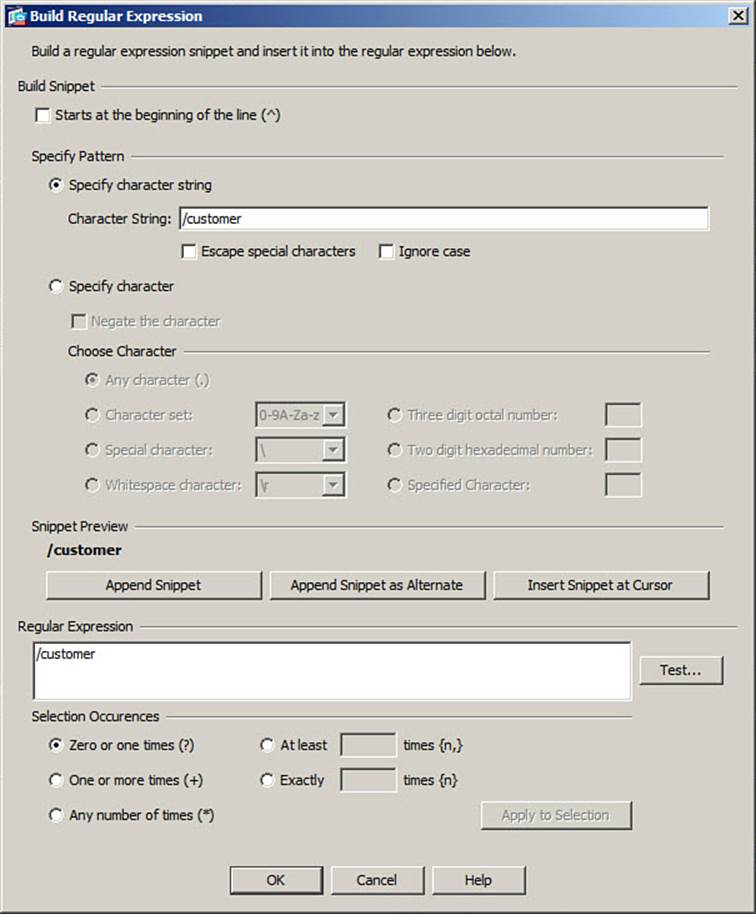
Figure 9-30. Defining a Regular Expression in ASDM
Tip
You can also click the Test button to manually test the regular expression against various text strings that you provide. By testing complex regular expressions, you can be more sure that they will match and give the results you are expecting.
Click the OK button to return to the Add Regular Expression dialog box, and then click the OK button to add the new regular expression to the list that is available to ASDM. In Figure 9-31, the newly defined regular expression named Customer-URI has been added to the bottom of the list. Click the OK button to return to the HTTP Inspect Map dialog box.
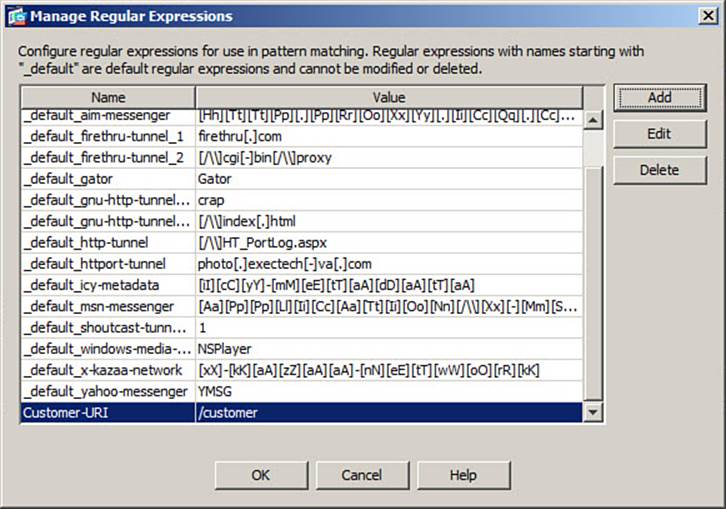
Figure 9-31. New Regular Expression Added to ASDM
In the Add HTTP Inspect dialog box, you can click Regular Expression and choose the new regular expression from the drop-down list. In Figure 9-32, the Customer-URI regular expression is selected as the match criteria value. Because only connections that do not contain the matching string are to be dropped, the match criteria has been changed to No Match, and the action has been set to Drop Connection. Click OK to add the new inspect policy to the HTTP inspect policy map.
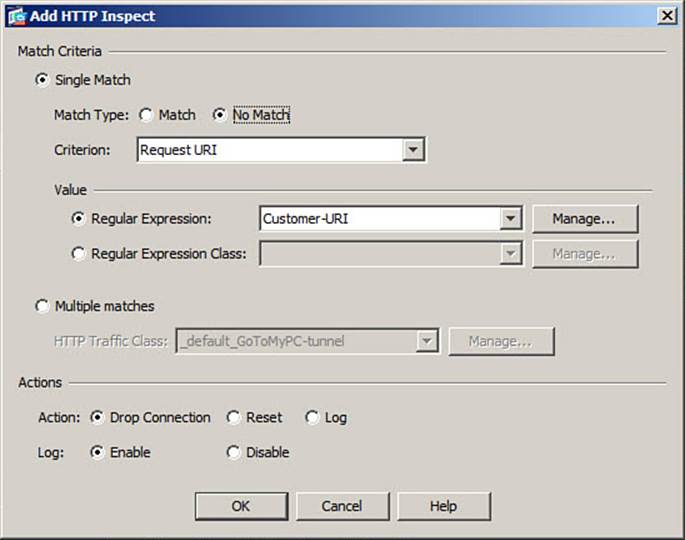
Figure 9-32. Matching Against a Regular Expression in an HTTP Inspect Policy
Now suppose you need to define an HTTP inspection policy that detects GET requests that include request arguments that contain external links to other, possibly malicious, locations. You can define a regular expression called Embedded-link that matches against the string “http://” or “https://”. In Figure 9-33, the character string “https://” has been entered and appended to the regular expression. Because the letter s might or might not appear to match the two target strings, it can appear zero or one time in the HTTP request text. To set up the regular expression, you would select the letter s, choose the Zero or One Times (?) option, and then click the Apply to Selection button.
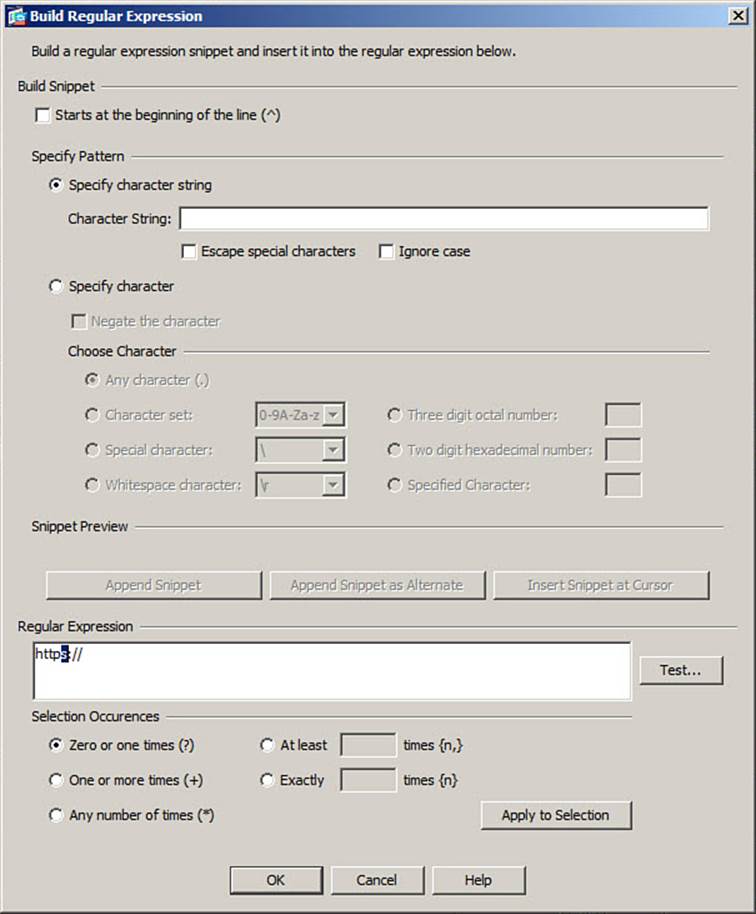
Figure 9-33. Defining a Regular Expression to Match Either http:// or https://
Because the regular expression is slightly more complex than a simple text string, you should click the Test button to verify that it works properly. In Figure 9-34, the regular expression “https?://” is being tested, to make sure that it matches against the string “http://”. After you click the Test button, ASDM runs the test and returns the test result Match Succeeded.
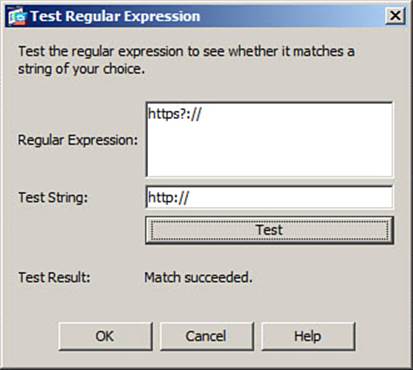
Figure 9-34. Testing a Regular Expression to Verify the Results
Click the OK button in the test dialog box, and then click OK in the Build Regular Expression dialog box. Finally, complete the Add HTTP Inspect dialog box by specifying the regular expression you want to use for matching. In Figure 9-35, the previously configured Embedded-link regular expression will be used as a matching criteria; connections that match and have the prohibited external link string will be dropped.
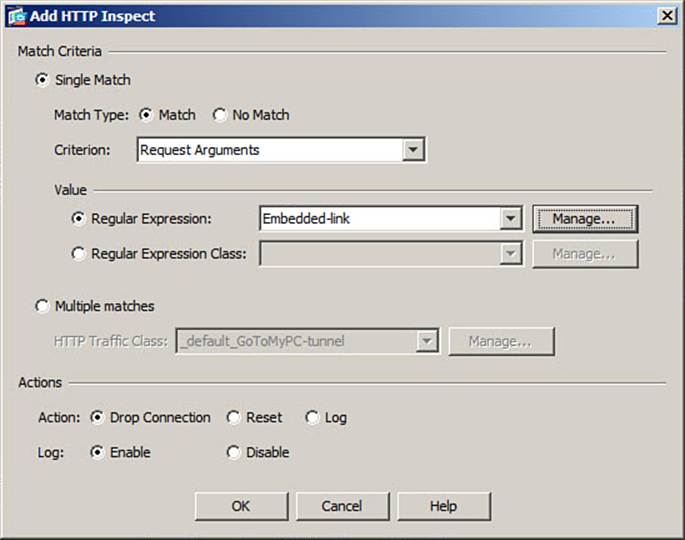
Figure 9-35. Specifying the Regular Expression for an HTTP Signature Inspection Policy
Click OK to complete the inspection policy configuration. As each policy is completed, it is listed as part of the HTTP inspect map, as shown in Figure 9-36.
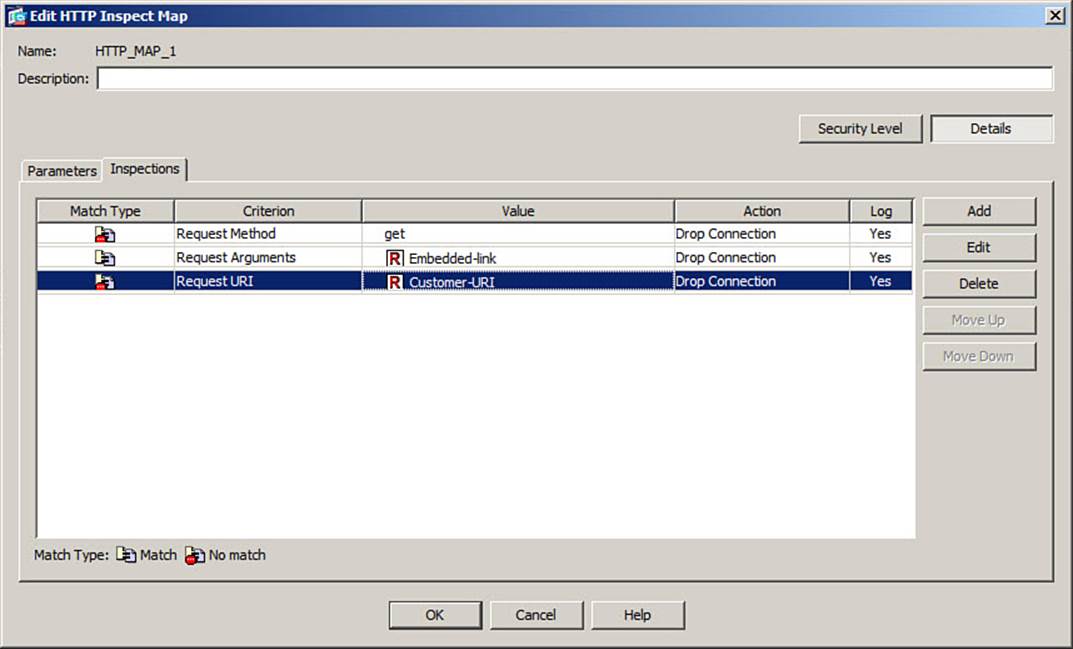
Figure 9-36. Displaying the Inspection Policies Within an HTTP Inspect Map
Step 4: Apply the HTTP Inspection Policy Map
After you configure an HTTP inspection policy map, you apply it to an HTTP inspection within a service policy rule. Any traffic that is classified or matched by the service policy rule will be sent through the customized inspection.
First, navigate to Configuration > Firewall > Service Policy Rules and select a service policy rule to edit. On the Traffic Classification tab, configure the traffic match criteria. Then click the Rule Actions tab. Make sure the HTTP check box is checked on the Protocol Inspection tab. At this point, only the default HTTP inspection will be used. Click the Configure button beside HTTP, and then click the Select an HTTP Inspect Map for Fine Control over Inspection radio button. Make sure the HTTP inspection policy map name is selected in the list and click OK.
In Figure 9-37, the inspection policy map named HTTP_MAP_1 is being applied to HTTP inspection for the service policy rule.
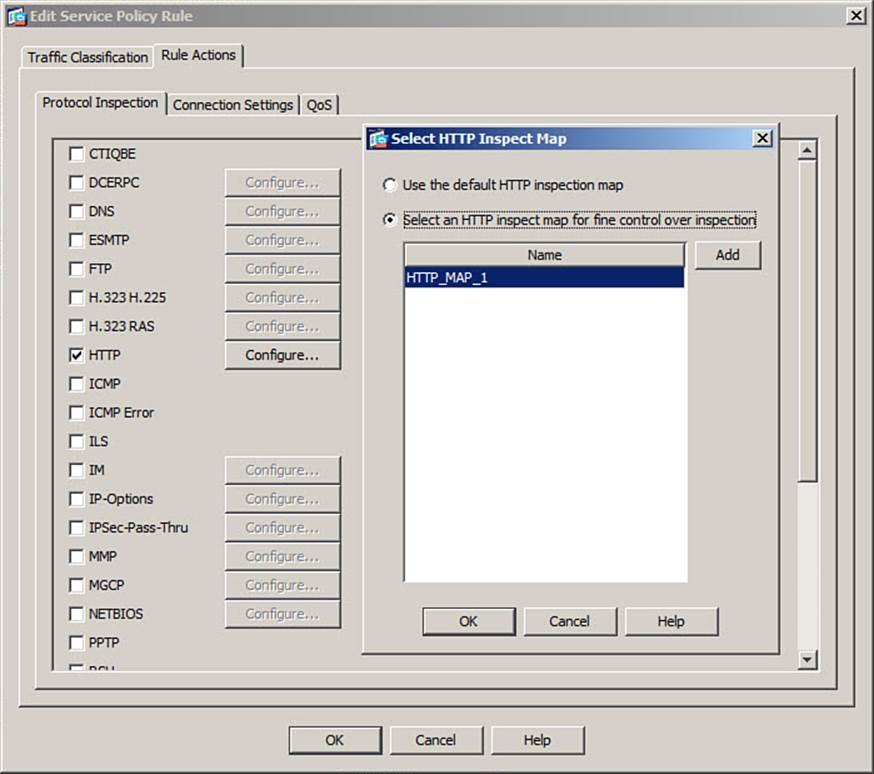
Figure 9-37. Applying an HTTP Inspection Policy Map to a Service Policy Rule
Configuring FTP Inspection
The File Transfer Protocol (FTP) is used between clients and servers. Clients can open FTP connections to servers and perform several different file-oriented operations. The ASA offers an FTP application inspector that must sit between the client and server to work properly. The FTP inspector offers the following functions:
• Protocol verification: Drop any FTP sessions that do not adhere to the FTP protocol specification and log the URI of all accessed FTP objects. FTP protocol verification is enabled by default and cannot be disabled.
• Protocol minimization: Allow only specific FTP commands and functions to be passed on to the protected client or server. For example, any FTP connections that use any request commands other than GET could be dropped.
• Payload minimization: Allow only specific FTP payloads to be delivered to the protected server. For example, an ASA can filter FTP connections according to filenames, file types, server names, and usernames.
• Application layer signatures: Identify and drop specific FTP payloads.
Configuring FTP Inspection Using the CLI
You can use the CLI to configure an FTP inspection policy map that is applied to the FTP inspector process. The policy map can use various matching criteria to detect conditions within FTP connections. In case of a match, the FTP connections can be reset.
You can use the following steps to build and apply an FTP inspection policy map:
Step 1. Define the FTP inspection policy map.
Step 2. Mask FTP server information.
Step 3. Configure an FTP minimization or detection policy, along with an action.
Step 4. Apply the FTP inspection policy map.
The sections that follow describe what is involved with each step.
Step 1: Define the FTP Inspection Policy Map
Use the following command to define and name the policy map:
ciscoasa(config)# policy-map type inspect ftp ftp-map-name
As an example, suppose you need to define an FTP inspection policy map called FTP_MAP_1. You could enter the following command:
ciscoasa(config)# policy-map type inspect ftp FTP_MAP_1
Step 2: Mask FTP Server Information
When a client opens a connection to an FTP server, the server often displays information about itself in a banner message or in its reply when the client sends the FTP SYST command. Malicious hosts might use this information to fingerprint the server’s operating system so that known vulnerabilities can be leveraged.
You can configure the ASA to mask the FTP server’s banner or its SYST reply with the following commands:
ciscoasa(config-pmap)# parameters
ciscoasa(config-pmap-p)# mask-banner
ciscoasa(config-pmap-p)# mask-syst-reply
ciscoasa(config-pmap)# exit
Step 3: Configure an FTP Minimization or Detection Policy, Along with an Action
You can define any protocol or payload minimization or FTP signature by selecting a matching criteria from Table 9-14 and entering the corresponding command. The match command will match against exactly the parameters you enter, whereas the match not command will match against anything other than the parameters you enter.
Table 9-14. Configuration Commands for Matching Against FTP Content
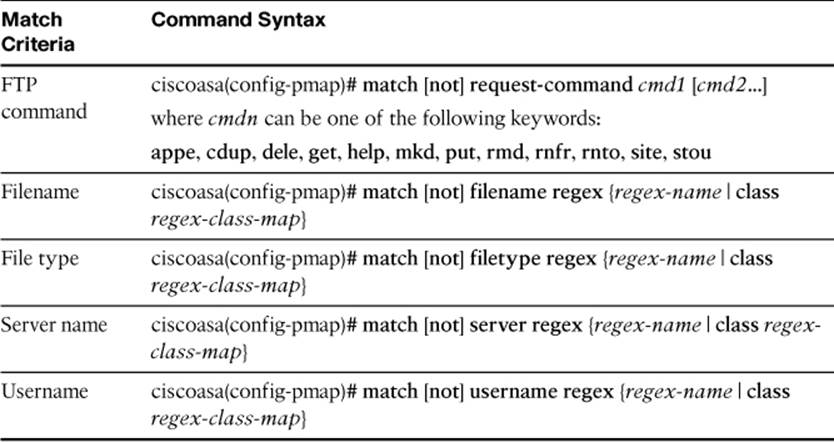
You can build up a set of inspection policies by configuring multiple match and action pairs in a single FTP inspection policy map. If a match command drops or resets an FTP connection, then no further matches are checked; otherwise, an FTP packet can be matched by subsequent matchcommands in the policy map.
By default, no action will be taken. You can use the following command to cause the matching FTP connection to be reset by sending a TCP RST:
ciscoasa(config-pmap-c)# reset
As an example, suppose you need to add a security policy to minimize the FTP protocol such that only GET, PUT, and HELP request commands will be permitted. As well, connections that involve filenames ending with “.exe” will be reset. You can use the following command:
ciscoasa(config)# regex FTP_BADNAMES \.exe
ciscoasa(config)# policy-map type inspect ftp FTP_MAP_1
ciscoasa(config-pmap)# match not request-command get put help
ciscoasa(config-pmap-c)# reset
ciscoasa(config-pmap)# match filename regex FTP_BADNAMES
Step 4: Apply the FTP Inspection Policy Map
After you have configured an FTP inspection policy map, you apply it to an FTP inspection within a service policy rule using the following command syntax:
ciscoasa(config-pmap-c)# inspect ftp ftp-map-name
Any traffic that is classified or matched by the service policy rule will be sent through the customized inspection.
Configuring FTP Inspection Using ASDM
You can also use ASDM to configure an FTP inspection policy map. Navigate to Configuration > Firewall > Objects > Inspect Maps and select FTP.
As with the CLI configuration, you can accomplish the ASDM configuration with the following steps:
Step 1. Define the FTP inspection policy map.
Step 2. Configure a minimization or signature detection, along with an action.
Step 3. Apply the FTP inspection policy map.
The sections that follow describe what is involved with each step.
Step 1: Define the FTP Inspection Policy Map
Click the Add button to add a new inspection policy map. Enter an arbitrary name for the map, as well as an optional description. Figure 9-38 shows a new policy map called FTP_MAP_1.
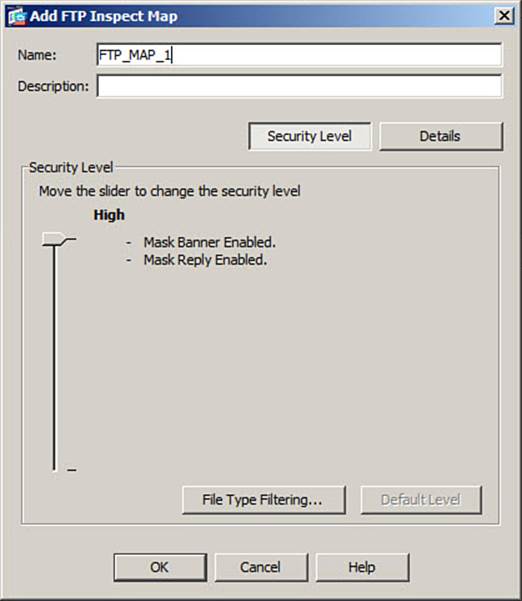
Figure 9-38. Adding a New FTP Inspect Map in ASDM
The Add FTP Inspect Map dialog box initially shows a Security Level slider that you can use to quickly set up some basic FTP inspection parameters. By sliding the pointer up or down, you can choose between the following security levels:
• Low: URI logging is enabled.
• High: URI logging is enabled; mask the FTP server banner and server replies to the FTP SYST command.
FTP protocol verification is always enabled, regardless of the slider setting. You can click the File Type Filtering button to define inspection rules that filter on FTP filenames.
Step 2: Configure a Minimization or Signature Detection, Along with an Action
Click the Inspections tab to see a list of any FTP inspection policies that have been configured. To add a new inspection, click the Add button.
Configuration begins in the Parameters tab, as shown in Figure 9-39. You can enable server information masking by checking the Mask Greeting Banner from the Server and the Mask Reply to SYST Command check boxes.

Figure 9-39. Configuring FTP Server Information Masking
Next, you can click the Inspections tab to list any configured FTP security policies. Click the Add button to add a new policy.
In the Add HTTP Inspect dialog box, click the Single Match radio button to define a single matching condition. Then click Match or No Match and choose a criterion type from the Criterion drop-down list. The options displayed in the Value section will change depending on the criterion you select. At the bottom of the dialog box, choose the actions that will be taken on the matching FTP connection. Click the OK button to add the new inspection to the FTP inspection policy map.
As an example, suppose that only the FTP GET, PUT, and HELP request commands are to be permitted; all other request methods should have their FTP connections reset. As shown in Figure 9-40, click No Match and choose the criterion Request Command. The check boxes next to values GET, HELP, and PUT are checked. In other words, if a client sends any FTP command other than these three, the connection will be reset. For FTP inspection, notice that the reset action is mandatory and cannot be disabled.
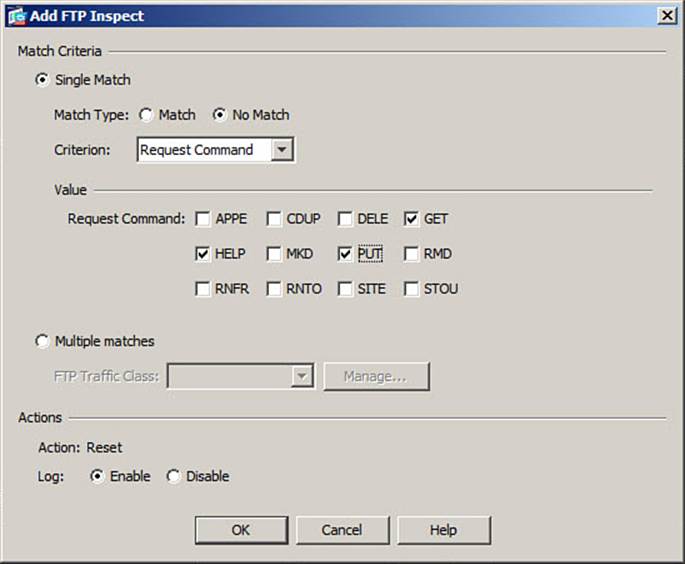
Figure 9-40. Defining an FTP Request Command Policy
As a second example, suppose that any FTP connections that involve filenames ending in .exe should be reset. In Figure 9-41, a regular expression called FTP_BADNAMES has been configured and applied to a new policy that uses a single match on the FTP File Name criterion.
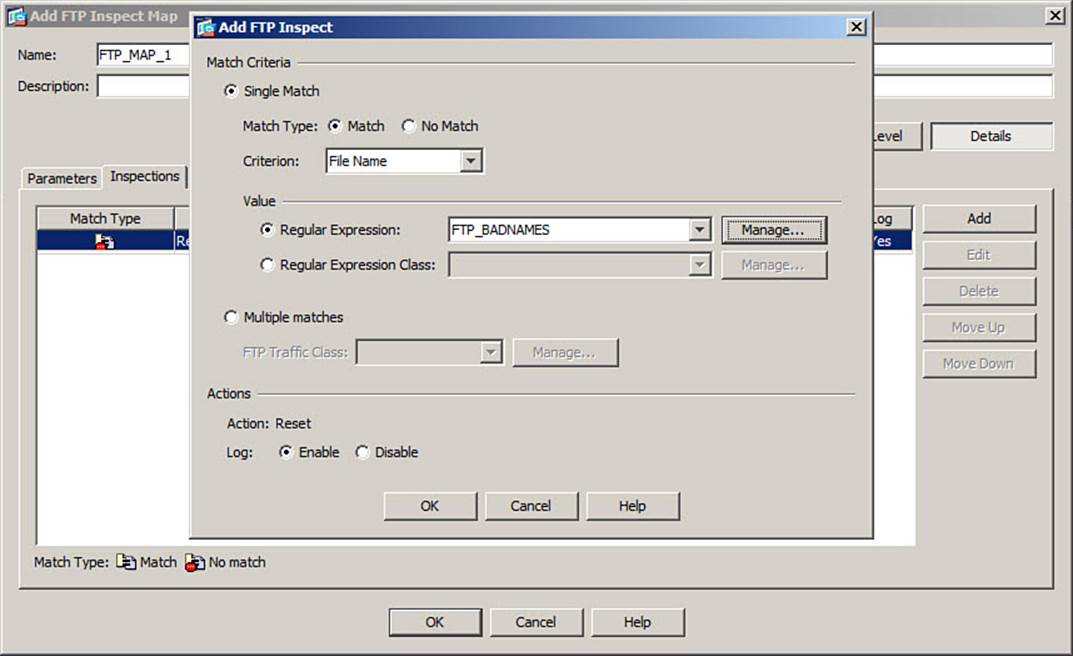
Figure 9-41. Defining a Policy to Match Against FTP Filenames
Step 3: Apply the FTP Inspection Policy Map
After you have configured an FTP inspection policy map, you apply it to an FTP inspection within a service policy rule. Any traffic that is classified or matched by the service policy rule will be sent through the customized inspection.
First, navigate to Configuration > Firewall > Service Policy Rules and select a service policy rule to edit. On the Traffic Classification tab, configure the traffic match criteria. Then click the Rule Actions tab. Make sure FTP is checked on the Protocol Inspection tab.
At this point, only the default FTP inspection will be used. Click the Configure button beside FTP, and then click the Select an FTP Inspect Map for Fine Control over Inspection radio button. Make sure the FTP inspection policy map name is selected in the list and click OK.
In Figure 9-42, the inspection policy map named FTP_MAP_1 is being applied to FTP inspection for the service policy rule.
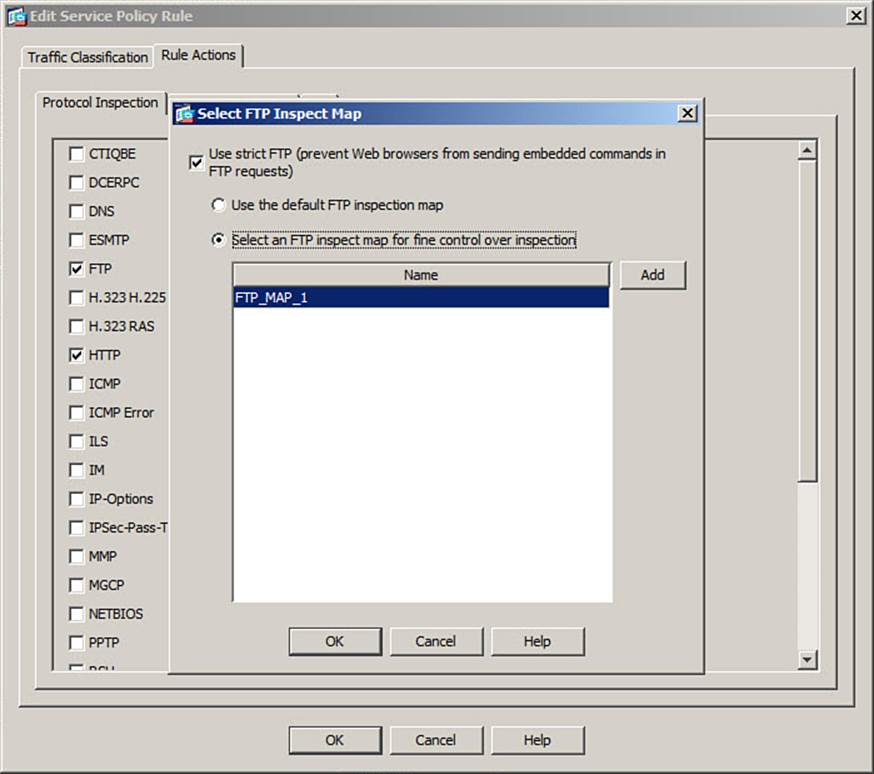
Figure 9-42. Applying an FTP Inspection Policy Map to a Service Policy Rule
Configuring DNS Inspection
An ASA can inspect the Domain Name Service (DNS) protocol that is used between clients and servers, as long as the clients and servers are located on opposite sides of the ASA. The DNS inspector offers the following functions:
• Application of NAT rules to the contents of DNS replies
• DNS protocol verification
• Randomization of DNS ID values to protect against DNS spoofing attacks
• DNS Guard, which closes a DNS UDP connection as soon as the first DNS reply is received
• Granular inspection and matching of DNS requests and replies
You can use the CLI to configure a DNS inspection policy map that is applied to the DNS inspector process. The policy map can use various matching criteria to detect conditions within DNS transactions. In case of a match, individual DNS packets can be dropped, the whole DNS connection can be dropped, and control over the TSIG parameter can be enforced. By leveraging a DNS inspection policy map, you can mitigate DNS threats such as reconnaissance with nslookup, DoS, cache poisoning, and so on.
Creating and Applying a DNS Inspection Policy Map Using the CLI
You can use the following steps to build and apply a DNS inspection policy map:
Step 1. Define the DNS inspection policy map.
Step 2. Inspect DNS parameters.
Step 3. Define a DNS inspection rule and an action.
Step 4. Apply the DNS inspection policy map.
Step 1: Define the DNS Inspection Policy Map
Use the following command to define and name the policy map:
ciscoasa(config)# policy-map type inspect dns dns-map-name
As an example, suppose you need to define a DNS inspection policy map called DNS_MAP_1. You could enter the following command:
ciscoasa(config)# policy-map type inspect dns DNS_MAP_1
Step 2: Inspect DNS Parameters
You can configure several different DNS inspection functions that control DNS connections and their content. Begin by using the following command to enter the policy map parameter configuration mode:
ciscoasa(config-pmap)# parameters
Next, choose and enter one or more commands from Table 9-15.
Table 9-15. DNS Parameter Inspection Commands
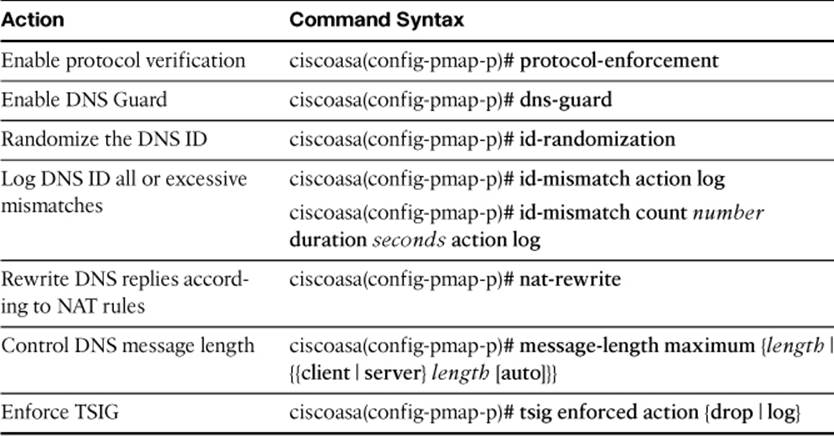
As an example, DNS protocol verification and DNS Guard are enabled, along with DNS ID randomization and NAT rewrite. The commands listed in Example 9-25 are used.
Example 9-25. Enabling DNS Parameter Inspection
ciscoasa(config-pmap)# parameters
ciscoasa(config-pmap-p)# protocol-enforcement
ciscoasa(config-pmap-p)# dns-guard
ciscoasa(config-pmap-p)# id-randomization
ciscoasa(config-pmap-p)# nat-rewrite
ciscoasa(config-pmap-p)# exit
Step 3: Define a DNS Inspection Rule and an Action
Choose and enter one or more commands from Table 9-16, followed by an action from Table 9-17.
Table 9-16. Commands for DNS Inspection Matching Conditions
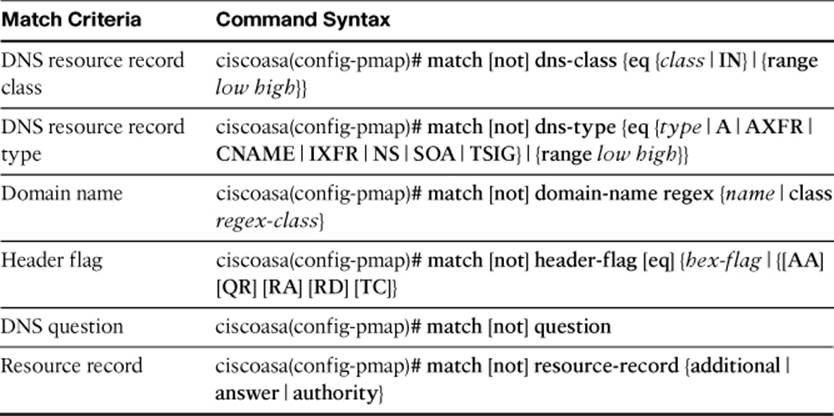
Table 9-17. Commands for a DNS Inspection Action

Step 4: Apply the DNS Inspection Policy Map
After you configure a DNS inspection policy map, you apply it to a DNS inspection within a service policy rule using the following command syntax:
ciscoasa(config-pmap-c)# inspect dns dns-map-name
Any traffic that is classified or matched by the service policy rule will be sent through the customized inspection.
Be aware that an ASA has a default DNS inspection configuration, as listed in Example 9-26. A DNS inspection policy map called preset_dns_map is used to limit DNS messages to 512 bytes in length. This inspection policy map is applied to the DNS inspector in the global_policy policy map for all types of traffic matched by default, and is applied as a global service policy to all ASA interfaces.
Example 9-26. Default DNS Inspection Policy Map Configuration
ciscoasa(config)# policy-map type inspect dns preset_dns_map
ciscoasa(config-pmap)# parameters
ciscoasa(config-pmap-p)# message-length maximum 512
ciscoasa(config-pmap-p)# exit
ciscoasa(config-pmap)# exit
ciscoasa(config)# policy-map global_policy
ciscoasa(config-pmap)# class inspection_default
ciscoasa(config-pmap-c)# inspect dns preset_dns_map
ciscoasa(config-pmap-p)# exit
ciscoasa(config-pmap)# exit
ciscoasa(config)# service-policy global_policy global
Creating and Applying a DNS Inspection Policy Map Using ASDM
You can also use ASDM to configure a DNS inspection policy map. Navigate to Configuration > Firewall > Objects > Inspect Maps and select DNS.
As with the CLI configuration, you can accomplish the ASDM configuration with the following steps:
Step 1. Define the DNS inspection policy map.
Step 2. Configure DNS protocol conformance.
Step 3. Configure DNS filtering.
Step 4. Configure DNS ID mismatch rate detection.
Step 5. Configure detailed DNS inspection policies.
Step 6. Apply the DNS inspection policy map.
Step 1: Define the DNS Inspection Policy Map
Click the Add button to add a new inspection policy map. Enter an arbitrary name for the map, as well as an optional description. Figure 9-43 shows a new policy map called DNS_MAP_1.
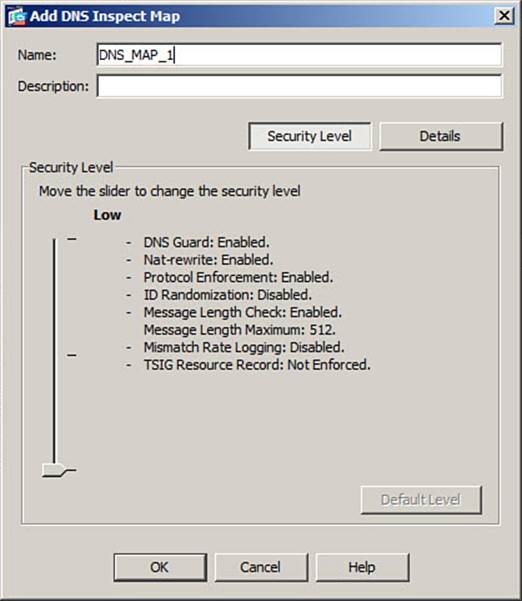
Figure 9-43. Adding a New DNS Inspect Map in ASDM
The Add DNS Inspect Map dialog box initially shows a Security Level slider that you can use to quickly set up some basic DNS inspection parameters. By sliding the pointer up or down, you can choose between the following security levels:
• Low: Protocol enforcement is enabled, DNS Guard is enabled, NAT rewrite is enabled, and DNS message length is limited to 512 characters.
• Medium: Adds DNS ID randomization and DNS ID mismatch rate logging to the Low settings.
• High: Adds TSIG resource record enforcement to the Medium settings.
Step 2: Configure DNS Protocol Conformance
Click the Protocol Conformance tab in the Add DNS Inspect Map dialog box. As shown in Figure 9-44, you can configure the DNS Guard, NAT rewrite, protocol enforcement, DNS ID randomization, and Transaction Signature (TSIG) enforcement functions.
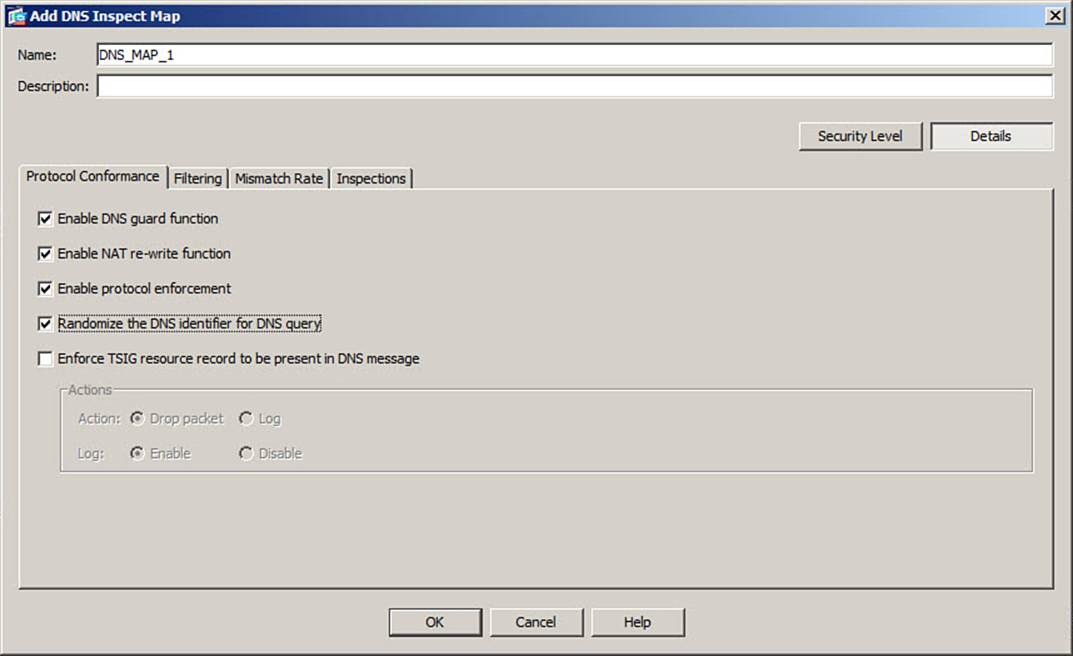
Figure 9-44. Configuring DNS Protocol Conformance
Step 3: Configure DNS Filtering
Click the Filtering tab in the Add DNS Inspect Map dialog box, as shown in Figure 9-45. You can configure message length filters that control the size of DNS messages sent globally, to servers, or to clients.
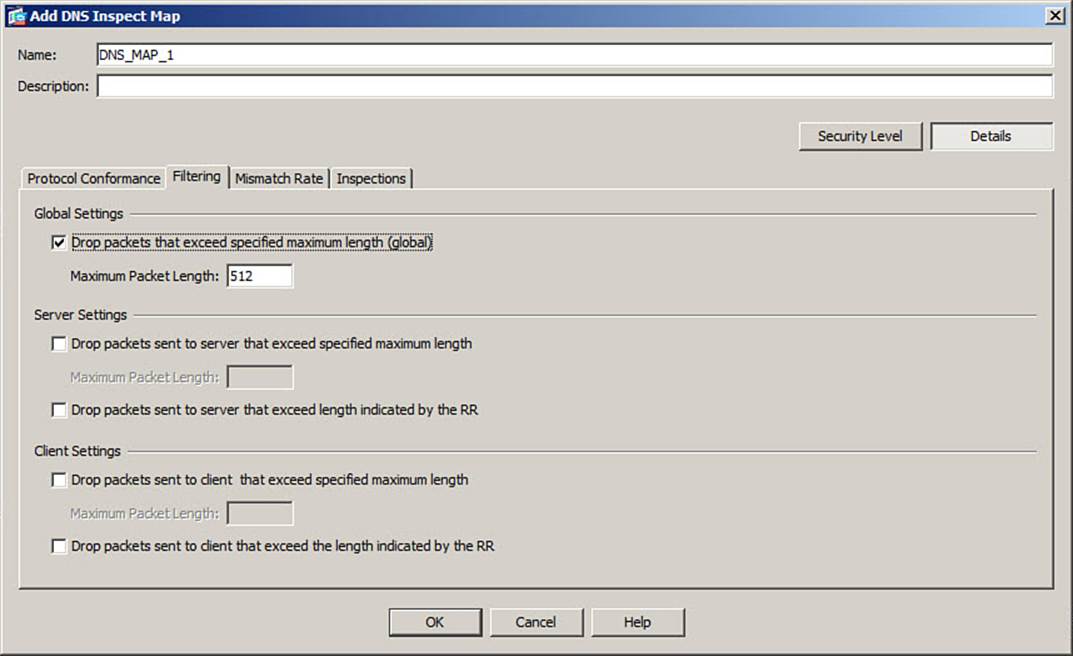
Figure 9-45. Configuring DNS Filtering
Step 4: Configure DNS ID Mismatch Rate Detection
Click the Mismatch Rate tab in the Add DNS Inspect Map dialog box, as shown in Figure 9-46. From there, you can enable the ID mismatch function and set thresholds for the number of mismatches detected during a time interval.
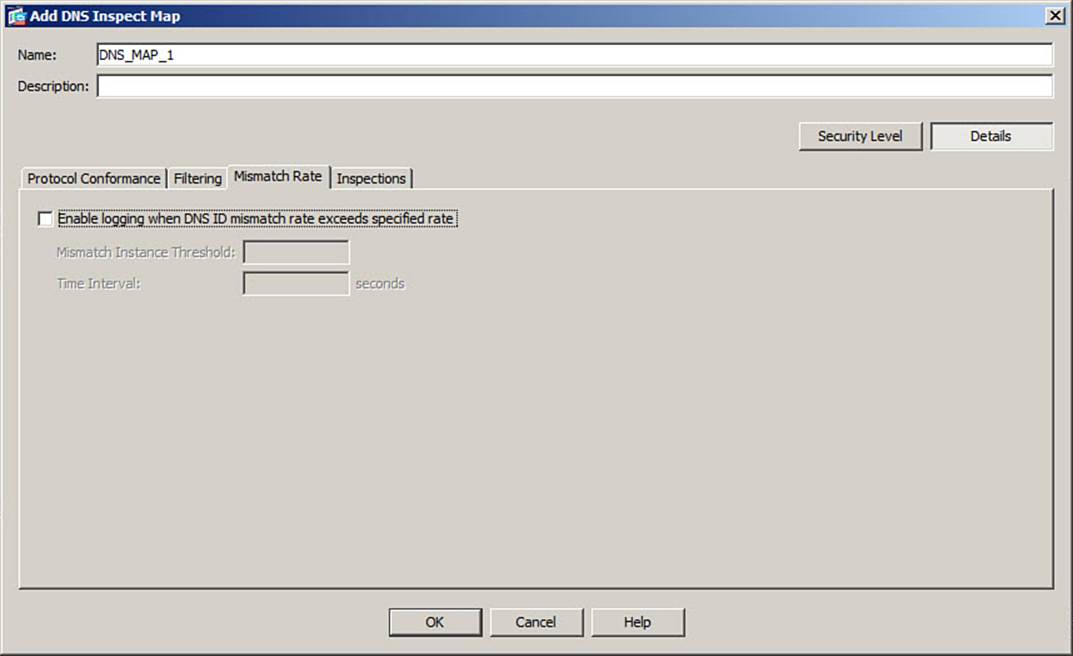
Figure 9-46. Configuring DNS ID Mismatch Rate Detection
Step 5: Configure Detailed DNS Inspection Policies
Click the Inspections tab in the Add DNS Inspect Map dialog box to see and configure individual DNS inspection policies. You can add a new inspection policy by clicking the Add button. In the Add DNS Inspect dialog box, shown in Figure 9-47, you can choose a match type, match criterion, values to match against, and the actions to take.
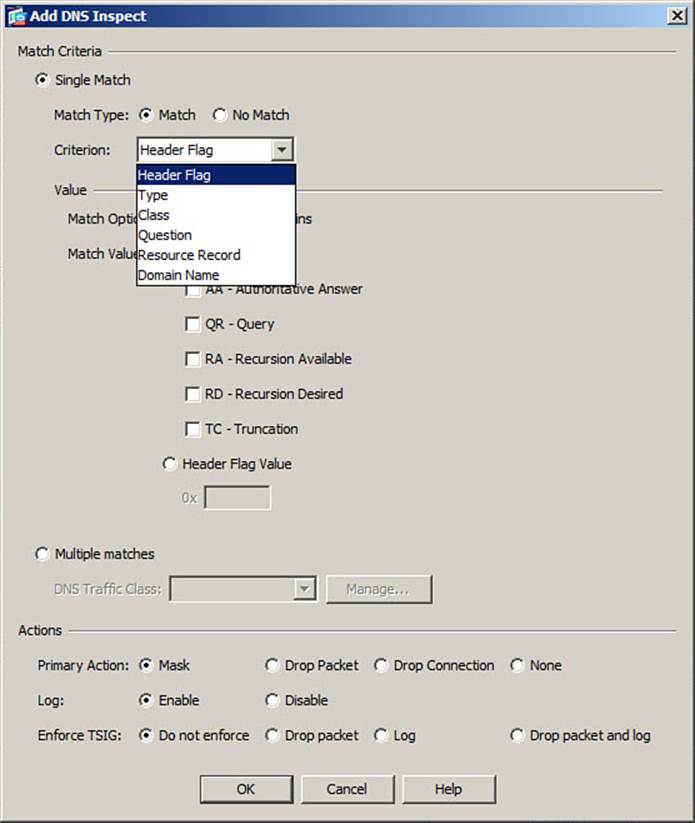
Figure 9-47. Configuring a DNS Inspection Policy
Step 6: Apply the DNS Inspection Policy Map
After you configure a DNS inspection policy map, you apply it to a DNS inspection within a service policy rule. Any traffic that is classified or matched by the service policy rule will be sent through the customized inspection.
First, navigate to Configuration > Firewall > Service Policy Rules and select a service policy rule to edit. On the Traffic Classification tab, configure the traffic match criteria. Then click the Rule Actions tab. Make sure DNS is checked on the Protocol Inspection tab.
Click the Configure button beside DNS, and then click the Select a DNS Inspect Map for Fine Control over Inspection radio button. Make sure the DNS inspection policy map name is selected in the list and click OK. In Figure 9-48, the inspection policy map named DNS_MAP_1 is being applied to DNS inspection for the service policy rule.
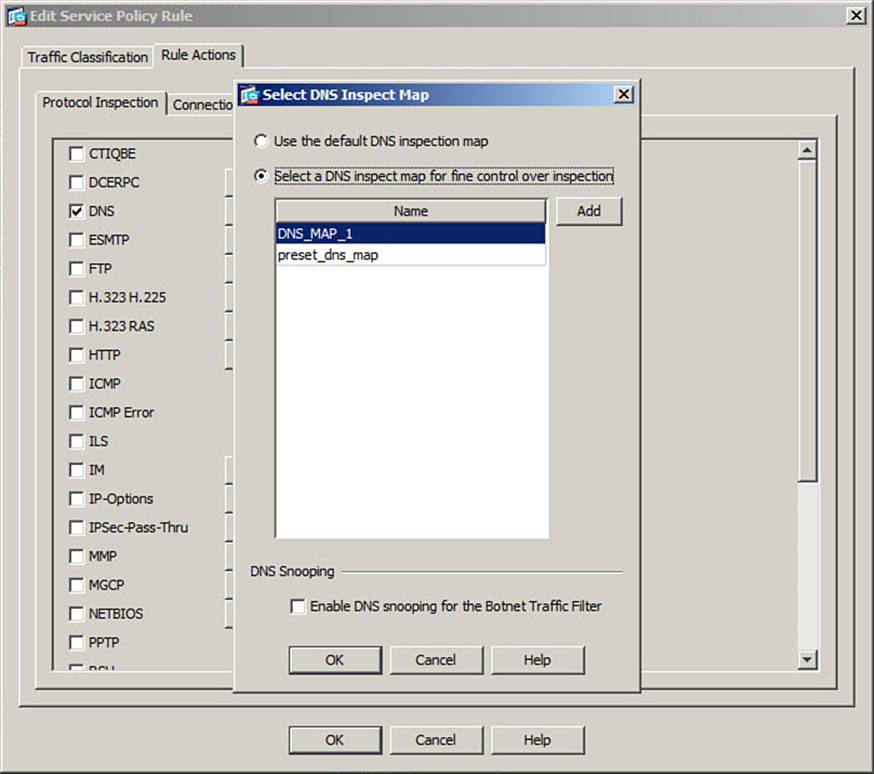
Figure 9-48. Applying a DNS Inspection Policy Map to a Service Policy Rule
Configuring ESMTP Inspection
An ASA can inspect the Extended Simple Mail Transfer Protocol (ESMTP) that is described in RFCs 5321 and 5322. ESMTP is used to transfer email between clients and servers and between servers and other servers. You can configure the ESMTP inspector to perform the following functions:
• ESMTP protocol verification
• Control over unauthorized mail relay servers
• Client and server filtering based on domain names
• Malicious character filtering
• Granular inspection and matching of ESMTP commands and content
Configuring an ESMTP Inspection with the CLI
You can use the CLI to configure an ESMTP inspection policy map that is applied to the ESMTP inspector process. The policy map can use various matching criteria to detect conditions within ESMTP connections. In case of a match, the ASA can log, drop, or reset the ESMTP connections.
You can use the following steps to build and apply an ESMTP inspection policy map:
Step 1. Define the ESMTP inspection policy map.
Step 2. Inspect ESMTP parameters.
Step 3. Define an ESMTP inspection rule and an action.
Step 4. Apply the ESMTP inspection policy map.
The sections that follow cover the specific tasks involved with each step.
Step 1: Define the ESMTP Inspection Policy Map
Use the following command to define and name the policy map:
ciscoasa(config)# policy-map type inspect esmtp esmtp-map-name
As an example, if you needed to define an ESMTP inspection policy map called ESMTP_MAP_1, you could enter the following command:
ciscoasa(config)# policy-map type inspect estmp ESMTP_MAP_1
Step 2: Inspect ESMTP Parameters
You can configure several different ESMTP inspection functions that control ESMTP connections and their content. Begin by using the following command to enter the policy map parameter configuration mode:
ciscoasa(config-pmap)# parameters
Then choose and enter one or more commands from Table 9-18.
Table 9-18. Commands for Inspecting ESMTP Parameters
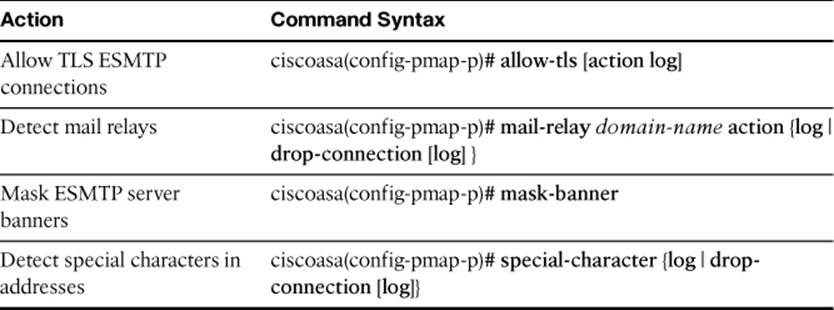
Step 3: Define an ESMTP Inspection Rule and an Action
Choose and enter one or more commands from Table 9-19, followed by an action from Table 9-20.
Table 9-19. Commands for ESMTP Inspection Matching Conditions
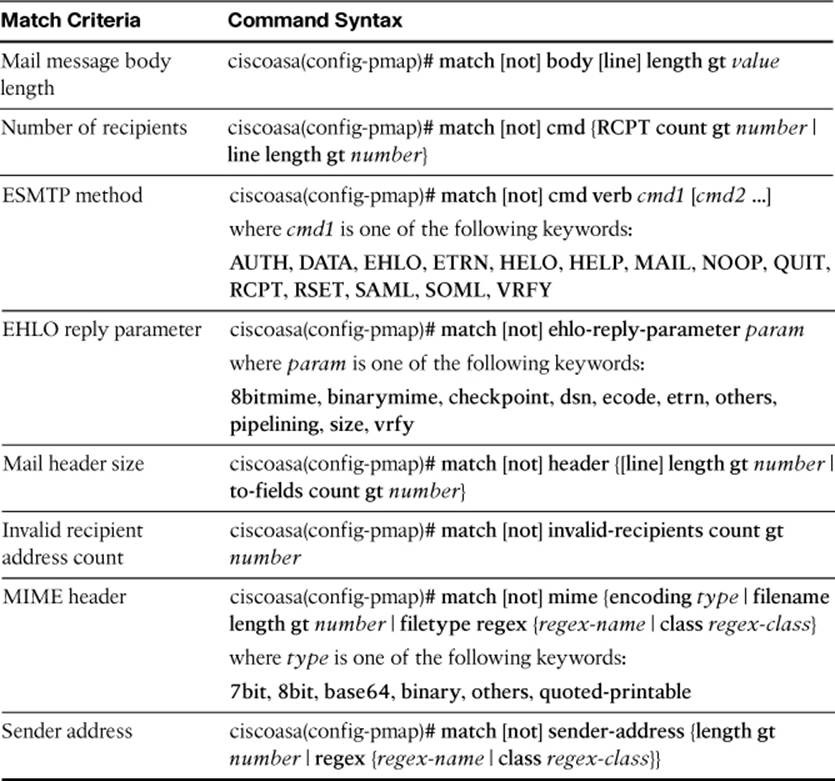
Table 9-20. Commands for an ESMTP Inspection Action

Step 4: Apply the ESMTP Inspection Policy Map
After you have configured an ESMTP inspection policy map, you apply it to an ESMTP inspection within a service policy rule using the following command syntax:
ciscoasa(config-pmap-c)# inspect esmtp esmtp-map-name
Any traffic that is classified or matched by the service policy rule will be sent through the customized inspection.
Configuring an ESMTP Inspection with ASDM
You can also use ASDM to configure an ESMTP inspection policy map. Navigate to Configuration > Firewall > Objects > Inspect Maps and select ESMTP.
As with the CLI configuration, you can accomplish the ASDM configuration with the following steps:
Step 1. Define the ESMTP inspection policy map.
Step 2. Configure ESMTP inspection parameters.
Step 3. Configure ESMTP filtering.
Step 4. Configure detailed ESMTP inspection policies.
Step 5. Apply the ESMTP inspection policy map.
The sections that follow cover the specific tasks involved with each step.
Step 1: Define the ESMTP Inspection Policy Map
Click the Add button to add a new inspection policy map. Enter an arbitrary name for the map, as well as an optional description. Figure 9-49 shows a new policy map called ESMTP_MAP_1.
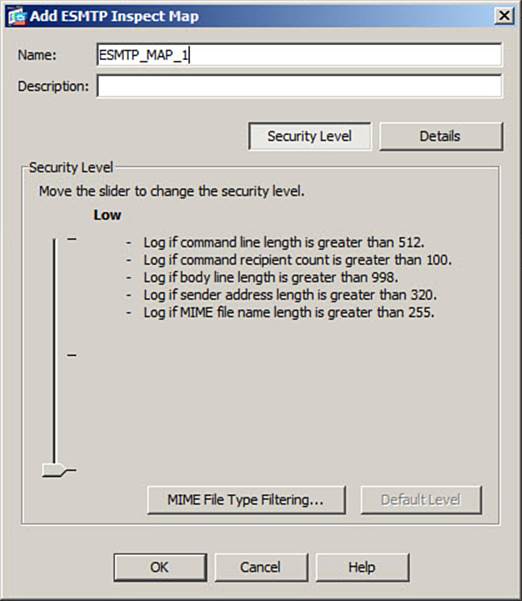
Figure 9-49. Adding a New ESMTP Inspect Map in ASDM
The Add ESMTP Inspect Map dialog box initially shows a Security Level slider that you can use to quickly set up some basic ESMTP inspection parameters. By default, ASDM sets the following message content thresholds that are used by the Security Level slider:
• Command line length: 512 characters
• Command recipient count: 100 recipients
• Body line length: 998 characters
• Sender address: 320 characters
• MIME filename: 255 characters
By sliding the pointer up or down, you can choose between the following security levels:
• Low: Content that exceeds a threshold is permitted but logged.
• Medium: Content that exceeds a threshold is dropped; the ESMTP server banner is masked.
• High: Content that exceeds a threshold is both dropped and logged; the ESMTP server banner is masked.
Step 2: Configure ESMTP Inspection Parameters
Click the Parameters tab in the Add ESMTP Inspect Map dialog box. As shown in Figure 9-50, you can enable server banner masking and you can bypass inspection for ESMTP connections that are encrypted with TLS.
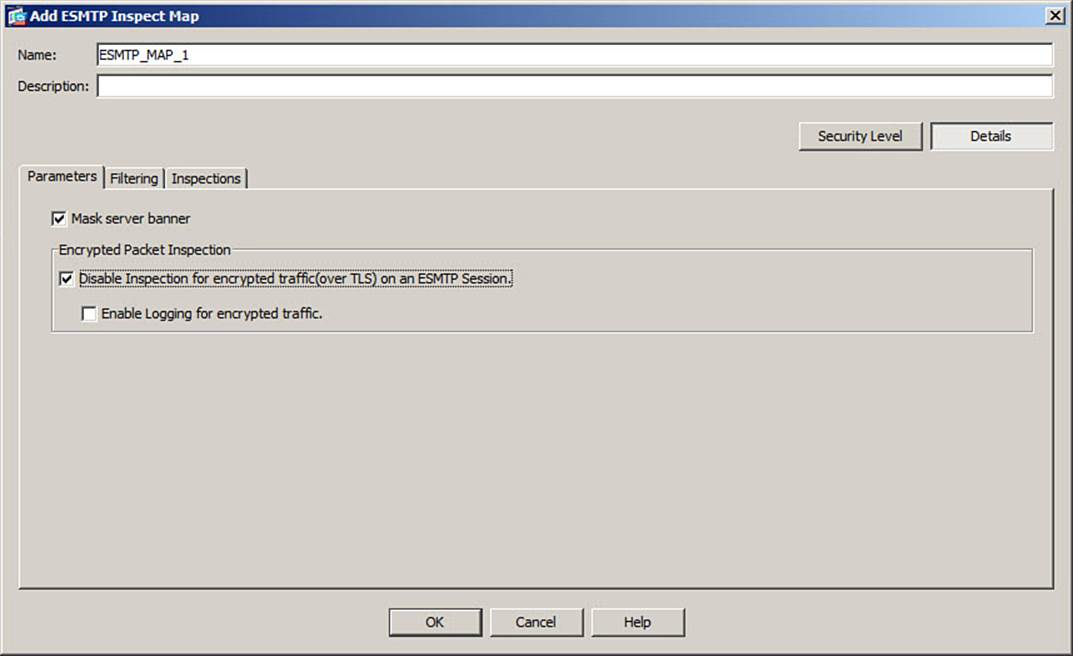
Figure 9-50. Configuring ESMTP Inspection Parameters
Step 3: Configure ESMTP Filtering
Click the Filtering tab in the Add ESMTP Inspect Map dialog box, as shown in Figure 9-51. You can configure mail relay filtering by domain name, as well as filtering for special characters that are known to be used in recipient addresses for malicious purposes.
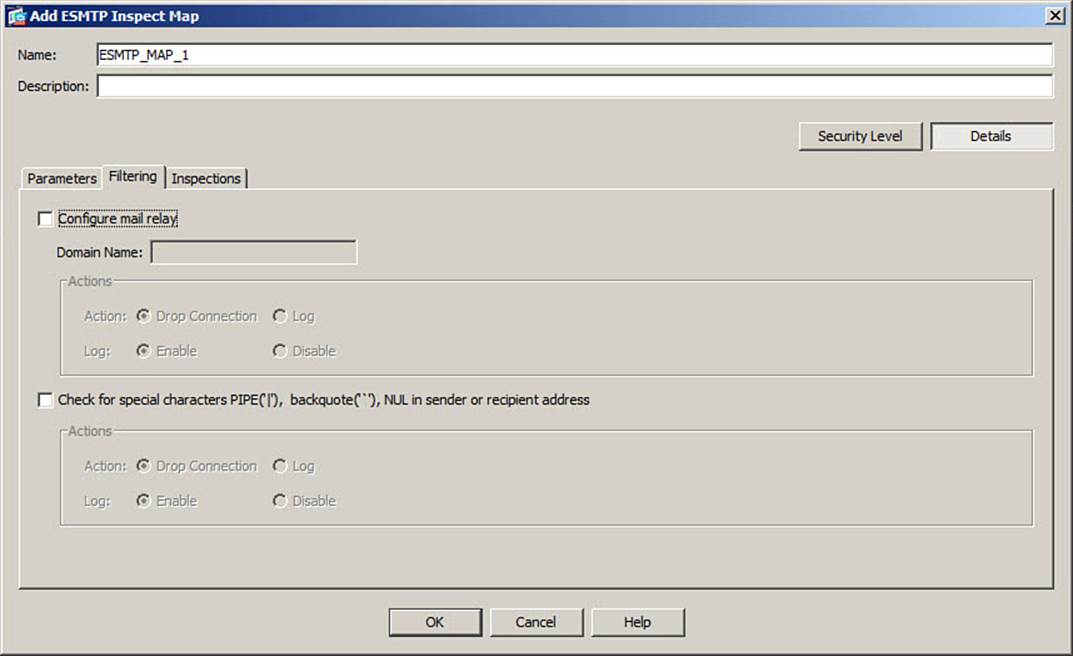
Figure 9-51. Configuring ESMTP Filtering
Step 4: Configure Detailed ESMTP Inspection Policies
Click the Inspections tab in the Add ESMTP Inspect Map dialog box to see and configure individual ESMTP inspection policies. You can add a new inspection policy by clicking the Add button. In the Add ESMTP Inspect dialog box, shown in Figure 9-52, you can choose a match type, match criterion, values to match against, and the actions to take.
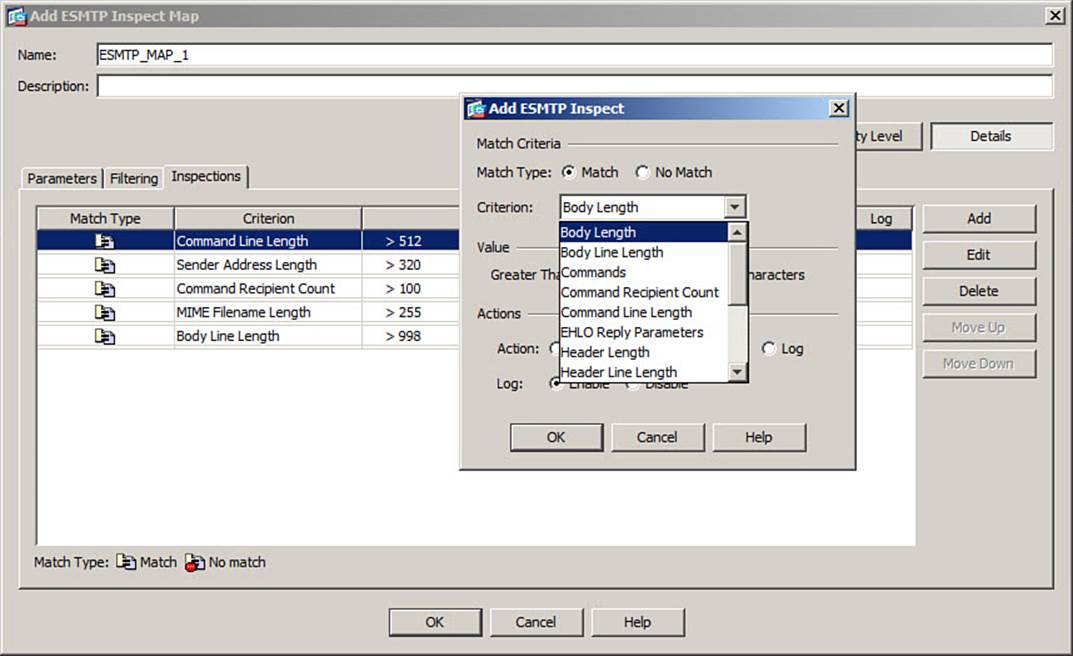
Figure 9-52. Configuring an ESMTP Inspection Policy
Step 5: Apply the ESMTP Inspection Policy Map
After you configure an ESMTP inspection policy map, you apply it to an ESMTP inspection within a service policy rule. Any traffic that is classified or matched by the service policy rule will be sent through the customized inspection.
First, navigate to Configuration > Firewall > Service Policy Rules and select a service policy rule to edit. On the Traffic Classification tab, configure the traffic match criteria. Then click the Rule Actions tab. Make sure ESMTP is checked on the Protocol Inspection tab.
Click the Configure button beside ESMTP, and then click the Select an ESMTP Inspect Map for Fine Control over Inspection radio button. Make sure the ESMTP inspection policy map name is selected in the list and click OK. In Figure 9-53, the inspection policy map named ESMTP_MAP_1 is being applied to ESMTP inspection for the service policy rule.
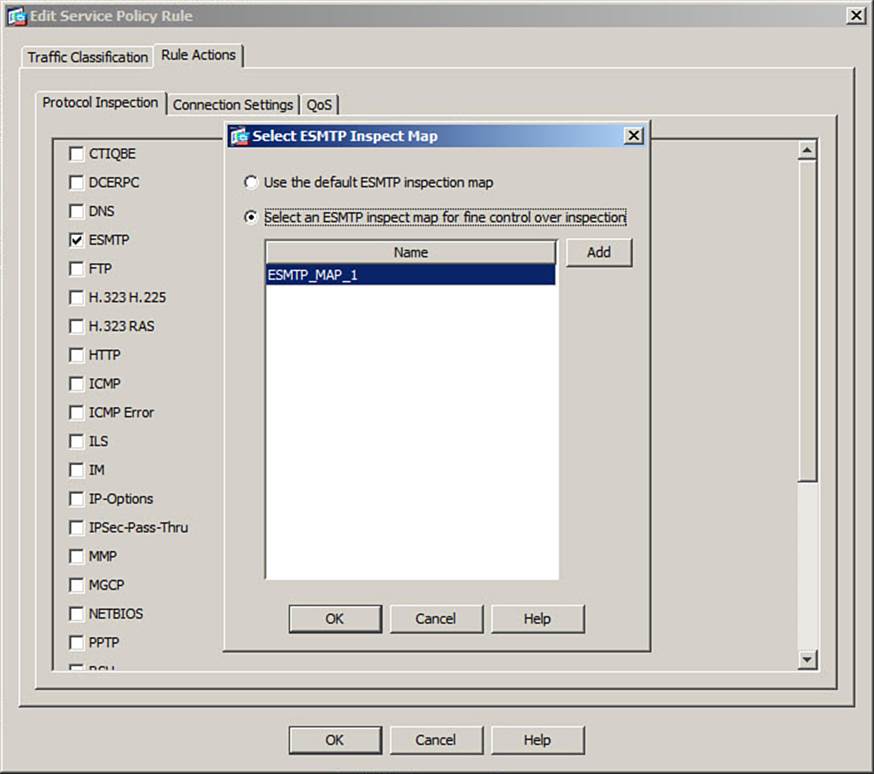
Figure 9-53. Applying an ESMTP Inspection Policy Map to a Service Policy Rule
Configuring a Policy for ASA Management Traffic
The MPF is commonly used to configure policies that inspect and control transit traffic, or traffic that is passing through the ASA from one interface to another. You can also configure a management traffic policy to control traffic that is destined for the ASA itself. For example, you might want to match against HTTP over SSL traffic so that you can limit the number of ASDM connections users can attempt to start. Other types of management traffic include SNMP, syslog, TFTP, SSH, and Telnet.
By classifying management traffic as a special case, you can configure specific policies to help prevent denial-of-service attacks on the firewall itself. Otherwise, once you enable the ASA’s HTTP server to offer the ASDM management interface, malicious users might also use the HTTP service and perhaps cripple the ASA’s CPU.
You can define a management traffic policy by first configuring a special “management” class map type to match specific traffic that terminates on the ASA itself. The command syntax is similar to a normal class map configuration command, except that the type management keywords must be added, as follows:
ciscoasa(config)# class-map type management mgmt_cmap_name
Next, use the match command to specify how the management traffic is to be matched or classified. Only two match criteria are possible, as listed in Table 9-21, although the commands can be repeated to match as many different kinds of management traffic as needed.
Table 9-21. Match Commands Used in a Management Traffic Class Map

After you have configured the management class map, you can reference it with a class command within a policy map, as you would a normal Layer 3–4 class map. The only difference is that management traffic terminating on the ASA itself will be classified and handled as a unique policy, separate from any other regular traffic policy.
As an example, suppose you would like to limit the number of inbound connections that potential ASDM users can open from the outside network. The goal is to limit the embryonic connections to TCP port 443 to five, preventing malicious users from trying to exhaust the ASA’s memory by opening too many bogus connections. The commands listed in Example 9-27 could be used to configure the management traffic policy.
Example 9-27. Configuring a Management Class Map and Policy Map
ciscoasa(config)# class-map type management MGMT-CLASS
ciscoasa(config-cmap)# match port tcp eq 443
ciscoasa(config-cmap)# exit
ciscoasa(config)# policy-map p1
ciscoasa(config-pmap)# class MGMT-CLASS
ciscoasa(config-pmap-c)# set connection embryonic-conn-max 5
ciscoasa(config-pmap-c)# exit
ciscoasa(config-pmap)# exit
ciscoasa(config)# service-policy p1 interface outside
You can also use ASDM to create security policies that can limit management traffic destined for an ASA. First, navigate to Configuration > Firewall > Service Policy Rules. Click beside the Add button to expand the options, and then choose Add Management Service Policy Rule. Select the interface and service policy where the new management policy will be applied. In Figure 9-54, an existing service policy called p1 will be used on the outside interface.
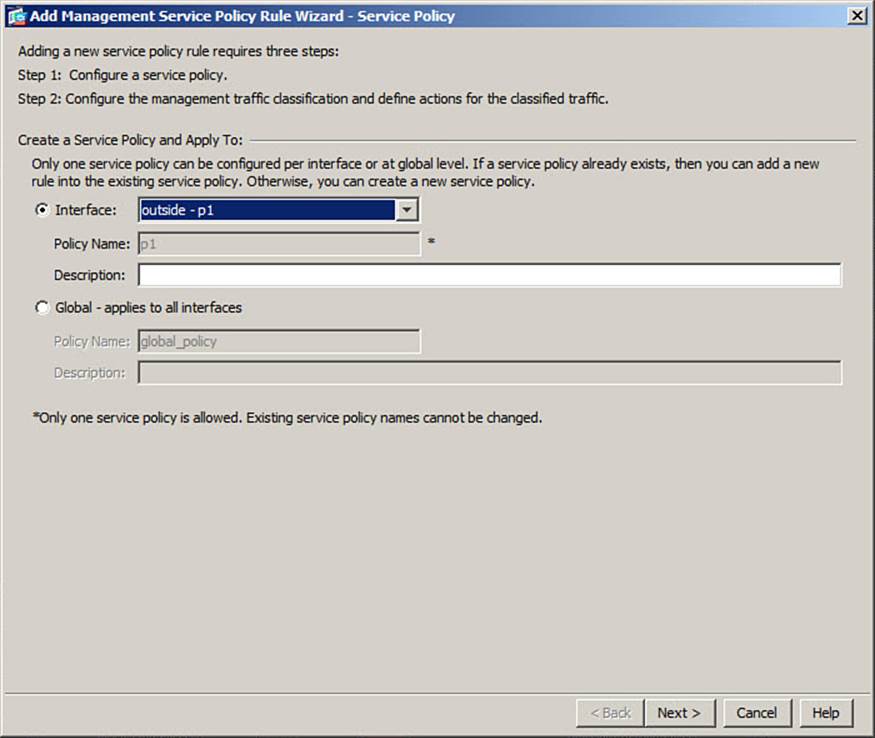
Figure 9-54. Configuring a New Service Policy to Limit ASA Management Traffic
Click the Next button to define the traffic matching criteria. In Figure 9-55, the management traffic class has been named MGMT-CLASS and will match against a fixed TCP or UDP port number.

Figure 9-55. Configuring a Management Class Map
In Figure 9-56, TCP port 443 (https) has been chosen. The goal is to limit the number of secure browser connections that can be initiated to the ASA, enabling it to keep control over its own resources.
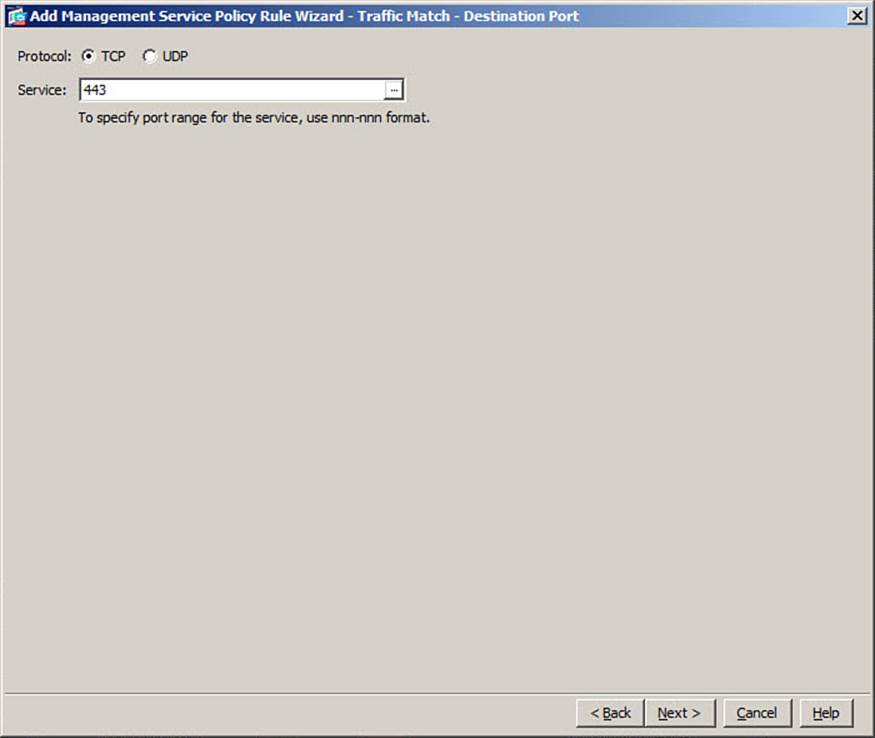
Figure 9-56. Specifying Management Traffic to Limit
Next, define the connection and embryonic connection limits that the ASA will impose. These values are 0 by default, permitting an unlimited number. In Figure 9-57, the connection limit has been left at 0, while the embryonic limit has been set to 5. Click the Finish button to complete the service policy configuration.
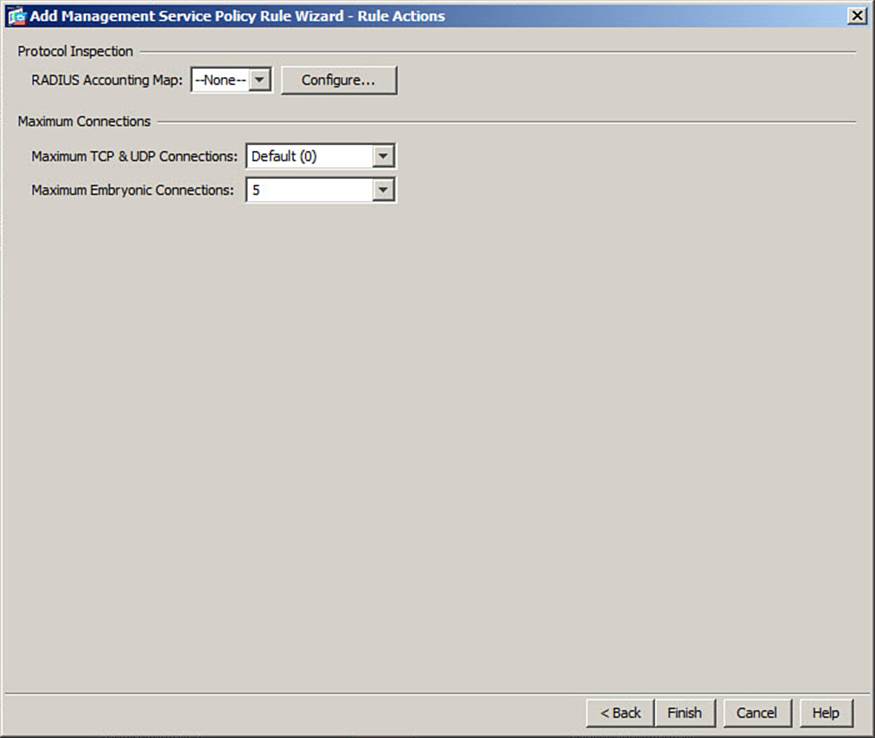
Figure 9-57. Setting Limits on Management Traffic Connections
Detecting and Filtering Botnet Traffic
In a botnet attack, individual hosts on the private, protected side of an ASA become infected with malware. Each of the infected hosts tries to contact a botnet control server located somewhere on the public Internet, as shown in Figure 9-58, to receive further instructions. The control server is then able to remotely control many infected hosts and align them in a coordinated attack against other resources.
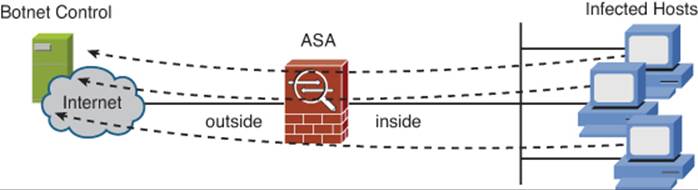
Figure 9-58. Botnet Activity Between Infected Hosts and a Control Server
Because the infected hosts are located on a secure side of the ASA, they are likely to be free to open outbound connections just like any other protected host. You can leverage the Cisco ASA Botnet Traffic Filter feature to detect botnet activity and prevent infected hosts from contacting their control servers.
When the Botnet Traffic Filter is enabled, an ASA maintains two reputation databases:
• A dynamic SensorBase database that is downloaded periodically from Cisco, which contains information about known botnet control servers
• A static database that you can populate, which can contain a “whitelist” of known good IP addresses and domain names or a “blacklist” of known bad servers
The ASA will monitor DNS queries that involve known bad machines listed in the databases. When a match is found, the ASA adds the name and IP address into a special DNS reverse lookup cache. As it builds new connections, the ASA will compare DNS replies and the source and destination addresses against its databases. If a connection to a known bad machine is found, a logging message is generated and the ASA can drop the connection.
The Botnet Traffic Filter feature is dependent upon four things:
• A Botnet Traffic Filter license purchased from Cisco and installed on the ASA
• A DNS server, which the ASA uses to look up names and addresses in the static database
• Botnet Traffic Filter DNS snooping, which enables the ASA to intercept DNS queries from infected hosts and match against hostnames it finds in the databases
• Live connectivity to the Internet, so that the Botnet Traffic Filter feature can communicate with Cisco
Before you begin configuring Botnet Traffic Filtering, verify that the feature license has been enabled. You can use the show version command to see a list of ASA features and their license status. Make sure Botnet Traffic Filter is listed as Enabled, as in Example 9-28.
Example 9-28. Verifying the Botnet Traffic Filter License Status
ciscoasa# show version
Cisco Adaptive Security Appliance Software Version 8.2(3)
Device Manager Version 6.3(4)
Compiled on Fri 06-Aug-10 07:51 by builders
System image file is "disk0:/asa823-k8.bin"
Config file at boot was "startup-config"
ciscoasa up 12 days 13 hours
[output truncated for clarity]
AnyConnect Essentials : Disabled
Advanced Endpoint Assessment : Disabled
UC Phone Proxy Sessions : 2
Total UC Proxy Sessions : 2
Botnet Traffic Filter : Enabled
Configuring Botnet Traffic Filtering with ASDM
You can use ASDM to enable and configure Botnet Traffic Filtering. Navigate to Configuration > Firewall, expand Botnet Traffic Filter, and use the following steps:
Step 1. Configure the dynamic database.
Step 2. Configure the static database.
Step 3. Enable DNS snooping.
Step 4. Enable the Botnet Traffic Filter.
The sections that follow provide information about the specific tasks involved with each step.
Step 1: Configure the Dynamic Database
Select Botnet Database to display the database configuration options, as shown in Figure 9-59. Next, check the Enable Botnet Updater Client and Use Botnet Data Dynamically from Updater Server check boxes to download and use the dynamic database obtained from Cisco. The database is automatically downloaded and updated periodically at one-hour intervals, but it cannot be saved to the startup configuration. You can manually fetch the database or purge it from the ASA’s running memory, if needed, by clicking the respective buttons. Click the Apply button to apply your configuration changes.
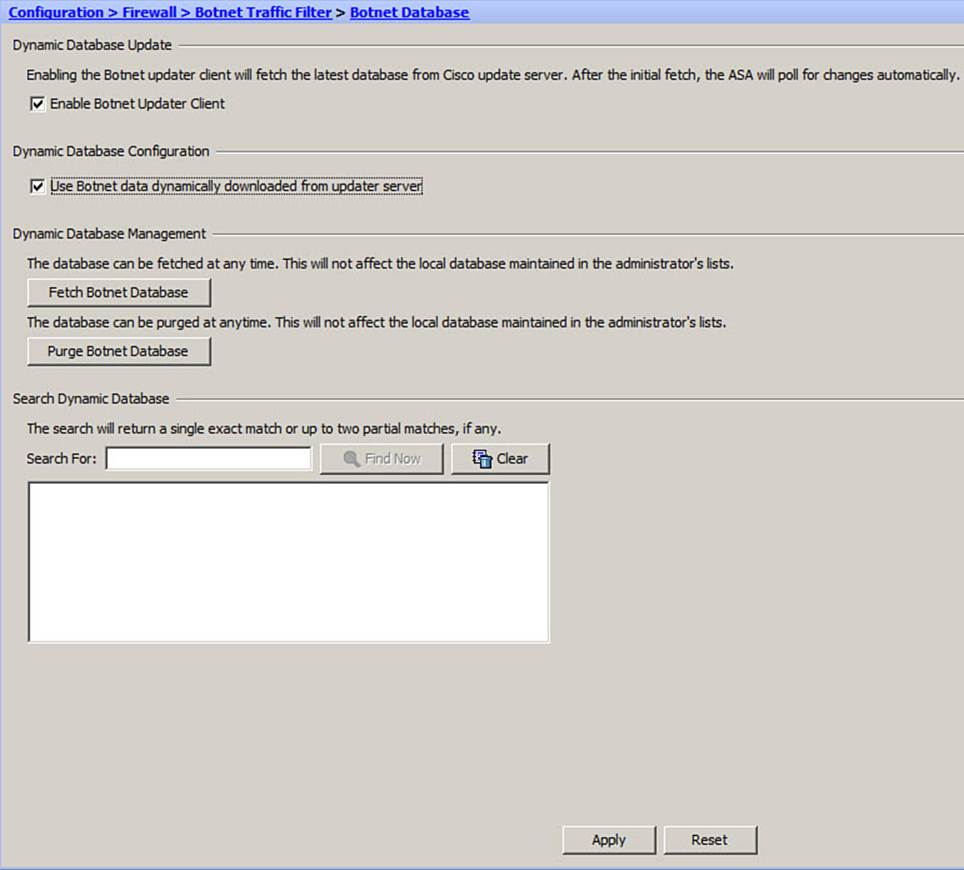
Figure 9-59. Configuring the Botnet Dynamic Database Options
Step 2: Configure the Static Database
Select Black and White Lists under Botnet Traffic Filter to display configuration options for the blacklist and whitelist in the static database. In Figure 9-60, the name www.most-lynice.com has been added to the whitelist. To add the name www.badnews4u.com to the blacklist, click the Addbutton next to Black List, and then enter the hostname and click OK. Once you have finished editing the lists, click the Apply button.
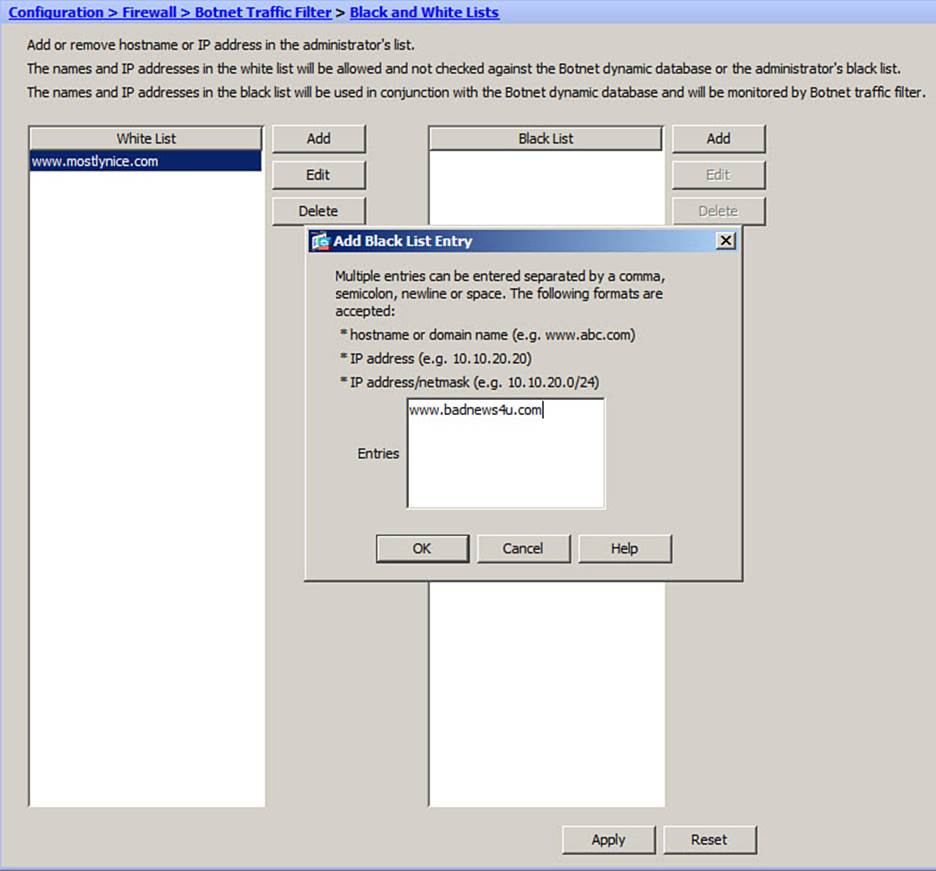
Figure 9-60. Configuring the Static Blacklist and Whitelist Databases
Step 3: Enable DNS Snooping
Configuring DNS snooping is much easier in ASDM than it is from the CLI. Select DNS Snooping under Botnet Traffic Filter to display the DNS snooping configuration options, as shown in Figure 9-61. To enable DNS snooping globally, just check the box under the heading DNS Snooping Enabled and click the Apply button.
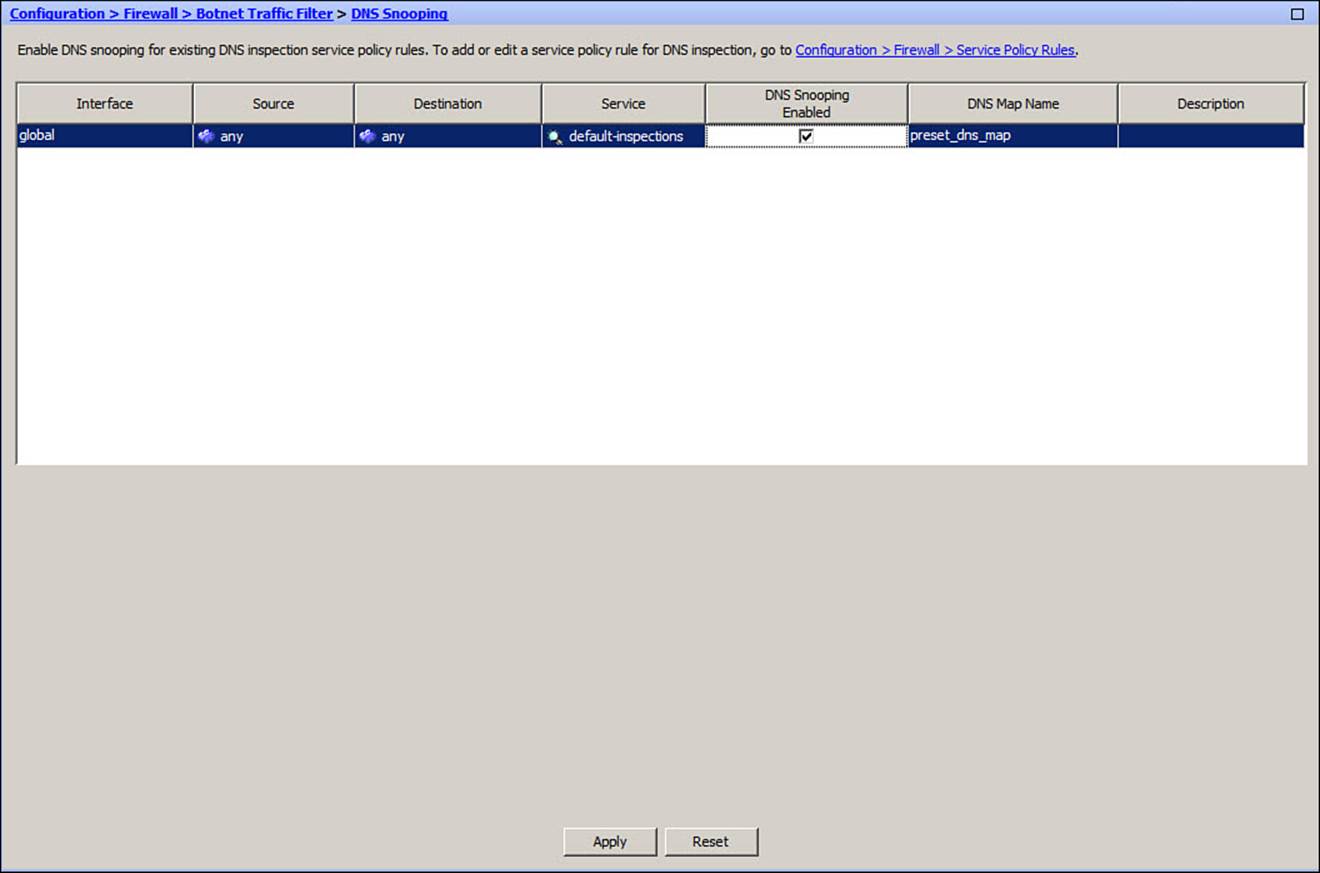
Figure 9-61. Enabling DNS Snooping for Botnet Traffic Filtering
Step 4: Enable the Botnet Traffic Filter
Select Traffic Settings under Botnet Traffic Filter to display the Traffic Settings options window. In the upper portion of the window, check the box next to each interface where Botnet Traffic Filtering should be enabled. In Figure 9-62, only the outside interface is selected because it is the only one facing the public Internet. As an option, you can click the Manage ACL button to create and apply an access list to match a subset of traffic for filtering.
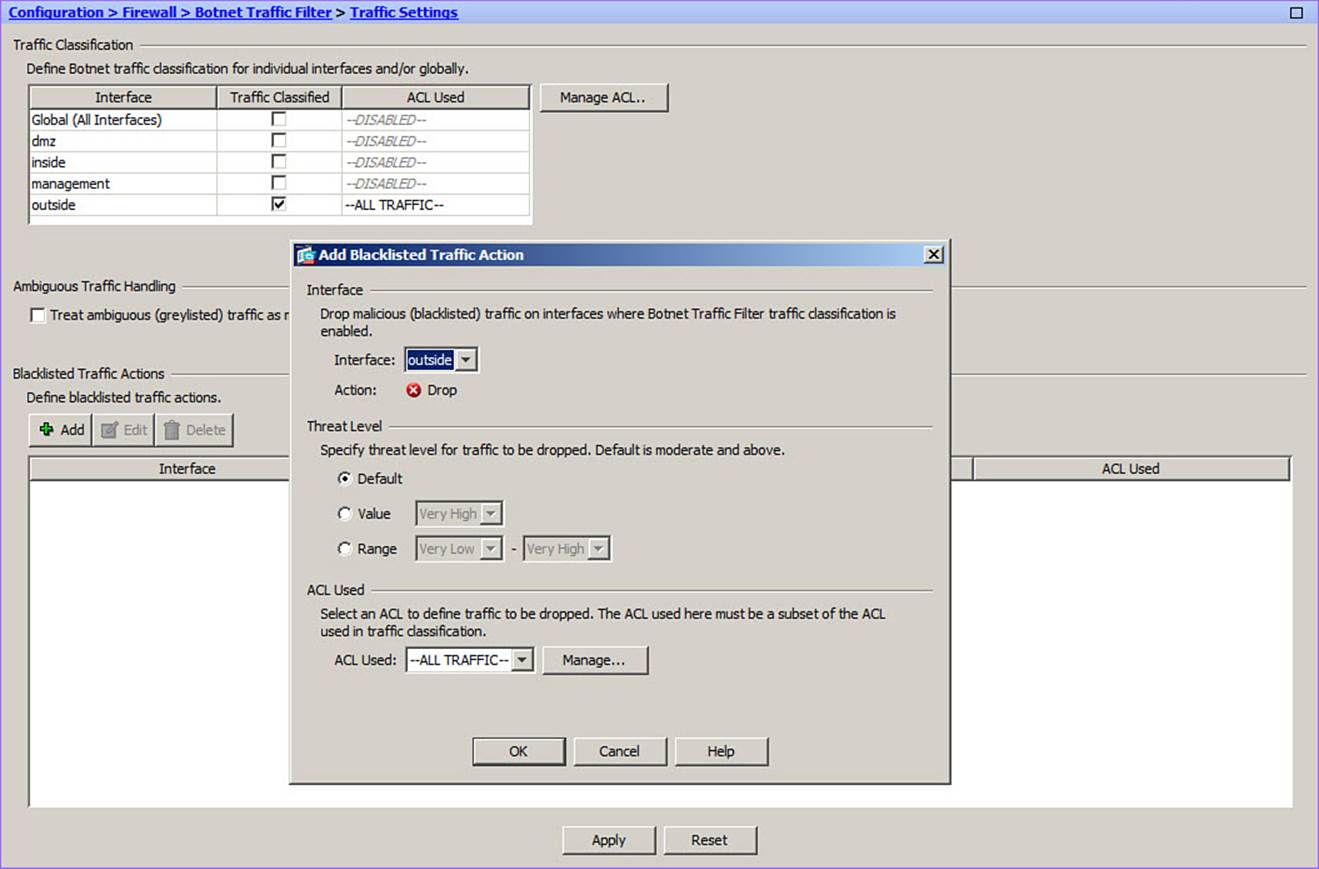
Figure 9-62. Configuring Botnet Traffic Filter Settings and Actions
By default, the Blacklisted Traffic Actions section in the bottom portion of the window is empty. This means that any botnet-related traffic will only be logged. If you want to have that traffic dropped instead, you need to add an action by clicking the Add button. In Figure 9-62, an action has been added for the outside interface to drop traffic. The Threat Level has been left to the default, which will match any blacklisted site marked with a threat level of Moderate to Very High. Click the OK button to add the action, and then click the Apply button to apply your changes.
Configuring Botnet Traffic Filtering with the CLI
You can also configure Botnet Traffic Filtering with the CLI by using the following steps:
Step 1. Configure the dynamic database.
Step 2. Configure the static database.
Step 3. Enable DNS snooping.
Step 4. Enable the Botnet Traffic Filter.
The sections that follow provide information about the specific tasks involved with each step.
Step 1: Configure the Dynamic Database
With the following commands, you can enable database downloading and the use of the database, respectively:
ciscoasa(config)# dynamic-filter updater-client enable
ciscoasa(config)# dynamic-filter use-database
Note
The ASA uses DNS to resolve the name of the database server. If you do not have DNS domain lookup configured properly, the ASA will return the following message:
ciscoasa(config)# dynamic-filter updater-client enable
WARNING: Can't resolve update-manifests.ironport.com, make sure dns nameserver is
configured
ciscoasa(config)#
The ASA updates its database once per hour, by default. The local database is stored in running memory.
Step 2: Configure the Static Database
As an option, you can define individual names or IP addresses in a static database. With the following commands, you can add a host to the blacklist or to the whitelist. Any connections discovered to or from a blacklisted host will be dropped, while a whitelisted host will be permitted and logged:
ciscoasa(config)# dynamic-filter {blacklist | whitelist}
ciscoasa(config-llist)# name hostname
-OR-
ciscoasa(config-llist)# address ip-address
Step 3: Enable DNS Snooping
As an option, you can enable DNS snooping so that the ASA can match against host names found in the database. DNS snooping is configured in the global_policy policy map, as an additional option to the DNS inspector. You can use the following commands to add DNS snooping to the default DNS inspector configuration:
ciscoasa(config)# policy-map global_policy
ciscoasa(config-pmap)# class inspection_default
ciscoasa(config-pmap-c)# inspect dns preset_dns_map dynamic-filter-snoop
Step 4: Enable the Botnet Traffic Filter
You can use the dynamic-filter enable command to enable botnet monitoring using the dynamic database. Monitoring will log botnet activity, but will not drop any connections. You can identify a specific interface or an access list that will be used to match a subset of traffic; if neither is entered with the following command, then Botnet filter monitoring will be enabled globally:
ciscoasa(config)# dynamic-filter enable [interface name] [classify-list access-
list]
To drop connections involved in botnet activity, you use the dynamic-filter drop blacklist command:
ciscoasa(config)# dynamic-filter drop blacklist [interface name][action-classify-
list subset_access_list] [threat-level {eq level | range min max}]
You can identify a specific interface or an access list that will be used to match a subset of traffic.
Cisco rates each entry in the dynamic database with one of the following threat levels: very low, low, moderate, high, very high. By default, the Botnet Traffic Filter will drop connections that are involved with hosts from a moderate to a very-high threat level. You can specify a single threat level or a range of threat levels, though it’s best to use the default. Entries that are found in the static blacklist automatically receive a threat level of very high.
Note
You should always enable Botnet Traffic Filtering on all interfaces that face the public Internet.
As an example, suppose you would like to begin using Botnet Traffic Filtering, along with DNS snooping. Connections to any blacklisted sites with threat levels moderate to very high should be dropped. In addition to the dynamic database from Cisco, you have discovered that hostwww.badnews4u.com is a known bad site. Host www.mostlynice.com is a suspect site, but connections to it should be permitted and logged. You could use the commands listed in Example 9-29 to accomplish your goal.
Example 9-29. Configuring Botnet Traffic Filtering
ciscoasa(config)# dynamic-filter updater-client enable
ciscoasa(config)# dynamic-filter use-database
ciscoasa(config)# dynamic-filter blacklist
ciscoasa(config-llist)# name www.badnews4u.com
ciscoasa(config)# dynamic-filter whitelist
ciscoasa(config-llist)# name www.mostlynice.com
ciscoasa(config-llist)# exit
ciscoasa(config)# policy-map global_policy
ciscoasa(config-pmap)# class inspection_default
ciscoasa(config-pmap-c)# inspect dns preset_dns_map dynamic-filter-snoop
ciscoasa(config-pmap-c)# exit
ciscoasa(config-pmap)# exit
ciscoasa(config)# dynamic-filter drop blacklist interface outside
You can use the commands listed in Table 9-22 to verify Botnet Traffic Filtering operation.
Table 9-22. Commands to Verify Botnet Traffic Filtering Operation

Using Threat Detection
Some malicious activity might occur without any prior background information. For example, a host might use a discovery or attack scheme that is an entirely new approach. An ASA might not have signatures or blacklist information that can be used to match the attack.
Threat detection is a feature that can be leveraged to discover suspicious activity passing through an ASA. By monitoring the rate at which security policies are triggered, the ASA can detect abnormal conditions that might indicate an attack in progress.
The threat detection feature can be described by the following three levels:
• Basic threat detection: Monitors the average and burst rate of dropped packets and security events over an interval; generates a logging message when a threshold is exceeded
• Advanced threat detection: Gathers statistics for both allowed and denied packets for objects such as hosts, protocols, ports, and access lists; generates a logging message when the TCP Intercept rate exceeds a threshold
• Scanning threat detection: Maintains a database of suspicious activity for each host; can detect a host that is scanning for vulnerable targets based on the average and burst rates of scanning events; generates logging messages and can automatically shun attacking hosts
You can configure threat detection in phases, adding more progressive levels as needed. Be aware that advanced and scanning threat detection can tax the ASA resources because they monitor and gather extensive and granular information.
Configuring Threat Detection in ASDM
You can configure all forms of threat detection from one window in ASDM. Begin by going to Configuration > Firewall > Threat Detection. Use the following steps as you move through the configuration:
Step 1. Configure basic threat detection.
Step 2. Configure advanced threat detection.
Step 3. Configure scanning threat detection.
Step 1: Configure Basic Threat Detection
Begin by checking the Enable Basic Treat Detection check box at the top of the window, as shown in Figure 9-63. All the default rate intervals and thresholds will already be in place. ASDM does not offer a way to adjust the parameters.
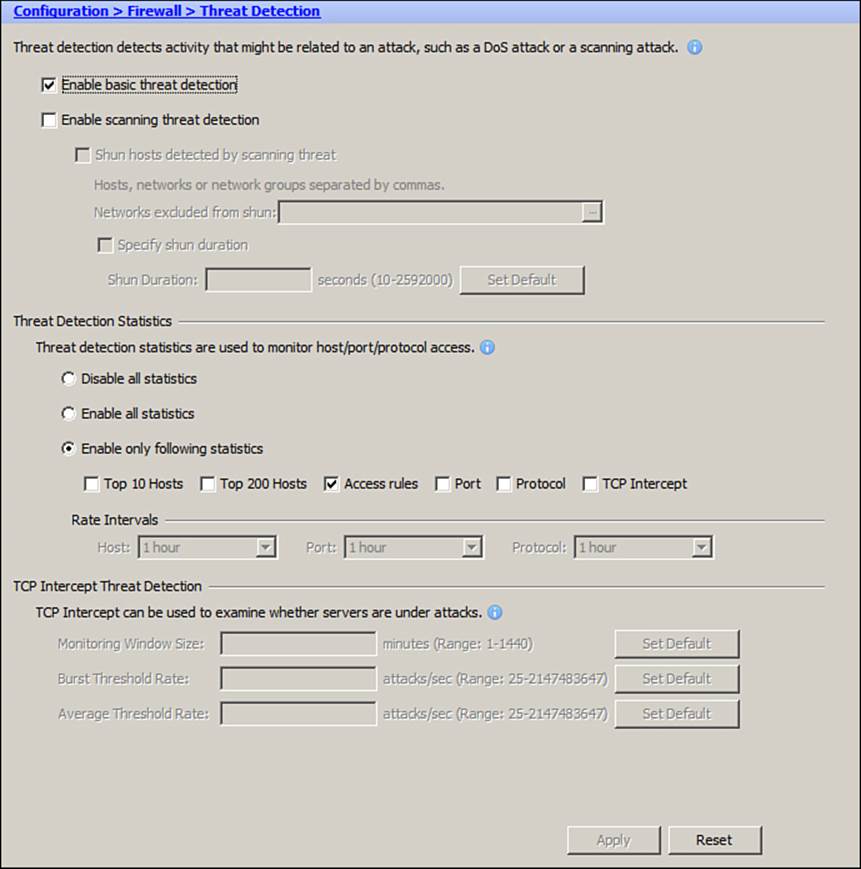
Figure 9-63. Enabling Basic Threat Detection in ASDM
Step 2: Configure Advanced Threat Detection
You can configure advanced threat detection to gather statistics about suspicious activity going either to or from individual objects. Based on the statistics, you can determine which protocols or ports are being used for an attack, which access list rules are being triggered, and if a host is attacking or being attacked.
You can enable advanced threat detection by clicking one of the radio buttons under Threat Detection Statistics. In Figure 9-64, Enable All Statistics has been chosen so that protocol, port, access-list, and host statistics will be collected. Under Rate Intervals, only the least frequent value (1 hour) for Host, Port, and Protocol, has been chosen, to lighten the load on ASA resources.
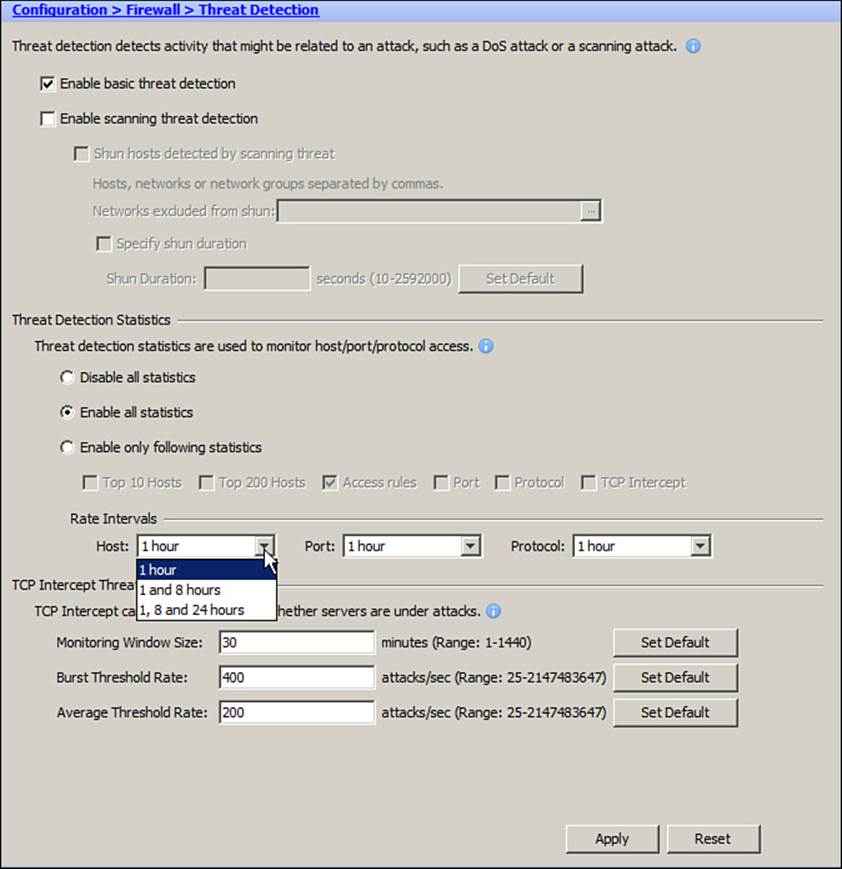
Figure 9-64. Configuring Advanced Threat Detection in ASDM
Advanced threat detection can also gather statistics about TCP Intercept activity and reports when thresholds are exceeded. The TCP Intercepts are counted over the duration of a rate interval monitoring window, which is 30 minutes by default. If the number of attacks, or TCP Intercept events, rises above an average rate threshold (default 200 per second) or above a burst threshold (default 400 per second), a logging message is generated. The default values are shown in Figure 9-64, although you can adjust the values at the bottom of the window.
Step 3: Configure Scanning Threat Detection
You can enable scanning threat detection by checking the Enable Scanning Threat Detection check box at the top of the Threat Detection configuration window. Under that is a check box to enable automatic shunning. You can also identify any IP addresses that should be excluded from shuns and set the shun duration.
In Figure 9-65, scanning threat detection has been enabled. Shuns have also been enabled, but hosts in the 192.168.101.0/24 network will be excluded. The default shun duration of 3600 seconds (1 hour) will be used.
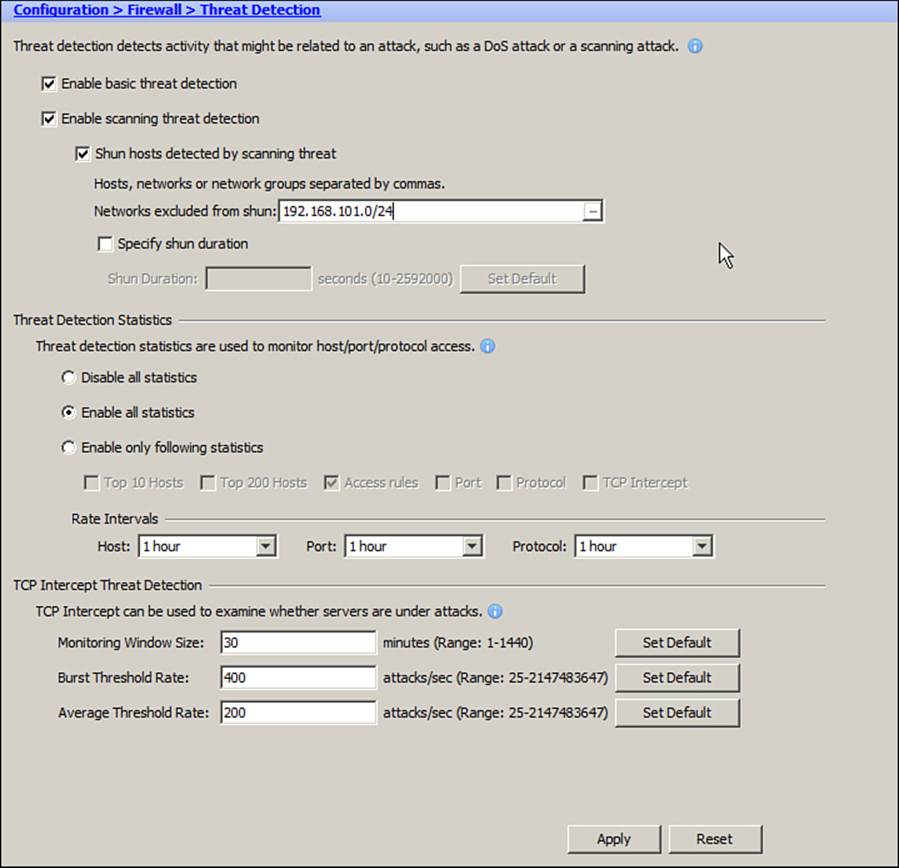
Figure 9-65. Configuring Scanning Threat Detection in ASDM
Be sure to click the Apply button to apply all of the threat detection configuration changes you have made.
Configuring Threat Detection with the CLI
Use the following steps to configure threat detection with the CLI:
Step 1. Configure basic threat detection.
Step 2. Configure advanced threat detection.
Step 3. Configure scanning threat detection.
Step 1: Configure Basic Threat Detection
Begin by enabling basic threat detection with the following command:
ciscoasa(config)# threat-detection basic-threat
Each type of detected event has three thresholds that can be set:
• Rate interval: The period of time that statistics are averaged
• Average threshold: The number of detected events per second that must be exceeded
• Burst threshold: The number of detected events per second exceeded over a shorter burst window; the larger of either 10 seconds or 1/30 of the rate interval
Next, as an option, you can set up the rate interval and thresholds for each type of detected event with the following configuration command:
ciscoasa(config)# threat-detection rate [acl-drop | bad-packet-drop | conn-limit-drop
| dos-drop | fw-drop | icmp-drop | inspect-drop | interface-drop | scanning-threat
| syn-attack] rate-interval rate_interval average-rate average_threshold_rate
burst-rate burst_threshold_rate
In fact, you can repeat this command up to three times to define multiple rate intervals and thresholds for each event type. By default, each event type has two threat-detection rate commands preconfigured. The default configuration should fit most scenarios, but you can tune the parameters to meet your specific needs.
You can get a feel for the events, the event type keywords, and the default rates and thresholds by looking over Table 9-23. You should become familiar with the types of events and the general command syntax, without becoming overwhelmed with the volume of information.
Table 9-23. Default Basic Threat Detection Rate Intervals and Thresholds
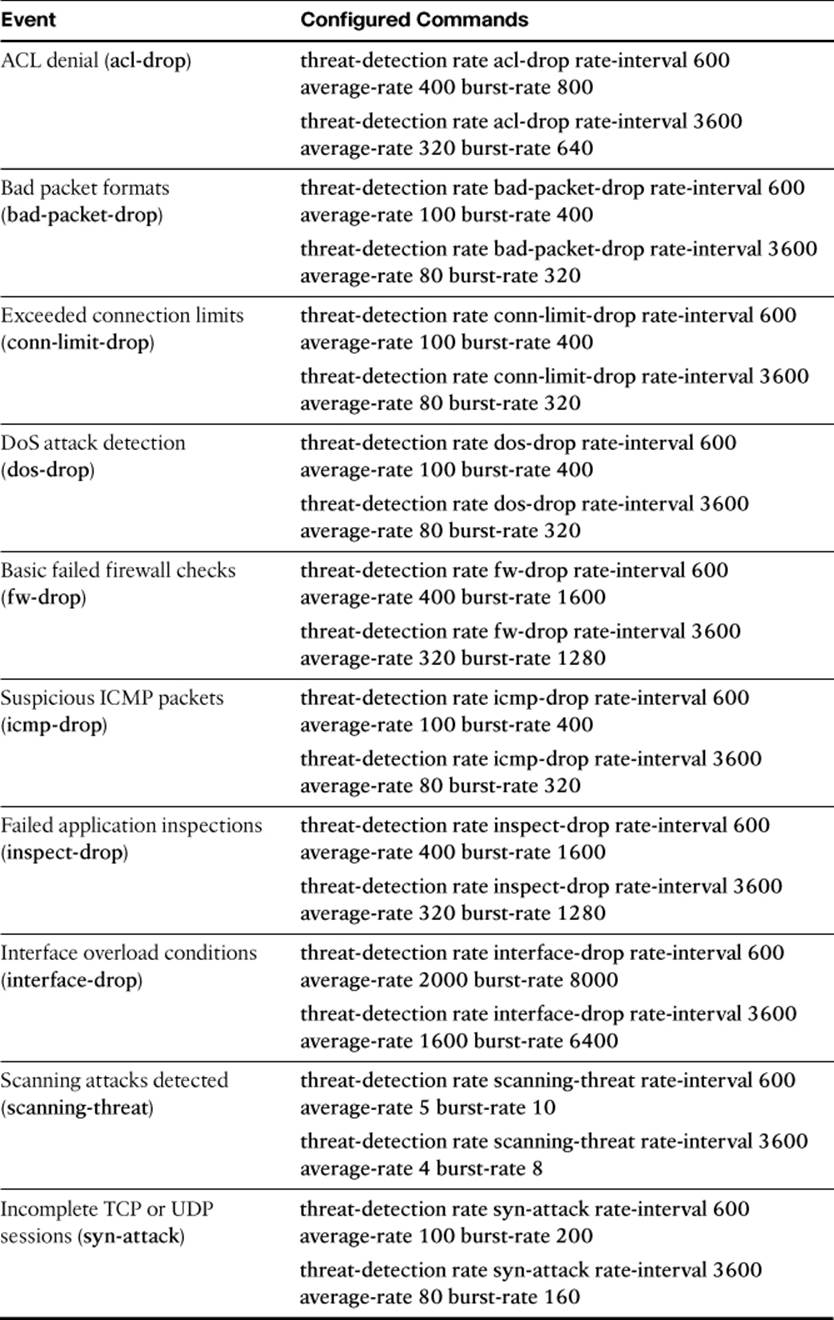
Basic threat detection will generate a logging message when an event type threshold is exceeded, so that you can learn about the activity and have an audit trail. In case the average rate and burst rate thresholds are both exceeded for a single event type, then only one logging message will be produced.
Example 9-30 lists the commands that can be used to enable basic threat detection and to change the ACL denial threshold for a 600-second rate interval to have an average rate of 300 drops per second and a burst rate of 600 drops per second.
Example 9-30. Enabling Basic Threat Detection
ciscoasa(config)# threat-detection basic-threat
ciscoasa(config)# threat-detection rate acl-drop rate-interval 600 average-rate 300
burst-rate 600
Step 2: Configure Advanced Threat Detection
With advanced threat detection, the ASA can gather statistics about suspicious activity going either to or from individual objects. Based on the statistics, you can determine which protocols or ports are being used for an attack, which access list rules are being triggered, and whether a host is attacking or being attacked.
You can choose one or more object types from Table 9-24 and enter the configuration commands listed. As an alternative, you can enter the threat-detection statistics command with no further arguments to enable statistics gathering for all event types.
Table 9-24. Advanced Threat Detection Object Types and Configuration Commands
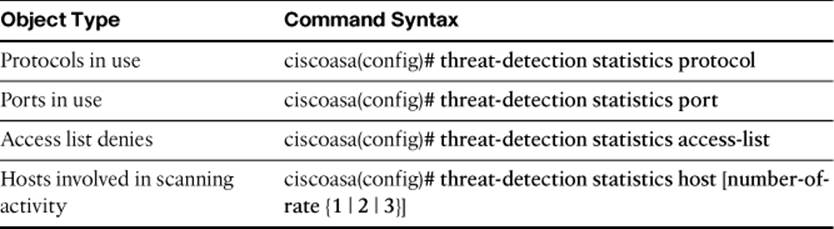
As an alternative, you can enable all types of advanced threat detection statistics gathering by using the threat-detection statistics command with no additional arguments.
When the host keyword is used, statistics are gathered for three different rate interval configurations (1 hour, 8 hour, and 24 hour) by default. You can add the number-of-rate keyword to specify the shortest number of rate intervals to use. Because host statistics gathering is CPU and memory intensive, you should try to minimize its use. If your ASA is under a heavy traffic load, consider enabling host statistics only temporarily.
Advanced threat detection can also gather statistics about TCP Intercept activity and reports when thresholds are exceeded. The TCP Intercepts are counted over the duration of a rate interval monitoring window, which is 30 minutes by default. If the number of attacks, or TCP Intercept events, rises above an average rate threshold (default 200 per second) or above a burst threshold (default 400 per second), a logging message is generated.
You can configure TCP Intercept threat detection by using the following command:
ciscoasa(config)# threat-detection statistics tcp-intercept [rate-interval
rate_interval] [average-rate average_threshold_rate] [burst-rate
burst_threshold_rate]
As an example, suppose you need to enable advanced threat detection to begin collecting statistics about suspicious activity. All possible types of statistics should be collected, but the host statistics should be reduced to one rate interval to conserve ASA memory. TCP Intercept statistics should also be collected using the default threshold values:
ciscoasa(config)# threat-detection statistics
ciscoasa(config)# threat-detection statistics host number-of-rate 1
ciscoasa(config)# threat-detection statistics tcp-intercept
Step 3: Configure Scanning Threat Detection
Scanning threat detection gathers statistics about individual hosts and their activity. The ASA can determine when a host is actively performing a network scan or sweep. If a scanning threat rate threshold is exceeded, the ASA can generate a logging message and can take aggressive action by shunning the attacker.
You can enable scanning threat detection with the following command:
ciscoasa(config)# threat-detection scanning-threat
You can also configure a rate interval, an average event rate, and a burst rate with the following command:
ciscoasa(config)# threat-detection rate scanning-threat rate-interval
rate_interval average-rate average_threshold_rate burst-rate
burst_threshold_rate
This command can be repeated to define up to three sets of values. By default, scanning threat detection is configured with the following two commands:
ciscoasa(config)# threat-detection rate scanning-threat rate-interval 600
average-rate 5 burst-rate 10
ciscoasa(config)# threat-detection rate scanning-threat rate-interval 3600
average-rate 4 burst-rate 8
By default, scanning threat detection will generate logging messages when scanning activity is detected. You can configure the ASA to take action by automatically shunning an attacking host with the following command:
ciscoasa(config)# threat-detection scanning-threat shun [except {ip-address ip-addr
mask |object-group network_obj_group_id} | duration seconds]
By default, shuns are created with a duration of 3600 seconds (1 hour). If there are IP addresses that you want to exclude, so that shuns are never created for them, you can specify an address and mask or a network object group.
The following commands can be used to enable scanning threat detection and automatic shunning, with the exception of any host in the 192.168.101.0/24 subnet:
ciscoasa(config)# threat-detection scanning-threat
ciscoasa(config)# threat-detection scanning-threat shun except ip-address
192.168.101.0 255.255.255.0
You can verify threat detection operation with the show commands listed in Table 9-25.
Table 9-25. Commands Used to Verify Threat Detection Operation
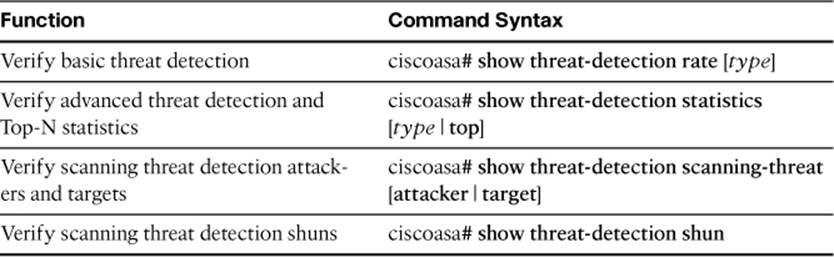
Exam Preparation Tasks
As mentioned in the section, “How to Use This Book,” in the Introduction, you have a couple of choices for exam preparation: the exercises here, Chapter 17, “Final Preparation,” and the exam simulation questions on the CD-ROM.
Review All Key Topics
Review the most important topics in this chapter, noted with the Key Topic icon in the outer margin of the page. Table 9-26 lists a reference of these key topics and the page numbers on which each is found.
Table 9-26. Key Topics for Chapter 9

Define Key Terms
Define the following key terms from this chapter and check your answers in the glossary:
Modular Policy Framework (MPF)
service policy
policy map
class map
application inspection engine
embryonic connection
dead connection detection (DCD)
TCP normalizer
deep packet inspection (DPI)
protocol verification
protocol minimization
payload minimization
application layer signature
regular expression (regex)
botnet attack
SensorBase
whitelist
blacklist
threat detection
Command Reference to Check Your Memory
The FIREWALL exam focuses on practical, hands-on skills that are used by a networking professional. Therefore, you should be able to identify the commands needed to configure and test an ASA feature. Review the examples and command syntax tables that are provided throughout this chapter to make sure you can identify the basic keywords that are needed.
All materials on the site are licensed Creative Commons Attribution-Sharealike 3.0 Unported CC BY-SA 3.0 & GNU Free Documentation License (GFDL)
If you are the copyright holder of any material contained on our site and intend to remove it, please contact our site administrator for approval.
© 2016-2026 All site design rights belong to S.Y.A.