CCNP Security FIREWALL 642-618 Official Cert Guide (2012)
Chapter 10. Using Proxy Services to Control Access
This chapter covers the following topics:
• User-Based (Cut-Through) Proxy Overview: This section defines this feature and provides an overview of the process on the Cisco ASA.
• AAA on the ASA: This section reviews the various roles that AAA can accommodate for the ASA.
• User-Based Proxy Preconfiguration Steps and Deployment Guidelines: This section provides expert guidance for deploying the cut-through proxy feature in enterprise environments.
• Direct HTTP Authentication with the Cisco ASA: This section explains why this option might be required in an enterprise environment, and details the required configuration.
• Direct Telnet Authentication: This section describes the option of direct Telnet authentication and its configuration.
• Configuration Steps of User-Based Proxy: This section provides an overview of the steps required to configure user-based proxy.
• Configuring User Authentication: This section details the configuration of the user authentication.
• Configuring Authentication Prompts and Timeouts: This section describes how to customize the authentication process using custom prompts and custom timeout values.
• Configuring User Authorization: This section details the configuration of user authorization.
• Configuring User Session Accounting: This section describes the configuration of user session accounting.
• Troubleshooting Cut-Through Proxy Operations: This section provides a structured approach for troubleshooting issues with cut-through proxy operations and demonstrates the power of syslog with this feature.
• Using Proxy for IP Telephony and Unified TelePresence: This section details the various Cisco Unified Communications proxy services that are possible on the Cisco ASA.
The Cisco Adaptive Security Appliance (ASA) now offers many options for proxy services. Thanks to robust support for authentication, authorization, and accounting (AAA) services, what is termed user-based, or cut-through proxy services are possible. This method of proxy allows the ASA to identify the user and then enact particular polices for the user on the network beyond the ASA.
With the popularity of Cisco Unified Communications, the ASA also provides a critical set of Unified Communications–related proxy services, which includes Phone Proxy, TLS Proxy, Mobility Proxy, and Presence Federation Proxy.
“Do I Know This Already?” Quiz
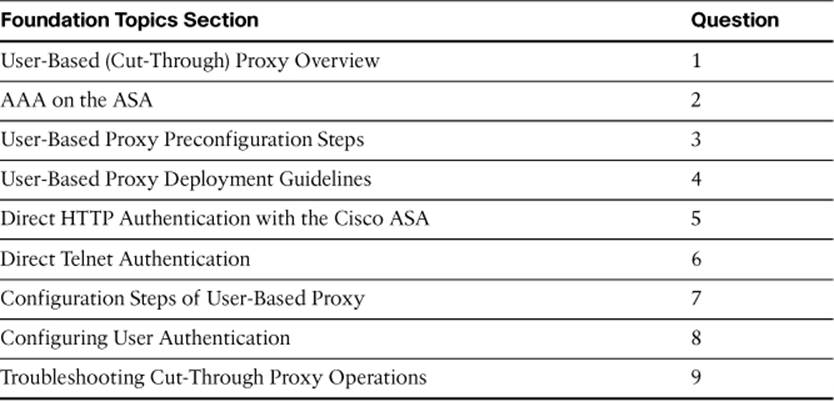
The “Do I Know This Already?” quiz allows you to assess whether you should read this entire chapter thoroughly or jump to the “Exam Preparation Tasks” section. If you are in doubt about your answers to these questions or your own assessment of your knowledge of the topics, read the entire chapter. Table 10-1 lists the major headings in this chapter and their corresponding “Do I Know This Already?” quiz questions. You can find the answers in Appendix A, “Answers to the ‘Do I Know This Already?’ Quizzes.”
Table 10-1. “Do I Know This Already?” Section-to-Question Mapping
Caution
The goal of self-assessment is to gauge your mastery of the topics in this chapter. If you do not know the answer to a question or are only partially sure of the answer, you should mark that question wrong for purposes of the self-assessment. Giving yourself credit for an answer you correctly guess skews your self-assessment results and might provide you with a false sense of security.
1. Which protocol cannot be used to trigger the user-based proxy capability on the ASA?
a. HTTP
b. TFTP
c. HTTPS
d. FTP
e. TELNET
2. Which of these is not a typical use of AAA on the Cisco ASA?
a. To control administrative access
b. To enable remote-access VPNs
c. To enable IPS capabilities on the ASA
d. To control user sessions across the device
3. Which of these is not typically considered prior to configuring user-based proxy?
a. The Modular Policy Framework Global Policy configuration
b. Information about the AAA infrastructure
c. The user-specific policies
d. Which traffic passing through the device you want to integrate with AAA
4. Which of the following are valid deployment guidelines for user-based proxy services? (Choose all that apply.)
a. Avoid in cases where IP addresses are shared.
b. Consider an external AAA server for scalability.
c. Remove any interface ACLs in place on the inside interface.
d. Engage in these policies only over trusted networks.
5. Which method of authentication presents to the user a web page from the ASA to input credentials?
a. Virtual HTTP
b. HTTP redirection
c. AAA Local
d. AAA External
6. In which situation would you recommend the direct Telnet authentication method?
a. You are using local AAA services.
b. You are using an external AAA service.
c. You are using traffic for which the ASA does not have an authentication proxy.
d. Traffic through the ASA is unusually high in volume.
7. Which of the following is not optional when configuring user-based proxy?
a. Configure accounting rules.
b. Change authentication prompts and timeouts.
c. Configure authentication rules on the ASA.
d. Configure authorization.
8. Which ASA verification command displays a Most Seen column?
a. show aaa users
b. show aaa
c. show users
d. show uauth
9. You need to test your AAA configuration on your Cisco ASA. You want to confirm that a particular server is configured correctly with the correct protocol. You also want to verify that a particular user account and password entry will successfully authenticate. What command should you use?
a. show aaa test
b. test aaa-server
c. test user
d. show aaa user test
Foundation Topics
You might be in an environment where you want to configure different network access policies based on the identity of the user who is attempting to communicate through your Cisco ASA. This capability is termed user-based policies. Cisco also calls this cut-through proxy in some of its documentation. This text will use both terms interchangeably. What is a proxy in this context? It is a device that has the capability to terminate and then reoriginate a connection between some client device in the network and a device acting as a server. This chapter provides all the details of this cut-through proxy configuration, including important information you should consider before and after deploying this Cisco ASA functionality.
This chapter also provides details regarding Cisco Unified Communications proxy features. These features enable the Cisco ASA to terminate encrypted communications, apply a security policy of the organization, and then forward the information along in a re-encrypted form. This not only ensures that no prying eyes can see the original information, but also ensures that your organization can enforce its prescribed access and threat defense policies.
User-Based (Cut-Through) Proxy Overview
User-based or cut-through proxy capabilities are possible on the Cisco ASA thanks to the tight integration with authentication, authorization, and accounting (AAA) services. If you properly configure this feature, when a user attempts to transit your Cisco ASA and access a resource, the ASA will check the user’s identity against a local or remote user database. This is the authentication aspect of the process. Next, user-specific policies can be applied (authorization). Finally, information about user-specific traffic can be sent to a server set up to collect this information (accounting). Although this process sounds lengthy, most of these mechanics take place only once, after which the traffic of the user is “cut through” efficiently.
User Authentication
Here is a more detailed look at the mandatory user authentication process used in cut-through proxy:

• A user of your network attempts to access a resource that requires authentication. The ASA provides a username/password prompt. You configure exactly which resources you want to trigger this authentication behavior.
• This authentication process needs to occur only once per source IP address for all the authentication rules that you configure on the Cisco ASA. This is where the cut-through part of the name originates. The credentials of the user are cached on the Cisco ASA so that subsequent authentication requests do not have to transpire. You can control the timeout behavior of this process.
• Initial authentication can be triggered only by one of the following protocols: HTTP, HTTPS, FTP, or TELNET.
User Authentication and Access Control
Notice that this user authentication described in the preceding list is an additional layer of access control that the Cisco ASA can provide. For example, you know that interface access rules (access control lists [ACL]) form the basis for access control with the Cisco ASA. In fact, you need to carefully consider this in your design. As you plan for user authentication, realize that interface access rules must also permit the sessions that will require user authentication.
The section, “Configuring User Authorization,” covers per-user authorization. This powerful capability allows you to change the default Cisco ASA behavior and have it dynamically download interface access rules on a per-user basis. This could obviously override your need to explicitly permit sessions under the typical interface access rules policy.
Implementation Examples
Perhaps there are ten users in your network that you need to permit to use FTP and HTTPS. There users are located off of the outside interface of your Cisco ASA. The FTP and HTTPS services that they need are located in the inside interface portion of the network. Deploying user-based policies, you can configure the Cisco ASA and the internal AAA server to authenticate these ten users and permit their access. Other end users in your organization can attempt this access through the ASA, but will be denied by the Cisco ASA and the AAA server.
Perhaps this is all working perfectly when it is decided that you do not want one of these ten users to be able to access the FTP services in the inside network. Now, you can add authorization into the mix. The Cisco ASA informs the AAA server that this user is specifically attempting FTP, and the AAA server can fail to authorize such access. As you can see, these per-user policy capabilities add flexibility to the overall Cisco ASA design.
AAA on the ASA
Authentication, authorization, and accounting (AAA) services are used for a variety of purposes on the Cisco ASA. The main three are the following:
• Administrative access: Controlling who can access the ASA from an administrative perspective is a key function of AAA services. Often called console access, this is usually the first (and only) job that many administrators think about when they think AAA.
• Cut-through proxy: Obviously, the focus of this chapter and the controlling of user sessions that transpire “across” the Cisco ASA.
• Remote-access VPNs: AAA also plays a key role when the Cisco ASA participates in the creation of remote-access virtual private networks (VPN) for remote devices to gain secure and managed connectivity to a remote location.
AAA Deployment Options
A key decision that you face when planning to implement cut-through proxy is exactly how you are going to implement the AAA server. You can rely on the Cisco ASA itself to function as the AAA server (using its local authentication database) or you can rely on an external server, such as Cisco Secure Access Control Server (Cisco ACS). There are many versions of the Cisco ACS product, including software-based versions that run on Windows and UNIX platforms.
You should consider using the Cisco ASA local authentication database under the following conditions:
• You require only a single device (the Cisco ASA itself) to provide authentication of network users.
• You have a manageable number of user accounts.
• You require user authentication only in your network environment. You do not need the additional power given to you by authorization and accounting services. (If you also require authorization and accounting, you must have an external server that supports the RADIUS or TACACS+ security protocol.)
• The use of user accounts with static passwords is acceptable under your organization’s security policy.
You should consider using an external AAA server when any of the following conditions is met:
• Your environment features several devices and several existing user credential databases that you want to participate in cut-through proxy.
• You want to require stronger passwords than simple, static strings. An example of enforcing stronger password is the use of one-time passwords.
• You want to take advantage of authorization and accounting services in addition to authentication.
User-Based Proxy Preconfiguration Steps and Deployment Guidelines
Like many of the advanced features of the Cisco ASA, user-based proxy requires important planning before it can be successfully implemented. This section examines the information you should collect prior to deployment and the key criteria you should consider before implementation.
User-Based Proxy Preconfiguration Steps
Before you attempt to deploy user-based proxy configuration on the Cisco ASA, complete the following steps. How long it will take to complete these steps depends on the complexity of your deployment:
Step 1. Determine which traffic flowing through your Cisco ASA you want to control with AAA settings. Specifically, determine which traffic you need to authenticate and then, additionally, which traffic you need to authorize and provide accounting services for. Gathering this data is absolutely critical so that you can create the appropriate AAA rules on the Cisco ASA.
Step 2. Gather all the appropriate information regarding your AAA infrastructure. You need the names and IP addresses of servers, and details regarding the exact AAA services that are configured and available.
Step 3. Document all information regarding user-specific policies that you want to implement. This information is critical so that you can configure the Cisco ASA to enact the appropriate per-user authorization rules you want.
User-Based Proxy Deployment Guidelines
There are several important deployment guidelines that you need to consider prior to implementing cut-through proxy on the Cisco ASA.
The first deployment guideline is to consider using an external AAA server. The main reason to consider using an external AAA server is scalability. Should your implementation need to grow dramatically in the future, an external server ensures that you can minimize the number of changes necessary to accommodate the larger environment. Another important reason is that the external server allows much more manageability in the AAA implementation. For example, specific management applications and methodologies exist for Cisco ACS that can help you gain control over the network infrastructure and its access. Finally, an external AAA server provides a valuable central store of accounting information regarding user activities. For companies that are interested in storing this information, this external server is absolutely critical.
Another key deployment guideline is that the cut-through proxy feature should not be used over untrusted networks. Because the Cisco ASA tracks authenticated users by their IP address, a man-in-the-middle or spoofing attack could compromise resource access. In fact, the exchange of credential information from your end users and the Cisco ASA is carried out in clear text. This exchange should take place only over a trusted network.
The final deployment guideline is to avoid user-based proxy in any environment where users share IP address information. A classic example of such an environment is one that uses Port Address Translation (PAT, a form of Network Address Translation [NAT]). When two users share the same IP address (as in PAT), the Cisco ASA will authenticate the first user, and then allow subsequent users access based on that IP address. Typically, allowing this type of access is not desired, of course, so be careful implementing cut-through proxy in such environments.
Direct HTTP Authentication with the Cisco ASA
In some environments, sending an internal user’s credentials to a remote web server is not desirable. In such an environment, you can configure direct HTTP authentication with the Cisco ASA. This is recommended if your internal users’ credentials would be passed over an untrusted network to the remote web server. This is often the case in deployments where the Cisco ASA protects your internal network from the public Internet. Another case in which you might need to configure direct HTTP authentication with the Cisco ASA is where the remote web server requires different username and password credentials using a separate authentication process.
The Cisco ASA provides two solutions for direct HTTP authentication:
• HTTP redirection
• Virtual HTTP
HTTP Redirection
With the HTTP redirection method, the Cisco ASA actively listens for HTTP requests on TCP port 80. When the Cisco ASA detects such requests, it redirects internal users to a local web page that is a form for the user to input their appropriate credentials. If the user is authenticated properly with these credentials, the user is then directed to access the external web server. If the external web server requires its own separate authentication process and credentials, it can challenge the user directly at that time. This method nicely accommodates an external web server that has its own authentication scheme. Of the two solutions, HTTP redirection is the newer of the methods and does not require an allocated IP address.
Note
There is an option to redirect the HTTPS sessions of users to an internal web page served by HTTPS. The use of this method is not recommended because it may result in certificate warnings being sent to the end user. These warnings could be interpreted as an attempted man-in-the-middle attack.
Virtual HTTP
Using the virtual HTTP method, the users authenticate against the Cisco ASA using an IP address of the virtual HTTP server inside the Cisco ASA. No web page for credentials is required. Once the user is authenticated, their credentials are not sent further into the outside network in order to access the external web server. Notice that this method works well when you want to prohibit the sending of credentials into an untrusted network.
Direct Telnet Authentication
You might have a situation where you do not permit through your Cisco ASA the protocols that can trigger cut-through proxy. As a reminder, the protocols that can trigger this behavior are HTTP, HTTPS, FTP, and Telnet. Or you might have a situation where you want authentication to be triggered by a protocol that does not fall into the subset of protocols that function with cut-through proxy. In this case, internal users can be authenticated using the virtual Telnet feature. The user establishes a Telnet session to a virtual Telnet IP address you assign on the Cisco ASA. At this point, the user is challenged for a username and password that can be presented against the AAA services.
An example of an environment in which direct Telnet authentication might be useful is one in which you have internal users that must authenticate before accessing a POP3 mail server located beyond the Cisco ASA. This presents a particular challenge because POP3 is not compatible with the cut-through proxy feature. Users in this case simply authenticate against the virtual Telnet address of the ASA and then are passed beyond it to access the mail server.
Note
You should use great care to not send sensitive information if using the virtual Telnet feature across an untrusted network. Remember, Telnet is a clear-text protocol.
Configuration Steps of User-Based Proxy
The following are the configuration steps for the user-based proxy feature. Note that you do not necessarily have to perform all of these steps in every implementation. This chapter provides more information on each of these steps:
Step 1. Configure the Cisco ASA to communicate with one or more external AAA servers or, alternatively, configure AAA on the Cisco ASA itself.
Step 2. Configure the appropriate authentication rules on the ASA.
Step 3. (Optional) Change the authentication prompts and timeouts.
Step 4. (Optional) Configure authorization.
Step 5. (Optional) Configure the accounting rules.
Configuring User Authentication
If you are using external AAA servers, you need to configure an AAA group that contains your authentication servers and the security protocol (TACACS+ or RADIUS) that is in use.
Note
You can reuse an existing AAA group setting that you have on your Cisco ASA for other AAA functions.
Configuring an AAA Group
To create your AAA group in the Cisco ASDM, navigate to Configuration > Device Management > Users/AAA > AAA Server Groups and click the Add button in the AAA Server Groups pane. This opens the Add AAA Server Group dialog box, as shown in Figure 10-1. Enter a name for the AAA server group and, from the Protocol drop-down list, choose the appropriate security protocol used in your environment. Options include the following:
• RADIUS
• TACACS+
• Microsoft NT Domain
• Security Dynamics International (SDI)
• Kerberos
• Lightweight Directory Access Protocol (LDAP)
• HTTP Form (used for SSL VPN users only)
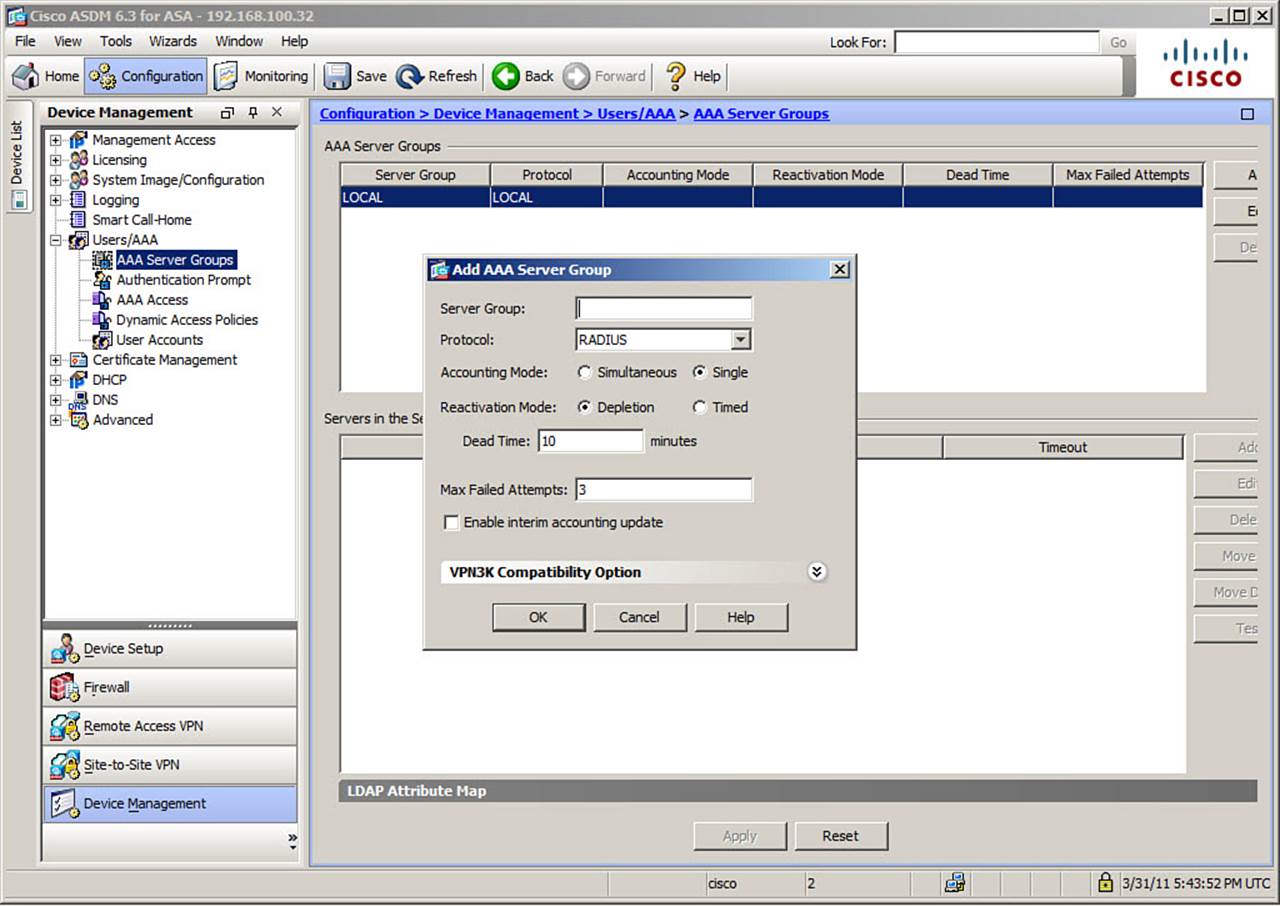
Figure 10-1. Add AAA Server Group Dialog Box
Next, choose one of the Accounting Mode radio buttons to specify the accounting mode to be used with the server group. Choosing the Simultaneous button causes the Cisco ASA to send accounting data to all servers in the group, whereas choosing the Single button causes accounting data to be sent only to one server.
Next, choose one of the Reactivation Mode radio buttons to specify when failed servers in the group will be reactivated. Choosing the Depletion button causes a failed server to reactivate only after all the servers in the group are inactive. Choose the Timed button to cause a failed server to reactivate after 30 seconds of downtime.
In the Dead Time field, specify the number of minutes you want to elapse between the failure of the last server in the group and the re-enabling of all the servers. Note that this setting is relevant only if you chose the Depletion option. In the Max Failed Attempts field, enter the number of failed connection attempts allowed before a server in the group is declared inactive.
After you complete this dialog box, click OK > Apply > Save.
Configuring an AAA Server
After you create your AAA server group, adding individual servers to the group is simple. Select the server group to which you want to add a server, and then click the Add button in the Servers in the Selected Group area of the AAA Server Groups panel. In the Add AAA Server dialog box, shown in Figure 10-2, choose the interface name and enter the IP address of the server. The Interface Name field specifies the Cisco ASA interface from which the AAA server can be contacted. Use the Timeout field to specify how long the Cisco ASA waits before attempting to contact another server in the group.
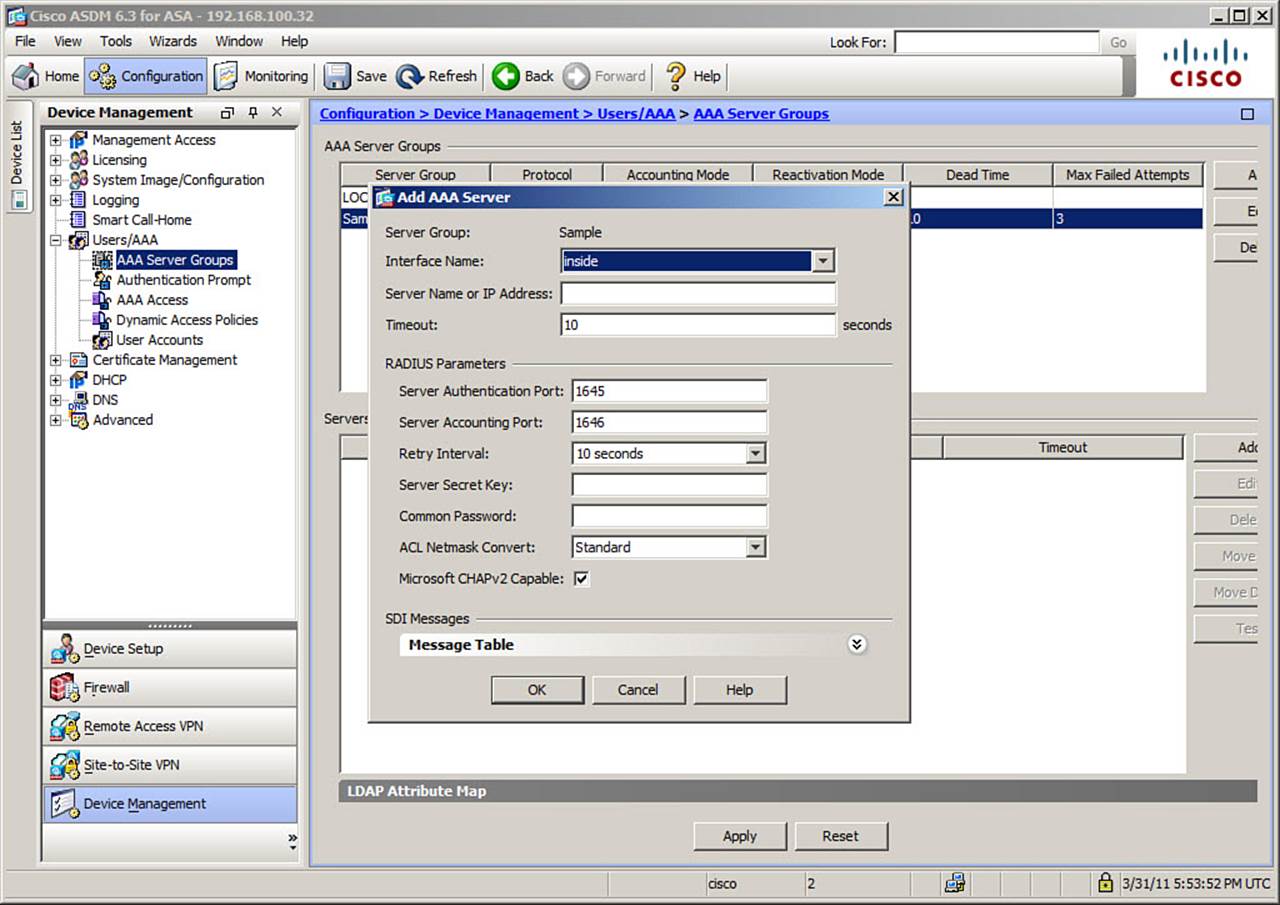
Figure 10-2. Add AAA Server Dialog Box
In the Server Authentication Port field of the RADIUS Parameters area, specify the server port used for authentication. The default is 1645. The latest RADIUS RFC, 2865, states that port 1812 should be used.
In the Server Accounting Port field, specify the appropriate port. The default is 1646. You might consider changing this to the latest RFC recommendation of 1813, per the latest RFC, 2866.
Choose a retry interval from the Retry Interval drop-down list. This specifies the number of seconds that the ASA should wait after sending a query to the server before it reat-tempts the communication.
Finally, enter a 64-character secret key in the Server Secret Key field. This value must match the value configured on your RADIUS server.
After you complete this dialog box, click OK > Apply > Save.
Configuring the Authentication Rules
To configure the authentication rules, navigate to Configuration > Firewall > AAA Rules > Add > Add Authentication Rule. In the Add Authentication Rule dialog box, shown in Figure 10-3, from the Interface drop-down list, specify the interface to which you are adding the rule. Verify that the Authenticate radio button (the default) is selected. From the AAA Server Group drop-down list, choose a server group or the local user database.
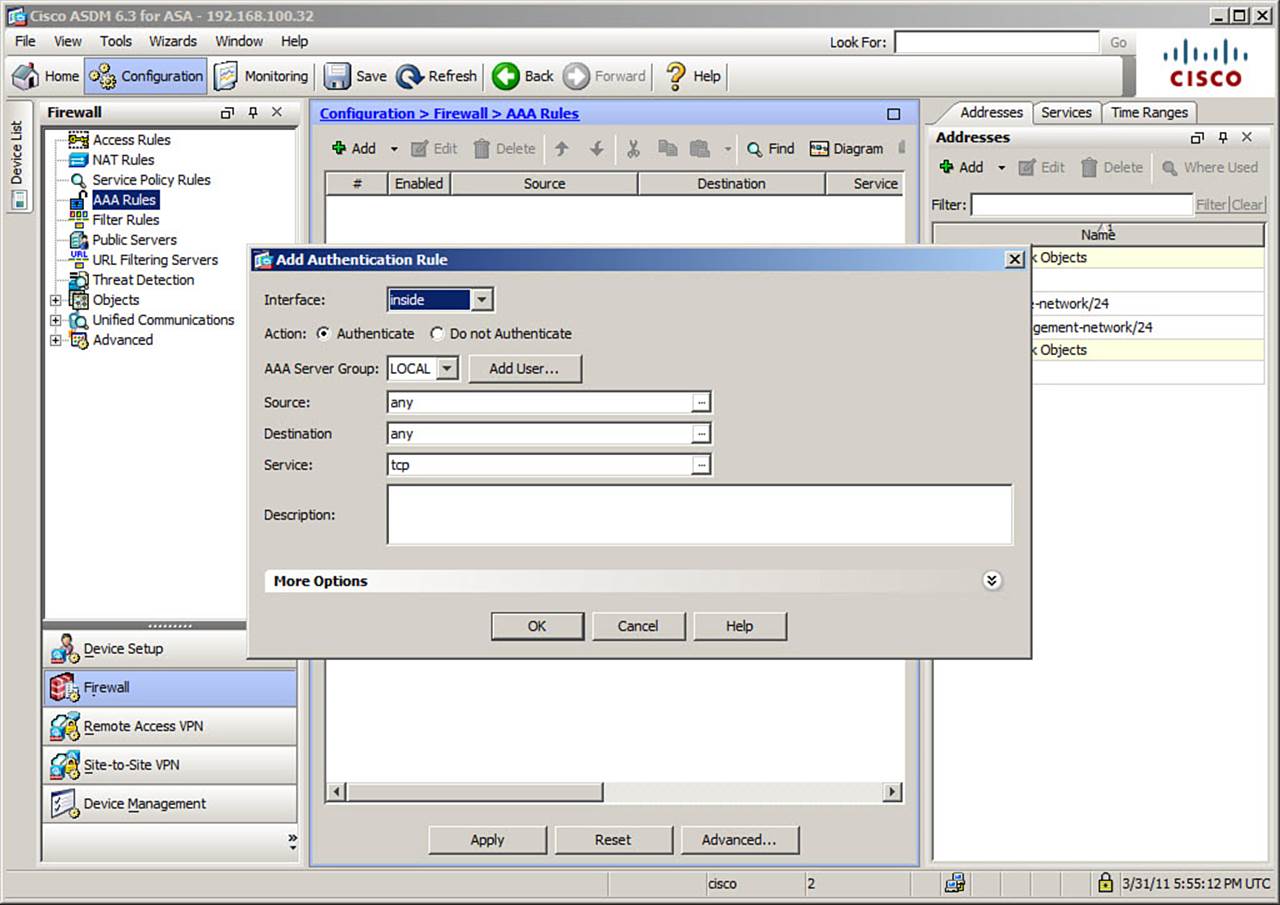
Figure 10-3. Add Authentication Rule Dialog Box
In the Source field, enter the IP address of traffic that should be authenticated. You can select IP addresses already defined in the Cisco ASA by clicking the ellipsis button.
In the Destination field, enter the IP address of traffic that should be authenticated. Once again, you can choose IP addresses already defined by clicking the ellipsis button.
Use the Service field to specify the destination service. You can make entries such as tcp/80 or tcp/http,tcp/ftp.
You can give the rule an optional description in plain English by using the Description field.
After you complete this dialog box, click OK > Apply > Save.
Example 10-1 demonstrates how this can be accomplished via the command-line interface (CLI) on the ASA.
Example 10-1. Configuring User Authentication at the CLI
FIREWALL(config)# aaa-server MYGROUP protocol radius
FIREWALL(config-aaa-server-group)# exit
FIREWALL(config)# aaa-server MYGROUP (inside) host 10.0.0.10
FIREWALL(config-aaa-server-host)# key MYKEY
FIREWALL(config-aaa-server-host)# exit
FIREWALL(config)# object-group service MYSERVICES tcp
FIREWALL(config-service)# port-object eq http
FIREWALL(config-service)# port-object eq ftp
FIREWALL(config-service)# exit
FIREWALL(config)# access-list ACL_IN extended permit tcp any host 192.168.1.101
object-group MYSERVICES
FIREWALL(config)# aaa authentication match ACL_IN outside MYGROUP
Verifying User Authentication
Verifying user-based proxy on the Cisco ASA is easy. Just initiate traffic of the appropriate type across the ASA and, when prompted, enter valid username and password credentials. Once you have done so, you can use the show uauth CLI command. This command allows you to easily inspect the following:
• Users currently authenticated by the Cisco ASA
• The IP address of an authenticated user
• The absolute and inactivity timers associated with each authenticated user
Should you need to clear the cached authentication information, use the clear uauth command. Note that this command causes users to reauthenticate, but it will not affect the current and established sessions of the authenticated users.
Another CLI command of value for verification is show aaa-server. This command enables you to display the following:
• The server group
• The protocol used
• The IP address of the active server in the group
• The status of the server
• Statistics on authentication requests and responses
Configuring HTTP Redirection
To configure the HTTP redirection method, described earlier in the chapter, navigate to Configuration > Firewall > AAA Rules and click Advanced in the AAA Rules pane. This opens the AAA Rules Advanced Options dialog box, shown in Figure 10-4. Click Add, and then click theHTTP radio button. You will create another rule associated to HTTP. The key to this configuration is to check the Redirect Network Users for Authentication Requests check box.
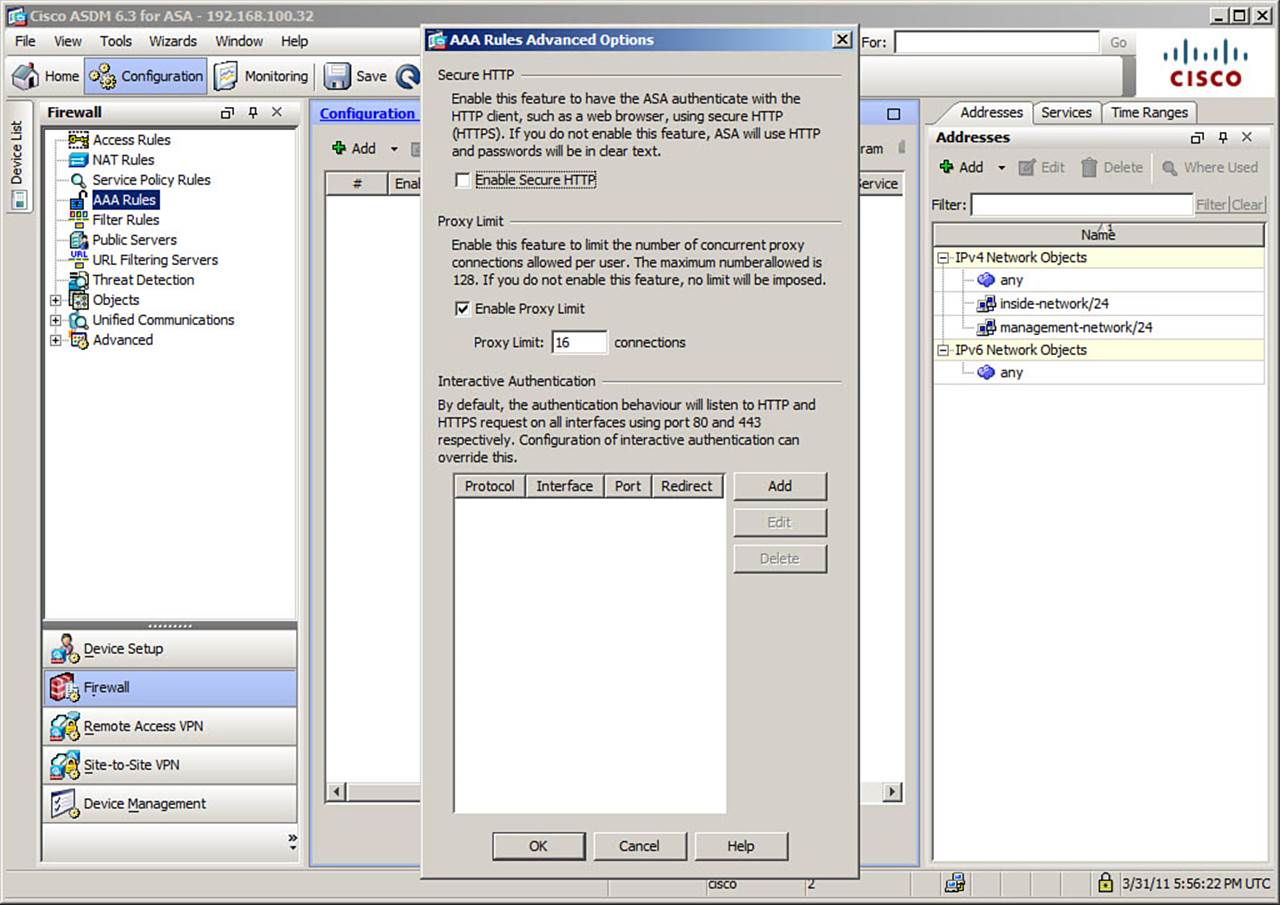
Figure 10-4. AAA Rules Advanced Options Dialog Box
After you complete this dialog box, click OK > OK > Apply > Save.
You can accomplish these results at the command line with the following statement:
FIREWALL(config)# aaa authentication listener http outside port http redirect
Configuring the Virtual HTTP Server
To configure the virtual HTTP method to direct HTTP authentication, described earlier in this chapter, navigate to Configuration > Firewall > Advanced > Virtual Access. In the Virtual Access pane, shown in Figure 10-5, check the Enable HTTP Server check box and enter an IP address. Click Apply > Save.
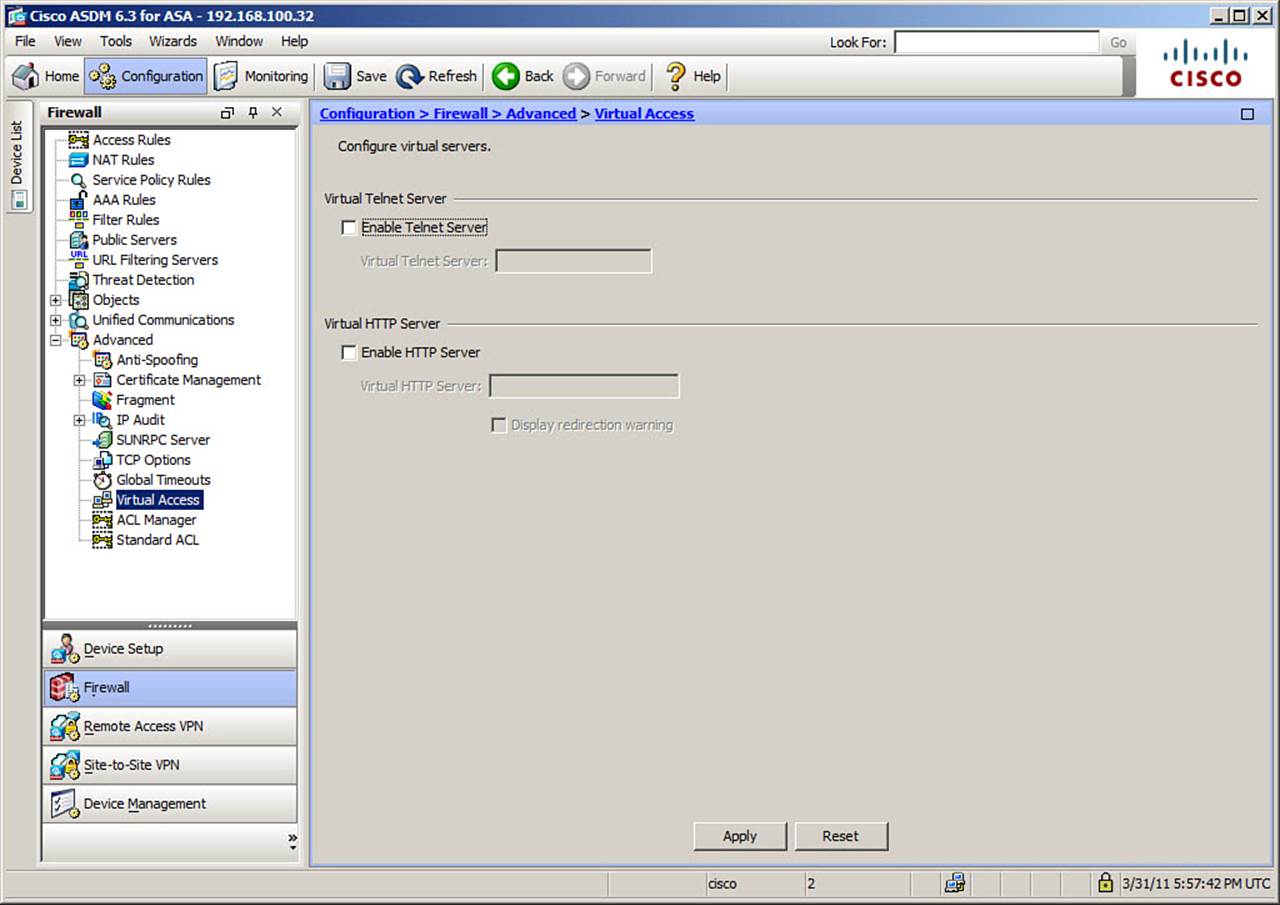
Figure 10-5. Virtual Access Pane
You can accomplish these results at the command line with the following statement:
FIREWALL(config)# virtual http 172.16.1.101
Configuring Direct Telnet
The configuration of the direct Telnet authentication option, described earlier in this chapter, is also simple. Navigate to Configuration > Firewall > Advanced > Virtual Access. In the Virtual Access pane (refer to Figure 10-5), check the Enable Telnet Server check box and provide the appropriate IP address. Click Apply > Save.
You can accomplish these results at the command line with the following statement:
FIREWALL(config)# virtual telnet 172.16.1.102
Configuring Authentication Prompts and Timeouts
You might want to specify a unique authentication prompt that your users will see when they are asked to authenticate by the Cisco ASA. You can also create specific messages that users see when they successfully or unsuccessfully authenticate. This provides a better end-user experience than is provided through the default username and password prompts that display. Without your customization, users see the following:
• When authenticating via FTP: Users see a default “FTP authentication” prompt.
• When authenticating via HTTP: Users see a default “HTTP authentication” prompt.
• When authenticating via Telnet: Users see no challenge text; instead, they see simple username and password prompts.
Configuring Authentication Prompts
To configure your own customized authentication prompts, navigate to Configuration > Device Management > Users/AAA > Authentication Prompt. The Authentication Prompt pane, shown in Figure 10-6, provides customization fields for Prompt, User Accepted, and User Rejected. After you enter your customized messages, click Apply > Save.

Figure 10-6. Authentication Prompt Pane
You can also configure these custom prompts from the command line with the following commands:
FIREWALL(config)# auth-prompt prompt
FIREWALL(config)# auth-prompt reject
FIREWALL(config)# auth-prompt accept
Configuring Authentication Timeouts
Authentication timeouts are critical because they set the time limits after which a user will be required to reauthenticate. Two types of timeouts are used with cut-through proxy:
• Inactivity timeout value: Controls timing out based on idle time (no user traffic is being forwarded by the Cisco ASA).
• Absolute timeout value: Ignores activity and begins just after the user is authenticated by the device. Obviously, the absolute timer should be set to a longer duration than the inactivity timer.
To set these values, navigate to Configuration > Firewall > Advanced > Global Timeouts. In the Global Timeouts pane, shown in Figure 10-7, check the Authentication Absolute and Authentication Inactivity check boxes and enter their respective values in the fields to the right. When you are finished, click Apply > Save.
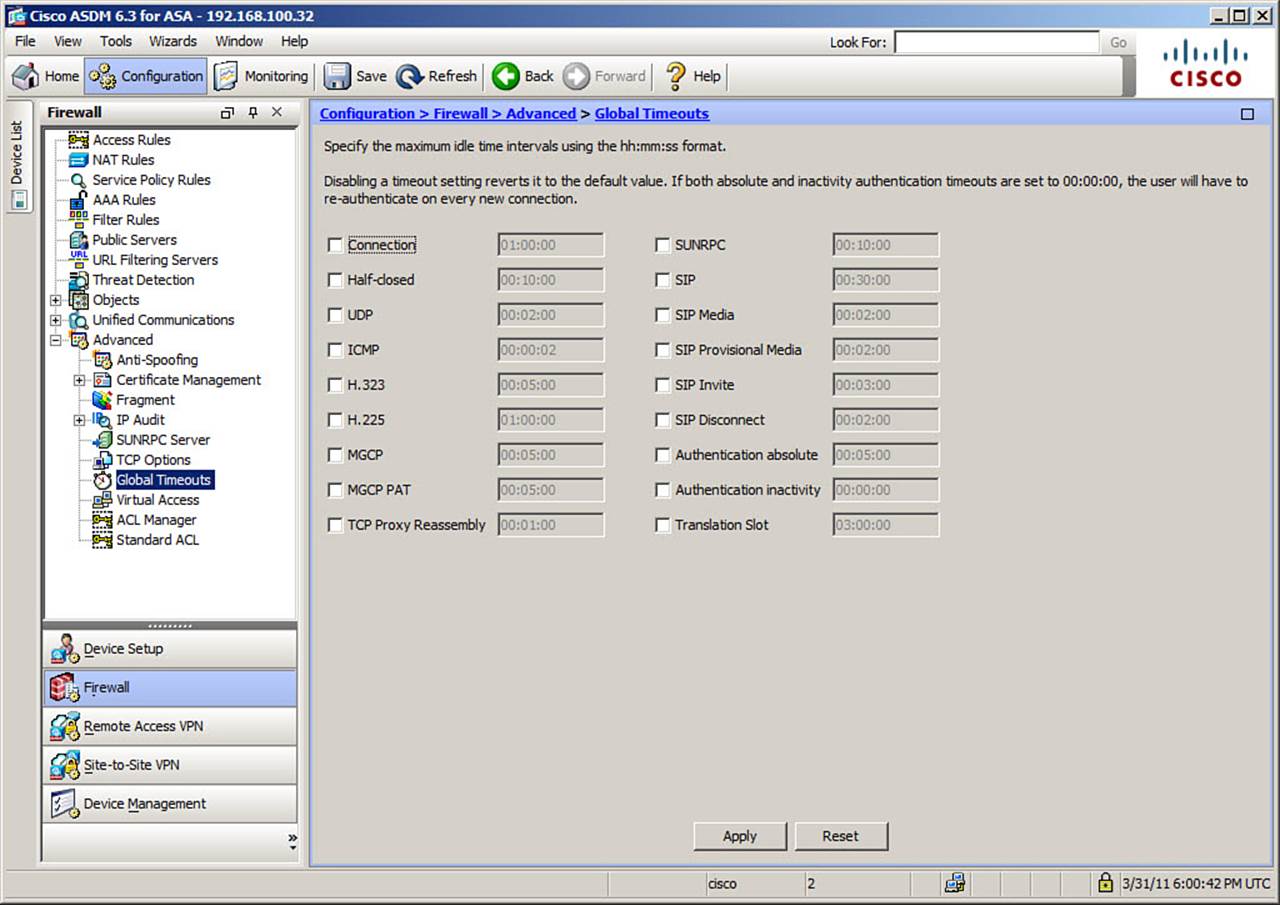
Figure 10-7. Global Timeouts Pane
The corresponding commands at the CLI are as follows:
FIREWALL(config)# timeout uauth inactivity
FIREWALL(config)# timeout uauth absolute
Configuring User Authorization
As previously described, you can permit all authenticated users to access the same resources using the same services through your Cisco ASA. You must ensure that your interface access rules permit the traffic of your authentication policy and no further configuration is required. If you want some users to access different resources from other users, however, you need to also implement user-based authorization. For example, perhaps you have an internal web and FTP server. You want some users to be able to access this device using both HTTP or FTP, but some other users should have only HTTP access. This is a classic scenario for user-based authorization.
The two user-based authorization methods possible with the Cisco ASA are as follows:
• Download per-user ACLs from a RADIUS AAA server during the authentication process: This is the process that Cisco strongly recommends.
• User authorization based on a TACACS+ AAA server: The AAA server is configured with rules that are consulted on demand for every attempted user connection. As a result of configuration complexity and potential issues with overhead, this method is discouraged by Cisco and is not covered further in this text.
Per-User Override
An important aspect of the downloadable per-user ACL feature is that it enables you to configure what is called per-user override. The per-user override feature allows the downloaded ACL to override an existing ACL on the interface for the particular user. Cisco recommends that you use this feature because it makes enacting specific policies for specific users in the network easier.
Without per-user override, both the interface ACL and the downloaded ACL are checked for permit statements for the packet to pass. With the per-user override, the interface ACL must still be configured to permit the authentication “trigger” packet.
Configuring Downloadable ACLs
To configure the downloadable ACL authorization feature, you must complete the following tasks:
• Configure the appropriate downloadable ACLs on the Cisco ACS server.
• Assign the downloadable ACLs to a specific user or group.
• Optionally, configure the per-user override feature on the Cisco ASA interface ACLs where the user will be authenticated.
To configure downloadable ACLs on the Cisco ACS server, access the Cisco ACS GUI and choose Interface Configuration > Advanced Options > User-Level Downloadable ACLs > Submit. Under Shared Profile Components, choose Downloadable IP ACLs and click Add.
To assign an ACL to a user account, in the Cisco ACS GUI, choose User Setup > Add/Edit > Downloadable ACLs > Assign IP ACL > Submit.
Configuring Per-User Override
Finally, you will most likely want to configure per-user override on ACLs on the Cisco ASA. To do this, in the Cisco ADSM, navigate to Configuration > Firewall > Access Rules > Advanced > Per User Override. After you enable this feature by checking the check box, click OK and then click Apply.
At the CLI, this configuration is a simple matter of using the per-user-override keyword at the end of the access-group command.
Verification
To verify the authentication of your users and their specific authorization information, use the show uauth command, as demonstrated in Example 10-2.
Example 10-2. Verifying User Authorization Information
FIREWALL# show uauth
Current Most Seen
Authenticated Users 1 1
Authen In Progress 0 1
user 'johns' at 172.16.171.33, authenticated
access-list #ACSACL#-FIREWALLjohns-4bc6b693_
absolute timeout: 2:30:00
inactivity timeout: 0:30:00
From this output, you can see that a user named johns is authenticated. Notice that an ACL for this user has been downloaded to the security appliance. The name of the access list is shown in three parts. First, an identifier string of #ACSACL#-, and then the actual name of the ACL, as defined on the RADIUS server. In this case, the name is FIREWALLjohns. Then, a unique rule version identification code is shown. In this case, the code is 4bc6b693.
Configuring User Session Accounting
As you will recall from earlier in this chapter, an important reason to use an external AAA server is to support accounting services for user sessions. Understand that if you use accounting services without authentication, you can track information based only on the source IP address. With the authentication required by user-based proxy services, accounting information gains value because it is based on network username.
Configuring User Session Accounting
To configure session accounting, in the Cisco ASDM, navigate to Configuration > Firewall > AAA Rules > Add > Add Accounting Rule. In the Add Accounting Rule dialog box, as shown in Figure 10-8, choose the correct interface and click the Account radio button. Choose the appropriate AAA server group and then complete the dialog box with the rule defining the traffic for which you want accounting. Click OK > Apply > Save.
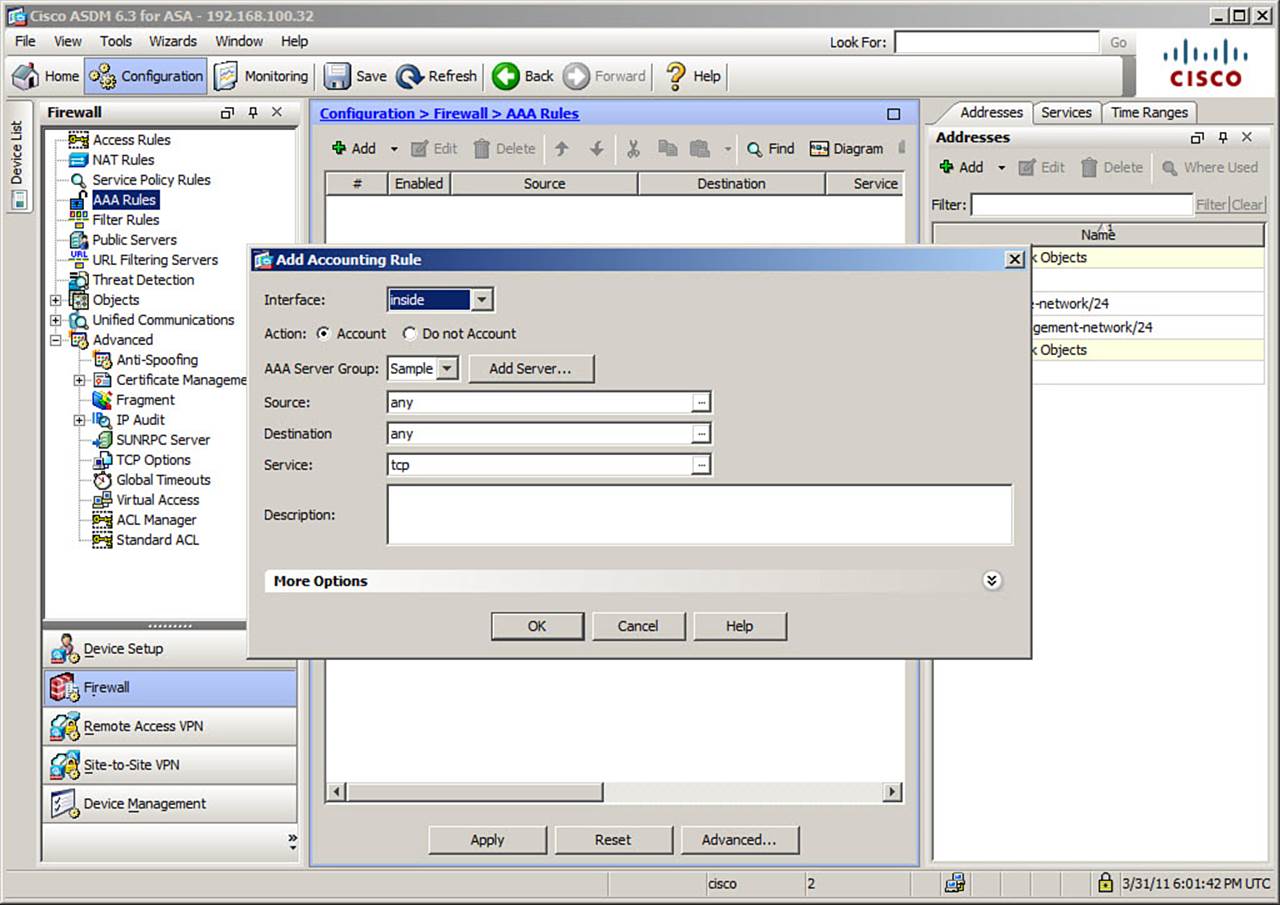
Figure 10-8. Add Accounting Rule Dialog Box
Configuring user session accounting is as simple as configuring an ACL to define the target traffic and then configuring an accounting rule using the aaa accounting match command. For example:
FIREWALL(config)# access-list FIREWALL_ACL extended permit tcp any host
172.16.0.100
FIREWALL(config)# aaa accounting match FIREWALL_ACL outside FIREWALLAUTH
In this example, accounting information on all TCP traffic from any host to the device at 172.16.0.100 over the outside interface is sent to the AAA device in the FIREWALLAUTH group.
Verification
To best verify accounting operations, visit the destination AAA server and examine the accounting information that is received there. For example, access the Cisco ACS GUI and choose Reports and Activity > RADIUS Accounting > RADIUS Accounting Active. This report should show the latest accounting records received from the properly configured Cisco ASA. Other reports that might be useful include the Passed Authentications and the Failed Attempts reports.
Troubleshooting Cut-Through Proxy Operations
Understand that troubleshooting user-based controls demonstrated in this chapter involves not just the Cisco ASA, but the AAA server in use as well. Key commands and components to keep at hand on the Cisco ASA include the following:
• show uauth
• show aaa-server
• test aaa-server
• System messages
For the AAA server, rely on the various reports and service indicators that are available.
A Structured Approach
It is important to consider a structured approach when troubleshooting cut-through proxy operations. For example, first verify if your users are prompted for authentication in the correct manner. If this is not occurring, ensure that the traffic to be authenticated is permitted through the Cisco ASA as it should be. Obviously, also carefully verify your cut-through proxy configuration, as demonstrated in this chapter.
If your users are prompted for authentication correctly, but there is still an issue, move to the AAA server troubleshooting. Ensure that this server is accessible from the Cisco ASA. Be sure that the shared secret on the AAA device and the Cisco ASA match, and verify that the Cisco ASA has been properly defined on the AAA server.
If all this checks out, it’s time to ensure that the correct user account exists on the AAA device and that this user account has the correct credentials defined.
System Messages
As previously mentioned, another extremely valuable source of troubleshooting information is the system messages created on the Cisco ASA. The device consistently logs messages related to the cut-through proxy operations. The system message indicating successful authentication is
%ASA-6-109005: Authentication succeeded for user 'johns' from 172.16.1.100/1322
to 172.16.0.12/80 on interface outside
The system message indicating a failure of authentication using the local database is
%ASA-6-109006: Authentication failed for user 'johns' from 172.16.1.100/1322 to
172.16.0.12/80 on interface outside
If an issue arises that causes your AAA server to not be accessible, look for the following system message:
%ASA-6-113014: AAA authentication server not accessible : server = 172.16.0.101
: user = johns
Using Proxy for IP Telephony and Unified TelePresence
For the FIREWALL exam, although you do not need to know the various configurations for the proxy services available on the Cisco ASA for Cisco Unified IP Telephony and TelePresence, you should be aware of the general concepts. The ASA device’s Cisco Unified Communications Proxy feature set includes the following specific capabilities:
• Phone Proxy: The Phone Proxy capability permits the ASA to terminate Cisco SRTP/TLS–encrypted IP Phone connections that permit secure remote access. This capability allows the elimination of expensive, dedicated VPN hardware equipment at headquarters, while ensuring that remote users simply need their Cisco IP Phone (and do not need any special VPN tunnels or hardware). This capability within the ASA replaces the Cisco Unified Phone Proxy and opens up these capabilities for Cisco IP Softphones as well.
• TLS Proxy: The TLS Proxy capability enables the ASA to intercept and decrypt encrypted information from Unified Communications endpoints en route to the Cisco Unified Communications Manager (CUCM). Once the information is decrypted, the ASA can ensure that the necessary threat protections and access controls are applied. The ASA then has the ability to re-encrypt the information and send it on its way to the CUCM server.
• Mobility Proxy: The ASA can also act as a proxy for the TLS signaling used between Cisco Unified Mobile Communicator (UMC) and the Cisco Unified Mobility Advantage (UMA) server. This set of solutions enables companies to take full advantage of mobile handsets.
• Presence Federation Proxy: The Cisco Unified Presence solution collects information about the users in the Unified Communications network and their capabilities. For example, it can tell you at what times users are available on Cisco IP Phones and whether they support video. Thanks to the ASA, TLS communications between Unified Presence servers can be terminated and the appropriate security policies can be applied.
Exam Preparation Tasks
As mentioned in the section, “How to Use This Book,” in the Introduction, you have a couple of choices for exam preparation: the exercises here, Chapter 17, “Final Preparation,” and the exam simulation questions on the CD-ROM.
Review All Key Topics
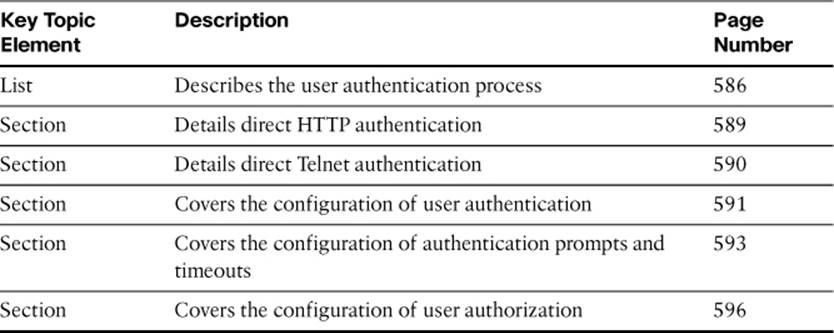
Review the most important topics in this chapter, noted with the Key Topics icon in the outer margin of the page. Table 10-2 lists a reference of these key topics and the page numbers on which each is found.
Table 10-2. Key Topics for Chapter 10
Define Key Terms
Define the following key terms from this chapter and check your answers in the glossary:
cut-through proxy
HTTP redirection
virtual HTTP
Phone Proxy
TLS Proxy
Mobility Proxy
Presence Federation Proxy
Command Reference to Check Your Memory
This section includes the most important configuration and EXEC commands covered in this chapter. It might not be necessary to memorize the complete syntax of every command, but you should be able to remember the basic keywords that are needed.
To test your memory of the commands, cover the right side of Tables 10-3 through 10-5 with a piece of paper, read the description on the left side, and then see how much of the command you can remember.
Table 10-3. Commands Related to User Authentication
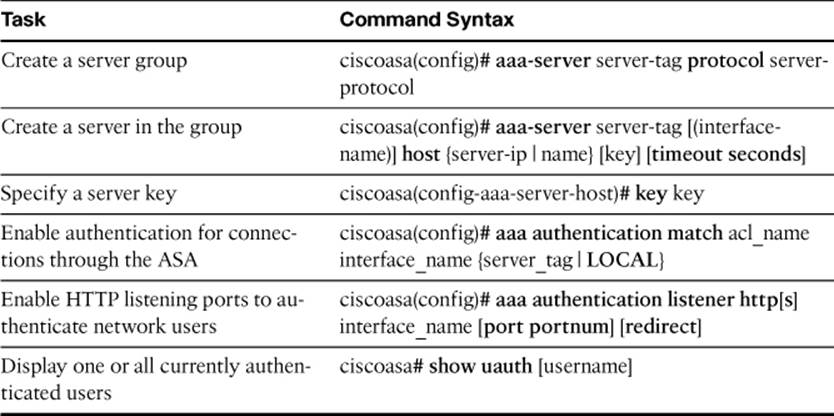
Table 10-4. Commands Related to Authentication Prompts and Timeouts

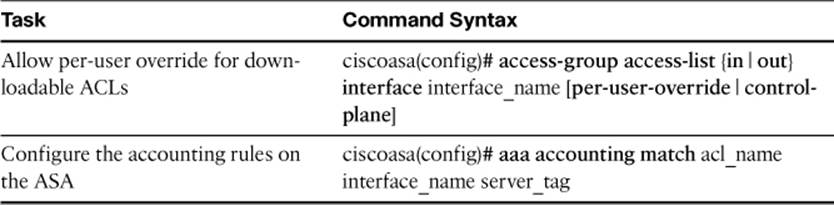
Table 10-5. Commands Related to User Authorization and Accounting
The FIREWALL exam focuses on practical, hands-on skills that are used by a networking professional. Therefore, you should be able to identify the commands needed to configure and test an ASA feature.
All materials on the site are licensed Creative Commons Attribution-Sharealike 3.0 Unported CC BY-SA 3.0 & GNU Free Documentation License (GFDL)
If you are the copyright holder of any material contained on our site and intend to remove it, please contact our site administrator for approval.
© 2016-2026 All site design rights belong to S.Y.A.