Modern Cryptography: Applied Mathematics for Encryption and Informanion Security (2016)
PART IV. Applications
Chapter 13. Secure Sockets Layer/Transport Layer Security Protocol
In this chapter we will cover the following:
![]() Digital signatures
Digital signatures
![]() Digital certificates
Digital certificates
![]() The Public Key Infrastructure (PKI)
The Public Key Infrastructure (PKI)
![]() SSL/TLS basics
SSL/TLS basics
The preceding 12 chapters have covered the algorithms used in cryptography, including symmetric key cryptography, asymmetric key cryptography, cryptographic hashes, and generating random numbers. In this chapter, as well as the next two chapters, we will be focusing on practical applications of cryptography. Chapter 14 will discuss virtual private networks, and Chapter 15 will cover military applications of cryptography. In this chapter, the primary focus is on Secure Sockets Layer and Transport Layer Security (SSL/TLS) Protocols. However, in order to cover this topic adequately, I will first cover digital signatures, digital certificates, and the Public Key Infrastructure (PKI), all of which are needed for SSL/TLS.
The importance of applied cryptography cannot be overstated. Without modern protocols such as SSL/TLS, modern e-commerce, online banking, and similar technologies would not exist. Although it is certainly important that you understand the mathematics behind cryptography and the actual algorithms being implemented, it is also important that you understand how all of this is used for secure communications.
Digital Signatures
I briefly touched on digital signatures when I discussed asymmetric cryptography in Chapter 10. The concept involves simply reversing some asymmetric algorithm process. A piece of data is encrypted with the sender’s public key. Anyone can access the sender’s public key and decrypt/verify that message.
There are primarily two types of digital signatures: direct and arbitrated. Each has its own strengths and weaknesses and is thus used in different situations. The question is not which type of signature is best, but rather which is better for a specific situation.
Direct Signature
A direct signature involves only two parties (the sender/signer and the receiver). The signature is usually done in one of two ways: either the entire message is encrypted with the sender’s private key, or a cryptographic hash, message authentication code, or HMAC is created that is then encrypted with the sender’s private key. In either case, the recipient will obtain the sender’s public key to decrypt/verify the message.
With a direct signature, there is no third-party verification of the sender’s identity. This type of signature is often used in e-mail communications. Verification is assumed based on the sender’s e-mail address and the fact that the recipient used the alleged sender’s public key to verify the message and it worked. If the e-mail was spoofed (that is, it was not really the purported sender, but rather someone else faking the sender’s e-mail address), then the message signature was actually done with some key other than the purported sender’s key, and thus verification would fail. The basic process is shown in Figure 13-1.
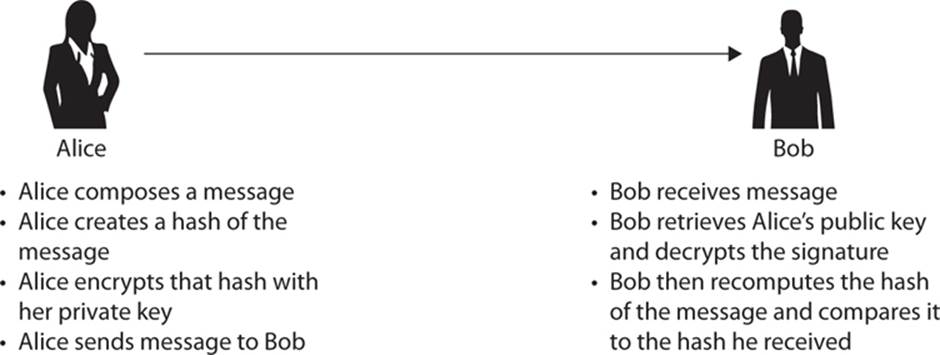
FIGURE 13-1 Direct digital signature process
A typical direct signature process involves the following steps:
1. Write the message.
2. Create a hash of the message.
3. Sign the hash with the sender’s private key.
4. Encrypt the message with the recipient’s public key.
5. Send the message.
This multi-step process ensures message integrity with the hash, verifies the identity of the sender with the digital signature, and provides message confidentiality with the encryption. This is diagrammed in Figure 13-2. Note that, in the diagram, H(M) means the cryptographic hash function of the message M: H is the hashing function and M is the input, or message. The S(H(M)) has similar meaning, with S denoting the digital signature of the hash of the message M.
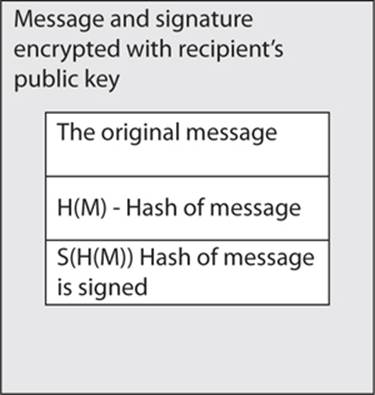
FIGURE 13-2 Typical signature process
Arbitrated Digital Signature
An arbitrated digital signature works similarly to a direct signature, but the entity signing the message is not the sender and is instead a third party that is trusted by both sender and receiver. The rest of the process is the same. This sort of digital signature is often used to provide even more assurance that the sender is indeed who they claim to be. A common implementation of this process is shown in Figure 13-3.
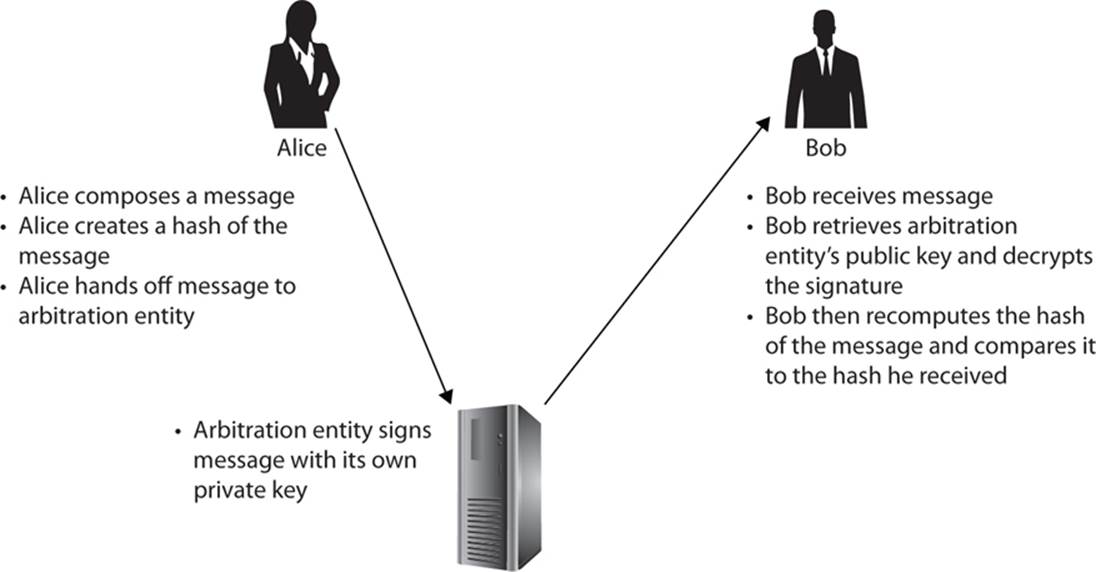
FIGURE 13-3 Arbitrated digital signature
Blind Signatures
The blind signature adds a nuance to the process of arbitrated digital signatures. The signer simply signs a message verifying that the sender did indeed send it, but the signer has no idea what the content of the message is. This allows the signer to verify the origin of the message but not the content.
Think about it like this: Assume you observe a person writing a note, putting it in an envelope, and then sealing the envelope. You then sign the envelope, verifying that the person did indeed write it and place it in the envelope. You can attest to the identity of the sender, but you have no idea what the contents are.
A blind signature is a great option when the privacy of the data being sent is of paramount importance, such as in voting situations or when using private digital currency. Blind signatures provide the enhanced validation of the sender via arbitrated digital signatures, but they protect the privacy of the data.
Digital Certificates
In Chapters 10 and 11 I discussed asymmetric key cryptography, also known as public-key cryptography. The strength of asymmetric cryptography is that there is no issue with key exchange. It is perfectly acceptable for anyone, and indeed everyone, to have access to the public keys of both the sender and receiver. However, this does not answer the question of how such public keys are disseminated. The first step in that process is a digital certificate, a digital document that contains some information about the certificate holder and the certificate holder’s public key. There are two major types of digital certificates: X.509 and PGP.
X.509
X.509 is an international standard for the format and information contained in a digital certificate. X.509 is the most common type of digital certificate in the world. It is a digital document that contains a public key signed by a trusted third party known as a certificate authority (CA). The X.509 standard was released in 1988. It has been revised since then, with the most recent version being X.509 version 3, specified in RFC 5280.1 This system supports not only obtaining information about the certificate holder, but also verifying that information with a trusted third party. This is key to secure protocols such as SSL and TLS, as you will see later in this chapter.
The content of an X.509 certificate is listed here:
![]() Version The version of X.509 being used (as of this writing, version 3).
Version The version of X.509 being used (as of this writing, version 3).
![]() Certificate holder’s public key The public key of the certificate holder—this is how public keys are disseminated.
Certificate holder’s public key The public key of the certificate holder—this is how public keys are disseminated.
![]() Serial number A unique identifier that identifies this certificate.
Serial number A unique identifier that identifies this certificate.
![]() Certificate holder’s distinguished name A distinguished, or unique, name for the certificate holder; usually a URL for a web site or an e-mail address.
Certificate holder’s distinguished name A distinguished, or unique, name for the certificate holder; usually a URL for a web site or an e-mail address.
![]() Certificate’s validity period Most certificates are issued for one year, but the exact validity period is reflected in this field.
Certificate’s validity period Most certificates are issued for one year, but the exact validity period is reflected in this field.
![]() Unique name of certificate issuer Identifies the trusted third party that issued the certificate. Public CAs include Thawte, VeriSign, GoDaddy, and others.
Unique name of certificate issuer Identifies the trusted third party that issued the certificate. Public CAs include Thawte, VeriSign, GoDaddy, and others.
![]() Digital signature of issuer Confirms that this certificate was really issued by the certificate authority it claims to have been issued by.
Digital signature of issuer Confirms that this certificate was really issued by the certificate authority it claims to have been issued by.
![]() Signature algorithm identifier The signer’s public key and the algorithm used, to verify the signer’s digital signature.
Signature algorithm identifier The signer’s public key and the algorithm used, to verify the signer’s digital signature.
There are other optional fields, but these are the required fields. Notice that the last three items are about verification. One of the benefits of the X.509 digital certificate is the mechanism for verifying the certificate holder. This is a key to secure communications, not just encrypting the transmissions, but verifying the identity of the parties involved. An overview of the process is provided in Figure 13-4.
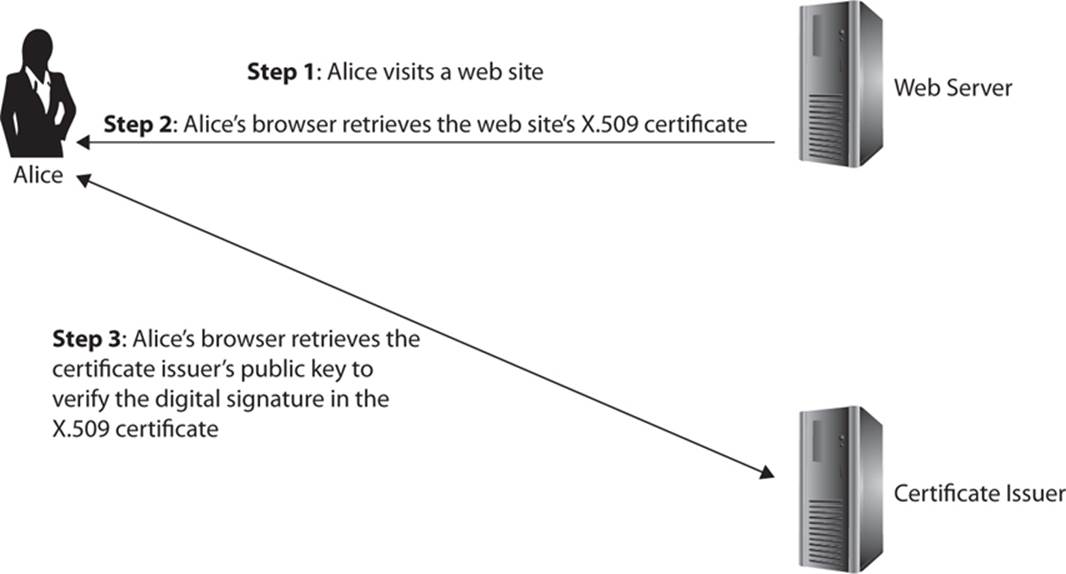
FIGURE 13-4 Verifying X.509 certificates
This leads to a significant question: Why would you trust the certificate issuer to verify the identity of the certificate holder? Certificates are issued by CAs, entities that are trusted by many different third parties. The major CAs include Symantec, GoDaddy, DigiCert, Global Sign, and Comodo, which are all considered trusted vendors.
Note
Companies and other organizations sometimes publish their own digital certificates, but those are useful only within the organizational network. Because the company’s CA is not trusted by other networks, the certificates issued by that CA won’t be trusted by other networks.
There are varying levels of digital certificates. Each involves a different level of verification of the certificate holder’s identity. The more verification used, the more expensive the certificate:
![]() Class 1 For individuals, intended for e-mail
Class 1 For individuals, intended for e-mail
![]() Class 2 For organizations, for which proof of identity is required; most web sites use a class 2 certificate
Class 2 For organizations, for which proof of identity is required; most web sites use a class 2 certificate
![]() Class 3 For servers and software signing, for which independent verification and checking of identity and authority is done by the issuing CA
Class 3 For servers and software signing, for which independent verification and checking of identity and authority is done by the issuing CA
![]() Class 4 For online business transactions between companies
Class 4 For online business transactions between companies
![]() Class 5 For private organizations or governmental security
Class 5 For private organizations or governmental security
PGP
The other type of certificate is the Pretty Good Privacy (PGP) certificate. The PGP methodology combines cryptographic hashes, asymmetric cryptography, and symmetric cryptography to create secure communications. Each public key is tied to a username and/or e-mail address, so PGP is often used for e-mail encryption. PGP operates by using certificates, but it uses self-signed digital certificates. That means there is no CA and thus no third-party verification of a sender’s identity. This is why PGP certificates are not used for web pages/e-commerce. A PGP certificate includes the following information:
![]() PGP version number The version of PGP is being used.
PGP version number The version of PGP is being used.
![]() Certificate holder’s public key The public key of the certificate holder. One of the purposes of using digital certificates is to disseminate public keys.
Certificate holder’s public key The public key of the certificate holder. One of the purposes of using digital certificates is to disseminate public keys.
![]() Certificate holder’s information Identifies who this certificate belongs to; can be a bit more extensive that the X.509 certificate.
Certificate holder’s information Identifies who this certificate belongs to; can be a bit more extensive that the X.509 certificate.
![]() Digital signature of certificate owner Because there is no CA, the certificate owner signs the certificate.
Digital signature of certificate owner Because there is no CA, the certificate owner signs the certificate.
![]() Certificate’s validity period How long the certificate is valid for.
Certificate’s validity period How long the certificate is valid for.
![]() Preferred symmetric encryption algorithm for the key Once asymmetric cryptography is in use, what type of symmetric algorithm does the certificate holder prefer to use.
Preferred symmetric encryption algorithm for the key Once asymmetric cryptography is in use, what type of symmetric algorithm does the certificate holder prefer to use.
PGP was created by Phillip Zimmerman in 1991. The first version used a symmetric algorithm that he created himself. Later versions of PGP use a variety of well-known symmetric algorithms.
Note
Phillip Zimmerman is well known in the world of cryptography. His PGP product is widely used to encrypt e-mail, and he has also worked on voice over IP (VoIP) encryption protocols. He holds a bachelor’s degree in computer science. The original release of PGP generated a criminal investigation because it enabled encryption of strengths that the U.S. government did not allow for export (see Chapter 15 for more on export laws). The case was dropped in 1996. Zimmerman has received significant recognition for his work, including being inducted into the Internet Hall of Fame, being named one of the Top 50 Tech Visionaries by PC World, and receiving the Louis D. Brandeis Privacy Award.
Public-Key Infrastructure X.509
PKI is the infrastructure required to create and distribute digital certificates. Because digital certificates are the means by which public keys for asymmetric algorithms are disseminated, the PKI is an important part of any implementation of asymmetric cryptography.
One role of the PKI is to bind public keys with some user’s identity via a CA. In other words, it is not adequate simply to have public keys widely available; there needs to be some mechanism to validate that a specific public key is associated with a specific user. With PKI, this is done via a CA that validates the identity of the user.
There are several parts to the PKI. Each certificate issuer must be trusted by the other certificate issuers for the certificates to be interchangeable. Consider the process of visiting an online banking site, for example. The site has a digital certificate issued by some CA, which needs to be one that you and the bank both trust. Then later, perhaps you visit an e-commerce web site, which might use an entirely different CA—but it must also be one that you trust.
The CA is responsible for issuing and managing certificates.2 This includes revoking certificates, which is accomplished in one of two ways:
![]() CRL (Certificate Revocation List) A list of certificates that have been revoked. These lists are distributed in two ways: via a push model, in which the CA automatically sends the CRL out at regular intervals, and via a pull model, in which the CRL is downloaded from the CA by those who want to see it to verify a certificate. Neither model provides instant, real-time updates.
CRL (Certificate Revocation List) A list of certificates that have been revoked. These lists are distributed in two ways: via a push model, in which the CA automatically sends the CRL out at regular intervals, and via a pull model, in which the CRL is downloaded from the CA by those who want to see it to verify a certificate. Neither model provides instant, real-time updates.
![]() Status checking Given that CRLs are not real-time, the Online Certificate Status Protocol (OCSP) was invented to verify whether a certificate is valid or not. OCSP is described in RFC 6960. It uses HTTP to communicate messages and is supported in Internet Explorer 7, Mozilla Firefox 3, and Safari.
Status checking Given that CRLs are not real-time, the Online Certificate Status Protocol (OCSP) was invented to verify whether a certificate is valid or not. OCSP is described in RFC 6960. It uses HTTP to communicate messages and is supported in Internet Explorer 7, Mozilla Firefox 3, and Safari.
The CA is often assisted by a registration authority (RA), which is responsible for verifying the person or entity requesting a digital certificate. Once that identity has been verified, the RA informs the CA that a certificate can be issued.
The Public-Key Infrastructure X.509 (PKIX) is the working group formed by the IETF to develop standards and models for the public key infrastructure. Among other things, this working group is responsible for updates to the X.509 standard. The working group involves experts from around the world, each contributing input to the standards.
The Public-Key Cryptography Standards (PKCS) is a set of voluntary standards created by RSA and along with several other companies including Microsoft and Apple. As of this writing, there are 15 published PKCS standards:
![]() PKCS #1: RSA Cryptography Standard
PKCS #1: RSA Cryptography Standard
![]() PKCS #2: Incorporated in PKCS #1
PKCS #2: Incorporated in PKCS #1
![]() PKCS #3: Diffie-Hellman Key Agreement Standard
PKCS #3: Diffie-Hellman Key Agreement Standard
![]() PKCS #4: Incorporated in PKCS #1
PKCS #4: Incorporated in PKCS #1
![]() PKCS #5: Password-Based Cryptography Standard
PKCS #5: Password-Based Cryptography Standard
![]() PKCS #6: Extended-Certificate Syntax Standard
PKCS #6: Extended-Certificate Syntax Standard
![]() PKCS #7: Cryptographic Message Syntax Standard
PKCS #7: Cryptographic Message Syntax Standard
![]() PKCS #8: Private-Key Information Syntax Standard
PKCS #8: Private-Key Information Syntax Standard
![]() PKCS #9: Selected Attribute Types
PKCS #9: Selected Attribute Types
![]() PKCS #10: Certification Request Syntax Standard
PKCS #10: Certification Request Syntax Standard
![]() PKCS #11: Cryptographic Token Interface Standard
PKCS #11: Cryptographic Token Interface Standard
![]() PKCS #12: Personal Information Exchange Syntax Standard
PKCS #12: Personal Information Exchange Syntax Standard
![]() PKCS #13: Elliptic Curve Cryptography Standard
PKCS #13: Elliptic Curve Cryptography Standard
![]() PKCS #14: Pseudorandom Number Generators
PKCS #14: Pseudorandom Number Generators
![]() PKCS #15: Cryptographic Token Information Format Standard
PKCS #15: Cryptographic Token Information Format Standard
SSL and TLS Protocol Basics
The Secure Sockets Layer (SSL) protocol has been supplanted by Transport Layer Security (TLS). Both protocols use X.509 certificates for the exchange of public keys and to authenticate them. Many references (books, magazines, courses, and so on) refer to SSL when in fact it is most likely that TLS is being used today. I will use the convention of referring to SSL/TLS when the specific version is not important.
History
When the World Wide Web first began, no one considered security. The Hypertext Transfer Protocol (HTTP), the foundation of communication on the Web, is inherently quite insecure, however, so it didn’t take long for computer scientists to realize that security was needed if the Web was to be used for sensitive communications such as financial data. When Netscape invented the SSL protocol, version 1.0 was never released because of significant security flaws. However, version 2.0 was released in 1995 and began to be widely used. But security flaws were found with it as well, and it was subsequently supplanted with version 3.0 in 1996, which was not just a minor improvement over past versions—it was a complete overhaul. It was published as RFC 6101.
TLS 1.0 was released in 1999 and was essentially an upgrade to SSL 3.0. However, it was not compatible with SSL 3.0.3 TLS 1.0 also added support for the GOST hashing algorithm as an option for message authentication and integrity. Previous versions had supported only MD5 and SHA-1 as hashing message authentication codes.
TLS 1.0 was eventually supplanted by TLS 1.1 in April 2006. It included a number of specific cryptographic improvements, including improved initialization vectors as well as support for cipher block chaining for the Advanced Encryption Standard (AES).
In August 2008, TLS 1.2 was released as RFC 5246.4 It had many improvements over previous versions, including the following:
![]() Replaced MD5 and ShAQ with SHA-256
Replaced MD5 and ShAQ with SHA-256
![]() Supported advanced modes of AES encryption
Supported advanced modes of AES encryption
Note
As of this writing, TLS 1.3 is still in draft and has not been released.
The Handshake Step-by-Step
The process of establishing an SSL/TLS connection is rather complex. The specific steps are described here:5, 6
1. Communication begins with the client sending a hello message (see the “Handshake Initiation” sidebar), which contains the client’s SSL version number, cipher settings (the algorithms the client supports), session-specific data, and other information that the server needs to communicate with the client using SSL.
2. The server responds with a server hello message, which contains the server’s SSL version number, cipher settings, session-specific data, and other information that the client needs to communicate with the server over SSL. The server also sends the client the server’s X.509 certificate. The client can use this to authenticate the server and then use the server’s public key. In some optional configurations, client authentication is required. In that case, part of the server hello message is a request for the client’s certificate.
3. The client uses the server’s X.509 certificate to authenticate the server by retrieving the public key of the CA that issued this X.509 certificate and using that to verify the CA’s digital signature on the certificate. Assuming authentication works, the client can proceed with confidence with the server.
4. Using all data generated in the handshake thus far, the client creates the premaster secret for the session, encrypts it with the server’s public key (obtained from the server’s certificate in step 2), and then sends the premaster secret to the server.
5. If the server is configured to require client authentication, it requires that the client send to the server the client’s X.509 certificate. The server will use this to attempt to authenticate the client.
6. If client authentication is required and the client cannot be authenticated, the session ends. If the client can be successfully authenticated, the server uses its private key to decrypt the premaster secret sent by the client.
7. Both the client and the server use the premaster secret that was sent from the client to the server to generate the session keys. The session keys are symmetric keys and use whatever algorithm the client and server have agreed upon in steps 1 and 2 of the handshake process.
8. Once the client has completed generating the symmetric key from the premaster secret, the client sends a message to the server stating that future messages from the client will be encrypted with that session key. It then sends an encrypted message indicating that the client portion of the handshake is finished.
9. The server sends a message to the client informing it that future messages from the server will be encrypted with the session key. The server then sends an encrypted message indicating that the server portion of the handshake is finished.
You can see this entire process in Figure 13-5, which shows the basic handshake process, without client authentication.
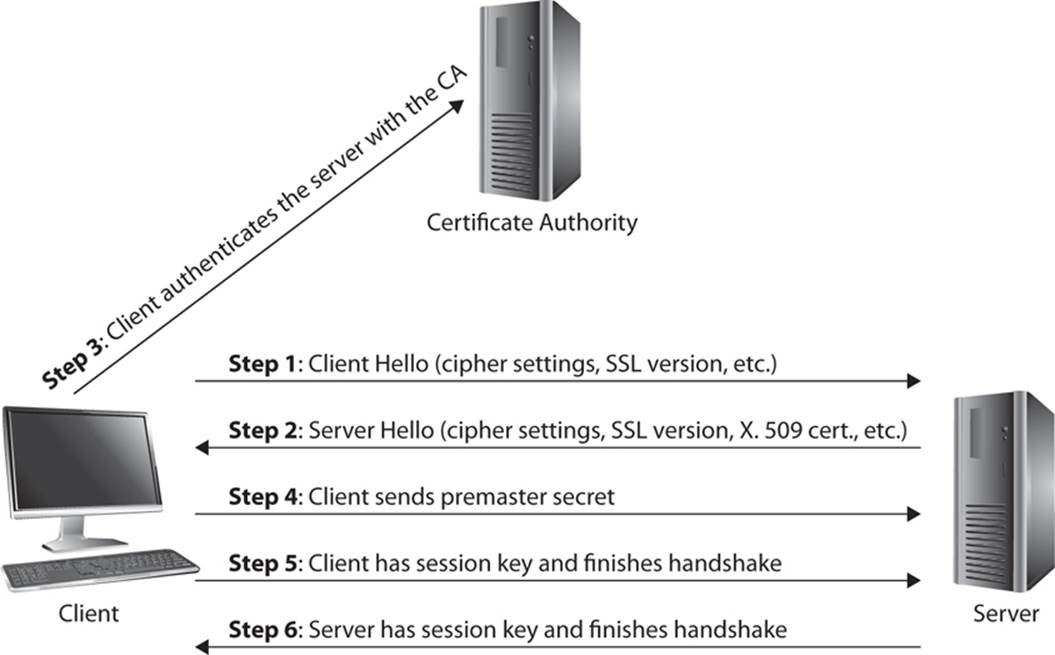
FIGURE 13-5 SSL/TLS handshake process
Note
Client authentication is not generally used in e-commerce, because it would require each and every client to have an X.509 certificate from a well-known and trusted CA. I suspect that most of you do not have such a certificate. If e-commerce sites did request such a certificate, it might reduce online fraud, but it would also add an extra burden and cost to consumers, who would have to purchase a certificate at an average cost of $19.95 per year.
The SSL/TLS process is very important. If you have ever purchased a product online, checked your bank statement online, or used any secure web site, you have already participated in this process. It is the basis for secure web traffic. Once the handshake is completed, you will notice that your browser URL changes from http to https, indicating that HTTP is secured by SSL/TLS. Many browsers also display a small visual indicator that the site communications are now secure, as shown here.

Microsoft Internet Explorer displays the indicator at the end of the URL text field, and Mozilla Firefox and Google Chrome display the indicator just before the URL, but both use a padlock indicator.
Handshake Initiation
The hello messages sent from client to server were discussed in “Handshake Step-by-Step.” The client hello consists of the following elements:
![]() Protocol version Indicates if this is SSL version 3, TLS version 1.1, and so on.
Protocol version Indicates if this is SSL version 3, TLS version 1.1, and so on.
![]() Random number A 32-byte random number; the first 4 bytes are the time of the day in seconds, and the next 28 bits are a random number; used to prevent replay attacks.
Random number A 32-byte random number; the first 4 bytes are the time of the day in seconds, and the next 28 bits are a random number; used to prevent replay attacks.
![]() Session ID A 32-byte number used to identify the SSL/TLS session.
Session ID A 32-byte number used to identify the SSL/TLS session.
![]() Compression algorithm If compression is used in transmission, the specific algorithm is provided here.
Compression algorithm If compression is used in transmission, the specific algorithm is provided here.
![]() Cipher suite A list of the cryptographic algorithms the client can use; often common symmetric ciphers such as Blowfish, AES, and so on. May also include hashing or message authentication code algorithms the client is capable of to allow for message integrity.
Cipher suite A list of the cryptographic algorithms the client can use; often common symmetric ciphers such as Blowfish, AES, and so on. May also include hashing or message authentication code algorithms the client is capable of to allow for message integrity.
The server hello is similar, consisting of the following elements:
![]() Protocol version Indicates if this is SSL version 3, TLS version 1.1, and so on.
Protocol version Indicates if this is SSL version 3, TLS version 1.1, and so on.
![]() Random number A 32-byte random number. The first 4 bytes are the time of the day in seconds, and the next 28 bits are a random number; used to prevent replay attacks.
Random number A 32-byte random number. The first 4 bytes are the time of the day in seconds, and the next 28 bits are a random number; used to prevent replay attacks.
![]() Session ID A 32-byte number used to identify the SSL/TLS session.
Session ID A 32-byte number used to identify the SSL/TLS session.
![]() Compression algorithm The server selects one of the algorithms the client has indicated that it can support.
Compression algorithm The server selects one of the algorithms the client has indicated that it can support.
![]() Cipher suite The server selects one of the algorithms the client has indicated that it can support.
Cipher suite The server selects one of the algorithms the client has indicated that it can support.
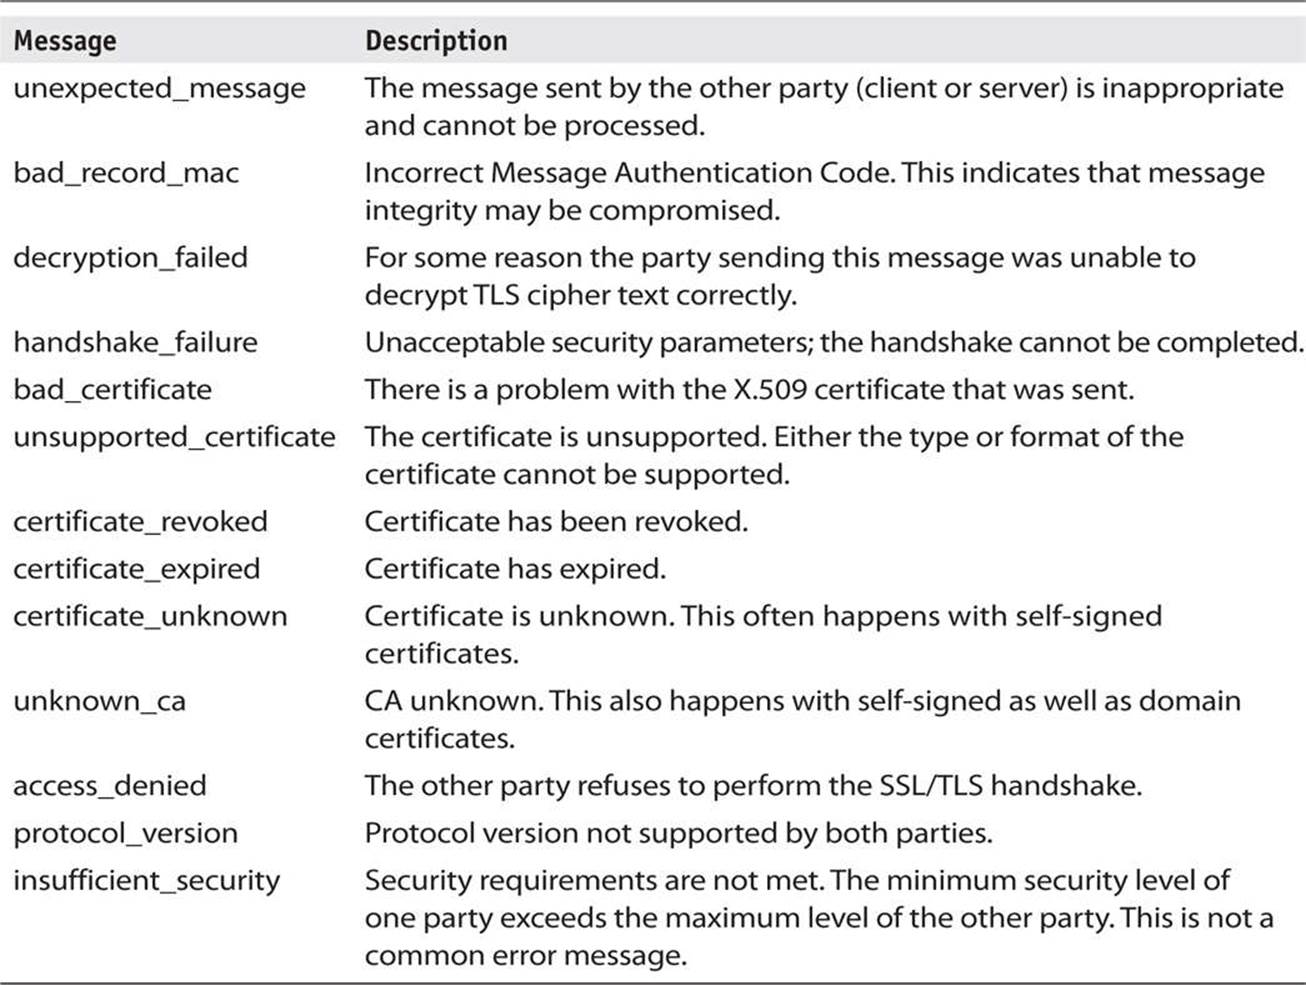
During the handshake, and throughout the SSL/TLS communication process, both client and server send a number of specific error messages to each other. The most critical of these messages is shown in Table 13-1.
TABLE 13-1 SSL/TLS Messages
SSL/TLS Applications
As mentioned, secure web communications depend on SSL/TLS. If you use the web for e-commerce, online banking, secure social media, or other secure communications, you are using SSL/TLS. Clearly this is a critical technology.
OpenSSL
OpenSSL is a popular open source implementation of SSL/TLS. It is written in C and is widely used for SSL/TLS. The OpenSSL project was founded in 1998 and is widely used today, with literally thousands of web servers running OpenSSL.7, 8
OpenSSL can support a wide range of cryptographic algorithms. For symmetric ciphers it can support DES, AES, Blowfish, 3DES, GOST, CAST 128, IDEA, RC2, RC4, RC5, Camellia, and SEED. For cryptographic hashes, OpenSSL can support MD2, MD4, MD5, SHA-1, SHA-2, RIPEMD-160, GOST, and MDC-2. For asymmetric algorithms, OpenSSL can support Diffie-Hellman, RSA, DSA, and elliptic curve cryptography.
OpenSSL and the Heartbleed Bug
No discussion of OpenSSL would be complete without including the infamous Heartbleed Bug. Heartbleed came down to a very simple flaw—a buffer over-read. The bug involved improper bounds checking that would allow an attacker to read more data than OpenSSL should be able to. The flaw was implemented in the OpenSSL source code repository on December 31, 2011, and was released with OpenSSL version 1.0.1 on March 14, 2012.
Here’s how the process worked: A computer at one end of the connection would send a heartbeat request message, simply a request to ensure the other end was still active. This included a 16-bit integer, and the receiving computer would send back the same payload (16 bits). The bug allowed the attacker to set any return length size desired, up to 64KB of data. With this flaw, the attacker would request whatever was in active memory up to 64KB. In the case of servers, this 64KB of data could include other users’ keys, credit card information, or other sensitive data. This bug has been patched, and OpenSSL continues to be widely used.
VoIP
Voice over IP (VoIP) is in wide use today. The ability to place phone calls using IP networks is quickly replacing traditional phone calls—at least for many people. VoIP depends primarily on two protocols: Session Initiation Protocol (SIP) establishes a session/phone call; then Real-time Transport Protocol (RTP) transmits the data. In many cases, Secure Real-Time Transport Protocol (sRTP) is used to secure the data. sRTP uses AES encryption. However, that still leaves the initial SIP communication insecure.
Some implementations of VoIP use an SSL/TLS connection established first, and then both SIP and RTP communication are conducted over the SSL/TLS connection. This allows for complete security of the entire communication session.
E-mail is usually sent using the Simple Mail Transfer Protocol (SMTP) and received using either Post Office Protocol version 3 (POP3) or Internet Message Access Protocol (IMAP). All of these protocols are quite effective at transferring e-mail, but they are simply not secure. To secure these protocols, SSL/TLS is added. SMTPS (SMTP using SSL/TLS) uses port 465 and can send e-mail over an encrypted channel. IMAPS (IMAP using SSL/TLS) uses port 993 and can retrieve e-mail from the e-mail server over an encrypted channel.
Web Servers
Obviously, SSL/TLS is used to encrypt web traffic. In fact, that may be one of the most common applications of SSL/TLS. The two most common web servers are Apache web server and Microsoft Internet Information Services (IIS). Let’s look at configuring SSL/TLS for each of these commonly used web servers.
Apache Web Server
The Apache web server ships by default with many Linux distributions. You can also download Apache for either Linux or Windows at www.apache.org. It is an open source product and a free download. This, combined with its ease of use, has made it a very popular web server.
Depending on the version of Apache being used, the configuration file (httpd.conf) will be found in one of the following two locations:
![]() /etc/apache2
/etc/apache2
![]() /etc/httpd
/etc/httpd
You can configure your web server to accept secure connections and, in some cases, to accept only secure connections simply by changing the httpd.conf file. For example, if you want the server to accept only SSL version 3:

Figure 13-6 shows an excerpt from an example httpd.conf file. This excerpt comes from the Apache.org web site.9
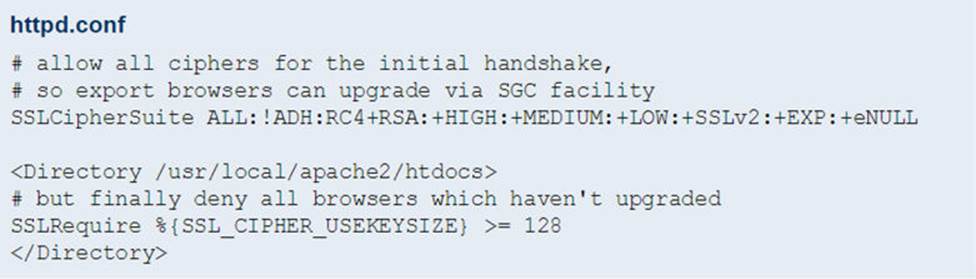
FIGURE 13-6 Configure SSL/TLS in Apache
Note
Go to the Apache.org web site to find other possible configurations. As you can see, it is a rather trivial matter to enable SSL/TLS for Apache.
Internet Information Services
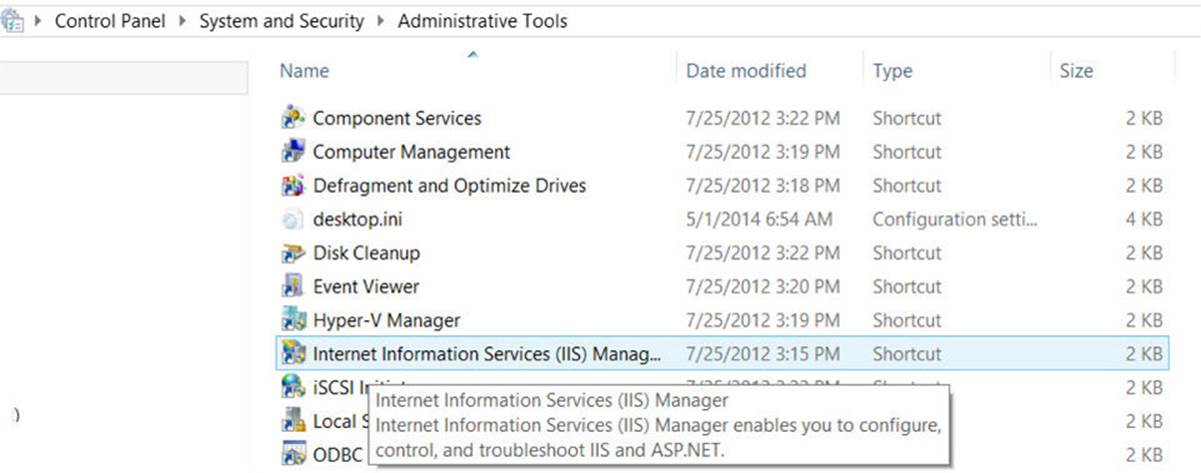
Microsoft IIS is configured entirely from GUI methods, although it is a lengthy process. Unlike Apache, there is no configuration file to edit. However, the steps are relatively simple, and this section offers a step-by-step guide.
First, navigate to the Control Panel, and then Administrative Tools. This process will be the same in every version of Windows (Windows Vista, 7, 8, 8.1; Server 2003, 2008, 2012; and so on). Under Administrative Tools, you should see Internet Information Services, as shown here.
If you do not see this option, you need to add it. In Windows Client operating systems (Windows 7, 8, and so on), you do this by going to Control Panel and then Programs; turn on Windows Features, as shown next.
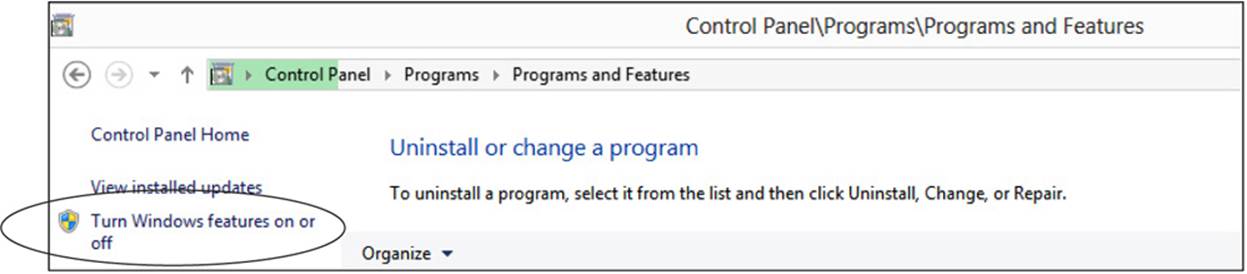
Note
IIS is a part of all versions of Windows and can be turned on or added to any Windows server or client. For servers, you simply use the Add Role function rather than “turn on” features.
Once you have IIS turned on, you can use the IIS manager in the Administrative Tools to configure IIS. There are really two segments to the IIS management: the first is for IIS server-wide, and the second is for specific sites. As you go through these steps, if you do not see an option mentioned, you are probably looking at the wrong aspect of the IIS manager. You can see the server settings circled in Figure 13-7.
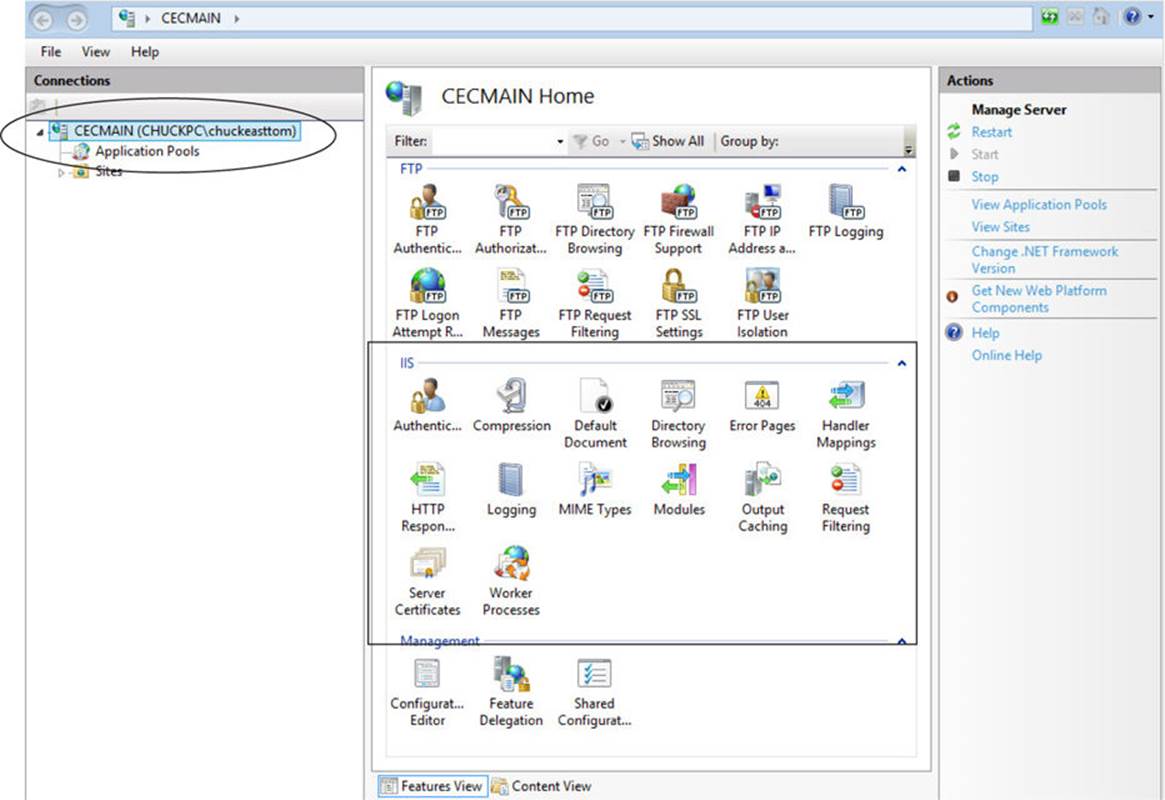
FIGURE 13-7 IIS server settings
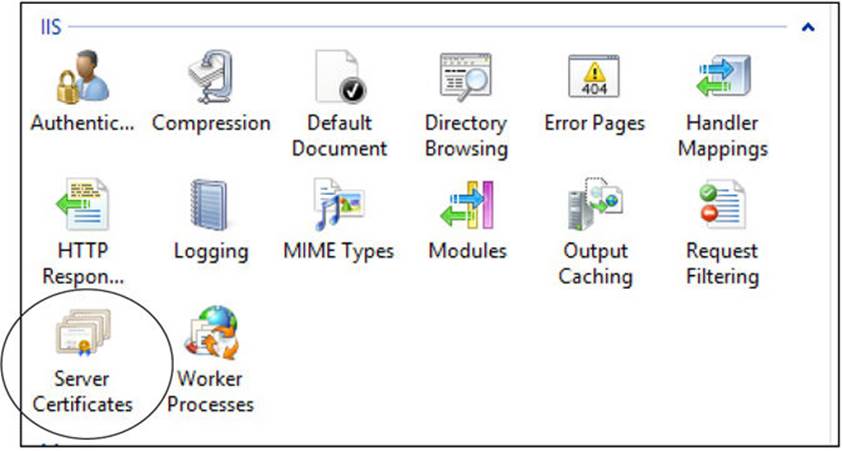
Within those server settings you need to select Server Certificates, as shown next.
On the right side of the Server Certificates screen is an Actions menu, where, as shown next, you can create a self-signed certificate, create a certificate request, create a domain certificate, or import an existing certificate.
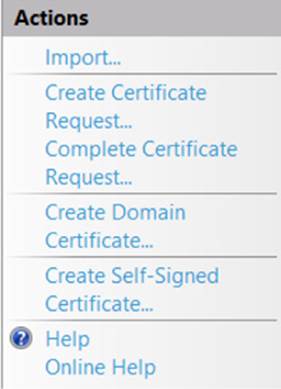
To test this, you may want to create a self-signed certificate.
To apply this certificate to a specific site, navigate from the server settings to a specific site’s settings and select SSL Settings, as shown in Figure 13-8. Notice that Windows refers to SSL when in fact you are most likely using TLS with any modern version of Windows.
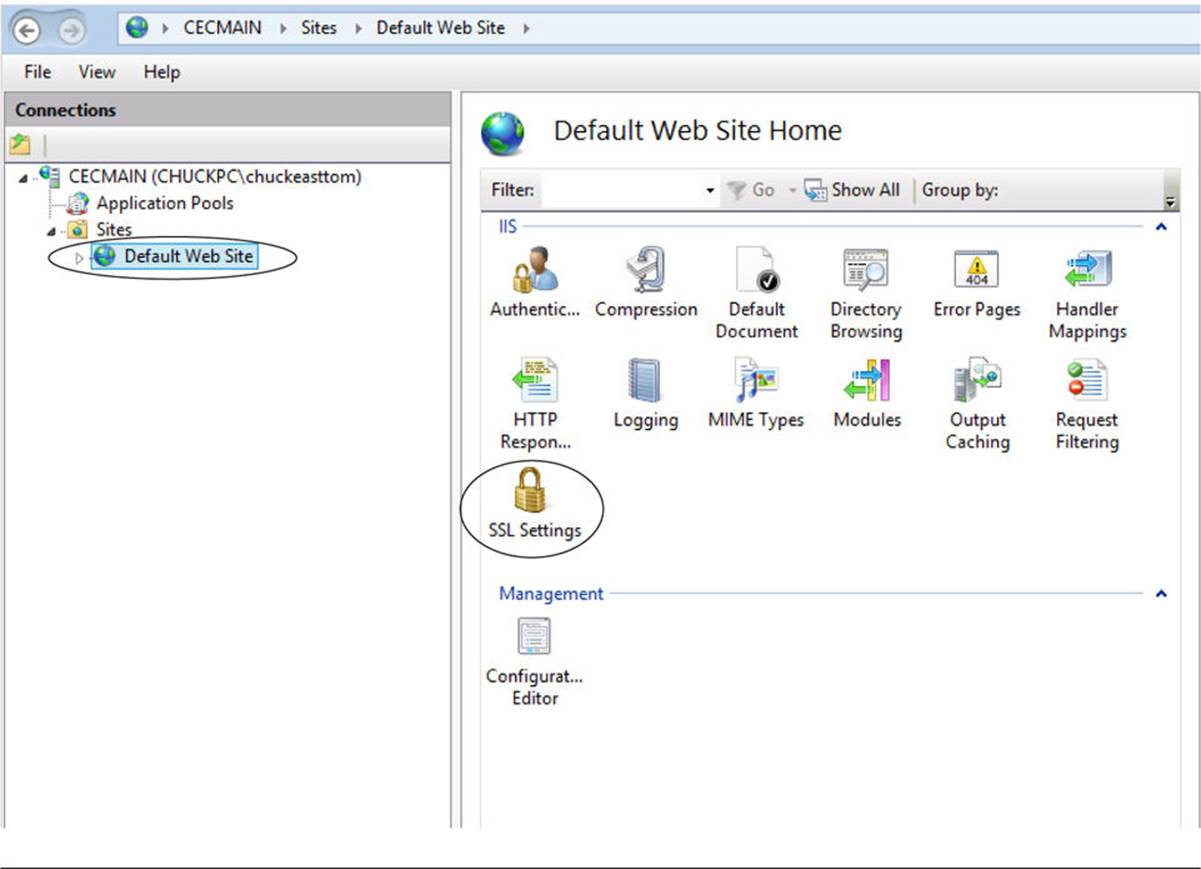
FIGURE 13-8 Site SSL Settings
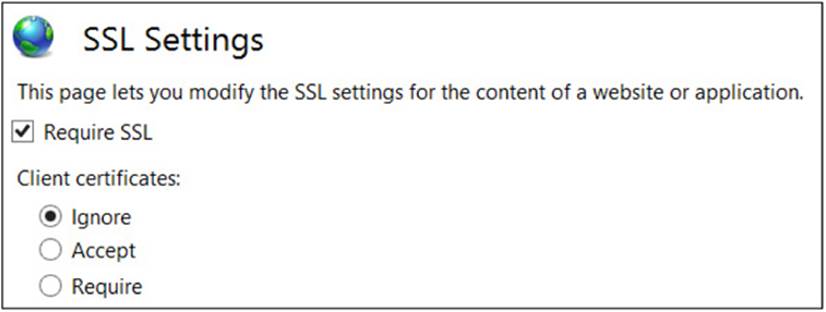
These settings allow you to decide if you want to require SSL. This will mean that a client can connect to this web site only using SSL/TLS, as opposed to the SSL/TLS being optional. If you choose this option, clients cannot connect to your web site using http:// but must use https://. You can also select how to respond to client certificates. These settings are shown here.
Finally, set the bindings for this site. When you have navigated to a specific site, the binding’s option is on the right side of the screen, as shown next.

Bind HTTPS to a specific port, usually 443, and select a certificate to use with this web site. This is shown in Figure 13-9.
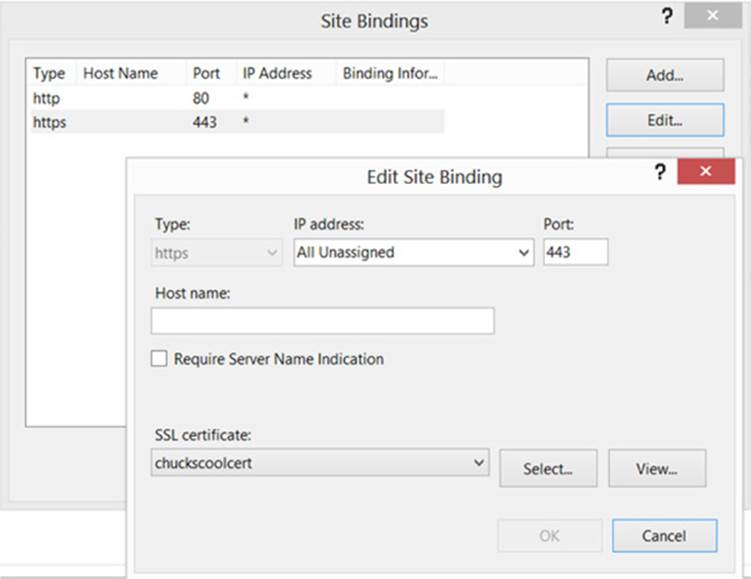
FIGURE 13-9 Finalizing HTTPS bindings
Conclusions
The SSL and TLS protocols are a cornerstone of modern secure communications. These protocols in turn depend on other technologies such as X.509 certificates, digital signatures, and the symmetric and asymmetric algorithms discussed in previous chapters. A thorough understanding of SSL/TLS is critical to your applying cryptography to real-world problems. After reading this chapter, you should be thoroughly familiar with digital certificates as well as the SSL/TLS handshake process.
You have also seen that SSL/TLS encrypted communications are important in a variety of technologies, including VoIP, e-mail, and web traffic. You explored the basics of setting up SSL/TLS for encrypting web traffic with both Apache and IIS.
Test Your Knowledge
1. In general terms, describe how digital signatures work.
2. Briefly describe the concept of blind signatures.
3. What does X.509 support that PGP certificates do not?
4. An X.509 certificate is digitally signed by whom?
5. What part of the SSL/TLS handshake includes the cryptographic ciphers the client can support?
6. If a certificate that is being used in SSL/TLS is on the CRL, what message will be sent?
7. On what port does secure IMAP operate by default?
8. What is an arbitrated signature?
9. Is voicemail secure?
10. Where is PGP most often used?
Answers
1. The private key is used to encrypt a message, usually the hash of the message, and the receiver uses the public key to verify.
2. Person A needs to send a message to Person B, but a trusted third party C must sign to verify that the data was in fact sent by A. However, A does not want C to see the contents of the message being signed.
3. Third-party authentication
4. The certificate issuer
5. The client hello
6. certificate_revoked
7. 993
8. The signature is from a trusted third party, not the message sender.
9. No, SIP and RTP are not inherently secure. Protocols such as sRTP need to be used to provide security.
10. E-mail encryption
Endnotes
1. IETF, RFC 5280, “Internet X.509 Public Key Infrastructure Certificate and Certificate Revocation List (CRL) Profile,” May 2008, www.rfc-editor.org/info/rfc5280.
2. Microsoft Developer Network, “Public Key Infrastructure,” https://msdn.microsoft.com/en-us/library/windows/desktop/bb427432(v=vs.85).aspx.
3. Microsoft TechNet, “What Is TLS/SSL?” https://technet.microsoft.com/en-us/library/cc784450(v=ws.10).aspx.
4. IETF RFC 5246, “The Transport Layer Security (TLS) Protocol Version 1.2,” https://tools.ietf.org/html/rfc5246.
5. IBM Knowledge Center, “An Overview of the SSL or TLS Handshake,” www-01.ibm.com/support/knowledgecenter/SSFKSJ_7.1.0/com.ibm.mq.doc/sy10660_.htm?lang=en.
6. Microsoft TechNet, “SSL/TLS in Detail,” https://technet.microsoft.com/en-us/library/cc785811(v=ws.10).aspx.
7. Netcraft, “April 2014 Web Server Survey,” http://news.netcraft.com/archives/2014/04/02/april-2014-web-server-survey.html.
8. BuiltWith, “OpenSSL Usage Statistics: Websites Using OpenSSL,” http://trends.builtwith.com/Server/OpenSSL.
9. Apache HTTP Server Version 2.0, “SSL/TLS Strong Encryption: How To,” http://httpd.apache.org/docs/2.0/ssl/ssl_howto.html.
All materials on the site are licensed Creative Commons Attribution-Sharealike 3.0 Unported CC BY-SA 3.0 & GNU Free Documentation License (GFDL)
If you are the copyright holder of any material contained on our site and intend to remove it, please contact our site administrator for approval.
© 2016-2026 All site design rights belong to S.Y.A.