Hack and HHVM (2015)
Chapter 8. XHP
XHP (named to resemble XHTML) is a feature of Hack that allows programmers to represent an HTML tree as PHP/Hack objects, by means of embedded XML-like syntax. This eliminates entire classes of bugs as well as a major source of security holes in web apps. It makes UI code cleaner, more maintainable, and more flexible.
Traditionally in PHP, you output web pages in one of two ways: either by using PHP templating within HTML:
<tt>Hello <strong><?= $user_name ?></strong>!</tt>
Or by concatenating or interpolating strings:
echo "<tt>Hello <strong>$user_name</strong>!</tt>";
With XHP, the same example looks like this:
echo <tt>Hello <strong>{$user_name}</strong></tt>;
This is a normal echo statement, and there are no quotation marks. The HTML-like syntax is part of the grammar.
XHP is a great foundation for a modern, object-oriented web app UI library. In this chapter, we’ll see why you should use it, how to use it, how to build on top of it, and how to convert a legacy codebase to use it.
Why use XHP?
XHP can help improve the security and correctness of your UI code, with a variety of ways to prevent you from making common mistakes. It also helps organize your UI code more sanely, by providing an object-oriented interface to your HTML markup.
Runtime Validation
Can you spot the problem with this code?
echo '<div class="section-header">';
echo '<a href="#intro">Intro to <span class="metal">Death Metal</sapn></a>';
echo '</div>';
One of the closing tags is misspelled: </sapn>. In real code, you probably wouldn’t detect a bug like this until you viewed the resulting webpage in a browser, and even then, depending on the bug, you may not notice it at all.
XHP eliminates this class of errors. The above example in XHP, including the typo, would look like this:
echo
<div class="section-header">
<a href="#intro">Intro to <span class="metal">Death Metal</sapn></a>
</div>;
When you try to run, include, or require this file, you’ll encounter a fatal error:
Fatal error: XHP: mismatched tag: 'sapn' not the same as 'span' in
/home/oyamauchi/test.php on line 4
XHP offers more sophisticated forms of validation as well. HTML has rules governing the allowed relationships between tags: which tags are allowed to have other tags inside them, which tags are allowed to have text inside them but no tags, and so on. XHP can check these constraints and raise errors if they’re violated.
For example, the following is not valid HTML, because the <select> tag is not allowed to have tags inside it other than <option> and <optgroup>:
<select><strong>bold text!</strong></select>
If you try to do this in XHP, you’ll encounter a fatal error, with details on what went wrong and where:
Fatal error: Element `select` was rendered with invalid children.
/home/oyamauchi/test.php:2
Verified 0 children before failing.
Children expected:
(:option|:optgroup)*
Children received:
:strong
XHP validates many of the rules imposed by the HTML5 draft specification, though not all. When you extend XHP with custom classes, you can add validation rules for them. We’ll see how to do that in children Declarations.
Secure by Default
Here’s some code that’s meant to be used as the target of a web form submission. The user enters their name in a form field and this page displays a personalized welcome message. What is the problem with it?
$user_name = $_REQUEST['name'];
echo '<html>';
echo '<head><title>Welcome</title></head>';
echo '<body>Welcome, ' . $user_name . '</body>';
echo '</html>';
There is a security vulnerability. If the user submits a string containing HTML markup, that markup will end up being interpreted by the browser as part of the DOM. For example, if the user submits <blink>blinky text</blink> in the name query parameter, there will be blinking text on the resulting page, and that surely isn’t what the site’s author intended. This class of vulnerability is called cross-site scripting, or XSS for short[31].
Without XHP, the XSS vulnerability is fixed by adding a call to htmlspecialchars(), like this:
$user_name = htmlspecialchars($_REQUEST['name']);
// ...
This is still troublesome: you have to remember to properly escape every string that could contain user input (including strings resulting from database queries and such). You also have to make sure they’re escaped exactly once, or you’ll see double-escaping bugs, which aren’t security holes but are still undesirable.
This example is simple to fix, but it’s also particularly egregious. XSS vulnerabilities in real code are likely to be quite a bit more subtle. Most codebases will have a large number of functions or methods that output pieces of a complete web page, and they are called in many different layers to assemble the final page; making sure that all the necessary escaping is done exactly once amid all the layers is a difficult and delicate task.
Here’s the same code in XHP:
$user_name = $_REQUEST['name'];
echo
<html>
<head><title>Welcome</title></head>
<body>Welcome, {$user_name}</body>
</html>;
There are no calls to htmlspecialchars() or any other escaping routines in this code, and yet there is no XSS vulnerability. XHP escapes reserved characters to HTML entities in the string before outputting it, replacing < with < and so on.
The root of the problem is that PHP and Hack make no distinction between raw strings and HTML strings. It’s best to think of these as two completely different data types, with nontrivial algorithms to convert between them. A raw string is meant for display as-is. An HTML string is a serialized DOM tree, meant to be used as input to an HTML rendering engine.
XSS vulnerabilities result from incorrectly treating raw strings as HTML strings. The string that the user types into the form field is a raw string, so it must be converted into an HTML string (i.e. reserved HTML characters must be escaped) before it gets used as input to an HTML rendering engine. To fail to do so is, in principle, a type error. XHP solves the problem by relieving you of the need to deal with HTML strings at all.
Thinking of HTML as a serialization format, rather than a markup language, makes this point clearer. Think of JSON, another commonly used serialization format. When you’re writing code that has to output JSON, you don’t do it by manually piecing together JSON characters; you build up a structure using PHP/Hack objects or arrays and then serialize it all to JSON by passing it to json_encode() as the last step. You, the application developer, are never dealing directly with strings containing JSON-encoded data.
Similarly, XHP gives you a way to build up a structure using PHP/Hack objects and then serialize it to HTML, without ever dealing with a serialized HTML string except to output it to a stream.
WHY IS XSS DANGEROUS?
A full exploration of XSS vulnerabilities is beyond the scope of this book, but here’s a quick overview. The most pressing danger posed by XSS attacks is that it allows attackers to execute malicious JavaScript code in the context of a site that the user trusts.
JavaScript code running in a browser can generally access information in other windows and tabs of the same browser, but only if they are displaying the same site. This way, if you have your bank’s website open in one tab and a malicious site open in another, the malicious site’s JavaScript can’t access your banking information. This restriction is called the same-origin policy.
However, if the bank’s website has an XSS vulnerability, the attacker may be able to use it to execute JavaScript of his own devising, as if the bank’s website had supplied it. The JavaScript will have access to the bank site’s DOM, and may, for example, make an HTTP request containing your bank account number to a site controlled by the attacker.
How to Use XHP
HHVM has support for XHP built in. You can turn it on and off with the configuration option hhvm.enable_xhp. You can enable XHP without enabling any other Hack features.
You’ll also need the Hack library for XHP. This contains classes that form the infrastructure of XHP, as well as classes that mirror all the tags that HTML5 supports. The recommended way to integrate this with your project is to use Composer. This will take care of fetching the source and setting up autoloading the necessary classes, so you can use XHP immediately.
A full guide to using Composer is outside the scope of this book, but here is what you’ll need to add to your project’s composer.json file:
"require": {
"facebook/xhp-lib": "~2.2"
}
This specifies that we require version 2.2 or later.
Basic Tag Usage
We’ve already seen several examples of XHP usage above, but we’ll start from the very beginning here.
XHP is syntactic sugar for creating XHP objects. XHP objects are just like any other Hack object: for example, you can call methods on them, and if you pass an XHP object to the builtin function is_object(), it will return true. The only difference is that instead of creating XHP objects with the keyword new, you create them with XHP tags, an HTML-like syntax extension.
XHP objects are instances of XHP classes, which again are like any other Hack class except for two things: their names start with a colon (:), which is invalid in PHP and Hack; and they descend, possibly indirectly, from the core XHP library class :xhp.
XHP objects are meant to form a tree structure. Each object can have any number of children, each of which is either text or another XHP object. This mirrors the structure of HTML documents.
At its most basic, XHP tag syntax consists of an XHP class name without the leading colon, surrounded by angle brackets (< and >). This is an opening tag. Every opening tag must be balanced by a matching closing tag, which consists of the same class name, prefixed with a slash (/), all inside angle brackets. Between the opening and closing tags can be text, other tags, or embedded Hack code (see Embedding Hack Code).
This example creates a single XHP object, an instance of the class :strong, and passes it as an argument to the echo statement. It has a single child, which is the string bold text.
echo <strong>bold text</strong>;
This is a more complex example that creates an XHP object of the class :div with two children. The first child is the string plain text. The second child is an XHP object of the class :strong with one child: the string bold text.
echo
<div>
plain text
<strong>bold text</strong>
</div>;
One important thing to learn from this example is that whitespace in XHP is mostly insignificant. In text within XHP, any sequence of whitespace characters (spaces, tabs, newlines, and carriage returns) will be collapsed into a single space. This is to allow for the linebreaking and indenting style used in this example, which we recommend for any XHP code that doesn’t fit on a single line.
Remember that the syntax is meant to describe a tree structure. To make sure it does, opening and closing tags must be properly nested. That is, after multiple opening tags, their corresponding closing tags must appear in the opposite order. For example, this is invalid syntax:
echo <strong><em>bold italic text</strong></em>;
The em tag (that is, the characters between the opening <em> and the closing </em>) is partially inside and partially outside the strong tag, which breaks the tree structure: one node in a tree cannot be partially a child of another one and partially not. In this example, the closing tag </em>must come before the closing tag </strong>. The HTML rendering engines in many web browsers are permissive about this kind of thing, but XHP is not.
Tags may also be self-closing; this is equivalent to an opening tag followed immediately by its closing tag, and is commonly used for XHP objects that don’t have children. Just as in HTML, the syntax for a self-closing tag is a slash immediately before the closing angle bracket. The space before the slash isn’t necessary; including it is a stylistic choice.
echo <hr />;
HTML Character References
HTML character references are a way to encode characters in HTML, as an alternative to simply using the literal character. This is useful when you need to encode a reserved HTML character like the ampersand (&), or when you need to use a character that is unsupported by the character set you’re using.
You can use HTML character reference syntax in text within XHP, and it will be converted to the corresponding character during parsing. XHP supports every HTML entity from the HTML5 draft specification, as well as numeric character reference syntax.
This example will print a <span> tag containing three hearts. The first uses the entity, the second uses decimal notation, and the third uses hexadecimal notation. The resulting string is UTF-8-encoded.
echo <span>♥ ♥ ♥</span>;
Remember that XHP escapes all reserved HTML characters (there are five: & < > ' "), so if you use this syntax to generate one of those, it will be turned back into an entity when you convert the XHP object back to a string. This example will output ♥ &.
echo <span>♥ &</span>;
There is no way to output a string like ♥ directly from XHP.
Attributes
In addition to children, XHP objects can also have attributes. Attributes are key-value pairs that can hold data for an object. This is similar to HTML, where tags can have attributes that influence their behavior. Each XHP class defines the attributes that it can have; each attribute has a type, and, optionally, a default value. Attributes may also be required; that is, it’s an error to not set them.
XHP tag syntax supports attributes, and they look very similar to HTML attributes. After the tag name, there can be any number of attributes, separated by whitespace. Each attribute is a name, followed by an equals sign, followed by a value. There must be no whitespace around the equals sign. The value must be either a double-quoted string or a curly-brace-enclosed Hack expression (see Embedding Hack Code).
echo <input type="button" name="submit" value="Click Here" />;
Note that although attribute values are double-quoted strings, they are not subject to variable interpolation as they are elsewhere. Dollar signs in attribute values have no special meaning. If you need variable interpolation, use embedded Hack code instead (see Embedding Hack Code).
Embedding Hack Code
You can embed Hack expressions within XHP syntax, to use the values of those expressions as attributes or children of XHP objects. The syntax is simple: enclose the Hack expression in curly braces. Here is an example with both ways you can use it: attribute value, and child.
echo
<a href={$user->getProfileURI()}>
{$user->getName()}'s Profile
</a>;
Apart from allowing you to insert dynamically generated data into XHP trees, this allows you to build up an XHP tree from individual pieces, instead of as a single mass.
$linked_profile_pic =
<a href={$user->getProfileURI()}>
<img src={$user->getProfilePicURI()} />
</a>;
echo
<div>
<div class="profile-pic">{$linked_profile_pic}</div>
{$user->getName()}
</div>;
This is exactly equivalent to putting the code for the a tag directly inside the div tag.
Type Annotations for XHP
There are two interfaces that you’ll use in type annotations when passing XHP objects around: XHPRoot and XHPChild.
XHPRoot is any object that is an instance of an XHP class. XHPChild is the set of things that are valid as the value of $xhpchild in this code:
echo <div>{$xhpchild}</div>;
That means XHP objects, as well as strings, integers, doubles, and arrays of the above. It does not include non-XHP objects with __toString() methods. XHPChild is special in that it is “implemented” by primitive types, so, for example, 123 instanceof XHPChild evaluates to true.
Here’s an example of when you might use XHPChild: rendering a UI element that could be either a link or plain unlinked text.
function render_page_link(Page $page, bool $is_self): XHPChild {
if ($is_self) {
return $page->getTitle();
} else {
return <a href={$page->getURI()}>{$page->getTitle()}</a>;
}
}
If you have an XHPChild and you need to pass it to something that requires an XHPRoot, you can wrap it in the special XHP class x:frag. It’s essentially a transparent wrapper for XHP content; adding an x:frag as a child to another XHP object is the same as adding each of the x:frag’s children individually. This class is also what you’ll use when you need to pass around a bundle of multiple XHP objects without anything to contain them.
function render_name_with_icon(User $user): XHPRoot {
return
<x:frag>
<img src={$user->getIconURI()} />
{$user->getName()}
</x:frag>;
}
Object Interface
XHP objects have several public methods that can be used to inspect and modify their attributes and children. This gives you much more flexibility: when you create an XHP object, you don’t need to have all of its children and attributes ready. You can create one and pass it around to other functions so that they can make modifications to it, or return one from a function so that the caller can customize it.
appendChild(mixed $child): this
Adds $child to the end of the object’s array of children. $child can also be an array, in which case each of its contained objects will be passed to appendChild() recursively in turn.
prependChild(mixed $child): this
Adds $child to the beginning of the object’s array of children. $child can also be an array, in which case each of its contained objects will be passed to prependChild() recursively in turn.
replaceChildren(...): this
Takes a variable number of arguments, puts all its arguments in an array, and replaces the object’s array of children with that array.
getChildren(?string $selector = null): Vector<XHPChild>
If $selector is not passed, this simply returns all of the object’s children. If $selector starts with %, this will return all children belonging to the category named by $selector (see Categories). Otherwise, this will return all children that are instanceof the class named by$selector.
getFirstChild(?string $selector = null): ?XHPChild
If $selector is not passed, this returns the object’s first child. Otherwise, it returns the first child that matches $selector (see getChildren() for details), or null if no such child exists.
getLastChild(?string $selector = null): ?XHPChild
If $selector is not passed, this returns the object’s last child. Otherwise, it returns the last child that matches $selector (see getChildren() for details), or null if no such child exists.
getAttributes(): Map<string, mixed>
Returns the object’s array of attributes. The returned Map is a copy of the object’s internal attribute array; you can modify it without affecting the object.
getAttribute(string $name): mixed
Returns the value of the attribute named $name. If the attribute is not set, this returns null if the attribute is not required, or throws XHPAttributeRequiredException if it is required. If $name is not the name of a declared attribute, this throwsXHPAttributeNotSupportedException.
You should only use this method if the name of the attribute you’re reading isn’t statically known. Otherwise, you should use the $this->:name syntax, because the typechecker understands it and can give the returned value the right type.
setAttribute(string $name, mixed $val): this
Sets the attribute named $name to $val. The value will be checked against the attribute’s type, and if the type check fails, this throws XHPInvalidAttributeException. If $name doesn’t contain the name of a declared attribute, this throwsXHPAttributeNotSupportedException.
Again, if you know the attribute name statically, you should use the $this->:name = $value syntax instead of this method.
setAttributes(KeyedTraversable<string, mixed> $attrs): this
Replaces the object’s array of attributes with $attrs. The error conditions from setAttribute() apply to this method as well.
isAttributeSet(string $name): bool
Returns whether the attribute named $name is set.
categoryOf(string $cat): bool
Returns whether the object belongs to the category named $cat.
When you’re using existing XHP classes, you’ll mostly be using appendChild(), prependChild(), and setAttribute(). When writing custom XHP classes (see Creating Your Own XHP Classes), you’ll mostly be using getChildren() and getAttribute().
Here’s an example of using the object-oriented interface to build up an HTML list:
function build_list(array<string> $names): XHPRoot {
$list = <ul />;
foreach ($names as $name) {
$list->appendChild(<li>{$name}</li>);
}
return $list;
}
Validation
XHP classes can declare the type and number of children they can have, as well as the types and names of the attributes they can have. These constraints are validated at various times:
§ Children constraints are validated at render time; that is, when toString() is called. See The Hack Library for more detail on this.
§ Attribute names and types are validated when the attributes are set, either in an XHP tag or through setAttribute().
§ The presence of @required attributes is validated when the individual @required attribute is read.
Validation is on by default, and it can be turned off. We recommend that you keep it on during development and testing, to catch mistakes. If you want to save CPU cycles in production, though, turning XHP validation off is a quick and easy way to do it. All you have to do is make sure this line of code runs before you start using XHP:
:xhp::$ENABLE_VALIDATION = false;
SYNTAX HIGHLIGHTING
Generally, the PHP syntax highlighting modules that come with popular text editors will work fine on files that contain XHP. The main source of trouble is the use of apostrophes in text within XHP; syntax highlighters usually end up treating these as opening single quotes, resulting in text being incorrectly highlighted as a string literal. This won’t cause a syntax error at runtime, but is confusing to read in a text editor.
The workaround is to put the apostrophe inside a double-quoted string inside an embedded code snippet. You can wrap just the apostrophe like this, or a larger part of the text, or anything in between.
echo <p>This is so text editors don{"'"}t get confused</p>;
echo <p>{"This'll work too"}</p>;
There’s no technical advantage to either style, but the first style is more consistent with text that doesn’t have apostrophes and thus doesn’t need any kind of quoting.
Creating Your Own XHP Classes
The true power of XHP comes from its extensibility. It comes with classes for each standard HTML tag, but you can define your own classes to encapsulate your own rendering logic. For example, you can define an XHP class that represents an alert box on a webpage, or a row in a list of users, or an entire navigation bar.
XHP class names always start with a colon (:), and may include colons in the middle, as long as there are never two adjacent colons. Colons aren’t allowed in class names in PHP and Hack, but this is one of the changes XHP introduces. XHP class names may also include hyphens (-), which is also invalid in PHP and Hack.
All you need to do to create a custom XHP class is to extend :x:element and implement the protected method render(), taking no arguments and returning an XHP object. Here’s a minimal example:
class :hello-world extends :x:element {
protected function render(): XHPRoot {
return <em>Hello World</em>;
}
}
echo <hello-world />; // Prints <em>Hello World</em>
It’s important to note that even when you’re defining your own XHP classes, you still never deal with HTML strings. You implement everything in terms of other XHP classes, which can be your own classes or the built-in classes that mirror HTML tags.
The render() method’s return type must be XHPRoot, so it must return an XHP object. If you want to return a plain string, wrap it in an x:frag:
class :hello-world extends :x:element {
protected function render(): XHPRoot {
return <x:frag>Hello world, plain as can be</x:frag>;
}
}
Attributes
Your custom XHP classes can declare attributes that they can have. Inside the class definition, put the reserved XHP keyword attribute, followed by a type, followed by the attribute name, optionally followed by a default value. Attribute names are conventionally all-lowercase, with no separators between words, mimicking the style used in HTML.
class :ui:profile-link extends :x:element {
attribute int profileid;
attribute bool showpicture = false;
}
XHP has special syntax for accessing the value of an attribute. It looks like regular property access syntax, with the attribute name as the property name, with one difference: the attribute name is prefixed with a colon.
class :hello extends :x:element {
attribute string target;
public function render(): XHPRoot {
return <x:frag>Hello {$this->:target}!</x:frag>;
}
}
If the attribute wasn’t set, this returns null, or the default value if there is one.
You can make attributes required by adding @required after the attribute name in the declaration. If you try to read a required attribute and that attribute hasn’t been set, an XHPAttributeRequiredException will be thrown. Note that if the exception propagates out of the render()method, :x:element will catch it and turn it into a fatal error. If you want to catch the exception, you must do so inside render(), but this isn’t recommended; instead, either make sure the attribute is set if it really is required, or don’t make it required.
The syntax lets you combine @required and default values (put the @required after the default value), but that doesn’t make sense semantically. If you don’t pass the attribute, you’ll still get an XHPAttributeRequiredException when you try to read it, so you’ll never see the default value.
Attribute Types
The types you can give to attributes are a subset of Hack type annotations. Every attribute must have a type, and attribute types are checked at runtime, even if the Hack typechecker is not being used.
Here is the set of acceptable attribute types and what they mean.
§ bool, int, float, string, array, and mixed all mean the same as they do in Hack type annotations. By default, there is no coercion; if you don’t pass the exact type the attribute expects, an XHPInvalidAttributeException will be thrown.
§ Hack enum names (see Enums) are allowed. They’re checked at runtime with the isValid() enum function. If the check fails, an XHPInvalidAttributeException will be thrown.
§ There’s another enum syntax that lets you list the acceptable values inline. It looks like this:
attribute enum {'get', 'post'} formmethod;
There’s no limit to the number of possible values in the list. The values must be all be scalars (i.e. boolean, numeric, or string literals) and they will all be cast to strings. enum attributes are checked at runtime against the list of acceptable values with ===. If the check fails, anXHPInvalidAttributeException will be thrown.
These are entirely unrelated to Hack enums, and you should use Hack enums instead; they’re more typesafe, and more consistent with non-XHP code.
§ Class and interfaces names are allowed. They’re checked at runtime with instanceof. If the check fails, an XHPInvalidAttributeException will be thrown.
Of particular note is the special interface Stringish. It’s special in the same way that XHPChild is: it’s “implemented” by a primitive type, namely strings. It is also implicitly implemented by any class that has a __toString() method. This is in contrast to the attribute type string, which only accepts strings, and not objects.
Generic types (see Chapter 3), including array, can take type arguments when used as attribute types. Type erasure still applies, so although the Hack typechecker will make use of the type arguments, the runtime will not check them.
In attribute types, type aliases (see Type Aliases) are not resolved. Nullable types are not syntactically valid as attribute types, and neither are callable types.
Inheriting Attributes
It’s common to find that one class should support all the attributes that some other class does. The most common case is that you want your custom XHP class to support For example, if you’re designing an XHP class that renders a box with a drop shadow on a webpage, you may want it to support all the attributes that the HTML <div> tag does.
The syntax for this is simple: the attribute keyword followed by the name of another XHP class, including the leading colon.
class :ui:drop-shadow-box extends :x:element {
attribute :div;
}
Be careful, though. This only declares attributes; it doesn’t include any automatical transfer of :div attributes to <div> objects that :ui:drop-shadow-box returns from its render() method. To make this more clear, the implementation of :ui:drop-shadow-box might look something like this:
class :ui:drop-shadow-box extends :x:element {
attribute :div;
protected function render(): XHPRoot {
return <div class="drop-shadow">{$this->getChildren()}</div>
}
}
Code that uses :ui:drop-shadow-box may then do something like this:
echo <ui:drop-shadow-box id="mainBox">{$stuff}</ui:drop-shadow-box>;
In the resulting HTML output, the <div> will not have an id attribute set. The <ui:drop-shadow-box> has the id attribute set, but its render() method never reads that attribute, so it’s simply lost. This is almost certainly not what you want.
To get automatic attribute transfer, you can use the XHPHelpers trait, which is fully described in XHP Helpers.
children Declarations
You can, and should, declare the types that your custom XHP class is allowed to have as children. The syntax for children declarations resembles regular expression syntax. To make these examples concrete, I’ll show declarations from some real HTML tags.[32]
If there is no children declaration, the class is allowed to have any number of children of any type. Having multiple children declarations in the same class is a syntax error.
The simplest children declaration is empty, meaning the element is not allowed to have children. For example, classes like :br and :hr would have declarations like this:
class :br extends :xhp:html-element {
children empty;
// ...
}
The next step is to name specific XHP classes (leading colon included) and put them in a sequence, separating them with commas.
class :html extends :xhp:html-element {
children (:head, :body);
// ...
}
This means that the <html> tag is required to have a <head> child and a <body> child, in that order, and no others.
There are two special pseudo-class names that you can use: pcdata, which stands for “parsed character data” and in practice means any Hack value that can be converted to a string; and any, which means anything is allowed, whether an XHP object or parsed character data. Note that these names do not have a leading colon.
class :option extends :xhp:html-element {
children (pcdata)*;
}
The next step is to use the repetition operators * and +. Put these after another specifier to means “zero or more of this” or “one or more of this”, respectively.
class :ul extends :xhp:html-element {
children (:li)*;
// ...
}
class :dl extends :xhp:html-element {
children (:dt+, :dd+)*;
// ...
}
As you can see in the example of :dl, these constructs can be wrapped in parentheses and have other constructs applied to them. What :dl’s children declaration says is that its children must be zero or more groups of a nonempty run of <dt> followed by a nonempty run of <dd>. In plain English, this means that all of its children must be either <dt> or <dd>, and the first one must not be <dd>, and the last one must not be <dt>.
There’s one other postfix operator, which is ?, meaning “zero or one of this”.
The next major concept is the alternation operator |, which means “this or that”.
class :select extends :xhp:html-element {
children (:option | :optgroup)*;
// ...
}
So <select> can have any number of children, but they must all be either <option> or <optgroup>.
The last thing to discuss is the use of categories, which we’ll look at in detail in Categories. In a children declaration, category names can be used anywhere an XHP class name can be used. They’re prefixed with %.
class :strong extends :xhp:html-element {
children (pcdata | %phrase)*;
// ...
}
This means that <strong>’s children can be either text or instances of XHP classes with the category %phrase.
As a demonstration of how richly these constraints can be described, here’s the children declaration of the <table> tag, which uses almost every possible construct and displays some deep nesting:
class :table extends :xhp:html-element {
children (
:caption?,
:colgroup*,
:thead?,
(
(:tfoot, (:tbody+ | :tr*)) |
((:tbody+ | :tr*), :tfoot?)
)
);
// ...
}
Categories
Categories in XHP are similar to interfaces in regular object-oriented programming. An XHP class can be marked with any number of categories that can then be referred to from children declarations. The syntax is very simple: list the categories, each prefixed with % and separated by commas, after the category keyword. They don’t need to be declared anywhere before using them.
class :strong extends :xhp:html-element {
category %flow, %phrase;
children (pcdata | %phrase)*;
// ...
}
The categories applied to the library-provided HTML tag implementations are taken directly from the HTML5 specification, and generally shouldn’t be used for your custom classes. You may wonder, though, how you can get away with having your custom classes be children of built-in tags without adding these categories. For example, the following is valid:
class :hello-world extends :x:element {
protected function render() {
return <x:frag>Hello World</x:frag>;
}
}
echo <strong><hello-world /></strong>;
It doesn’t look like this will pass validation, since :strong requires its children to either be pcdata or have the category %phrase, and :hello-world does neither. The trick is that there are two separate children validation stages, and this is discussed in much more detail in The Hack Library.
Context
You’ll sometimes find that some XHP object deep down inside a tree needs access to a piece of information that’s only available at the highest level. For example, a button on a website may need a different appearance depending on whether it’s being viewed by an administrator or a regular user. The only way we’ve seen so far for the low-level object to get the information (if there’s no global way to get it) is to have it passed down as an attribute through every level above. This is far from ideal: not only does it simply require a lot of tedious duplicated code to define the attributes and pass them on, but it breaks encapsulation by forcing higher-level objects to have attributes simply for the sake of their low-level children.
Context were introduced to XHP to solve this problem. You can set context information on any XHP object, and when that object is rendered, it will pass its context down to all of its child objects.
$post_list = <ui:post-list posts={$posts} />;
$post_list->setContext('user_is_admin', $user_is_admin);
On the other side, in the lower-level object, simply call getContext() with the appropriate name to read the value. This class, farther down the stack, renders a post with a delete button only if the context item user_is_admin is true.
class :ui:post extends :x:element {
protected function render() {
$delete_button = null;
if ($this->getContext('user_is_admin')) {
$delete_button = <ui:button style="delete">Delete Post</ui:button>;
}
// ...
}
}
Other things to note:
§ Context is only passed down the tree at render time. If you call setContext('key', 'value') on an object and then immediately call getContext('key') on its children, it will return null. In general, you should only call getContext() within a render() method.
§ As an object is transferring context to its children during rendering, it does not overwrite the child’s context if they have context items under the same key. For example:
§ $inner = <inner />;
§ $inner->setContext('key', 'inner-value');
§ $outer = <outer>{$inner}</outer>;
$outer->setContext('key', 'outer-value');
If the inner object calls getContext('key'), it will return inner-value.
Async XHP
XHP integrates with Hack’s async feature (see Chapter 7). When defining an XHP class, you can use async in its rendering function with two steps:
1. Use the trait XHPAsync inside the class.
2. Implement the function asyncRender() instead of render(). asyncRender() should have no parameters, and return an Awaitable<XHPRoot>.
class :ui:external-api-status extends :x:element {
use XHPAsync;
protected async function asyncRender(): Awaitable<XHPRoot> {
$status = await HH\Asio\curl_exec("https://example.com/api-status");
return <x:frag>Status: {$status}</x:frag>;
}
}
The XHP infrastructure will detect that your element is async, and use asyncRender() instead of render().
XHP Helpers
XHP provides a trait, XHPHelpers, which implements three very useful behaviors:
§ Transferring attributes from one object to the object returned from its render() method.
§ Giving each object a unique id attribute.
§ Managing the class attribute.
Transferring Attributes
It’s very common for an XHP class to inherit attributes from the XHP class that it will return from its render() method. For example, a class that implements a box with a drop shadow will probably inherit attributes from :div, because it will render the box as a div.
class :ui:drop-shadow-box extends :x:element {
attribute :div;
protected function render(): XHPRoot {
return <div class="drop-shadow">{$this->getChildren()}</div>
}
}
The problem with this code is that any attribute that you set on a ui:drop-shadow-box instance will simply be lost; the div returned from its render() method will not get those attributes automatically.
$box = <ui:drop-shadow-box title="the best box" />;
// Prints <div class="drop-shadow"></div>
echo $box->toString();
To get attributes transferred automatically, all you have to do is to use the trait XHPHelpers inside a class that you want this behavior for:
class :ui:drop-shadow-box extends :x:element {
attribute :div;
use XHPHelpers;
protected function render(): XHPRoot {
return <div class="drop-shadow">{$this->getChildren()}</div>;
}
}
Now, after the ui:drop-shadow-box is rendered, XHPHelpers will iterate over all the attributes set on the ui:drop-shadow-box. For each attribute, if the object returned from render() declares that attribute, XHPHelpers will transfer it over.
$box = <ui:drop-shadow-box title="the best box" somename="somevalue" />;
// Prints <div class="drop-shadow" title="the best box"></div>
echo $box->toString();
Note that the attribute somename="somevalue" was not transferred. This is because :ui:drop-shadow-box box doesn’t declare it, directly or indirectly (through inheriting attributes from :div).
When transferred, attributes set on the ui:drop-shadow-box will overwrite attributes of the same name that are set on the resultant div. For example:
class :ui:drop-shadow-box extends :x:element {
attribute :div;
use XHPHelpers;
protected function render(): XHPRoot {
return
<div class="drop-shadow" title="title on the div">
{$this->getChildren()}
</div>;
}
}
$box = <ui:drop-shadow-box title="title on the box" />;
// Prints <div class="drop-shadow" title="title on the box"></div>
echo $box->toString();
There is one exception to that overwriting class attribute. Instead of simply overwriting the div’s value of the attribute, XHPHelpers will append to it instead (making sure the classes are separated by spaces).
$box = <ui:drop-shadow-box class="class-on-box" />;
// Prints <div class="drop-shadow class-on-box"></div>
echo $box->toString();
Unique IDs
In web programming, it’s useful to give DOM nodes id attributes, so that CSS selectors and JavaScript code can refer to them. However, this is significantly less useful if node IDs aren’t unique.
XHPHelpers provides a method that get a unique ID for any element. Under the hood, it is generating random IDs[33]. In your render() function, just call getID():
class :hello-world extends :x:element {
protected function render() {
return <span id={$this->getID()}>Hello world</span>;
}
}
Managing the class Attribute
As we saw above, the attribute-transferring logic of XHPHelpers treats the class attribute specially. That’s because the class attribute of DOM nodes is unlike others: semantically, its value is a set, not a single value.
XHPHelpers provides two methods in line with those semantics: addClass() and conditionClass().
addClass() takes a string as an argument, and appends that string to the object’s class attribute. (Of course, the object’s class must declare the class attribute, directly or indirectly.) It makes sure the existing value of the attribute and the new value being appended are separated by whitespace.
class :ui:drop-shadow-box extends :x:element {
attribute :div;
protected function render(): XHPRoot {
$div = <div />;
$div->addClass('drop-shadow');
$div->appendChild($this->getChildren());
return $div;
}
}
conditionClass() takes two arguments, a boolean and a string. If the boolean argument is true, it simply calls addClass() with the string argument.
XHP Best Practices
HHVM gives you the syntax, and the Hack library gives you the infrastructure and HTML tags, but building a good UI library on top of these foundations is left as an exercise for the reader. There are some open-source XHP UI frameworks, and there will be more over time, but you may find yourself needing to build all or part of one yourself.
A good source of inspiration for good XHP design is XHP-Bootstrap. This is an XHP interface to Bootstrap, a popular library of common web UI components like buttons, dropdown menus, navigation bars, etc.
XHP is an unfamiliar paradigm for most PHP and Hack developers, and since it’s relatively new, there’s not much folk wisdom in the world about how to design good XHP libraries. This section is a collection of distilled experience from Facebook, where XHP originated. Facebook’s usage of XHP dates back to 2009, and in 2014, 100% of its web frontend code uses XHP to generate HTML.
No Additional Public API
XHP classes represent UI components. A user of an XHP class should be able to create it using tag syntax and render it to a string, without calling any methods on it. (Even methods like appendChild() are just alternatives to tag syntax.)
You shouldn’t put any public methods in XHP classes—that breaks the convention that it simply represents a UI component. The only public API you should add to XHP classes are attribute and children declarations.
Composition, Not Inheritance
One of the key tenets of XHP class design is to avoid sharing functionality using inheritance. Facebook’s original non-XHP UI library used inheritance extensively, and the battle scars we gained from it were what drove us to avoid heavy use of inheritance as we migrated to XHP.
The problem with using inheritance pre-XHP was that it resulted in one of two things: unmaintainable code, or suboptimal output. The root cause is the need for parent classes to allow for subclasses to influence their behavior or output. There are two options:
§ Specify some methods as “can/should be overridden”. This approach does a decent job of preventing tight coupling between the classes, but can lack flexibility because the only possible customizations are those which the designers of the parent class thought of.
§ Don’t allow or encourage overriding of protected methods, and instead force subclasses to modify the HTML returned from parent methods. Either the child class has to know details about the parent’s implementation, which results in excessively tight coupling and a parent class that is very difficult to modify; or the child class simply wraps the parent’s output with <div> or <span> or similar, which results in poor output.
XHP mitigates the latter problem somewhat by providing an object-oriented interface to the objects being passed around, but inheritance still isn’t ideal. The main problem is that it obscures control flow: someone reading the code may have to trace up through several levels of inheritance to find inherited methods.
A UI library using XHP shouldn’t need inheritance at all. XHP classes can inherit attributes (see Inheriting Attributes) and because of the “no additional public API” rule, this is all you need to be able to use XHP classes polymorphically—polymorphism being one of the main benefits of traditional inheritance.
There is one application for inheritance in a good XHP UI library. A single abstract base class, which all other classes extend directly, is generally a good idea. XHP-Bootstrap does this, in the form of :bootstrap:base.
Don’t Make Control Flow Tags
After being introduced to XHP, most developers will eventually feel a very strong temptation to create control flow tags in XHP. If this happens to you, resist the temptation. XHP isn’t designed to be used for control flow, and trying to do so will result in awkward, inefficient constructs.
Here’s an example of the usage of a hypothetical <x:if> tag that renders its first child if its condition is true, and its second child otherwise.
echo
<x:if cond={is_logged_in()}>
<ui:logged-in-nav-bar />
<ui:logged-out-nav-bar />
</x:if>;
This looks clean and elegant, but there are a couple of things wrong with it. First of all, you are guaranteed to instantiate a useless object in all cases. Remember that XHP is syntactic sugar for creating objects; in this case, the code would instantiate both a :ui:logged-in-nav-bar and a:ui:logged-out-nav-bar, keep them allocated until render time, and then throw one of them away without rendering it. This is inefficient, and it breaks the correspondence between the XHP tree and the eventual HTML tree.
The other problem is that it doesn’t scale. The example above is clear and readable, but once the two children of <x:if> start to get complex, readability quickly diminishes.
echo
<x:if cond={is_logged_in()}>
<x:if cond={user_is_admin()}>
<div>
<ui:admin-link />
<ui:logged-in-nav-bar />
</div>
<ui:logged-in-nav-bar />
</x:if>
<ui:logged-out-nav-bar />
</x:if>;
So conditional constructs are awkward, but what about loops? Here’s a hypothetical <x:foreach> class that mimics a foreach loop in Hack.
echo
<ul>
<x:foreach seq={$items} func={function ($item) {
return <li>{$item}</li>;
}} />
</ul>;
This appears to be much more sensible: there are no useless XHP objects being instantiated, and it will scale well: the closure passed to the <x:foreach> object can increase in complexity without hurting clarity.
But remember, again, that XHP is just syntactic sugar for object creation. If you look at what’s going on under the hood, it becomes clear that this <x:foreach> class is a bad idea. Here’s a “de-sugared” version of the above code:
echo new xhp_ul(array(
new xhp_x__foreach(array(
'seq' => $items,
'func' => function ($item) {
return new xhp_li(array($item));
}
))
));
This scheme is creating an object to represent a loop, which is silly: don’t create an object to represent a loop, just write the loop. The object superficially resembles a regular Hack foreach loop when dressed up in XHP syntax, but the reality is quite different.
The recommended way to do what’s shown above is to use appendChild() inside a regular Hack loop. The result is still quite easy to understand.
$ul = <ul />;
foreach ($items as $item) {
$ul->appendChild(<li>{item}</li>);
}
echo $ul;
Attributes vs. Children
When you’re designing XHP classes, you’ll often have to choose what should be an attribute and what should be a child. The guidance for this choice comes from XHP’s philosophy of trying to represent the eventual DOM tree: if a value corresponds to a node in the DOM tree, it should be a child. Otherwise, it should be an attribute.
Here are some examples, inspired both by XHP-Bootstrap and Facebook’s internal UI library.
§ A class that represents a button might have attributes for visual style (“cancel”, “default”, etc.) and for disabled-ness, and take its caption as a child.
§ A class that represents a dialog box might have an attribute for visual style (“note”, “warning”, etc.) and take a header, body and footer as children.
The main corollary to this is that no attribute should ever have a type that is an XHP class.
Style Guide
§ Separate words in XHP class names with hyphens. Class names should be all lowercase.
§ Use colons in XHP class names as a form of namespacing. For example, if you have desktop and mobile versions of your website in the same codebase, you might have a class for the navigation bar on each version, named something like :desktop:nav-bar and :mobile:nav-bar. Note: this is just a convention, and there are no real namespacing semantics. For example, from within :mobile:nav-bar, you still have to include the prefix when referring to other XHP classes prefixed with :mobile.
§ Each class should only have the attribute keyword once, and all attribute declarations should follow it, separated by commas:
§ class :photo-frame extends :x:element {
§ attribute
§ :div,
§ string caption,
§ string imgsrc @required,
§ enum {'compact', 'full'} style;
}
Migrating to XHP
In an ideal world, we would never have to deal with ugly legacy code. We would be free to build beautiful, clean abstractions on top of beautiful, clean abstractions, always choosing the best design for the problem at hand, our code in perfect harmony with the task at hand.
But we live in the real world, where millions of lines of legacy code are still serving traffic, and are unlikely to go away any time soon. New tools and abstractions need to be able to work with old ones. This is fairly easy with XHP, but there are a few things to watch out for.
Converting Bottom-Up
The smoothest way to turn legacy UI code into XHP-using code is to work bottom-up. That is, take the most basic, low-level components — the ones that don’t depend on any others — and convert them to XHP. For example, consider this:
function render_profile_link($user) {
$uri = htmlspecialchars($user->getProfileURI());
$name = htmlspecialchars($user->getName());
return "<a href=\"$uri\">$name's Profile</a>";
}
The least-disruptive way to convert this to XHP is to build the HTML structure and convert it to a string, all inside the function:
function render_profile_link($user) {
$link =
<a href={$user->getProfileURI()}>
{$user->getName()}'s Profile
</a>;
return $link->toString();
}
This change is very easy because it’s self-contained — it doesn’t require you to modify the function’s callers — but it makes very little meaningful progress towards a broader conversion. The problem is that it does nothing to change the fact that data is crossing abstraction boundaries in the form of HTML strings, instead of XHP objects. Callers still have to be concerned about escaping, and can’t sanely modify the content returned from render_profile_link(). If you want to convert the next level up — the components that use render_profile_link() — to use XHP, it’s still awkward because you will need to bridge the gap between HTML strings and raw strings.
The best alternative is to convert render_profile_link() into an XHP class.
class :ui:profile-link extends :x:element {
attribute User user @required;
protected function render(): XHPRoot {
$user = $this->:user;
return
<a href={$user->getProfileURI()}>
{$user->getName()}'s Profile
</a>;
}
}
For convenience, you can keep around a version of render_profile_link() that just delegates to this XHP class:
function render_profile_link($user): string {
return (<ui:profile-link user={$user} />)->toString();
}
Be aware that this function is a crutch, though. The real goal is to convert every former caller of render_profile_link() to use <ui:profile-link> instead, and then delete render_profile_link().
Getting Around XHP’s Escaping
As we saw in Secure by Default, any string that you embed in an XHP structure will have its reserved HTML characters escaped as the XHP object gets turned into a string. This is a very good thing, as it makes XHP secure by default and eliminates XSS vulnerabilities.
Sometimes, though, this behavior isn’t what you want. For example, you may be using a function from a library that returns an HTML string—a library for rendering markup formats like Markdown, for example—that must be output as-is, without escaping.
There is a deliberate backdoor in XHP’s infrastructure that allows the creation of classes (regular classes, not XHP classes) that are exempt from escaping and validation. This takes the form of two interfaces:
XHPUnsafeRenderable
This interface declares one method, toHTMLString(). It takes no arguments and returns a string. You can put objects implementing this interface into an XHP object tree, and the XHP rendering infrastructure will put the result of calling toHTMLString() directly into the returned HTML string, without escaping.
XHPAlwaysValidChild
A class that implements this interface is a valid child of any XHP object, unless it has a declaration of children empty. The interface itself declares no methods.
The XHP library doesn’t come with any classes that implement these interfaces because, ideally, they shouldn’t be needed, and using them has security implications. We wanted to create a barrier to doing these unsafe things, so that they’re still possible, but so that you have to know the risks before you can do them.
With that stern warning, here’s an example of a class that gets HTML from an external syntax highlighting library, and lets it be added to an XHP tree:
class SyntaxHighlight implements XHPUnsafeRenderable {
private string $content;
public function __construct(string $source) {
$this->content = external_highlighting_function($source);
}
public function toHTMLString(): string {
return $this->content;
}
}
And to use it:
$code = <div>{new SyntaxHighlight($source)}</div>;
XHP Internals
This section is optional reading for people who want to understand what’s going on under the hood. You shouldn’t need to understand any of this to be able to use XHP effectively.
There are two components to XHP: the parser-level transformation that turns tag syntax into new expressions, and the Hack library that contains the core objects-to-strings infrastructure and implementations of HTML tags.
The Parser Transformation
As XHP syntax is being parsed, the parser transforms it into regular Hack syntax.
§ XHP class names (those starting with colons) are transformed into legal Hack class names as follows:
1. The leading colon is replaced with xhp_.
2. Colons other than the leading one are replaced with __ (two underscores).
3. Hyphens are replaced with _ (a single underscore).
So, for example, the class name :ui:nav-bar will be transformed to xhp_ui__nav_bar internally. This transformation applies to XHP class definitions and uses.
Error messages will use these transformed names, which is why I’ve described the transformation in detail.
§ children, category, and attribute declarations are transformed into definitions of protected methods. Each method does nothing but return an array that contains an encoding of the declaration. The format of this array is an implementation detail and should never matter to users of XHP.
§ XHP tag syntax is replaced with a new expression. There will be two arguments passed to the XHP class’ constructor: an array of attributes (names mapping to values), and an array of children. Here is an example:
§ echo
§ <a href="/signup.php">
§ Subscribe to <span class="brand">The Dispatch</span>
§ </a>;
§
§ // Is transformed into:
§ echo new xhp_a(
§ array('href' => '/signup.php'),
§ array(
§ 'Subscribe to ',
§ new xhp_span(
§ array('class' => 'brand'),
§ array('The Dispatch')
§ )
§ )
)
In fact, you can write code in the second style manually, and it will work.
The Hack Library
The Hack library defines several abstract classes that form the core objects-to-strings infrastructure of XHP.
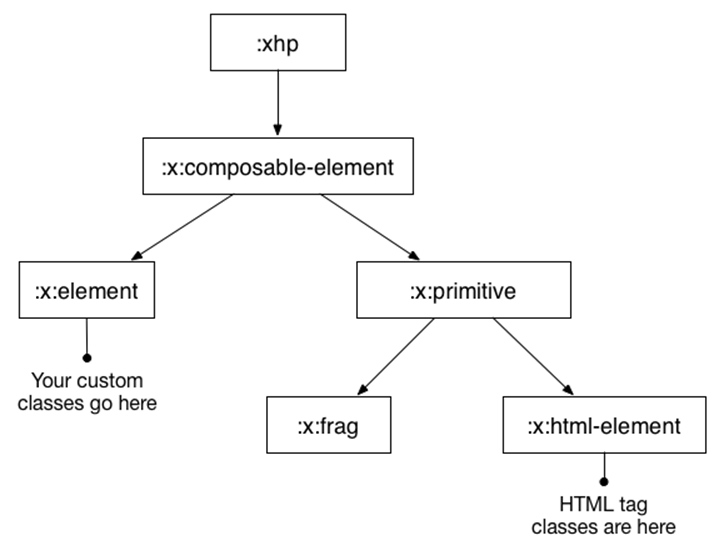
Figure 8-1. The hierarchy of XHP’s core classes
:xhp
This defines the interface to XHP objects. It declares several abstract methods that define the interface to all XHP objects: getting and setting children and attributes. It has no properties and no non-static methods.
:x:composable-element
This extends :xhp and is also abstract, but has a lot of concrete functionality: it provides implementations of child and attribute management methods, as well as validation of category, child, and attribute constraints. It has declared properties: arrays for children, attributes, and context.
:x:primitive and :x:element
These both extend :x:composable-element, and are both abstract. The key distinction between them is that :x:primitive expects its subclasses to implement a method called stringify() that returns a string, whereas :x:element expects its subclasses to implement a method called render() or asyncRender() that returns an XHP object. This split is the key: it enables two separate validation stages, which allows built-in classes to seamlessly mix with custom ones while still performing meaningful validation.
The key operation is called flushing: converting an :x:element into an :x:primitive by repeatedly calling render() or asyncRender() on it, and recursively flushing its children, until it and all its children are :x:primitive objects. The rendering methods can return any XHP object, and your :x:element-extending custom classes may be built up in many layers, but at the bottom of the stack there must be the :x:primitive-extending classes from the XHP library, so this procedure is guaranteed to terminate eventually.
Flushing an :x:element tree creates an async dependency tree (see Structuring Async Code) by recursively calling and awaiting of asyncRender() on each element. Multiple elements can be rendering in parallel this way, including ones from different levels of the tree.
You initiate the process of converting an XHP tree to a string by calling toString(), or calling and awaiting asyncToString(), on a single XHP object, which is the root of the tree.
:x:element’s toString()
Validates the element’s children (first stage of validation), flushes the element, and then calls toString() on the resulting :x:primitive.
:x:primitive’s toString()
Flushes all of the element’s children (awaiting them all simultaneously using HH\Asio\m()), validates the flushed children (second stage of validation), then calls stringify() on each child and concatenates the resulting strings together.
The last detail is the position of the library classes that represent HTML tags. These all extend :xhp:html-element, which extends :x:primitive. There are a few subclasses of :xhp:html-element that represent specific archetypes of HTML tags (e.g. :xhp:html-singletonwhich is not allowed to have children), but these should be considered as internal to XHP, and not for use outside of the library.
[31] It’s not CSS because that’s Cascading Style Sheets.
[32] Note that you’ll see classes extending :xhp:html-element instead of :x:element. See The Hack Library for more details on that, but you should never need to do this with your own XHP classes.
[33] Yes, this means it’s not guaranteed to be unique, but the chances of generating the same ID twice on the same page are vanishingly small.
All materials on the site are licensed Creative Commons Attribution-Sharealike 3.0 Unported CC BY-SA 3.0 & GNU Free Documentation License (GFDL)
If you are the copyright holder of any material contained on our site and intend to remove it, please contact our site administrator for approval.
© 2016-2026 All site design rights belong to S.Y.A.