Cyber Operations: Building, Defending, and Attacking Modern Computer Networks (2015)
6. Active Directory
Mike O’Leary1
(1)
Department of Mathematics, Towson University, Towson, MD, US
Introduction
Active Directory is a database of Users, Groups, Computers, Printers, and other objects. Windows uses Active Directory to organize the objects together into domains and larger forests. These are managed by domain controllers. Common platforms for domain controllers include Windows Server 2008, Windows Server 2008 R2, Windows Server 2012, and Windows Server 2012 R2.
This chapter provides an introduction to Active Directory, beginning with the process to install Active Directory components on Windows servers and promote them to domain controllers. Test domains are developed that not only include Windows systems but incorporate Linux systems using PowerBroker Open. Active Directory relies on Windows DNS, which can interact with BIND DNS servers. PowerShell scripts can be used to manage a domain; this chapter demonstrates a script to add domain users. The Sysinternals tool psexec allows an administrator on one Windows computer to run commands on another machine. Groups and organizational units allow domain administrators to delegate authority and apply group policy. The chapter includes an example of a group policy that restricts the directories in which users can run executable programs.
Installation
The process to configure a Windows server as the first domain controller for a domain is similar, whether the server runs Windows Server 2008, 2008 R2, 2012, or 2012 R2. In this example, no existing architecture is assumed present – no existing domain, no forest, and no existing DNS infrastructure. Active Directory is installed first. When complete, the system is promoted to a domain controller, installing DNS in the process.
Windows 2012
Consider for example, a Windows 2012 server. From Server Manager (Figure 6-1), select Add Roles and Features.

Figure 6-1.
Windows Server 2012 Server Manager
Choose “Role-based or feature-based installation.” Windows 2012 Server Manager allows an administrator to manage both local and remote servers. Since this is the first domain controller for the domain, select the local system as the destination for the installation. From the list of server roles, select Active Directory Domain Services. This requires additional features to be installed, including the Active Directory module for Windows PowerShell; these are automatically selected. No additional features are necessary for the server at this stage. The wizard continues with a confirmation prompt before it is ready to begin the installation.
When the installation is complete, Server Manager shows a new role, AD DS, and a notification flag. From the notification flag, select the option to promote the server to a domain controller. The same option is available if the AD DS role is selected from the navigation pane in Server Manager; a warning notification appears indicating that the configuration is required for the system and letting the user promote the system to a domain controller. In either case, the Active Directory Domain Services Wizard (Figure 6-2) launches.
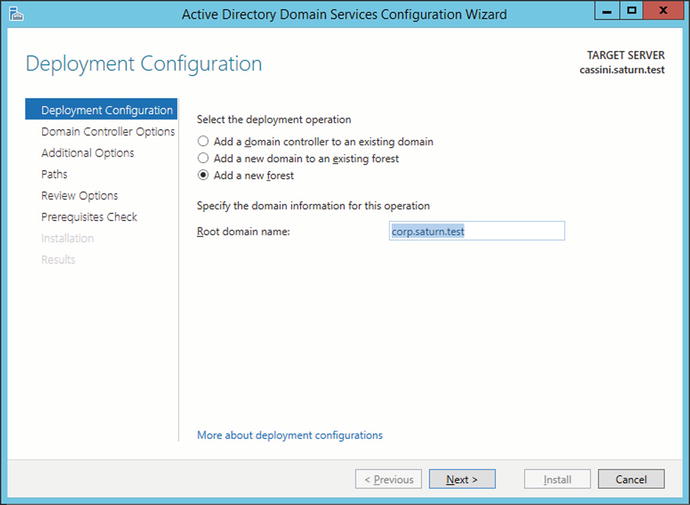
Figure 6-2.
Windows Server 2012 Active Directory Domain Services Configuration Wizard
From the wizard, select the option to add a new forest. In this example, the server is named cassini.saturn.test, and the root domain name is corp.saturn.test.
When selecting the name for the domain, do not use the top-level domain name .example. Windows Server 2012 and 2012 R2 are unable to create DNS forward zones for this namespace; they report the name as “invalid.” These systems are also unable to create conditional forwarders to the .example domain. This problem does not occur on Windows Server 2008 or 2008 R2.
Select the functional level of the forest and the domain. Servers older than the functional level of the forest cannot join the forest, and servers older than the functional level of the domain cannot join the domain. Because the intent of this example is to replicate servers as deployed between 2008 and 2013, Windows Server 2008 is a reasonable choice as the functional level for both the forest and the domain.
Directory Services Restore Mode (DSRM) is one of the options when booting a domain controller in safe mode. Since a system in restore mode does not have access to the Active Directory database, the DSRM password is used to authenticate the user logging in at the terminal. This password should be kept secure; a user with this password and physical access to the system has complete access to the Active Directory database.
Because this example does not assume an existing DNS structure, the domain controller needs to add DNS capabilities; this is marked for installation by default. As the wizard continues, a warning box appears saying “A delegation for this DNS server cannot be created because the authoritative parent zone cannot be found or it does not run Windows DNS server.” During the DNS server installation process, the server tries to contact DNS servers for the parent zone and set up a delegation for the new server. In this example, there is no parent DNS server, so this message is expected.
The wizard continues and presents a candidate NetBIOS name for the domain. NetBIOS names are 15 characters or less and usually capitalized.
The Active Directory data file (ntds.dit), the log file (edb.log) and other working files are stored in the database directory or the log file directory; in both cases the default is C:\Windows\NTDS. Group policy files and various scripts are stored in the SYSVOL folder, by default the directory C:\Windows\SYSVOL.
The wizard reviews the options and checks prerequisites. Two warnings are expected. One refers to the already noted inability to create a delegation zone on the parent DNS server; the second points out that the weaker cryptography algorithms are disallowed. Press the install button to complete the promotion of the server to a domain controller. The system reboots during the installation.
Once the system reboots, it is a domain controller and a DNS server. The installation process changes the default nameserver for the system; a check of the network adapter settings shows that the preferred nameserver becomes 127.0.0.1. Although the host name remains unchanged, the system’s domain changes to match the domain. The server originally named cassini.saturn.test for the Windows domain corp.saturn.test becomes cassini.corp.saturn.test. This behavior is expected; when setting a host’s name (System Properties ➤ Computer Name ➤ Change ➤ More), the box to automatically change the DNS suffix to match domain membership is checked by default (Figure 6-3).
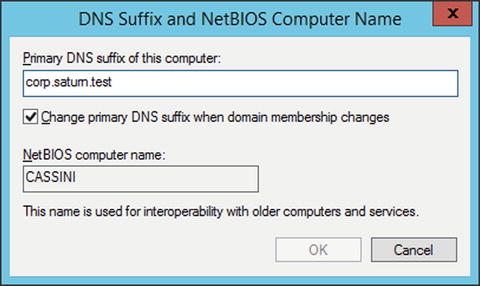
Figure 6-3.
Changing the DNS Suffix on a Windows Server 2012 R2 System
Windows 2008
The situation for Windows 2008 is similar. Instead of starting with Server Manager, from the Initial Configuration Tasks window (Figure 6-4), select “Add Roles.” From the list of roles, choose Active Directory Domain Services. Windows Server 2008 R2 (only) prompts the user to add the required .NET 3.5.1 framework before it is ready to begin the installation.
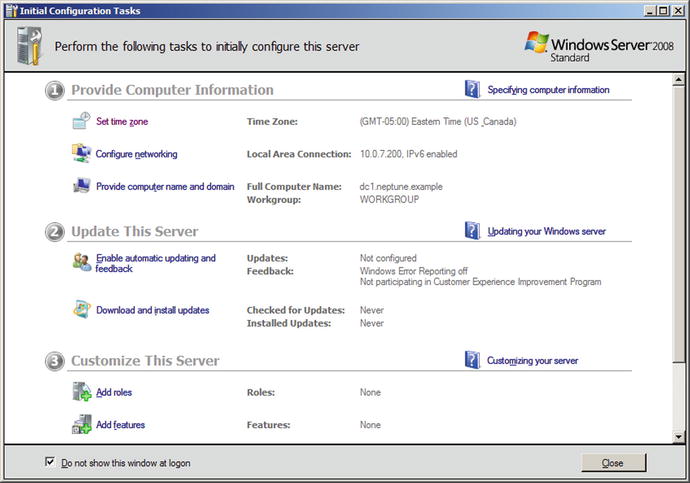
Figure 6-4.
Windows Server 2008 Initial Configuration Tasks
Once the installation completes, the wizard tells the user that the Active Directory Domain Services Installation Wizard (dcpromo.exe) needs to be run. This is in the form of a clickable hyperlink; the program can also be run directly from the Run menu or an Administrator command prompt.
The Active Directory Domain Services Wizard functions in much the same way as it does for Server 2012. One caveat is that a Windows 2008 system with a static IPv4 address and a dynamically assigned IPv6 address warns the user that a dynamically assigned address is present on the system.
Windows DNS
Windows Server uses DNS Manager to manage its DNS server. To launch it on Windows Server 2012 or 2012 R2, from Server Manager select Tools, then navigate to DNS. It is also available directly from the start menu on Windows Server 2012. On Windows Server 2012 R2, 2008, and 2008 R2 it can be found by navigating the start menu to Administrative Tools.
From the navigation pane, expand the host name. There are four main subheadings: the forward lookup zones, the reverse lookup zones, conditional forwarders, and global logs. Figure 6-5 shows the result from an example Windows Server 2008 R2 system. The host’s name is galileo.ad.jupiter.test, which is a domain controller for the domain ad.jupiter.test. Other Windows servers behave similarly.
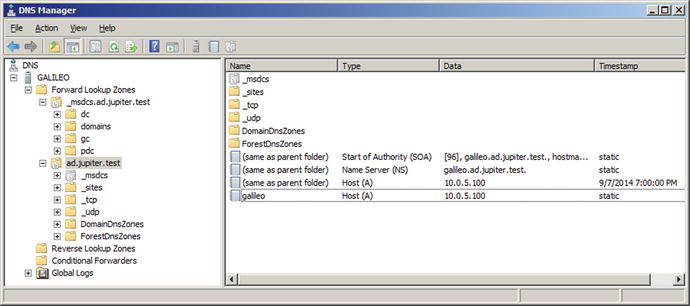
Figure 6-5.
DNS Manager on Windows Server 2008 R2
The first forward lookup zone, _msdcs.ad.jupiter.test, contains service location records (SRV) that provide information about the domain. For example, navigate _msdcs.ad.jupiter.test ➤ dc ➤ _tcp ➤ _ldap to locate a SRV record that indicates that the LDAP service is running on port TCP/389 on the server galileo.ad.jupiter.test.
The second forward lookup zone provides records for the namespace; in this example this is ad.jupiter.test. It includes similar service location records, organized by Active Directory site, protocol (TCP/UDP), domain and forest. It also includes the start of authority (SOA), nameserver (NS) and address records for the namespace. Note that the nameserver contains a host (A) record for the name of the domain.
To add a new address record to the forward lookup zone for the DNS domain ad.jupiter.test, right-click on the DNS domain name, then select New Host to obtain the New Host dialog box (Figure 6-6). Choose the host name and IP address, then select Add Host.
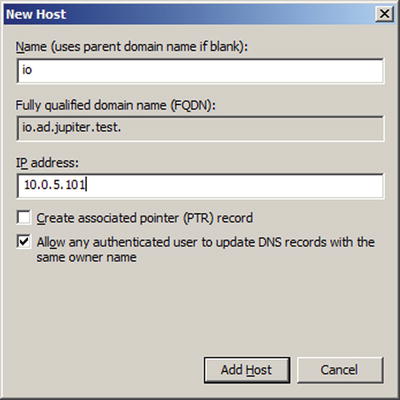
Figure 6-6.
Adding a New Host on Windows Server 2008 R2
The user can add both the forward zone A record and the reverse zone PTR record in one step. However if this is done immediately after the server is configured, it fails. Although the DNS server correctly configured its forward zone, by default it does not configure the reverse zone. Right-click on the Reverse Lookup Zone from the navigation pane in DNS Manager, then select New Zone to launch the New Zone Wizard (Figure 6-7). Create a primary zone storing the result in Active Directory. Choose where it should be replicated – to all DNS servers in the forest or all DNS servers in the domain. Specify the network for the reverse zone, either through the ID or the zone name.
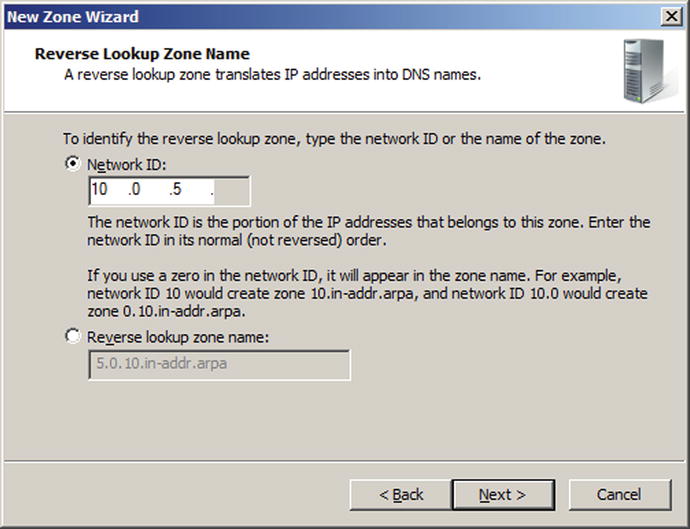
Figure 6-7.
Creating a Reverse Lookup Zone in Windows Server 2008 R2
Windows Server by default allows for secure dynamic updates for DNS zones integrated with Active Directory. Systems can then update their own DNS record, and DHCP servers can update PTR records.
When the reverse zone is complete, it includes the SOA and nameserver records; it does not include pointer records, even for the domain controller itself. Add this record, as well as the PTR records for any address records added earlier. Subsequent new hosts can add both the address record and the pointer record at the same time, provided the appropriate box is checked; see Figure 6-6.
Scripting Windows DNS
When a large number of hosts need to be added to a DNS server, it is better to do so with a script. Suppose that a list of host names and addresses is available in the file dns_data.txt in the form
File 6-1. Sample file dns_data.txt with DNS data for a network
101 Io
102 Europa
103 Ganymede
104 Callisto
105 Amalthea
106 Himalia
107 Elara
... Output Deleted ...
The user intends that the host io.ad.jupter.test receive the address 10.0.5.101, the host europa.ad.jupiter.test receive the address 10.0.5.102, and so on. Consider the Windows batch script
Script 6-1. Windows batch script DNS.bat to read a text file and add entries to a Windows DNS server.
@echo off
for /f "tokens=1,2" %%i in (dns_data.txt) do (
dnscmd /RecordAdd ad.jupiter.test %%j /CreatePTR A 10.0.5.%%i
)
By default, batch files echo each run command to the screen; the command @echo off disables this. The script uses the for loop to read through the data in the in the file dns_data.txt. Two tokens are specified; the file is parsed and everything up to the first space or connected group of spaces is stored in the variable %%i and what remains (up to the second space or connected group of spaces) is stored in the variable %%j. The Windows command prompt provides help on the use and syntax of for loops in a batch script through the command
C:\Users\Administrator>for /?
Runs a specified command for each file in a set of files.
FOR %variable IN (set) DO command [command-parameters]
%variable Specifies a single letter replaceable parameter.
(set) Specifies a set of one or more files. Wildcards may be used.
command Specifies the command to carry out for each file.
command-parameters
Specifies parameters or switches for the specified command.
To use the FOR command in a batch program, specify %%variable instead
... Output Deleted ...
The host name in the %%j variable and the last octet of the IP address in the %%i variable are passed to dnscmd. This is a command-line utility for managing DNS servers on Windows. The /RecordAdd switch is used to add new records to a DNS zone. The first argument is the name of the zone, and the second is the name of the record to be added. The /CreatePTR switch is used so that both the forward zone and reverse zone entries are made. The command concludes with the type of record – an A address record, and its value, the IP address of the host. More information about the syntax of dnscmd is available by running it from the command line with the /? switch.
Save the batch script as DNS.bat in the same directory as the data file dns_data.txt. Run the script from the command line, and all of the necessary data is passed to the DNS server.
C:\Users\Administrator\Desktop>dns.bat
Add A Record for io.ad.jupiter.test at ad.jupiter.test
Command completed successfully.
Add A Record for europa.ad.jupiter.test at ad.jupiter.test
Command completed successfully.
... Output Deleted ...
DNS Configuration
To forward requests for a DNS domain to a different server, from DNS Manager select Conditional Forwarders in the navigation pane, then right-click and select New Conditional Forwarder (Figure 6-8). Enter the name of the DNS domain to be forwarded, and choose the IP address to receive the forwarded requests.
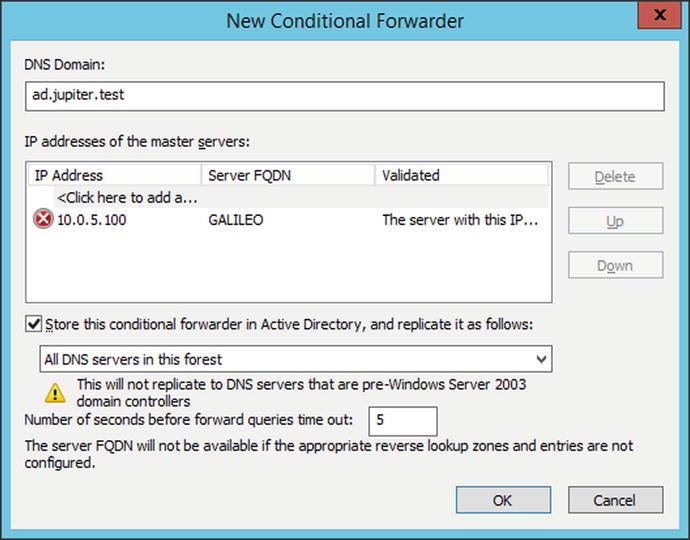
Figure 6-8.
Setting up a New Conditional Forwarder in Windows Server 2012 R2
The server may initially be unable to validate the server, as seen in Figure 6-8. Once the forwarder is in place, from the navigation pane right-click on the forwarder, select Properties, then Edit. The server is listed as validated.
The process for forwarding reverse queries is the same, but now the domain is an appropriate subdomain of .in-addr.arpa. For example, the appropriate reverse lookup zone for 10.0.5.0/24 is named 5.0.10.in-addr.arpa.
Windows uses server-level forwarding for DNS domains not explicitly provided with a conditional forwarder. From the navigation pane of the DNS Manager, right-click on the name of the server, then select Properties. From the Forwarders tab select one or more forwarders: these are used for queries that the server cannot answer. If none of the forwarders can answer the query, the server may use the root hints; this is the default behavior.
The root hints file can be updated from the Root Hints tab on the same Properties dialog box. The root hints file itself is located on the server in C:\Windows\System32\Dns\Cache.dns, and can be replaced with an updated copy from http://www.iana.org/domains/root/files .
Like BIND servers, by default Windows DNS Server is vulnerable to DNS amplification attacks; this can be verified with the Metasploit module auxiliary/scanner/dns/dns_amp as was done in Chapter 5. To disable recursion, select the Advanced tab from the same Properties dialog box (Figure 6-9), then select Disable recursion. This disables server-level forwarders, but does not disable zone-level conditional forwarders. It is not possible to disable recursion from some hosts and allow it from other, presumably trusted hosts.
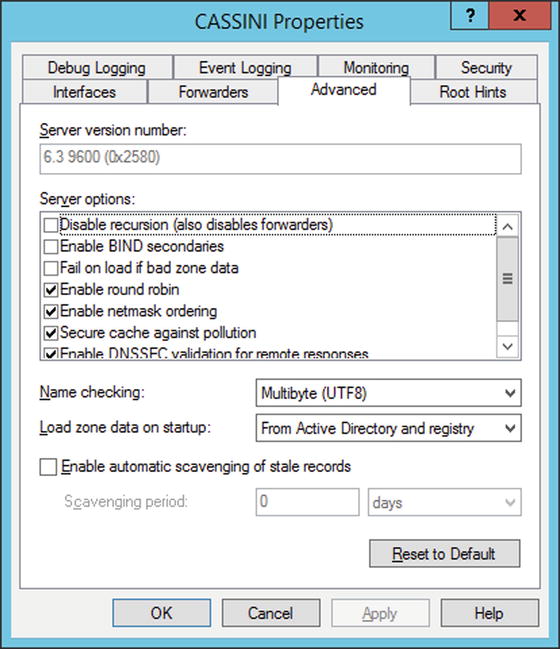
Figure 6-9.
The Properties Dialog Box for the DNS Server on Windows Server 2012 R2
Windows logs information, warnings, and errors about the DNS server using the Windows log system (c.f. Chapter 8). View these from DNS Manager by expanding the Global Logs node in the navigation pane (Figure 6-10). These logs are also available in Event Viewer.
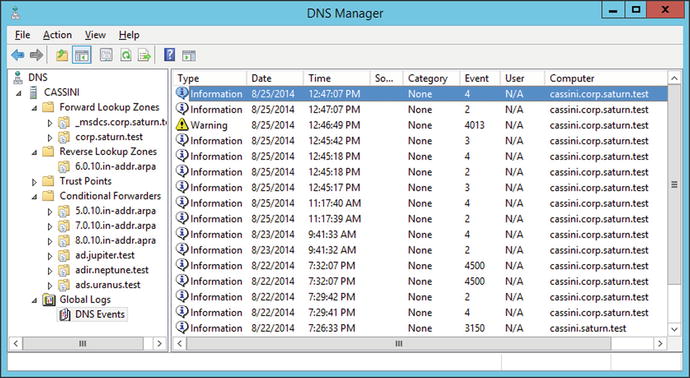
Figure 6-10.
Viewing DNS Logs in DNS Manager on Windows Server 2012 R2
Windows can be configured to log the details of DNS queries. From DNS Manager, right-click on the name of the server and bring up the Properties dialog box. From the Debug Logging tab, select the types of data to be recorded and the location of the log file. The log file is plain text, and begins with a key that explains the fields. Here is an example of a log file that shows a request from 10.0.4.252 for the address titan.corp.saturn.test and the server’s response.
DNS Server log file creation at 8/25/2014 10:25:17 AM
Log file wrap at 8/25/2014 10:25:17 AM
Message logging key (for packets - other items use a subset of these fields):
Field # Information Values
------- ----------- ------
1 Date
2 Time
3 Thread ID
4 Context
5 Internal packet identifier
6 UDP/TCP indicator
7 Send/Receive indicator
8 Remote IP
9 Xid (hex)
10 Query/Response R = Response
blank = Query
11 Opcode Q = Standard Query
N = Notify
U = Update
? = Unknown
12 [ Flags (hex)
13 Flags (char codes) A = Authoritative Answer
T = Truncated Response
D = Recursion Desired
R = Recursion Available
14 ResponseCode ]
15 Question Type
16 Question Name
8/25/2014 10:25:22 AM 0770 PACKET 000000F62A727B10 UDP Rcv 10.0.4.252 8d7d Q [0001 D NOERROR] A (5)titan(4)corp(6)saturn(4)test(0)
8/25/2014 10:25:22 AM 0770 PACKET 000000F62A727B10 UDP Snd 10.0.4.252 8d7d R Q [0085 A D NOERROR] A (5)titan(4)corp(6)saturn(4)test(0)
... Output Deleted ...
To change other settings for a zone, right-click it inside DNS Manager, then select Properties (Figure 6-11). The Start of Authority (SOA) tab allows the user to update the timing settings: refresh interval, retry interval, TTL, and expiration. The serial number can be manually set or simply incremented. The Zone Transfers tab on the same dialog box allows the user to control zone transfers. By default, zone transfers are prohibited; this can be overridden and zone transfers permitted to a list of known servers or to any server.
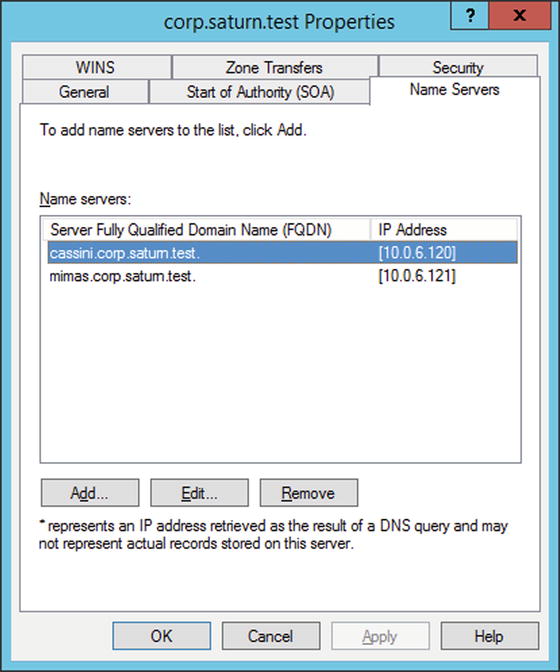
Figure 6-11.
The Name Servers Tab in the Zone Properties Dialog box on Windows Server 2012 R2
Instead of setting up conditional forwarders, the user may prefer to set up a stub zone. To build a stub zone, from DNS Manager right-click on the type of zone (Forward Lookup or Reverse Lookup) and select New Zone. For the zone type, select stub zone. Choose how the zone is to be replicated in Active Directory. Provide the name of the zone and the IP address of a master DNS server for the zone. The chosen master must allow zone transfers. It takes a few moments for the zone transfer to occur, and if checked immediately after configuration, the zone may report an error. If it has been configured correctly, wait a moment then refresh the view.
To configure a zone on a BIND server as a slave to a zone hosted on a Windows master, first configure the slave zone in BIND, specifying the master. For example, if cassini.corp.saturn.test at 10.0.6.120 is the Windows DNS master, in the BIND named.conf file include an appropriate zone definition like
zone "corp.saturn.test" in {
type slave;
file "slave/bak.corp.saturn.test";
masters {10.0.6.120; };
};
On the Windows master, from DNS Manager right-click on the zone to bring up the zone properties dialog box (Figure 6-11). From the Name Servers tab, add the entry for the new name server. Be sure that the Windows server allows zone transfers to the new nameserver.
Because of the complexity of the DNS entries for a domain controller, it is difficult to set up a BIND master for an Active Directory installation. A Windows Server acting as a stand-alone DNS server (without Active Directory) can easily be configured as a slave to a BIND DNS server (or another Windows DNS server for that matter). To do so, create a new zone, specifying the type as a secondary zone. Provide the name of the zone and the IP addresses of one or more master servers.
Managing a Domain
The key benefit of an Active Directory structure is the ability to manage computers and users. With a domain controller built, the next steps are to add these computers and users.
Adding Systems
Before adding a new system to a domain, ensure that the system is on the network, that it is using the DNS server provided by Active Directory, and that it can reach the Active Directory domain controller. It is simplest if the system to be added to the domain already has a DNS entry in the DNS server.
Windows desktop systems can be added to a Windows domain without additional software. The process of joining the domain is similar to the method used to set the system’s domain name. Start the Control Panel on the new system, navigate System and Security ➤ System, then from the Computer name domain and workgroup setting section, select Change Settings. On the resulting system properties dialog box (Figure 6-8) use the option to rename the computer or change its domain or workgroup. Provide the domain name. A dialog box appears asking for an account name and password on the domain; provide the credentials. Once the system authenticates, the user is welcomed to the domain; the system then needs to be restarted.
Linux systems can be added to a Windows domain. This can be done by installing and configuring Samba, but this is somewhat complex. The open source tool PowerBroker Open ( http://www.powerbrokeropen.org/) simplifies the process considerably. Start by downloading an appropriate version and package; for Mint or Ubuntu systems it is a .deb file, while for a CentOS or OpenSuSE system it is an .rpm file. Different versions are available for different architectures (x86 or x86_64). Run the file (as root) to start the installer.
As an example, suppose that an Ubuntu 9.10 (x86) system uses PowerBroker Open 7.1.1 to join the domain ad.jupiter.test. Start by installing the software.
hminkowski@io:∼/Desktop$ sudo sh ./pbis-open-7.1.1.1221.linux.x86.deb.sh
Creating directory pbis-open-7.1.1.1221.linux.x86.deb
Verifying archive integrity... All good.
Uncompressing pbis-open-7.1.1.1221.linux.x86.deb..............
Would you like to install package for legacy links? (i.e. /opt/likewise/bin/lw-find-user-by-name -> /opt/pbis/bin/find-user-by-name) (yes/no) yes
Would you like to install now? (yes/no) yes
Installing packages and old packages will be removed
Selecting previously deselected package pbis-open-upgrade.
(Reading database ... 114096 files and directories currently installed.)
Unpacking pbis-open-upgrade (from .../pbis-open-upgrade_7.1.1.1221_i386.deb) ...
... Output Deleted ...
Setting up pbis-open-legacy (7.1.1.1221) ...
Installing Packages was successful
New libraries and configurations have been installed for PAM and NSS.
Please reboot so that all processes pick up the new versions.
As root, run domainjoin-gui or domainjoin-cli to join a domain so you can log on
with Active Directory credentials. Example:
domainjoin-cli join MYDOMAIN.COM MyJoinAccount
The installer automatically launches the graphical user interface to join the domain (Figure 6-12).

Figure 6-12.
Using PowerBroker 7.1.1.1221 to Join a Windows Domain on Ubuntu 9.10
Provide the name of the domain, then an account and password on the domain. After authentication succeeds, the system needs to be restarted.
After the Linux system restarts, log in as a regular, non-Active Directory user. Validate that the system correctly joined the domain by querying the domain and checking that it can reach the domain controller.
hminkowski@io:∼$ sudo /opt/pbis/bin/domainjoin-cli query
Name = io
Domain = AD.JUPITER.TEST
Distinguished Name = CN=IO,CN=Computers,DC=ad,DC=jupiter,DC=test
hminkowski@io:∼$ sudo /opt/pbis/bin/get-dc-name ad.jupiter.test
Printing LWNET_DC_INFO fields:
===============================
dwDomainControllerAddressType = 23
dwFlags = 13309
dwVersion = 5
wLMToken = 65535
wNTToken = 65535
pszDomainControllerName = galileo.ad.jupiter.test
pszDomainControllerAddress = 10.0.5.100
pucDomainGUID(hex) = 16 2C 04 E4 25 02 17 4A AE 06 33 D5 BD F3 7A FD
pszNetBIOSDomainName = AD
pszFullyQualifiedDomainName = ad.jupiter.test
pszDnsForestName = ad.jupiter.test
pszDCSiteName = Default-First-Site-Name
pszClientSiteName = Default-First-Site-Name
pszNetBIOSHostName = GALILEO
pszUserName = <EMPTY>
Next, check that the system can correctly locate users on the domain.
hminkowski@io:∼$ sudo /opt/pbis/bin/find-user-by-name ad\\administrator
User info (Level-0):
====================
Name: administrator
SID: S-1-5-21-2450268519-3044719913-3176223898-500
Uid: 300941812
Gid: 300941825
Gecos: <null>
Shell: /bin/sh
Home dir: /home/local/AD/administrator
Logon restriction: NO
When referring to a domain user, the proper syntax on a Linux system is domain\username, however when this is used on the command line, the backslash needs to be escaped, hence the double backslash on the command line.
To correctly configure the bash environment for Active Directory users, run
hminkowski@io:∼$ sudo /opt/pbis/bin/config LoginShellTemplate /bin/bash
Ubuntu systems do not grant all users sudo privileges. A reasonable approach is to grant sudo privileges to all Active Directory domain administrators. Run visudo (using sudo), and add the line
%ad\\domain^admins ALL=(ALL) ALL
Log out, then log in as the user ad\administrator or some other domain administrator. Verify that the bash prompt is set correctly, and this user can use sudo to perform system administration tasks.
The installation does not always proceed quite so simply. For example, on a CentOS 5.5 (x86) system running PowerBroker Open 7.1.0, the first try running the graphical tool to join a domain results in an error (a missing LDAP entry), but the domain join process succeeds on its second attempt.
On a default Mint 10 (x64) system with PowerBroker Open 7.1.2, the graphical tool to join a domain halts with an error stating that it is unable to find the SSH binary (Figure 6-13).
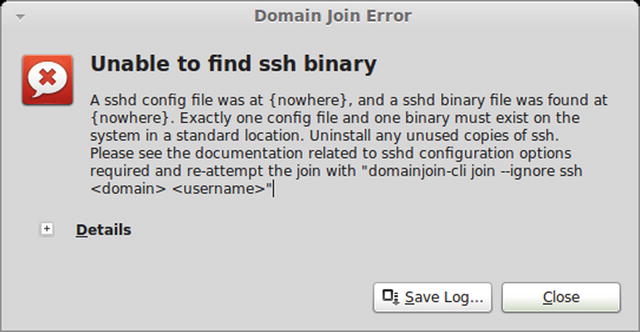
Figure 6-13.
SSH Error from PowerBroker 7.1.2 on Mint 10 (x64)
If apt-get is used to install ssh on Mint 10, it also installs and starts openssh-server. Once SSH is installed (see Chapter 9), the graphical tool to join the domain can be run again; it is located at /opt/pbis/bin/domainjoin-gui.
In some cases, the graphical tool is unable to run; this is the case for OpenSuSE 13.1 (x64) running PowerBroker Open 7.5.0.
mimas:∼ # /opt/pbis/bin/domainjoin-gui
/opt/pbis/bin/domainjoin-gui: error while loading shared libraries: libpangox-1.0.so.0: cannot open shared object file: No such file or directory
However, the command line tool can be used.
mimas:∼ # /opt/pbis/bin/domainjoin-cli join corp.saturn.test administrator
Joining to AD Domain: corp.saturn.test
With Computer DNS Name: mimas.corp.saturn.test
administrator@CORP.SATURN.TEST’s password:
Warning: System restart required
Your system has been configured to authenticate to Active Directory for the
first time. It is recommended that you restart your system to ensure that all
applications recognize the new settings.
SUCCESS - Login as corp\administrator
The command line tool can also be used to join a domain if the system is not running SSH. See Figure 6-13.
Some systems join Active Directory correctly, but have problems with the login screen. For example, by default the greeter on an Ubuntu 12.10 system does not provide the option to enter a user name. To allow this, modify /etc/lightdm/lightdm.conf to include
[SeatDefaults]
autologin-guest=false
user-session=ubuntu
greeter-session=unity-greeter
greeter-show-manual-login=true
Finally, in some cases, the process to join the domain appears to work, but the verification process yields an error.
pfatou@rhea:∼$ sudo /opt/pbis/bin/find-user-by-name corp\\administrator
Failed to locate user. Error code 40008 (LW_ERROR_NO_SUCH_USER).
No such user
Though the system is joined the domain, this error prevents Active Directory users from logging on to the system. The underlying cause is a failure in the lsass system. To correct the problem, restart that service with the command
pfatou@rhea:∼$ sudo /opt/pbis/bin/lwsm restart lsass
Stopping service: lsass
Starting service: lsass
If other problems occur during installation, the documentation available with the package at /opt/pbis/docs/pbis-open-installation-and-administration-guide.pdf has an excellent troubleshooting section.
Adding Users
Users and computers in the domain can be managed with the tool Active Directory Users and Computers (Figure 6-14). On a Windows Server 2008 or 2008 R2 system, launch the tool from the start menu, navigating Start ➤ Administrative Tools ➤ Active Directory Users and Computers. For Windows Server 2012 or 2012 R2, from Server Manager (Figure 6-1) select Tools, then Active Directory Users and Computers. On Windows Server 2012, it is also available directly from the start menu, while on Windows Server 2012 R2 it is available from the Administrative Tools entry on the start menu. The tool can also be started from a terminal with dsa.msc.
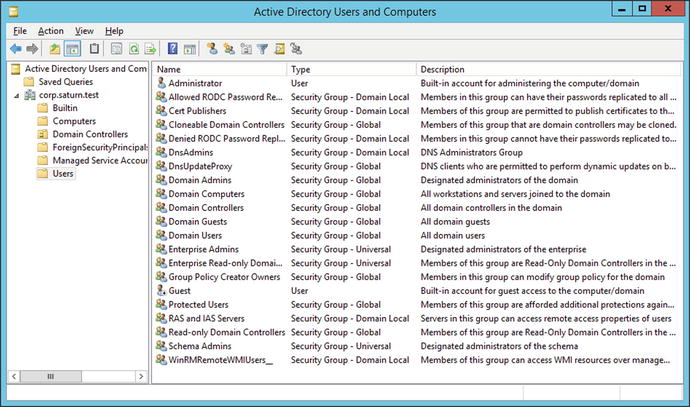
Figure 6-14.
Active Directory Users and Computers on Windows Server 2012 R2
To see the computers that are members of the domain, from the navigation pane select the domain, then the container labeled Computers. To see the users on the system, select the container labeled Users.
There are a number of default user groups present. The domain users group contains all users on the domain. Users in the domain admins group have administrator-level access on domain controllers, domain servers, and domain workstations. Members of the enterprise admins can administer all of the domains in the forest.
Notice that not all of the groups listed under users refer to people; there is a group for domain computers and a group for domain controllers.
To add a new user, from the navigation pane in the Active Directory Users and Computers right-click on users; select New, then User. Enter the name of the user and an account name, then choose a password for the new user. By default, the user must change the password at their next logon.
Once the user is created, double-click on the username in the Active Directory Users and Computer Window to see the as yet unset properties of that user (Figure 6-15). There are tabs for general information, the address of the user, details of the account and profile, the telephone number for the user, and the place the user has within the organization. Some of the account properties include the domain groups to which the user belongs, the location of the user profile, and the location of the user’s home directory.
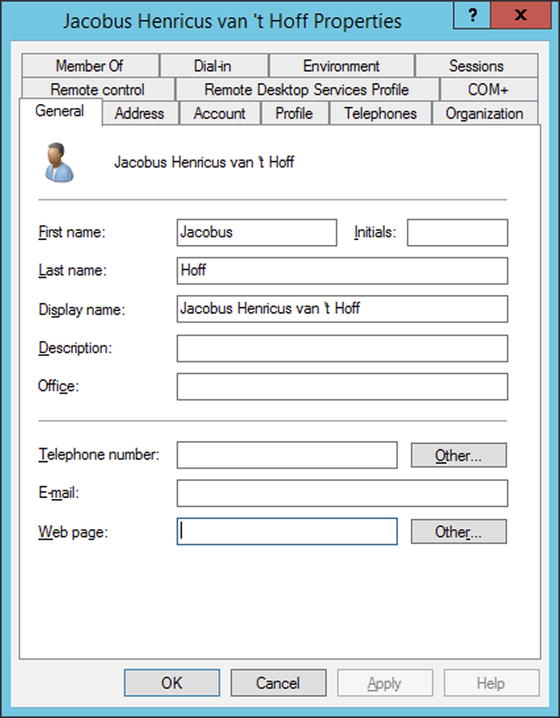
Figure 6-15.
Properties of a User on Windows Server 2012 R2
Scripting and PowerShell
Although the graphical process works well when adding a single user, adding a large number of users is better handled with a script. Beginning with Windows Server 2008 R2, PowerShell is available.1 PowerShell includes an Integrated Scripting Environment (ISE); this is installed by Default on Windows Server 2012 and 2012 R2, but is an additional feature on Windows Server 2008 R2. To install it, navigate the start menu through Administrative Tools ➤ Server Manager. From Server Manager, expand the navigation pane for the server, right-click on Features, then select Add Features. From the resulting menu, select Windows PowerShell Integrated Scripting Environment (ISE) and install. PowerShell ISE then appears in the start menu; navigate All Programs ➤ Accessories ➤ Windows PowerShell ISE. On Windows Server 2012 or 2012 R2, there is an icon for PowerShell on the taskbar. Right-click on it, then select Run ISE as Administrator (Figure 6-16).
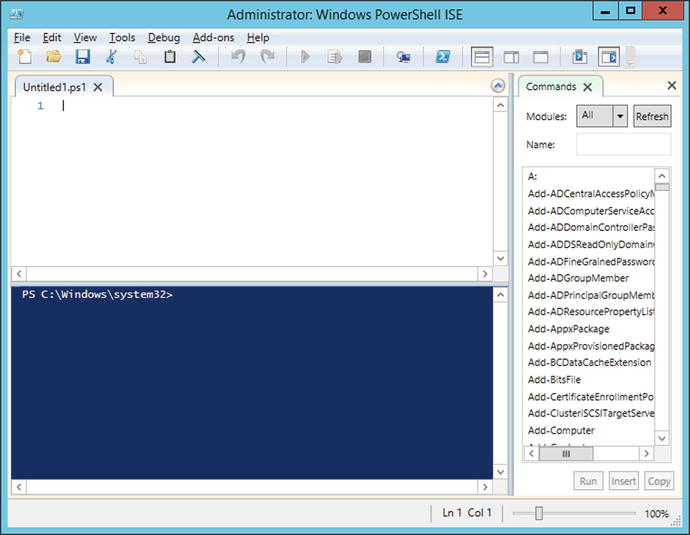
Figure 6-16.
Windows PowerShell ISE on Windows Server 2012 R2, Showing the Script Pane (CTRL+R) and the Commands Add-On
To create a Hello World PowerShell script, create a script with the single line
Script 6-2. The “Hello World” PowerShell script Testing.ps1
"Hello World"
There is no need for a print statement or an echo statement; putting a string alone on a line causes it to be printed. Save the result as say “Testing.psl.” The script can be executed directly from the PowerShell ISE by pressing F5.
On Windows Server 2008 R2 or Windows Server 2012, the script fails; on Windows Server 2012 the returned error is
PS C:\Windows\system32> C:\Users\Administrator\Desktop\Testing.ps1
File C:\Users\Administrator\Desktop\Testing.ps1 cannot be loaded because running
scripts is disabled on this system. For more information, see
about_Execution_Policies at http://go.microsoft.com/fwlink/?LinkID=135170 .
+ CategoryInfo : SecurityError: (:) [], ParentContainsErrorRecordExcept ion
+ FullyQualifiedErrorId : UnauthorizedAccess
By default, these systems do not allow users, even administrators, to run scripts that have not been signed by a trusted publisher (like Microsoft). The current policy can be found by running
PS C:\Windows\system32> Get-ExecutionPolicy
Restricted
A better choice is to set this to RemoteSigned.
PS C:\Windows\system32> Set-ExecutionPolicy RemoteSigned
In this mode, local scripts can be run, but scripts downloaded remotely must be signed. This is the default policy on Windows Server 2012 R2. With this change, the Hello World script runs as expected.
Suppose that the list of users to be added to the system is available in the plain text file Users.txt.
File 6-2. The file Users.txt
Jacobus Henricus van ’t Hoff
Hermann Emil Fischer
Svante August Arrhenius
William Ramsay
Johann Friedrich Wilhelm Adolf von Baeyer
Henri Moissan
Eduard Buchner
Ernest Rutherford
... Output Deleted ...
Consider the PowerShell script useradd.ps1 (for Windows Server 2012 or 2012 R2) that reads a file of user names and creates the corresponding user in Active Directory.
Script 6-3. The PowerShell script useradd.ps1
$nameslist = Get-Content C:\Users\Administrator\Desktop\Users.txt
ForEach ($name in $nameslist) {
$first = $name.Split(’ ’)[0]
$last = $name.Split(’ ’)[-1]
$username = $first.ToLower()[0] + $last.ToLower()
New-ADUser -Name $name `
-AccountPassword (ConvertTo-SecureString "password1!" -AsPlainText -Force) `
-DisplayName $name `
-Enabled $true `
-SamAccountName $username `
-givenname $first `
-surname $last `
-userprincipalname ($username + "@corp.saturn.test") `
}
The script begins by reading the contents of the file Users.txt into the array $nameslist. It then loops through each name in the list, pulling out the first name, the last name, and building a username formed by taking the first letter of the first name and appending it to the last name, all in lower case.
The function New-ADUser is a cmdlet; there are many cmdlets that can perform a number of different jobs. This one adds the given user to Active Directory with a fixed password, setting only a few of the many available fields for a user. Help for a cmdlet is available2 directly from PowerShell;
PS C:\Users\Administrator> get-help new-aduser
NAME
New-ADUser
SYNOPSIS
Creates a new Active Directory user.
SYNTAX
New-ADUser [-Name] <String> [-AccountExpirationDate <DateTime>] [-AccountNotDelegated <Boolean>] [-AccountPassword <SecureString>] [-AllowReversiblePasswordEncryption <Boolean>] [-AuthenticationPolicy <ADAuthenticationPolicy>] [-AuthenticationPolicySilo <ADAuthenticationPolicySilo>] [-AuthType {Negotiate | Basic}] [-CannotChangePassword
... Output Deleted ...
DESCRIPTION
The New-ADUser cmdlet creates a new Active Directory user. You can set commonly used user property values by using the cmdlet parameters.
Property values that are not associated with cmdlet parameters can be set by using the OtherAttributes parameter. When using this parameter be sure to place single quotes around the attribute name.
... Ouput Deleted ...
Returning to the script, the backticks on each line indicate that the command is continued over multiple lines; this makes the result much easier to read.
This script also works on Windows Server 2008 R2, but only if it is preceded with the line
Import-Module ActiveDirectory
By default, PowerShell on Windows Server 2008 R2 does not load the New-ADUser cmdlet.
Running Commands Remotely
The Sysinternals3 tool psexec allows a user on a Windows system to execute commands remotely on a second system. Before remote commands can be executed, the firewall on the target must be correctly configured. From the Control Panel on the destination, navigate System and Security ➤ Windows Firewall ➤ Allow and App or Feature through Windows Firewall. Enable Remote Service Management.
Log on to a domain member (workstation or server) as a domain administrator, and uncompress the Sysinternals tools to a convenient directory, for example, C:\SysinternalsSuite. If the host titan is on the same domain, then a command such as ipconfig can be run remotely.
c:\SysinternalsSuite>psexec \\titan ipconfig
PsExec v2.11 - Execute processes remotely
Copyright (C) 2001-2014 Mark Russinovich
Sysinternals - www.sysinternals.com
Windows IP Configuration
Ethernet adapter Ethernet:
Connection-specific DNS Suffix . :
Link-local IPv6 Address . . . . . : fe80::a984:6a6b:d29e:1dc7%12
IPv4 Address. . . . . . . . . . . : 10.0.6.126
Subnet Mask . . . . . . . . . . . : 255.255.0.0
Default Gateway . . . . . . . . . : 10.0.0.1
... Output Deleted ...
ipconfig exited on titan with error code 0.
Error code 0 indicates that the command completed successfully.
By running cmd on the remote system, the user obtains a remote interactive shell on the target
c:\SysinternalsSuite>whoami
corp\administrator
c:\SysinternalsSuite>hostname
enceladus
c:\SysinternalsSuite>psexec \\titan cmd
PsExec v2.11 - Execute processes remotely
Copyright (C) 2001-2014 Mark Russinovich
Sysinternals - www.sysinternals.com
Microsoft Windows [Version 6.2.9200]
(c) 2012 Microsoft Corporation. All rights reserved.
C:\Windows\system32>hostname
titan
C:\Windows\system32>^C
cmd exited on titan with error code 0.
Exit the remote shell by pressing CTRL+C.
The source system does not need to be a domain member, provided the user has administrative-level credentials on the target. For example, suppose that the user ad\nbohr in the domain ad.jupiter.test wants to use psexec to run ipconfig on the remote system titan located in the domain corp.saturn.test. Because the NetBIOS name is not sufficient to identify the target system, the FQDN of the target is used. Further, a username and credentials of an administrator on the target need to be provided.
c:\SysinternalsSuite>hostname
amalthea
c:\SysinternalsSuite>whoami
ad\nbohr
c:\SysinternalsSuite>psexec -u corp\administrator \\titan.corp.saturn.test ipconfig
PsExec v2.11 - Execute processes remotely
Copyright (C) 2001-2014 Mark Russinovich
Sysinternals - www.sysinternals.com
Password:
Windows IP Configuration
Ethernet adapter Ethernet:
Connection-specific DNS Suffix . :
Link-local IPv6 Address . . . . . : fe80::a984:6a6b:d29e:1dc7%12
IPv4 Address. . . . . . . . . . . : 10.0.6.126
Subnet Mask . . . . . . . . . . . : 255.255.0.0
Default Gateway . . . . . . . . . : 10.0.0.1
... Output Deleted ...
ipconfig exited on titan.corp.saturn.test with error code 0.
Oddly, it is more difficult to use psexec to run a command on the same domain than on different domain whenever psexec is run as a different user than the one logged on. Here is a user trying to access the same system with the same domain administrator credentials, but now logged on as the domain user corp\cbosch on a system already connected to the domain.
c:\SysinternalsSuite>whoami
corp\cbosch
c:\SysinternalsSuite>hostname
enceladus
c:\SysinternalsSuite>psexec -u corp\administrator \\titan ipconfig
PsExec v2.11 - Execute processes remotely
Copyright (C) 2001-2014 Mark Russinovich
Sysinternals - www.sysinternals.com
Password:
Could not start PSEXESVC service on titan:
Access is denied.
There is a workaround though, using the cmdkey tool.
c:\SysinternalsSuite>whoami
corp\cbosch
c:\SysinternalsSuite>hostname
enceladus
c:\SysinternalsSuite>cmdkey /add:titan /user:corp\administrator
CMDKEY: Credential added successfully.
c:\SysinternalsSuite>psexec -u corp\administrator \\titan ipconfig
PsExec v2.11 - Execute processes remotely
Copyright (C) 2001-2014 Mark Russinovich
Sysinternals - www.sysinternals.com
Password:
Windows IP Configuration
Ethernet adapter Ethernet:
Connection-specific DNS Suffix . :
Link-local IPv6 Address . . . . . : fe80::a984:6a6b:d29e:1dc7%12
IPv4 Address. . . . . . . . . . . : 10.0.6.126
Subnet Mask . . . . . . . . . . . : 255.255.0.0
Default Gateway . . . . . . . . . : 10.0.0.1
... Output Deleted ...
ipconfig exited on titan with error code 0.
c:\SysinternalsSuite>cmdkey /delete:titan
CMDKEY: Credential deleted successfully.
One security issue with psexec is that older versions passed credentials in the clear; this is not the case beginning with version 2.1
Finally, note that psexec allows a user with administrative credentials access to system-level credentials by passing the -s switch; this is true even if the user is coming from systems outside the domain.
c:\SysinternalsSuite>whoami
corp\administrator
c:\SysinternalsSuite>hostname
enceladus
c:\SysinternalsSuite>psexec -s -u corp\administrator \\titan.corp.saturn.test cmd
PsExec v2.11 - Execute processes remotely
Copyright (C) 2001-2014 Mark Russinovich
Sysinternals - www.sysinternals.com
Password:
Microsoft Windows [Version 6.2.9200]
(c) 2012 Microsoft Corporation. All rights reserved.
C:\Windows\system32>hostname
titan
C:\Windows\system32>whoami
nt authority\system
The tool winexe provides comparable functionality for connections from Linux systems. The source code for winexe is available at http://sourceforge.net/projects/winexe/ . As an example of how to compile the program from source, consider an Ubuntu 9.10 system configured along the lines of Chapter 1. Some additional packages are necessary before compilation.
hminkowski@io:∼$ sudo apt-get install build-essential autoconf python-dev
Download winexe, uncompress it to a convenient location and change to the directory winexe-1.00/source4/. From that directory run autogen.sh, configure, then make. The resulting winexe program is stored in winexe-1.00/source4/bin. Pre-built binaries are available for some architectures at http://download.opensuse.org/repositories/home:/ahajda:/winexe/ .
The tool is used in much the same fashion as psexec:
hminkowski@io:∼/Desktop/winexe-1.00/source4/bin$ ./winexe -U corp/administrator //titan.corp.saturn.test ipconfig
Password for [CORP\administrator]:
Windows IP Configuration
Ethernet adapter Ethernet:
Connection-specific DNS Suffix . :
Link-local IPv6 Address . . . . . : fe80::a984:6a6b:d29e:1dc7%12
IPv4 Address. . . . . . . . . . . : 10.0.6.126
Subnet Mask . . . . . . . . . . . : 255.255.0.0
Default Gateway . . . . . . . . . : 10.0.0.1
... Output Deleted ...
hminkowski@io:∼/Desktop/winexe-1.00/source4/bin$ ./winexe -U corp/administrator //titan.corp.saturn.test cmd
Password for [CORP\administrator]:
Microsoft Windows [Version 6.2.9200]
(c) 2012 Microsoft Corporation. All rights reserved.
C:\Windows\system32>whoami
whoami
corp\administrator
C:\Windows\system32>hostname
hostname
titan
C:\Windows\system32>
Organizing a Domain
In Active Directory, an organizational unit (OU) is a container for users, groups, and/or computers. OUs can be created around roles, around geography, around the structure of the company/organization, or around any other convenient set of distinctions.
Consider, for example, a small company that has decided to create an OU named “Main Site” in the anticipation that their organization will later grow. That OU contains two separate OU’s: one for their computers and one for their users. Each of these is further subdivided into the following structure
· Main Site
· Main Site – Computers
· Linux Servers
· Linux Workstations
· Windows Servers
· Windows Workstations
· Main Site – Users
· Disabled Accounts
· IT Staff
· Production
· Sales
· Security Groups
To create this structure, launch Active Directory Users and Computers (Figure 6-17), either from the start menu or from the Server Manager. Right-click on the domain name, select New ➤ Organizational Unit, then create the parent OU named Main Site. Each child OU is created in the same fashion by right-clicking on the parent OU.
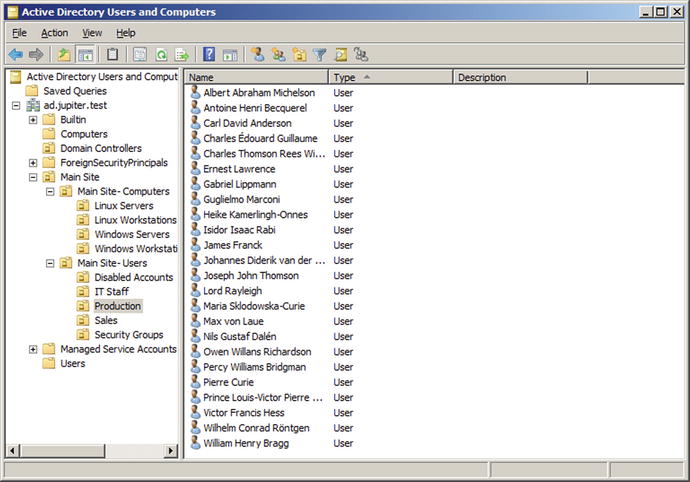
Figure 6-17.
OU Structure Implemented in Windows Server 2008 R2
When creating an OU, the checkbox “Protect container from accidental deletion” is enabled by default. To delete a protected OU, start Active Directory Users and Computers as a domain administrator. From the main menu, navigate View ➤ Advanced Features. This shows additional elements in the navigation pane. Right-click on the OU that is to be deleted, then select Properties. From the Object tab, uncheck the box that protects the object from accidental deletion. The OU can then be deleted by right-clicking on it and selecting Delete.
Moving users and computers to and from OUs is simple; just drag the item from the source and drop it in the destination. Each time this is done, a dialog box appears (Figure 6-18), warning the user that this change can affect how group policies are applied; this is expected behavior.

Figure 6-18.
Warning Box from Moving Objects in Active Directory, from Windows Server 2008 R2
Groups and Delegation
A user or computer can only be a member of a single OU; however, they can be part of multiple groups. Groups come in two types: distribution groups, primarily used for e-mail distribution lists; and security groups, used to manage permissions and rights.
To demonstrate the power of groups, create a new group in the Security Groups OU created earlier. To do so, right-click on the OU, select New ➤ Group. Provide the name of the group, for example, Sales Admins. There are three options for the scope of the group: domain local, global, and universal; select the default global scope. For the group type, select Security.
To add users to the newly created group, select a user from Active Directory Users and Computers, then right-click; select Add to a group and provide the group name.
Despite the name of the group (Sales Admins), membership in this group has not (yet) given these users any additional privileges. To give the members of this group privileges, right-click on the Sales OU and select Delegate Control; this starts the Delegation of Control Wizard (Figure 6-19). Select the Sales Admins group, and delegate some common tasks, for example the abilities to
· Create delete, and manage user accounts;
· Reset user passwords and force password change at the next logon;
· Modify the membership of a group.
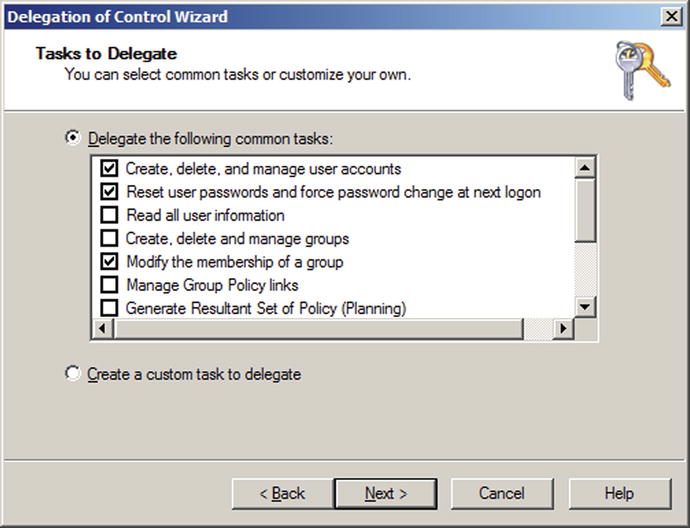
Figure 6-19.
The Delegation of Control Wizard on Windows Server 2008 R2
Although creating delegations is easy, the process of determining which tasks, if any, have already been delegated is more complex. In Active Directory Users and Computers, from the View menu select Advanced Features. Right-click on a container, for example, the Sales OU, then select Properties. From the Security Tab, press the Advanced button. The permissions tab lists all of the permissions assigned to the object; this includes the delegated tasks (Figure 6-20).
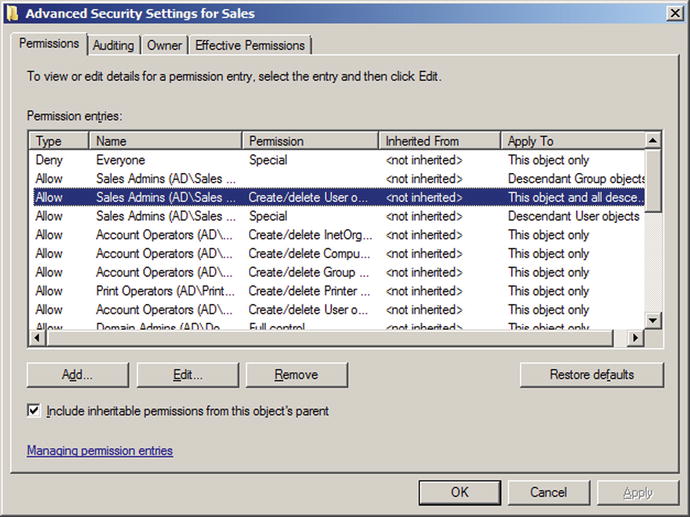
Figure 6-20.
Advanced Security Settings for the OU Sales, Showing the Authority Delegated to Members of the Sales Admins group, on Windows Server 2008 R2
Remote Administration
Once the Delegation of Control wizard completes, the members of the Sales Admins group have these additional privileges, but it is not clear how these are to be exercised. Domain members that are not domain administrators do not have privileges to log on locally to the domain controller, so how can the members of this group perform administrative activities?
The Remote Server Administration Tools (RSAT) allow a user with the proper privileges the ability to make administrative changes to a domain from a workstation. Different versions are available for different systems
· Win 7 (SP1): http://www.microsoft.com/en-us/download/details.aspx?id=7887
· Win 8: http://www.microsoft.com/en-us/download/details.aspx?id=28972
· Win 8.1: http://www.microsoft.com/en-us/download/details.aspx?id=39296
On Windows 7 systems, once the tool is installed, its components must be enabled. From the Control Panel, navigate Programs ➤ Turn Windows features on or off under Programs and Features. From the Windows Features dialog box, select the desired remote administration snap-ins and tools. Administrative tools are not shown on the start menu for all users; this is done on a per-user basis. Right-click the start menu Start; select Properties. On the start menu tab, click Customize. From the Customize start menu dialog box, scroll down to System Administrative Tools, and select Display on the All Programs menu and the start menu. Click OK.
On Windows 8, the components are enabled automatically and an entry for Administrative tools placed in the start menu. That item may not be visible though, until the user right-clicks on the Windows 8 start menu and selects All apps.
If a member of the Sales Admins group is logged onto a domain workstation, they can use the Active Directory Users and Computers tool installed on that workstation to make allowed changes using the same interface a domain administrator might use on a domain controller.
Group Policy
Group policies are used to create and enforce different policies, including security-related policies. Group policies are either local to the machine, or are based on Active Directory. To view the local group policy settings on a system, run the program gpedit.msc as an administrator; this can be run either from the command line or from the run box.
Group Policies can be set at different levels in the following order
· Local group policies
· Site-linked policies
· Domain-linked policies
· OU-linked policies
In the case of overlapping policies, whichever is written last is the one that is applied. When multiple policies are assigned at the same level, they are executed as they appear in the graphical interface in reverse order, from the last to the first. In general, it is best to work on group policies at the site, domain, or OU level. Local group policies would need to be manually replicated on individual machines and do not take advantage of the ability to use Active Directory to manage many systems at once.
The core tool for group policy is the Group Policy Management tool (Figure 6-21). It is available from Server Manager. In Windows Server 2008 it is listed as a feature, while in Windows Server 2012 it is available in the tools list. Group Policy Management can also be launched from the start menu, under administrative tools.
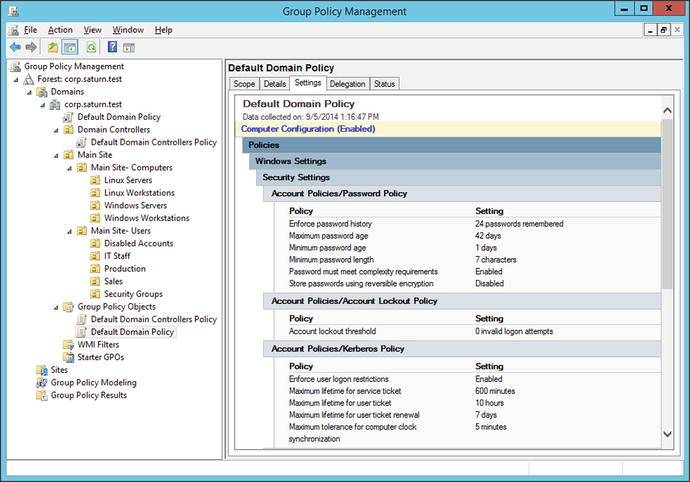
Figure 6-21.
The Group Policy Management Tool on Windows Server 2012 R2, Viewing the Settings for the Default Domain Policy
To view a group policy, from the Group Policy Management tool, expand the navigation pane through Group Policy Management ➤ Forest: [Your Forest name] ➤ Domains ➤ [Your Domain Name] ➤ Group Policy Objects. There are two pre-built policies, named “Default Domain Controllers Policy” and “Default Domain Policy.” Select the Default Domain Policy, and view the Setting Tab. By default, the user is prompted with a warning stating that content within this application is being blocked by the Internet Explorer Enhanced Security Configuration. [If that is not a metaphor, I don’t know what is.]
This policy sets, for example, the password requirements and lockout thresholds that are applied to the domain.
The name of the policy, by itself, is not sufficient to ensure that it is actually applied. The Group Policy Management tool shows a link from the default domain (corp.saturn.test in Figure 6-21) to the Default Domain Policy directly beneath the domain name in the navigation pane; it is this link that actually applies the policy. Click on the domain name in Group Policy Management, then view the tab Linked Group Policy Objects to see that the Default Domain Policy is being applied, with link order 1.
Group policy can be used to configure the system and accounts in a wide range of ways. For example, it is possible to use Group Policy to automatically create a directory on the desktop for each user who logs in, for example, the directory %USERPROFILE%\Desktop\Tools.
To create a new group policy object (GPO), right-click on Group Policy Objects in the navigation pane, then select New. Give the new GPO a descriptive name – for example, “Desktop Tools Directory.” Because policies can be quite complex, an organization may create template policies, called starter GPOs that can be used as the basis of a new policy; this is not necessary in this example.
To add policies to the newly created policy object, right-click the name of the policy in the navigation pane and select Edit. This brings up the Group Policy Management Editor (Figure 6-23); this is the tool that is used to set the policies that are to be enforced. From the navigation pane, expand User Configuration ➤ Preferences ➤ Windows Settings ➤ Folders. Right-click to create a new folder rule. Specify the action as “Create,” and provide the location of the folder (Figure 6-22). Update the attributes and set the parameters in the Common tab as desired.
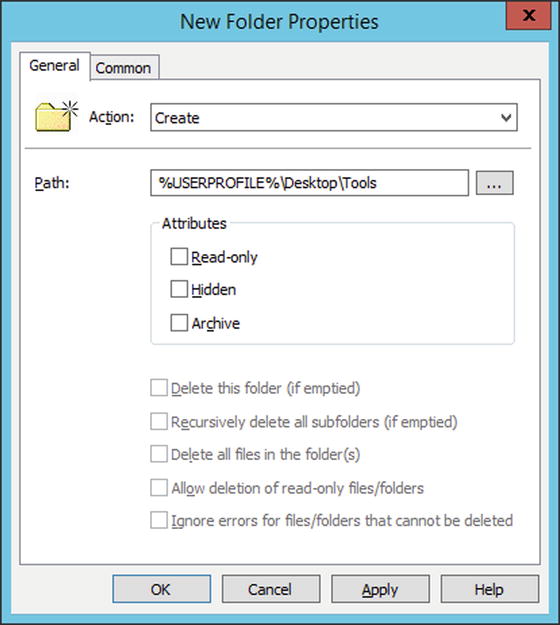
Figure 6-22.
The New Folders Dialog Box from the Group Policy Management Editor, on Windows Server 2012 R2
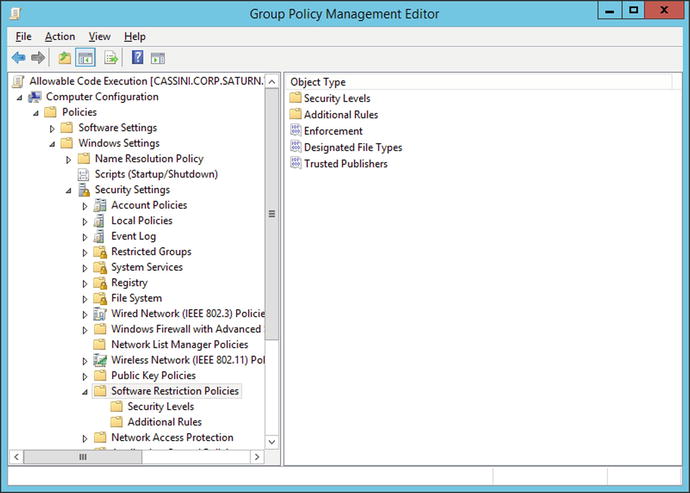
Figure 6-23.
Group Policy Management Editor for the Allowable Code Execution Policy using software Restriction Policies, on Windows Server 2012 R2
This completes the specification of the rule. The Group Policy Management Editor does not contain an option to save the rule; it is automatic. Once the rule’s options are set, quit the editor.
Although the rule has been created, it has not been applied to any members of the domain. Earlier, organizational units were created with computers in one OU, subdivided by system type, and users in a second OU, subdivided by role. To apply this policy to all of the members in an OU, right-click on an OU, for example, Main Site – Users, and select Link and Existing GPO. Choose the newly created GPO from the list. At this point, the GPO is applied.
GPOs are pulled by clients from the server. This happens on a regular basis, but it is not immediate. The client updates their GPO settings on login, so if a domain user logs out then logs back on, the new directory Tools appears on the Desktop.
Group policy can also be used to enforce security settings. For example, it is possible to limit users so that they can only execute programs from defined directories. Create a new GPO with the name Allowable Code Execution, and edit it. From the navigation pane in the Group Policy Management Editor (Figure 6-23), navigate Computer Configuration ➤ Policies ➤ Windows Settings ➤ Security Settings ➤ Software Restriction Policies, then right-click and select New Software Restriction Policies.
Select Security Levels; three are available– Unrestricted, Basic User, and Disallowed. These are the allowable default policies, and the default security level is set to be Unrestricted. Double-click on Disallowed, and choose Set as Default. In this setting, without an explicit allow rule allowing program execution, no program can run. When the setting is changed, the user is warned that the new setting is more restrictive than it previously was, and could result in programs failing to run.
Select Additional Rules. By default, it contains two directories, determined by paths in the registry. A check with regedit for example, shows that the first path %HKEY_LOCAL_MACHINE\SOFTWARE\Microsoft\Windows NT\CurrentVersion\SystemRoot% is c:\Windows, while the second %HKEY_LOCAL_MACHINE\SOFTWARE\Microsoft\Windows\CurrentVersion\ProgramFilesDir% is c:\Program Files. For each of these directories, an exception has been made, and the security level has been set to unrestricted. This allows any program contained in these directories (or subdirectories) to run. One problem is that these default rules do not allow files in the directory c:\Program Files (x86) to run. From the navigation pane for the Group Policy Management Editor, right-click on Additional Rules, and select New Path Rule. For the path, choose %HKEY_LOCAL_MACHINE\SOFTWARE\Microsoft\Windows\CurrentVersion\ProgramFilesDir (x86)% which corresponds to c:\Program Files (x86) and set the policy to unrestricted.
To allow a user to run programs of their own choosing, also add the directory %USERPROFILE%\Desktop\Tools and set permissions on it to be unrestricted; this is the directory the previous group policy automatically creates.
Return to Software Restriction Policies in the Group Policy Management Editor; select Enforcement. The resulting dialog allows the user to select how the restriction policies should be implemented. Apply the policies to all software files and to all users.
The collection of designated file types is used to determine what the policy considers to be an executable file. By default, shortcuts are considered executable files, meaning that they no longer function unless located in a permitted directory. As this is probably too restrictive, select the LNK file type, and remove it from the list; this allows links to function as expected.
This completes the construction of the policy. To apply it, link it to an appropriate OU, for example, the OU containing all Windows workstations. Unlike most group policies, software restriction policies actually require the target system to reboot. This can be done remotely with the command
C:\Users\Administrator>shutdown /r /m \\hyperion
Here the /r switch indicates the system is to reboot, while /m specifies the name of the remote system. The firewall on the remote system must allow remote management. The user on the system is told that the system will reboot in less than one minute. That amount of time can be extended up to 600 seconds with the flag /t; consider the command
C:\Users\Administrator>shutdown /r /t 600 /m \\iapetus
This informs the users on iapetus that the system will shut down in 600 seconds, or in 10 minutes.
When the system reboots, standard programs such as Internet Explorer, Paint or Calculator all work as expected. However if a user tries to run a program from elsewhere, it is blocked with the message
This program is blocked by group policy. For more information, contact your system administrator.
If the program is copied into the directory Desktop\Tools however, it is allowed to run.
Adding a Second Domain Controller
Because of the importance of the domain controller to an organization, a domain should never have just one domain controller. To add a second domain controller, start with another Windows server; set the host name and IP address for the system and join it to the domain.
Run the Add Roles Wizard; choose Active Directory Domain Services Installation. It is not necessary to install DNS services at this time; in fact attempts to do so on Windows Server 2008 systems are met with an error message. Once the role is installed, run the Active Directory Domain Services Installation Wizard (dcpromo.exe) in the same fashion as the first domain controller. For the deployment configuration, choose to add the domain controller to the existing domain. The user is prompted for domain credentials. A directory services restore mode password is required; this can be distinct from the DSRM password on other domain controllers. Once the wizard completes, the server functions as an additional domain controller.
Replication ensures that changes made on one domain controller are replicated to all others; this can be verified by inspection on the new domain controller.
EXERCISES
1.
The domain controller diagnostics tool dcdiag can be used to test the health of a domain controller. Test DNS on a domain controller with the command C:\Users\Administrator>dcdiag /test:DNS, and test the services on the domain controller with C:\Users\Administrator>dcdiag /test:Services. How helpful are the results?
2.
Windows checks the file c:\Windows\system32\drivers\etc\hosts before making a DNS query. Add an entry in that file, giving the hostname google.com the IP address of yahoo.com. Verify that visiting google.com in a browser results in the Yahoo! web page appearing.
3.
From the Windows command line, run ipconfig /displaydns. Try again with /flushdns.
4.
A user with credentials can enumerate the structure of a domain, even from a system not connected to the domain. Download AdFind from http://www.joeware.net/freetools/tools/adfind/index.htm . AdFind uses an encoded form for passwords on the command line; to determine the encoded password to use, run
C:\Users\Hermann Weyl\Desktop\AdFind>AdFind.exe -encpwd password1!
AdFind V01.47.00cpp Joe Richards (joe@joeware.net) October 2012
Encoding password1! as ENCPWD:Z=Z=rQjIUxrQJm9cSvAdP39cWzgFhG9c
To query the domain corp.saturn.test at 10.0.6.120 as the domain user corp\ohahn with this password, run the command
C:\Users\Hermann Weyl\Desktop\AdFind>AdFind.exe -b "DC=corp,DC=saturn,DC=test" -dn -h 10.0.6.120 -u corp\ohahn -up ENCPWD:Z=Z=rQjIUxrQJm9cSvAdP39cWzgFhG9c
Using server: cassini.corp.saturn.test:389
Directory: Windows Server 2012
dn:DC=corp,DC=saturn,DC=test
dn:CN=Users,DC=corp,DC=saturn,DC=test
dn:CN=Computers,DC=corp,DC=saturn,DC=test
dn:OU=Domain Controllers,DC=corp,DC=saturn,DC=test
dn:CN=System,DC=corp,DC=saturn,DC=test
dn:CN=LostAndFound,DC=corp,DC=saturn,DC=test
dn:CN=Infrastructure,DC=corp,DC=saturn,DC=test
dn:CN=ForeignSecurityPrincipals,DC=corp,DC=saturn,DC=test
... Output Deleted ...
311 Objects returned
Additional documentation for AdFind is available from Microsoft at http://social.technet.microsoft.com/wiki/contents/articles/7535.adfind-command-examples.aspx
5.
Download and run Active Directory Explorer from Sysinternals. Use it to find the SID for the computers in the domain. Repeat for the users in the domain.
6.
Use Active Directory Explorer from Sysinternals to find the Active Directory entries for the Microsoft DNS services. Locate the entries for locally stored forward and reverse zones. Locate the entries for conditional forwarders. Are they stored in the same location?
7.
Rename the domain administrator account.
8.
Run the Security Configuration Wizard on each Windows server. It is available from Server Manager.
9.
The command c:\>bitsadmin /transfer n http://site.example/document "c:\Users\User Name\Desktop\results" is a command line technique to download the file http://site.example/document and save it locally in the file c:\Users\User Name\Desktop\results. Test it. See also http://msdn.microsoft.com/en-us/library/aa362813.aspx .
10.
Run the command gpresult with the flag /z to see the result of the group policies applied to a system.
11.
Run the command gpupdate with the flags /force and /target to update group policy on a remote system.
12.
Edit an existing group policy or modify an existing group policy to lock out an account for five minutes if it receives ten failed login attempts within a single minute.
13.
Use the id command on a Linux system connected to a Windows domain to determine the userid for a domain user. To find the user name for the user ID 1891632312, run the command
srobinson@dione ∼ $ getent passwd 1891632312
Use ssh to login to a Linux system as a Windows domain user: for example, using ssh corp\\srobinson@rhea. Compare the user id numbers for the same user across different systems.
Notes and References
I like two (recent) general references for Windows Server operating systems:
· Windows Server 2012 Inside Out, William Stanek. Microsoft Press, January 2013.
· Mastering Windows Server 2012 R2, Mark Minasi, Kevin Greene, Christian Booth, Robert Butler, John McCabe, Robert Panek, Michael Rice, and Stefan Roth. Sybex, December 2013.
Not only do these books cover Windows Server 2012, they contrast the behavior of Windows Server 2012 with Windows Server 2008.
Installing Active Directory
NetBIOS names actually have 16 characters, but on Windows systems the last character is reserved for the resource type ( http://technet.microsoft.com/en-us/library/cc779578.aspx ). Moreover, the NetBIOS specification allows for case sensitive names ( http://msdn.microsoft.com/en-us/library/dd891456.aspx ), but in practice NetBIOS names are capitalized. The NetBIOS name should be a truncated version of the host name; if not applications may break ( http://msdn.microsoft.com/en-us/library/windows/desktop/ms724220.aspx ). See also Microsoft KB 909264 ( http://support.microsoft.com/kb/909264 ) for naming conventions.
During testing, you may be tempted to use the same top-level name for the root domain name of different domains. For example, you may want to name the first domain ad.neptune.test and the second domain ad.saturn.test. This may lead to trouble, as both systems want the same NetBIOS name – AD. If both systems are together on the same network, a NetBIOS name collision results. The solution is to also use different top-level names – for example, ad.neptune.test and corp.saturn.test.
The inability of Windows Server 2012 and 2012 R2 to use the top-level domain .example appears to conflict with RFC 6761 ( http://tools.ietf.org/html/rfc6761 ); section 6.5 explicitly states that “Authoritative DNS servers SHOULD NOT recognize example names as special.”
Details of the file structure for Active Directory domain controllers can be found in Chapter 24 of Windows 2012 Server Inside and Out.
DNS
For more detail on the different kinds of Active Directory records in DNS, check out Chapter 22 of Windows Server 2012 Inside Out or Chapter 6 of Mastering Windows Server 2012 R2.
The discussion of DNS, both here and in Chapter 4, is superficial. A deeper understanding requires knowing much more about delegation and recursion. The security problems of DNS are well known, and many are solved with DNSSEC, which is not even mentioned. Sorry.
A nice place to learn more about batch scripting is available at Wikibooks, at http://en.wikibooks.org/wiki/Windows_Batch_Scripting . Microsoft TechNet has a summary of the various Windows command-line tools (including dnscmd) at https://technet.microsoft.com/en-us/library/cc754340.aspx .
Managing a Domain
When building a domain on a test network, you may only create the administrator account on the domain controller, and the Windows system may only have the local administrator account. When the Windows system is joined to the domain, attempts to login as the domain administrator may be interpreted as an attempt to login as the local administrator. To specify the domain account, be sure to use the account name domainname/administrator.
For more details on the various default groups, see http://technet.microsoft.com/en-us/library/cc771990.aspx .
Powershell
PowerShell is worth a book in its own right; a good starting place is at the Microsoft Scripting Center at http://technet.microsoft.com/en-us/scriptcenter/powershell.aspx . More information about PowerShell execution policies can be found at http://technet.microsoft.com/en-us/library/hh847748.aspx .
A good place to learn more about cmdlets in PowerShell is on the Microsoft Developer Network at http://msdn.microsoft.com/en-us/library/ms714395.aspx . Specifics about the New-ADUser cmdlet can be found at http://technet.microsoft.com/en-us/library/ee617253.aspx or http://technet.microsoft.com/en-us/library/hh852238.aspx .
Organizing a Domain
The announcement that psexec no longer uses clear text passwords was made in March 2014 at http://blogs.technet.com/b/sysinternals/archive/2014/03/07/updates-process-explorer-v16-02-process-monitor-v3-1-psexec-v2-1-sigcheck-v2-03.aspx .
Another option for managing which applications can run on a system is AppLocker. Unfortunately, AppLocker is not available for most versions of Windows, including Home Premium and Professional. See http://technet.microsoft.com/en-us/library/ee424382.aspx.
Windows servers run a number of services on a range of ports. Microsoft maintains a list of the port requirements for Windows Server systems at http://technet.microsoft.com/en-us/library/dd772723.aspx .
Footnotes
1
PowerShell is available for Windows Server 2008, provided that Service Pack 2 is installed. See https://technet.microsoft.com/en-us/library/hh847837.aspx .
2
The first time PowerShell is asked for help, it will prompt the user for permission to download additional help data online; without it, PowerShell only provides partial help. To manually download the online help data, from PowerShell run PS C:\Users\Administrator> update-help.
3
Available from Microsoft at http://technet.microsoft.com/en-us/sysinternals/bb842062.aspx ; see also Chapter 3.
© Mike O'Leary 2015
Mike O'LearyCyber Operations10.1007/978-1-4842-0457-3_7
All materials on the site are licensed Creative Commons Attribution-Sharealike 3.0 Unported CC BY-SA 3.0 & GNU Free Documentation License (GFDL)
If you are the copyright holder of any material contained on our site and intend to remove it, please contact our site administrator for approval.
© 2016-2026 All site design rights belong to S.Y.A.