Learning Pentesting for Android Devices (2014)
Chapter 4. Traffic Analysis for Android Devices
In this chapter, we will look into the network traffic of Android devices and analyze the traffic data of the platform and applications. Often applications leak sensitive information in their network data, so finding it is one of the most crucial tasks of a penetration tester. Also, you will often encounter applications that perform authentication and session management over insecure network protocols. So, in this chapter, we will learn the ways to intercept and analyze traffic of various applications in an Android device.
Android traffic interception
The insufficient transport layer protection is the third biggest risk in mobile devices according to OWASP Mobile Top10 (https://www.owasp.org/index.php/Projects/OWASP_Mobile_Security_Project_-_Top_Ten_Mobile_Risks). In fact, imagine a scenario where an application is submitting the user's login credentials via HTTP to the server. What if the user is sitting in a coffee shop or at an airport and is logging in to his application while someone is sniffing the network. The attacker will be able to get the entire login credentials of the particular user, which could be used for malicious purposes later. Let's say the application is doing the authentication over HTTPS, the session management over HTTP, and is passing the authentication cookies in the requests. In that case as well, the attacker will be able to get the authentication cookies by intercepting the network while performing a man-in-the-middle attack. Using those authentication cookies, he could then directly log in to the application as the victim user.
Ways to analyze Android traffic
There are two different ways of traffic capture and analysis in any scenario. We will be looking at the two different types that are possible in the Android environment and how to perform them in a real-world scenario. The Passive and Active analyses are as follows:
· Passive analysis: This is a way of traffic analysis in which no active interception is done with the application sending the network data. Instead, we will try to capture all the network packets and later open it up in a network analyzer, such as Wireshark, and then try to find out the vulnerabilities or the weak security issues in the application.
· Active analysis: In Active analysis, the penetration tester will actively intercept all the network communications being made and can analyze, assess, and modify the data on the fly. Here, he will be setting up a proxy and all the network calls being made and received by the application/device will pass through that proxy.
Passive analysis
In Passive analysis, the concept is to save all the network information to a specific file and later view it using a packet analyzer. This is what we will be doing with Passive analysis in Android devices as well. We will be using tcpdump in order to save all the information to a location onto the device itself. Thereafter, we will pull that file to our system and then view it using Wireshark or Cocoa packet analyzer. Refer to the following steps:
1. We will start with downloading the tcpdump binary compiled for ARM from Timur Alperovich's website http://www.eecs.umich.edu/~timuralp/tcpdump-arm. If we wish, we could also download the original binary for tcpdump and cross compile (to cross compile your binaries for Android, follow the link http://machi021.blogspot.jp/2011/03/compile-busybox-for-android.html. The link is shown for cross compiling BusyBox, but the same steps could be applied on tcpdump.).
Once we have downloaded tcpdump, we can confirm that it is compiled for ARM by executing a file on the binary we have just downloaded. In case of Windows users, you could use Cygwin in order to execute the command. The output will be similar to the one shown in the following screenshot:
![]()
2. The next step here will be to push the tcpdump binary to one of the locations in the device. We also have to keep in mind that we need to go ahead and later execute this file. So, we will push it to a location from where we could change the permissions as well as execute the binary in order to capture the traffic.
3. Now, go ahead and push the binary using adb's push command in order to push the binary to the device. Similarly, in cases where we need to pull contents from the device, we could use pull instead of push.
4. Here, we will use adb push to /data/local/tmp in the Android device:
5. adb push tcpdump-arm /data/local/tmp/tcpdump
5. Once we have the tcpdump binary in our device, we then need to go to the device in a shell using adb shell and change the permissions of the binary. If we try to run tcpdump as it is, it will give us a permission error because we do not have the execute rights.
In order to change the permission, we need to navigate to the /data/local/tmp location, use the chmod command, and give it a permission of 777, which means the application will have all the permissions. The following screenshot shows the resulting output from the preceding command:

6. The final step here will be to launch tcpdump and write the output to a .pcap file. Launch tcpdump with the -s, -v, and -w flags. Refer to the following description:
o -s: This indicates to snarf given (in our case 0) bytes of data from each packet rather than the default of 65535 bytes.
o -v: This indicates the verbose output.
o -w: This indicates the filename to write the raw packets to. For example, we could use ./tcpdump -v -s 0 -w output.pcap in order to write all the files to output.pcap with verbose output.
7. While the traffic capture is running, open your phone browser and go to a sample vulnerable login form located at http://attify.com/data/login.html, which sends all the data via HTTP and uses GET requests:

8. Here log in to the application with the Username android and Password mysecretpassword.
9. We could now terminate the process (using Ctrl + C) anytime we want through the adb shell service. The next step would be to pull the captured information from the device to our system. To do this, we will simply use adb pull as follows:
adb pull /data/local/tmp/output.pcap output.pcap
10.You might also need to change the permissions of output.pcap in order to pull it. In this case, simply execute the following command:
11.chmod 666 output.pcap
11.Once we have downloaded the .pcap file of the captured network data, we could open it up in Wireshark and analyze the traffic. Here, we will try to look for our captured login requests. We could download Wireshark from the website http://www.wireshark.org/download.html. Once it is downloaded and installed, open up Wireshark and open our newly pulled file output.pcap in it by navigating to File | Open.
As soon as we open the .pcap file in Wireshark, we would notice a screen similar to the one shown in the following screenshot:
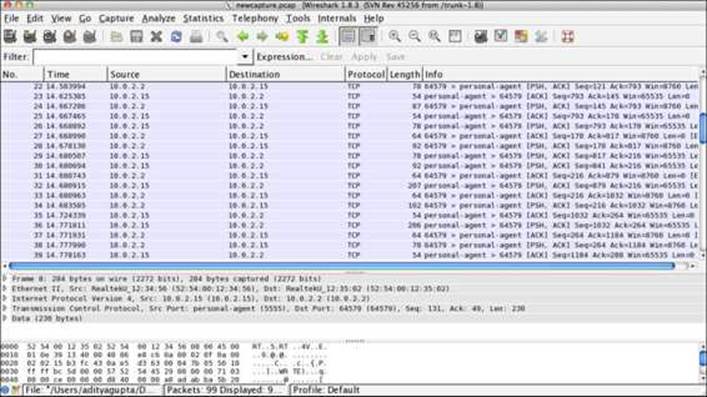
Wireshark is an open source packet analyzer, which helps us in finding sensitive information and analyzing the traffic data from all the network connections made. Here, we are searching for the requests we made to http://attify.com and entered our login credentials.
12.Now, go to Edit and click on Find Packets. Here, we will look for the website in which we submitted the login credentials and check on String.
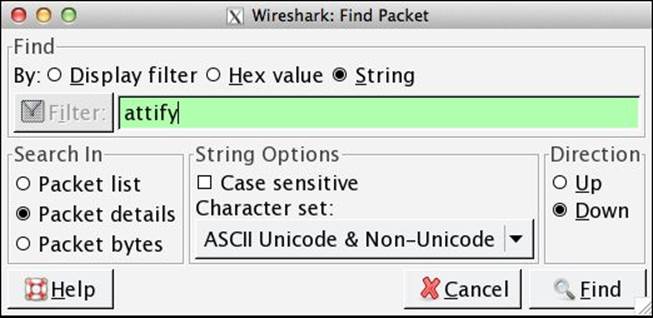
13.Here, we could see the connection made to http://attify.com/data/login.html. If we look for more information about this packet in the bottom pane, we could see the request URL that contains the username and password that we entered.

Thus, we have successfully captured the network data using tcpdump and stored it in a .pcap file, which was then analyzed using Wireshark. However, passive traffic capture could also be done directly via the adb shell.
adb shell /data/local/tmp/tcpdump -i any -p -s 0 -w /mnt/sdcard/output.pcap
Here, -i stands for interfaces. In this case, it is capturing data from all the available interfaces. –p stands for specifying tcpdump to not put the device to promiscuous mode (which is a mode often used while performing sniffing attacks and is not suitable for our use currently). We could also specify the use of tcpdump while starting the emulator using the -tcpdump flag. We also need to specify the AVD name we want to capture the traffic on along with the –avd flag.
emulator -avd Android_Pentesting --tcpdump trafficcapture.pcap
Active analysis
In Active analysis, the fundamental rule is to make every request and response pass through an intermediate stage defined by us. In this case, we will set up a proxy and make all the requests and responses go through that particular proxy. Also, we will be having an option to manipulate and modify both the packets in the requests and response, and thus assess the application's security:
1. In order to create a proxy for HTTP, start up the emulator with the -http-proxy flag specifying the proxy IP and Port. Since we are running the emulator on the same system, we will use the IP 127.0.0.1 and any port that is available. In this case, we will be using the port 8080.
2. emulator -avd Android_Pentesting –http-proxy 127.0.0.1:8080
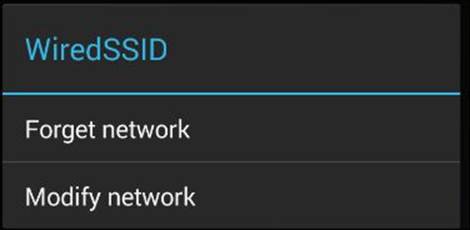
2. On a device, we could also set up the proxy by navigating to Settings | Wi-Fi and then long tapping on the network Wi-Fi that we are connected to. Also, the system that we'll be using for interception should be on the same network if we are doing it using an actual device.
3. Once we long tap on the Wi-Fi connection, we will have a screen similar to the one shown in the following screenshot. Also, if you're performing this exercise with a real device, the device needs to be on the same network as the proxy.
4. Once into the modify connection screen, while going down, notice the proxy configurations asking for the IP address of the device on the network and the port of the proxy system.
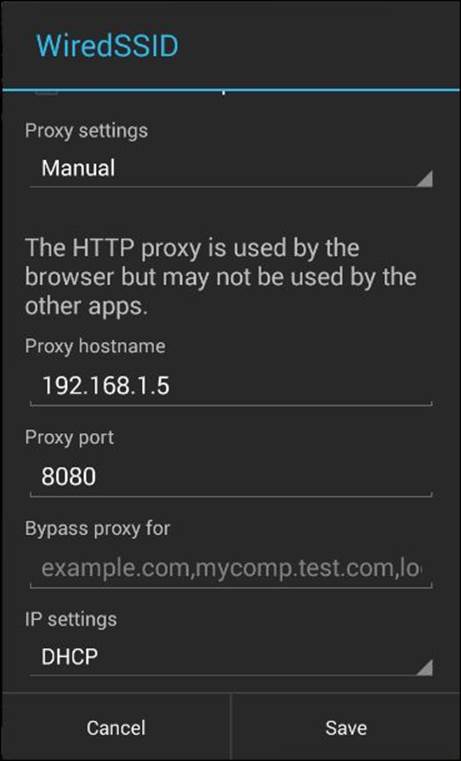
However, these settings are only in the latest versions of Android starting from 4.0. If we want to implement a proxy on a device less than 4.0, we will have to install a third-party application, such as ProxyDroid available on Play Store.
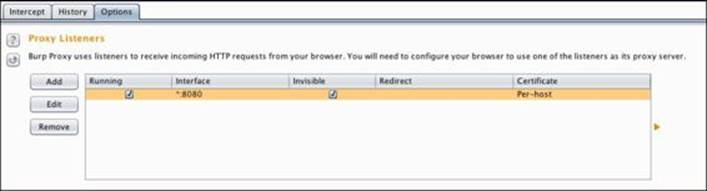
5. Once we have set up the proxy in the device/emulator, go ahead and launch the Burp Proxy in order to intercept the traffic. Here is how the Burp setting should look in the Options tab in order to effectively intercept the traffic of both the browser and the application.
6. We also need to check the invisible proxy in order to make sure that our proxy is also capturing the nonproxy requests. (Readers could read more about invisible proxying and nonproxy requests at Burp's website at http://blog.portswigger.net/2008/11/mobp-invisible-proxying.html.)
7. In order to check whether the proxy is working or not, open up the browser and launch a website. We will then be able to see if it is getting intercepted in the proxy or not.
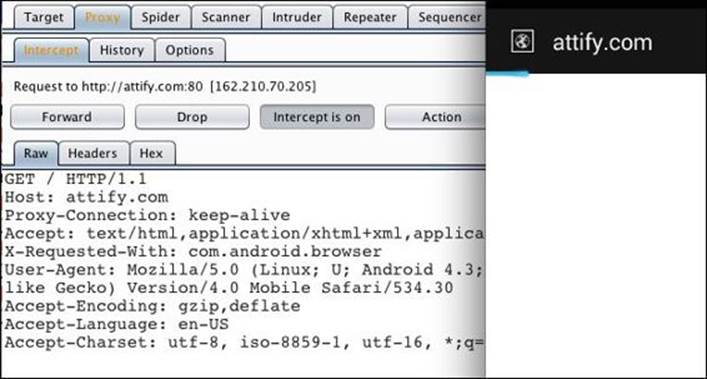
As we can see in the preceding screenshot, we are opening up a URL, http://attify.com, and the request is right now being displayed in the Burp Proxy screen. So, we have managed to successfully intercept all the HTTP-based requests from the device and the application.
HTTPS Proxy interception
The preceding method will work in the normal traffic interception of application and browser when they are communicating via the HTTP protocol. In HTTPS, we will get an error due to the certificate mismatch, and thus we won't be able to intercept the traffic.
However, in order to solve the challenge, we will be creating our own certificate or Burp/PortSwigger and installing it on the device. In order to create our own certificate, we will need to set up a proxy in Firefox (or any other browser or global proxy):
1. To set up a proxy in Firefox, go to Options present in Tools (Firefox | Preferences on Mac) and go to the Advanced tab. Under the Advanced tab, we will click on the Network option.

2. Once in the Network tab, we need to click on Settings in order to configure the proxy with Firefox.

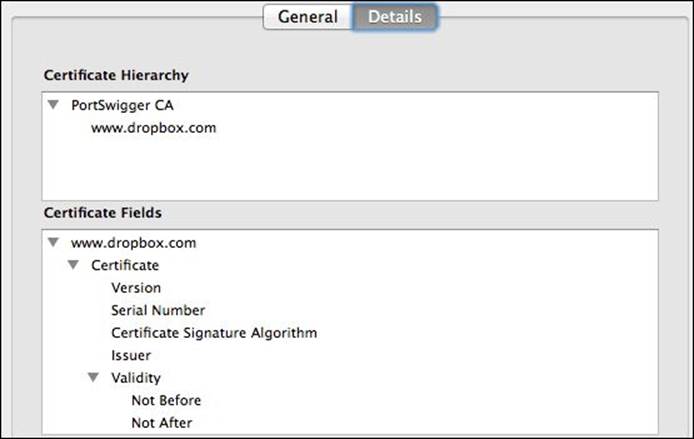
3. Once done, go to the HTTPS website on our system browser of which we would want to intercept the traffic on our device. Here we will receive a The Network is Untrusted message. Click on I understand the Risks and hit Add Exception.
4. Thereafter, click on Get Certificate and finally click on View and then on Export in order to save the certificate.
5. Once the certificate is saved on our system, we could now push this to our device using adb.
6. adb push portswiggerca.crt /mnt/sdcard/portswiggerca.crt
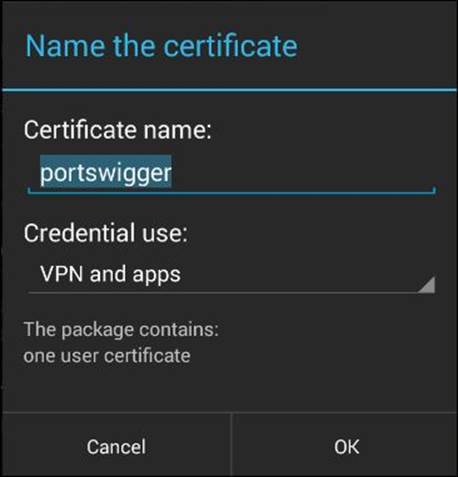
6. Now, in our device, go to Settings, and under the Personal category, we will find Security. Once we go into Security, notice that there is an option to install certificates from the SD card. Clicking on that will lead us to finally save the certificate with a given name, which will be applicable for all the applications and browsers for even the HTTPS websites.
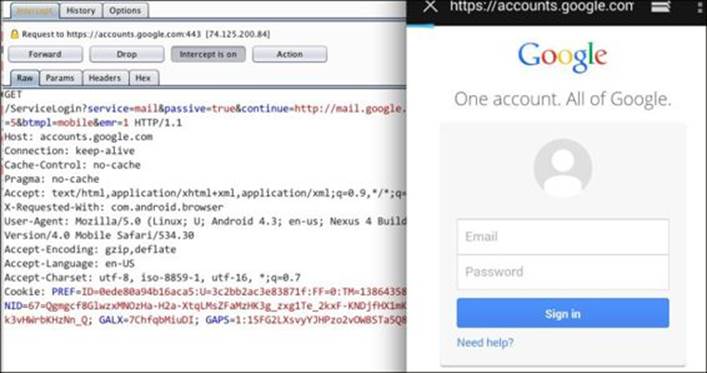
7. Confirm this by going back to our browser and opening an HTTPS website, such as https://gmail.com in this case. As we can see in the following screenshot, we have successfully intercepted the communication in this case as well:
Other ways to intercept SSL traffic
There are other ways to do SSL traffic interception as well as different ways to install certificates on the device.
One of the other ways include pulling the cacerts.bks file from the /system/etc/security location of the Android device. Once we have pulled it out, we could then use the key tool along with Bouncy Castle (located in the Java installation directory) to generate the certificate. If you're unable to find Bouncy Castle in the Java installation directory, you could also download it from http://www.bouncycastle.org/latest_releases.html and place it at a known path. Thereafter, we will need to mount the /system partition as read/write in order to push the updated cacerts.bkscertificate back to the device. However, in order to make this change permanent in case we are using an emulator, we will need to use mks.yaffs2 in order to create a new system.img and then use it.
Also, there are other tools you can use to intercept traffic of Android devices, such as Charles Proxy and MITMProxy (http://mitmproxy.org). I highly recommend you to try out both of them on the basis of the knowledge of Burp proxying, as they are quite the same when it comes to usability, but are much more powerful. While using Charles Proxy, we could directly download the certificate from www.charlesproxy.com/charles.crt.
In some penetration tests, the application might be contacting the server and getting a response. For example, imagine a scenario where the user is trying to access a restricted area of the application that is being requested from the server. However, since the user is not authorized to view that area, the server responds with a 403 Forbidden message. Now, we as penetration testers could intercept the traffic and modify the response from 403 Forbidden to 200 OK. Thus, the user will now be able to access even the unauthorized area of the application. An example of modifying the response of a similar kind can be found in Chapter 8, ARM Exploitation, where we will be discussing some other vulnerabilities exploitable via traffic interception.
A secure way of implementing traffic securely in the application is to have everything go over HTTPS and at the same time include a certificate in the app itself. This is done so that when the application tries to communicate with the server, it will verify if the server certificate corresponds with the one present in the application. However, if someone is doing a penetration test and is intercepting the traffic, the new certificate used by the device that has been added by the penetration tester, such as the portswigger certificate, won't match the one present in the application. In those cases, we will have to reverse engineer the application and analyze how the app is verifying the certificates. We might even need to modify and recompile the application.
Extracting sensitive files with packet capture
We will now go ahead and look at how to extract sensitive files from the traffic data using Wireshark. In order to do this, we could go to the packet capture and load it in Wireshark for analysis.
The underlying concept in order to extract files from network capture is that they are always sent a header specifying the file type to be multipart form data (multipart/form-data). The following are the steps to extract any kind of files from a network traffic capture:
1. In Wireshark, simply go to Edit and search for the string multipart from our packet details.

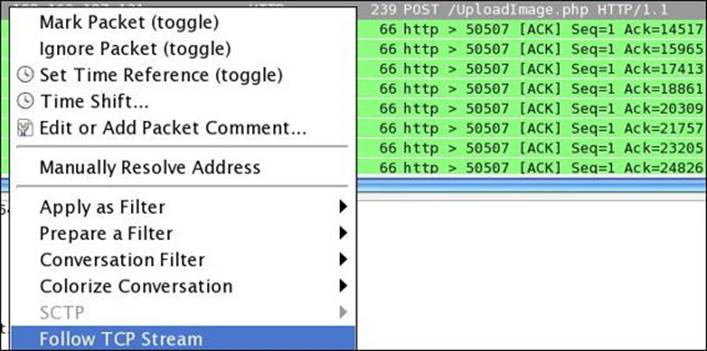
2. Once we get a packet sending a POST request (or GET in extremely rare cases) to a server, right-click on the packet and click on Follow TCP Stream.
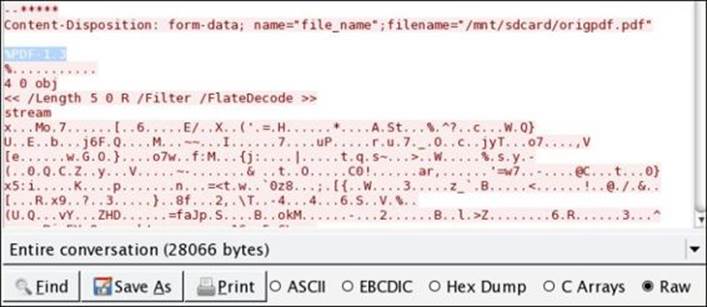
3. Thereafter, depending on the file starting values, such as %PDF in the case of PDF, select Raw from the following options and then save the file with the extension.pdf. Thus, we have the final PDF, which was being uploaded to a website via the Android device, and we happen to have the network capture in our pentest.
4. We could also do this with other tools such as NetworkMiner for Windows (downloadable from http://www.netresec.com/?page=NetworkMiner), which provides a well-built GUI to interact with and explicitly specifies the files that have been captured in the network traffic.
Summary
In this chapter, we learned about various ways of performing traffic analysis on Android devices. Also, we went ahead and intercepted both the HTTP and HTTPS traffic data from the application and browser. We also saw how to extract sensitive files from the network capture information.
In the next chapter, we will look into Android forensics and will extract some sensitive information from an Android device using manual methods and also with the help of different tools.
All materials on the site are licensed Creative Commons Attribution-Sharealike 3.0 Unported CC BY-SA 3.0 & GNU Free Documentation License (GFDL)
If you are the copyright holder of any material contained on our site and intend to remove it, please contact our site administrator for approval.
© 2016-2026 All site design rights belong to S.Y.A.