Learning Pentesting for Android Devices (2014)
Chapter 5. Android Forensics
In this chapter, we will cover the following aspects of Android forensics:
· How to perform Android forensics in a real-world scenario
· Physical and logical acquisition of data
· Using tools to help in the forensic acquisition process
· Manual methods to perform Android forensics
Types of forensics
Forensics is the extraction and analysis of data from a device using different manual and automated methods. It could be broadly divided into two categories as follows:
· Logical acquisition: This is the method of forensics in which the examiner interacts with the device and extracts data from the filesystem. This data could be anything, such as application specific data, contacts, call logs, messages, web browser history, social networking user information, and financial information. The advantage of logical acquisition is that it is easier to acquire logical information in most cases than physical acquisition. However, one limitation of this method, in some cases, is that the evidence (smartphone and its data) in this case has a high risk of getting tampered with.
· Physical acquisition: This means a bit-by-bit copy of the entire physical storage medium. We could also target different individual partitions while performing physical acquisition. In comparison to logical acquisition, this method is much slower, but more reliable and trustworthy. Also, in order to perform physical acquisition on a smartphone, the examiner needs to be familiar with different types of filesystems as well such as Yet Another Flash File System 2 (YAFFS2), ext3, ext4, rfs, and so on.
Filesystems
Before we dive deep into forensics and extract data from the device, we should have a clear understanding of the filesystem types and the differences between them. As we discussed earlier, one of the main reasons physical acquisitions are a little trickier in Android is because of the different filesystems.
The main partition of the Android filesystem is often partitioned as YAFFS2. The reason YAFFS2 is used in Android is because of the advantages it provides to the device, including better efficiency and performance, and a lower footprint. A few years back, when Android was just introduced, forensics was a big issue on the platform because there were very few forensic tools used to support the YAFFS2 filesystem format.
An SD card is of the type FAT32, which is a well-known format among normal system users as well. So, to acquire the image of an SD card, any conventional forensic data acquisition tool could be used.
One of the most famous tools to make a copy or to create an image of an existing data system is using the tool dd, which does a block-by-block copy from the original source to the system. However, it is not recommended to be used during forensic investigations, due to some of the drawbacks of the tool, such as missing out of block memory and skipping the bad blocks leading to data corruption. In the upcoming sections, we will go deeper into the Android filesystem and will look at how to extract data from the filesystem in the most effective way possible.
Android filesystem partitions
As we discussed in the earlier chapters as well, Android is based on a Linux kernel, and derives most of its functionalities and properties from Linux itself. In Android, the filesystem is divided into different partitions, each of which holds a significant importance.
In order to see the partitions on an Android device, we could use adb shell and then look into the mtd file under proc, as shown in the following command. In some devices where the mtd file is not present, there is another file with the name partitions under proc, as shown in the following command:
adb shell
cat /proc/mtd
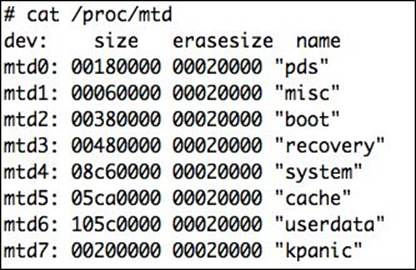
The following is a screenshot of the output after executing the preceding command on a device to list all the partitions.
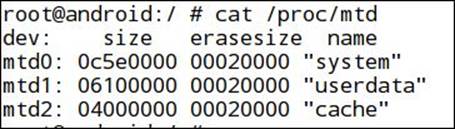
As we can see in the preceding screenshot, there are various filesystem partitions along with their respective sizes. You will generally see some of the data partitions such as system, userdata, cache, recovery, boot, pds, kpanic, and misc in most of the Android devices, mounted at different locations specified by the dev column. In order to see the different partitions along with the type, we could type in mount in the adb shell.
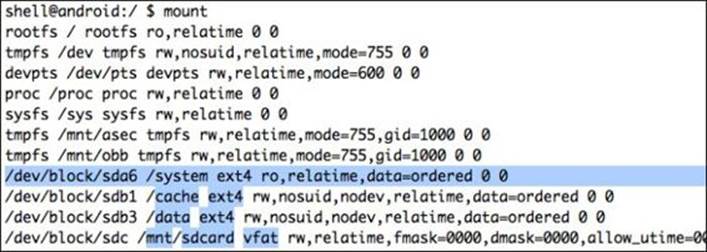
As we can see in the following screenshot, by executing the mount command lists, all the different partitions along with their locations are mounted:
Using dd to extract data
The dd utility is one of the most used tools in forensics in order to create an image for the data extraction process. In other words, it is used to convert and copy the input file specified to the output file. Often during analysis, we won't be allowed to interact with and make changes to the evidence directly. So, it is always a good option to have an image of the device filesystems and then perform the analysis on it.
The dd utility is present by default in most of the Linux-based systems, as well as in Android devices at /system/bin. If it is not present in your device, you could install BusyBox, which will install dd along with some other useful binaries. You could get the dd binary for Android from the BusyBox App (https://play.google.com/store/apps/details?id=stericson.busybox) or you could even cross-compile it yourself.
The standard syntax to use dd is as follows:
dd if = [source file which needs to be copied] of = [destination file to be created]
There are several command-line options that could be passed along with dd, which include:
· if: This precedes the input file to be copied
· of: This precedes the output file to which the content will be copied
· bs: This is the block size (a number) that specifies the size of the block in which dd will copy the image
· skip: This is the number of blocks to skip before starting the copying process
Let us now go ahead and take an image of one of the existing partitions for forensics usage.
1. The first thing we need to find are the different partitions, which exist on our Android device as we have done earlier. This could be done by viewing the contents of the /proc/mtd file.
2. Next, we will find out where the data partition is located, as in this case we will be taking the backup of the data partition. In this case, it is located at mtdblock6. Here, we will fire up dd, and store the image in sdcard, which we will later pull using the adb pull command. The adb pullcommand simply allows you to pull a file from the device to the local system.

3. Once the copying is complete, which might take some time, we could quit the adb shell and go to our terminal and type in the following code:
4. adb pull /mnt/sdcard/data.img data.img
4. We could also directly save the image to a remote location/system using the Netcat utility. For this, we will first need to forward a port from a device to a system.
5. adb forward tcp:5566 tcp:5566
5. Also, we need to start the Netcat utility over here, listening on port 5566.
6. nc 127.0.0.1 5566 > data.img
6. Thereafter, we will have to do an adb shell to get into the device and then start the dd utility along with forwarding the output to Netcat.
7. nc -l -p 5566-e dd if=/dev/block/mtdblock6
This would save the image into the system instead of saving it on any location on the device and then pulling it later on. In case you don't have dd binary on your phone, you could also install BusyBox to get the dd binary.
One thing we should make sure before starting the forensic investigation is to check whether the device is made to operate in the superuser mode, which often requires rooting of the device. However, not all the devices we come across are rooted. In those cases, we will use our custom recovery image in order to boot the phone, and then root the device.
Using a custom recovery image
A custom recovery image is an image that allows the device to boot up, without loading the operating system. One of the most famous and most used recovery images is the ClockwordMod Recovery image, which could be downloaded with different builds for specific handsets from the official website https://www.clockworkmod.com/rommanager. Once we load the device in recovery, and do adb devices, instead of the usual online mode of our device, we will notice that the current mode is set to recovery. Rooting the device is extremely important; otherwise, we as a forensic investigator won't be able to extract most of the useful information from the device unless the device is rooted. One of the best places to look for the rooting of a specific device handset is the XDA-Developers forum at http://forum.xda-developers.com.
In order to flash a new recovery to the device, we could reboot the device first to the bootloader mode, and then flash a new custom ROM.
adb reboot bootloader
You could also reboot to the bootloader mode by pressing certain key combinations depending on the handset. In some cases, the bootloader also needs unlocking which could void the warranty of the device. This is useful when the phone is in a protected mode using any password or pin protection, as well as when the USB debugging is turned off. Pushing a new recovery to the device is either via putting it on the SD card, or executing the following command:
fastboot boot [recovery-name].img
So, once we have flashed a new ROM to the device, such as CyanogenMod, we could then turn on USB debugging and delete gesture.key/password.key to remove the protection.
Also, one of the most important things to note is that in nand-based flash devices dd is not relied upon that much. Instead, better alternatives, such as dc3dd and nanddump, are used to create images. The binaries could be downloaded from https://github.com/jakev/android-binaries. The dc3ddalternative is a patched version of dd, designed specifically for forensic analysis. It could be run in the same way as dd using the following command:
#dc3dd if=/dev/block/mtdblock6 of=data.img verb=on hash=md5 hash=sha256 hlog=data.hashlog log=data.log
Here, the additional parameters are simply to calculate the hashes and store the copied login files, such as data.hashlog and data.log.
Also, we could use nanddump in the same way by running nanddump on the device and forwarding the output to the system via Netcat as follows:
# nanddump [any options if needed] /dev/mtd/mtd1 | nc -l -p 5566 (on the device)
nc 127.0.0.1 5566 > data.img (on the system)
Once we have created the image, we could then open the image in any forensic image analyzer tool, such as The Sleuth Kit (TSK) (http://www.sleuthkit.org/sleuthkit/), Oxygen Suite (http://www.oxygen-forensic.com), or IEF by Magnet Forensics (http://www.magnetforensics.com/software/internet-evidence-finder/).
Using Andriller to extract an application's data
Andriller is an open source, multi-platform forensics tool written in Python by Denis Sazonov, which helps to extract some basic information from the device and could be helpful in forensic analysis. Once the analysis is complete, it generates the forensic report in HTML format.
In order to download this, we could go to the official website at http://android.saz.lt/cgi-bin/download.py and download the necessary package. If we are on a Linux or Mac environment, we could simply use the wget command in order to download and then extract the package. Since it is just a Python file, along with some other necessary binaries, there is no need to install it; instead, we could directly start using it.
$ wget http://android.saz.lt/download/Andriller_multi.tar.gz
Saving to: 'Andriller_multi.tar.gz'
100%[=============================>] 1,065,574 114KB/s in 9.2s
2013-12-27 04:23:22 (113 KB/s) - 'Andriller_multi.tar.gz' saved [1065574/1065574]
$ tar -xvzf Andriller_multi.tar.gz
Once it is extracted, we could go to the Andriller folder and simply run it using python andriller.py. One of the major dependencies of Andriller is Python 3.0. In case you are using Python 2.7, which comes preinstalled on most operating systems, you could download the 3.0 version from the official website, http://python.org/download/releases/3.0/ or http://getpython3.com/.
Now, once we have connected the device, we could go ahead and run Andriller.py in order to capture information from the device and create the log file and databases.
$ python Andriller.py
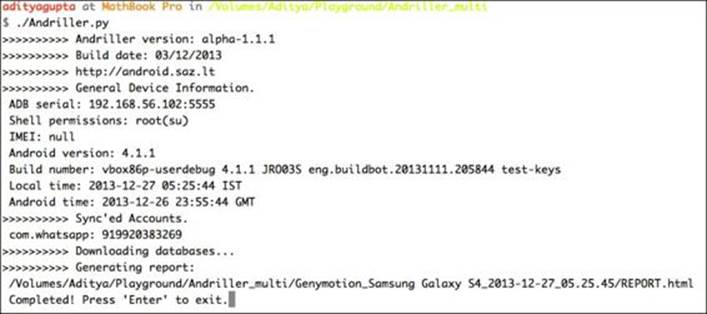
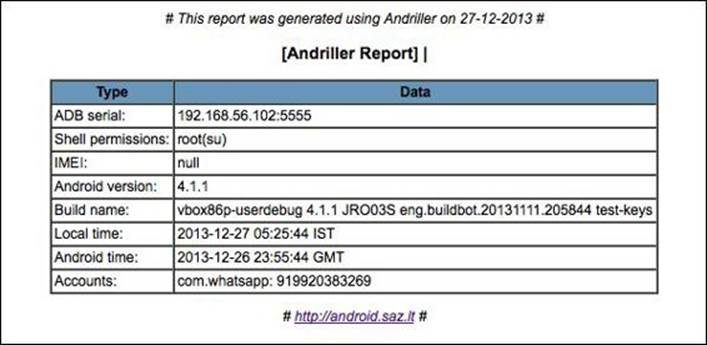
Once it starts running, we'll notice that it prints out several information from the device, such as the IMEI number, build number, and social networking applications that are installed. In this case, it detected a WhatsApp application present along with the phone number associated with it, so it will go ahead and pull all the databases of the WhatsApp application.
Once the analysis has finished, we'll see a screen similar to the following screenshot:
If we go and view the HTML file, which it has created for us, it will show us some basic information about the device, as shown in the following screenshot. It will also create a dump of all the databases in the same folder directory under the folder name db.
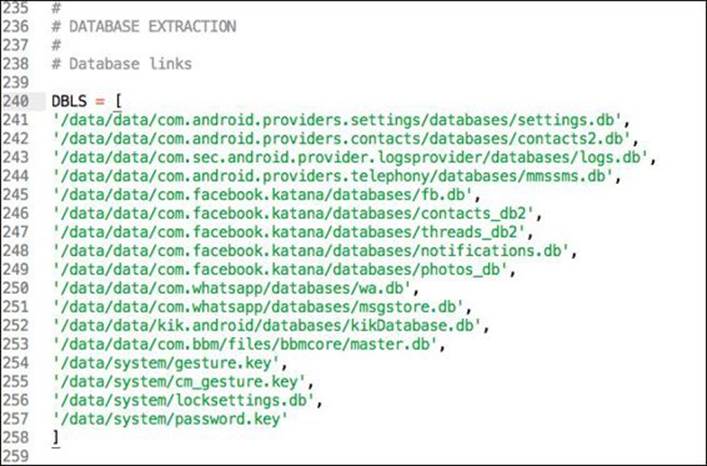
If we go and analyze the source code of this application, we could see in the source code of Andriller.py that it is checking for different packages present in the device. We could also add our own packages here, which we would like Andriller to find for us, and save the databases.
As you can see in the following screenshot, you could manually add more databases that you wish to back up using Andriller.
Using AFLogical to extract contacts, calls, and text messages
AFLogical is a tool written by viaForensics in order to create a logical acquisition from the device and present the result to the forensic examiner. It extracts some of the key components from the device, including SMS, contacts, and call logs.
In order to use AFLogical, we need to download the source code of the project from the GitHub repo https://github.com/viaforensics/android-forensics. Once downloaded, we could then import this project to our Eclipse workspace and build it. We could import an existing project into our Eclipse workspace by navigating to File | New | Other | Android | Android Project from our existing code and then selecting the path of the downloaded source.
Once we have imported the project to our workspace, we could then run it on our device by right-clicking on the project and selecting Run as an Android application. As soon as we run it, we will notice the AFLogical application on our device with options to select what information to extract. In the following screenshot, you will see AFLogical running on the device, and asking the user about the details that are to be extracted:
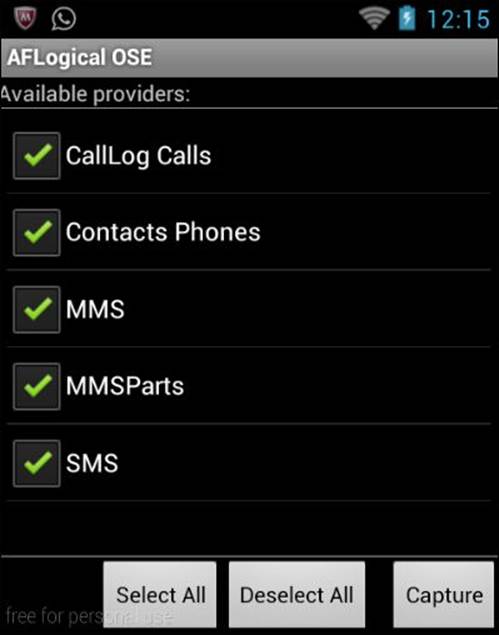
We will check everything, and then click on Capture. AFLogical will then start capturing the details from different sources and saving the captured details in a csv file, in the SD card. We will notice an alert box once the capturing process is complete.
We could now look into our SD card path, and we will find the saved .csv files.
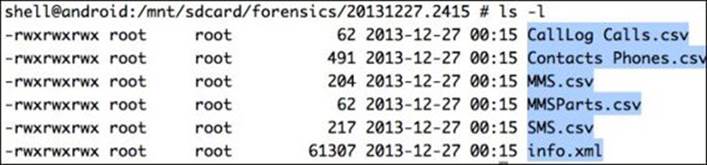
These .csv files could then be opened in any .csv file viewer to see the details. Thus, AFLogical is a quick and effective tool to pull some of the information from the device, such as contacts, call logs, and messages.
Dumping application databases manually
Now that we have seen a lot of tools to aid us while performing forensics, we could also use adb and our manual skills to extract some of the information from the device. As we learned earlier, the application files are stored at /data/data/[application's package name]/. Since most of the applications also use databases to store the data, we will notice that there is another folder named databases inside the package named directory. One thing to note here is that this will only help us extract the information from the applications that use databases in order to store applications and other related information. In some of the applications, we might also notice that the application is storing data in an XML file or using shared preferences, which we need to manually review.
Android uses the SQLite database (which we'll be covering in depth in the next chapter) with the file format of the files .db. Here is how we could go ahead and extract all the databases manually:
· Get into the device, and create a folder to store all the databases
· Find all the .db files and copy them to the created folder
· Archive the folder and pull it
Thus, we could use adb shell to find all the db files inside the /data/data/ location, zip them in an archive, and then pull it.
1. Create a folder named BackupDBS inside the SD card.
2. To do this, we could simply do an adb shell, and then create a folder named BackupDBS under /mnt/sdcard:
3. adb shell
mkdir /mnt/sdcard/BackupDBS
3. Find all the .db files and copy them to BackupDBS.
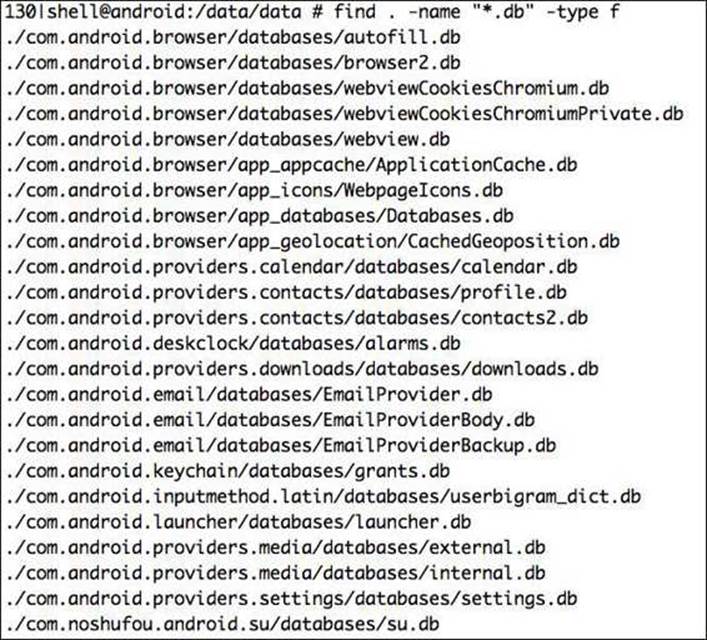
4. To do this, we could use a simple command line kung-fu to find and copy all the .db files inside /data/data. We will first start with looking for all the .db files using the find command. In the following command, we are using the find utility, and specifying to search from the current location with and then looking for all files with the extension db, with any filename (a wildcard *) as *.db and looking for type files – f.
5. find . -name "*.db" -type f
The following screenshot shows the output:
5. Now, we could simply use cp along with find in order to copy it to the BackupDBS directory.
6. find . -name "*.db" -type f -exec cp {} /mnt/sdcard/BackupDBS \;
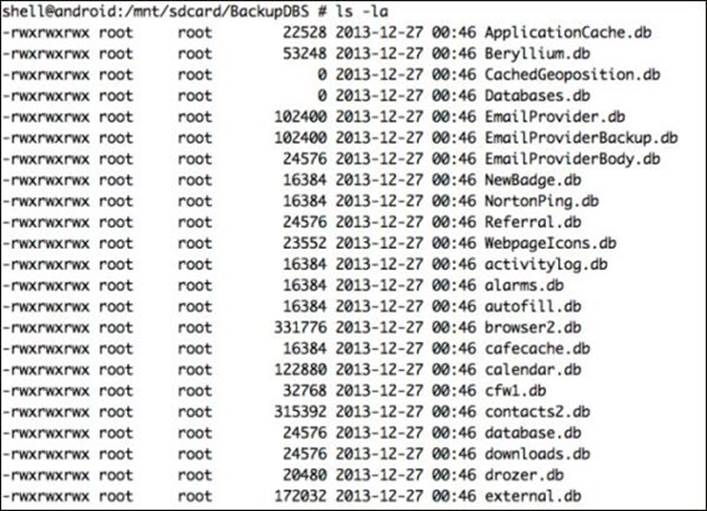
6. Now, if we look inside the BackupDBS directory under /mnt/sdcard, all our databases have been successfully copied to this location.
7. Zip and pull the file. Now, while in the same location, we could simply create an archive using the tar utility and pull it using adb pull.
8. tar cvf backups.tar BackupDBS/
8. Then, from the system, we could simply pull it as follows. This method could also be used to pull all the .apk files from phones by querying in the /data/app and /data/app-private folders with the file type .apk.

If we look closely, in our backups.tar, there is also the database of the WhatsApp application named msgstore.db. Let's go ahead and analyze and look into what is inside the database.
9. To do this, we need to first extract the tar archive we have just pulled.
10.tar -xvf backups.tar
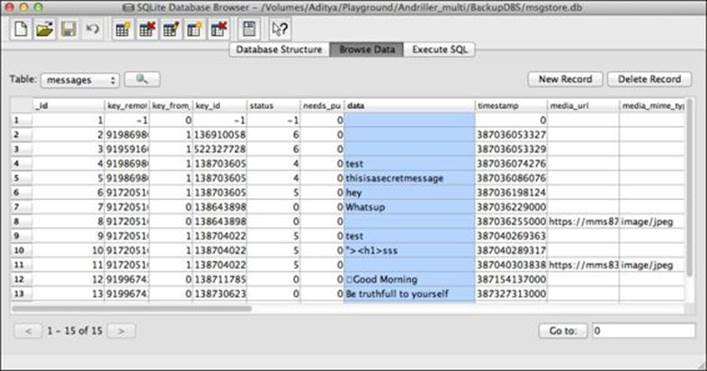
10.Now, in order to analyze the SQLite database of WhatsApp named msgstore.db, we could download and use any SQLite Browser. For this book, we will be using SQLite Database Browser, which could be downloaded from http://sourceforge.net/projects/sqlitebrowser/.
11.Now, if we open the msgstore.db file in the SQLite Database Browser and navigate to browser data, we could see all our WhatsApp conversations in the SQLite Browser. In the following screenshot, we can see the msgstore.db opened in the SQLite Database Browser displaying all the chat conversations of the WhatsApp application:
Logging the logcat
Android logcat is also sometimes useful during forensic investigations. It contains the logs of all the activities carried out on the phone as well as the radio devices. Though not complete, it will help the investigator to get an idea of what has been going on in the device.
To capture and save the logcat dump, we could simply use adb logcat and save the output to a file, which we could analyze later on.
adb logcat > logcat_dump.log
We could also use logcat to get the logs in a much more detailed and useful manner. For example, we could get the radio logs by specifying radio along with the -b parameter. The -b flag is used to display the logcat of a buffer (such as radio or event). The -v flag is used to control the output format which is verbose and could be either time, brief, process, tag, raw, threadtime, or long. Instead of –v, we could also use -d (debug), -i (information), -w (warning), or -e (error).
adb logcat -v time -b radio -d
We could also use other utilities such as dmesg, which would print the kernel messages and getprop, which would print the properties of the device:
adb shell getprop
An XDA Developers' member, rpierce99, has also made an application to automate the capturing of information from logcat and other related sources, which could be downloaded and used from https://code.google.com/p/getlogs/.
Using backup to extract an application's data
Android from 4.0 introduced a feature of backup using adb. This functionality could be used to create the backup of an application along with its entire data. This could be highly useful in forensics as the examiner will be capturing the application along with its entire data. Refer to the following steps:
1. This could be done by issuing the adb backup command to the terminal followed by the application's package name. In case we don't know the exact package name of the application, we could use pm to list all the packages and then filter the app name.

2. The other way to do this will be to use the pm list package command, with the –f flag specifying the string you want to find in the package name.

3. Next, we could simply take a backup of any application we need using the package name of the application.
4. adb backup [package name] -f [destination file name]
4. The destination file will be stored with the file extension .ab or Android backup. Here, we are taking the backup of the WhatsApp application.

5. Once we run the command, it will pause and will ask for confirmation on the device, as shown in the following screenshot:
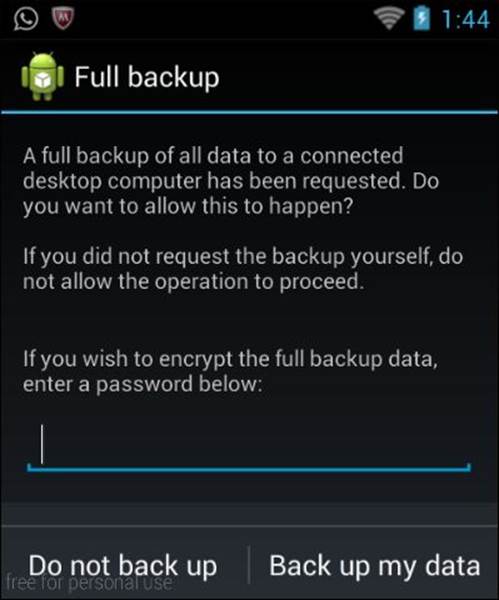
6. Here, we need to select the Back up my data option, and could also specify an encryption password for the backup. Once the backup process is complete we will be having a whatsapp_backup.ab file.
7. Next, we will need to extract this backup in order to get the databases from the .ab file. For this, we will be using dd and openssl to create a .tar file, which we could then extract.

8. Now, since we have the .tar file, we could simply unzip it using tar xvf.
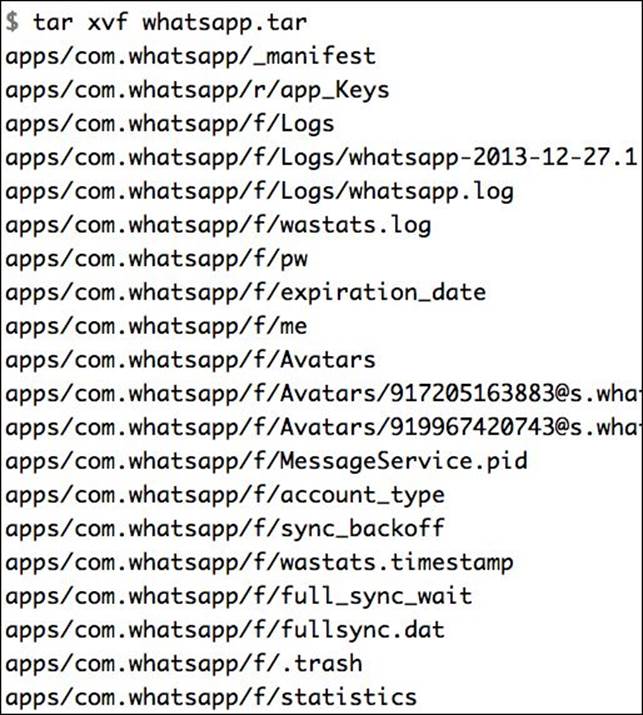
9. Once it has unzipped completely, we could then navigate to the db folder under apps/[package-name] in order to get the databases. In this case, the package name is com.whatsapp.
Let's do a quick ls -l to see all the available files in the db folder. As you can see, we have the msgstore.db file, which we already saw in the last section, containing the WhatsApp conversations.

Summary
In this chapter, we have analyzed different methods of performing forensics, as well as various tools, which we could use in order to help us in forensic investigations. Also, we had a look at some of the manual methods that we could perform in order to extract data from the device.
In the next chapter, we will be going in depth into the SQLite databases, which are another important element of Android penetration testing.
All materials on the site are licensed Creative Commons Attribution-Sharealike 3.0 Unported CC BY-SA 3.0 & GNU Free Documentation License (GFDL)
If you are the copyright holder of any material contained on our site and intend to remove it, please contact our site administrator for approval.
© 2016-2026 All site design rights belong to S.Y.A.