Learning Pentesting for Android Devices (2014)
Chapter 6. Playing with SQLite
SQLite is an open source database with a lot of functionalities that are similar to other relational databases such as SQL. If you are an application developer, you might also notice that SQLite queries look more or less like SQL ones. The reason for choosing SQLite in Android is due to its low memory footprint. The reason SQLite is loved by Android developers is because it requires no setup or configuration of the database and can be directly called within the application.
In this chapter, we will cover the following topics:
· Understanding SQLite in depth
· Using the sqlite3 utility to interact with the databases
· Security issues in sqlite3
· Injection-based attacks
· Attacking databases using Drozer
Understanding SQLite in depth
As we have seen in the previous chapter, SQLite databases are stored by default in Android in the /data/data/[package name]/databases/ location with an extension of .db files (.db in most of the cases in Android). Now, before we go deeper into SQLite vulnerabilities, we should get a clear understanding of SQLite statements and some of the basic commands.
Analyzing a simple application using SQLite
Here, we have a basic Android application, which supports login and registration for the user, and uses SQLite in the backend. Follow these steps:
1. Let's run the application and analyze the databases created by it. You could download the vulnerable application from http://attify.com/lpfa/vulnsqlite.apk. The code sample used to create the database is as shown in the following screenshot:

2. This means we have seven fields with the names id (integer), firstName (text), lastName (text), email (text), phoneNumber (text), username (text), and password (text). The tableName field was earlier named USER_RECORDS.
3. Let's now go to the adb shell and check the database. We can access the SQLite files using the SQLite browser, which we used in the previous chapter, or we could use the command-line utility called sqlite3. For this entire chapter, we will be using the command-line utility called sqlite3, which is present in most Android devices. In case it is not present in your Android device, you could install it using the BusyBox application available in the Play Store.
4. So, let's go ahead and analyze the databases. The first thing we need to do is use the adb shell to get into the device.
5. The next step would be to go to the /data/data/[package-name] directory's location and look for the databases folder. Once we go inside the databases folder, we will notice various files. Now, SQLite databases are mostly in the.db file format as mentioned earlier, but they could also have .sqlite, .sqlitedb, or any other extension specified by the developer while creating the application. If you remember the exercise in the previous chapter, this would be the right time to look for other extensions such as .sqlite as well while looking for the database files.
6. Now, we could open up the database with sqlite3 using the following command:
7. sqlite3 [databasename]
In this case, since the database name is vulnerable-db, we could simply type in sqlite3 vulnerable-db to open it. We could also open multiple databases using sqlite3 at a given time. To have a look at the current databases that are loaded, we could issue a .databases command to list the current databases for us, as shown in the following screenshot:

7. Now, the first thing that we would like to do when we open a database is to see the tables contained within the database. The list of tables can be shown by .tables, as shown in the following screenshot:

As we can see here, there are two tables with the names USER_RECORDS and android_metadata. Since we are more interested in USER_RECORDS, we will first go ahead and see the various columns within the table, and later on, we will dump the data in the column fields. In order to view more information about the table, such as the column fields, we could use the .schema command, as shown in the following screenshot:
![]()
8. The next thing that we need to do here is to view the data within the column fields by issuing a SELECT query.
Note
Another important thing to note here is that most of the queries used in SQL will remain valid for SQLite as well.
9. Use the application and fill the database with some information. Next, in order to query the USER_RECORDS table and view all the contents, which could be specified by a wildcard *, we could use the following command:
SELECT * from USER_RECORDS;
Running the preceding command will result in an output similar to the one shown as follows:

Now, sqlite3 also gives us the freedom to change the output format and see additional information along with the desired one. So, let's go ahead and set the viewing mode to column, and headers to on.
10.Let's run the same query again and check the output, as shown in the following screenshot:

There are also additional options available for us that could be useful during a penetration test. One of them is the .output command. This will automatically save the output of the upcoming SQL queries to a specified file, which we could pull later on, instead of displaying it on the screen. Once we are done with saving the output in the file and would like to come back to the screen display mode, we could use the .output command and set it to stdout, which will again bring back the display of the output on the terminal itself.
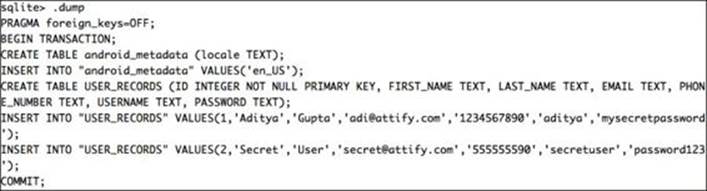
In SQLite, .dump will create a list of all the SQL operations performed so far, right from its creation to the present day, on the database. The following is a screenshot of the output of the command being run on the current database:
Also, all these operations could be performed from the terminal as well instead of getting into the shell and then launching the sqlite3 binary. We could directly pass our commands with the adb shell itself and get the output, as shown in the following screenshot:

Security vulnerability
One of the most common vulnerabilities in both web applications and mobile applications are the injection-based vulnerabilities. SQLite also suffers from an injection vulnerability if the input given by the user is used as it is or with little but insufficient protection in a dynamic SQL query.
Let's have a look at the SQL query used to query the data in the application, as shown here:
String getSQL = "SELECT * FROM " + tableName + " WHERE " +
username + " = '" + uname + "' AND " + password + " = '" + pword +
"'";
Cursor cursor = dataBase.rawQuery(getSQL , null);
In the preceding SQL query, the uname and pword fields are being passed from the user input directly into the SQL query, which is then executed using the rawQuery method. The rawQuery method will, in fact, simply execute whatever SQL query is passed to it. Another method that is similar torawQuery is the execSQL method, which is as vulnerable as rawQuery.
The preceding SQL query is used to verify the user's login credentials and then display the information that they used during registration. So, here the SQL engine checks if the username and password match in a row, and if that is the case, it returns a Boolean TRUE.
However, imagine a scenario where we could modify our input so that instead of a normal text input, it appears to be a part of the SQL query to the application, which in turn returns TRUE, thus granting us authentication. It turns out that if we put the username/password as 1'or'1'='1 or any similar query that is TRUE always, we have defeated the authentication mechanism of the application, which in turn is a big security risk. Also, note that the OR used in the preceding input will be treated as the OR in a SQL query due to the use of single quotes. This will close the username field, and the rest of our input will appear as a SQL query. You could download the vulnerable application from http://attify.com/lpfa/sqlite.apk. Here is the SQL query in case of an attack:
SELECT * FROM USER_RECORDS WHERE USERNAME = '1'or'1'='1' AND
PASSWORD = 'something'
If the application detects a successful login, it shows a pop-up box with the user information as it does in the case of a SQLite authentication bypass attack, as shown in the following screenshot:

We could also append double hyphens (--) at the end of our input to make the rest of the SQL query appear as just a comment to the application.
Let's also have a look at another application and this time, exploit the SQLite injection vulnerability using drozer, a tool that we have used earlier as well.
In this application, which is a to-do application, users could save their notes; the note is stored in a database named todotable.db and is accessed in the application via a content provider. Follow these steps:
1. Let's go ahead and start drozer, and look at the database of this application, as shown in the following command. The package name is com.attify.vulnsqliteapp.
2. adb forward tcp:31415 tcp:31415
3. drozer console connect
2. Once we are in the Drozer console, we could then run the finduri scanner module to see all the content URIs and the ones that are accessible, as shown here:
3. dz> run scanner.provider.finduris -a com.attify.vulnsqliteapp
4. Scanning com.attify.vulnsqliteapp...
5.
6. Unable to Query
7. content://com.attify.vulnsqliteapp.contentprovider/
8.
9. Able to Query
10.content://com.attify.vulnsqliteapp.contentprovider/todos
11.
12.Able to Query
13.content://com.attify.vulnsqliteapp.contentprovider/todos/
14.
15.Unable to Query
16.content://com.attify.vulnsqliteapp.contentprovider
17.
18.Accessible content URIs:
19. content://com.attify.vulnsqliteapp.contentprovider/todos
20. content://com.attify.vulnsqliteapp.contentprovider/todos/
3. Next, we will check for the injection-based vulnerabilities in our application using the injection scanner module in Drozer, as shown here:
4. dz> run scanner.provider.injection -a com.attify.vulnsqliteapp
5. Scanning com.attify.vulnsqliteapp...
6. Not Vulnerable:
7. content://com.attify.vulnsqliteapp.contentprovider/
8. content://com.attify.vulnsqliteapp.contentprovider
9.
10.Injection in Projection:
11. No vulnerabilities found.
12.
13.Injection in Selection:
14. content://com.attify.vulnsqliteapp.contentprovider/todos
15. content://com.attify.vulnsqliteapp.contentprovider/todos/
4. So, now we could query these content providers along with a selection argument, such as 1=1, which will return TRUE in all cases, as shown in the following screenshot:

5. Also, we could go ahead and insert our own data into the SQLite database using the Drozer module, app.provider.insert, and by specifying the parameter and the type of data we want to update. Let's assume that we want to add another to-do entry in the database. So, we will have four fields: id, category, summary, and description with the data types integer, string, string, and string, respectively.
6. Thus, the complete syntax will become:
7. run app.provider.insert
8. content://com.attify.vulnsqliteapp.contentprovider/todos/ -
9. -integer _id 2 --string category urgent --string summary
10."Financial Summary" --string description "Submit Annual
11.Report"
Upon successful execution, it will display a Done message, as shown in the following screenshot:

Summary
In this chapter, we understood SQLite databases in depth and even went ahead and found vulnerabilities in an application and exploited them using Drozer. SQLite databases should be one of the major points of concern for penetration testers as they contain a plethora of information about the application. In the upcoming chapters, we will learn more about some lesser-known Android exploitation techniques.
All materials on the site are licensed Creative Commons Attribution-Sharealike 3.0 Unported CC BY-SA 3.0 & GNU Free Documentation License (GFDL)
If you are the copyright holder of any material contained on our site and intend to remove it, please contact our site administrator for approval.
© 2016-2026 All site design rights belong to S.Y.A.