Hacking Secret Ciphers with Python (2013)
Chapter 8: ENCRYPTING WITH THE TRANSPOSITION CIPHER
Topics Covered In This Chapter:
· Creating functions with def statements.
· main() functions
· Parameters
· The global and local scope, and global and local variables
· The global statement
· The list data type, and how lists and strings are similar
· The list() function
· Lists of lists
· Augmented assignment operators (+=, -=, *=, /=)
· The join() string method
· Return values and the return statement
· The special __name__ variable
The Caesar cipher isn’t secure. It doesn’t take much for a computer to brute-force through all twenty-six possible keys. The transposition cipher has many more possible keys to make a brute-force attack more difficult.
Encrypting with the Transposition Cipher
Instead of replacing characters with other characters, the transposition cipher jumbles up the message’s symbols into an order that makes the original message unreadable. Before we start writing code, let’s encrypt the message “Common sense is not so common.” with pencil and paper. Including the spaces and punctuation, this message has 30 characters. We will use the number 8 for the key.
The first step is to draw out a number of boxes equal to the key. We will draw 8 boxes since our key for this example is 8:
The second step is to start writing the message you want to encrypt into the boxes, with one character for each box. Remember that spaces are a character (this book marks the boxes with (s) to indicate a space so it doesn’t look like an empty box).
|
C |
o |
m |
m |
o |
n |
(s) |
s |
We only have 8 boxes but there are 30 characters in the message. When you run out of boxes, draw another row of 8 boxes under the first row. Keep creating new rows until you have written out the full message:
|
1 st |
2 nd |
3 rd |
4 th |
5 th |
6 th |
7 th |
8 th |
|
C |
o |
m |
m |
o |
n |
(s) |
s |
|
e |
n |
s |
e |
(s) |
i |
s |
(s) |
|
n |
o |
t |
(s) |
s |
o |
(s) |
c |
|
o |
m |
m |
o |
n |
. |
We shade in the two boxes in the last row to remind us to ignore them. The ciphertext is the letters read from the top left box going down the column. “C”, “e”, “n”, and “o” are from the 1st column. When you get to the last row of a column, move to the top row of the next column to the right. The next characters are “o”, “n”, “o”, “m”. Ignore the shaded boxes.
The ciphertext is “Cenoonommstmme oo snnio. s s c”, which is sufficiently scrambled to keep someone from figuring out the original message by looking at it.
The steps for encrypting are:
1. Count the number of characters in the message and the key.
2. Draw a number of boxes equal to the key in a single row. (For example, 12 boxes for a key of 12.)
3. Start filling in the boxes from left to right, with one character per box.
4. When you run out of boxes and still have characters left, add another row of boxes.
5. Shade in the unused boxes in the last row.
6. Starting from the top left and going down, write out the characters. When you get to the bottom of the column, move to the next column to the right. Skip any shaded boxes. This will be the ciphertext.
Practice Exercises, Chapter 8, Set A
Practice exercises can be found at http://invpy.com/hackingpractice8A.
A Transposition Cipher Encryption Program
Encrypting with paper and pencil involves a lot of work and it’s easy to make mistakes. Let’s look at a program that can implement transposition cipher encryption (a decryption program will be demonstrated later in this chapter).
Using the computer program has a slight problem, however. If the ciphertext has space characters at the end, then it is impossible to see them since a space is just empty… well, space. To fix this, the program adds a | character at the end of the ciphertext. (The | character is called the “pipe” character and is above the Enter key on your keyboard.) For example:
Hello| # There are no spaces at the end of the message.
Hello | # There is one space at the end of the message.
Hello | # There are two spaces at the end of the message.
Source Code of the Transposition Cipher Encryption Program
Open a new file editor window by clicking on File ► New Window. Type in the following code into the file editor, and then save it as transpositionEncrypt.py. Press F5 to run the program. Note that first you will need to download the pyperclip.py module and place this file in the same directory as the transpositionEncrypt.py file. You can download this file from http://invpy.com/pyperclip.py.
Source code for transpositionEncrypt.py
1. # Transposition Cipher Encryption
2. # http://inventwithpython.com/hacking (BSD Licensed)
3.
4. import pyperclip
5.
6. def main():
7. myMessage = 'Common sense is not so common.'
8. myKey = 8
9.
10. ciphertext = encryptMessage(myKey, myMessage)
11.
12. # Print the encrypted string in ciphertext to the screen, with
13. # a | (called "pipe" character) after it in case there are spaces at
14. # the end of the encrypted message.
15. print(ciphertext + '|')
16.
17. # Copy the encrypted string in ciphertext to the clipboard.
18. pyperclip.copy(ciphertext)
19.
20.
21. def encryptMessage(key, message):
22. # Each string in ciphertext represents a column in the grid.
23. ciphertext = [''] * key
24.
25. # Loop through each column in ciphertext.
26. for col in range(key):
27. pointer = col
28.
29. # Keep looping until pointer goes past the length of the message.
30. while pointer < len(message):
31. # Place the character at pointer in message at the end of the
32. # current column in the ciphertext list.
33. ciphertext[col] += message[pointer]
34.
35. # move pointer over
36. pointer += key
37.
38. # Convert the ciphertext list into a single string value and return it.
39. return ''.join(ciphertext)
40.
41.
42. # If transpositionEncrypt.py is run (instead of imported as a module) call
43. # the main() function.
44. if __name__ == '__main__':
45. main()
Sample Run of the Transposition Cipher Encryption Program
When you run the above program, it produces this output:
Cenoonommstmme oo snnio. s s c|
This ciphertext (without the pipe character at the end) is also copied to the clipboard, so you can paste it into an email to someone. If you want to encrypt a different message or use a different key, change the value assigned to the myMessage and myKey variables on lines 7 and 8. Then run the program again.
How the Program Works
transpositionEncrypt.py
1. # Transposition Cipher Encryption
2. # http://inventwithpython.com/hacking (BSD Licensed)
3.
4. import pyperclip
The transposition cipher program, like the Caesar cipher program, will copy the encrypted text to the clipboard. So first we will import the pyperclip module so it can call pyperclip.copy().
Creating Your Own Functions with def Statements
transpositionEncrypt.py
6. def main():
7. myMessage = 'Common sense is not so common.'
8. myKey = 8
A function (like print()) is a sort of mini-program in your program. When the function is called, the execution moves to the code inside that function and then returns to the line after the function call. You can create your own functions with a def statement like the one on line 6.
The def statement on line 6 isn't a call to a function named main(). Instead, the def statement means we are creating, or defining, a new function named main() that we can call later in our program. When the execution reaches the def statement Python will define this function. We can then call it the same way we call other functions. When we call this function, the execution moves inside of the block of code following the def statement.
Open a new file editor window and type the following code into it:
Source code for helloFunction.py
1. def hello():
2. print('Hello!')
3. total = 42 + 1
4. print('42 plus 1 is %s' % (total))
5. print('Start!')
6. hello()
7. print('Call it again.')
8. hello()
9. print('Done.')
Save this program with the name helloFunction.py and run it by pressing F5. The output looks like this:
Start!
Hello!
42 plus 1 is 43
Call it again.
Hello!
42 plus 1 is 43
Done.
When the helloFunction.py program runs, the execution starts at the top. The first line is a def statement that defines the hello() function. The execution skips the block after the def statement and executes the print('Start!') line. This is why 'Start!' is the first string printed when we run the program.
The next line after print('Start!') is a function call to our hello() function. The program execution jumps to the first line in the hello() function’s block on line 2. This function will cause the strings 'Hello!' and '42 plus 1 is 43' to be printed to the screen.
When the program execution reaches the bottom of the def statement, the execution will jump back to the line after the line that originally called the function (line 7). In helloFunction.py, this is the print('Call it again.') line. Line 8 is another call to the hello() function. The program execution will jump back into the hello() function and execute the code there again. This is why 'Hello!' and '42 plus 1 is 43' are displayed on the screen two times.
After that function returns to line 9, the print('Done.') line executes. This is the last line in our program, so the program exits.
The Program’s main() Function
transpositionEncrypt.py
6. def main():
7. myMessage = 'Common sense is not so common.'
8. myKey = 8
The rest of the programs in this book have a function named main() which is called at the start of program. The reason is explained at the end of this chapter, but for now just know that the main() function in the programs in this book are always called soon after the programs are run.
On lines 7 and 8, the variables myMessage and myKey will store the plaintext message to encrypt and the key used to do the encryption.
transpositionEncrypt.py
10. ciphertext = encryptMessage(myKey, myMessage)
The code that does the actual encrypting will be put into a function we define on line 21 named encryptMessage(). This function will take two arguments: an integer value for the key and a string value for the message to encrypt. When passing multiple arguments to a function call, separate the arguments with a comma.
The return value of encryptMessage() will be a string value of the encrypted ciphertext. (The code in this function is explained next.) This string will be stored in a variable named ciphertext.
transpositionEncrypt.py
12. # Print the encrypted string in ciphertext to the screen, with
13. # a | (called "pipe" character) after it in case there are spaces at
14. # the end of the encrypted message.
15. print(ciphertext + '|')
16.
17. # Copy the encrypted string in ciphertext to the clipboard.
18. pyperclip.copy(ciphertext)
The ciphertext message is printed to the screen on line 15 and copied to the clipboard on line 18. The program prints a | character (called the “pipe” character) at the end of the message so that the user can see any empty space characters at the end of the ciphertext.
Line 18 is the last line of the main() function. After it executes, the program execution will return to the line after the line that called it. The call to main() is on line 45 and is the last line in the program, so after execution returns from main() the program will exit.
Parameters
transpositionEncrypt.py
21. def encryptMessage(key, message):
The code in the encryptMessage() function does the actual encryption. The key and message text in between the parentheses next to encryptMessage()’s def statement shows that the encryptMessage() function takes two parameters.
Parameters are the variables that contain the arguments passed when a function is called. Parameters are automatically deleted when the function returns. (This is just like how variables are forgotten when a program exits.)
When the encryptMessage() function gets called from line 10, two argument values are passed (on line 10, they are the values in myKey and myMessage). These values get assigned to the parameters key and message (which you can see on line 21) when the execution moves to the top of the function.
A parameter is a variable name in between the parentheses in the def statement. An argument is a value that is passed in between the parentheses for a function call.
Python will raise an error message if you try to call a function with too many or too few arguments for the number of parameters the function has. Try typing the following into the interactive shell:
>>> len('hello', 'world')
Traceback (most recent call last):
File "<stdin>", line 1, in <module>
TypeError: len() takes exactly one argument (2 given)
>>> len()
Traceback (most recent call last):
File "<stdin>", line 1, in <module>
TypeError: len() takes exactly one argument (0 given)
>>>
Changes to Parameters Only Exist Inside the Function
Look at the following program, which defines and then calls a function named func():
def func(param):
param = 42
spam = 'Hello'
func(spam)
print(spam)
When you run this program, the print() call on the last line will print out 'Hello', not 42. When func() is called with spam as the argument, the spam variable is not being sent into the func() function and having 42 assigned to it. Instead, the value inside spam is being copied and assigned toparam. Any changes made to param inside the function will not change the value in the spam variable.
(There is an exception to this rule when you are passing something called a list or dictionary value, but this will be explained in chapter 10 in the “List References” section.)
This is an important idea to understand. The argument value that is “passed” in a function call is copied to the parameter. So if the parameter is changed, the variable that provided the argument value is not changed.
Variables in the Global and Local Scope
You might wonder why we even have the key and message parameters to begin with, since we already have the variables myKey and myMessage from the main() function. The reason is because myKey and myMessage are in the main() function’s local scope and can’t be used outside of the main()function.
Every time a function is called, a local scope is created. Variables created during a function call exist in this local scope. Parameters always exist in a local scope. When the function returns, the local scope is destroyed and the local variables are forgotten. A variable in the local scope is still a separate variable from a global scope variable even if the two variables have the same name.
Variables created outside of every function exist in the global scope. When the program exits, the global scope is destroyed and all the variables in the program are forgotten. (All the variables in the reverse cipher and Caesar cipher programs were global.)
The global Statement
If you want a variable that is assigned inside a function to be a global variable instead of a local variable, put a global statement with the variable’s name as the first line after the def statement.
Here are the rules for whether a variable is a global variable (that is, a variable that exists in the global scope) or local variable (that is, a variable that exists in a function call’s local scope):
1. Variables outside of all functions are always global variables.
2. If a variable in a function is never used in an assignment statement, it is a global variable.
3. If a variable in a function is not used in a global statement and but is used in an assignment statement, it is a local variable.
4. If a variable in a function is used in a global statement, it is a global variable when used in that function.
For example, type in the following short program, save it as scope.py, and press F5 to run it:
Source code for scope.py
1. spam = 42
2.
3. def eggs():
4. spam = 99 # spam in this function is local
5. print('In eggs():', spam)
6.
7. def ham():
8. print('In ham():', spam) # spam in this function is global
9.
10. def bacon():
11. global spam # spam in this function is global
12. print('In bacon():', spam)
13. spam = 0
14.
15. def CRASH():
16. print(spam) # spam in this function is local
17. spam = 0
18.
19. print(spam)
20. eggs()
21. print(spam)
22. ham()
23. print(spam)
24. bacon()
25. print(spam)
26. CRASH()
The program will crash when Python executes line 16, and the output will look like this:
42
In eggs(): 99
42
In ham(): 42
42
In bacon(): 42
0
Traceback (most recent call last):
File "C:\scope.py", line 27, in <module>
CRASH()
File "C:\scope.py", line 16, in CRASH
print(spam)
UnboundLocalError: local variable 'spam' referenced before assignment
When the spam variable is used on lines 1, 19, 21, 23, 25 it is outside of all functions, so this is the global variable named spam. In the eggs() function, the spam variable is assigned the integer 99 on line 4, so Python regards this spam variable as a local variable named spam. Python considers this local variable to be completely different from the global variable that is also named spam. Being assigned 99 on line 4 has no effect on the value stored in the global spam variable since they are different variables (they just happen to have the same name).
The spam variable in the ham() function on line 8 is never used in an assignment statement in that function, so it is the global variable spam.
The spam variable in the bacon() function is used in a global statement, so we know it is the global variable named spam. The spam = 0 assignment statement on line 13 will change the value of the global spam variable.
The spam variable in the CRASH() function is used in an assignment statement (and not in a global statement) so the spam variable in that function is a local variable. However, notice that it is used in the print() function call on line 16 before it is assigned a value on line 17. This is why calling the CRASH() function causes our program to crash with the error, UnboundLocalError: local variable 'spam' referenced before assignment.
It can be confusing to have global and local variables with the same name, so even if you remember the rules for how to tell global and local variables apart, you would be better off using different names.
Practice Exercises, Chapter 8, Set B
Practice exercises can be found at http://invpy.com/hackingpractice8B.
The List Data Type
transpositionEncrypt.py
22. # Each string in ciphertext represents a column in the grid.
23. ciphertext = [''] * key
Line 23 uses a new data type called the list data type. A list value can contain other values. Just like how strings begin and end with quotes, a list value begins with a [ open bracket and ends with ] close bracket. The values stored inside the list are typed within the brackets. If there is more than one value in the list, the values are separated by commas.
Type the following into the interactive shell:
>>> animals = ['aardvark', 'anteater', 'antelope', 'albert']
>>> animals
['aardvark', 'anteater', 'antelope', 'albert']
>>>
The animals variable stores a list value, and in this list value are four string values. The individual values inside of a list are also called items. Lists are very good when we have to store lots and lots of values, but we don't want variables for each one. Otherwise we would have something like this:
>>> animals1 = 'aardvark'
>>> animals2 = 'anteater'
>>> animals3 = 'antelope'
>>> animals4 = 'albert'
>>>
This makes working with all the strings as a group very hard, especially if you have hundreds, thousands, or millions of different values that you want stored in a list.
Many of the things you can do with strings will also work with lists. For example, indexing and slicing work on list values the same way they work on string values. Instead of individual characters in a string, the index refers to an item in a list. Try typing the following into the interactive shell:
>>> animals = ['aardvark', 'anteater', 'antelope', 'albert']
>>> animals[0]
'aardvark'
>>> animals[1]
'anteater'
>>> animals[2]
'antelope'
>>> animals[3]
'albert'
>>> animals[1:3]
['anteater', 'antelope']
>>>
Remember, the first index is 0 and not 1. While using slices with a string value will give you a string value of part of the original string, using slices with a list value will give you a list value of part of the original list.
A for loop can also iterate over the values in a list, just like it iterates over the characters in a string. The value that is stored in the for loop’s variable is a single value from the list. Try typing the following into the interactive shell:
>>> for spam in ['aardvark', 'anteater', 'antelope', 'albert']:
... print('For dinner we are cooking ' + spam)
...
For dinner we are cooking aardvark
For dinner we are cooking anteater
For dinner we are cooking antelope
For dinner we are cooking albert
>>>
Using the list() Function to Convert Range Objects to Lists
If you need a list value that has increasing integer amounts, you could have code like this to build up a list value using a for loop:
>>> myList = []
>>> for i in range(10):
... myList = myList + [i]
...
>>> myList
[0, 1, 2, 3, 4, 5, 6, 7, 8, 9]
>>>
However, it is simpler to directly make a list from a range object that the range() function returned by using the list() function:
>>> myList = list(range(10))
>>> myList
[0, 1, 2, 3, 4, 5, 6, 7, 8, 9]
>>>
The list() function can also convert strings into a list value. The list will have several single-character strings that were in the original string:
>>> myList = list('Hello world!')
>>> myList
['H', 'e', 'l', 'l', 'o', ' ', 'w', 'o', 'r', 'l', 'd', '!']
>>>
We won’t be using the list() function on strings or range objects in this program, but it will come up in later in this book.
Reassigning the Items in Lists
The items inside a list can also be modified. Use the index with a normal assignment statement. Try typing the following into the interactive shell:
>>> animals = ['aardvark', 'anteater', 'antelope', 'albert']
>>> animals
['aardvark', 'anteater', 'antelope', 'albert']
>>> animals[2] = 9999
>>> animals
['aardvark', 'anteater', 9999, 'albert']
>>>
Reassigning Characters in Strings
While you can reassign items in a list, you cannot reassign a character in a string value. Try typing the following code into the interactive shell to cause this error:
>>> 'Hello world!'[6] = 'x'
Traceback (most recent call last):
File "<stdin>", line 1, in <module>
TypeError: 'str' object does not support item assignment
>>>
To change a character in a string, use slicing instead. Try typing the following into the interactive shell:
>>> spam = 'Hello world!'
>>> spam = spam[:6] + 'x' + spam[7:]
>>> spam
'Hello xorld!'
>>>
Lists of Lists
List values can even contain other list values. Try typing the following into the interactive shell:
>>> spam = [['dog', 'cat'], [1, 2, 3]]
>>> spam[0]
['dog', 'cat']
>>> spam[0][0]
'dog'
>>> spam[0][1]
'cat'
>>> spam[1][0]
1
>>> spam[1][1]
2
>>>
The double index brackets used for spam[0][0] work because spam[0] evaluates to ['dog', 'cat'] and ['dog', 'cat'][0] evaluates to 'dog'. You could even use another set of index brackets, since string values also use them:
>>> spam = [['dog', 'cat'], [1, 2, 3]]
>>> spam[0][1][1]
'a'
>>>
Say we had a list of lists stored in a variable named x. Here are the indexes for each of the items in x. Notice that x[0], x[1], x[2], and x[3] refer to list values:
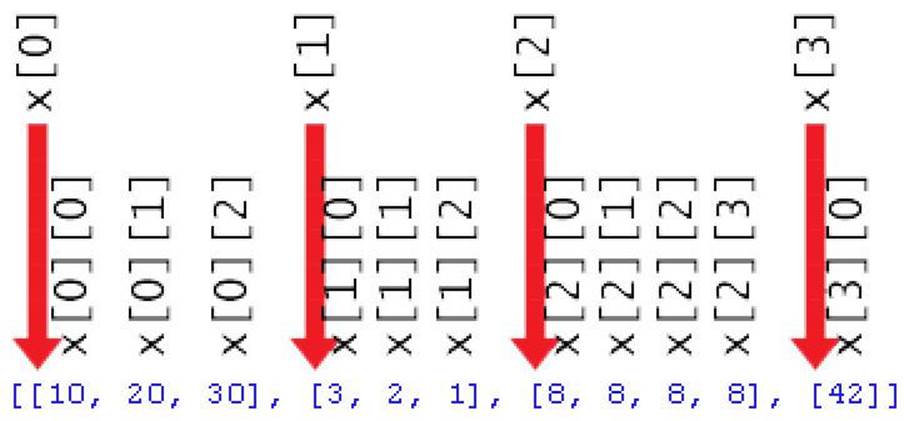
Figure 8-1. A list of lists with every item’s index labeled.
Practice Exercises, Chapter 8, Set C
Practice exercises can be found at http://invpy.com/hackingpractice8C.
Using len() and the in Operator with Lists
We’ve used the len() function to tell us how many characters are in a string (that is, the length of the string). The len() function also works on list values and returns an integer of how many items are in the list.
Try typing the following into the interactive shell:
>>> animals = ['aardvark', 'anteater', 'antelope', 'albert']
>>> len(animals)
4
>>>
We’ve used the in operator to tell us if a string exists inside another string value. The in operator also works for checking if a value exists in a list. Try typing the following into the interactive shell:
>>> animals = ['aardvark', 'anteater', 'antelope', 'albert']
>>> 'anteater' in animals
True
>>> 'anteater' not in animals
False
>>> 'anteat' in animals
False
>>> 'delicious spam' in animals
False
>>>
Just like how a set of quotes next to each other represents the blank string value, a set of brackets next to each other represents a blank list. Try typing the following into the interactive shell:
>>> animals = []
>>> len(animals)
0
>>>
List Concatenation and Replication with the + and * Operators
Just like how the + and * operators can concatenate and replicate strings, the same operators can concatenate and replicate lists. Try typing the following into the interactive shell:
>>> ['hello'] + ['world']
['hello', 'world']
>>> ['hello'] * 5
['hello', 'hello', 'hello', 'hello', 'hello']
>>>
That’s enough about the similarities between strings and lists. Just remember that most things you can do with string values will also work with list values.
Practice Exercises, Chapter 8, Set D
Practice exercises can be found at http://invpy.com/hackingpractice8D.
The Transposition Encryption Algorithm
We need to translate these paper-and-pencil steps into Python code. Let’s take a look at encrypting the string 'Common sense is not so common.' with the key 8. If we wrote out the boxes with pencil and paper, it would look like this:
|
C |
o |
m |
m |
o |
n |
(s) |
s |
|
e |
n |
s |
e |
(s) |
i |
s |
(s) |
|
n |
o |
t |
(s) |
s |
o |
(s) |
c |
|
o |
m |
m |
o |
n |
. |
Add the index of each letter in the string to the boxes. (Remember, indexes begin with 0, not 1.)
|
C 0 |
o 1 |
m 2 |
m 3 |
o 4 |
n 5 |
(s) 6 |
s 7 |
|
e 8 |
n 9 |
s 10 |
e 11 |
(s) 12 |
i 13 |
s 14 |
(s) 15 |
|
n 16 |
o 17 |
t 18 |
(s) 19 |
s 20 |
o 21 |
(s) 22 |
c 23 |
|
o 24 |
m 25 |
m 26 |
o 27 |
n 28 |
. 29 |
We can see from these boxes that the first column has the characters at indexes 0, 8, 16, and 24 (which are 'C', 'e', 'n', and 'o'). The next column has the characters at indexes 1, 9, 17, and 25 (which are 'o', 'n', 'o' and 'm'). We can see a pattern emerging: The nth column will have all the characters in the string at indexes 0 + n, 8 + n, 16 + n, and 24 + n:
|
C 0+0=0 |
o 1+0=1 |
m 2+0=2 |
m 3+0=3 |
o 4+0=4 |
n 5+0=5 |
(s) 6+0=6 |
s 7+0=7 |
|
e 0+8=8 |
n 1+8=9 |
s 2+8=10 |
e 3+8=11 |
(s) 4+8=12 |
i 5+8=13 |
s 6+8=14 |
(s) 7+8=15 |
|
n 0+16=16 |
o 1+16=17 |
t 2+16=18 |
(s) 3+16=19 |
s 4+16=20 |
o 5+16=21 |
(s) 6+16=22 |
c 7+16=23 |
|
o 0+24=24 |
m 1+24=25 |
m 2+24=26 |
o 3+24=27 |
n 4+24=28 |
. 5+24=29 |
There is an exception for the 6th and 7th columns, since 24 + 6 and 24 + 7 are greater than 29, which is the largest index in our string. In those cases, we only use 0, 8, and 16 to add to n (and skip 24).
What’s so special about the numbers 0, 8, 16, and 24? These are the numbers we get when, starting from 0, we add the key (which in this example is 8). 0 + 8 is 8, 8 + 8 is 16, 16 + 8 is 24. 24 + 8 would be 32, but since 32 is larger than the length of the message, we stop at 24.
So, for the nth column’s string we start at index n, and then keep adding 8 (which is the key) to get the next index. We keep adding 8 as long as the index is less than 30 (the message length), at which point we move to the next column.
If we imagine a list of 8 strings where each string is made up of the characters in each column, then the list value would look like this:
['Ceno', 'onom', 'mstm', 'me o', 'o sn', 'nio.', ' s ', 's c']
This is how we can simulate the boxes in Python code. First, we will make a list of blank strings. This list will have a number of blank strings equal to the key because each string will represent a column of our paper-and-pencil boxes. (Our list will have 8 blank strings since we are using the key 8 in our example.) Let’s look at the code.
transpositionEncrypt.py
22. # Each string in ciphertext represents a column in the grid.
23. ciphertext = [''] * key
The ciphertext variable will be a list of string values. Each string in the ciphertext variable will represent a column of the grid. So ciphertext[0] is the leftmost column, ciphertext[1] is the column to the right of that, and so on.
The string values will have all the characters that go into one column of the grid. Let’s look again at the grid from the “Common sense is not so common.” example earlier in this chapter (with column numbers added to the top):
|
0 |
1 |
2 |
3 |
4 |
5 |
6 |
7 |
|
C |
o |
m |
m |
o |
n |
(s) |
s |
|
e |
n |
s |
e |
(s) |
i |
s |
(s) |
|
n |
o |
t |
(s) |
s |
o |
(s) |
c |
|
o |
m |
m |
o |
n |
. |
The ciphertext variable for this grid would look like this:
>>> ciphertext = ['Ceno', 'onom', 'mstm', 'me o', 'o sn', 'nio.', ' s ', 's c']
>>> ciphertext[0]
'Ceno'
The first step to making this list is to create as many blank strings in the ciphertext list as there are columns. Since the number of columns is equal to the key, we can use list replication to multiply a list with one blank string value in it by the value in key. This is how line 23 evaluates to a list with the correct number of blank strings.
transpositionEncrypt.py
25. # Loop through each column in ciphertext.
26. for col in range(key):
27. pointer = col
The next step is to add text to each string in ciphertext. The for loop on line 26 will iterate once for each column, and the col variable will have the correct integer value to use for the index to ciphertext. The col variable will be set to 0 for the first iteration through the for loop, then 1 on the second iteration, then 2 and so on. This way the expression ciphertext[col] will be the string for the colth column of the grid.
Meanwhile, the pointer variable will be used as the index for the string value in the message variable. On each iteration through the loop, pointer will start at the same value as col (which is what line 27 does.)
Augmented Assignment Operators
Often when you are assigning a new value to a variable, you want it to be based off of the variable’s current value. To do this you use the variable as the part of the expression that is evaluated and assigned to the variable, like this example in the interactive shell:
>>> spam = 40
>>> spam = spam + 2
>>> print(spam)
42
>>>
But you can instead use the += augmented assignment operator as a shortcut. Try typing the following into the interactive shell:
>>> spam = 40
>>> spam += 2
>>> print(spam)
42
>>> spam = 'Hello'
>>> spam += ' world!'
>>> print(spam)
Hello world!
>>> spam = ['dog']
>>> spam += ['cat']
>>> print(spam)
['dog', 'cat']
>>>
The statement spam += 2 does the exact same thing as spam = spam + 2. It’s just a little shorter to type. The += operator works with integers to do addition, strings to do string concatenation, and lists to do list concatenation. Table 8-1 shows the augmented assignment operators and what they are equivalent to:
Table 8-1. Augmented Assignment Operators
|
Augmented Assignment |
Equivalent Normal Assignment |
|
spam += 42 |
spam = spam + 42 |
|
spam -= 42 |
spam = spam - 42 |
|
spam *= 42 |
spam = spam * 42 |
|
spam /= 42 |
spam = spam / 42 |
Back to the Code
transpositionEncrypt.py
29. # Keep looping until pointer goes past the length of the message.
30. while pointer < len(message):
31. # Place the character at pointer in message at the end of the
32. # current column in the ciphertext list.
33. ciphertext[col] += message[pointer]
34.
35. # move pointer over
36. pointer += key
Inside the for loop that started on line 26 is a while loop that starts on line 30. For each column, we want to loop through the original message variable and pick out every keyth character. (In the example we’ve been using, we want every 8th character since we are using a key of 8.) On line 27 for the first iteration of the for loop, pointer was set to 0.
While the value in pointer is less than the length of the message string, we want to add the character at message[pointer] to the end of the colth string in ciphertext. We add 8 (that is, the value in key) to pointer each time through the loop on line 36. The first time it is message[0], the second time message[8], the third time message[16], and the fourth time message[24]. Each of these single character strings are concatenated to the end of ciphertext[col] (and since col is 0 on the first time through the loop, this is ciphertext[0]).
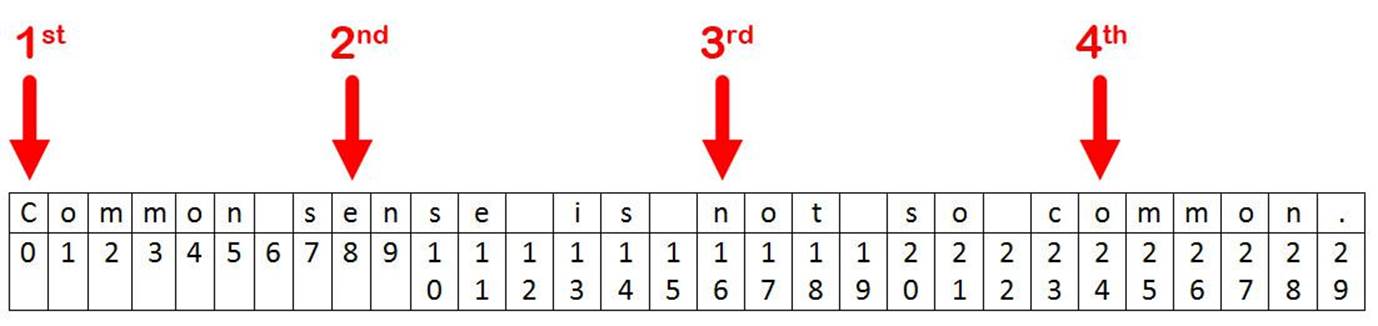
Figure 8-2. Arrows pointing to what message[pointer] refers to during the first iteration of the for loop when col is set to 0.
Figure 8-2 shows the characters at these indexes, they will be concatenated together to form the string 'Ceno'. Remember that we want the value in ciphertext to eventually look like this:
>>> ciphertext = ['Ceno', 'onom', 'mstm', 'me o', 'o sn', 'nio.', ' s ', 's c']
>>> ciphertext[0]
'Ceno'
>>>
Storing 'Ceno' as the first string in the ciphertext list is our first step.
On the next iteration of the for loop, col will be set to 1 (instead of 0) and pointer will start at the same value as col. Now when we add 8 to pointer on each iteration of line 30’s while loop, the indexes will be 1, 9, 17, and 25.
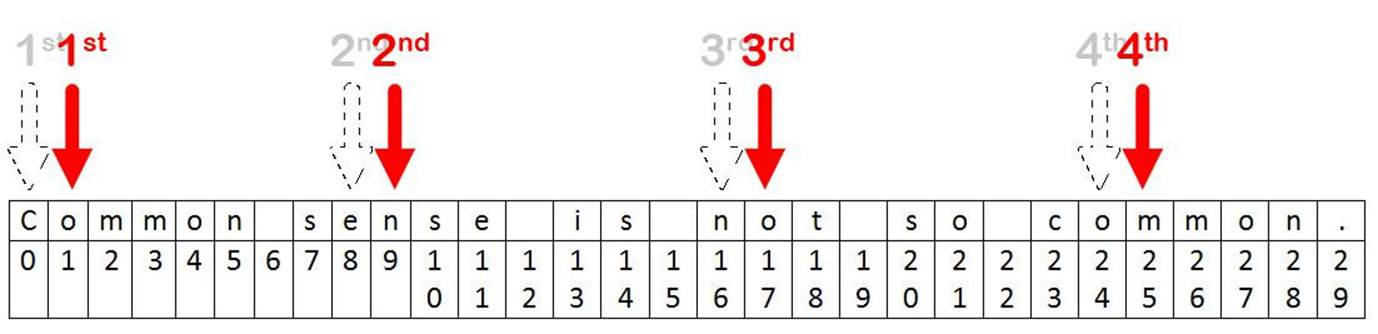
Figure 8-3. Arrows pointing to to what message[pointer] refers to during the second iteration of the for loop when col is set to 1.
As message[1], message[9], message[17], and message[25] are concatenated to the end of ciphertext[1], they form the string 'onom'. This is the second column of our grid.
Once the for loop has finished looping for the rest of the columns, the value in ciphertext will be ['Ceno', 'onom', 'mstm', 'me o', 'o sn', 'nio.', ' s ', 's c']. We will use the join() string method to convert this list of strings into a single string.
The join() String Method
The join() method is used later on line 39. The join() method takes a list of strings and returns a single string. This single string has all of the strings in the list concatenated (that is, joined) together. The string that the join() method gets called on will be placed in between the strings in the list. (Most of the time, we will just use a blank string for this.) Try typing the following into the interactive shell:
>>> eggs = ['dogs', 'cats', 'moose']
>>> ''.join(eggs)
'dogscatsmoose'
>>> ' '.join(eggs)
'dogs cats moose'
>>> 'XYZ'.join(eggs)
'dogsXYZcatsXYZmoose'
>>> ''.join(eggs).upper().join(eggs)
'dogsDOGSCATSMOOSEcatsDOGSCATSMOOSEmoose'
>>>
That last expression, ''.join(eggs).upper().join(eggs), looks a little tricky, but if you go through the evaluation one step at a time, it will look like this:
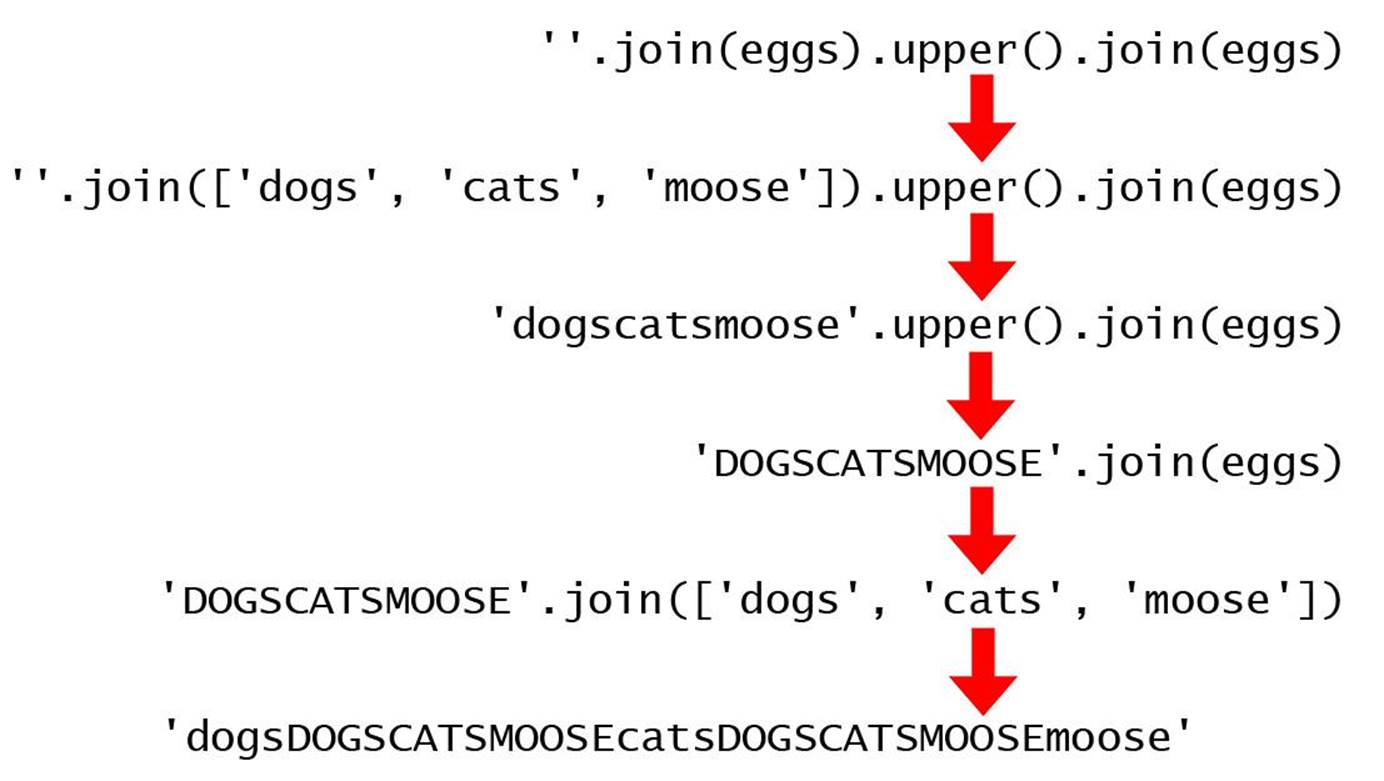
Figure 8-4. The steps of evaluation for ''.join(eggs).upper().join(eggs)
This is why ''.join(eggs).upper().join(eggs) returns the string, 'dogsDOGSCATSMOOSEcatsDOGSCATSMOOSEmoose'.
Whew!
Remember, no matter how complicated an expression looks, you can just evaluate it step by step to get the single value the expression evaluates to.
Return Values and return Statements
transpositionEncrypt.py
38. # Convert the ciphertext list into a single string value and return it.
39. return ''.join(ciphertext)
Our use of the join() method isn’t nearly as complicated as the previous example. We just want to call join() on the blank string and pass ciphertext as the argument so that the strings in the ciphertext list are joined together (with nothing in between them).
Remember that a function (or method) call always evaluates to a value. We say that this is the value returned by the function or method call, or that it is the return value of the function. When we create our own functions with a def statement, we use a return statement to tell what the return value for our function is.
A return statement is the return keyword followed by the value to be returned. We can also use an expression instead of a value. In that case the return value will be whatever value that expression evaluates to. Open a new file editor window and type the following program in and save it asaddNumbers.py, then press F5 to run it:
Source code for addNumbers.py
1. def addNumbers(a, b):
2. return a + b
3.
4. spam = addNumbers(2, 40)
5. print(spam)
When you run this program, the output will be:
42
That’s because the function call addNumbers(2, 40) will evaluate to 42. The return statement in addNumbers() will evaluate the expression a + b and then return the evaluated value. That is why addNumbers(2, 40) evaluates to 42, which is the value stored in spam on line 4 and next printed to the screen on line 5.
Practice Exercises, Chapter 8, Set E
Practice exercises can be found at http://invpy.com/hackingpractice8E.
Back to the Code
transpositionEncrypt.py
38. # Convert the ciphertext list into a single string value and return it.
39. return ''.join(ciphertext)
The encryptMessage() function’s return statement returns a string value that is created by joining all of the strings in the ciphertext list. This final string is the result of our encryption code.
The great thing about functions is that a programmer only has to know what the function does, but not how the function’s code does it. A programmer can understand that if she calls the encryptMessage() function and pass it an integer and a string for the key and message parameters, the function call will evaluate to an encrypted string. She doesn’t need to know anything about how the code in encryptMessage() actually does this.
The Special __name__ Variable
transpositionEncrypt.py
42. # If transpositionEncrypt.py is run (instead of imported as a module) call
43. # the main() function.
44. if __name__ == '__main__':
45. main()
We can turn our transposition encryption program into a module with a special trick involving the main() function and a variable named __name__.
When a Python program is run, there is a special variable with the name __name__ (that’s two underscores before “name” and two underscores after) that is assigned the string value '__main__' (again, two underscores before and after “main”) even before the first line of your program is run.
At the end of our script file (and, more importantly, after all of our def statements), we want to have some code that checks if the __name__ variable has the '__main__' string assigned to it. If so, we want to call the main() function.
This if statement on line 44 ends up actually being one of the first lines of code executed when we press F5 to run our transposition cipher encryption program (after the import statement on line 4 and the def statements on lines 6 and 21).
The reason we set up our code this way is although Python sets __name__ to '__main__' when the program is run, it sets it to the string 'transpositionEncrypt' if our program is imported by a different Python program. This is how our program can know if it is being run as a program or imported by a different program as a module.
Just like how our program imports the pyperclip module to call the functions in it, other programs might want to import transpositionEncrypt.py to call its encryptMessage() function. When an import statement is executed, Python will look for a file for the module by adding “.py” to the end of the name. (This is why import pyperclip will import the pyperclip.py file.)
When a Python program is imported, the __name__ variable is set to the filename part before “.py” and then runs the program. When our transpositionEncrypt.py program is imported, we want all the def statements to be run (to define the encryptMessage() function that the importing program wants to use), but we don’t want it to call the main() function because that will execute the encryption code for 'Common sense is not so common.' with key 8.
That is why we put that part of the code inside a function (which by convention is named main()) and then add code at the end of the program to call main(). If we do this, then our program can both be run as a program on its own and also imported as a module by another program.
Key Size and Message Length
Notice what happens when the message length is less than twice the key size:
|
C |
o |
m |
m |
o |
n |
(s) |
s |
e |
n |
s |
e |
(s) |
i |
s |
(s) |
n |
o |
t |
(s) |
s |
o |
(s) |
c |
o |
|
m |
m |
o |
n |
. |
When using a key of 25, the “Common sense is not so common.” message encrypts to “Cmommomno.n sense is not so co”. Part of the message isn’t encrypted! This happens whenever key size becomes more than twice the message length, because that causes there to only be one character per column and no characters get scrambled for that part of the message.
Because of this, the transposition cipher’s key is limited to half the length of the message it is used to encrypt. The longer a message is, the more possible keys that can be used to encrypt it.
Summary
Whew! There were a lot of new programming concepts introduced in this chapter. The transposition cipher program is much more complicated (but much more secure) than the Caesar cipher program in the last chapter. The new concepts, functions, data types, and operators we’ve learned in this chapter let us manipulate data in much more sophisticated ways. Just remember that much of understanding a line of code is just evaluating it step by step the way Python will.
We can organize our code into groups called functions, which we create with def statements. Argument values can be passed to functions for the function’s parameters. Parameters are local variables. Variables outside of all functions are global variables. Local variables are different from global variables, even if they have the same name as the global variable.
List values can store multiple other values, including other list values. Many of the things you can do with strings (such as indexing, slicing, and the len() function) can be used on lists. And augmented assignment operators provide a nice shortcut to regular assignment operators. The join()method can join a list that contains multiple strings to return a single string.
Feel free to go over this chapter again if you are not comfortable with these programming concepts. In the next chapter, we will cover decrypting with the transposition cipher.
All materials on the site are licensed Creative Commons Attribution-Sharealike 3.0 Unported CC BY-SA 3.0 & GNU Free Documentation License (GFDL)
If you are the copyright holder of any material contained on our site and intend to remove it, please contact our site administrator for approval.
© 2016-2026 All site design rights belong to S.Y.A.