Untangle Network Security (2014)
Chapter 12. Untangle VPN Services
This chapter covers the Untangle solutions used to provide virtual private network (VPN) services. Untangle provides two solutions: OpenVPN and IPsec. OpenVPN is an SSL/TLS-based VPN, which is mainly used for remote access as it is easy to configure and uses clients that can work on multiple operating systems and devices. OpenVPN can also provide site-to-site connections (only between two Untangle servers) with limited features in comparison to IPsec.
IPsec, a paid module from Untangle, Inc., is mainly used for site-to-site connections as it provides great features and performance in comparison to OpenVPN. It can also be used to provide a remote access service by leveraging L2TP/IPsec, which is more complex to set up and configure than the OpenVPN client.
A list of topics that will be covered in this chapter are as follows:
· Understanding VPN
· OpenVPN
· IPsec VPN
Understanding VPN
VPN allows you to extend your internal private network across a public network such as the Internet. VPN clients outside the company can access resources inside your company as if they were located inside the company. There are two general VPN types: remote access (client-to-site), which allows your road warriors to connect to your internal network while traveling on the road, and the site-to-site type, which is used to connect geographically-distributed branches of your organization. Any PC inside the branch office can connect to any resource located inside the main branch and vice versa with no connection required on the client side. The connections and configurations are done on the gateways of each branch.
A VPN provides a secure connection between the endpoints as it provides authentication, data integrity, and confidentiality. These terms are explained as follows:
· Authentication: The client ensures that the VPN server is not a rogue server, using a preshared key (PSK) or digital certificates. Also, the server authenticates the client before allowing it to initiate a connection to the internal network using a username and password or digital identity certificates.
· Data integrity: A VPN uses hashing protocols to ensure that no data manipulation will happen while the data will transfer between the two ends.
· Confidentiality: The transferred data between the two ends will be encrypted. Thus, if anyone intercepted the traffic, they will not be able to read it in plain text. Symmetric shared keys are used to encrypt the transferred data. However, to negotiate and transfer this symmetrickey between the two ends, asymmetric algorithms are used (public and private keys or Diffie-Hellman key exchange).
Note
If you are interested in VPNs and the cryptography techniques and protocols such as public/private keys and Diffie-Hellman key exchange, and want to learn more about them, a great course by Prof. Dan Boneh from Stanford University might be your best choice. The course is available at https://www.coursera.org/course/crypto.
OpenVPN
Untangle's OpenVPN is an SSL-based VPN solution that is based on the well-known open source application, OpenVPN. Untangle's OpenVPN is mainly used for client-to-site connections with a client feature that is easy to deploy and configure, which is widely available for Windows, Mac, Linux, and smartphones. Untangle's OpenVPN can also be used for site-to-site connections but the two sites need to have Untangle servers. Site-to-site connections between Untangle and third-party devices are not supported.
How OpenVPN works
In reference to the OSI model, an SSL/TLS-based VPN will only encrypt the application layer's data, while the lower layer's information will be transferred unencrypted. In other words, the application packets will be encrypted. The IP addresses of the server and client are visible; the port number that the server uses for communication between the client and server is also visible, but the actual application port number is not visible. Furthermore, the destination IP address will not be visible; only the VPN server IP address is seen.
Secure Sockets Layer (SSL) and Transport Layer Security (TLS) refer to the same thing. SSL is the predecessor of TLS. SSL was originally developed by Netscape and many releases were produced (V.1 to V.3) till it got standardized under the TLS name.
The steps to create an SSL-based VPN are as follows:
1. The client will send a message to the VPN server that it wants to initiate an SSL session. Also, it will send a list of all ciphers (hash and encryption protocols) that it supports.
2. The server will respond with a set of selected ciphers and will send its digital certificate to the client. The server's digital certificate includes the server's public key.
3. The client will try to verify the server's digital certificate by checking it against trusted certificate authorities and by checking the certificate's validity (valid from and valid through dates).
4. The server may need to authenticate the client before allowing it to connect to the internal network. This could be achieved either by asking for a valid username and password or by using the user's digital identity certificates. Untangle NGFW uses the digital certificates method.
5. The client will create a session key (which will be used to encrypt the transferred data between the two devices) and will send this key to the server encrypted using the server's public key. Thus, no third party can get the session key as the server is the only device that can decrypt the session key as it's the only party that has the private key.
6. The server will acknowledge the client that it received the session key and is ready for the encrypted data transformation.
Configuring Untangle's OpenVPN server settings
After installing the OpenVPN application, the application will be turned off. You'll need to turn it on before you can use it.
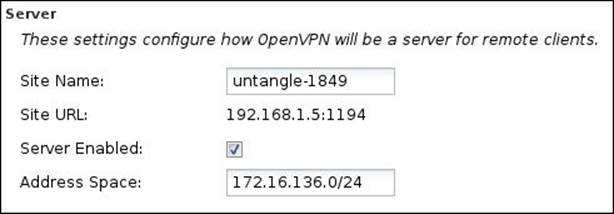
You can configure Untangle's OpenVPN server settings under OpenVPN Settings | Server. The settings configure how OpenVPN will be a server for remote clients (which can be clients on Windows, Linux, or any other operating systems, or another Untangle server). The different available settings are as follows:
· Site Name: This is the name of the OpenVPN site that is used to define the server among other OpenVPN servers inside your origination. This name should be unique across all Untangle servers in the organization. A random name is automatically chosen for the site name.
· Site URL: This is the URL that the remote client will use to reach this OpenVPN server. This can be configured under Config | Administration | Public Address.
Note
If you have more than one WAN interface, the remote client will first try to initiate the connection using the settings defined in the public address. If this fails, it will randomly try the IP of the remaining WAN interfaces.
· Server Enabled: If checked, the OpenVPN server will run and accept connections from the remote clients.
· Address Space: This defines the IP subnet that will be used to assign IPs for the remote VPN clients. The value in Address Space must be unique and separate across all existing networks and other OpenVPN address spaces. A default address space will be chosen that does not conflict with the existing configuration:
Configuring Untangle's OpenVPN remote client settings
Untangle's OpenVPN allows you to create OpenVPN clients to give your office employees, who are out of the company, the ability to remotely access your internal network resources via their PCs and/or smartphones. Also, an OpenVPN client can be imported to another Untangle server to provide site-to-site connection. Each OpenVPN client will have its unique IP (from the address space range defined previously). Thus, each OpenVPN client can only be used for one user. For multiple users, you'll have to create multiple clients as using the same client for multiple users will result in client disconnection issues.
Creating a remote client
You can create remote access clients by clicking on the Add button located under OpenVPN Settings | Server | Remote Clients.
A new window will open, which has the following settings:
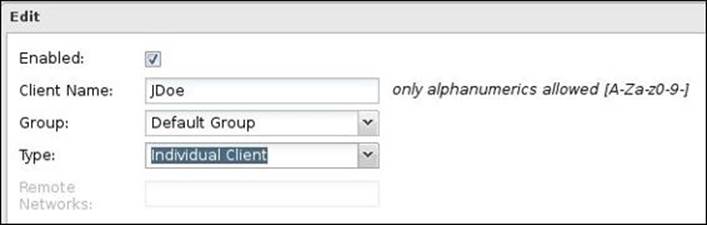
· Enabled: If this checkbox is checked, it will allow the client connection to the OpenVPN server. If unchecked, it will not allow the client connection.
· Client Name: Give a unique name for the client; this will help you identify the client. Only alphanumeric characters are allowed.
· Group: Specify the group the client will be a member of. Groups are used to apply similar settings to their members.
· Type: Select Individual Client for remote access and Network for site-to-site VPN.
The following screenshot shows a remote access client created for JDoe:
After configuring the client settings, you'll need to press the Done button and then the OK or Apply button to save this client configuration. The new client will be available under the Remote Clients tab, as shown in the following screenshot:

Understanding remote client groups
Groups are used to group clients together and apply similar settings to the group members. By default, there will be a Default Group. Each group has the following settings:
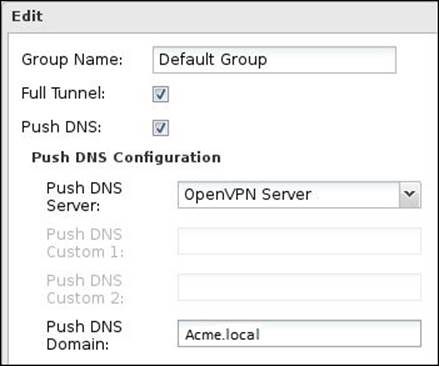
· Group Name: Give a suitable name for the group that describes the group settings (for example, full tunneling clients) or the target clients (for example, remote access clients).
· Full Tunnel: If checked, all the traffic from the remote clients will be sent to the OpenVPN server, which allows Untangle to filter traffic directed to the Internet. If unchecked, the remote client will run in the split tunnel mode, which means that the traffic directed to local resources behind Untangle is sent through VPN, and the traffic directed to the Internet is sent by the machine's default gateway.
Note
You can't use Full Tunnel for site-to-site connections.
· Push DNS: If checked, the remote OpenVPN client will use the DNS settings defined by the OpenVPN server. This is useful to resolve local names and services.
· Push DNS server: If the OpenVPN server is selected, remote clients will use the OpenVPN server for DNS queries. If set to Custom, DNS servers configured here will be used for DNS queries.
· Push DNS Custom 1: If the Push DNS server is set to Custom, the value configured here will be used as a primary DNS server for the remote client. If blank, no settings will be pushed for the remote client.
· Push DNS Custom 2: If the Push DNS server is set to Custom, the value configured here will be used as a secondary DNS server for the remote client. If blank, no settings will be pushed for the remote client.
· Push DNS Domain: The configured value will be pushed to the remote clients to extend their domain's search path during DNS resolution.
The following screenshot illustrates all these settings:
Defining the exported networks
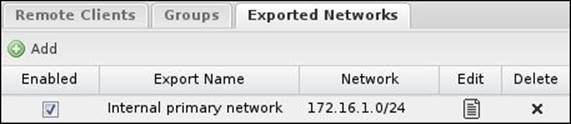
Exported networks are used to define the internal networks behind the OpenVPN server that the remote client can reach after successful connection. Additional routes will be added to the remote client's routing table that state that the exported networks (the main site's internal subnet) are reachable through the OpenVPN server. By default, each static non-WAN interface network will be listed in the Exported Networks list:
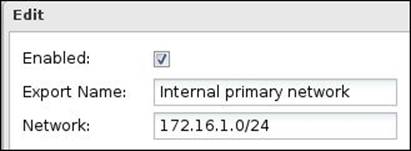
You can modify the default settings or create new entries. The Exported Networks settings are as follows:
· Enabled: If checked, the defined network will be exported to the remote clients.
· Export Name: Enter a suitable name for the exported network.
· Network: This defines the exported network. The exported network should be written in CIDR form.
These settings are illustrated in the following screenshot:
Using OpenVPN remote access clients
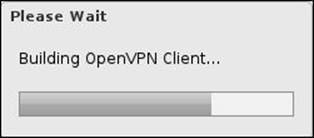
So far, we have been configuring the client settings but didn't create the real package to be used on remote systems. We can get the remote client package by pressing the Download Client button located under OpenVPN Settings | Server | Remote Clients, which will start the process of building the OpenVPN client that will be distributed:
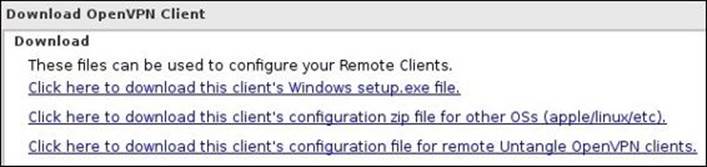
There are three available options to download the OpenVPN client. The first option is to download the client as a .exe file to be used with the Windows operating system. The second option is to download the client configuration files, which can be used with the Apple and Linux operating systems. The third option is similar to the second one except that the configuration file will be imported to another Untangle NGFW server, which is used for site-to-site scenarios. The following screenshot illustrates this:
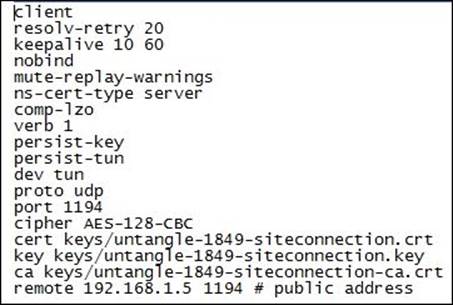
The configuration files include the following files:
· <Site_name>.ovpn
· <Site_name>.conf
· Keys\<Site_name>.-<User_name>.crt
· Keys\<Site_name>.-<User_name>.key
· Keys\<Site_name>.-<User_name>-ca.crt
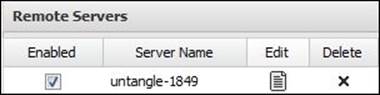
The certificate files are for the client authentication, and the .ovpn and .conf files have the defined connection settings (that is, the OpenVPN server IP, used port, and used ciphers). The following screenshot shows the .ovpn file for the site Untangle-1849:
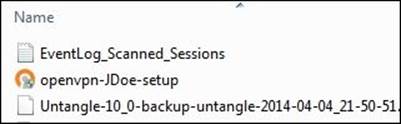
As shown in the following screenshot, the created file (openvpn-JDoe-setup.exe) includes the client name, which helps you identify the different clients and simplifies the process of distributing each file to the right user:
Using an OpenVPN client with Windows OS
Using an OpenVPN client with the Windows operating system is really very simple. To do this, perform the following steps:
1. Set up the OpenVPN client on the remote machine. The setup is very easy and it's just a next, next, install, and finish setup.
Note
To set up and run the application as an administrator is important in order to allow the client to write the VPN routes to the Windows routing table. You should run the client as an administrator every time you use it so that the client can create the required routes.
2. Double-click on the OpenVPN icon on the Windows desktop:

3. The application will run in the system tray:
![]()
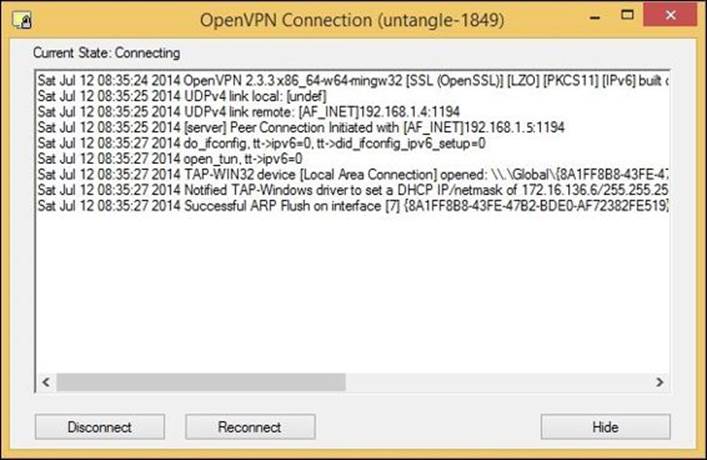
4. Right-click on the system tray of the application and select Connect. The client will start to initiate the connection to the OpenVPN server and a window with the connection status will appear, as shown in the following screenshot:
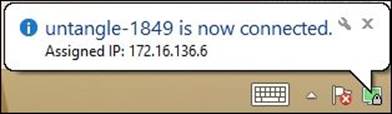
5. Once the VPN tunnel is initiated, a notification will appear from the client with the IP assigned to it, as shown in the following screenshot:
If the OpenVPN client was running in the task bar and there was an established connection, the client will automatically reconnect to the OpenVPN server if the tunnel was dropped due to Windows being asleep.
By default, the OpenVPN client will not start at the Windows login. We can change this and allow it to start without requiring administrative privileges by going to Control Panel | Administrative Tools | Services and changing the OpenVPN service's Startup Type to automatic. Now, in the start parameters field, put –-connect <Site_name>.ovpn; you can find the <site_name>.ovpn under C:\Program Files\OpenVPN\config.
Using OpenVPN with non-Windows clients
The method to configure OpenVPN clients to work with Untangle is the same for all non-Windows clients. Simply download the .zip file provided by Untangle, which includes the configuration and certificate files, and place them into the application's configuration folder. The steps are as follows:
1. Download and install any of the following OpenVPN-compatible clients for your operating system:
o For Mac OS X, Untangle, Inc. suggests using Tunnelblick, which is available at http://code.google.com/p/tunnelblick
o For Linux, OpenVPN clients for different Linux distros can be found at https://openvpn.net/index.php/access-server/download-openvpn-as-sw.html
o OpenVPN connect for iOS is available at https://itunes.apple.com/us/app/openvpn-connect/id590379981?mt=8
o OpenVPN for Android 4.0+ is available at https://play.google.com/store/apps/details?id=net.openvpn.openvpn
2. Log in to the Untangle NGFW server, download the .zip client configuration file, and extract the files from the .zip file.
3. Place the configuration files into any of the following OpenVPN-compatible applications:
o Tunnelblick: Manually copy the files into the Configurations folder located at ~/Library/Application Support/Tunnelblick.
o Linux: Copy the extracted files into /etc/openvpn, and then you can connect using sudo openvpn /etc/openvpn/<Site_name>.conf.
o iOS: Open iTunes and select the files from the config ZIP file to add to the app on your iPhone or iPad.
o Android: From OpenVPN for an Android application, click on all your precious VPNs. In the top-right corner, click on the folder, and then browse to the folder where you have the OpenVPN .Conf file. Click on the file and hit Select. Then, in the top-right corner, hit the little floppy disc icon to save the import. Now, you should see the imported profile. Click on it to connect to the tunnel. For more information on this, visit http://forums.untangle.com/openvpn/30472-openvpn-android-4-0-a.html.
4. Run the OpenVPN-compatible client.
Using OpenVPN for site-to-site connection
To use OpenVPN for site-to-site connection, one Untangle NGFW server will run on the OpenVPN server mode, and the other server will run on the client mode. We will need to create a client that will be imported in the remote server. The client settings are shown in the following screenshot:
We will need to download the client configuration that is supposed to be imported on another Untangle server (the third option available on the client download menu), and then import this client configuration's zipped file on the remote server. To import the client, on the remote server under the Client tab, browse to the .zip file and press the Submit button. The client will be shown as follows:
You'll need to restart the two servers before being able to use the OpenVPN site-to-site connection. The site-to-site connection is bidirectional.
Reviewing the connection details
The current connected clients (either they were OS clients or another Untangle NGFW client) will appear under Connected Remote Clients located under the Status tab. The screen will show the client name, its external address, and the address assigned to it by OpenVPN. In addition to the connection start time, the amount of transmitted and received MB during this connection is also shown:

For the site-to-site connection, the client server will show the name of the remote server, whether the connection is established or not, in addition to the amount of transmitted and received data in MB:

Event logs show a detailed connection history as shown in the following screenshot:

In addition, there are two reports available for Untangle's OpenVPN:
· Bandwidth usage: This report shows the maximum and average data transfer rate (KB/s) and the total amount of data transferred that day
· Top users: This report shows the top users connected to the Untangle OpenVPN server
Troubleshooting Untangle's OpenVPN
In this section, we will discuss some points to consider when dealing with Untangle NGFW OpenVPN.
· OpenVPN acts as a router as it will route between different networks. Using OpenVPN with Untangle NGFW in the bridge mode (Untangle NGFW server is behind another router) requires additional configurations. The required configurations are as follows:
o Create a static route on the router that will route any traffic from the VPN range (the VPN address pool) to the Untangle NGFW server.
o Create a Port Forward rule for the OpenVPN port 1194 (UDP) on the router to Untangle NGFW.
o Verify that your setting is correct by going to Config | Administration | Public Address as it is used by Untangle to configure OpenVPN clients, and ensure that the configured address is resolvable from outside the company.
· If the OpenVPN client is connected, but you can't access anything, perform the following steps:
o Verify that the hosts you are trying to reach are exported in Exported Networks
o Try to ping Untangle NGFW LAN IP address (if exported)
o Try to bring up the Untangle NGFW GUI by entering the IP address in a browser
· If the preceding tasks work, your tunnel is up and operational. If you can't reach any clients inside the network, check for the following conditions:
o The client machine's firewall is not preventing the connection from the OpenVPN client.
o The client machine uses Untangle as a gateway or has a static route to send the VPN address pool to Untangle NGFW.
o In addition, some port forwarding rules on Untangle NGFW are needed for OpenVPN to function properly. The required ports are 53, 445, 389, 88, 135, and 1025.
· If the site-to-site tunnel is set up correctly, but the two sites can't talk to each other, the reason may be as follows:
o If your sites have IPs from the same subnet (this probably happens when you use a service from the same ISP for both branches), OpenVPN may fail as it consider no routing is needed from IPs in the same subnet. You should ask your ISP to change the IPs.
· To get DNS resolution to work over the site-to-site tunnel, you'll need to go to Config | Network | Advanced | DNS Server | Local DNS Servers and add the IP of the DNS server on the far side of the tunnel. Enter the domain in the Domain List column and use the FQDN when accessing resources. You'll need to do this on both sides of the tunnel for it to work from either side.
· If you are using site-to-site VPN in addition to the client-to-site VPN. However, the OpenVPN client is able to connect to the main site only:
o You'll need to add VPN Address Pool to Exported Hosts and Networks
Lab-based training
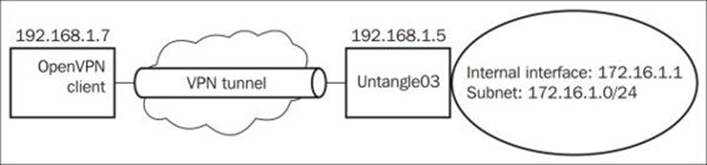
This section will provide training for the OpenVPN site-to-site and client-to-site scenarios. In this lab, we will mainly use Untangle-01, Untangle-03, and a laptop (192.168.1.7).
The ABC bank started a project with Acme school. As a part of this project, the ABC bank team needs to periodically access files located on Acme-FS01. So, the two parties decided to opt for OpenVPN. However, Acme's network team doesn't want to leave access wide open for ABC bank members, so they set firewall rules to limit ABC bank's access to the file server only.
In addition, the IT team director wants to have VPN access from home to the Acme network, which they decided to accomplish using OpenVPN.
The following diagram shows the environment used in the site-to-site scenario:

To create the site-to-site connection, we will need to do the following steps:
1. Enable OpenVPN Server on Untangle-01.
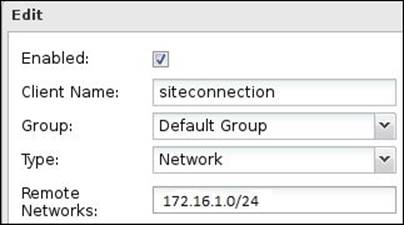
2. Create a network type client with a remote network of 172.16.1.0/24.
3. Download the client and import it under the Client tab in Untangle-03.
4. Restart the two servers.
5. After the restart, you have a site-to-site VPN connection. However, the Acme network is wide open to the ABC bank, so we need to create a firewall-limiting rule.
6. On Untangle-03, create a rule that will allow any traffic that comes from the OpenVPN interface, and its source is 172.16.136.10 (Untangle-01 Client IP) and is directed to 172.16.1.7 (Acme-FS01). The rule is shown in the following screenshot:
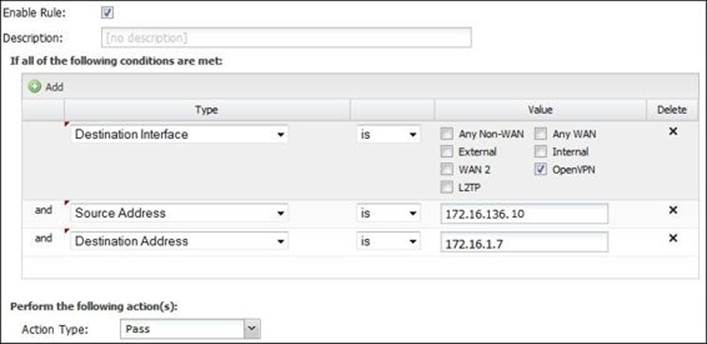
7. Also, we will need a general block rule that comes after the preceding rule in the rule evaluation order.
The environment used for the client-to-site connection is shown in the following diagram:
To create a client-to-site VPN connection, we need to perform the following steps:
1. Enable the OpenVPN server on Untangle-03.
2. Create an individual client type client on Untangle-03.
3. Distribute the client to the intended user (that is 192.168.1.7).
4. Install OpenVPN on your laptop.
5. Connect using the installed OpenVPN and try to ping Acme-DC01 using its name. The ping will fail because the client is not able to query the Acme DNS.
6. So, in the Default Group settings, change Push DNS Domain to Acme.local.
Note
Changing the group settings will not affect the OpenVPN client till the client is restarted.
7. Now, the ping process will be a success.
IPsec VPN
The Untangle IPsec VPN is mainly used to provide site-to-site connections, which have many advantages over site-to-site solutions provided by OpenVPN including (but not limited to) better support for sharing, replication, LDAP protocols, and higher speed. Untangle IPsec VPN also provides the client-to-site connection method based on L2TP/IPsec. These features come at an additional cost as Untangle, Inc. provides the IPsec VPN as a paid module.
How the IPsec VPN works
The IPsec VPN works on the OSI layer 3 (the network layer), which allows the encryption of information from layer 3 and the above layers. Thus, any eavesdropper will not be able to get any information about the packet, including the used ports and the IP addresses.
Unlike SSL/TLS VPN, the IPsec parties have no prior knowledge of each other, and the connection initiation process will not include any server certificates. The connection between the two parties is established using the Internet Key Exchange (IKE) protocol, which has two phases:
· IKE phase 1: This phase authenticates the IPsec peers and establishes a secure channel that will be used in phase 2 for IPsec tunnel negotiation and building. In this phase, only the IPsec peers can talk to each other and no network-to-network or client-to-network communication is possible. IKE phase 1 includes the following negotiations:
o Hashing: This determines the hash protocol that will be used to validate the data integrity.
o Authentication: This method will be used for the IPsec peers to authenticate each other. A PSK or digital certificate can be used.
o Diffie-Hellman group: The Diffie-Hellman key exchange method allows two parties that have no prior knowledge of each other to jointly establish a symmetric shared secret key over an insecure communications channel, which can be used to encrypt subsequent communications.
o Lifetime: This determines IKE phase 1's tunnel time to live.
o Encryption: This is the symmetric encryption protocol to be used.
After completing the negotiation, the peers will run the Diffie-Hellman key exchange to generate the shared key; then, they will authenticate each other using the methods agreed in the negotiation.
· IKE Phase 2: This is also known as an IPsec tunnel. This phase will build the IPsec tunnel that allows network-to-network and client-to-network communication. IKE phase 2 tunnels' lifetimes are shorter than those of IKE phase 1. Thus, multiple IKE phase 2 tunnels are created in the same IKE phase 1 tunnel. IKE phase 2 negotiation settings are as follows:
o Lifetime: This is the IKE phase 2 tunnel's lifetime.
o Hashing: This is the Hash protocol to be used.
o Diffie-Hellman group: The Diffie-Hellman group will be used to create the symmetric key for IKE phase 2 tunnels. If perfect forward secrecy (PFS) is used, each phase 2 key is derived independently through a separate Diffie-Hellman exchange. With PFS, if a single key is compromised, the integrity of the subsequently-generated keys is not affected.
o Encryption: This is the encryption protocol to be used.
After completing the negotiation, the peers will build and use the IPsec tunnel using the methods agreed on the negotiation.
The default values used by Untangle NGFW are PSK for authentication, MD5 for hashing, 3DES for encryption, the Diffie-Hellman group 2 (1,024 bit), phase 1 lifetime of 28,800 seconds, and phase 2 lifetime of 3,600 seconds.
IKE phase 1 is done over UDP port 500. If any NAT/PAT device is located between the IPsec peers and this device can't forward the IPsec protocol (protocol number 50), we will use NAT traversal, which allows the encapsulation of IPsec packets inside UDP 4500 packets; TCP 10000 can also be used.
By default, IPsec only provides the site-to-site connection and works with IP networks. To allow the client-to-site connection and provide the ability to transport protocols other than IP, Layer 2 Tunneling Protocol (L2TP) over IPsec (L2TP/IPsec) can be used, which encapsulates L2TP packets between the two ends using IPsec.
Configuring Untangle's IPsec VPN
This section will cover how to create IPsec tunnels, and will describe the different options available for L2TP.
Creating IPsec tunnels
The NAT traversal can be enabled or disabled under IPsec VPN Settings | IPsec Options. This will be applied on all tunnels.
Tunnels can be configured under IPsec VPN Settings | IPsec Tunnels; there are two existing default disabled tunnels that can help you understand how to configure IPsec tunnels; you can modify them if you wish. To create a new tunnel, press the Add button located under the IPsec tunnels tab. The tunnel editor screen will appear with the following configurable settings:
· Enable: This determines if you wish to enable or disable this tunnel.
· Description: Include a description that can help you identify the tunnel in future. For example, if you have multiple branch sites and you want to create a tunnel for each site, it's recommended to set the description for each tunnel with the name of the branch site.
· Connection Type: IPsec has two connection types (Tunnel and Transport):
o Tunnel: This is used with site-to-site connections. It can support NAT traversal and it encrypts the payload and the IP header.
o Transport: This is used with client-to-site connections. It can't support NAT traversal; it only encrypts the payload and doesn't encrypt the IP header. L2TP can be used with this connection type. In addition, this type is usually used for encrypted traffic that will end at the tunnel endpoint (for example, if you're establishing an SSH connection to the endpoint server) as the endpoint server will need to read the IP header. In short, if the encrypted traffic is not to the endpoint of the tunnel, the Tunnel mode will be used.
· Auto Mode: This specifies the IPsec tunnels' starting behavior. There are two modes available:
o Start Mode: The tunnel is automatically loaded, inserts routes, and initiates a connection. This mode always provides a connected tunnel.
o Add Mode: The tunnel load is in standby mode, waiting to respond to an incoming connection request. This mode provides an on-demand tunnel.
· Interface: This allows you to choose the interface that you want to associate with the IPsec tunnel. When you select an interface, the IP of this interface will automatically be populated to the External IP field. If you wish to not use the interface's current IP, selecting Customallows you to set the custom IP on the External IP field.
· External IP: This field determines the external IP that will be associated with the IPsec tunnel.
· Remote Host: This determines the IP or the hostname of the other endpoint of the tunnel.
· Local Network: This determines the networks (behind this endpoint) that will be reachable from the other endpoint. The current internal network is selected by default.
· Local IP: This determines the IP of the internal interface of Untangle NGFW that will be available for the remote endpoint.
· Remote Network: This determines the internal network located behind the remote endpoint.
· Shared Secret: Untangle NGFW uses a PSK to authenticate the two endpoints; the two endpoints must have the same key to be able to create the tunnel. The longer and more complex the key, the higher level of security you get.
· Perfect Forward Secrecy (PFS): This determines if you want to use PFS or not. PFS is enabled by default and leaving it this way is suggested to provide higher security. Don't disable PFS unless you have a purpose for this.
· Dead Peer Detection (DPD) Interval: This determines the interval during which Untangle NGFW tries to detect if the other endpoint is still available.
· DPD Timeout: This determines the time with no response from the other endpoint before trying to re-initiate the tunnel.
· Authentication and SA/Key Exchange: IPsec automatically does the IKE negotiation with the remote peer. However, some peers require specific settings (usually when connecting Untangle to the third-party appliance); you can configure Untangle to use these specific settings on the tunnel initiation by manually choosing the desired settings for both IKE phase 1 and IKE phase 2. The available settings are encryption, hashing, the Diffie-Hellman key group, and lifetime.
Untangle can establish IPsec tunnels with third-party firewalls and appliances. Each firewall will have its required specific negotiation settings, a list of the settings required to successfully establish IPsec tunnels between Untangle and pfSense, M0n0wall, Cisco, Endian, Watchguard, eSoft InstaGate, and SonicWall are located at http://wiki.untangle.com/index.php/IPsec_VPN.
Note
If your device is not included in the preceding list of devices, Untangle may still be able to connect to your device. However, this has not been tested before.
Configuring L2TP options
L2TP options found under IPsec VPN settings are used to configure the Untangle NGFW server to support L2TP VPN client connections. The different settings are as follows:
· Enable L2TP Server: This enables Untangle to serve the L2TP VPN clients.
· Listen addresses: The external interface on which the server will listen for the incoming L2TP connections.
· Address pool: This configures the pool of addresses that will be assigned to the L2TP clients. The server will take the first IP in the pool and the clients will be assigned IPs dynamically when they connect to the Untangle server.
· The default pool is 192.18.0.0/16, which is a private network that is generally reserved for internal network testing. It was chosen as the default because it is used less frequently than other RFC-1918 address blocks, and thus, it is less likely to conflict with existing address assignments on your network. You should not change this default address pool unless you have to, and don't set the pool to the same address block used by your internal network.
· Custom DNS: Here, you can configure the DNS servers to be used by the client. If kept blank, the client will send the DNS queries to Untangle NGFW.
· IPsec Secret: This is the secret used to establish the IPsec tunnel that will encapsulate the L2TP packets.
· Configure Local Directory: In addition to the secret key, the client must authenticate using a valid username and password stored in the local directory; clicking on the Configure Local Directory button will open Config | Local Directory from where you can manage the local users.
Reviewing the connection events
All enabled IPsec tunnels will be shown under Enabled IPsec Tunnels located under the Status tab. The tunnel details in addition to its status (active or not) are displayed as shown in the following screenshot:

The IPsec State tab shows the status of the established connections. Each tunnel will have two entries, one for the local side and one for the remote side, as shown in the following screenshot:
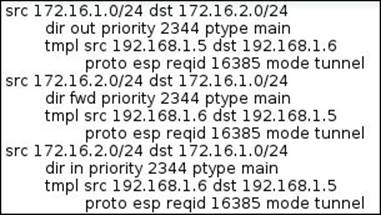
The IPsec Policy tab shows the routing table associated with each IPsec VPN, as shown in the following screenshot:
The IPsec Log tab provides low-level status messages that are generated by the underlying IPsec protocol components. This information can be very helpful when attempting to diagnose connection problems or other IPsec issues.
An active L2TP session can be found under the Status tab:

The L2TP event log shows detailed connection events as follows:

Lab-based training
The Acme network administrator decided to use Untangle IPsec to provide their branch office with a VPN connection to the HQ as it provides better performance than the OpenVPN module. In addition, they decided to use it with devices that support L2TP for remote access cases while sticking with OpenVPN for the other device. In this section, we will learn how to create site-to-site VPN and remote access VPN using the Untangle IPsec module.
In this lab, we will use Untangle-03, Untangle-04, laptop (192.168.1.7), and any internal clients you wish in the Acme sites.
The site-to-site lab network topology is shown in the following diagram:

In Untangle-03, we will need to create the IPsec tunnel. We will keep the defaults and only change the following settings:
· Interface: External
· Remote Host: 192.168.1.6
· Remote Network: 172.16.2.0/24
· Shared Secret: asd123@
In Untangle-04, we will need to do the same, but this time, with the following settings:
· Interface: External
· Remote Host: 192.168.1.5
· Remote Network: 172.16.1.0/24
· Shared Secret: asd123@
Now, the IPsec tunnel is established and running. You can test connectivity by trying to ping a device in the 172.16.2.0/24 network from the 172.16.1.0/24 network or vice versa.
The client-to-site connection lab can be done with a network diagram as the one shown previously in the OpenVPN client-to-site lab.
The server-side configuration will be done as follows:
· Enable L2TP server: This will be checked
· Address pool: This will be kept as the default settings
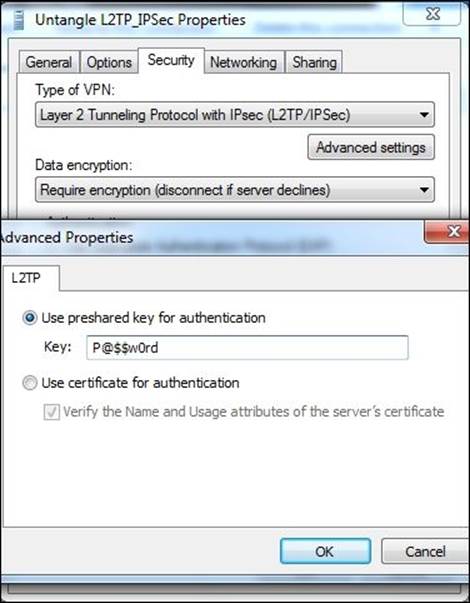
· IPsec Secret: P@$$w0rd
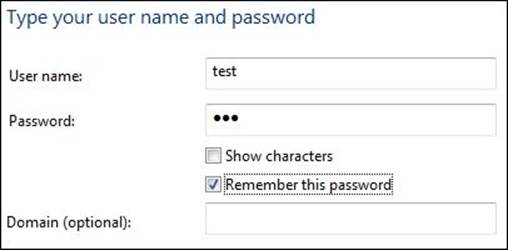
· Local Directory: We have a local user (test) whose password is 123
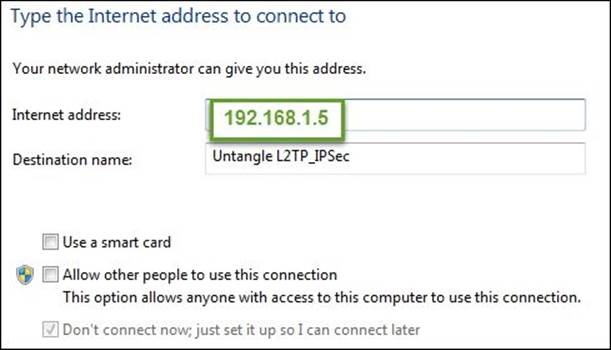
· Server Listen addresses: This will be kept as the default settings, which include the server's external IP (192.168.1.5)
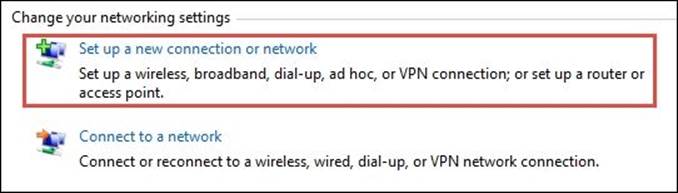
The client-side configuration on Windows can be done as follows:
1. From Control Panel | All Control Panel Items | Network and Sharing Center, choose Set up a new connection or network:
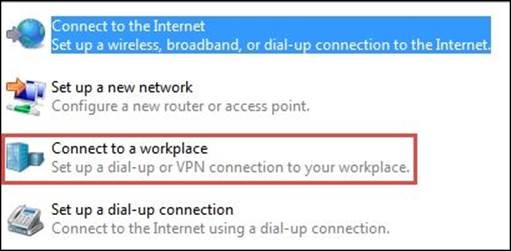
2. A new wizard is displayed, from which you need to select Connect to a workspace:
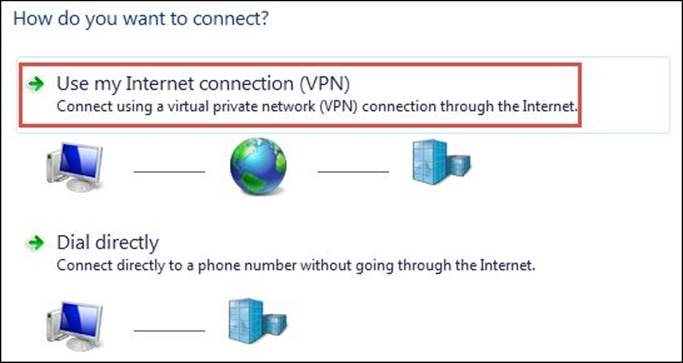
3. In the next step, select Use my Internet connection (VPN):
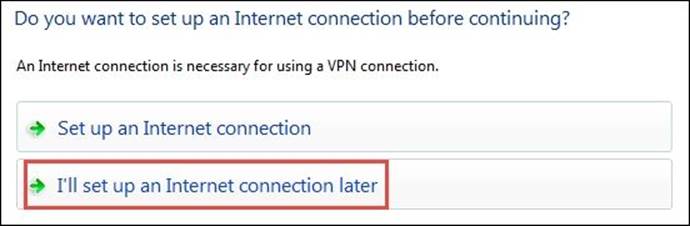
4. Now, select I'll set up an Internet connection later:
5. Enter the server's IP address and description for the connection:
6. Next, you will need to provide the username and the password of the user created on the Untangle NGFW local directory:
7. From Control Panel | Network and Internet | Network Connections, right-click on the newly-created VPN connection and select Properties. Under Security, change Type of VPN to L2TP/IPsec, and press the Advanced Settings button to add the pre-shared key used for the connection:
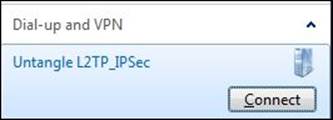
8. Now, you can connect to Untangle's local network using the created VPN connection:
9. Now, try to open the Untangle-03 administration GUI using its internal IP (172.16.1.1). The GUI will open, which means that the client is able to access Acme's local resources.
Summary
In this chapter, we covered the VPN services provided by Untangle NGFW. We went deeply into understanding how each solution works. This chapter also provided a guide on how to configure and deploy the services. Untangle provides a free solution that is based on the well-known open source OpenVPN, which provides an SSL-based VPN. IPsec is also provided from Untangle as a paid service. Both applications can be used for client-to-site and site-to-site connections. The site-to-site service provided by IPsec is much better than the one provided by OpenVPN. The client-to-site connection provided by IPsec is based on L2TP/IPsec.
In the next chapter, we'll discuss the Untangle NGFW Reports and how the administrator can manage them. We'll also see how we can rebrand Untangle NGFW to our company brands using the Branding Manager. The Live Support service allows the administrator to get Untangle support when they face an issue with their server. The Configuration Backup service automatically creates daily backups of the server configurations and stores them in the data center of Untangle, Inc.
All materials on the site are licensed Creative Commons Attribution-Sharealike 3.0 Unported CC BY-SA 3.0 & GNU Free Documentation License (GFDL)
If you are the copyright holder of any material contained on our site and intend to remove it, please contact our site administrator for approval.
© 2016-2026 All site design rights belong to S.Y.A.