Untangle Network Security (2014)
Chapter 2. Installing Untangle
Now, after we have seen an overview of Untangle NGFW in the previous chapter, it's time to get some hands-on experience. However, first, you will need to get a PC with Untangle NGFW installed. This chapter will guide you through building and installing your Untangle NGFW server.
At the beginning, we will define the minimum and the recommended hardware requirements for the Untangle NGFW server. After that, we will see how we can get a copy of Untangle NGFW. Later, we will see how we can write the Untangle NGFW image into a USB or CD to make a bootable installation media. Then, we will go through a step-by-step installation guide. Also, a complete lab environment that can be used to study this book will be included.
In this chapter, we'll cover the following topics:
· Understanding the hardware requirements of Untangle NGFW
· Setting up a lab
· Obtaining the Untangle installation media
· A step-by-step installation guide
Understanding the hardware requirements of Untangle NGFW
Untangle NGFW is a software that can be installed on a standard Intel/AMD-compatible hardware, or can be delivered preinstalled on hardware appliances. Understanding the hardware requirements for Untangle NGFW is necessary to build/select the right server that can perform well without any latency or performance degradation.
In this section, we will cover the different available appliances provided by Untangle, Inc. We will also review the minimum and recommended hardware requirements to build your own Untangle NGFW box. Later, we will discuss the ability to install Untangle NGFW on VM. Finally, we will review the modules' effect on the CPU, RAM, and disk I/O, and how we can tweak them.
Untangle NGFW appliances
Untangle NGFW appliances come in many classes based on the expected number of users and workloads. Buying an Untangle NGFW appliance removes the headache of choosing the right hardware to be used in building your Untangle NGFW server. By using an Untangle NGFW appliance, you also guarantee that your server will perform well under the rated user count.
Untangle, Inc. offers its appliances with the free or the complete package. When you buy an appliance with the complete package, you will pay for the hardware and the subscription in the first year, and for the subscription only in the later years.
Untangle NGFW appliances come with a one year warranty; this could be extended to two or three years for additional money. Also, you can get a cold spare for additional money. The cold spare is another Untangle NGFW appliance that will reside inside your company's offlinewaiting for your primary appliance to fail. When the primary appliance fails, you can get the cold spare online and move the license to it so that it can protect your network instead of the failed appliance.
You can buy appliances from Untangle, Inc. or from the third-party hardware vendors. For more information about the official appliances, visit http://www.Untangle.com/appliances, and for the third-party vendors, visithttp://wiki.Untangle.com/index.php/3rd_Party_Hardware_Vendors. The following table shows the specifications of the available Untangle NGFW appliances:
|
u10 |
u50 |
u150 |
u500 |
m1500 |
m3000 |
|
|
Processor |
Intel Atom® single core processor |
Intel Atom® dual core processor |
Intel Pentium® dual core processor |
Intel Xeon® quad core processor |
Dual Intel Xeon® quad core processors |
Dual Intel Xeon® six core processors |
|
RAM |
1 GB RAM |
2 GB RAM |
4 GB RAM |
16 GB RAM |
16 GB RAM |
16 GB RAM |
|
Hard Drive |
160 GB 7200 rpm |
160 GB 7200 rpm |
500 GB 7200 rpm |
500 GB 7200 rpm |
1 TB 7200 rpm |
1 TB 7200 rpm |
|
Ethernet Ports |
4 Gigabit Ethernet ports |
4 Gigabit Ethernet ports |
6 Gigabit Ethernet ports |
8 Gigabit Ethernet ports |
8 Gigabit Ethernet ports |
8 Gigabit Ethernet ports |
|
Users |
1-25 |
25-75 |
75-250 |
250-750 |
750-1500 |
1500-5000 |
Building your Untangle NGFW box
Unlike the case of the hardware appliances, it's your job to determine the hardware specifications when you want to install the software on a dedicated box. Generally, Untangle NGFW requires a dedicated PC with a CD/DVD drive or USB ports and at least two NICs. The following table shows the minimum and recommended hardware specifications for the Untangle server:
|
Resource |
Minimum |
Recommended |
|
CPU |
1.0 GHz |
More than 2.0 GHz |
|
Memory |
512 MB |
1 to 2 GB |
|
Hard drive |
20 GB |
More than 40 GB |
|
Network cards |
2 |
More than 3 (for DMZ) |
Note that even if you used the recommended specifications mentioned in the preceding table, you may suffer performance degradation with the high workloads and user count. So, as a best practice, follow the same hardware specifications used in the appliances.
Note
Make sure that you don't have any data that is important or not backed up on the hard disk where you will install Untangle NGFW, as it will format the hard disk.
Virtualizing your Untangle NGFW
You can install Untangle NGFW inside a virtual machine (VM) with no performance or functionality issues as long as you follow the recommended hardware requirements. However, Untangle will not support you with any issues related to the hypervisor misconfiguration, but it will support you with the Untangle system itself.
Note
To learn how to install VMware tools on your Untangle NGFW VM, visit http://forums.untangle.com/hacks/34393-updated-way-installing-vmware-tools-untangle-v10-esxi-5-1-5-5-a.html.
In addition, Untangle, Inc. offers a virtual appliance that can be imported directly to your hypervisor. The virtual appliance can be downloaded from http://sourceforge.net/projects/untangle/files/. It's a VM with an OVA extension and can be used with VMware ESXi, Citrix Xen server, VMware Workstation, and Oracle VirtualBox. For more information about the virtual appliance and how you can import it to the ESXi server, visit http://wiki.Untangle.com/index.php/Untangle_Virtual_Appliance_on_VMware.
Note
While the virtual appliance could be used with type 2 hypervisors such as VMware Workstation and Oracle VirtualBox, it's practical to use them only with type 1 hypervisors such as VMware ESXi and Citrix Xen server.
Tweaking your Untangle NGFW
The main factors of server performance are CPU, memory, and disk I/O. This section will discuss the effect of each factor on Untangle NGFW performance. In addition, this section will show you the resource utilization by each Untangle module.
While CPU clock speed and power are important factors, they are the least important factors to consider when dealing with Untangle NGFW. A fairly underpowered CPU could be used to run large sites if you have enough memory and disk I/O. Increasing the CPU speed and number of cores would help to increase Untangle NGFW performance but not to the same point if we increased the memory and disk I/O.
Tip
Intel Atom processors don't have enough power for Virus Blocker, Spam Blocker, and VPN modules.
The running applications and the in-process data are placed in memory. If you are in shortage of memory, Untangle NGFW will keep the current data in process in the RAM and will swap any other data to the hard disk; when it needs something from the swapped data, it will move it to the RAM and swap the other set of data. So, you'll see consistent swapping, or in other words, bad performance and many pauses.
Disk I/O is the most important factor and is the real bottleneck for many implementations. Untangle NGFW does not use flat logfiles; instead, it uses a database to store the logfiles, which dramatically increases the disk I/O especially when generating a report. For example, if you have a 16 core CPU and 16 GB of RAM but a slow hard disk, you'll get bad performance.
Note
While RAIDs could be used to increase disk I/O and for reliability, it's uncommon to use RAIDs with Untangle NGFW. Untangle NGFW doesn't support software RAIDs. In addition, because it's based on Debian, only reputable hardware RAID controllers can be used; common RAID controllers on motherboards won't be accepted by Untangle NGFW.
In addition, the price of the external RAID controller and the additional hard disks could be used to buy a better hard disk.
Also, the time required to rebuild your server after RAID failure is similar to the time required to rebuild the server from backup after a single disk failure.
In short, use plenty of the three resources while you can, and consider buying an SSD as they have greater disk I/O.
Further tweaking can be done if you understand the utilization of resources by each Untangle NGFW module. Tweaking performance can be done by disabling the application or buy reconfiguring its settings. For example, if you have shortage of memory, disable Web Filter, and if you have shortage of CPU and you have configured Virus Blocker to scan incoming image files, disable this option. The following table shows the resource utilization caused by the Untangle platform and the different applications:
|
Component/App |
Memory |
CPU |
Disk I/O |
|
Platform |
Medium |
Medium |
Medium |
|
Web Filter |
Low |
Low |
Low |
|
Web Filter Lite |
High |
Low |
Low |
|
Virus Blocker |
Medium |
Medium |
Medium |
|
Virus Blocker Lite |
Medium |
Medium |
Medium |
|
Spyware Blocker |
Low |
Low |
Low |
|
Spam Blocker |
Medium |
Medium |
Medium |
|
Spam Blocker Lite |
Medium |
Medium |
Medium |
|
Phish Blocker |
Medium |
Medium |
Medium |
|
Web Cache |
Medium |
Low |
High |
|
Bandwidth Control |
Low |
Medium |
Low |
|
Application Control |
Low |
Medium |
Low |
|
Application Control Lite |
Low |
Medium |
Low |
|
HTTPS Inspector |
Medium |
High |
Low |
|
Firewall |
Low |
Low |
Low |
|
Intrusion Prevention |
Low |
Medium |
Low |
|
Ad Blocker |
Low |
Low |
Low |
|
Reports |
Medium |
Medium |
Very high |
|
Policy Manager |
Low |
Low |
Low |
|
Directory Connector |
Low |
Low |
Low |
|
WAN Failover |
Low |
Low |
Low |
|
WAN Balancer |
Low |
Low |
Low |
|
Captive Portal |
Low |
Low |
Low |
|
IPsec VPN |
Low |
Low |
Low |
|
OpenVPN |
Low |
Low |
Low |
|
Attack Blocker |
Low |
Low |
Low |
|
Configuration Backup |
Low |
Low |
Low |
|
Branding Manager |
Low |
Low |
Low |
|
Live Support |
Low |
Low |
Low |
Setting up your lab
I recommend that you build your own lab environment to get comfortable with Untangle NGFW and practice the different scenarios before deploying it to your production environment. You can use virtualization platforms such as VMware Workstation or Oracle VirtualBox to build the lab environment.
In our lab, we have ABC bank and Acme school as fictional organizations. ABC bank uses two Untangle NGFWs in a high availability mode. It has two internal subnets for the servers and users, and it uses a leased line for the Internet connectivity.
Acme school has two locations. The HQ has Untangle NGFW running in the router mode, protecting two subnets (internal and DMZ). The remote branch office has an existing firewall, which Acme school decided to replace with Untangle NGFW. So, Acme school deployed Untangle NGFW in the bridge mode behind the existing firewall till the expiration of the firewall license. After the license expiration, Untangle NGFW will be deployed in the router mode. Acme school use ADSL for the Internet connectivity. It uses two ADSL lines in the HQ and only one ADSL line in the branch office.
The remote laptop is used to test the connection from outside organizations and to implement a remote access VPN.
The following figure shows the lab environment used in this book:
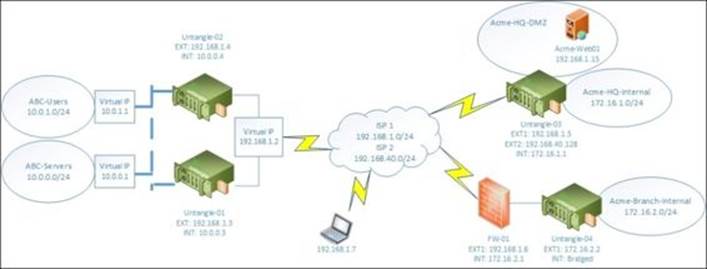
The 192.168.1.0/24 subnet is selected to be used as the external interface for all the Untangle NGFW servers to simplify the process of routing between the devices. The detailed environment components are listed in the following table:
|
ABC-Servers |
||
|
ABC-DC01 |
10.0.0.5 |
Domain controller |
|
ABC-EX01 |
10.0.0.10 |
Exchange server |
|
ABC-LY01 |
10.0.0.12 |
Lync server for VOIP |
|
ABC-Users |
||
|
ABC-Client01 |
10.0.1.15 |
Normal user PC |
|
ABC-CEO01 |
10.0.1.60 |
CEO PC |
|
Printer01 |
10.0.1.99 |
Printer that needs Internet connection |
|
Acme-DMZ |
||
|
Acme-Web01 |
192.168.1.15 |
Web server |
|
Acme-HQ-Internal |
||
|
Acme-DC01 |
172.16.1.5 |
Domain controller |
|
Acme-FS01 |
172.16.1.7 |
File server |
|
Acme-EX01 |
172.16.1.10 |
Exchange server |
|
Acme-Client01 |
172.16.1.105 |
Normal PC |
|
Acme-Client02 |
172.16.1.106 |
Normal PC |
|
Acme-Branch-Internal |
||
|
WG-Client01 |
172.16.2.45 |
Normal PC |
Most of the time, we will deal with the components listed in the preceding table. However, additional components may be used in special scenarios, but they will follow the same environment design.
The lab environment is quite large, but not all the environment components will be used at the same time. You can practice most of this book's scenarios using only two machines, one as the Untangle server and the other as the client that we will apply our policies on. Also, for scenarios that require the use of more than one client VM, you can use one VM and change its IP to simulate using different clients.
Getting Untangle
Untangle NGFW can be downloaded in two different formats: ISO and IMG. The ISO format can be used to create CDs or directly with virtualization platforms, while the IMG format is used to create bootable USB drives. To get your copy of Untangle NGFW, browse towww.Untangle.com/store/get-Untangle and select the version you want to download, whether it's ISO or IMG and whether it's 32- or 64-bit, as shown in the following screenshot:
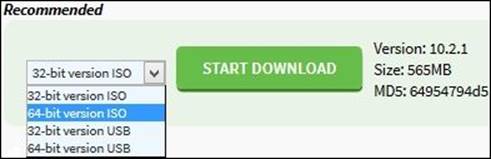
After selecting the desired version, click on the START DOWNLOAD button to start downloading your Untangle copy.
Tip
Use the 64-bit version of the Untangle server when you are going to use 4 GB or more of RAM on your PC as this will utilize all available memory and provide performance enhancements.
Writing your image
Now, after you've successfully downloaded the Untangle NGFW image, it's time to write this image to a suitable media drive, which will be used to install Untangle NGFW.
Windows users can burn ISO files directly to a CD using Windows Disk Image Burner, which is available with Microsoft Windows 7 or later versions of Windows, or by using third-party applications such as Nero, Power ISO, and ISO Burner. Different options and tools are also available for Mac and Linux users.
You can make a bootable USB drive from the IMG file by using applications such as Win32DiskImager, RMPrepUSB, or Rufus. Personally, I prefer using Rufus as it's the simplest and fastest application for this purpose; you can get it at http://rufus.akeo.ie.
Note
Mac and Linux users can use UNetbootin, which is available at http://unetbootin.sourceforge.net/.
To make your Untangle bootable USB drive, first attach the USB drive into your computer and then start Rufus, as shown in the following screenshot:
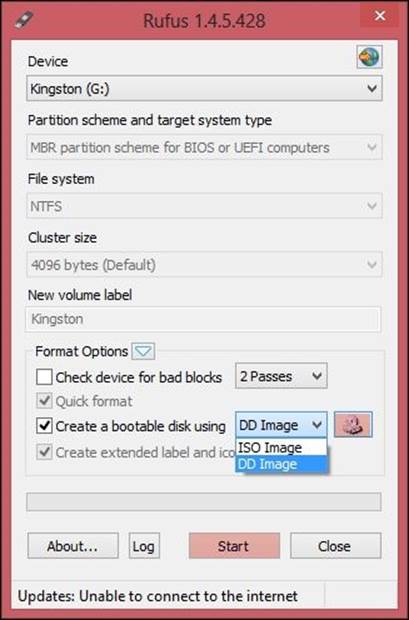
Select DD Image and click on the CD drive icon next to it. This will open a Windows explorer window from where you can browse to the IMG file location to select it. Then, click on the Start button on the program; it will take less than a minute to complete the process.
Note
The USB drive will be renamed to Debian Installer, and its drive letter will be removed so it will disappear from the My Computer window, but you can still find it under Computer Management | Disk Management.
Untangle NGFW installation guide
Untangle NGFW installation is a very simple and straightforward process. If you have installed a Linux OS before, you will be familiar with the steps in this section and you can skip this section. However, if this is the first time you will be installing a Linux OS, you will need to go through this section.
Step 1 – booting and selecting the installation mode
We'll need to boot a dedicated PC using the Untangle NGFW installation media we have just created.
Tip
You may need to change the boot device order to be able to boot from the installation media. The simplest way to achieve this is by pressing F12 at the time of starting your computer (this may differ depending on your hardware manufacturer). The boot menu will display and you can select the desired device.
Successfully doing this will introduce you to the menu shown in the following screenshot, where you can select whether you want to use the graphical or text mode installation. Both modes will walk you through the same wizard; the only difference is the interface. Depending on your VGA card, select the right option for you.

The text interface is shown in the Step 3 – Configuring the system locale section, while the graphical interface is shown in the upcoming sections.
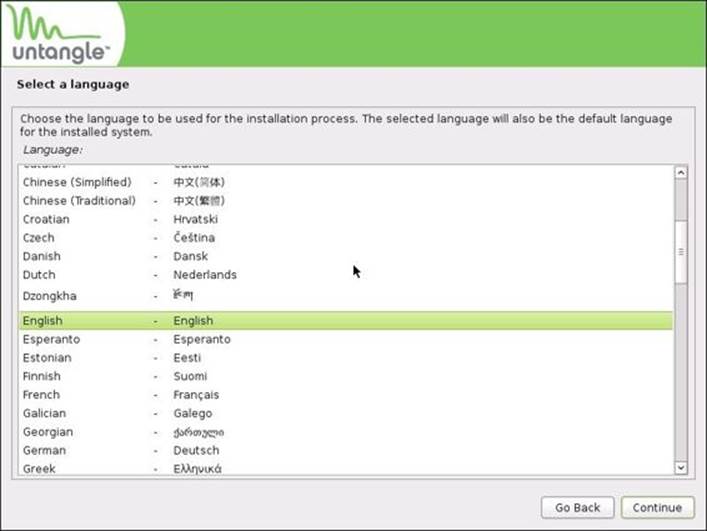
Step 2 – selecting the installation wizard language
In this section, we will need to select the installation wizard language. The selected language will be used in the installation process and will be the default language for the installed system. Note that you can change the system language later after the installation. Choose the language you want from the menu and then click on Continue as shown in the following screenshot:
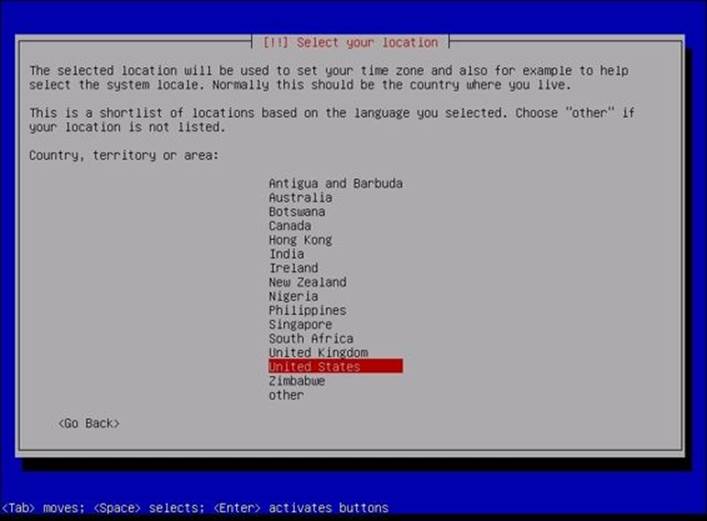
Step 3 – configuring the system locale
In this section, you'll need to select your location as this will help the system to adjust the server time to your time zone and set the system locale. A list of suggested locations will appear based on the language you select in the previous step, as shown in the following screenshot:
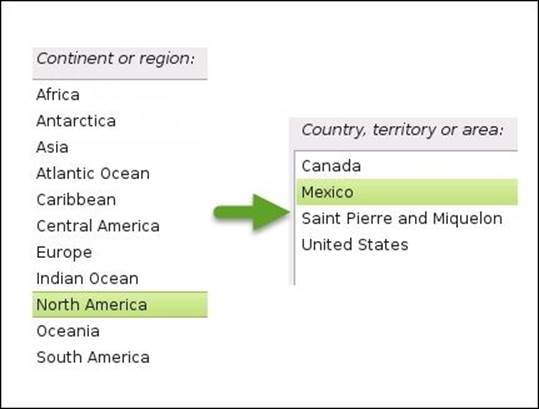
If your country is not listed in the preceding list, you can choose other. This will open a new menu from which you can select your continent/region; as a result, another menu with the countries, territories, and areas located in the selected continent/region will appear, where you can select your country. The following screenshot shows the two menus:
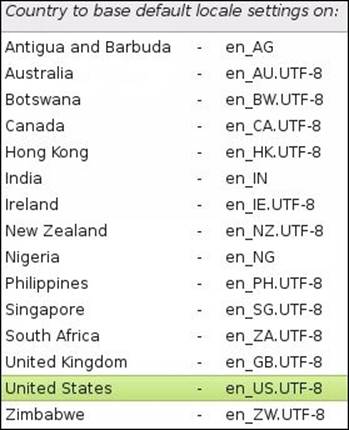
If there is no locale defined for the combination of language and country you have selected, you will be prompted to select a locale from the previously selected language's default locales. For example, if you have selected the English language and selected Algeria (an Arabic locale) as the location, you will be prompted by the installation wizard to select one of the English locales as shown in the following screenshot:
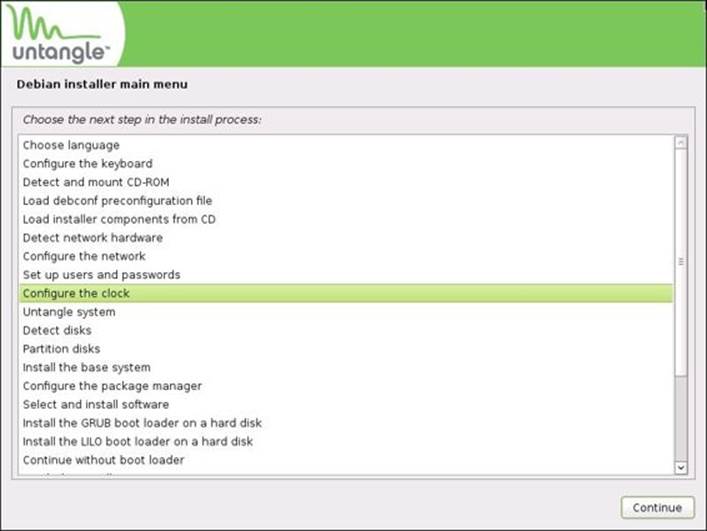
You can go back in the installation wizard at any time to change the configurations. Just press the Go Back button in any menu. This will display the Debian Installer Main menu, which contains all setup steps. All that you have to do is select the step you want and press Continue. The next screenshot shows the Debian installer main menu window:
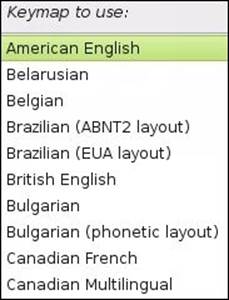
Step 4 – configuring the keymaps
The keymap is the keyboard layout you will use. Different countries have different keyboard layouts. For example, using Shift + 2 in the US keyboard will give you the @ symbol, while using the same combination in the UK keyboard will give you the " symbol. The following image shows the difference between the UK and US keymaps:
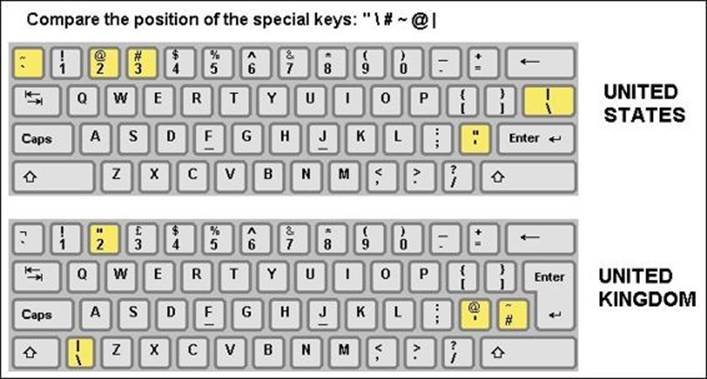
http://www.goodtyping.com/difteclats.htm
In the Untangle NGFW installation wizard, select the desired keymap and press Continue.
After that, the installation wizard will try to detect and mount the CD, load the installer components from the CD, detect the network hardware, and configure the network. Those steps will be streamlined and you will not be prompted for anything.
Note
Some setup steps will be streamlined and will not prompt you for any input; neither the steps will appear on the screen as progress. For example, after detecting the network hardware, you will be prompted to configure the clock, skipping the two steps between them, which are shown in the Debian installer main menu window.
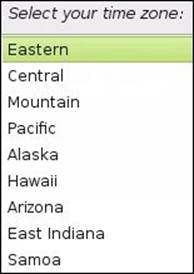
Step 5 – configuring the server's time zone
Based on the selected location in the previous steps, a list of different time zones related to that location will appear to select from. The following screenshot shows the time zones related to the United States:
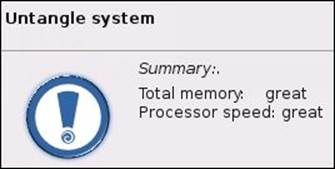
Step 6 – reviewing the hardware rating summary
Based on the summary of your hardware rating and whether or not it meets the recommended requirements, a value will be displayed, as shown in the following screenshot. You may have different values based on your hardware specifications, such as great, OK, and insufficient on 64-bit:
Step 7 – preparing the hard disk
Untangle NGFW will need to format the hard disk as shown in the following screenshot:
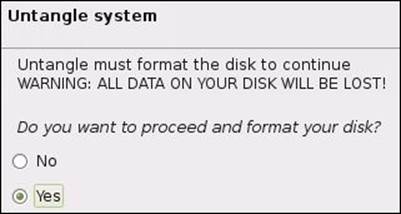
Note
Warning
This will erase any data on the hard disk.
You must press Yes to continue with the installation process.
After that, the Untangle NGFW installation wizard will prompt you to create two hard disk partitions, as shown in the following screenshot. Again, you have to select Yes to be able to continue with the installation process:
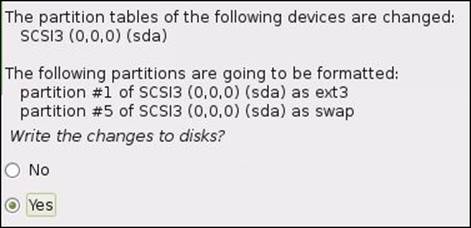
The two partitions are partition #1, which will contain the Untangle server system files and is formatted as ext3 (ext3 is a filesystem used by Linux systems), and the other partition is partition # 5, which will be used as memory swap space (when the RAM is full and the system needs more RAM space, the inactive pages in the memory will be moved to this swap space partition to free some space on the RAM); the partition is formatted as swap, which is similar to to the page file in Microsoft Windows operating systems.
By pressing Continue in the previous window, you will start the installation process. It will take about 10 minutes to complete the installation.
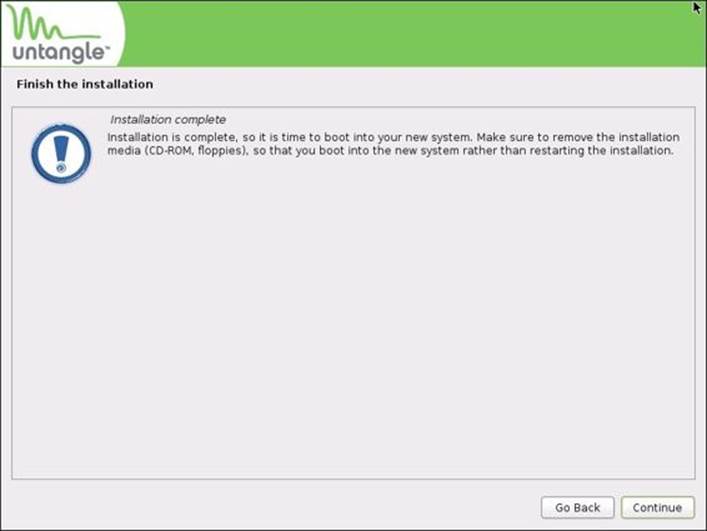
Step 8 – completing the installation
Eventually, the Finish the installation window will be displayed as shown in the following screenshot. It informs you that the installation process has completed, and asks you to remove the installation media from the PC and then restart the system. Thus, you can boot to the Untangle NGFW system instead of booting into the installation wizard again. Just press Continue to exit this wizard and let the Untangle NGFW server restart.
Summary
In this chapter, you saw that Untangle NGFW is available as a downloadable software or as an appliance to be purchased. We defined its hardware requirements. You also learned how to download an Untangle image, how to make a bootable media from this image, the lab environment to be used to practice the scenarios in this book, and finally, had a step-by-step guide through the installation process.
In the next chapter, we'll see the initial configuration of the server.
All materials on the site are licensed Creative Commons Attribution-Sharealike 3.0 Unported CC BY-SA 3.0 & GNU Free Documentation License (GFDL)
If you are the copyright holder of any material contained on our site and intend to remove it, please contact our site administrator for approval.
© 2016-2026 All site design rights belong to S.Y.A.