Untangle Network Security (2014)
Chapter 3. The Initial Configuration of Untangle
Now, after we have successfully completed the installation of Untangle NGFW, it's time to decide how we want to set and run it in our network. This can be achieved through the initial configuration wizard.
First, we will cover the different boot options of Untangle NGFW. After that, we will cover the initial configuration wizard. Essentially, in the initial configuration wizard, we will see how the different NICs will work. Then, we will configure which NIC will face the Internet and which one will face the internal network. We will also configure their IPs. In addition, we will set the admin account password and the automatic upgrade behavior.
After completing the initial configuration, we will need to start downloading and installing the different applications. This requires us to have an Untangle account and to register the Untangle server to this account to be able to install the applications. In this chapter, we will see how we can achieve this. In addition, we will review Untangle NGFW's GUI. Eventually, we will look at the different options available to manage and administer Untangle NGFW.
In this chapter, we are going to cover the following topics:
· Understanding the Untangle boot menu
· The initial configuration wizard
· Creating an Untangle account and registering the server to it
· The Untangle GUI
· The administration console
Understanding the boot options
After the initial restart, a menu with different boot options will be displayed, as shown in the following screenshot:

If no button is pressed within 5 seconds, the option used on the previous boot is automatically chosen. The different boot options are as follows:
· default boot: This is the best option for most servers, and provides you with the best graphical experience.
· safe video mode: This is another video configuration that may work if the default option fails. It attempts the most basic video configuration in a low resolution (1024 x 768).
· kern video mode: This is another video configuration that may work if the previous options fail.
· hardware safe mode: This is another option that might be better for some hardware. It disables APIC and ACPI, and hides the bootsplash screen.
Note
Advanced Programmable Interrupt Controller (APIC) is an architectural design intended to solve interrupted routing efficiency issues in multiprocessor/multicore computer systems.
Advanced Configuration and Power Interface (ACPI) is an open standard that allows the operating system to directly configure, power-manage, and thermal-manage the motherboards. Simply, it changes the way your board communicates with CPU, RAM, PCI slots.
· recovery mode: This option launches the recovery utility, which will be covered later in Chapter 5, Advanced Administration Settings.
To start the initial configuration wizard, select any boot option except the recovery mode option.
The initial configuration wizard
The setup wizard will open automatically when Untangle NGFW first boots.
Note
If you do not have a keyboard, mouse, and monitor connected to the Untangle server, the setup wizard can be reached by plugging a DHCP-configured laptop into the internal interface, and opening a browser at http://192.168.2.1/.
Step 1 – selecting the wizard language
The first step of the initial configuration wizard is to choose the language that will be used through the wizard. Select the language you wish and then press Next to continue:

After selecting the desired language, a welcome screen that thanks you for choosing Untangle will be displayed; press Next to proceed to the next step.
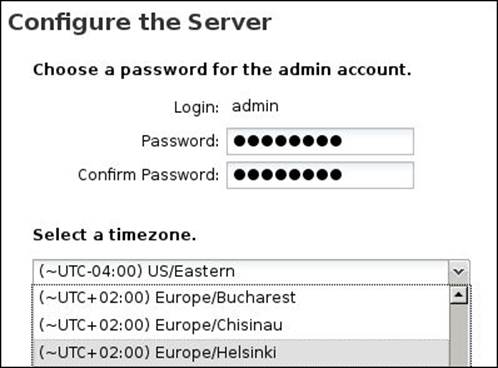
Step 2 – setting the admin password and server's time zone
In this step, you will be asked to set a password for the admin account; the username will be admin, and the password should be three characters at least. Additionally, we will be asked to set the server time zone, which is useful in the preinstalled Untangle NGFW cases (for example, appliances). In our case, we will not have to change these settings as it will reflect the settings that we have configured in Chapter 2, Installing Untangle. Put in your password and change the time zone if necessary and then press Next:
Step 3 – mapping the network cards
In this step, we will map the physical network cards to the desired logical interfaces (that is, determine which physical NIC will act as the external interface and which one will act as the internal interface). An external interface will be the Internet-facing one while the internal one will face the local network.
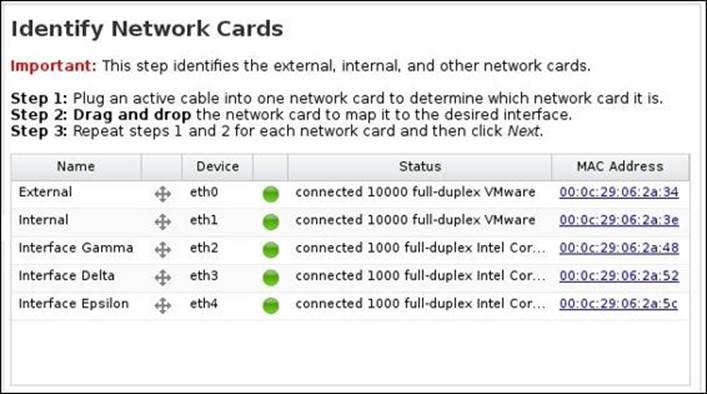
If you have more than two interfaces, the third interface and beyond are disabled by default. You can't rename the interfaces at this step. Managing the interfaces is covered in Chapter 4, Untangle Advanced Configuration.
Note
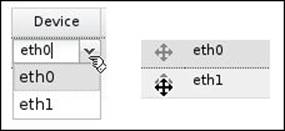
To determine whether the physical network cards are mapped to the correct interface, plug in one cable at a time and verify that it is in the correct position. For example, unplug all network cables from Untangle NGFW. Plug in a cable into the desired external physical network card. If the green light on the external interface of the wizard lights up, that physical network card is mapped to the correct interface. If the green light on another interface lights up, you should drag that device to the external interface using the arrow icon next to the device name. Alternatively, you can select the dropdown on the device and choose the desired device.
Step 4 – configuring the Internet connection
In this step, we are going to configure the external (WAN) interface settings. So, we will configure the interface IP and its gateway and DNS. These settings can be retrieved automatically through DHCP or can be configured manually using static configurations; the third option isPPPoE.
Acquiring automatic configurations from DHCP
The default option is Auto (DHCP), in which the current automatically-assigned address will be displayed if an address was successfully acquired. The Auto (DHCP) option is typical in home and small networks where ISPs provide no static addresses and DHCP is used to hand out addresses. Also, if Untangle is installed behind another device that serves DHCP, this option can be used.
The following screenshot shows the external interface settings of Untangle-01 used in our lab environment:
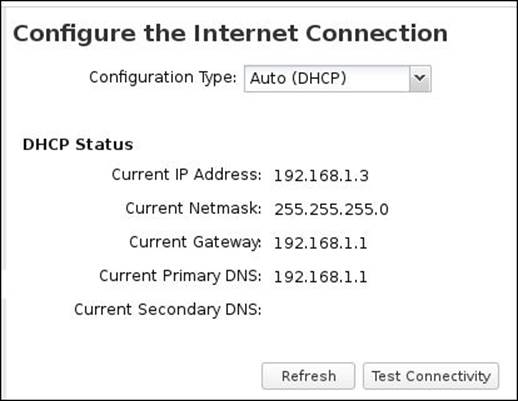
You can ensure the server's ability to connect to the Internet by pressing the Test Connectivity button. Also, the connectivity test will be run automatically if you pressed Next.
Manually configuring the interface settings
For larger networks, a static configuration is preferred. In a static configuration, you manually add the IP configurations using values provided by your ISP.
Note
If Untangle is being installed behind another firewall doing network addresstranslation (NAT), the ISP's public address should not be used. It is common to use the gateway's IP plus one. For example, if 192.168.1.1 is the gateway for Untangle, you can use 192.168.1.2 for the address for Untangle and 192.168.1.1 as the gateway.
The other option is to let Untangle NGFW do the point-to-point protocol over Ethernet (PPPoE) authentication instead of the modem. Also, in this option, you'll need to enter the configuration given to you by your ISP.
Note
If you're in the router mode and have a PPPoE WAN connection, contact your ISP and see whether the modem can do the authentication and pass the IPs to the Untangle server so that you can set the external interface to static. This is a much better situation than having the Untangle server do the PPPoE login as some features (such as multi WAN) will not work with interfaces set to PPPoE.
Step 5 – configuring the Untangle NGFW operation mode
The Untangle NGFW operation mode is determined based on how the internal interface is configured. So, when we say that we are going to configure the Untangle NGFW operation mode, what we are really going to do is configure the internal interfaces.
Untangle is not a proxy; it acts as a transparent filter for traffic. So, you do not point browsers to the Untangle server for traffic filtering as you would with a proxy. Computers on your network will either use Untangle as their gateway, or your network will force their traffic to flow through it. Untangle has two operation modes, router and bridge modes.
Understanding the router operation mode
In the router mode, Untangle will be the edge device on your network and will serve as a router and firewall. You will need to configure the internal interface with a private static IP address (that is, 192.168.2.1). The following diagram shows how Untangle NGFW in the router mode can be deployed in your environment:
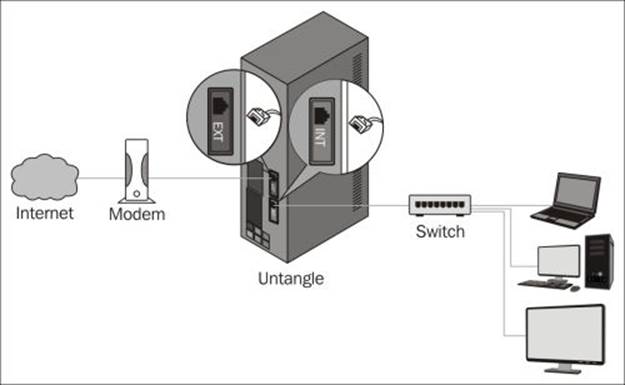
Using the router mode, you can decide whether you want to let Untangle act as a DHCP server or not. In addition, NAT will be enabled so all internal machines will have private addresses and share one public IP (the address of the external interface configured in the previous step).
Note
If you are using the Untangle server in an Active Directory environment, it's better to disable the DHCP service of the Untangle server and use the Windows server DHCP instead.
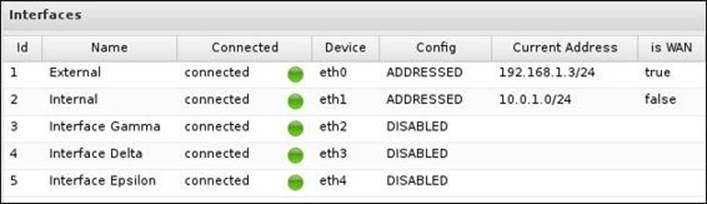
The interfaces will be configured as follows:
Understanding the transparent bridge operation mode
In the transparent bridge mode, Untangle is installed behind an existing firewall and sits between your existing firewall and main switch, whereas in the bridge mode, Untangle is transparent. This means that you won't need to change the default gateway of the computers on your network or the routes on your firewall. The following diagram shows how Untangle NGFW in the transparent bridge mode can be deployed in your environment:
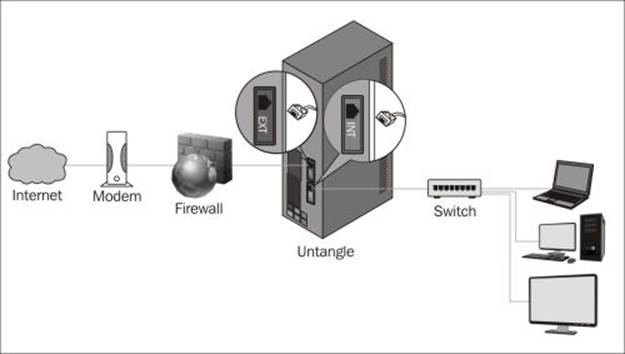
The bridge mode defines the external interface as static and the internal interface as bridged to the external. Thus, the internal interface does not have its own address and simply shares the external's address. It also disables DHCP and NAT by default. An example of Untangle-04 interfaces is shown in the following screenshot:

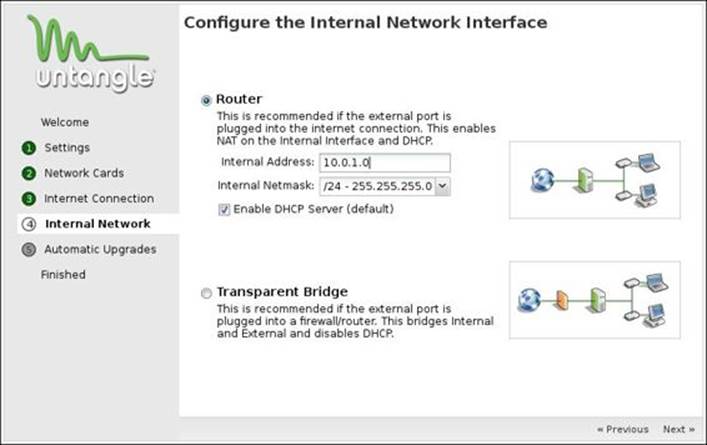
You can configure these settings by selecting the operation mode, providing an internal interface IP, and deciding whether to enable the DHCP service or not.
Note
We can only configure the internal interface (interface number 2); any additional interfaces can be configured later.
The following screenshot shows the operation mode's selection screen. The subnet configured in the following screenshot is the ABC-users subnet on Untangle-01:
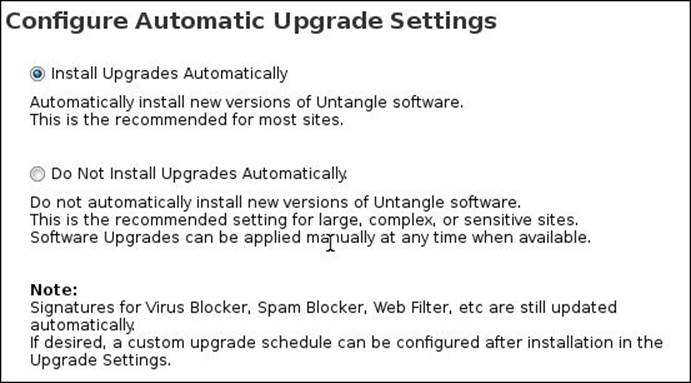
Step 6 – configuring the automatic upgrade settings
Here, we will be asked to configure the automatic upgrade settings. These settings are related to the Untangle system itself and will not affect the update behavior of the Untangle filters, such as the signature updates of the Virus Blocker and Spam Blocker, as these filters will continueto automatically update regardless of which setting is selected here. You can allow automatic upgrades or disable them. If the option of automatic upgrades is enabled, the server will automatically check for new versions and upgrade automatically between 1 a.m. and 2 a.m. every morning. The following screenshot shows different automatic upgrade options:
Step 7 – finishing the initial configuration wizard
Now, we have completed the initial configuration wizard and are ready to download and configure the applications; press Finish to load the Untangle system.
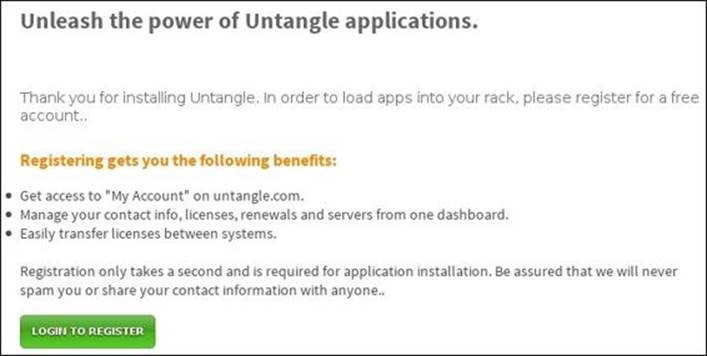
Registering your server
You need an Untangle account to manage your subscriptions, invoices, billing information, and so on, even if you are using the free applications only. To be able to start download and use the different apps, you need to assign the new server to your Untangle account. After the initial login to the system, you will be asked to register your server as shown in the following screenshot:
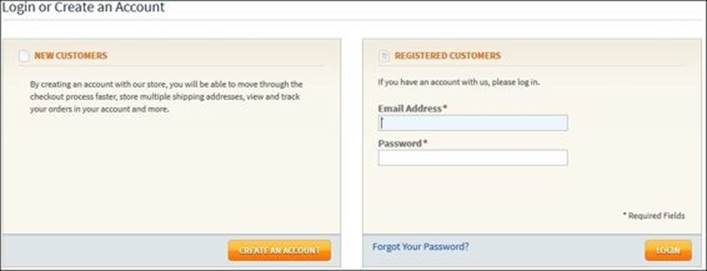
Click on the LOGIN TO REGISTER button. This will open a new window in which you can log in with your existing Untangle account or register for a new account. The registration process is very simple. You will be prompted only for your first and last names, e-mail address, and a password for this account, as shown in the following screenshot:
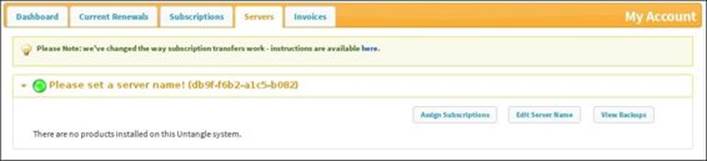
After successfully logging in with your Untangle account, the new server will be added to your account under the Servers tab, as shown in the following screenshot:
After setting the Untangle account under which Untangle NGFW will be added, you will be asked whether you want to install the recommended apps (that is, the complete package) or whether you want to install apps manually later. Here, I have selected No, I will install the apps manually to show you how to add the apps manually later:

Reviewing the GUI
Untangle NGFW GUI is one of the simplest and richest user interfaces you could ever work with. The following screenshot shows the Untangle interface along with the description of the different components:
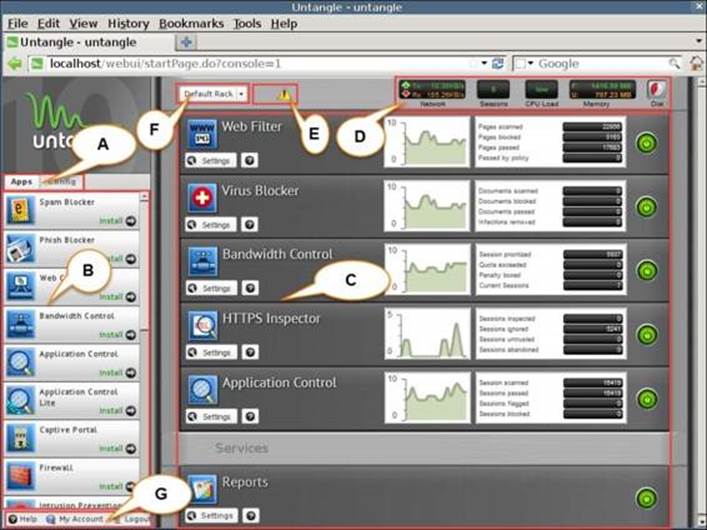
· A: These are Apps that allow you to manage the different Untangle NGFW modules. Config allows you to configure the Untangle NGFW server.
· B: If Apps is selected, this section will show the applications available to be installed. If Config is selected, this section will show the different configuration settings.
· C: This section contains the installed modules. Each module has a faceplate that displays the scan traffic status. In addition, managing the applications is done through this faceplate.
· D: This section monitors the server resources' utilization, the amount of traffic, and the number of sessions.
Tip
Hovering over any of the monitors will show a pop up with detailed information.
· E: Administration alerts appear in this area. An example of administration alerts could be a warning about using the Internet Explorer to manage Untangle NGFW. A full list of administration notifications can be found athttp://wiki.untangle.com/index.php/Administrative_Alerts.
· F: This drop-down menu is used to switch between the different virtual racks or to select the session viewer or the host viewer.
· G: This gives you an access to the Untangle wiki through the Help button. You can also access your Untangle account from the My Account button, and finally, you can log out from this administration console by clicking on the Logout button.
Untangle NGFW administration options
The initial installation and configuration of Untangle NGFW is often done via the local console (that is, a keyboard, mouse, and monitor directly attached to the server). As the Untangle server will normally be located inside a data center, the local console is not a suitable solution for day-to-day administration, but it is still necessary if any issue is preventing remote administration. Additionally, some functionality are only available through the local console.
When you boot your Untangle NGFW using the local console, the following options will be available for you:
· Launch Client: This allows you to manage Untangle NGFW locally through the Iceweasel browser.
· Reboot and Shutdown: This enables you to reboot or shut down your Untangle NGFW server. The options are also available through the browser administration console.
· Recovery Utilities: This allows you to recover Untangle NGFW. This tool is described in Chapter 5, Advanced Administration Settings.
· Terminal: This allows you to manage Untangle NGFW through the command line.
The preceding options are illustrated in the following screenshot:

Note
Any configurations done via the terminal are not supported by Untangle, Inc. and may lead to the loss of server support, although throughout this book, we will use the GUI to configure our server.
The terminal is useful for troubleshooting. A list of troubleshooting commands can be found at http://forums.untangle.com/installation/13877-list-good-troubleshooting-commands.html.
Untangle NGFW can be administered remotely via a web browser or via SSH, as follows:
· Web browser from LAN: This uses the IP of the internal interface of Untangle NGFW. Also, the host name of Untangle NGFW could be used if it's resolvable. An example would be http://10.0.0.1.
· Web browser from WAN: This uses the IP of the external interface of Untangle NGFW. Also, the hostname of Untangle NGFW could be used if it's resolvable. The administration is available only via HTTPS and it's disabled by default. An example would behttps://203.0.113.1.
· Using SSH: SSH is disabled by default, and we suggest you keep it as is. As the case with the terminal, any changes done through SSH are not supported by Untangle, Inc.
Summary
In this chapter, you learned about the different boot options of the Untangle server and the different methods to administer the server locally and remotely. We also walked through a step-by-step guide of the initial configuration wizard and reviewed the router and the bridge operation modes. Additionally, we learned how to create an Untangle account and how to register the server to that account. We also quickly reviewed the Untangle GUI.
In the next chapter, we are going to do a more advanced configuration that is related to the Untangle server.
All materials on the site are licensed Creative Commons Attribution-Sharealike 3.0 Unported CC BY-SA 3.0 & GNU Free Documentation License (GFDL)
If you are the copyright holder of any material contained on our site and intend to remove it, please contact our site administrator for approval.
© 2016-2026 All site design rights belong to S.Y.A.