Untangle Network Security (2014)
Chapter 4. Untangle Advanced Configuration
At this point, Untangle has the basic configuration that will work for most networks. However, some networks require some more configurations. Any additional interfaces that are installed on Untangle NGFW were not available to be configured during the running of the initial configuration wizard. In this chapter, we will learn how to configure additional interfaces.
In addition, this chapter will teach you about the placement options for Untangle NGFW, and how the traffic is passed through the system. Also, this chapter will show you how to configure an Untangle NGFW hostname and the ports that the Untangle NGFW services run at (such as, the Administration Interface) to allow any internal services that use the same port to work. Also, we will cover Untangle functionality such as router, DNS, and DHCP.
After that, we will cover the concept of Untangle NGFW rules and how they work. Next, we will cover some rules such as port forwarding and NAT. Eventually, this chapter will end with a guide on how to troubleshoot any connectivity issues.
In this chapter, we will cover the following topics:
· Untangle NGFW placement options
· Untangle NGFW architecture
· Managing Untangle NGFW interfaces
· Configuring Untangle high availability
· Configuring the Untangle NGFW hostname
· Configuring Untangle NGFW Services ports
· Untangle network services such as router, DNS, and DHCP
· Untangle rules
· Network troubleshooting
Untangle placement options
There are several key rules to how Untangle NGFW operates that should be understood before deploying Untangle NGFW in an advanced/complex network:
· Untangle must be installed in line: Untangle NGFW is a gateway product that is designed to be in line with network traffic. Deploying Untangle NGFW without installing it in line is not likely to work. Examples of the Untangle NGFW in-line functionality include Spam Blocker, which will filter SMTP as it passes through Untangle NGFW; it will not store and forward the e-mails to your e-mail server like some products. In addition, Web Filter will filter web traffic as it passes through Untangle NGFW; it does not operate as a proxy that you point your clients' browsers to send web traffic.
· Untangle MUST have a working Internet connection: Many Untangle NGFW modules depend on cloud services to get definitions and query them about URLs and so on. Untangle NGFW must have a working and consistent connection to the Internet; this includes unfiltered HTTPS, HTTP, and DNS access to various cloud services.
· Untangle routes ALL traffic according to its routing table: When Untangle NGFW receives packets on an interface, it will look up where to send it in the routing table/rules (this also includes bridged interfaces). If you have a subnet that Untangle NGFW doesn't know about or have a route for, then the traffic will be sent back to the default gateway even if those hosts are internal. For Untangle NGFW to operate correctly, you must configure Untangle NGFW with a complete routing table so it knows how to reach all hosts on your network.
After considering the mentioned rules, it is time to decide where to place Untangle NGFW on the network. Since Untangle NGFW must be installed in line with all network traffic, we will have the following placement options:
· Installing Untangle NGFW as the gateway/firewall for the network (Router Mode): This is the simplest and recommended approach. This approach allows Untangle NGFW to leverage its full set of features including WAN Failover and WAN Balancer. This also places it in a suitable place to handle other separate internal networks that may only connect at the gateway (such as wireless segments). In addition, if you have tagged VLANs, it is much simpler to manage them using this approach.
· Installing Untangle NGFW behind an existing gateway/firewall in flow with traffic (Transparent Bridge Mode): Often, organizations don't want to replace an existing gateway/firewall. Installing Untangle NGFW in this mode allows it to scan and process network traffic without providing the routing functions of your firewall.
· Installing Untangle NGFW in front of an existing firewall or device that performs NATing: Though this option is technically possible, it's not recommended. Firewalls/gateways use NAT to allow all internal hosts to share external IPs; thus, Untangle NGFW will not be able to differentiate between internal hosts (as the traffic coming from them will appear as if it comes from the other NAT device). So, the Untangle NGFW functionality (such as web filters, reports, shields, and so on) will be severely compromised.
Understanding the architecture of Untangle NGFW
The Untangle NGFW architecture includes a kernel—Untangle VM (UVM)—and apps.
Untangle NGFW itself runs on the UVM; thus, any traffic directed to Untangle NGFW local services (such as the administration console) will be processed on the UVM. In addition, unlike other Linux products, the network processes (such as routing, NATing, and so on) are done on the UVM and not the kernel.
Untangle applications run on the UVM. When traffic comes to the Untangle NGFW server, the packets' stream will be endpointed on the UVM and reconstructed at layer 7 (the application layer). The data then flows through the applications for scanning, and if passed, the data is eventually put back into new packets and sent on its way.
So, the possible actions that can be done on incoming streams are as follows:
· Incoming streams can be bypassed at the kernel level (the traffic will be forwarded to its destination without scanning)
· Incoming streams can be dropped at the kernel level (based on filter rules, the traffic can be blocked based on its criteria, way before being scanned by the applications, which increases resource utilization)
· Incoming streams can be forwarded to Untangle NGFW local services (such as the administration interface)
· Incoming streams can be forwarded to be scanned by the applications (different actions can be done based on the scan result, such as passing or blocking the traffic, or modifying the traffic contents)
The following figure shows the architecture of Untangle NGFW:

Managing Untangle NGFW interfaces
In the initial configuration wizard, we have configured both the internal and external interfaces. Any additional interfaces are disabled by default and must be configured before we can use them. This section will cover the different use cases of the additional interfaces. In addition, it will cover the different configuration settings of the Untangle NGFW interfaces.
Common uses of additional interfaces
This section concludes the different uses of additional interfaces; detailed configurations will be described later in this chapter. The different uses include:
· Additional WAN interfaces: Adding additional WAN interfaces is useful to have a reliable Internet connection by failover / load balancing between the different interfaces. Just configure the new interface as a WAN interface and enter the IP configuration details provided to you by your ISP.
· Additional internal interfaces: You may have different subnets inside your network. In the initial configuration wizard, we configured only one internal interface; any other internal interfaces need to be configured. Just configure the new interface as a non-WAN interface andenter IP configurations suitable for the subnet you want to add.
· Demilitarized Zone (DMZ): If you have servers with public IP addresses, you can isolate them from your internal network by putting them inside the DMZ. This is done by bridging the additional interface to the external interface.
· Additional NICs for existing networks: For redundancy, you can make two interfaces serve the same subnet. For example, if you want to provide redundancy for the internal subnet, you will need to bridge the additional interface to the internal interface.
Configuring Untangle NGFW interfaces
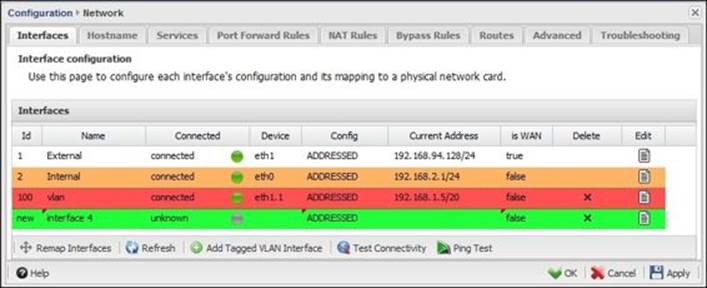
We can configure the Untangle NGFW interfaces, review their details, remap them, create VLAN interfaces, and perform basic troubleshooting by navigating to Config | Network | Interfaces. The different options available under the Interfaces screen are as follows:
· Edit: This opens the interface configuration menu
· Remap Interfaces: This allows you to change the mapping between a physical device and logical interfaces
· Refresh: This refreshes the interface's connection status (that is, connected or disconnected)
· Add Tagged VLAN Interface: This allows you to create up to 4094 virtual LAN interfaces that share the same logical interface (that is, a physical NIC)
· Test Connectivity: This verifies that the server is connected to the Internet
· Ping Test: This launches the ping test for configuration troubleshooting
The following figure shows the details of Untangle-01 interfaces:
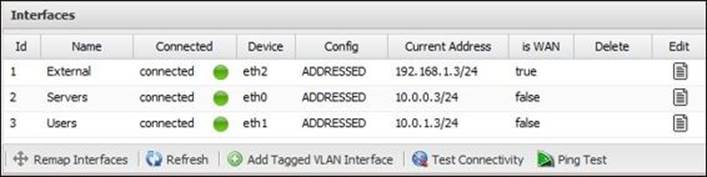
The different configuration types available for Untangle NGFW interfaces are:
· Addressed: The interface will have its own IP address and configuration
· Bridged: The interface doesn't have its own address, and all the traffic is directed to another interface
· Disabled: The interface will not respond to any traffic
· VLAN: VLANs or Virtual LANs are commonly used to create completely separated subnets (including separate broadcast domains) that share the same wire using 802.1q tagging (IEEE 802.1q is a standard that defines a system of tagging for Ethernet frames)
Addressed interfaces
To configure an Untangle NGFW interface in order to make it an addressed interface, select the Addressed config type under the Edit menu. Under the Edit menu, you can provide the Interface Name and select whether it will be a WAN interface or not.
As addressed interfaces have their own IP and configurations, we will need to configure these settings. Untangle NGFW interfaces can be configured using IPv4 and IPv6. However, IPv6 is disabled by default.
The required IP settings are the Interface IP, its default gateway, DNS, and DHCP servers. These configurations can be provided either automatically or manually.
Note
Only WAN interfaces can be assigned dynamic IPs, while non-WAN interfaces can only be assigned static IPs.
It's advisable to configure the interface from the top of the page downward, as the available options vary depending on the selected settings.
The following table covers the available IPv4 configuration settings:
|
Option |
Description |
|
Config Type |
Static: This interface has a static IPv4 address. Auto (DHCP): This interface will use DHCP to automatically acquire an address. PPPoE: This interface will use PPPoE to acquire an address. This option is only available for WAN interfaces because non-WANs can only be statically configured. |
|
Static Config Type |
|
|
Address |
This is the manually-entered IP address. It is only shown if Config Type is Static. |
|
Netmask |
This is the manually-entered netmask. It is only shown if Config Type is Static. |
|
Gateway |
This is the manually-entered static gateway. It is only shown if Config Type is Static. |
|
Primary DNS |
This is the first manually-entered DNS server for DNS queries' resolution. It is only shown if Config Type is Static. |
|
Secondary DNS |
This is the second manually-entered DNS server for DNS queries' resolution. It is only shown if Config Type is Static. |
|
Auto (DHCP) Config Type |
|
|
Address Override |
The address entered here will be used instead of the one acquired by DHCP. It is only shown if Config Type is Auto (DHCP). |
|
Netmask Override |
The netmask entered here will be used instead of the one acquired by DHCP. It is only shown if Config Type is Auto (DHCP). |
|
Gateway Override |
The gateway entered here will be used instead of the one acquired by DHCP. It is only shown if Config Type is Auto (DHCP). |
|
Primary DNS Override |
The primary DNS entered here will be used instead of the one acquired by DHCP. It is only shown if Config Type is Auto (DHCP). |
|
Secondary DNS Override |
The secondary DNS entered here will be used instead of the one acquired by DHCP. It is only shown if Config Type is Auto (DHCP). |
|
Renew DHCP Lease |
This sends a new lease request to the DHCP server. It is only shown if Config Type is Auto (DHCP). |
|
PPPoE Config type |
|
|
Username |
This is the PPPoE username as provided by your ISP. It is only shown if Config Type is PPPoE. |
|
Password |
This is the PPPoE password as provided by your ISP. It is only shown if Config Type is PPPoE. |
|
Use Peer DNS |
If checked, the DNS settings provided by the PPPoE server will be used. It is only shown if Config Type is PPPoE. |
|
Primary DNS |
This is available if Use Peer DNS is not checked; the entered settings will be used as the primary DNS for DNS queries' resolution. It is only shown if Config Type is PPPoE. |
|
Secondary DNS |
This is available if Use Peer DNS is not checked; the entered settings will be used as the secondary DNS for DNS queries' resolution. It is only shown if Config Type is PPPoE. |
|
Advanced Options |
|
|
IPv4 Aliases |
These are additional IP addresses that can be concurrently used with the configured IP. |
|
IPv4 Options—NAT traffic exiting this interface (and bridged peers) |
This is only available for WAN interfaces and, by default, it is checked. It will NAT all traffic that exits from this interface and any interfaces bridged to—Additional information can be found in the NAT Rules part. |
|
IPv4 Options—NAT traffic coming from this interface (and bridged peers) |
This is only available for non-WAN interfaces, and by default, is unchecked. It will NAT all traffic that comes from this interface and any interfaces bridged to. Additional information can be found in the NAT Rules part. |
The following table covers the IPv6 configuration options:
|
Option |
Description |
|
Config Type |
Disabled: This interface has no IPv6 configuration. Static: This interface has a static IPv6 address. Auto (SLAAC/RA): This interface will use SLAAC to automatically acquire an address. This option is only available for WAN interfaces because non-WANs can only be statically configured. |
|
Address |
This is the IPv6 static address. This is allowed to be blank, which means no IPv6 address will be given. It is only shown if Config Type is Static. |
|
Prefix |
This is the IPv6 static prefix. It is only shown if Config Type is Static. |
|
Gateway |
This is the IPv6 static gateway. It is only shown if Config Type is Static. |
|
Primary DNS |
This is the primary DNS used for DNS resolution. It is only shown if Config Type is Static. |
|
Secondary DNS |
This is the secondary DNS used for DNS resolution. It is only shown if Config Type is Static. |
|
IPv6 Aliases |
These are additional IP addresses that can be concurrently used with the configured IP. This is only available on non-WAN interfaces. |
|
IPv6 Options—Send Router Advertisements |
This is only available for non-WAN interfaces. If checked, route advertisements will be sent to this interface. |
Note
When you create, delete, or modify settings on Untangle NGFW, the new settings will not be immediately applied. The affected option will be highlighted with a color that reflects the changes made on this option. Green highlights reflect a newly created option, orange highlights reflect a modified option, and the red highlights reflect a deleted option. You will need to confirm these modifications by clicking on the Apply or OK buttons, or you can discard them via the Cancel button.
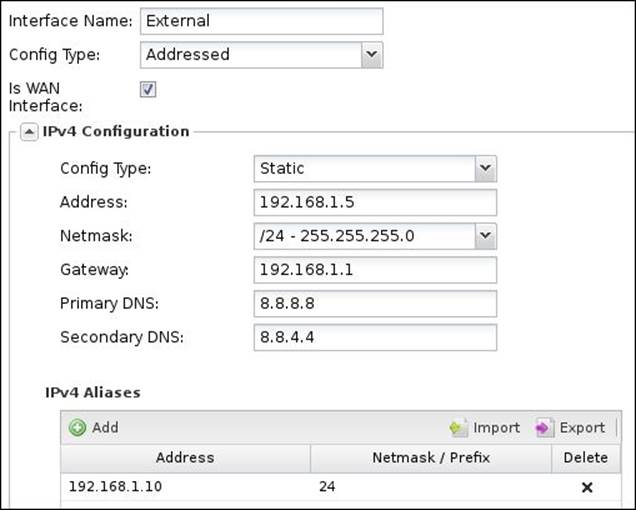
The following figure shows the external interface on Untangle-03 where it's configured statically with an 192.168.1.5 IP. In addition, it has an alias IP of 192.168.1.10.
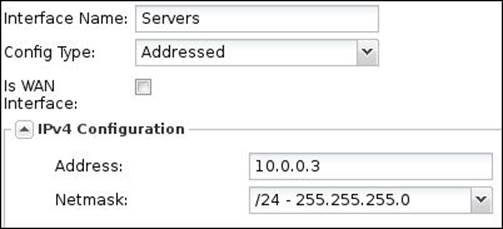
The following figure shows the configuration settings of the server's interface on Untangle-01:
As part of the interface configuration, we will need to configure how internal interfaces will respond to the DHCP requests. Under DHCP Configuration, we can configure the DHCP serving settings of this interface. DHCP serving is only available on addressed non-WAN interfaces. The following table shows the different DHCP configuration settings:
|
Option |
Description |
|
Enable DHCP Serving |
This allows Untangle NGFW to serve a DHCP request on this interface |
|
Range Start |
This is the beginning of the DHCP address pool; if this is blank, Untangle will automatically choose an address based on the interface's static address |
|
Range End |
This is the end of the DHCP address pool; if this is blank, Untangle will automatically choose an address based on the interface's static address |
|
Lease Duration |
This is the validity duration of the provided DHCP leases in seconds |
|
Gateway Override |
This defines the gateway to be provided in the DHCP leases; you can specify a value or leave it blank to use the static gateway of this interface |
|
Netmask Override |
This defines the Netmask to be provided in the DHCP leases; you can specify a value or leave it blank to use the static netmask of this interface |
|
DNS Override |
This defines the DNS settings to be provided in the DHCP leases; you can specify a value or leave it blank to use the static DNS settings of this interface |
|
DHCP Options |
Here, we can configure additional DHCP options such as PXE and NTP servers. You can find a list of the different DHCP options at http://www.networksorcery.com/enp/protocol/bootp/options.htm. For example, to specify an NTP server, we will use the following format: enabled = true, description = "time server", and value = "42,192.168.1.2" In the preceding code, 42 is the NTP option number, and 192.168.1.2 is the NTP server. The value must be specified in a valid dnsmasq format, as described at http://www.thekelleys.org.uk/dnsmasq/docs/dnsmasq-man.html. |
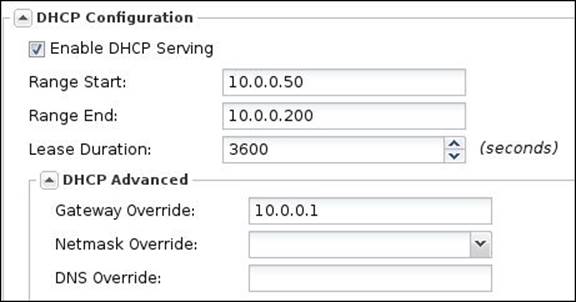
The following figure shows the DHCP settings for the server's interface on Untangle-01. The gateway is configured to be overridden by the Virtual IP used for Untangle high availability.
Bridged interfaces
In Untangle NGFW, when two interfaces are bridged, this means they are effectively sharing a configuration (that is, they are in the same zone, or they both connect to the same network space). The different modes to use bridged interfaces include:
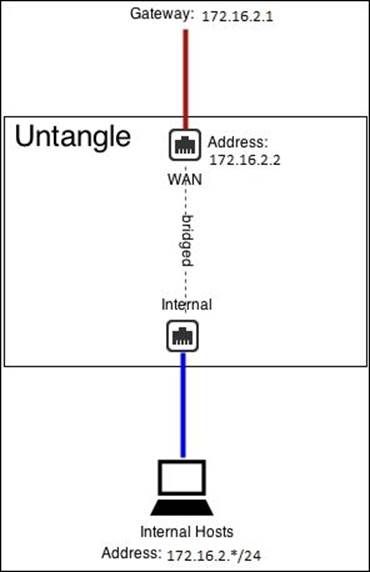
· Standard bridge mode: The most common scenario is to use the standard bridge mode where the external interface is bridged to the internal interface. This is extremely useful when there is a firewall upstream.
The following figure shows Untangle-04 located on Acme-Branch, which is located behind an existing firewall. The old firewall IP is 172.16.2.1, and you can see that Untangle shares the same subnet.
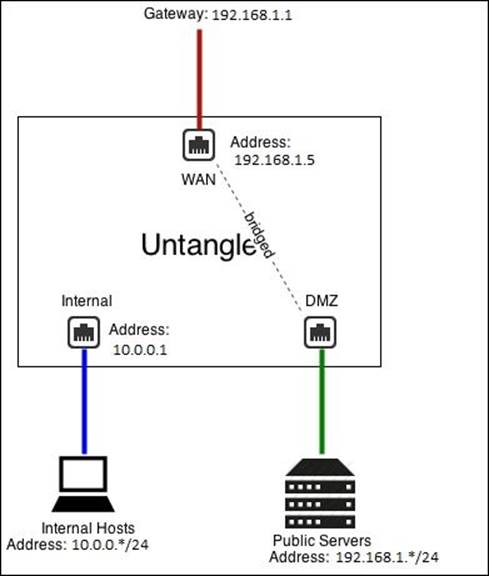
· DMZ Bridge: This is useful in scenarios when you have public servers and want to keep them separate from the internal network to avoid NAT/port forwarding issues. The DMZ interface is bridged to the external interface (so that the server would be as it is on the Internet directly and not behind a firewall).
The following figure shows the configuration of a DMZ interface on Untangle-03:
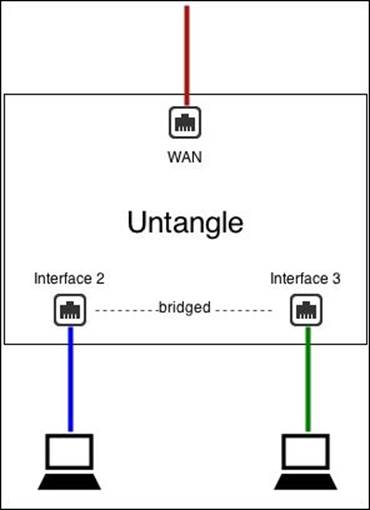
· Additional Port: This bridge mode can be used to provide alternate ports to existing interfaces/zones. Be careful, as the traffic between the two interfaces goes through Untangle!
For example, if Interface 2 is configured as 10.0.1.4/24 and Interface 3 is bridged to Interface 2, then they are both effectively 10.0.1.4. Basically, Interface 3 becomes an additional port for the Interface 2 network.
The following figure illustrates the Additional port case.
VLANs
VLANs have several uses. The first is to create multiple, completely separate internal subnets on a network without using multiple physical networks; the second use is when you are limited with a number of interfaces on your server.
Note
Using VLANS requires VLAN-enabled switches and products throughout the network.
If you want to use a single network card but you don't care about keeping the two LANs separate, you don't need VLANs and can just use aliases/routes.
You can create a VLAN interface by clicking on the Add Tagged VLAN Interface button on the bottom of the interface's screen (Config | Network | Interfaces). You will just need to complete the following data:
· Interface Name: Give a name for this interface
· Parent Interface: This is the logical interface under which the VLAN interface will be created
· 802.1q Tag: This tag is used to differentiate between the VLANs, and can take a value from 1 to 4094
After providing the preceding data, you can configure the interface as any normal interface.
Configuring Untangle NGFW high availability
The Untangle NGFW high availability approach is based on the Virtual Router Redundancy Protocol (VRRP). VRRP is a network protocol that provides redundancy and high availability when using a statically configured router on a Local Area Network (LAN).
Multiple Untangle servers can run in parallel to provide a high availability configuration. Thus, one Untangle NGFW server will be the master (that is, the server with the highest priority) and the other servers will be the slaves.
All Untangle NGFW servers must be on and configured with static IPs and with a VRRP virtual address. The master server is the only Untangle NGFW to answer/handle traffic routed to the VRRP virtual address. When the master server fails, the slave server with the next highest priority will take over the master role; thus, the network traffic will continue to flow without any interruption.
Note
You will need to configure the clients to connect to Untangle NGFW servers using the VRRP virtual address.
There is zero state sharing between Untangle NGFW servers. The session tables are separate, so sessions will be reset if the slave takes over. Furthermore, application data is not shared or synchronized between servers.
Note
All Untangle NGFW servers' interfaces must be configured statically, and there must be no bridged interfaces. Parallel Untangles configured as bridges will create a bridge loop.
The high availability options can be configured by navigating to Config | Network | Interfaces | Redundancy (VRRP) Configuration. The available options include:
· Enable VRRP: This enables/disables the VRRP.
· VRRP ID: This is used to define the members of the same VRRP group. The VRRP ID must be unique on the server.
· VRRP Priority: This defines the priority of the server; based on this priority, the master server is selected, along with the next server to take over the master role when a failure occurs.
· VRRP Aliases: This includes the virtual addresses that will be used in server communication instead of their real IPs; the traffic coming to this virtual address will be forwarded to the master server.
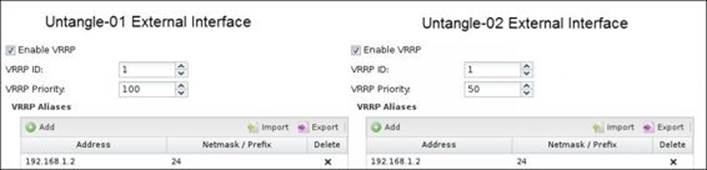
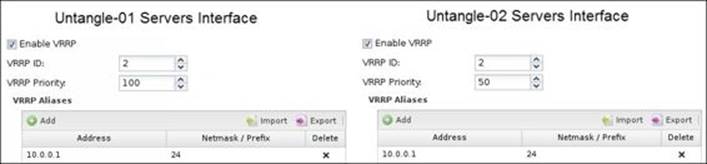
The following screenshots show the configurations done on Untangle-01 and Untangle-02 to make them work on a high availability mode. Untangle-01 is configured to be the master (since it has the highest priority). We will have three VRRP IDs (one for the external interface, another for the server's interface, and the final one for the user's interface).
Tip
You can still configure HA for just the external interface or the internal interface.
The following figure shows the settings done on the external interfaces on both the servers:
The following figure shows the server interface VRRP settings on both the servers:
If Untangle NGFW is providing DHCP, configure Untangle-01 as the authoritative one with 10.0.0.1 as the Gateway Override, and configure Untangle-02 in the same way as Untangle-01 but as non-authoritative. This way, Untangle-01 will handle all DHCP leases unless it is down, in which case Untangle-02 will handle DHCP.
VRRP acts very quickly in the case of a failure, and usually switches in less than a few seconds. However, TCP sessions will be reset as the state is lost.
Tip
To test the VRRP functionality, open CMD on ABC-Client01 and write Ping 8.8.8.8 –t. Then, try to unplug one interface at a time; you'll notice that the failover is done within a few seconds.
Configuring the Untangle NGFW hostname
The hostname settings can be configured by navigating to Config | Hostname. In this tab, we can set the fully qualified domain name (FQDN) of the Untangle NGFW server (that is, the hostname + domain name). The FQDN can be used in Untangle NGFW's publicly-available services such as the VPN, and in quarantines; you will need to ensure that the Untangle NGFW FQDN is resolvable in DNS to the Untangle NGFW public IP.
Dynamic DNS is helpful in dynamic IP scenarios as instead of configuring your services with an IP that could be changed at any time, you will configure the services with a domain name that will dynamically resolve to the current dynamic-assigned IP.
There are many Dynamic DNS providers that can be used with the Untangle NGFW server; you will need to subscribe with a Dynamic DNS service provider before you can start to use their services.
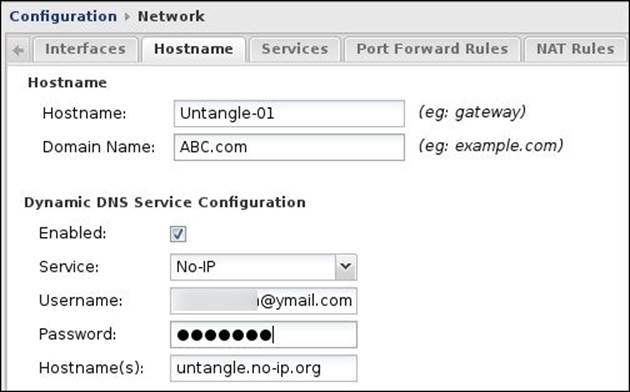
The following screenshot shows the hostname configuration for Untangle-01:
Configuring Untangle NGFW Services ports
The Services settings that are available by navigating to Config | Network | Services are used to define the ports that will be used to access the web services hosted on the Apache server located on Untangle NGFW, such as the Administration interface, Spam Quarantine, Reports, and Blockpages.
By default, ports 80 and 443 are used to access these services. TCP traffic directed to the primary address of each interface on the HTTPS port will be forwarded to the local web server to provide services. So, when you have an internal service that needs to run on the default HTTPS port, you'll have to change the Untangle NGFW Services port, or add an alias IP to the interface and port forward the traffic directed to the alias IP to the internal service.
For example, if we set the new HTTPS port to 4343, we will use https://172.16.1.1:4343/ to access the Untangle-03 administration console instead of the default https://172.16.1.1/.
HTTP access to Untangle NGFW services form external interfaces is prohibited and is only available for non-WAN interfaces. So, cases where you will need to change the HTTP services port are rare, but you can do so.
Untangle NGFW network services
In this section, we are going to learn about the Untangle NGFW functionality as a router, DNS server, and DHCP server.
Untangle NGFW as a router
If we have a certain subnet that is not directly attached to an Untangle NGFW interface (that is, behind another local router), we will need to define how Untangle NGFW can reach this subnet (that is, the route to this subnet). If no route was set, all the traffic destined to this subnet will be directed to the default gateway instead.
Untangle NGFW only supports static routes. You can configure the routes by navigating to Config | Network | Routes.
To set a route, we will need to define the following settings:
· The destination network: This is the remote subnet (for example, 10.0.5.0/8)
· The Next Hop: This defines how we can reach the destination network (that is, the local router interface that is seen by the Untangle NGFW); there are two options to use as the next hop:
o Using IP address: All traffic to the destination network will be routed to the specified IP address
o Using Untangle NGFW interface: All traffic to this network will be routed locally on the specified IP address using ARP to resolve those hosts
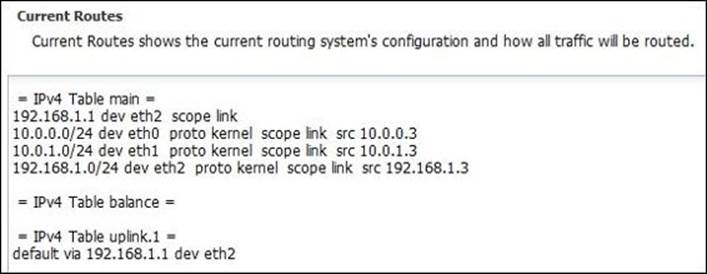
· Refresh Routes: This button will show you the current routing table, as displayed on the following screenshot:
The Untangle NGFW DNS service
Untangle NGFW DNS Server Options are available at Config | Network | DNS Server. A DNS server is used to resolve hostnames to its IP addresses. The external DNS queries are forwarded to the DNS configured in the interface settings. The internal DNS queries can be resolved via preconfigured static entries set on Untangle NGFW or by forwarding the query to another internal DNS server.
The static entries can be configured under Static DNS Entries, and this is suitable for servers that have a static IP. The following figure shows a DNS record for Acme-EX01 configured on Untangle NGFW:
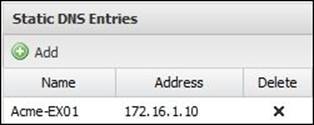
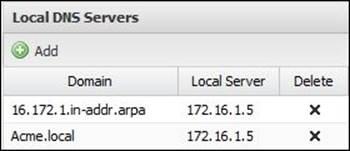
To forward the DNS queries to an internal DNS server, you will need to add the server under Local DNS Servers. The following figure shows that 172.16.1.5 is configured to resolve any queries about Acme.local; in addition, it's configured to resolve any reverse DNS lookups about the 172.16.1.* subnet (to configure the reverse DNS lookup settings, add subnet.in-addr.arpa as the domain):
It's typical for small environments to use the Untangle DNS server, while for Active Directory environments, it's better to use the Active Directory integrated zone option.
Note
You can set the DHCP settings under the internal interfaces to distribute the DNS configurations of your internal DNS directly, or you can leave it unchanged, which will distribute Untangle NGFW IP to be used to resolve the internal DNS queries. If the Untangle NGFW is configured to resolve the DNS queries, then we have to configure settings under Config | Network | DNS Server.
The Untangle NGFW DHCP service
We can configure DHCP serving for a particular interface by checking Enable DHCP Serving under that interface configuration. The DHCP Server tab (Config | Network | DHCP Server) gives us the ability to set DHCP reservation by setting Static DHCP Entries; thus, a certain MAC address will always get the same IP.
In addition, we are able to review the active DHCP leases and their expiration time, and we can even make them static entries under Current DHCP Leases:

DNS and DHCP advanced options
Untangle DNS and DHCP services are based on the DNSMasq server. We can configure the custom dnsmasq options for advanced DHCP and DNS configurations under Config | Network | Advanced | DNS & DHCP.
Note
A list of dnsmasq command formats can be found at http://www.thekelleys.org.uk/dnsmasq/docs/dnsmasq-man.html.
Please note that this option is for advanced users, and any misconfiguration will result in halting of the DHCP and DNS services.
Configuring advanced network options
Some advanced network settings can be found by navigating to Config | Network | Advanced. The Options tab has the following advanced configuration options:
· Enable SIP NAT Helper: Most SIP solutions handle NAT on their own, but sometimes, rewriting of an address inside SIP by the NAT device is necessary. Enabling this will enable bypassed SIP sessions to be rewritten in the kernel. By default, this is off.
· Send ICMP Redirects: ICMP redirects are used to alert machines if a shorter route to their destination is available. By default, this is on.
· Enable STP (Spanning Tree) on bridges: If you want to connect your Untangle server to a switch via two cables for redundancy, you should check this option to ensure a loop-free topology.
· DHCP Authoritative: If this is enabled, all DHCP serving is authoritative. By default, this is on.
Note
If we have two running DHCP servers, one is authoritative and the other is non-authoritative. The client will always accept the DHCP leases provided by the authoritative server. However, the use of the non-authoritative DHCP is still critical as when the authoritative server fails, the non-authoritative server will provide the DHCP leases.
The Network Cards tab has the following options:
· Maximum Transmission Unit (MTU): This is used to determine the packet size. The default value is Auto, which has a maximum value of 1500, and you are suggested to not change it.
· Ethernet Media: This configures the duplexity of the network card. The default value is Auto. If your NIC can't automatically configure the duplex mode, or it performs poorly with the Auto option, then you can change this value.
Understanding Untangle NGFW rules
Before we take another step forward in this chapter, it's suitable to review the Untangle rules first. After understanding the anatomy of Untangle rules, we will cover some network-related rules such as port forwarding and NATing rules.
Many Untangle applications use rules such as Firewall, Application Control, and Bandwidth Control. All of these rules are based on the same logic.
Rules are used to categorize the traffic and define the action to be taken based on this categorization. For example, Firewall can decide whether to block or pass traffic depending on the destination port, source address, protocol, and so on.
Rules are evaluated against every session in order, from top to bottom. If a rule match is found, the action defined in that rule will be taken directly, and no additional rules are evaluated. If the traffic doesn't match any rule, the action will be defined by the application, which is usually doing nothing.
The properties of Untangle NGFW rules are as follows:
· Enable checkbox: This determines whether the rule is to be checked against the traffic or not. When unchecked, the rule will be simply skipped.
· Description: By default, [no description] will appear for all rules, so it's advisable to write what each rule does for easier troubleshooting.
· Conditions: This defines the traffic properties that should be met before taking an action. The rule will be considered matched if and only if all of the conditions are true.
Untangle NGFW uses a large set of conditions; there are some generic matchers that are common to the different applications such as Sources Address, Destination IP, and Destination Port. In addition to this, there are some application-specific conditions such as Application Control: Application, which is used by Application Control to block a particular application. The full conditions list is available at http://wiki.untangle.com/index.php/Rules#Condition_List. You need to set a value for the condition to match. For example, to know the difference between an IP Address of 192.168.1.5 and 192.168.1.*, please visit http://wiki.untangle.com/index.php/Untangle_Rule_Syntax.
· Action: This defines the action to be taken if a matched rule is found; the actions are application-dependent. However, common actions include:
o Allow/Pass: This will allow the traffic that matches with this rule
o Log: This will allow the traffic but will log it on the event logs and the reports so that the administrator can review them and take any necessary actions
o Block: This will block and log the traffic
Port forward rules
Port forwarding is used to forward traffic destined to the server's public IP to a specific internal IP based on a specific criterion. For example, if you want to have remote access on an internal computer (such as 172.16.1.100) via a remote desktop from outside (that is, you should use the public IP), you should set a port forward rule that will forward port 3389 from the public address to the internal address of the desired machine. Port forward rules can be managed by navigating to Config | Network | Port Forward Rules.
There are two ways to add port forward rules (that is, simple rules and advanced rules). Simple rules are the easiest way to configure port forwarding, and it is suggested to always use simple port forward rules where possible as they cover the most common use cases and prevent misconfiguration errors. You can create simple rules via the Add Simple Rule button; you will need to specify the traffic to be forwarded (protocol and port) and the destination computer.
Note
The destination on the simple rules is Destined Local, which means any traffic coming to Untangle NGFW on any external IP address.
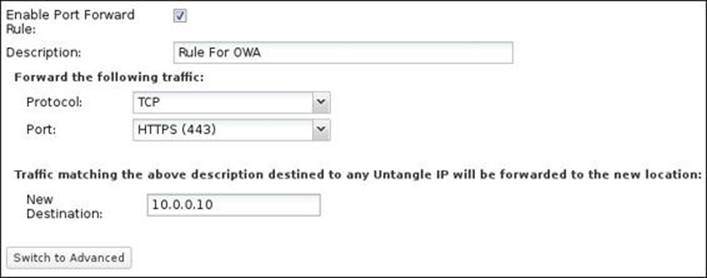
The following figure shows a simple rule that will forward any traffic directed to port 443 on Untangle-01 to your internal exchange server (10.0.0.10) in order to provide OWA for the external users. Note that you'll need to change the administration interface port from 443 to something else for port forwarding to work properly. If the admin interface was using port 443, any coming traffic will be ended on the admin interface (that is Untangle NGFW) and will not be forwarded.
The Switch to Advanced button will open the rule for editing on the advanced mode, which allows for additional configurations. In addition, you can add advanced rules directly via the Add button.
The advanced mode can be used in the cases when we want to port forward a certain port for two or more devices. For example, to have remote access to computer A, we will use the external IP and the default remote desktop port 3389, so we can't use the same port to access computer B; instead, we will use the same external IP address and any unused port (for example 3399); then, we have two options, first is to configure computer B to accept RDP traffic from the new port, or let Untangle NGFW to remap the traffic from the new port to the default port before it is directed to computer B.
Additionally, the advanced mode can be used for protocols, either to TCP and UDP (for example, ICMP); also, it allows for additional conditions to limit when a port forward rule will be matched. For example, we can limit traffic forwarding to traffic from a specific interface, specific IP range, and so on.
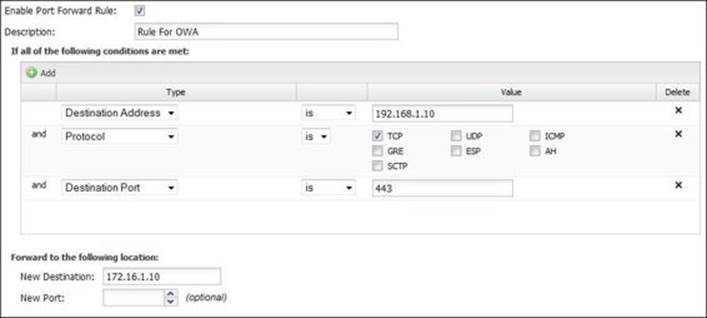
The following figure shows an advanced rule on Untangle-03 that will forward any traffic that is directed to 192.168.1.10 (public static IP for exchange) on port 443 to the internal exchange server:
If you are having issues with port forwards, it is suggested to follow the Port Forward Troubleshooting Guide available at http://wiki.untangle.com/index.php/Port_Forward_Troubleshooting_Guide.
Tip
Additional rules are required for this book's scenario to work properly. You will need to forward traffic destined to port 53 to your domain controller, traffic to port 587 to your SMTP server, and traffic to port 21 to your FTP server, and if you are using the FTP passive mode, you will need to configure the port range on the FTP server and the Untangle NGFW server; an example of a port range to be used by the passive mode is 50000 to 60000.
NAT rules
Network Access Translation (NAT) is used to allow internal devices to communicate with the external world through the Untangle NGFW public IP. For example, when an internal machine (for example 10.0.1.105) makes a connection to a public server (for examplewww.google.com), the Untangle NGFW server rewrites the source address to the public IP address of Untangle NGFW (for example 192.168.1.2) on the way out. When the return traffic in that session returns to 192.168.1.2, it is rewritten back to the internal address and then forwarded to the internal server.
There are three different methods of NATing: Static NAT, Dynamic NAT, and NAT PAT. Static NAT is a 1:1 relationship, and thus, if we have four public IP addresses, only four predetermined internal devices can access the Internet; Dynamic NAT is also a 1:1 relationship, but differs in that any four devices can access the Internet instead of the predetermined devices in the case of Static NAT; NAT PAT (Port Address Translation) is a many-to-one relationship, and thus, any number of devices can share the same public IP address, and the server will differ between the traffic by the different ports.
There are three ways to configure NAT on Untangle NGFW:
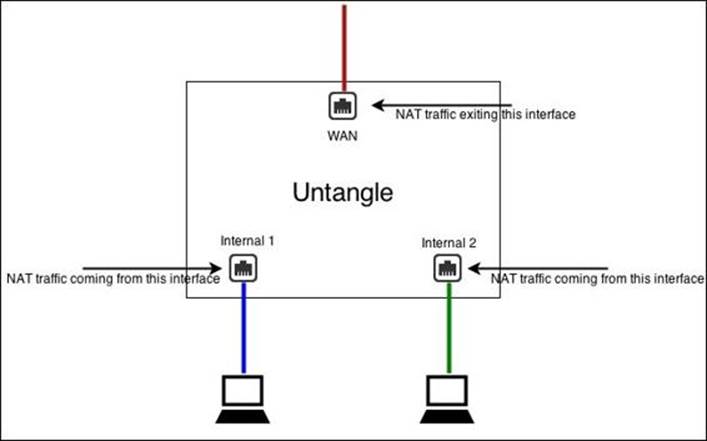
· The NAT traffic exiting this interface (and bridged peers) option on a WAN interface configuration: Any and all traffic that exits from this WAN interface or bridged peers will be NAT'd to auto, which is the current primary address of this WAN interface. In other words, all sessions that leave the external interface will use the external interface's primary IP. This option is enabled by default.
· The NAT traffic coming from this interface (and bridged peers) on non-WAN interfaces: All traffic from this interface will get NAT'd to auto, which is the primary address of whichever interface the traffic exits from. This option is not enabled by default.
Note
The default behavior of NATing is to allow outgoing traffic and block the incoming traffic unless it was a response to a session initiated from the internal devices, or there is a rule that allows the traffic to enter the network. This not only helps to protect against attacks initiated from the Internet, but it also will stop communications between the different internal subnets (if the option is enabled on the non-WAN interfaces).
If you want internal networks to be able to speak with each other (that is, 10.0.0.5 should be able to reach 10.0.1.105 on a different interface), then you do not want to NAT between those networks. This means that you should uncheck NAT traffic coming from this interface (and bridged peers) on both the LAN interfaces, and check NAT traffic exiting this interface (and bridged peers) on the WAN(s).
If you wish that the internal networks should be completely separate such that they cannot communicate with each other, NAT can be done by checking NAT traffic coming from this interface (and bridged peers) on the non-WAN interfaces. This means that the different subnets will be completely separated.
The following figure illustrates the different NAT cases:
· NAT rules: Like all rules, the NAT rules are evaluated in order. The session will be NAT'd according to the first matching rule. If no rule is matched, the session will be NAT'd according to the checkboxes in the Interfaces settings. If there is no rule match and all NAT options in Interfaces are disabled or do not match the session in question, the session is not NAT'd, and it is sent with the original source address.
Note
There are two actions in NAT rules. The first is auto, which is equivalent to the NAT traffic exiting this interface (and bridged peers) option in WAN, and the second is custom, which allows you to specify the new IP address.
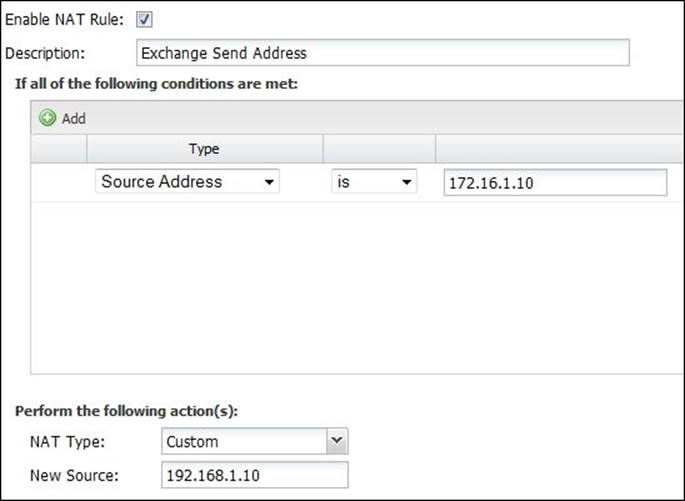
Occasionally, custom rules may be needed. For example, we have two public IPs, 192.168.1.5 and 192.168.1.10. By default, all the traffic will be NAT'd to the primary address 192.168.1.5. However, if we have a mail server (172.16.1.10) that we need to send mails from 192.168.1.10, we will need to add a NAT rule stating that traffic from the mail server should be NAT'd to 192.168.1.10. To do this, we will add a rule with Source Address equal to 172.16.1.10, where NAT Type is Custom and New Source is 192.168.1.10. The rule is shown in the following figure:
Bypass rules
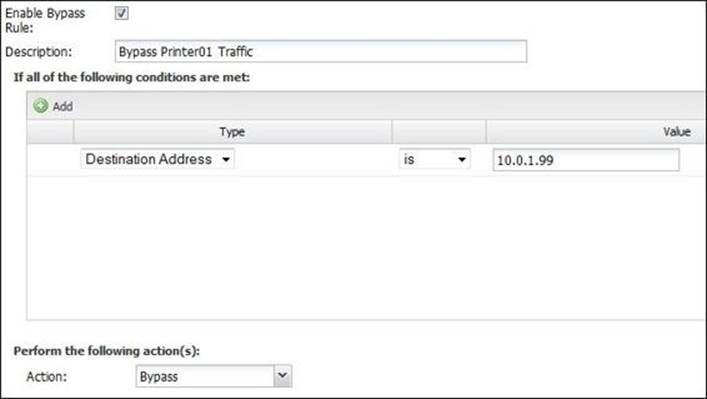
Bypass rules allow the traffic to pass through the kernel directly to its destination, skipping the layer 7 scanning and processing. This could be used for performance reasons (especially in environments with over 1,000 users) to save server resources and to prevent delays (resultant from scanning) for some sensitive traffic such as VOIP. The bypass rules can be managed by navigating to Config | Network | Bypass Rules.
For example, the default VoIP (SIP) session bypass rule is set with the Destination Port = 5060 and action = Bypass conditions. The following figure shows a rule to bypass traffic from ABC Banks Printer as we are not interested in scanning its traffic:
QoS rules
Quality of Service (QoS) is a mechanism to ensure high-quality performance for delay- and bandwidth-sensitive applications such as VoIP. Based on rules, whenever latency-sensitive traffic arrives on the Untangle NGFW server, it will immediately be processed at the cost of less important traffic such as IM. QoS has a great effect on the network performance and important protocols, especially when the bandwidth is saturated. However, when misconfigured, it could have detrimental effects on the network performance. The QoS settings are available under the Config | Network | Advanced | QoS menu.
The seven priorities
There are seven QoS priorities that determine how Untangle NGFW will treat its related traffic. Each one of the top four priorities can use all the available bandwidth if no higher priority class has traffic; if there is traffic from a higher priority, the available bandwidth will be split between them with a ratio related to the difference in priorities. The bandwidth will be split equally for traffic from the same priorities.
The bottom three priorities are always limited even if no higher priority class consumes any traffic. The limit ratio differs depending on whether there is traffic from another priority or not.
The following table shows the default values of how the traffic will be divided between the different priorities; these values could be changed, but it's not advisable to do so. The limit value sets the maximum amount of bandwidth available to this priority under any circumstance, while the reservation value sets the minimum amount of bandwidth available to this priority under any circumstance.
|
Priority |
Upload Reservation |
Upload Limit |
Download Reservation |
Download Limit |
|
Very High |
50% |
100% |
50% |
100% |
|
High |
25% |
100% |
25% |
100% |
|
Medium |
12% |
100% |
12% |
100% |
|
Low |
6% |
100% |
6% |
100% |
|
Limited |
3% |
75% |
3% |
75% |
|
Limited More |
2% |
50% |
2% |
50% |
|
Limited Severely |
2% |
10% |
2% |
10% |
Configuring the QoS settings
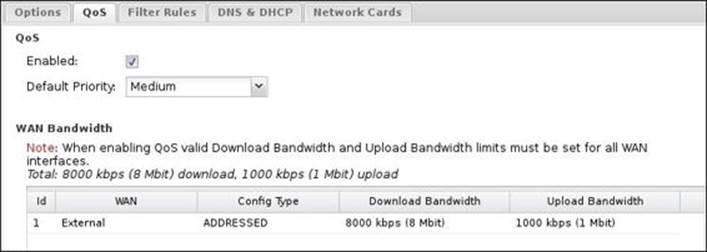
By default, QoS is disabled; you can enable it by checking the Enabled checkbox. However, WAN Bandwidth should be set before enabling QoS. The following screenshot shows the QoS tab:
· Default Priority: This determines the priority assigned to traffic that doesn't match any QoS rule. It is advisable to leave this as the default setting of Medium.
· WAN Bandwidth: This should be set to 85-95 percent of your theoretical line speed (in Mbps) because of losses due to noise and distortion. It's critical to correctly configure this part as the different QoS priorities' bandwidth will be calculated dependent on this bandwidth. Misconfiguring this option or inefficient applying of the priorities may lead to very slow traffic for all your clients. You should configure this setting for all of your WAN interfaces.
Note
QoS runs only on WAN interfaces and doesn't run on internal or DMZ interfaces. In addition, QoS can't be used with PPPOE interfaces.
Rules run on all traffic, regardless of which WAN interface the traffic is coming from. However, different WAN interfaces are treated separately. Thus, the bandwidth setting on each WAN interface is separate, and they are treated as separate resources that are divided among traffic independently.
Configuring the QoS rules
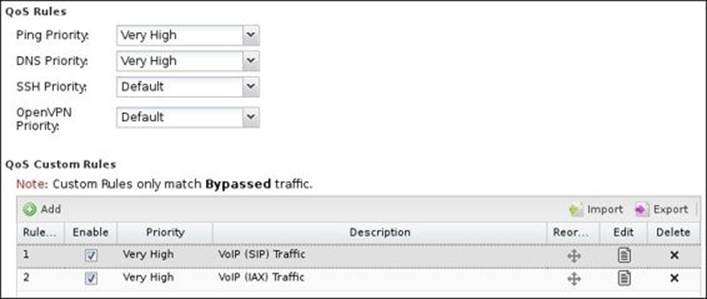
Untangle NGFW comes with some predefined rules to optimize some of your critical services. Untangle NGFW provides predefined priorities for Ping, DNS, SSH, and OpenVPN under the QoS Rules part. It's advisable to not change these default settings.
In addition, you can create custom rules to prioritize the traffic you wish under QoS Custom Rules, which provides an easy way to prioritize or deprioritize certain traffic. Also, Untangle NGFW provides two default rules for VOIP traffic. The QoS custom rules only work withbypassed traffic, and they don't have any effect when traffic is not bypassed.
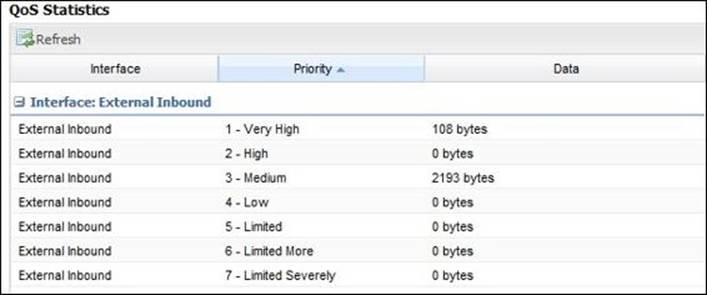
Reviewing the QoS status
QoS Statistics shows the status of the recent activity of the QoS. These statistics are reset at every reboot. QoS Current Sessions shows the current active sessions and the assigned priority of each. The following screenshot shows the QoS Statistics:
Filter rules
Filter rules are kernel-level iptables "filter" rules. They can be configured under Config | Network | Advanced | Filter Rules.
Forward Filter Rules have a functionality that is similar to the Firewall application on Untangle NGFW. Both can be used to block/pass traffic depending on that traffic's criteria. However, the Forward Filter Rules differ from the Firewall app in that they can scan the bypassed traffic; they also apply to all protocols while the Firewall application only can be used with TCP and UDP. Firewall rules have more application-layer conditions available such as Client has exceeded Quota and HTTP: Client User OS.
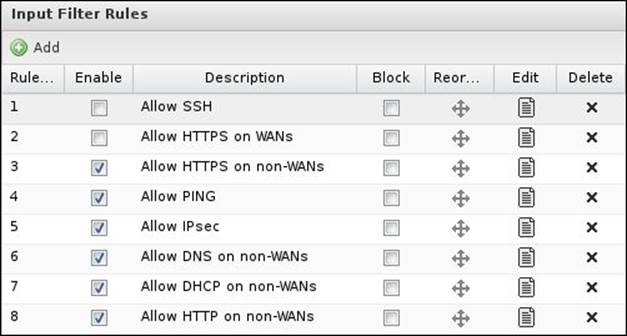
Input Filter rules apply to sessions destined to the Untangle NGFW server's local processes. Many preconfigured rules exist and you would not have to create any new rules. It's also advisable to not change any rule settings except Allow HTTPS on WANs and Allow SSH as any other changes may result in security compromise and server malfunctioning.
Troubleshooting
Untangle NGFW offers different tools that you can use to troubleshoot your network connectivity; the different tools can be located by navigating to Config | Network | Troubleshooting. The following table lists the different troubleshooting tools and their function:
|
Setting |
Description |
|
Connectivity test |
This tests the ability of your Untangle NGFW to resolve and connect to http://updates.untangle.com. |
|
Ping test |
This tests the ability of Untangle NGFW to reach the remote destination using echo requests. The remote destination can be entered as a hostname or IP. |
|
DNS test |
This tests the ability of Untangle NGFW to resolve a domain name and get its IP. |
|
Connection test |
This tests the status of a port on a remote machine; just enter the remote machine name or IP and the desired port. |
|
Traceroute test |
This is used to see the different hops between you and the remote machine. |
|
Download test |
Untangle will try to download the following file: http://cachefly.cachefly.net/5mb.test. |
|
Packet test |
This is a simple packet-sniffing tool based on Tcpdump; just specify an interface and a timeout value to view the traffic on this interface. |
In the Microsoft world, a reboot may solve your system issues. This is not the case in the Linux world. When you have a connectivity issue, it's important to successfully specify the exact problem. The following checklists could help you with your troubleshooting.
On Untangle NGFW:
· Use the connectivity test, does it succeed?
· Using the ping test, can it ping the gateway of Untangle NGFW?
· Using the ping test, can it ping 8.8.8.8 (Google DNS, which considers highly available destinations to test against)?
· Using the ping test, can it ping www.google.com?
· Using the connection test, can it connect to www.google.com port 80?
On a client behind Untangle NGFW:
· Can the PC ping Untangle NGFW's internal IP? (doesn't apply for the bridge mode)
· Can the PC ping Untangle NGFW's external IP?
· Can the PC ping the gateway of Untangle NGFW?
· Can the PC ping 8.8.8.8?
· Can the PC perform DNS lookups? (open a command window and run nslookup google.com or host google.com)
· Can the PC ping www.google.com?
· Can the PC open a browser to www.google.com?
· Can the PC open a browser to Untangle NGFW's internal administration interface?
On a machine outside the network (if available):
· Can the machine ping the Untangle gateway's IP?
· Can the machine ping Untangle NGFW's external IP?
· Can the machine open a browser to the HTTPS administration on Untangle NGFW?
By answering these questions, it will greatly narrow down where the problem is likely to exist, which will make it far easier to find the problem or make it easier for someone to help you.
Summary
In this chapter, we covered the different placement options for Untangle NGFW; we also took a look at how the traffic is moved between the kernel, the UVM, and the applications. In addition, we covered how to configure Untangle NGFW interfaces, and the high availability options.
After that, we saw how to configure the Untangle NGFW hostname, and change the default ports that the Untangle NGFW services runs at; then, we saw how to manage the Untangle NGFW functionality as a router, DNS, and DHCP server.
Next, we covered Untangle rules; we first learned about the rules concept and how it works, then we discussed multiple Untangle rules such as the port forward and NAT rules.
Eventually, we ended the chapter with a section that can help you diagnose your connectivity problems.
In the next chapter, we will continue the configuration of Untangle NGFW. The chapter will discuss the different administration options such as managing the administrator's accounts, allowing remote administration of the server, and determining the hostname that will be used to refer back to the Untangle NGFW in e-mails sent from it, such as the Quarantine Digest.
After that, the chapter will teach you how to manage Server SSL certificates, which are used to access Untangle services from the outside world, and are used with the HTTPS Inspector application. Next, the chapter will cover how to configure the e-mail settings to allow Untangle to send required e-mails such as daily reports; in addition, we will see how we could use the Spam Quarantine feature.
Furthermore, the chapter will cover how to create local user accounts, upgrade the server, and back up and restore the server while monitoring the server. Eventually, the chapter will cover how to review the system information and license details.
All materials on the site are licensed Creative Commons Attribution-Sharealike 3.0 Unported CC BY-SA 3.0 & GNU Free Documentation License (GFDL)
If you are the copyright holder of any material contained on our site and intend to remove it, please contact our site administrator for approval.
© 2016-2026 All site design rights belong to S.Y.A.