Untangle Network Security (2014)
Chapter 7. Preventing External Attacks
DoS attacks are increasing at an alarming rate. They are really dangerous and can affect your Service Level Agreement (SLA) and your reputation. In this chapter, we will learn how to be protected from DoS attacks using the Untangle Shield. Attackers can gain access to your network and steal critical data by exploiting known applications or operating system vulnerabilities. Intrusion Detection and Prevention Systems are used to protect against these attacks. In this chapter, we'll learn how to manage Untangle's Intrusion Prevention module. We'll also learn how to limit access from the Internet to your internal resources using Untangle's Firewall application.
In this chapter, we'll cover the following topics:
· The Shield
· Untangle's Intrusion Prevention application
· Untangle's Firewall application
Protecting against DoS attacks
DoS attacks are done by initiating as many sessions as possible on the victim server as an attempt to make this server unresponsive or unavailable. Untangle Shield (previously known as Attack Blocker) is used to protect Untangle NGFW and the network against DoS attacks.
Managing the shield
The Shield (located under Config | System | Shield) monitors the clients' session creation rate. Every time a client initiates a session, the Shield will calculate the session creation rate of that client. If this rate is considered to be too high, the Shield will refuse any additional sessions from that client.
Note
The Shield is enabled by default and should not be disabled unless for troubleshooting.
The Shield runs during session initialization, and it only monitors the session creation rate. The Shield is not able to see or scan the session traffic.
The default session creation rate limit is one user (which is a reasonable number of sessions that can be created by a single network device). We can override this default limit via Shield Rules.
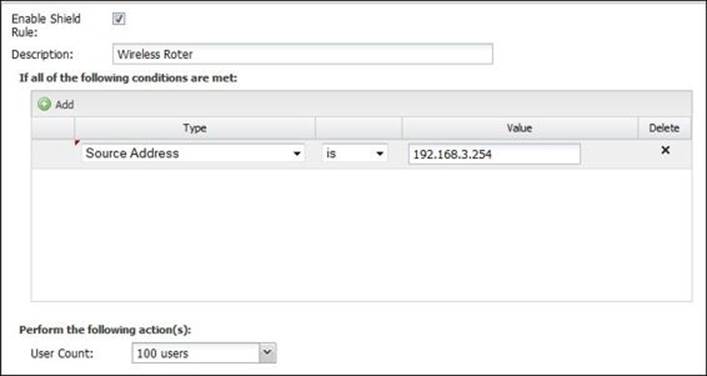
For example, if clients are connected to Untangle via a router that performs NATing, all the traffic directed from these clients to Untangle will appear to come from the router. So, we will have to create a Shield rule that allows a much higher session creation rate for the router IP. We can select a higher number of users (5, 25, 50, 100, or unlimited).
So, for our case, if we have 100 devices behind that router, we will create a rule that will make Untangle NGFW increase the session creation rate from the router IP by 100 times the normal rate.
To add a rule, press the Add button; then, set the rule condition by setting the source address to our router's IP address and the user count to 100 users, as shown in the following screenshot:
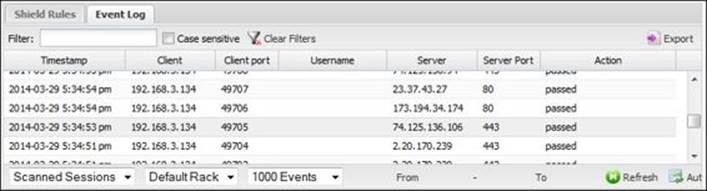
Reviewing the shield events
You can review the scanned/blocked sessions via Event Log. This requires the Reports app to be installed:
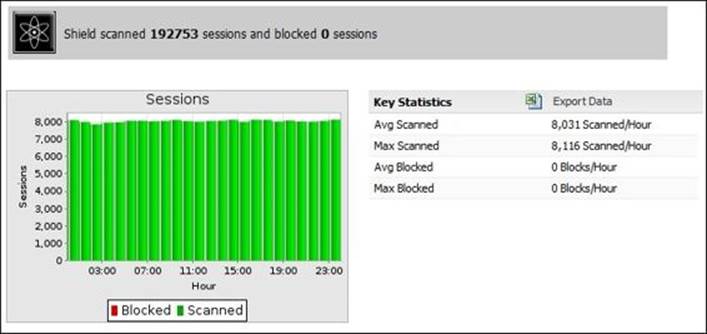
In addition, the Reports app provides a summary of the Shield events, as follows:
· Sessions: This gives the average and the maximum number of sessions scanned by the Shield in an hour of a certain day
· Top ten shield-blocked hosts (by hits): This shows the top ten hosts that the Shield dropped sessions from
· Top ten shield-blocked users (by hits): This shows the top ten users that the Shield dropped sessions from
The following figure shows the sessions report:
Lab-based training
In this lab, we will initiate a port scan against ABC-Web01 from the external laptop using Nmap (the port scan in itself is not a DoS attack, but it's a simple way to explain the Shield functionality).
From ABC-Web01, start the Nmap program, and then configure Target to 192.168.1.15 and Profile to Intense scan. Finally, press the Scan button:

Nmap will start to scan the open ports on ABC-Web01 by initiating a session to every port on ABC-Web01. The Shield will recognize the high session-creation rate and will block them, as shown in the following screenshot:
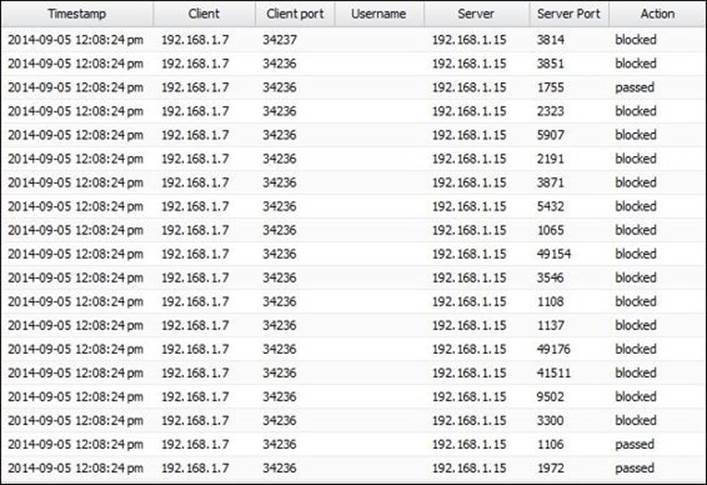
The Nmap log will show a similar result, which says that the delay between each created session will increase because from the 66 sessions initiated previously, 27 sessions were dropped, as shown in the following screenshot:
![]()
Intrusion prevention using Untangle NGFW
Now, you have either opened ports on your firewall for your servers (for example, a web server and/or an e-mail server) to be accessed from outside, or you have internal users who access external sites and have returned traffic.
The traffic coming back to your network can be legitimate or malicious. An Intrusion Prevention System (IPS) scans the incoming traffic to detect, log, and block any malicious activities.
How intrusion prevention systems work
When we talk about IPS, it is unquestionable that we will also talk about the Intrusion Detection System (IDS). IPS and IDS are connected technologies. In fact, IPS has the IDS functionalities in addition to the ability to block malicious traffic. In the next section, we will cover the difference between IPS and IDS, how IPS/IDS can identify malicious traffic, and some countermeasures to take when an attack is detected.
IDS versus IPS
The IPS is an inline sensor (traffic must go through it) that lies between the router and your network devices. It scans the traffic before reaching the intended destination and can block it if any malicious traffic is detected. However, because the traffic is scanned by the IPS before it is delivered to the intended device, a small latency will be added, and if only one IPS device is used, it can be a single point of failure if it goes down.
The IDS is not an inline sensor as is the case with the IPS. Instead, we configure switches to forward packets to the IDS for scanning (the promiscuous mode). Thus, it will not be able to directly stop any attack. However, it can be configured to send commands to the router and the firewall to block the traffic's source address.
The following table summarizes the differences between IPS and IDS:
|
IPS |
IDS |
|
|
Position in the network |
In line with the traffic. The IPS sees it first hand. |
Off to the side. The IDS gets a copy of packets. |
|
Latency/delay |
Yes, a small delay. |
No latency for the traffic. |
|
Can cause DoS attacks |
Yes, it is in line. |
No, not in line. |
|
Can prevent an attack |
Yes, can drop offending traffic. |
Not directly. |
Identification methods
There are many different methods that can be used to detect malicious activities. These methods are as follows:
· Signature based: This is the most used method. The IPS has a signature database that includes thousands of known attack patterns. A signature describes how an attack looks like; for example, a ping sweep attack is when one single IP address is sending multiple ICMP echo requests to a range of other devices. Another signature example is the port scan, which is done when one device sends a TCP SYN request to multiple ports on other devices in a period of 30 seconds.
· Policy based: Let's say we want to prevent the usage of Telnet inside our network because it uses clear text. We will create a rule that blocks any TCP traffic directed to port 23.
· Anomaly based: This method compares the current network traffic's state to the normal network traffic's state (baseline). For example, if the normal half-formed sessions (when a device sends a TCP SYN request to another device but doesn't receive SYN ACK) in your network are 20 sessions/min, the IPS will consider an attack is happening when the number of these sessions increases to 100 sessions/min.
· Reputation based: Some countries are known to launch large cyber-attacks on certain other countries and companies. The IPS is connected to global databases that track these attacks. If any attack is initiated against your country, the IPS will start to protect you against the potential attack by dropping any traffic coming from the attacker countries.
Counter measures
After detecting the malicious traffic, we should start to take actions. These actions include denying that traffic from reaching your network or just logging that traffic for additional study. Additional actions include sending alerts to a specific device or the management machine, sending an SNMP trap to the administrator, and sending a TCP reset to the attacker to close the session.
Note
Information on what to do when an intrusion is detected can be found here:
· In the article Intrusion Detection FAQ: What Do You Do After You Deploy the IDS? by Chris Morris at http://www.sans.org/security-resources/idfaq/deploy.php
· In the book Intrusion Prevention and Active Response: Deploying Network and Host IPS by Michael Rash
Technical details
Untangle's Intrusion Prevention application is based on the well-known, open source, and widely deployed intrusion prevention and detection system software Snort. Snort uses many detection methods including signature and anomaly-based inspection.
As is the case with all Untangle apps, Untangle's Intrusion Prevention app comes ready for deployment and running with its preconfigured settings. The signature database and the default settings are kept current with the Untangle updates.
The Untangle Intrusion Prevention app defines the signatures as rules. You are free to modify the existing rules to fit your network or create additional rules, which is probably not required.
Note
Untangle's Intrusion Prevention app is signature-based with 2,464 rules, while the number of Snort rules exceeds 11,000. Snort rules cover the OSI 7 layers, while Untangle only scans the traffic passed through the appliance and reconstructed on layer 7. So, the other layers' rules are not needed, and will never be triggered if implemented by Untangle. In addition, any traffic terminated on the Untangle server itself will not be scanned by Untangle's Intrusion Prevention app . However, you can implement a Snort box to work concurrently with Untangle.
Intrusion Prevention settings
This section will cover Untangle's Intrusion Prevention application's Status and Rules.
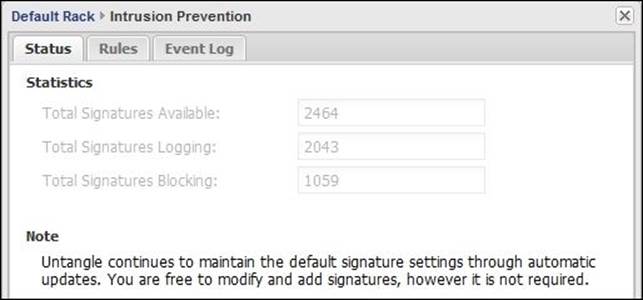
Status
The Status tab shows information about the Intrusion Prevention app's signature database such as the total number of available signatures and the number of signatures that causes the traffic to be logged or blocked, as shown in the following screenshot:
Not all of Untangle's Intrusion Prevention rules are blocked by default, as many of these rules may block unmalicious traffic. Untangle evaluated the rules and set the action to be taken based on the following criteria:
|
Criteria |
Action |
|
If the rule is known to always block malicious traffic |
IPS will block and log traffic that matches this rule |
|
If the rule is known to sometimes block malicious traffic (it may also block legitimate traffic if enabled) |
IPS will log traffic that matches this rule and will not block any traffic to reduce the false positive |
|
If the rule is known to never block malicious traffic |
IPS will neither block nor log the traffic that matches this rule |
Reports
Let's first learn how Snort defines the different rules. Each Snort rule has two basic parts: the rule header and the rule options. The rule header contains the following:
· Action
· Protocol
· Source_IP
· Source_Port
· Direction
· Destination_IP
· Destination_Port
The options part allows you to create a descriptive message to associate with the rule. In addition, it allows the checking of many packet attributes. For example, if we want to log and block all TCP packets from 192.168.1.50 irrespective of the port when the packet includes 0x70 and associate a message that the packet is a possible exploit, we'll use the following rule:
Drop TCP 192.168.1.50 any > any any (msg:"possible exploit"; content:"|70|";)
The rule states that traffic from 192.168.1.50 from any port going to any address on any port and including 0x70 will be dropped (logged and blocked) and a message of possible exploit will be associated with the rule log.
For additional information about Snort rules, visit http://manual.snort.org/node29.html and http://www.oreilly.com.
The Rules part shows all rules defined by Untangle along with the associated action(s) (that is, whether they will block, log, or pass on the traffic) as well as information such as descriptions and signature IDs:
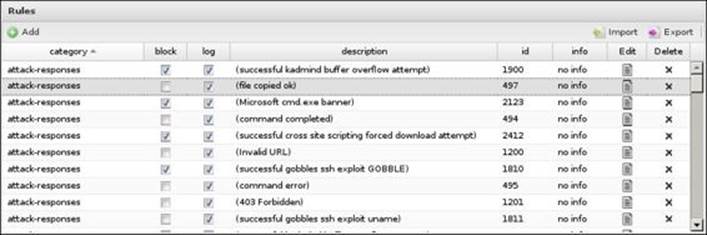
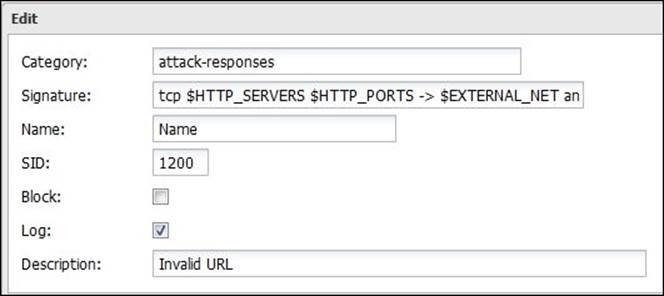
You can modify the block/log settings on any rule by modifying the checkboxes next to it or by clicking on the Edit button next to it:
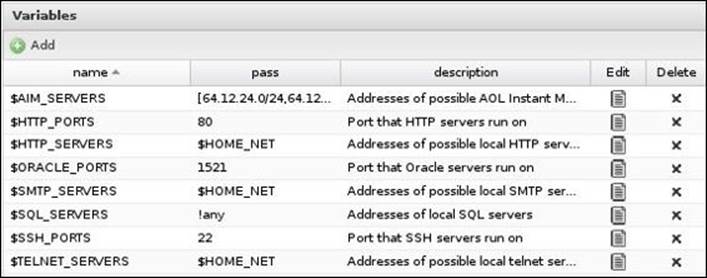
The Variables part is used to define variables that can be used in the rules. For example, the previous screenshot shows that the rule uses the $HTTP_PORTS variable, which is defined in the following screenshot as port 80 (you can add additional ports such as 443). You can add additional variables and modify the existing ones, but it's advisable to not change the $HOME_NET variable, which defines the network to be protected:
Reviewing the scan history
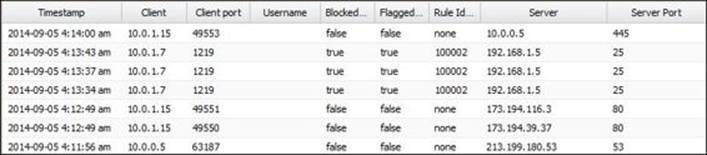
We are able to review the total number of scanned, logged, and blocked sessions since the last system restart through the application's faceplate. The number of current sessions and the real-time scan graph are also shown:

In addition to the application's faceplate, we have the event log and Reports methods. The following table describes the different event log terms:
|
Name |
Description |
|
Timestamp |
Time when the scan occurred. |
|
Client |
The IP address of the attacker. |
|
Username |
The user who initiated the traffic request; this is available when using captive portal. |
|
Blocked |
True if the traffic is blocked, and false if not. |
|
Rule ID |
The rule that caused this event. |
|
Rule description |
The description associated with the rule options. |
|
Server |
The IP address of the internal machine the traffic was directed to. |
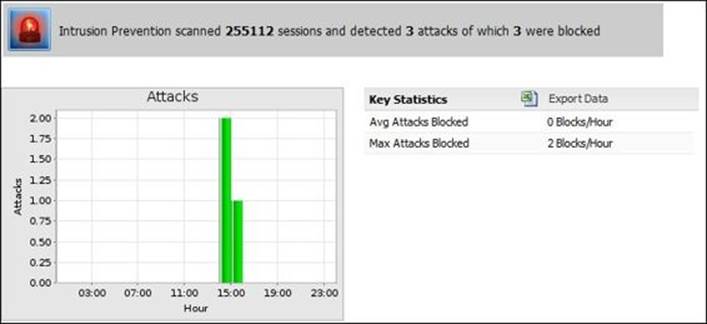
The Reports app provides a daily chart summary of the intrusion application activities. The available reports are as follows:
· Attacks: This gives the maximum and the average attacks blocked per hour during a day
· Top attacks (by hits): This shows the rules that matched the attack pattern and how many times
The following screenshot shows the Attacks report:
Lab-based training
In this lab, we will use two Windows client machines (one is the attacker and the other is the victim), in addition to the Untangle box that runs in the bridge mode. The bridge mode is selected here to avoid the blocking caused by the NAT to simplify the test process.
In addition, we will need to disable the Untangle Shield before starting this lab to avoid any traffic block caused by it.
In this lab, we will use the external laptop (192.168.1.7), ABC-Web01, and Untangle-03. The lab assumes that Untangle's Intrusion Prevention application is installed and running, the Shield is disabled, the attacker's machine has the Metasploit application installed, and the victim machine firewall is turned off.
Note
Metasploit is an exploit development framework that includes known exploits to help pen testers scan the system defense by executing these exploits against the system. For more information, visit http://www.metasploit.com/.
Perform the following steps to set up a lab:
1. On the attacker's machine, select Services from Metasploit, as shown in the following screenshot:
2. A new window will appear. Now, click on the Scan button to specify the victim machine to be scanned:

3. A new window will appear; from there, you can enter the IP address of the victim's machine or the entire network address range. Then, press the Launch Scan button.
4. The scan will take about two minutes to complete; after that, you can review Untangle's Intrusion Prevention application events. You will find a single logged event with ID 1616:
![]()
5. You can modify the settings of this rule to block the traffic instead of just logging it, as shown in the following screenshot:

6. Now, retrying the previous steps will result in the following event log:

7. The result of blocking the traffic can be noticed from the test log as the following line will not appear in the test with the blocked traffic:
![]()
Understanding Untangle's Firewall application
Firewalls are used to separate your internal networks from the Internet and to limit access from outside the network to your internal resources. Untangle's Firewall application is a layer 7 firewall, which means it can block traffic based on the protocol, IP, port, and even the Active Directory users and groups.
Technical details
Untangle's Firewall application works in OSI layer 7 (application layer), which allows it to completely understand the traffic and hence filter that traffic based on various application layer conditions such as Client has Exceeded Quota and HTTP: Client User OS.
Untangle's Firewall application rules define the criteria of the traffic. When this criteria is matched with the rule, the action described on that rule will be taken. The different criteria (matchers) are as follows:
· Source IP address
· Source port
· Source interface
· Destination IP address
· Destination port
· Destination interface
· Protocol
· Active Directory user
· Active Directory group
The actions can be to block and/or flag the traffic. The blocked traffic will always be flagged.
Untangle Firewall rules are similar to the Forward Filter rules located under Config, as they can both block/pass traffic based on their criteria. The differences are as follows:
· Forward Filter rules run on the kernel level, so they can filter the bypassed traffic while Untangle's Firewall application cannot, as it only sees traffic passed through the Untangle VM (UVM)
· As the traffic is end-pointed and passed to Untangle's Firewall application for scanning, it could apply layer 7 matchers, while the Forward Filter rules can only apply the lower layers rules
Note
Always remember that the Filter rules are done on the kernel before passing to the UVM, while Firewall rules are done on the UVM. Thus, the Filter rules are done before NAT, while the Firewall rules are done after NAT for the incoming traffic and would be vice versa for the outgoing traffic.
The default rule of Untangle's Firewall app is ALLOW ALL. This is not considered a threat as most Untangle deployments are in the router mode, which is doing NAT, or in the bridge mode behind another firewall or router that is also doing NAT. The NAT rules allow all outgoing traffic and any incoming traffic as a reply for that outgoing traffic, and blocks any outside initiated incoming traffic unless a port forward rule is in place for that traffic.
This achieves the common policy for most organizations. The main use for Untangle's Firewall app is the blocking of unwanted outgoing traffic such as the blocking of port 25 for the entire network except for the e-mail server, and the blocking of all ports except port 80 and 433 for VPN users. However, additional incoming rules can be added if needed.
Firewall settings
Untangle's Firewall application has three preconfigured disabled rules, which can be used as templates or can be edited to suit your network configuration. The different rules can be configured under the Edit button and some rule settings can be configured through the Block, Flag, and Enable checkboxes:

Reviewing the events of the Firewall application
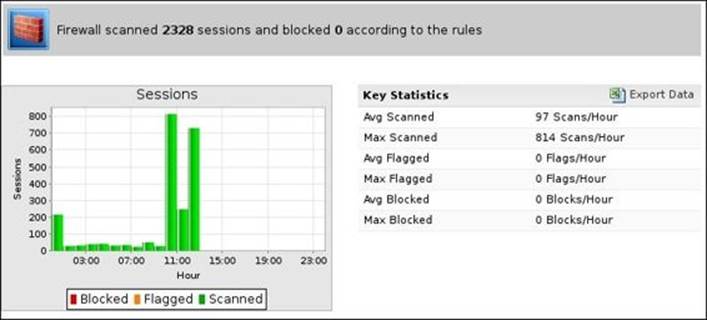
We can review the scan activity via the Firewall application faceplate, which shows the number of current sessions and the total number of sessions passed, flagged, and blocked since the last system restart.
The faceplate doesn't have the real-time traffic graph because Firewall doesn't really have sessions; the initial connection is either passed or blocked. The session itself is not moderated once the session is passed.

The second option is to review the Firewall application's event logs, which show when the scan takes place and the source IP address (10.0.1.7), the source port (1219), the destination server IP address (192.168.1.5), the destination port (25), whether the traffic matches a rule (Rule ID), and the action taken (block and/or flag).
The final option is to use the Reports application. The available reports for the Firewall application are as follows:
· Sessions: This shows the maximum and the average number of sessions scanned per hour and how many are blocked and flagged
· Top ten Firewall flagging rules (by hits): This shows the rules that are set to flag matching traffic and how many times the rules are matched
· Top ten Firewall flagged hosts (by hits): This shows the hosts that matched a rule that is set to flag matching traffic and how many times the host matched the rule
· Top ten Firewall flagged users (by hits): This shows the users that matched a rule that is set to flag matching traffic and how many times those users matched the rule
· Top ten Firewall blocking rules (by hits): This shows the rules that are set to block matching traffic and how many times the rules are matched
· Top ten Firewall blocked hosts (by hits): This shows the hosts that matched a rule that is set to block matching traffic and how many times the host matched the rule
· Top ten Firewall blocked users (by hits): This shows the users that matched a rule that is set to block matching traffic and how many times those users matched the rule
The following screenshot shows the sessions report:
Lab-based training
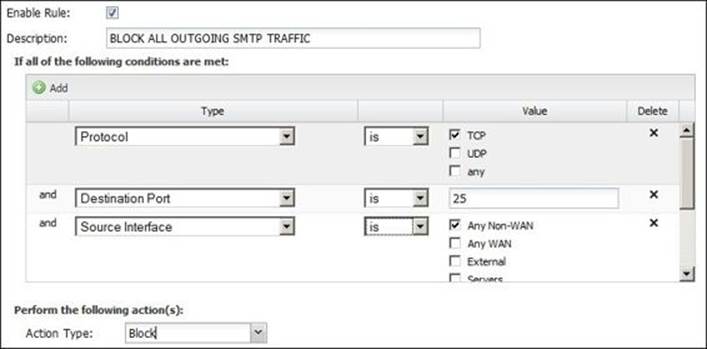
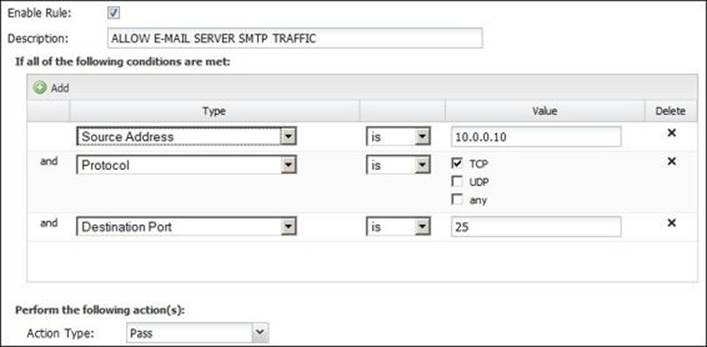
Let's learn how we can block SMTP traffic for unintended computers. In this lab, we will use Untangle-01, ABC-DC01, ABC-EX01, ABC-Client01, Untangle-03, Acme-DC01, and Acme-EX01.
By default, any device behind Untangle-01 can send SMTP traffic to the Internet. If any of these devices gets infected by a worm that sends spam e-mails to the external world, your IP will get blacklisted. So, we want to only allow our e-mail server to send SMTP traffic to the external world and block any other device:
1. If you tried to initiate a Telnet connection from ABC-Client01 to Acme-EX01, the connection will be accepted. Telnet 192.168.1.5 25 will give the following message:

2. If we want to block all internal computers from sending SMTP traffic except the e-mail server, we will create a general block rule that denies all computers in the network from sending any SMTP traffic, as shown in the following screenshot:
3. Then, we will need to create a rule that will permit the e-mail server to send SMTP traffic, as shown in the following screenshot:
4. We will need to order the rules; thus, the permit rule is the first and then the deny rule comes later:

5. After applying the changes, the Rule ID will be changed as shown in the following screenshot. Remember that Flag will allow the traffic but will create an event log about the session, while Block will block the traffic and create the event:

6. Now, let's initiate a Telnet connection to port 25 again from the ABC-Client01 computer; the connection will be refused with the following message:
![]()
7. Now, if we try the Telnet connection from the ABC-EX01 computer to the Acme-EX01 computer, the connection will be accepted.
Summary
In this chapter, we covered how to protect against DoS attacks using the Shield, protect against intrusions using Untangle's Intrusion Prevention application, and prohibit access to specific ports using Untangle's Firewall application. The concepts behind each technology were covered. We also saw how to configure, manage, and monitor the applications' activities.
In the next chapter, we will continue covering Untangle applications. This time, we will cover how to block users' access to certain sites based on their category such as pornography and social media.
Most of today's websites are HTTPS, so the regular filtering methods may fail to work properly; thus, there is a need to have an application that can decrypt HTTPS traffic and pass it to the other modules for scanning as a normal HTTP stream. In the next chapter, we will cover the Untangle application for this purpose (HTTPS Inspector). Eventually, we will learn how we can block certain applications (Facebook, Skype, and so on) and protocols' (BitTorrent) traffic using Untangle's Application Control.
All materials on the site are licensed Creative Commons Attribution-Sharealike 3.0 Unported CC BY-SA 3.0 & GNU Free Documentation License (GFDL)
If you are the copyright holder of any material contained on our site and intend to remove it, please contact our site administrator for approval.
© 2016-2026 All site design rights belong to S.Y.A.