The Basics of Web Hacking: Tools and Techniques to Attack the Web (2013)
Chapter 3. Web Application Recon and Scanning
Chapter Rundown:
■ Web traffic demystified with a web proxy
■ Why Burp Suite is a web hacker’s go-to toolkit
■ Recon with Burp Spider: finding all web resources made easy
■ The good & bad of web application scanning
■ Scanning with Zed Attack Proxy (ZAP) and Burp Scanner
Introduction
The recon and scanning phases for the web application will provide detailed information about the resource (pages, files, directories, links, images, etc.) that make up the web application. These are very important pieces of information that will be used during web application exploitation later in our approach.
Performing web application recon involves discovering every single resource that the application interacts with so that we can then scan them for vulnerabilities. Only resources discovered during recon will be scanned so it’s critical that we find as many of the resource as possible. The tools used in web application recon and scanning include:
■ An intercepting proxy to catalog every HTTP/S request sent from the browser and every response issued by the web application
■ A spidering tool to make automated requests to the web application so we don’t have to rely on an error-prone human to request every possible resource
■ A vulnerability scanner specific to web applications to search the cataloged resources for identifiable vulnerabilities
■ A brute forcing tool to discover commonly used directories in web applications that can reveal even more resources
■ A site map of all cataloged resources so manual recon and inspection can be conducted on especially interesting resources
Web Application Recon
There are many ways to perform recon on web applications in order to find all the related resources. Perhaps, the most common guidance is to “fully understand how the application behaves” in order to be in the best possible position for exploitation, which includes such activities as:
■ Locating data entry points (HTML input fields such as forms fields, hidden fields, drop-down boxes, and radio button lists)
■ Inspecting HTTP headers, HTTP cookies, and URL query strings
■ Tracking URL and POST body parameters to see how the application interacts with the database
■ Performing client-side HTML and JavaScript functionality review
■ Identifying the encoding scheme(s) used
Certainly, these activities are very valuable if you’re interested in gaining a deep understanding of a target web application, but they require considerable time, skill, and programming background and are best suited to more advanced attacks that actually target the logic of the web application. We won’t include all these activities in our recon step; instead, we’ll focus on vulnerabilities that are easily detected and exploited using widely available tools. We will conduct our recon activities by using spidering tools, which can be configured to run automatically or manually, to discover the resources of the target web application. The resources discovered during recon will be used during scanning to search for web application vulnerabilities in a similar way that we identified vulnerabilities in the web server.
Basics Of A Web Proxy
There seems to be a universally accepted mantra in web hacking that one of the first items on your to-do list is to install and configure a proxy to run with your browser. I’m a strong proponent of such a plan, as long as you understand the reasoning behind using a proxy as your browser interacts with the web application. To begin, let’s define the actions that the browser (client) and the web application (server) perform millions of times per day. The browser sends requests to the web application, and the web application sends responses back to the browser. This cycle fundamentally drives our use of the Internet. A proxy allows you to see how these cycles of requests and responses actually work because it sits between the browser and the web application and controls the flow of these requests and responses that pass through it as shown in Figure 3.1.
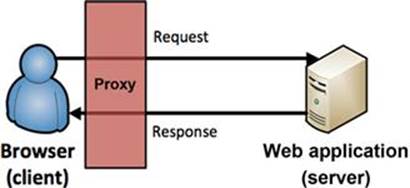
FIGURE 3.1 A proxy as part of the request and response cycle between a browser and web application.
Once you’ve configured your proxy, you’ll be able to inspect every request and response that passes through it, and intercept and change values of parameters used during the process. This is a very handy functionality to have when it comes to web application exploitation.
Another great use of a web proxy is to keeping a running history (catalog) of all the requests and responses that pass through it. This requires no interference of the request and response cycle, but it does allow the cycle to be inspected later on during scanning and exploitation for requests and responses that are core the web application’s functionality.
Burp Suite
For our purposes, we’ll use Burp Suite Intercept (or just Burp for short) as our proxy as it is widely viewed as one of the most feature-rich web hacking platform available. We will be using many tools in Burp Suite throughout the duration of our hacking approach. Burp Suite is available in BackTrack, but for more information or to download Burp Suite as a stand-alone file, check out www.portswigger.net. Burp Suite can be opened in BackTrack via Applications → BackTrack → Vulnerability Assessment → Web Application Assessment → Web Application Proxies → Burpsuite as shown in Figure 3.2.
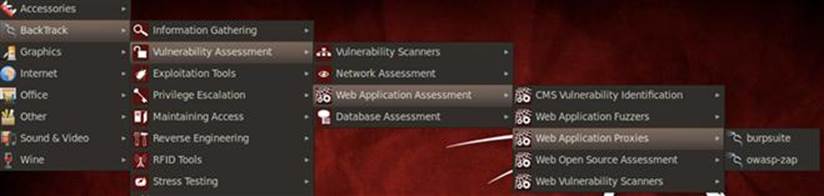
FIGURE 3.2 Opening Burp Suite in BackTrack.
Burp Suite may take a few seconds to load the first time, so be patient if you don’t see immediate action. Depending on your version of BackTrack, you may also see a warning about the Java runtime environment (JRE). Click OK to continue and then accept the license agreement. If you receive notifications that there are newer versions of Burp Suite available for download, feel free to install them.
Configuring Burp Proxy
In order to have all HTTP/S requests and responses cataloged by Burp Suite, you need to configure your browser to use the proxy.
1. Open Firefox (from the Applications → Internet menu) then choose Edit → Preferences
2. Choose the Advanced menu at the top of the Firefox Preferences box
3. Choose the Network tab and then click Settings as shown in Figure 3.3
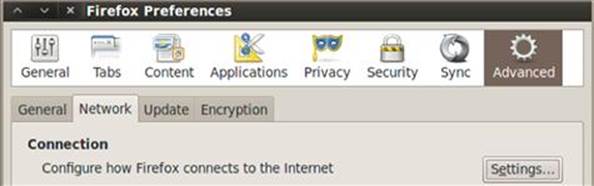
FIGURE 3.3 Configuring Firefox to use a proxy for Internet communications.
4. Select the Manual Proxy Configuration radio button and enter 127.0.0.1 in the HTTP Proxy input box
5. Enter 8080 in the Port input box
6. Clear the No Proxy For input box, make sure the Connection Settings mirror Figure 3.4, and click OK
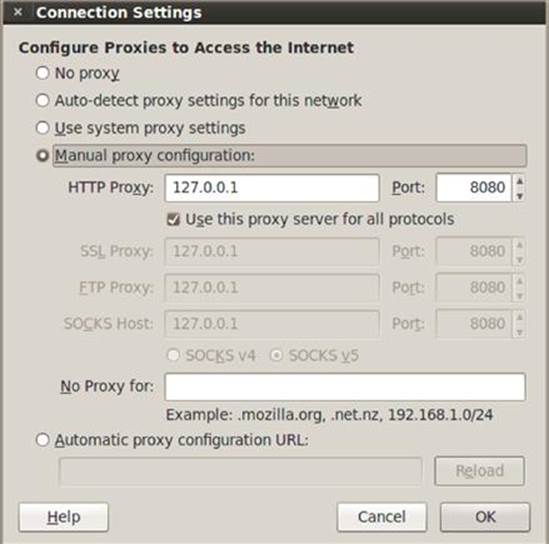
FIGURE 3.4 Setting Burp Suite’s configuration details in Firefox.
7. Close the Firefox Preferences window
Alert
While Burp Suite runs on port 8080, other proxies may use a different port number. Be sure to use the correct port if you choose to use a different proxy. Also, we removed the entries in the “No Proxy For” input box because our target is on localhost. When accessing a remote web application, you don’t need to edit the entries found in the “No Proxy For” textbox.
Spidering With Burp
Now that our browser is configured to use Burp as the proxy, we can begin our recon of the web application. This is the critical beginning to any web hack, and it’s critical that we discover as much about the target application as we can before we create and execute exploits.
Spidering is the act of indexing all resources of a web application and cataloging them for future use by crawling the entire web application. The question is whether to do manual or automated spidering as each approach has its benefits, and the choice will depend on your goals.
Automated Spidering
Automated spidering takes any URL and automatically finds and requests links, submits forms, and performs any allowed action within the specified scope—even if the actions are sensitive ones such as logoff, changing a password, updating a profile, or similar. This searching happens recursively until no new content is discovered and is stored in a site map of cataloged resources. The scope of automated spidering is usually the highest level URL of the web application you are gathering information on, such as syngress.com or a specified IP address. Attackers would not usually unleash an automated spider on a target because the vast amount of requests that will be made to the server. Even a half-decent IT administrator will notice the influx of requests from the same IP addresses and know that someone is actively performing recon on the web application.
Manual Spidering
Manual spidering, also known as passive spidering, relies on the gentle touch of human browsing to build the site map of gathered information. It’s just normal browsing with a proxy in place cataloging everything. Manual spidering maintains stealth during recon because from the web server and application perspective, there is nothing out of the ordinary. The rate of requests is set by how fast you can click links on the web application; surely, not to sound the alarm bells of a watchful web server administrator.
Running Burp Spider
To use Burp Spider passively against our DVWA environment, follow these steps.
1. Start Burp Suite from the steps earlier in this chapter if it’s not running already.
2. Configure Firefox to use a proxy from the steps earlier in this chapter if it’s not already.
3. Browse using Firefox to the DVWA login page at http://127.0.0.1/login.php.
Alert
Burp Intercept proxy is configured to intercept all requests by default. This is why the DVWA login page won’t load initially. To toggle this off, click on the proxy tab in Burp, then the intercept sub-tab, and click the “intercept is on” button to toggle it off. We will come back to the intercept tab during the hacking steps, but for now, you can turn it off. Tabs within Burp will change to red (as an alert), so you know what tab in the suite needs your attention!
4. Login to DVWA with admin and password.
Burp is now cataloging every request that you make as well as the responses from the DVWA web application. This running history is best illustrated in the site map tree that Burp automatically builds under the target tab and site map sub-tab as shown in Figure 3.5.
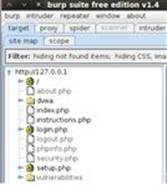
FIGURE 3.5 Site map in Burp Suite.
Now is also a good time to set the scope of your hacking efforts in Burp. Scope simply refers to what URL (or IP address) you want to consider as a target and be used in automated spidering. In our example, we would want to include everything on the localhostweb server, so we’d set 127.0.0.1 as our scope by selecting add item to scope in the right-click menu in the site map as shown in Figure 3.6. Make sure to right-click on the root of the tree (127.0.0.1), so the entire site will be set in the scope.
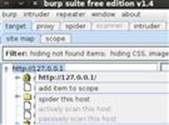
FIGURE 3.6 Adding item to Burp Suite scope.
You can add several web application IP addresses or URLs to the scope of your testing. To view your current scope, use the scope sub-tab under the target tab. If you attempt to use any Burp tool outside the specified scope, you will be prompted to accept that you are working outside of the scope. Most of the time you can simply add that item to scope and continue on with your activity. But in some cases, this prompt will save you from inadvertently interacting with a target that is actually outside of your intended scope.
Directories are displayed with the folder icon and can be expanded and collapsed to see the pages that Burp has found within the directory. The gear icon is used for pages that have additional functionality built into them. Most of the time, these pages are using parameters to perform an action such as logging in, setting up the database, or retrieving data. Think of these pages as dynamic as opposed to static. This is important because it’s our first signal of the pages in this web application that act upon user input. The white page icon is used for web pages that do not accept input and do not have dynamic functionality; these are just static web pages.
The site map entries that are bold are the resources that you have manually requested and have been cataloged by the proxy. You can see in Figure 3.5 that at the time of the screenshot, I had manually browsed to the dvwa directory, index.php, instructions.php,login.php, and setup.php. All of the grayed out entries have been discovered by the Burp Spider with its reconnaissance and not by a user making the request in a browser.
By default, Burp Spider will passively scan the HTML of all requests and responses for links to other directories and files. The manual (passive) Spider will not request these resources but will include them in the site map. As you browse to more DVWA pages, the site map will continue to populate both inside the 127.0.0.1 directory and external web applications that are referenced by DVWA. Good examples of this behavior are the dvwa.svn.sourceforge.net and dvwa.co.uk URL directories that are now part of your site map. Although you haven’t browsed to these sites in your browser, they are both referenced in DVWA pages that your browser did request. Related web applications and references are a great piece of recon that will be used later in the user exploitation phase.
With passive spidering enabled, you can now visit every single page on DVWA for it to be included in the site map. With fewer than 20 total pages that would not take long, you will be left with a complete site map of the web application. You can then pinpoint the exact pages and parameters to attack! However, with larger target applications, you could be clicking links for many hours with no guarantee that you will actually hit every link possible. For instances such as this, or when you aren’t concerned with being stealthy, you can use the automated spider in Burp.
You can also selectively spider any branch of the target web application, or the entire web application if you’d like, by selecting spider this branch from the right-click menu on the site map. You can watch the progress of the spider under the spider tab andcontrol sub-menu. Before we simply walk away from the automated spider, there are a few settings that need to be reviewed under the spider tab and the options sub-tab as shown in Figure 3.7.
■ All of the checkboxes under settings are enabled by default including the check robots.txt setting.
■ You can uncheck the passive spidering if you’d like, but I encourage you to leave it on. Even if you’re not in the hacking mood, it’s still quite interesting to review the site map that gets built after a day’s worth of browsing!
■ All of the default values of the spider options can be reset by using the Reset Defaults option in the Burp menu, so feel free to experiment with different settings.
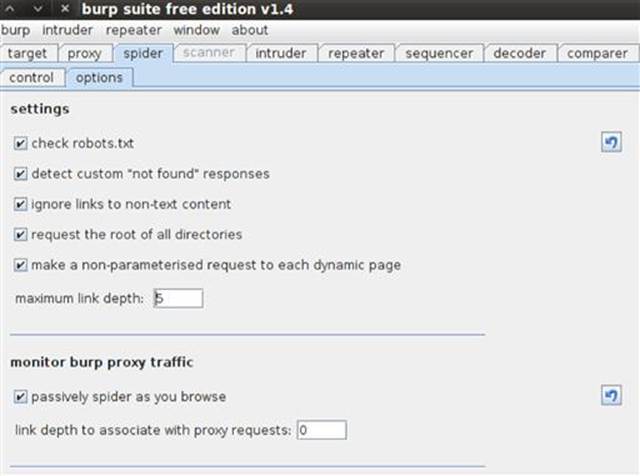
FIGURE 3.7 Burp Spider settings and traffic monitoring options.
There are also two important spidering options for submitting forms. By default, the automated spider will submit all forms that it finds. It does not care what the form is for, where it is located, or the ramifications of submitting the form several hundred (or thousand) times. I can’t stress this point enough: if the automated spider finds a form, it will submit it without regard for human life! (OK, that was a tad too dramatic, but you get the point). If the spider finds the change password form that does not require the existing password in order to process the auto-filled new password, you will have an embarrassing call to make to your client to reset your test account. Another potential sticking point is the Contact Us form that so many website use. It’s common for the spider to easily submit thousands of emails to the target email server via this form and cause all sorts of heartburn for the receiving company trying to keep their email server running correctly after such an onslaught. Consider using the prompt for guidance option for form submission if you want more granular control of what Burp Spider actually submits to the web application.
Also, note the default values that Burp uses for all the form fields as shown in Figure 3.8. These are the exact values that will be sent to the web application when the spider encounters a form that can be submitted.

FIGURE 3.8 Burp Spider forms options.
Although Peter Wiener from Weinerville, WI is very catchy and fun, it probably isn’t the most appropriate to use when conducting a professional penetration test. The “Legend of Peter Wiener” has a cult-like following in the information security community, and there are running blog posts about the funny places that Peter Wiener has turned up during penetration tests. The creator of Burp Suite, Dafydd Stuttard, is a great fellow from England where the term wiener doesn’t have the same connotations that it has in the United States. Or so he says.
Let me tell you a quick story about my personal run-in with Peter Wiener. I completed a large amount of manual spidering on especially sensitive pages of an online banking application that I was testing as to not trigger any unexpected functionality. Once that tedious task was done, I thought it would be appropriate to use automated scanning to make quick work of what I thought was only static HTML pages. Later that week as I was finishing the project and starting the report, I got a call from the bank's chief security officer (CSO) wondering who Peter Wiener was and why he had submitted over 400 questions to the bank via the Contact Us page. The CSO was a bit taken aback by the name Peter Wiener and he wanted to know what he should tell the bank's board of directors if they asked about it. Gulp! It was at that exact moment that I went into the settings of Burp Spider and changed Peter Wiener from Weinerville, WI to Peter Winner from Winnerville, WI. That one letter change has made all of my explanations much easier! One last note on Peter: these default values will return when you download a new version of Burp, so make sure you change them every time!
There is one other pointer about using automated web hacking tools that I think is worth mentioning. It is very tempting to configure and execute the tools and then walk away (or go to bed). Please don’t do this. While most of the time it is perfectly safe, there are more and more reports of unsupervised automated tools running amuck! Web developers and web server administrators will set up black holes on the servers and applications that will put the automated hacking tool into an infinite loop of requests and cataloging. As some point, the hacker’s hard drive will become full of the temporary files from the automated tools running for hours. Nothing will ruin your morning like trying to put your machine back together after having the hard drive effectively bricked.
Web Application Scanning
Web application scanners provide an automated way of discovering vulnerabilities in the application similar to Nessus finding web server misconfigurations and missing patches. Most web application scanners sit between a browser and the web application just like a web proxy and are part of larger toolkit like Burp Suite and ZAP. Web scanners send crafted input to the application and analyze the response for signs of known vulnerabilities. It’s common for a web scanner to send hundreds of requests to an input field on a web application to check for all different types of signature-based vulnerabilities.
There are two specific web scanners that I encourage you to investigate: Burp Suite Scanner and the Scanner in OWASP’s Zed Attack Proxy (ZAP). Burp Scanner is only available in the pro version of Burp Suite, which at the time of this writing was approximately $300. Only you can decide if that price is worth it to you, but I suggest you read some of the comparison studies that have been done on web scanners. Burp Suite has performed very well overall and is #1 given the price tag of its nearest competitors. The great thing about Burp Scanner and ZAP Scanner is that the usage of these two scanners is very similar, so you can work through executing a scan with ZAP, and if you decide to purchase Burp Suite Pro, you are well on your way to understanding how to use it.
What A Scanner Will Find
There are three main types of web application vulnerabilities, regardless of which tool you choose to conduct the test, that web scanners are well equipped to identify:
■ Input-based vulnerabilities that target the server side such as SQL injection and operating system command injection. This type of vulnerability is sometimes difficult to positively identify for web scanners because the response from the web application often times is suppressed on the server side. In the good old days (early 2000s), server side code would throw all sorts of verbose exceptions that could easily be inspected by web scanners for telltale signs of vulnerabilities. The classic example is that of SQL injection where inputting one single quote would send back an error message from the application that was easily recognizable as vulnerable. As developers have gotten better at generic error messages, the detection of server side code vulnerabilities has become much tougher, but scanners can still find it.
■ Input-based vulnerabilities that target the client side such as Cross-site Scripting (XSS). Most web scanners can identify this type of vulnerability very reliably because the client-side code is visible. When hunting for a reflected XSS vulnerability, the scanner will submit input and immediately inspect the response from the web application for that same input being echoed back. More refined scanners will use this one instance of echoed input to then dive into more sophisticated XSS checks to verify the vulnerability is present. These advanced checks are the intelligence (the “secret sauce” as some researchers like to say) that the creator of each tool is banking on to stand out as a strong selling point.
■ Vulnerabilities that can be identified by inspecting the request and response cycle between the browser and web application such as insecure cookies and unencrypted password transmission. These vulnerabilities will be used in attacks that target both the web application and the web user. Most web scanners should hit a homerun with this type of vulnerability detection. The requests from the browser and the responses from the web application are completely visible to the scanner, so it only needs to parse them and compare the results to a known set of rules. It’s not difficult to check if username and password parameters are being sent insecurely over HTTP, for example.
What A Scanner Won’t Find
Web application scanners have some clear-cut deficiencies in the types of vulnerabilities that they can find that you really need to be aware of before using any tool. Here’s a list of web application vulnerabilities that are not detected by automated scanners regardless if it is a free open-source product or a $15,000 wonder beast.
■ Weak Passwords: Although spiders will try to login to the application with the default credentials, that is just to submit the form to find additional content. In the rare event that this default login is successful, the scanner doesn’t recognize the reason as a weak password. So even if an administrator account is easily guessable, the scanner will not provide any indication of this vulnerability.
■ Meaningful Parameter Names: The scanner is not intelligent enough to know what parameters are meaningful to the application and what different values of these parameters even mean to the overall functionality and security. This is especially true if the developer has used obscure parameter names such as a, hugs, nighthawk, foo or used a different language all together to define variables. (I once found myself wrangling with an SAP installation and was dealing with variables declared in German. Good times!)
■ Stored SQL Injection (second-order SQL Injection): Because this vulnerability rarely provides a direct response back to the scanner, it largely goes undetected and unreported. This is quite opposite from traditional SQL injection that provides immediate feedback to the scanner to compare to the onboard signatures. Worse yet, sometimes scanners will report stored SQL injection that end up being false positives resulting in a large amount of time trying to verify the scanner findings.
■ Broken Access Control: The ability for an attacker to circumvent access control mechanisms will not be flagged by a web scanner because the scanner simply doesn’t realize when a user could access another user’s resources (horizontal privilege escalation) or when a user could access an administrator’s resources (vertical privilege escalation). Even if the vulnerability is present, the escalation outside of the intended access control level will look like just another resource to request to the scanner. This is because scanners can’t make logical decisions and will never know what parameters and values drive functionality of the web application.
■ Multistep Stored XSS: Almost all vulnerabilities requiring multiple steps will not be caught by a scanner because it does not have the ability to intelligently complete sequential steps. For example, a scanner will miss a stored XSS vulnerability in the third step of a five-step check-out procedure because it won’t be able to satisfactorily complete the first two steps to even get to the vulnerable page.
■ Forceful Browsing (file and directory brute forcing): This vulnerability, also known as forced browsing, will not be flagged by the scanner because it involves requesting several similar resources in succession and being able to decipher which ones are meaningful to the application. A scanner will miss these because it does not understand the context of the application’s functionality for each of the requested resources.
■ Session Attacks: Short of blatant session vulnerabilities such as transmitting session identifiers over insecure HTTP, a scanner will not recognize session attacks such as session fixation, riding, or donation. All of these attacks involve human interaction by both the attacker and victim and are outside the scope of any automated scanner.
■ Logic Flaws: Because of the custom nature of web applications and the functionality they must provide, there are no scanner signatures for logic flaws. These vulnerabilities are much harder to detect by programmers and hackers alike because they deal with the logic of the web application instead of the syntax. An easy example is that a scanner isn’t smart enough to understand the difference in the following two URLs where the uid parameter dictates the user’s role: https://www.zoinks.com/viewHealthHistory.aspx?uid=scott https://www.zoinks.com/viewHealthHistory.aspx?uid=admin This vulnerability will never be found by an automated scanner but could provide access to every user’s health history; that is, you’re allowed to cycle through all records by simply changing the uid and submitting the request.
Scanning With ZED Attack Proxy (ZAP)
Before we move onto ZAP, you should completely close out of Burp Suite as both of these proxies run on port 8080 by default. Although you can have both running at the same time on different ports, the functionality that such an arrangement provides is outside the scope of this book. You can open ZAP via the menu structure in BackTrack clicking Applications → BackTrack → Vulnerability Assessment → Web Application Assessment → Web Application Proxies → owasp-zap as shown in Figure 3.9.
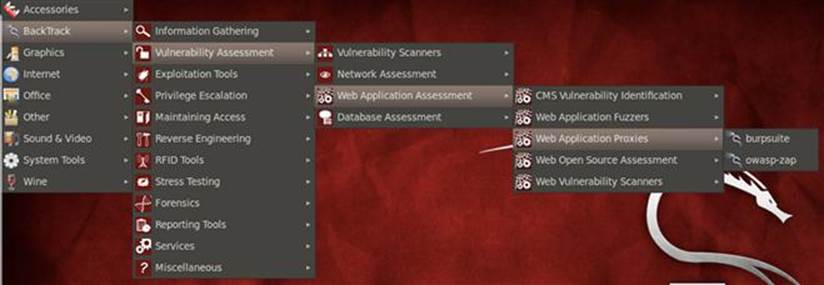
FIGURE 3.9 Opening OWASP’s Zed Attack Proxy (ZAP) in BackTrack.
ZAP is very similar to Burp Suite in many ways as they both include several of the same tools such as a site map, an intercepting proxy, a spider, and the ability to encode/decode values. ZAP also has a port scanner that could be used during web server recon, a fuzzing tool for rapid input sent to the application, and a directory brute force tool that guesses common and known directory names on the web server.
Configuring ZAP
When you open ZAP the first time, a license dialog box appears that you must first accept. Then a SSL certificate warning dialog box greets you. In order for ZAP to function properly over HTTPS, it needs to have an onboard SSL certification. You can simply click the Generate button to have a certificate created for you immediately as shown in Figure 3.10 and Generate again in the Options dialog box to correctly accept it into ZAP.
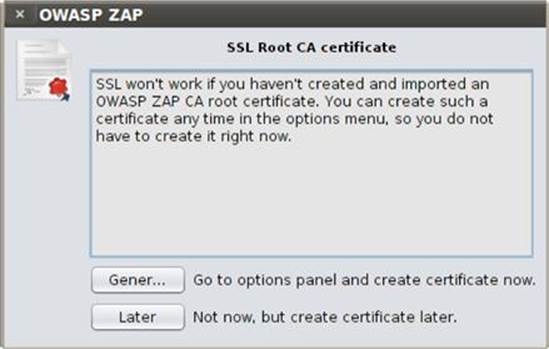
FIGURE 3.10 SSL certificate warning in ZAP.
Once your dynamic SSL certificate has been generated, it is displayed to you in the Options dialog box as shown in Figure 3.11. Once you’ve reviewed any options you’d like to inspect, you can click the OK button to get down to the business of using ZAP.
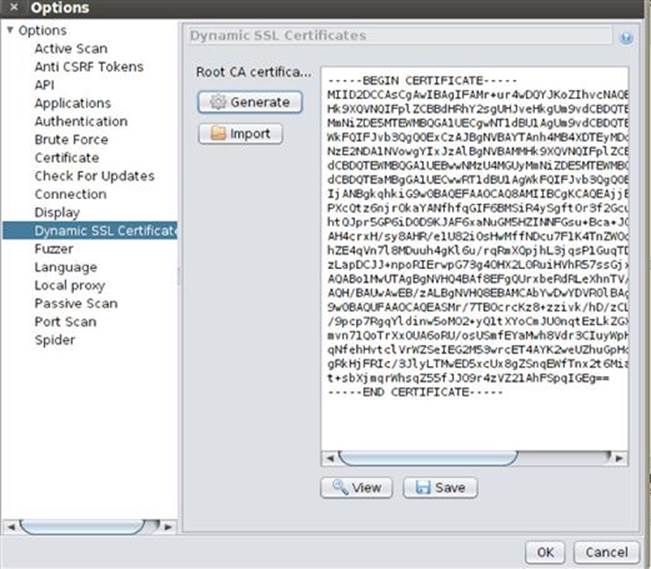
FIGURE 3.11 Generating certificate in ZAP.
Running ZAP
As you visit pages, the Sites tab will be populated in the same manner that the Site Map was generated in Burp Suite. Right-clicking any IP address or URL brings up the context menu in which you can select to scan, spider, brute force, or port scan the target application and server as shown in Figure 3.12.
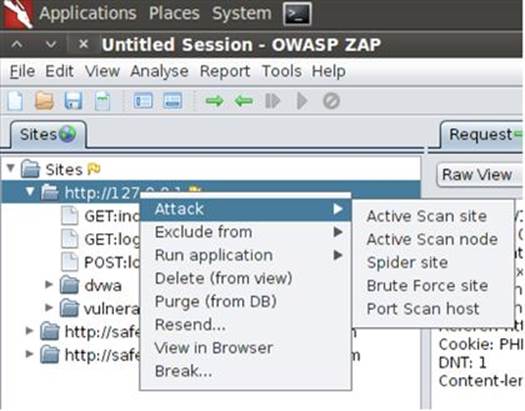
FIGURE 3.12 Right-click menu from the “Sites” tab in ZAP.
The first task you should complete is to spider the site to find all resources to be scanned. This spidering is priming the pump for the scanner to do its work. After you select Spider site from the context menu, the spider tab will display the discovered content and a status bar indicator of the spidering process as shown in Figure 3.13.
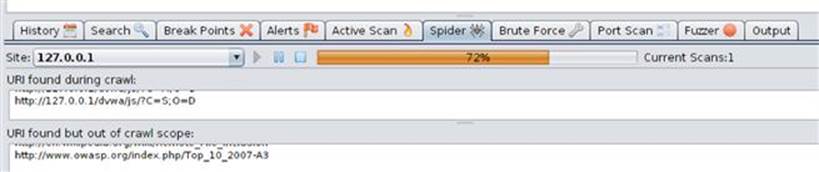
FIGURE 3.13 Spider progress in ZAP.
When the spider is done, you can execute the active scan of the web application by using the context menu or by selecting the Active Scan tab. If you use the tab, you just have to click the play button to start the live scanning. The active scan’s output is found as shown in Figure 3.14.
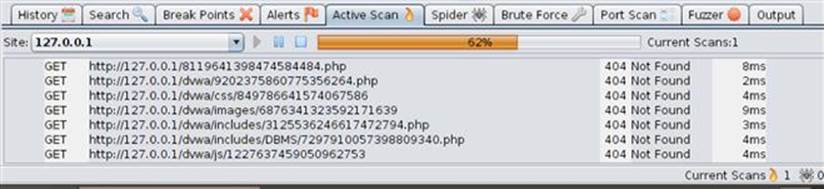
FIGURE 3.14 Active scan progress in ZAP.
ZAP also has passive scanning functionality so that as you perform manual browsing all the responses from the web application that pass through the proxy will be inspected for known vulnerabilities. This is such a handy feature to be able to effectively scan for vulnerabilities without having to send a large number of malicious requests back to the web application. This feature is enabled by default in ZAP just as it is in Burp Suite.
Reviewing ZAP Results
Once the active scanning has completed, you can review the findings in the Alerts tab where a tree structure will display the discovered vulnerabilities. It’s not surprising that our DVWA application has several existing vulnerabilities (that’s the whole point!) as illustrated by the SQL injection finding here. ZAP provides a brief description of the vulnerability, what page it was discovered on (login.php in this example), and the parameter’s value that triggered the finding as shown in Figure 3.15.
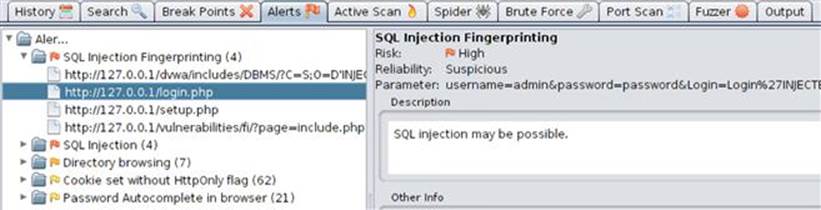
FIGURE 3.15 Single item in the Alerts tab in ZAP.
We now have the exact URL to attack and we know the parameter that is vulnerable. Instead of using a benign proof-of-concept request sent to the web application, we can send in malicious input to compromise the web application. We can perform this attack in the actual HTML form field in a browser if we want to type our malicious input there, or we can use a proxy to intercept the request and edit the parameter’s value. We can even use additional tools, such as sqlmap, to exploit the application. We will be doing a little bit of each of these scenarios coming up during the actual web application hacking.
The full report of ZAP Scanner’s findings can be exported as HTML or XML via the Reports menu. As soon as you save the report file as HTML, as shown in Figure 3.16, it will open in your default browser for you to review further.
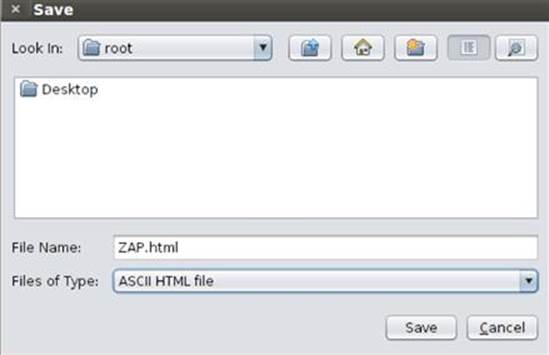
FIGURE 3.16 Saving the exported file from ZAP to the root directory.
The full report details the findings for each of the discovered vulnerability in the same format as the Alerts tab view. Below is the report entry for an SQL injection vulnerability on the include.php page. The most important parts are the URL and the parameter value that triggered the vulnerability.
Alert Detail:
High (Suspicious): SQL Injection Fingerprinting
Description: SQL injection may be possible.
URL: http://127.0.0.1/vulnerabilities/fi/?page=include.php'INJECTED_PARAM
Parameter: page=include.php'INJECTED_PARAM
...
Solutions:
Do not trust client side input even if there is client side validation. In general,
If the input string is numeric, type check it.
If the application used JDBC, use PreparedStatement or CallableStatement with parameters passed by '?'
If the application used ASP, use ADO Command Objects with strong type checking and parameterized query.
If stored procedure or bind variables can be used, use it for parameter passing into query. Do not just concatenate string into query in the stored procedure!
Do not create dynamic SQL query by simple string concatentation.
Use minimum database user privilege for the application. This does not eliminate SQL injection but minimize its damage. Eg if the application require reading one table only, grant such access to the application. Avoid using 'sa' or 'db-owner'.
...
ZAP Brute Force
The other tool in ZAP to use during scanning is the Brute Force (formerly known as DirBuster) found on the brute force tab. It comes preloaded with lists of common directory names and simply requests these directories to see if they exist. These preloaded lists are listed in order of importance (top is best) as found by research of the most common directories found online. Once a directory is discovered, the tool will continue to brute force search for deeper directories until it has exhausted the entire list as shown in Figure 3.17.
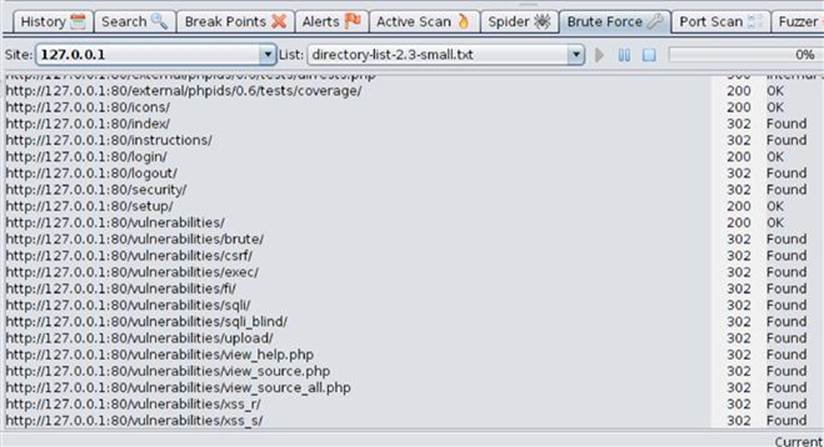
FIGURE 3.17 Brute Force tool in ZAP.
This tool takes a long time to run, especially if you use any of the large word lists, so be aware that it won’t be completed nearly as fast as the spider or scanner tools. However, you can leave the Brute Force tool run while you use other tools in ZAP or complete other hacking tasks.
Scanning With Burp Scanner
The other web scanner that is a really strong option is Burp Scanner, and it is very similar to the ZAP scanning process that we just worked through. The scanner in Burp is only available in the Pro version, which costs approximately $300 at the time of this writing. The free version that you are running in BackTrack won’t have this functionality, but it’s important to introduce you to the functionality of Burp Scanner as it is a very well respected tool in the web hacking world.
Configuring Burp Scanner
A great property of Burp Scanner is the ability to handpick the exact vulnerabilities to scan for with an on/off toggle in the options tab.
■ SQL Injection
■ Operating System Command Injection
■ Reflected Cross-site Scripting (XSS)
■ Stored Cross-site Scripting (XSS)
■ Path Traversal
■ HTTP Header Injection
■ Open Redirection
■ LDAP Injection
■ Header Manipulation
■ Server-level Issues
These are the typical vulnerabilities that are found by automated scanners, and it’s a nice feature to be able to turn off any of them if you are specifically looking for only a subset of them. One good use of this would be to run Burp Scanner after finding the SQL injection vulnerability originally when running ZAP to validate that the vulnerability is present. These tools are very easy to run, and the time to run both to cross validate the findings is very minimal.
Running Burp Scanner
You can select Active Scan for any high-level URL or underlying branch of the URL from the Site Map (sub-tab of the Target tab) by using the right-click context menu. As you identify the URLs of the web application that you want to target, it is critical that you add them to the scope of your selected tool suite. Then you can specify to scan only items in scope in the Burp Scanner with a simple checkmark during the scanner initiation process as shown in Figure 3.18.
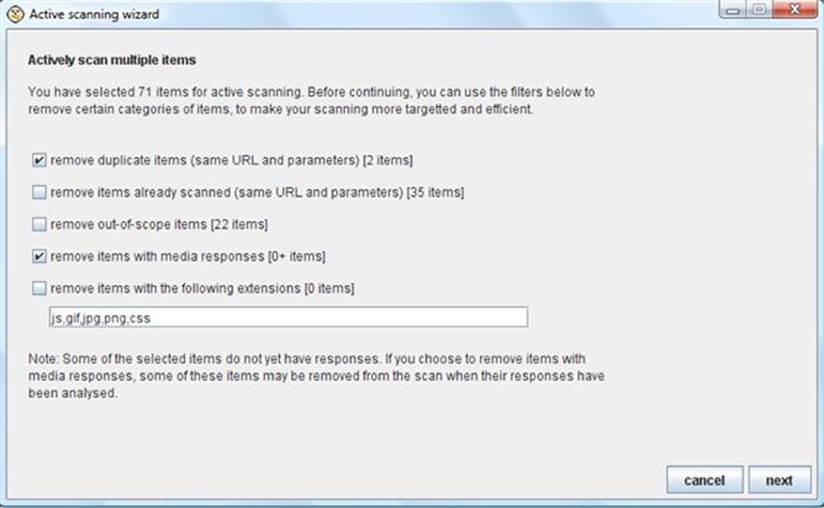
FIGURE 3.18 Active scanning wizard in Burp Scanner.
Reviewing Burp Scanner Results
Any vulnerability identified during passive scanning will appear immediately in the results tab, but because of the large amount of requests sent by Burp Scanner during active scanning, there is a scan queue tab that provides the real-time status of the current scan. This queue can grow quite large and take a long time (several hours) to complete if spidering discovered a lot of resources being used by the web application.
You can also fine-tune the performance of the scanner in the options tab by editing the number of threads the scanning engine uses (three is the default), how many retries the scanner will attempt if it encounters any network errors (three is the default), and how long to wait before trying the same request again (2000 ms is the default). If you increase the thread count, your scan will execute faster, but you run the possibility of overwhelming the web application and effectively performing a denial of service attack.
Once the scan is completed for each resource, the status indicator will transition from a percentage completed to a finished indicator. Any identified vulnerability is counted and color coded in the issues column on the Results tab where red is the most severe vulnerability as shown in Figure 3.19.
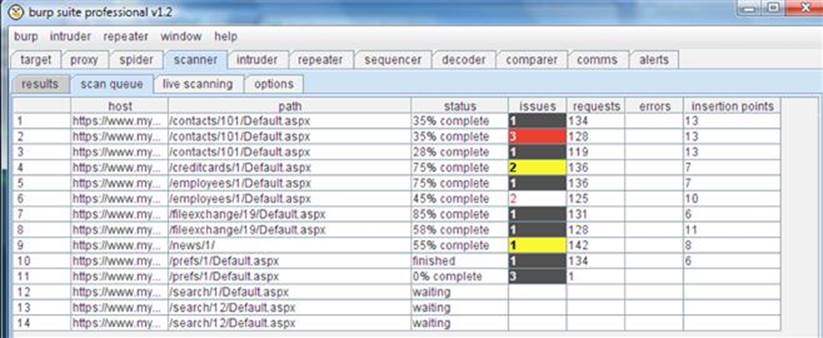
FIGURE 3.19 Active scan queue in Burp Scanner.
You can review any of the identified vulnerabilities in greater detail by double-clicking it in the scan queue tab as shown in Figure 3.20. The great thing about this detailed view is that you can review the exact request and response cycle that triggered the vulnerability discovery. This reviewing of the proof-of-concept attack is a huge help because it can be used to create an actual malicious attack against the same page and parameter. There is also supporting text that describes the vulnerability and how it can be best mitigated.
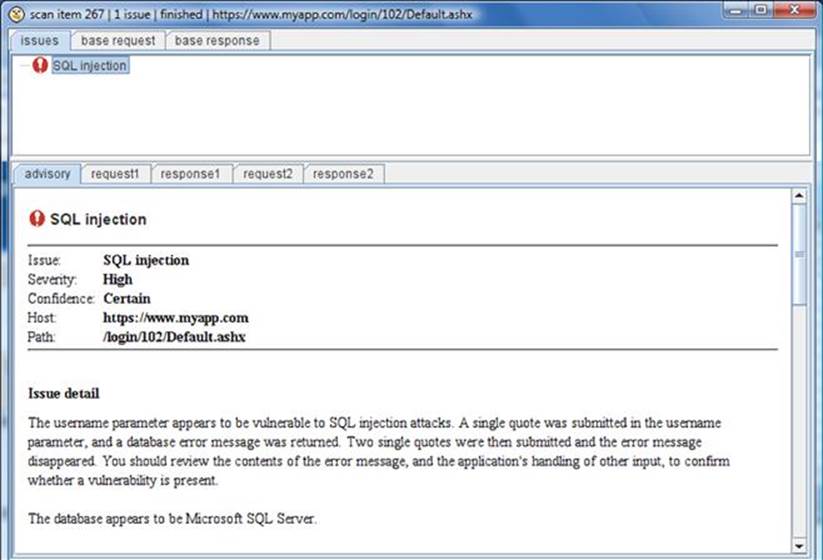
FIGURE 3.20 Single item review in Burp Scanner.
The results tab includes the running total of all discovered vulnerabilities from the scan and can be viewed as a tree structure just like the site map of the web application as shown in Figure 3.21.
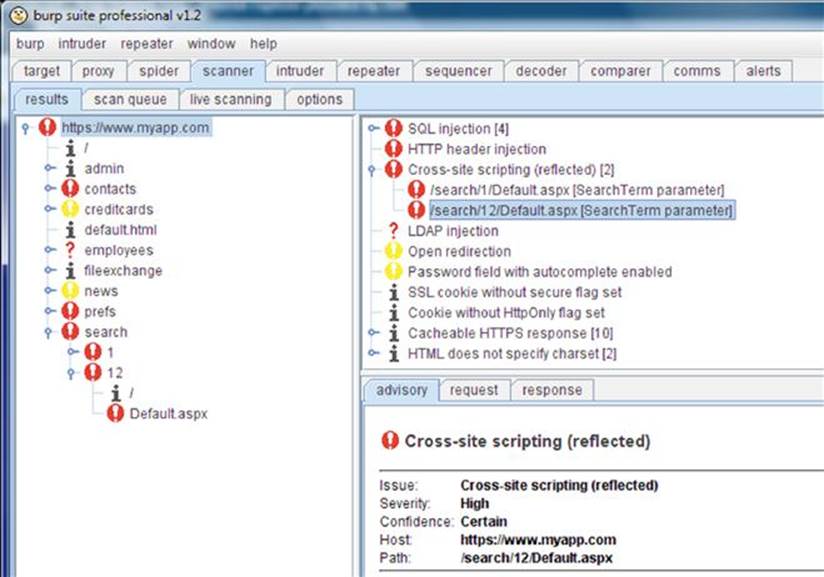
FIGURE 3.21 Tree view of discovered vulnerabilities in Burp Scanner.
Each vulnerability’s severity is categorized as high (red), medium (orange), low (yellow), or informational (black) as well as the confidence of the finding as certain, firm, or tentative. The severity and confidence values of each vulnerability in the scanner results can be edited, but I strongly urge you to not to do that. The Burp community has assigned these values from years of testing and professional use, so rest easy in knowing these are best practices.
All materials on the site are licensed Creative Commons Attribution-Sharealike 3.0 Unported CC BY-SA 3.0 & GNU Free Documentation License (GFDL)
If you are the copyright holder of any material contained on our site and intend to remove it, please contact our site administrator for approval.
© 2016-2026 All site design rights belong to S.Y.A.