The Basics of Web Hacking: Tools and Techniques to Attack the Web (2013)
Chapter 5. Web Application Exploitation with Broken Authentication and Path Traversal
Chapter Rundown:
■ Why authentication and session vulnerabilities are so widespread
■ Using Burp Intruder for brute force authentication attacks
■ Why session attacks are so difficult: cookie cracking is not a good idea
■ Pillaging the web server’s file system with path traversal attacks
Introduction
Authentication allows us to sign in to a web application so we have a personalized browsing experience, while session management keeps tracks of the requests and responses so we can perform multistep actions such as shopping and bill paying. They are really two peas in a pod. Neither authentication nor session management was considered when the HTTP protocol was invented as it is a stateless protocol. So using these two features as the Internet has matured has proved to be a very difficult situation.
Unfortunately, authentication and session management are wrought with vulnerabilities in many web applications. The tools and techniques used to exploit each differ slightly, but because of the close relationship of authentication and session management it makes perfect sense to investigate them together.
Path traversal attacks occur when hackers are allowed to traipse through the directory structure of the web server. This is most common when web applications allow upload functionality and the user (attacker) crafts a malicious input value that is processed by the web application and allows access to sensitive directories on the web server.
We will look at the directories that are often under attack in both Windows and Linux environments and how these attacks actually take place!
Authentication and Session Vulnerabilities
Today’s Internet has been twisted and contorted to use authentication and session management, essentially breaking both. The most common authentication attack uses a proxy-based attack tool (Burp Suite’s Intruder, for example) to brute force the login credentials of a legitimate user. There is not a lot of stealth to this type of attack, but it’s very successful because users continue to pick weak passwords. We will be using Burp Intruder as our tool of choice along with a list of the most commonly used weak passwords. There are several aspects of authentication throughout the web application that need to be considered for these attacks, such as:
■ Application login
■ Password change
■ Secret questions
■ Predictable usernames
■ Predictable initial password
■ Passwords that never expire
Throughout this chapter, the term “cookie” will be used to mean “session cookie” or “session identifier.” Session management attacks are only possible in two flavors: (1) attacking how strongly the session identifier is generated (measuring entropy) and (2) attacking how the cookie is used and handled by the web application. Attacking how a cookie is generated is very difficult because most of the session management frameworks bundled with web servers are capable of creating cookies that are very difficult to guess even when a hacker has tons of processing power to generate thousands of cookies in short order. A much more applicable attack is to investigate how the application uses the cookie. This type of attack doesn’t require understanding how a cookie was generated, but instead focuses on accessing and using the cookie in a nefarious manner. A hacker will gladly steal and use a securely generated cookie!
Path Traversal Vulnerabilities
When a web server is installed and configured, the web application is given a slice of the file system on the web server that the application is allowed to live in. These allowed directories are usually a couple of folders deep into the file system of the web server and include 100% of what the web application needs to perform in normal circumstances: the code, the images, the database, the style sheets, and everything else that the application may need. The application should never attempt to access resources that are outside of its prescribed directories because the other resources on the web server aren’t applicable to the application’s scope. The ability for a hacker to break outside this confined world and access resources on the web server that he shouldn’t is the core concept of path traversal attacks.
Brute Force Authentication Attacks
Authentication actually takes place in many other parts of the web application other than the main login page. It is also present when you change your password, update your account information, use the password recovery functionality, answering secret questions, and when you use the remember me option. If any of these authentication processes is flawed, the security of all the other authentication mechanisms may be compromised. The frightening thing about authentication vulnerabilities is that they can open the door for all other accounts to be compromised. Imagine the carnage when an administrator’s account is compromised because of poor authentication!
We will be using the Brute Force exercise in DVWA as our guide to complete an online brute force authentication attack. It is an HTML form-based authentication page; just like over 90% of web applications use. Despite ongoing efforts to include additional factors into the authentication process, such as CAPTCHA and challenge questions, the traditional username and password is still the most popular authentication mechanism.
This attack is much different than the offline password hash cracking that we completed with John the Ripper. We will now be interacting directly with the web application and database that process the username and password parameters during authentication. Online brute force authentication hacking is much slower than offline password hash cracking because we are making repeated requests to the application and must wait for it to generate a response and send it back.
Intercepting The Authentication Attempt
Browse to the Brute Force exercise in DVWA and ensure Burp is configured as the proxy with your browser. We want to intercept a login attempt that we send to the application, so make sure Burp Intercept is set to on. We aren’t trying to guess the username and password manually in this HTML form, but rather this step is just priming the pump so we understand what parameters are sent to the application during a normal authentication attempt. It makes absolutely no difference what we provide for username and password. I’ve entered corndogs for the username and sureareyummy for the password as shown in Figure 5.1.
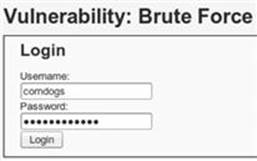
FIGURE 5.1 Initial login attempt to be captured by Burp Intercept.
Once you submit this login attempt with the Login button, you can see the parameters in the Params tab in Burp Intercept that are used during an authentication attempt as shown in Figure 5.2.
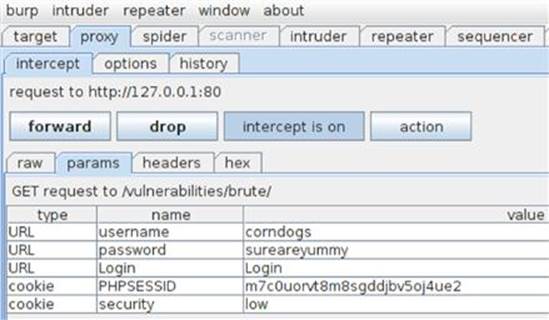
FIGURE 5.2 Intercepted authentication parameters in DVWA.
We are only concerned with the username and password parameters for this attack; the other three will be left alone. Remember, we fully expect this login attempt to fail. Our only goal right now is to get a valid authentication attempt in our proxy history, so we can change the parameters’ values to exploit the weak authentication process. You can now forward this request to the application as well as the subsequent responses until you get the Username and/or password incorrect message on the page.
One feature of a web proxy that is often overlooked is that it catalogs every single request and response cycle that passes through it. You can then go back and inspect (and reuse) any request that you have already made. This is exactly why you primed the pump with the sure-to-fail authentication attempt. It was surely going to fail, but you needed a request that had everything correct except the username and password! You can review all the requests you’ve made in the history tab in the Proxy tool of Burp. You are specifically looking for the authentication attempt you just made with the corndogs username and sureareyummy password combination as shown in Figure 5.3.
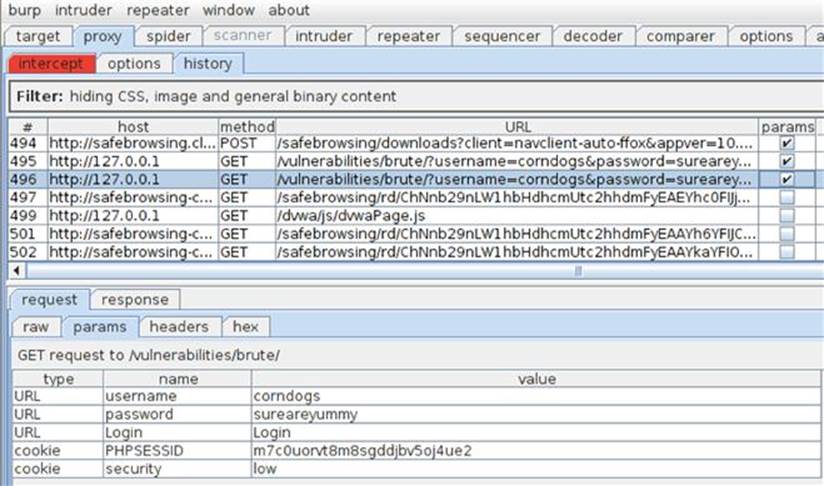
FIGURE 5.3 Authentication attempt retrieved from the proxy history of Burp Intercept.
If you’re overwhelmed by the sheer amount of requests in this history view, it is helpful to look for requests that have parameters (look for the checked checkbox in the Params column) as well as ordering the requests by date/time. You can see the username and password that you submitted in the parameters view in the lower part of the screen.
Configuring Burp Intruder
You can now use this request as your skeleton to attempt to exploit this authentication page with different usernames and passwords. To do this, simply right-click on the request and select send to intruder as shown in Figure 5.4.
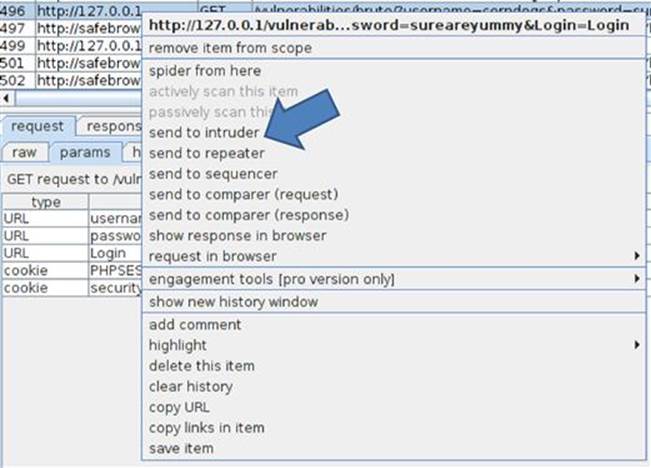
FIGURE 5.4 Sending the authentication attempt to Intruder.
Burp Intruder is a tool for automating customized attacks against web applications, but it is not purely a point-and-click tool. You need to configure Intruder to only attack the parameters that you choose and with the exact payloads that you select. In the Positionstab of Intruder, you can see there are five automatically highlighted parameters that you may want to brute force as shown in Figure 5.5.
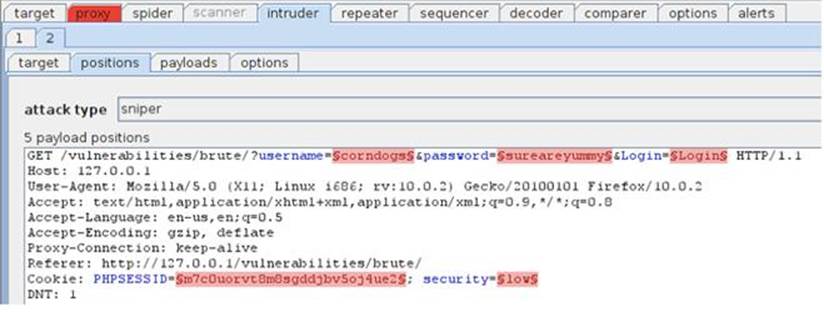
FIGURE 5.5 Automatically identified parameters in Burp Intruder.
These five parameters should look very familiar, as they are the exact same parameters that you saw in the intercepted request. You are only concerned with the username and password parameters and the other three can be left alone. In order for Intruder to ignore these three benign parameters, you need to clear the payload markers (the squiggly markings before and after each parameter value) by highlighting them and clicking the clear button. Once you’ve successfully done that, you will have only two positions marked: username and password.
Intruder Payloads
You also need to consider the attack type that we want to conduct. Intruder has four different attack types that you can select from the pull-down menu.
1. Sniper: This attack uses a single set of payloads and targets each position in turn before iterating to the next value. This is most applicable when fuzzing for vulnerabilities such as cross-site scripting (XSS).
2. Battering Ram: This attack also uses a single set of payloads but inserts the same payload into all of the marked parameters at once. This is most applicable when an attack requires the same input to be inserted in multiple places such a username in the cookie header and the message body simultaneously.
3. Pitchfork: This attack uses multiple payload sets for each marked parameter and iterates through all payload sets simultaneously. This is most applicable when an attack requires related values to be used in several parameters in the request such as a user_IDparameter and the corresponding first_name parameter. A pitchfork attack will advance each of these payloads in parallel so the first values of each payload will execute, followed by the second value of each payload, and so on.
4. Cluster Bomb: This attack uses multiple payload sets, but a different payload set for each marked parameter and iterates through each payload set in turn to ensure all possible combinations are used. This attack is most applicable when an attack requires different input to be used in multiple places in the request such as a username and password. The cluster bomb attack will lock in the first payload (username, for example) and iterate all of the passwords with this first username. Once all the password values have been tried for the first username, the username is changed to the second username and the entire password list is used with this second username.
Obviously you are going to use the cluster bomb attack type for the authentication hack, but knowing when to use each of these attack types is a great weapon in your arsenal. The Help menu in Burp Suite has additional documentation on these attack types if you’d like further explanation. Once you’ve selected Cluster bomb from the drop-down menu, you can select the Payloads tab in Intruder. A payload is the values to iterate through during the brute forcing. You have two positions available to send payloads to: the username and the password. The Payload set drop-down menu in Intruder indicates which parameter you are targeting and they are processed in the same order that they appear in the positions tab, so username is up first.
There are many options for the username payload, but perhaps the most useful is the runtime file that can be fed to Intruder during the attack. Such a file is a great place to store usernames that you gather during the previous recon steps. We already know the five valid users for DVWA so it’s an easy task to start gedit, create a text file full of valid users, and save it as dvwa_users.txt in the root directory that we can use in Intruder as shown in Figure 5.6.
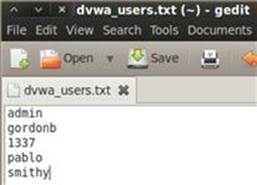
FIGURE 5.6 Creating the dvwa_users.txt file to be used by Burp Intruder.
We are going to use a readily available password list as the runtime file for the password parameter. It is the 500 Worst Passwords list from the team at Skull Security that can be downloaded as a .bz2 file fromhttp://www.skullsecurity.org/wiki/index.php/Passwords. Save this file in your root directory and then open a terminal and run the following command to extract it to a text file.
bunzip2 500-worst-passwords.txt.bz2
Once you’ve successfully downloaded and unzipped this password list, run an ls command to ensure the text file is in your root directory. If everything goes as intended, both the username file (dvwa_users.txt) and the password file (500-worst-passwords.txt) will be available as text files in your root directory.
With these lists ready and the payload markers set in Intruder, the only remaining task before attempting this exploit is to assign each text file as a runtime file. As shown in Figure 5.7, there is a “Payload Options (Runtime file)” section where you can browse your local hard drive to select your text file for each payload. Remember position 1 is for dvwa_users.txt and position 2 is for 500-worst-passwords.txt.
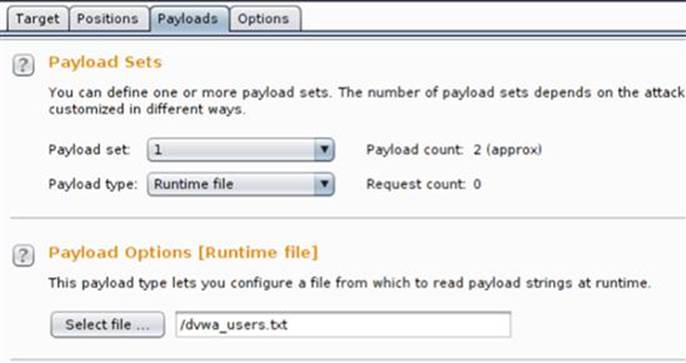
FIGURE 5.7 Selecting runtime file to be used by Intruder.
Running Intruder
You can execute this exploit by selecting start attack from the Intruder menu. Burp Intruder will alert you that the free version is throttled to attack slower, so you will need to click-through this prompt. Because you’re most likely using the free version of Burp Suite, this attack will take approximately 30-40 min to finish because of the nearly 2500 requests with a 1 s delay between each request running on only one thread. The pro version, however, will tear through this attack very quickly! The vast majority of your authentication attempts will fail, but it’s easy to identify the few requests that are a different length as successful logins when sorting by response length as shown in Figure 5.8.

FIGURE 5.8 Successful brute force logins via Intruder.
You can also include custom string terms to search for, so it’s easier to identify a successful login under the options tab in Intruder. Perhaps you want to search for the term Welcome! as a known string when authentication is successful. Just make sure you know an actual string that will be displayed with a valid authentication attempt otherwise it will return no results.
Alert
If it’s been a couple of minutes since your last activity in DVWA, you may have been logged out. If you’re logged out, the attack will still run but all exploit attempts will fail because you won’t be authenticated to the DVWA application to make requests to the Brute Force exercise page. So make sure that you have a current DVWA session before starting the attack.
Session Attacks
Here are some of the most popular session attacks that are currently being used by hackers to exploit session vulnerabilities.
■ Session hijacking: This is when a user’s session identifier is stolen and used by the attacker to assume the identity of the user. The stealing of the session identifier can be executed several different ways, but XSS is the most common. We will look further into XSS in a later chapter.
■ Session fixation: This is when an attacker is assigned a valid session identifier by the application and then feeds this session to an unknowing user. This is usually done with a web URL that the user must click on the link. Once the user clicks the link and signs into the application, the attacker can then use the same session identifier to assume the identity of the user. This attack also occurs when the web server accepts any session from a user (or attacker) and does not assign a new session upon authentication. In this case, the attacker will use his or her own, prechosen session, to send to the victim. These attacks work because the session identifier is allowed to be reused (or replayed) in multiple sessions.
■ Session donation: This is very similar to session fixation, but instead of assuming the identity of the user, the attacker will feed the session identifier of the attacker’s session to the user in hopes that the user completes an action unknowingly. The classic example is to feed the user a valid session identifier that ties back to the attacker’s profile page that has no information populated. When the user populates the form (with password, credit card info, and other goodies), the information is actually tied to the attacker’s account.
■ Session ID in the URL: This is when session identifiers are passed as URL parameters during the request and response cycle. If this functionality is present, an attacker can feed such a URL to the user to conduct any of the attacks described above.
Cracking Cookies
One of the first activities that new security researchers always attempt is cracking session-generating algorithms, so they can predict session identifiers. I was even a faculty supervisor for such an adventure! My team created an application that logged into an application, archived the assigned cookie, logged out of the application, and repeated that cycle millions of times. Once we gathered over one million session identifiers, we mined the database for any instance of duplicate cookies. None were to be found. We then turned our attention to trying to crack the algorithm that created these cookies. No dice. We calculated that it would take several hundreds of years before compromising the algorithm. If you think that attacking these algorithms is the path of least resistance to web application compromise, you’re doing it wrong.
There was a time when session identifiers were created using weak algorithms, but those days are long gone. Unless a web administrator totally misses the boat when configuring the application environment or somebody decides to roll their own session creation algorithm (always a terrible idea), there is little hope in attacking the algorithm that generates session identifiers. Is it mathematically possible? Absolutely! Is it a good use of your time and resource? Not in a million years (which is how long some of the cracks will take)!
Burp Sequencer
You can test how strongly session identifiers are generated by using Burp Sequencer, which tests for randomness in session values where the security of the application relies on unpredictability of these random session identifiers. It’s a very handy tool that performs extensive analysis on gathered session IDs and displays the results in easy to understand graphs and tables. Burp Sequencer tests a hypothesis (“the session identifier is actually randomly generated”) against a collection of gathered session identifiers to calculate the probability of actual randomness. This is fancy talk for “it checks to see if the sessions cookie is actually random compared to tons of other session cookies.” If this probability falls below the significance level, the session identifier is categorized as nonrandom. By default, Sequencer uses the 0.0002–0.03% FIPS standard for significance, but you are free to adjust this measurement for your own uses. FIPS is the Federal Information Processing Standards that is used government-wide for security and interoperability of Federal computer systems. The steps to conduct a Sequencer test and analysis are very easy to perform:
1. Find a request in your proxy history that has a session identifier in its response. This session identifier is what we want to test and analyze with Sequencer.
2. Use the right-click menu on this request to send to sequencer.
3. Identify the session identifier in Sequencer if it’s not automatically identified. Sequencer will automatically identify most stock web environments’ session identifiers.
4. Set any options you’d like in Sequencer such as the thread count and request speed to dictate the speed in which the session identifiers will be gathered. Remember it’s critical that you get the session identifiers are quickly as possible without losing sessions to other users. If you can get a large consecutive stream of session identifiers, your testing will be more accurate.
5. Click the Start Capture button. You can review results as soon as Sequencer has been issued 100 session identifiers. The FIPS standard mandates 20,000 session identifiers to be reliable.
6. Review the results of the tests in the generated charts.
Here is a screenshot identifying the session identifier right after sending the request to Sequencer. This is a screenshot of Daf conducting this analysis on the BBC news website, not us using DVWA. Notice the token starts and token ends options on the right side of the screen that identify the exact parameter that you’d like tested as shown in Figure 5.9.
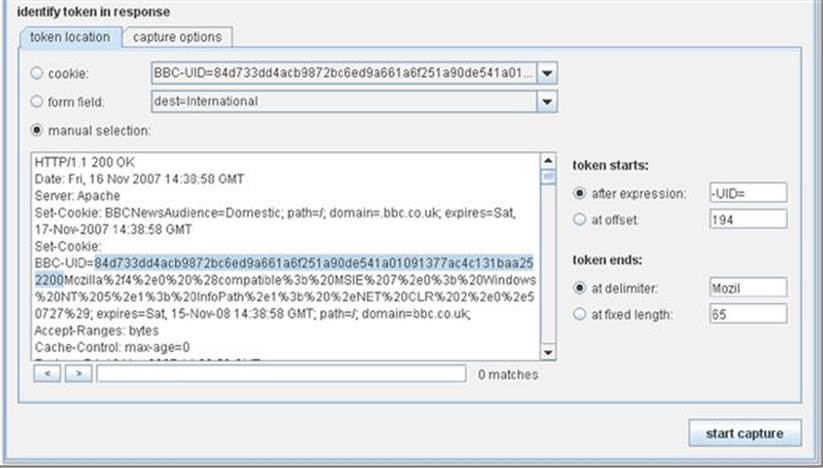
FIGURE 5.9 Identifying the session identifier in Burp Sequencer.
The results of the Sequencer testing can be viewed from an overall significance level perspective and at the bit level perspective. Here are results for varying levels of significance where it is discovered that there is over 170 bits of entropy for the 0.001% significance level (bottom bar in the chart). Entropy is a measure of unpredictability. So the higher the entropy in the session identifiers, the more confident we are that they are randomly generated as shown in Figure 5.10.
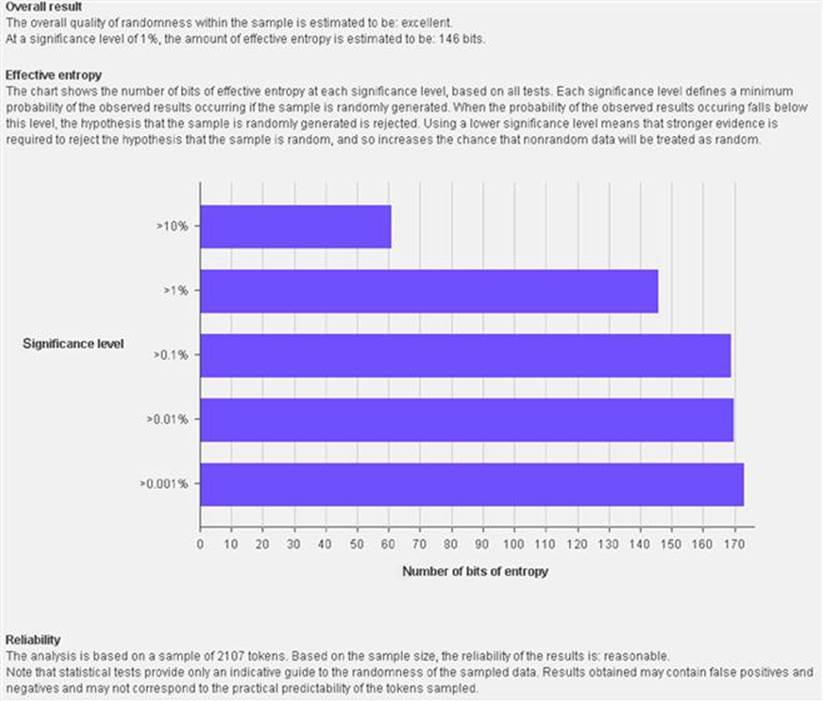
FIGURE 5.10 Entropy results for Sequencer tests.
If you mandate FIPS compliance, the bit level results are especially applicable because you can cycle through several tabs across the top of the graph that provides several different FIPS test results as shown in Figure 5.11.
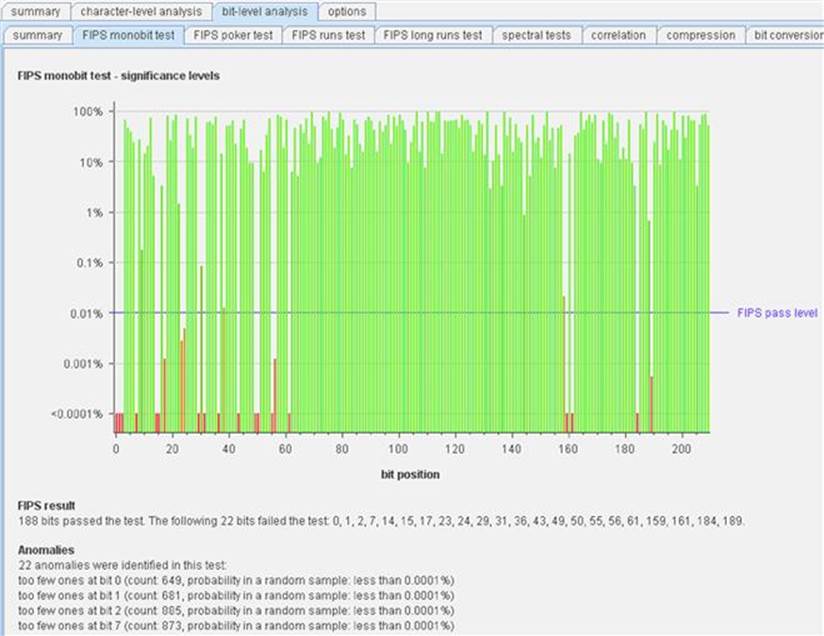
FIGURE 5.11 Bit level results for Sequencer tests.
Sequencer is a great tool for quickly testing the randomness of session identifier generation. It is very rare that you will find problems with session identifiers even when you gather 15,000 or 20,000 of them for analysis.
Other Cookie Attacks
Viable attacks against session identifiers all revolve around the concept of reusing a cookie. It doesn’t matter whom the cookie was issued to, how the hacker stole the cookie, or how the hacker plans to reuse it. It only matters that the application is perfectly functional with old cookies being used more than once. It’s that simple. You can complete a series of tests against any application once you’ve received a valid session identifier to check if it’s vulnerable to cookie reuse.
■ Log out of the application, click the back button in your browser, and refresh the page to see if you can still access a page in the web application that should require an active session such as an my account page.
■ Copy and paste your valid session identifier into a text file (so you have a copy of the value) and use it again after logging out. You can use an intercepting proxy to plug in your old session identifier.
■ Simply walk-away from, or stop using, your browser all together for several hours to test the time-out limits of the application after you’ve received a valid session identifier. It’s all too common to simply have to click OK when it warns you that your session has been terminated when it actually hasn’t.
■ Many applications will issue you a cookie when you first visit the site even before you log in. Copy and paste that session identifier into a text file and then log in. Compare the session identifier that was issued to you when you first visited the site and the session identifier you were issued after successfully authenticating. They should be different. If they aren’t, this is a big vulnerability related to session donation.
■ Log into the same application from two different browsers to see if the application supports dual logins. If both sessions persist, do they have the same session identifier? Is the first session warned that the same account has been logged into concurrently from a different location?
There are several variants of the manual tests above that you can develop on your own. It’s all about testing to see how the application deals with the session identifier during normal usage. We will return to session attacks when we cover attacking the web user.
Path Traversal Attacks
Path traversal attacks take place when a hacker attempts to circumvent any safeguards and authorization checks that the web server administrator and web programming team have set up to keep all web application users only in the specified directories. These attacks are often executed by authenticated users of the application; that way they can fully inspect what a normal authenticated user has access to so they can better craft malicious reference request. Trying to identify what parameters are in play during normal usage of the application from a guest account would be very difficult. Think of all the extra functionality (thus parameters and pages) that is made available to you as soon as you log into an online store or bank.
Web Server File Structure
If you use Linux for your web environment, the directory structure will vary depending on the exact web server, but for our DVWA installation, the directory structure will resemble what is introduced in Figure 5.12.
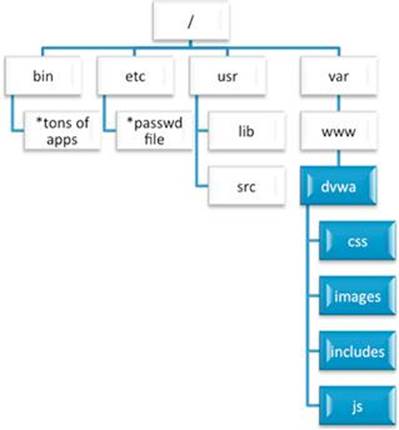
FIGURE 5.12 Partial directory structure for DVWA on the web server.
The shaded directories with white type are the directories on the web server that the web application is allowed to access. All other directories (many more not shown at the root level) are intended to be accessed only by the web server administrator.
If you were curious what the directory structure is for other Linux installations, I would recommend taking a stepwise approach to discovering them. Run a series of cd and ls commands, so you can see the changes from one directory level to the next as shown inFigure 5.13.

FIGURE 5.13 Web server directory discovery for DVWA environment.
You will be executing a path traversal attack (a.k.a. directory traversal) to retrieve resources from the web server that you have no authorization to in the File Inclusion DVWA exercise. Specifically you will retrieve files from the most notable directories on the DVWA web server. This vulnerability also provides a mechanism to upload, install, configure, and execute additional tools on the web server.
The first step in this attack is to realize where in the file system the application is housed. You won’t normally have access to the web server’s file system to run cd and ls commands to fully map out where the application is allowed to operate. You know that you need to break out of the assigned directories, but you just don’t know where exactly you are in the overall file structure. I always liken this to stumbling around a dark room looking for a way out. You know there’s a door somewhere, but you don’t know where it is because of the darkness. Your best bet is to simply walk along the wall until you find the door. If you come to a corner before the door, you just walk along the new wall. Sooner or later you will find the door to escape.
In the context of our path traversal attack, this hunting is done with the up a directory command, which is represented by ../ in the web application world. You can use this dot-dot-slash command as many times as you want once you’ve identified the path traversal vulnerability. It’s not important that you know how many levels deep you are in the directory structure, because when you reach the root directory and attempt to go up a directory, you will stay in root. You could be 3 or 7 or 14 levels deep; as long as you put in 14 or more up commands, you will reach the root directory regardless of where you start. Trying to go up a directory when you’ll at the root directory will simply keep you in the root directory, so error on the side of using too many! You can then drill down into your intended directory that you’d like to pillage as shown in Figure 5.14.
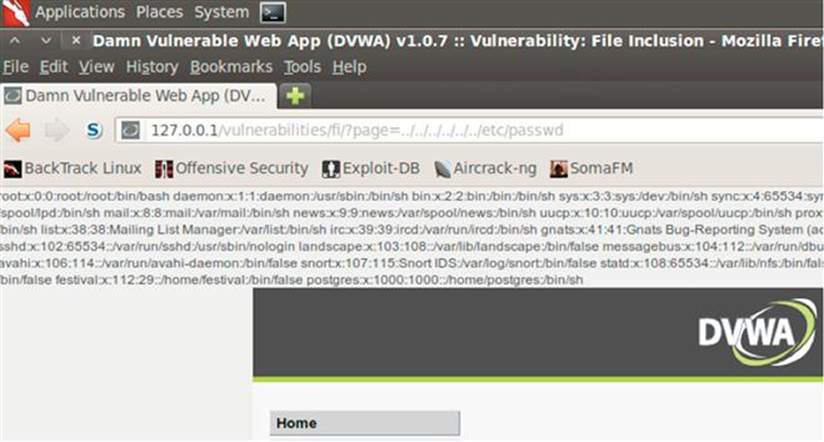
FIGURE 5.14 Retrieving the /etc/passwd file via a path traversal vulnerability in DVWA.
In order for this attack to work as described, ensure that your DVWA is still running with the “low” security level that you configured earlier in the book. Here we are using six instances of ../ when we know that we really only need to use four of the commands to reach the root directory. Once we’ve reached the root directory, we then request the /etc/passwd file. The contents of the passwd file are displayed back to our web application.
We just used the web application to reach into parts of the file system that it was not authorized to do and extract out sensitive information! All from the comfort of our browser interacting with the application like a normal user. The ../ rarely works in its natural format like it does here. There are tons of sanitization routines that attempt to identify and remove path traversal characters from user requests. The battle then becomes understanding how these sanitization routines work and how you can circumvent them to still have your attack exploit this vulnerability. A firm understanding of encoding and regular expressions will serve you well in this battle.
Forceful Browsing
Another example of direct object reference is forceful browsing (i.e., forced browsing) where the hacker simply enumerates known filename and directories in search of resources that he shouldn’t have access to retrieve. This is exactly what ZAP’s Brute Force tool and Nikto do when they search for directory names during the scanning phase. You can also do this very attack with a custom list in Intruder. This is another place where information gathering in the web server recon and web application recon steps will come in handy. There’s no sense in using a list full of typical Microsoft .NET web folder names if you are interacting with a LAMP stack application (if you’re unfamiliar, the LAMP stack stands for a Linux operating system, Apache web server, MySQL database, and PHP as the web application language). You could even specify several individual parameters to target during a forced browsing attack on any URL as shown here.
https://bigbank.com/reports/2013/q1/financial/CashFlow.pdf
You could create a list of years, say 2004-2013, to cycle through for the 2013 value of this URL. The q1 obviously means the first financial quarter, so q2, q3, and q4 are appropriate directory names to try. The financial directory could be replaced with any other department in the bank such as loan, HR, legal, travel, and any others that you can come up with. And finally, the CashFlow.pdf file gives us several clues. First, they are using capitalized hump notation for their filenames and .pdf as the filetype. Just these two factors alone would lead to a large collection of possible values to attempt to retrieve. Consider BalanceSheet.pdf, LoanSummary.pdf, LoanPortfolio.pdf, FinancialStatement.pdf, AnnualReport.pdf, and tons more! Just using 10 years, 4 quarters, 5 departments, and 7 file names gives us 1400 unique URLs to forcefully request!
All materials on the site are licensed Creative Commons Attribution-Sharealike 3.0 Unported CC BY-SA 3.0 & GNU Free Documentation License (GFDL)
If you are the copyright holder of any material contained on our site and intend to remove it, please contact our site administrator for approval.
© 2016-2026 All site design rights belong to S.Y.A.