Autodesk Smoke Essentials: Autodesk Official Press (2014)
Chapter 10. Working with Audio
In this chapter, you’ll take a closer look at the process of refining your audio in the Autodesk® Smoke® environment. First you’ll re-edit your production audio and add additional music and audio effects. Then you’ll learn how to add audio effects from the timeline effects ribbon. Finally, you’ll use the Audio Desk to mix all of the audio tracks of your scene for a pleasing final result.
Topics in this chapter include the following:
· Importing the opening scene
· Refining the production audio
· Using audio effects
· Adding music and sound effects
· Setting clip levels
· Mixing with the Audio Desk
Importing the Opening Scene
First, you need to import the scene in which you’ll be refining the audio. For the exercises in this chapter, you’ll be pulling a more fully baked cake out of the oven, so to speak, because the imported clips will have the final effects to which you can time your sound design. All of the sound design in this chapter is adapted from the terrific work done on the audio of “The Place Where You Live,” by Kelly Pieklo at Splice Here in Minneapolis, who was generous enough to share the original source elements for use in the following exercises.
1. Open the Conform tab, click the Conform Task pop-up menu (with the gear icon), and choose Load New EDL from the context menu. The File Browser panel appears.
2. Use the Bookmarks pop-up menu to navigate to the directory bookmarked in Chapter 2, which contains your downloaded book media; select the Open for Audio.edl file, and click the Load button.
3. Click the Set Search Location button to open the Set Directory browser, and use the Local Devices list at the left to navigate to your media, double-clicking each volume and directory until you select the folder containing all of the tutorial media. Click the Set button at the bottom right of this window.
4. Open the Match Criteria pop-up menu, and choose Source Timecode to turn this option on.
5. Click the pop-up arrow at the right of the Link Selected button, and choose Link Matched Sources from the pop-up menu. Every clip in the imported EDL should now be linked to the downloaded project media. Open the Timeline panel.
Refining the Production Audio
Before beginning any other audio work, you need to clean up the production tracks. In this scene, that means you need to eliminate unwanted background noise, clips with room ambience that doesn’t match, yelled-out instructions from the director, and any other unwanted sound. In the process, you’ll need to fill these holes in the soundtrack with room tone, which is the ambient sound of silence in a particular location.
1. Before you begin, click the Options pop-up menu, and choose Scrub Audio to enable audio playback when you’re dragging the positioner around on the timeline. This can be useful when you’re working on the audio of a project.
2. Play through the scene, and identify the audio clip that you need to replace.
You should notice that the audio of the first, second, third, fifth, and eighth clips is either absent or completely wrong.
3. Hold the Command key down, and drag a selection box from any empty area of the timeline around the first three pairs of audio clips to select them. Then add to the selection by Command+clicking the audio of the fifth and last clips. Finally, make sure Link and Ripple are disabled, and press Delete to perform a lift edit to eliminate these clips.
The audio of the fourth clip has the sound of the director saying “ding” as an audio cue to the actor.
4. Click the lock icon of track V1.1 to prevent changes to the video. Then use the JKL keys to move the positioner to a frame right before the ding, and press Control+Shift+V to add a cut to all tracks. Then use the Trim tool to roll the incoming half of the edit to the right to remove the ding. Notice that with Scrub Audio turned on, the Trim tool plays the audio as you drag edits around.
The audio of the sixth clip has sections of lines from another take; the dialog should be eliminated, but the quiet moments of ambient room tone should be left in the timeline.
5. Use the Trim tool to roll the in point of each audio track associated with the sixth and seventh clips past the sound of the director saying the line “Thanks, Nina.”
You should now have a timeline with missing audio in parts and gaps between what production audio is left, as shown in Figure 10.1.
FIGURE 10.1 The timeline after eliminating unwanted audio

Now you need to fill those holes in the audio tracks. In some cases the sound recordist would have recorded a section of room tone, but in many cases you need to derive room tone from quiet sections of the regular production audio. First, you’ll examine the audio from clip A0006_C024_1209GUto see if you can pull room tone out of it.
6. Press Option+2 to put the viewport into Source-Sequence viewer mode, and then right-click the last remaining audio clip in track A1 and choose Match ![]() Content from the context menu. This command opens a new copy of the original clip in the source viewer, placing this duplicate in the currently selected bin of the Media Library. Alternatively, you can choose Reveal
Content from the context menu. This command opens a new copy of the original clip in the source viewer, placing this duplicate in the currently selected bin of the Media Library. Alternatively, you can choose Reveal ![]() Segment from the same context menu to find the original clip in the Media Library without opening it or duplicating it.
Segment from the same context menu to find the original clip in the Media Library without opening it or duplicating it.
To examine the audio waveform of this clip more closely in order to see if there’s a good section of ambient room tone, you’ll use the green source timeline tab, as shown in Figure 10.2.
FIGURE 10.2 The source timeline tab always appears to the left of all the timeline tabs.

The source timeline is something that you’ve so far ignored, but it’s there to make it easy for you to scrub through a clip that’s selected in the Media Browser. Within the context of doing audio work, the source timeline lets you examine the waveform of a source clip to help you make decisions about where to set in and out points.
7. Click the green timeline tab to the left to open the source timeline. If you like, you can click the timeline’s right vertical scrollbar and drag to the left to make the timeline tracks taller. Scrub through the audio tracks, and you’ll discover that the sections of this track that you may have thought were quiet aren’t really as quiet as you might have hoped. This won’t work.
8. Open the Audio folder that you placed within the Office Scene library, and you’ll see a clip named Office Scene Room Tone (the sound recordist came through after all). Select it to open it in the source timeline instead, play through it to find a quiet section free of microphone handling, and set in and out points.
At this point, you’ve got a bit of a problem. The Office Scene Room Tone clip is a stereo clip, but the audio tracks you want to edit to are mono tracks. You may have noticed that the source-destination controls in the patch panel area cannot be connected; this is because stereo audio cannot be edited into mono tracks.
9. If necessary, click the stereo audio clips to select them; then open the Timeline Task menu (the gear), and choose Stereo ![]() Split Stereo Track. The source timeline is now split into two mono tracks, and the source-destination controls are enabled.
Split Stereo Track. The source timeline is now split into two mono tracks, and the source-destination controls are enabled.
10. Click the Open For Audio timeline tab again, and notice that the source and destination controls in the patch panel area mirror the assignments made in the source timeline. Then press the Home key to move the positioner to the beginning of the timeline, and perform a series of overwrite edits to fill the empty area of tracks A1 and A2. Be careful not to overwrite any of the previously edited audio; you want to preserve the original sounds of the actor’s movement.
11. To fill gaps that are narrower than the duration of the incoming segment of audio, press the Page Down key to move the focus of the positioner to track A1, move the positioner to the gap, and press X to set timeline in and out points to match the duration of the gap. Then clear the out point in the source viewer (select the source viewer and press Option+O), and perform an insert edit to fill the gap with the source clip.
12. With all of these gaps filled with room tone, Command+drag a bounding box from an empty section of the timeline to the left or right of tracks A1 and A2 to select every clip on those tracks, and choose Effects ![]() Audio Transitions
Audio Transitions ![]() Fade (or press -T) to add an audio fade to every audio edit at once, preventing unwanted clicks or pops. Please note that for this to work, no video item can be selected. When you’re finished, the timeline should look like the one shown in Figure 10.3.
Fade (or press -T) to add an audio fade to every audio edit at once, preventing unwanted clicks or pops. Please note that for this to work, no video item can be selected. When you’re finished, the timeline should look like the one shown in Figure 10.3.
FIGURE 10.3 The timeline after editing room tone to fill the gaps and adding fades to each edit

With this accomplished, you’ve created a solid base upon which to build the rest of the sound design that you’ll be adding to this scene — all without distractingly abnormal silences.
Using Audio Effects
At this point, the sole piece of dialog is the man’s video message, but right now it sounds too perfect. In this next exercise, you’ll learn how to apply and manipulate audio effects.
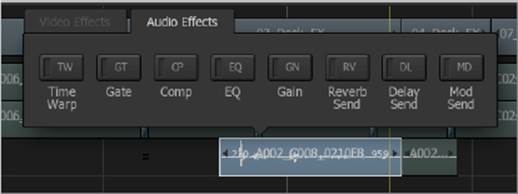
1. Select the first clip in track A3 of the man talking, and then press Control+Tab to open the floating FX Ribbon. Since you selected an audio clip, the FX Ribbon displays the Audio Effects tab, which presents a variety of audio effects for you to apply, as shown in Figure 10.4. Click the EQ button.
FIGURE 10.4 Summoning the floating FX Ribbon using Control+Tab
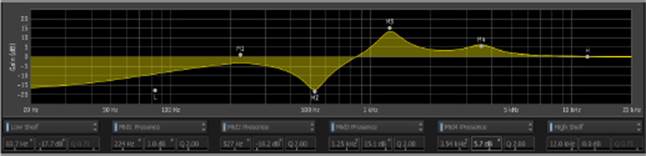
2. Double-click the clip to which you added the EQ effect to open the EQ editor, which presents a series of handles inside a graph that you can use to boost or attenuate different ranges of audio frequencies. While EQ can be effective for improving a speaker’s presence or downplaying unwanted noise or sonic qualities of a recording, in this exercise you’re going to use the EQ editor to degrade the man’s voice to make it sound more like a speakerphone.
3. Click and hold the Play button to access its pop-up menu, and choose Loop. Then click and hold the Play button a second time, and choose Selection. This sets the Play button to loop the currently selected clip while you work.
4. Play the clip, and adjust the EQ handles in the graph while you preview the result. Try dragging the L and M2 handles down to attenuate the lower frequencies of his voice, and drag the M3 and M4 handles up to boost his higher frequencies. Note how these handles correspond to the frequency, dB, and Q parameters below. The overall result should be a tinny sound, but don’t overdo it; it’s important for the audience to be able to understand him clearly. One possible EQ setting is shown in Figure 10.5.
FIGURE 10.5 Adjusting EQ for a tinny “on the phone” sound
5. When you’re finished with this adjustment, set the Play button back to Normal and Once, and then click the EXIT button to return to the timeline.
6. Zoom the timeline vertically until you can see the EQ effects box on the clip you’ve just adjusted, and then drag it to the second clip in track A3 to copy it.
As you can see, applying audio effects using the FX Ribbon and the accompanying effect editors is very similar to applying video effects.
Adding Music and Sound Effects
Next, you’ll cut in some additional ambience, effects, and music, in the process learning how to spot audio effects clips to specific frames and how to organize your tracks in Smoke.
1. Click the FX tab to hide the FX Ribbon, making more room for audio tracks.
2. Select the ATMOS 01 clip to open it in the source viewer, and set an in point one second into the clip (to leave some heads available for cross-fading) and out points to mark the first 43 seconds of the clip. This isolates a good section of general ambience, just before some more specific sound effects occur.
3. Option+click the Audio+ button to create a new stereo pair of tracks; then drag the source control to assign A1.L and A2.L to the new tracks 5–6, and edit the ATMOS 01 clip as many times into the new tracks as it takes to cover the entire scene. Use the Trim tool with Ripple turned off to resize the end of the last clip to conform to the last frame of video.
4. Select all of the ATMOS 01 clips you just edited, and choose Effects ![]() Audio Transitions
Audio Transitions ![]() Fade to add an audio fade to every audio edit at once, as shown in Figure 10.6. This provides some “outside of the window” street ambience, which when mixed with the room tone will give more of a sense of place.
Fade to add an audio fade to every audio edit at once, as shown in Figure 10.6. This provides some “outside of the window” street ambience, which when mixed with the room tone will give more of a sense of place.
FIGURE 10.6 Adding stereo ambience to tracks A4.L and .R
5. Option+click the Audio+ button five times to create five new sets of stereo tracks, which you’ll use for editing in some synced stereo sound effects and music.
6. With the viewport set to Src-Seq mode, select the PROD FX 01 clip, set an in point at the first frame of the clip, and then play through the source audio. It’s a foley effect of the woman inhaling and exhaling that you want to sync to clip 02_Desk_FX.
7. In the timeline, set tracks A5.L and .R as the destination tracks; then move the positioner to the frame where the woman is about to exhale (12:30:28_03). In the source timeline, move the positioner to the frame where the sound of the exhale begins (01:00:50+18). To edit the audio clip into the timeline so that the frame at the source viewer positioner lines up with the timeline positioner, click the secondary edit pop-up menu, and choose Aligned Edit, as shown in Figure 10.7.
FIGURE 10.7 Using Aligned Edit to edit a source clip into the timeline so that the frame at the source positioner is aligned with the sequence positioner
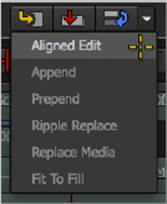
The Aligned Edit command is useful for editing sound effects where you really want a particular frame to be synced with a specific frame of audio.
8. Set tracks A6.L and .R as the destination tracks, and then move the timeline positioner to the frame where the woman first touches the heads-up display (HUD), 12:30:22+09. Then select clip UI FX 01 to open it in the source viewer, and click the Overwrite Edit button to edit it into the sequence. This sound effect starts right at the beginning, so no in point needs to be set.
9. If you like, use your own judgment to edit UF FX 02 through UI FX 07 into the timeline to match the woman’s physical interactions with the computer screen and the actions in the scene, such as the voice conference chime ringing so that she “answers the phone,” or you can proceed according to the following list.
On Tracks A6.L and .R:
· UI FX 01 at 12:30:22+09 and 12:30:34+05
· UI FX 04 at 12:30:23+13 and 12:30:36+08
· UI FX 06 at 12:30:49+15
On Tracks A7.L and .R:
· UI FX 03 at 12:30:32+17
· UI FX 05 at 12:30:49+05
10. Next, move the positioner in the timeline to the frame in the last clip where the “dimensional doorway” just starts to appear against the wall (around 12:30:55+21). Open the HUM FX clip into the source viewer, set an in point at the beginning of the clip, and move the source positioner to the part of audio when the hum at the beginning starts to transform into something more extreme, around 00:00:10+15.
11. With the positioners so lined up, set tracks A8.L and A8.R as the destination tracks; then click the secondary edit pop-up menu, and choose Aligned Edit to edit that clip into the timeline to match the action of the sequence, with the quiet part of the hum sneaking up into the scene and the more dramatic part of the hum coinciding with the doorway actually opening.
12. Now, select the CUE01_FINAL clip to open it into the source viewer, and move the positioner to frame 01:00:30+13, at the very beginning of a dramatic bar of music. Then move the positioner in the timeline to the very beginning of the sequence, set tracks A9.L and .R as the destination tracks, and use the Aligned Edit command to edit the music cue into the timeline. Without setting an in point, the beginning of the incoming audio clip is cut off at the location of the positioner, which in this case is fine.
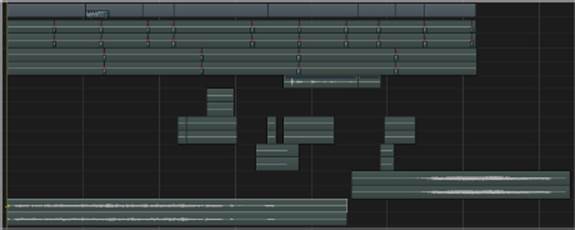
Now you have 16 tracks of audio adding ambience, sound effects, and music to the scene. Before moving on to a much-needed mix, it’s worth taking some time to organize these tracks.
13. Click the header of track 3 in the timeline patch panel, and drag it down below tracks 5–6, so that all of the ambience tracks appear together. A tooltip lets you see where you’ll be inserting the track (as shown in Figure 10.8); this actually moves the entire track, with all clips on it, to another position in the timeline.
FIGURE 10.8 Dragging an entire track to reorganize your sound effects

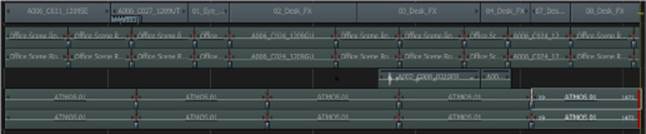
At this point, you can see that you’ve been working in a fairly organized way. Using the destination track numbers, the ambience for the scene is now on tracks A1, A2, and A3.L and .R; the dialog appears in the newly moved track A4, VFX is in tracks A6.L and .R through A8.L and .R, and music appears in tracks A9.L and .R. This structure should resemble Figure 10.9.
FIGURE 10.9 The edited audio cues for this scene
You can formalize your organization by naming each track, so you don’t forget what is where.
14. Right-click the track A4 header in the timeline patch panel, and choose Rename Track. Enter Dialog into the Text Input window, and click Enter. Nothing appears to have happened, but if you drag the border between the timeline patch panel and the video/audio tracks to the right, you can see that each track has a name, as shown in Figure 10.10.
FIGURE 10.10 Track names are revealed by dragging the timeline patch panel divider to the right.

15. Take some time to label the ambience, dialog, foley, SFX, and music tracks.
Setting Clip Levels
Now that you’ve edited together some nicely augmented sound for the scene, you’re no doubt eager to start adjusting the levels of different clips to keep the different audio cues from train-wrecking into one another. In this next short exercise, you’ll learn how to adjust the gain of individual clips.
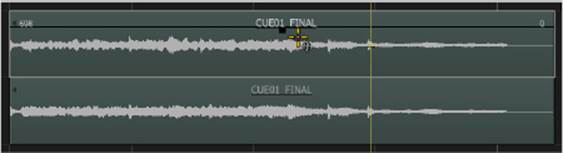
1. Zoom into the CUE01 FINAL music clip in tracks A9.L and .R, and increase the track height so that it’s easier to see the clip’s waveform.
2. Open the timeline Options pop-up menu, and choose Show Gain Animation. Move the pointer over the top track of CUE01 FINAL in the timeline, and notice how a black line with a square handle appears over the clip, as shown in Figure 10.11. This is an adjustable volume control just for that clip.
FIGURE 10.11 Individual clip Gain Animation audio controls
3. Drag the black handle down to reduce (or attenuate) the volume of that clip to a point when the tooltip reads about −8.84 dB. While making this adjustment, you should also notice that the FX Ribbon has automatically opened up and a Gain parameter shows you the current gain of that clip. Whenever you adjust the Gain Animation control on a clip, a Gain FX box is automatically applied to that clip. If you find the Gain Animation control a bit finicky to work with, you can always use the Gain parameter in the FX Ribbon to make your adjustments.
Enabling Auto Key in the FX Ribbon before adjusting the levels via the Gain parameter or the clip gain handle lets you create animated changes in the levels that the black Gain Animation line will display.
4. Next, the PROD FX 01 audio of the woman sighing is a bit heavy-handed, so zoom into that clip in tracks A5.L and .R, and drag the Gain Animation control down to about −12.68, so that it doesn’t sound quite so much like the microphone is right against her nose.
5. At this point, use your discretion and make individual adjustments to the various sound effects you’ve added for the woman’s interactions with the HUD interface.
Mixing with the Audio Desk
Individual clip gain adjustments are really useful when quickly setting levels during an edit, but if you have an entire track full of clips that need adjusting, you can use the Audio Desk, which exposes a mixer interface that you can use to adjust the volume of an entire track. Track-level control is applied on top of clip-level control, so you have two levels of audio mixing that you can use together to mix the sound in a piece.
1. Press Option+1 to set the viewport to Player mode, and then choose Window ![]() Show Audio Desk from the menu bar to open the track-based mixing controls, as shown in Figure 10.12. You’ll want to choose Fit from the Zoom pop-up menu to shrink the viewer to the new size.
Show Audio Desk from the menu bar to open the track-based mixing controls, as shown in Figure 10.12. You’ll want to choose Fit from the Zoom pop-up menu to shrink the viewer to the new size.
FIGURE 10.12 The Audio Desk is a track-level mixer for your sequence.
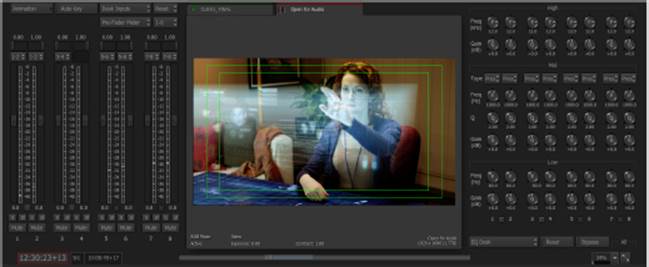
At the left of the viewport are the vertical volume sliders, mute and solo controls, and buttons and pop-up menus for allowing the automatic keyframing of mixing adjustments and for showing which desk inputs are displayed when you have more audio tracks than you have room for track controls (up to eight can be displayed at one time).
At the right of the viewport are a set of High, Mid, and Low equalizer controls for each track. If you click the EQ Desk button, you can also reveal the Auxiliary Effects Desk, which has controls for Chorus, Delay, and Reverb that you can apply to selected tracks.
For this exercise, you’ll be focusing on setting levels for the ambience of the room, since these tracks have more audio clips than you’ll want to adjust one by one.
2. Click the square Gain Fader Lock button at the bottom of the audio meters in tracks 1 and 2. Even mono tracks are displayed in pairs, and this square button determines whether the two sliders act in unison. This button is automatically enabled for stereo track pairs, and it appears dark gray when enabled and light gray when disabled. These buttons can be seen in Figure 10.13.
FIGURE 10.13 The Gain Fader Lock buttons, which lock the volume controls of each pair of faders together

Before you begin mixing, here’s something you should notice. When you rearranged the audio tracks, the destination controls automatically renumbered themselves, but the actual track numbers did not. The faders in the Audio Desk refer to the track numbers, not the destination numbers. This means that track 3, which is the fifth track from the top in the timeline, still corresponds to fader 3 on the mixer. If you like, you can click and drag the mixer track number control to reassign audio tracks to different mixer channels.
3. You need to mix the ambience tracks, but it’s difficult to evaluate them with the music playing, so click the Input Strip Display pop-up menu (which currently reads 1-8) and choose 9-16. Now you can click the Mute button for tracks 15 and 16 to disable the music temporarily while you work.
4. Choose 1-8 from the Input Strip pop-up menu, move the positioner to the beginning of the sequence, and then play the sequence. As it plays, drag the volume faders for tracks 5 and 6 down until the outside ambience sounds like it’s really outside a window, somewhere around −4.8 dB.
5. Finally, fade tracks 1 and 2 down to lower the noise floor even further, to about −3 dB.
At this point, you should notice that the levels you’ve set affect every single clip on those tracks, so your ambience mixing is now done.
The Essentials and Beyond
This chapter covered additional editorial commands useful for audio editing and refinement, as well as the basics of audio effects and mixing. Extra media is available, which you can use to design more fully the audio in this scene, providing you with ample excuses for additional sound sweetening, equalization, and mixing.
Additional Exercises
· Create another set of stereo audio tracks into which to edit the provided fabric foley SFX (named FOL 01 through 10), and edit these cloth sounds to match the woman’s movements, adding another layer of hyperrealism to the scene.
· Add the EQ effect to one of the cloth layers, and attenuate (reduce) the higher frequencies to give the cloth a more muffled sound. Once you achieve a good EQ setting, copy it to the other cloth sounds you edited into the sequence.
· Use either the clip level or track controls to reduce the cloth foley levels to a believable background volume.
All materials on the site are licensed Creative Commons Attribution-Sharealike 3.0 Unported CC BY-SA 3.0 & GNU Free Documentation License (GFDL)
If you are the copyright holder of any material contained on our site and intend to remove it, please contact our site administrator for approval.
© 2016-2026 All site design rights belong to S.Y.A.