Autodesk Smoke Essentials: Autodesk Official Press (2014)
Chapter 13. Exporting from Smoke
Once you’ve finished everything you can inside the Autodesk® Smoke platform, it’s time to export your project. Smoke supports a variety of export types, depending on what you need to give to whom. You can export individual clips as image sequences or audio files, or you can export an entire sequence as a movie file or as an AAF export, in order to have your audio worked on more comprehensively at an audio facility.
Topics in this chapter include the following:
· Preparing to export
· Exporting your project
· Exporting an EDL or AAF file
· Exporting a movie
· Exporting a file sequence
· Exporting audio
· Archiving your project
Preparing to Export
Before you export anything, it’s important to know that Smoke exports clips and sequences in their entirety only. If you set in and out points for a clip or sequence, they will be ignored, and the entire clip or sequence will still be exported.
If you want to export part of a clip, or a portion of a sequence, you need to create a new export sequence expressly for the purpose of exporting and then edit only the portion of the clip or sequence you want to export into it. You can then use the Export command on the export sequence to output what you need.
Additionally, many clients request bars and tone, slates, sections of black, countdown, and other leader elements that need to be edited into the timeline prior to the program start. Smoke has commands for creating color bars, audio tone, and color source clips (which can be set to black) in the File![]() New menu. In conjunction with timeline text effects, you can create whatever kind of leader you need for tape output, and you can add 2-pop audio sync cues at the head and tail of a sequence timeline prior to exporting AAF for sound work.
New menu. In conjunction with timeline text effects, you can create whatever kind of leader you need for tape output, and you can add 2-pop audio sync cues at the head and tail of a sequence timeline prior to exporting AAF for sound work.
Exporting Your Project
Exporting a clip or sequence can be incredibly easy if you use one of the supplied presets that come with Smoke. Alternatively, it can be more complicated if you take advantage of each preset’s extensively customizable features.
In essence, to export either a clip or a sequence, you’ll follow these steps:
1. Right-click the clip or sequence you want to export in the Media Library, and choose Export (![]() +E). For this exercise, export the Visitation scene that you created in Chapter 5.
+E). For this exercise, export the Visitation scene that you created in Chapter 5.
2. When the Media Export window appears, choose a volume and directory to save the resulting export to by using the file browser at the top. Once you choose a location to export to, the Export options become available, as shown in Figure 13.1.
Figure 13.1 The basic Export options

3. Choose what type of output you want from the Export pop-up menu. The options include the following:
Sequence Publish This option is used to export an AAF or EDL of the selection.
Movie This option is used to export an MXF, QuickTime, or H.264 movie file.
File Sequence This option is used to export an image sequence in one of the supported file types, which include DPX, OpenEXR, Tiff, and JPEG.
Audio File This option is used to export an audio file in one of the supported file types, which include AIFF, MP3, and WAVE.
For this exercise, choose Movie.
4. Choose one of the available formats from the Format Preset pop-up menu. Which formats are available depends on the Export type you selected in step 3. For this exercise, choose Final Cut Pro (ProRes 422 HQ).
Keep in mind that even though an export may appear to be complete, Smoke may need to continue processing exported media in the background, so you may need to wait longer than you think for your exported media to become available. In these cases, exporting is done in the background using Backburner, which enables you to continue working as the export proceeds. To check on the status of your render, you can click the small button at the bottom-left corner of the Smoke UI (two upward-pointing arrows) to view the Status Display, which shows all of the background jobs being processed.
5. Enter a name of your choosing in the Filename field, and click the Export button.
It can be as simple as that. However, if you need more specific output, the Show Advanced Options button exposes additional settings from which you can choose. These settings are described in more detail in the following sections.
Exporting an EDL or AAF File
Typically, Smoke is used to finish a program, so the final output is usually a movie file or image sequence with accompanying audio file. However, in the event that you need to transfer a project to another editing environment, or export multiple audio tracks via AAF for more sophisticated sound design and mixing elsewhere, you can choose Sequence Publish from the Export pop-up menu, which exposes the following options (among others):
AAF For Avid Pro Tools This option lets you export your audio tracks in a way that can be imported into Pro Tools.
EDL Publish This option lets you export your sequence as a single video track and multiple audio tracks using a CMX 3600 EDL format that’s unique to Smoke.
Simple Publish This option exports the video and audio media of a program, either as individual clips or flattened tracks.
In the Advanced Options for each of these format presets, you are presented with options to export the selected sequence with video and/or audio tracks enabled or disabled. You also have the option of separately enabling or disabling the export of video media and audio media.
A Pattern field lets you define how the output files should be named, using both plain text and bracketed tokens, which automatically insert various text strings into the filename. The available tokens can be added via a pop-up menu to the right of the Pattern field.
If you’re electing to export video or audio media, separate Video Options and Audio Options tabs are available that let you define the media format and customize media parameters such as compression format, resolution, bit depth, and sampling, depending on your needs.
Exporting a Movie
When you choose Movie from the Export pop-up menu, the Advanced Options change to reflect the fact that you’re outputting a single file. The Movie Options tab lets you choose the format, compression type, and profile. You also have the option to include or exclude audio.
The YUV Headroom button lets you choose whether you export the video data as full range (when turned off) or video range (when turned on). Full-range data is typical for RGB-encoded media destined for digital cinema viewing, VFX work, or other RGB-oriented workflows. Video range data is more typical for Y’CbCr (often referred to as YUV) encoded media destined for broadcast. If in doubt, be sure to check ahead to see what is required for delivery.
Additionally, you can turn on a Use LUT button in order to apply a 1D LUT or 3D LUT with which to process the exported output. This can be useful for quickly normalizing log-encoded media or for applying a film-simulation or other image-processing LUT operation for a variety of utilitarian and creative workflows.
As with other export formats, a Pattern field lets you define how the name of the media being output will be written.
Finally, a series of Resolution options lets you define the frame size, bit depth, and scan mode (interlaced or progressive) of the output. If you’re changing the resolution on output, other parameters let you adjust how the change in frame size should be handled (via letterboxing or zooming and cropping).
Again, separate Video Options and Audio Options tabs are available that let you define the media format and customize media parameters such as compression format, resolution, bit depth, and sampling, depending on your needs.
Exporting a File Sequence
When you choose File Sequence from the Export pop-up menu, the Advanced Options are limited to Video options, and the available Video Format options include still-image formats only. You also have the option to process the output using 1D LUTs or 3D LUTs.
There are more options for file naming, including how many digits to use for frame padding (remember that image sequences are identified by a frame number included with the filename) and whether or not to use the timecode of the exported media to generate the frame number.
Exporting Audio
As you would expect, choosing Audio File from the Export pop-up menu limits the Advanced Options to the audio format you want to use, separate compression settings if any are available for the format you’ve selected, and bit depth and sampling rate for the audio output.
A Mixdown pop-up menu lets you choose whether to export the audio tracks as is or to mix the available tracks down to mono, stereo, or 4-track audio files.
The Pattern field lets you define a simple name for the exported audio media.
Archiving Your Project
While Smoke 2013 has no facility for exporting project files as used by other postproduction applications, this functionality is covered by the Archives functionality in the MediaHub.
When you archive a project or sequence, you essentially write the project data and media to one or more self-contained archive files. These files contain everything necessary for restoring that project or sequence in its entirety, including all clips and effects.
Archiving a Project or Sequence
You can archive an entire project or a set of one or more sequences. You can also archive a collection of clips, but that may be a bit redundant since there are many other ways of storing and exchanging collections of media files all by themselves.
Be aware that Smoke archives everything as uncompressed DPX files, regardless of your Preferred Format setting. This results in the creation of files that are larger than your original compressed sources, so your archive may be significantly larger than your original project or sequence.
Before you begin the process of archiving a project or media, there are a few ways you can help keep your archives lean and usable:
· Remove unused media and sequences from the Media Library of a project, and unused clips from tracks of a sequence, prior to creating an archive. For example, if you have clips in lower video tracks that are hidden from view by clips on higher tracks during playback, those can be removed to save space.
· Use clear naming conventions for media and sequences to make it easy to browse the contents of an archive in cases when you only want to partially restore the contents.
· Right-click the sequences you’re going to archive in the Media Library, and choose Media ![]() Flush Renders to eliminate cached render media and avoid archiving effects media that can be re-rendered later.
Flush Renders to eliminate cached render media and avoid archiving effects media that can be re-rendered later.
· For sequences and clips, you’ll be able to relink to them when retaining the original media via other means. Thus, there’s no need to archive the original media when you can relink it later. Right-click these sequences and clips in the Media Library, and choose Media ![]() Flush Source Media Cache to unlink them from the original media. Do this only when you absolutely know that the source media is being backed up elsewhere, or you could get into trouble.
Flush Source Media Cache to unlink them from the original media. Do this only when you absolutely know that the source media is being backed up elsewhere, or you could get into trouble.
· Use the Consolidate Media command on effects clips within a sequence that you’re going to archive if you want to save the end result and not the original effect; media with smaller handles will be archived as a result.
Once you’ve done this simple housecleaning, the process of creating and writing to an archive is as follows:
1. Open the MediaHub, and click the Archives button at the top of the file browser.
2. Use the file browser controls to open a volume to which you want to write the archive, and then click the New Archive button.
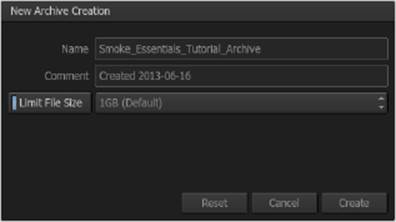
3. In the New Archive Creation dialog (see Figure 13.2), enter a name and a comment (optional), and choose a file size to which you want to limit archive files. If you’re ultimately storing the archives on optical or LTO media, or if you’re uploading archives to a cloud-based service, you may want to limit the maximum size of an archive; this means that larger projects will be automatically segmented into multiple archive files. Don’t worry; this is perfectly fine and multiple archive files are easily restored. Also, if you choose a large maximum size but don’t write that much media to it, the resulting archive will only be as large as the actual media that’s archived.
Figure 13.2 Available options when creating a new archive
4. Click Create.
5. The archive list appears, currently empty, waiting for you to put something into the archive, and you have two options:
a. To archive the entire project, including all of the contents of the Media Library, click the Archive Project button at the bottom. This is all you need to do; Smoke will begin writing the archive. This can take a long time and create an enormous archive, so don’t do this now.
b. To archive only specific files or sequences, drag them from the Media Library into the archive list. For this exercise, drag the End Credits sequence you created in Chapter 12 into the archive list.
6. After dragging one or more clips or sequences into the archive list, the available buttons underneath change to Archive and Clear Pending. But before you begin, click the Archive Options tab.
7. You can choose from the following options, as shown in Figure 13.3:
Figure 13.3 The archival options
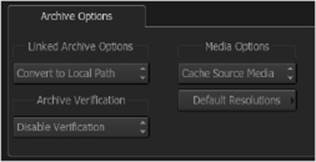
Linked Archive Options These options let you choose how the file path to the archived media is set once the archive is restored. Use Archived Path is convenient if you’ll be restoring the archive to the same volume from which it came. Convert To Local Path is preferable if you’ll be restoring the archive to a completely different volume.
Archive Verification This option lets you choose whether to verify the archive you’re creating automatically after it’s written. Disabling this saves you time but at the expense of the peace of mind of knowing that the archive you’ve written is stored safely to whichever volume you’ve specified.
Media Options These options let you choose Cache All Source Media, which writes all clips used by a sequence into the archive as well, or Archive Links Only, which only archives references to sequence clips. When you cache all clips, the resulting archive is completely self-contained. When you archive links, the archive is smaller, depending on how many effects you have.
8. Once you’ve selected the appropriate options, click the Archive button and the archive will begin writing. In this case, the archive should write pretty quickly.
9. When the archive is finished, click the Close Archive button. The archive list closes, leaving only the file browser, which should show your archive on whatever volume you chose.
Be aware that when creating archives, all cached source media will be archived even when Linked Archive is enabled. Furthermore, all clips with effects that have been rendered will have the rendered cache files written into the archive as additional media — even when Archive Links Only is chosen.
Restoring an Archive
Restoring the contents of archives to the currently open Smoke project is simple. An added bonus is that you don’t have to restore the complete contents of an archive; you can elect to restore only those clips and sequences that you need, leaving the rest alone.
1. Open the MediaHub, and click the Archives button at the top of the file browser.
2. Use the file browser controls to open the volume that contains your archive.
3. Double-click the archive you want to restore. The archive list appears, showing the contents of that archive. If it’s a segmented archive, you may be asked to identify the location of the other segments. Locate them when prompted.
4. When a folder appears within the archive list containing the contents of the archive, drag the clips or sequences you want to restore to a location in the Media Library. For this exercise, drag the End Credits sequence you archived into any library of the Media Library. The sequence appears grayed out.
5. Click the Restore button. After some time, the grayed-out items in the Media Library become solid, and the restoration is complete. The project and media have been copied to the same volume that’s used by the current project.
If you change your mind while restoring an archive, simply click your mouse to interrupt the operation, and click Confirm when asked if you want to abort.
The Essentials and Beyond
This chapter covered, in broad strokes, all of the options that exist for exporting projects and media. The methods are flexible, and there are a lot of options, so it’s a good idea to become familiar with how to set up different sorts of exports.
Additional Exercises
· Export the sequence you created in Chapter 10, “Working with Audio,” using the AAF for Avid Pro Tools preset.
· Export only a portion of a single clip by editing it into a new sequence and then exporting that sequence as a DPX file sequence.
· Export the sequence you created in Chapter 5, “Editing Dialog and Advanced Trimming,” using the EDL Publish preset. This time, however, use the Advanced Options to disable audio and video media export—you just want the EDL.
All materials on the site are licensed Creative Commons Attribution-Sharealike 3.0 Unported CC BY-SA 3.0 & GNU Free Documentation License (GFDL)
If you are the copyright holder of any material contained on our site and intend to remove it, please contact our site administrator for approval.
© 2016-2026 All site design rights belong to S.Y.A.