Autodesk Smoke Essentials: Autodesk Official Press (2014)
Chapter 2. The Smoke Interface
This chapter guides you through the different parts of the Autodesk® Smoke® user interface. Because Smoke is an integrated environment spanning the editorial, compositing, and finishing stages of postproduction, the interface is similarly organized into discrete areas where you can focus on each task as it arises.
Topics in this chapter include the following:
· Understanding the MediaHub and Media Library
· Importing projects using Conform
· Using the viewer
· Working in the Timeline panel
· Applying timeline effects and using axis effects
· Getting into ConnectFX
· Finding more functions in Tools
The Four Tabs
Smoke has four functionality panels within which you perform different tasks. These panels are accessible via tabs that run along the bottom of the Smoke interface, as shown in Figure 2.1.
FIGURE 2.1 The four panels of functionality
![]()
These four functionality panels are as follows:
MediaHub This panel is a browser that lets you import file-based media that you want to use within a project. It’s also where you import media and sequences from other projects and where you create and manage archives for long-term storage or project exchange. Media that you import using the MediaHub is stored in the Media Library.
Conform This panel provides an interface for importing XML, AAF, or EDL project files from other applications and for relinking the resulting sequence to its corresponding media.
Timeline This panel is where you’ll spend most of your time in Smoke. It’s where you edit and where you find all of the tools and controls needed for accessing the advanced compositing features in Smoke.
Tools This panel contains a variety of features that you can use for processing clips and sequences in different ways. For example, the Clip Tools tab contains filters for denoising to remove noise from an image, transform tools for stabilizing or flipping, and fields tools for dealing with interlacing. The Utilities tab has tools for letterboxing, adding timecode window burns, altering timecode and frame rate, and managing stereo 3D media.
Each panel facilitates a specific stage of postproduction workflow. To get started, first you’ll use the Conform panel.
Importing Projects Using Conform
In order to tour the interface, you’ll need to load a project. This is a perfect excuse for using the Conform panel. Smoke is frequently used as a finishing application, where you import edited sequences from other NLEs (non-linear editors) in order to add effects, titles, color correction, and any last-minute editing changes in preparation for exporting the final polished program.
Smoke is capable of importing EDL, AAF, and Final Cut Pro 7– or Final Cut Pro X–formatted XML project files from a variety of applications. In the following exercise, you’ll import an EDL file and relink its accompanying media to it. The procedure works the same for AAF and XML files.
When exporting an XML or AAF file to import into Smoke, it’s best to place the XML or AAF project file within the same directory as the accompanying media to guarantee the easiest import.
1. Open Smoke, choose the Introductory_Project project and Student user you created in the previous chapter, and click Start.
2. Click the Conform tab.
3. Right-click anywhere within the Conform list, and choose Load New EDL from the context menu. The File Browser panel appears.
Smoke uses its own file browser to help you find what you need (as opposed to using the OS X file browser). By default, the location is set to the Home directory, which is /usr/discreet/project/your_project_name/edl/, but that of course is not where your project is actually located. The controls for changing the current directory appear at the top and to the right, as shown in Figure 2.2.
FIGURE 2.2 Browser navigation controls

4. Click the button with an up arrow five times to navigate to the top level of your filesystem. The Subdirectories list at the left should update each time to show you all of the directories at the current file path. When the path to the right of the Scan Subdirectories button displays only “/”, you’ll know that you’re at the top-level directory of your system.
5. Click Volumes in the Subdirectories list, which should show you all of the storage devices attached to your computer. Then navigate to the location of the project and media files that you downloaded. If you accidentally open the wrong folder, click the up-arrow button to move back up in the directory hierarchy. The path field shows you where you are as you navigate.
6. When you find the directory with the downloaded book media, click the Add button to add it to the Bookmarks pop-up menu to the right. This will make it easy to get to this directory whenever you need to find it.
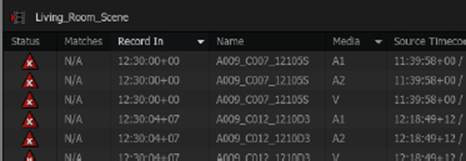
7. Now, find the Living_Room_Scene EDL file, click it to select it in the list, and click Load. You return to the Conform panel, but now the timeline contains a series of red-outlined clips, and the list above it contains a series of clips with a red warning icon in the Status column, as shown inFigure 2.3. At this point, the project information has been imported, but you need to relink the clips in this sequence to their accompanying media.
FIGURE 2.3 Offline clips in the conform list
The positioner is what other applications refer to as the playhead. It’s a yellow line in the timeline that indicates the currently visible frame as well as the likely frame where the next editorial function will happen.
8. Click Set Search Location to open the Set Directory browser, and use the Local Devices list at the left to navigate to your media, double-clicking each volume and directory until you open the media folder named Editing – Living Room Scene. As you navigate, the Current Path Field at the top updates to show you the current directory hierarchy; you can click any button in this field to navigate back up the hierarchy.
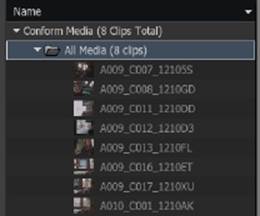
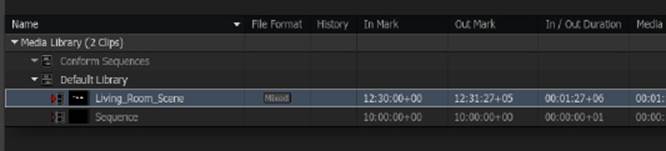
9. When you’ve opened the Editing – Living Room Scene directory so that it’s selected in the list at the left, click Set. The media should appear at the top of the Media Library in a separate Conform Media list at the top, as shown in Figure 2.4. However, there’s a problem; none of the clips in the conform list appear to be relinked, and there’s a new yellow warning icon in the Status column. This icon lets you know that, while a match has almost been made, there’s some sort of conflict preventing an easy solution.
FIGURE 2.4 The Conform Media list
10. To fix this, open the Match Criteria pop-up menu and choose Source Timecode. The Match Criteria pop-up menu contains all of the possible media attributes that can be used for linking the clips in a sequence with media files on disk. These attributes are dynamically assignable so that changing which attributes are checked automatically updates the conform list. As you can see, setting Smoke to use Source Timecode to find a match immediately fixed the problem. Now that you’ve found a match, as indicated by a green check mark, there’s one more step to link the media you’ve matched to the clips in the sequence.
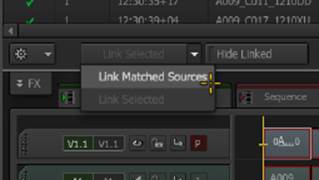
11. Click the arrow at the right of the Link Selected button, and choose Link Matched Sources from the pop-up menu, as shown in Figure 2.5. Simply clicking Link Selected only links the currently selected clip, but choosing Link Matched Sources automatically relinks all of the clips in the conform list that have green check marks. The clips in the timeline should now appear without red outlines.
FIGURE 2.5 The Link Matched Sources command
12. Click Preview to open a viewer, move the pointer to the timeline ruler at the bottom of the timeline, and then click and drag within the timeline ruler to move the positioner back and forth along the timeline. You should see the newly relinked timeline clips appear within the viewer.
Now that you’ve imported a project file, it’s time to examine the rest of the Smoke user interface.
Understanding the MediaHub and Media Library
The second step on our tour will be the MediaHub panel, used for importing media, importing sequences from other projects, and creating and restoring archives.
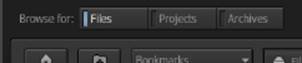
1. Click the MediaHub tab at the bottom of the Smoke window. Three Browse For buttons appear at the top of the MediaHub panel, as shown in Figure 2.6. Click Files if it’s not already selected.
FIGURE 2.6 The Browse options
Files mode of the MediaHub lets you manually browse your filesystem in order to locate media that you want to import into your Smoke project. Right now, it should be set to the same directory you selected when you conformed the EDL in the previous exercise. Only now, you can see all of the clips in thumbnail view. Two controls, a Thumbnail Size slider and a Display Type pop-up menu, let you modify how the contents of the browser are displayed.
2. Drag the Thumbnail Size slider to change the value to 3. The thumbnails shrink so that more clips can be seen.
3. Click the pop-up menu to the right of the Thumbnail Size slider, and choose List, as shown in Figure 2.7.
FIGURE 2.7 MediaHub display options
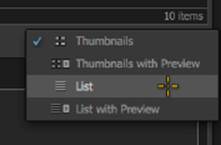
The browser changes to List view, with a series of columns showing different media attributes for each clip. Drag the horizontal scrollbar to the left to see the other columns that are visible. There’s a lot of information available, but you can reveal even more.
4. Right-click the header of any column to display a list of all available media attribute columns that can be exposed, and choose File Size to make that attribute visible as a column as well.
5. Drag the File Size attribute to the left to position it to the right of the File Location column, and then click the File Size header once to sort the browser in ascending order by size. Click it again to browse in descending order. When you’re finished, right-click any column’s header and uncheck File Size.
You’ll learn more about importing media from the MediaHub into the Media Library in Chapter 3, “Importing Your Project’s Media.”
6. Click Projects at the top of the MediaHub. In Projects mode, the MediaHub displays a list of all of the projects on the current computer within the Local Projects list at the right of the MediaHub browser. If this is a brand-new installation of Smoke, the Local Projects list will be empty; but if you had other projects on your computer, such as those shown in Figure 2.8, you could double-click any project to access its workspace, then double-click the workspace item to access its Media Library, and double-click the Media Library to access its sequences.
FIGURE 2.8 The Local Projects list with a variety of other projects
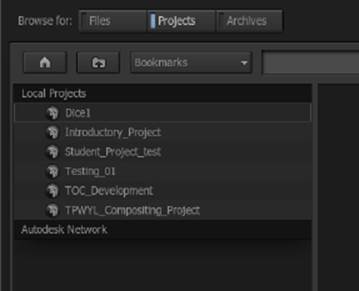
In this way, you can import sequences from one project to another. The Autodesk Network section of the Projects Browser lets you access other projects on other Smoke workstations connected to the current network, which is useful for a shared environment.
7. Click Archives at the top of the MediaHub. In Archive mode, you’re set up to create and access archives, which are consolidated collections of Smoke project data and media that you can use to back up a project for long-term storage, or to which you can export selected sequences and media for moving to another Smoke workstation.
Whenever you choose a MediaHub mode, the tab underneath the browser updates to show the different options and controls that are available within each mode. For example, in Archives mode, this tab is labeled Archive Options and shows the various options that are available for customizing the creation of new archives.
Now that you’ve seen the three modes of the MediaHub, it’s time to move on to the timeline, which is where you’ll be doing the majority of your work in Smoke.
Working in the Timeline Panel
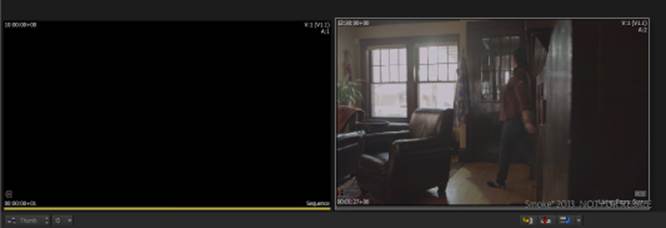
The Timeline panel is where you’ll do most of your work in Smoke. When you first open the timeline, the viewer is set to Thumbnail mode, and the FX Ribbon is hidden.
1. Click the Timeline tab at the bottom of the Smoke window, and then click the View Mode pop-up menu and choose Player.
2. Click the FX tab underneath the viewer and to the left of the timeline tabs.
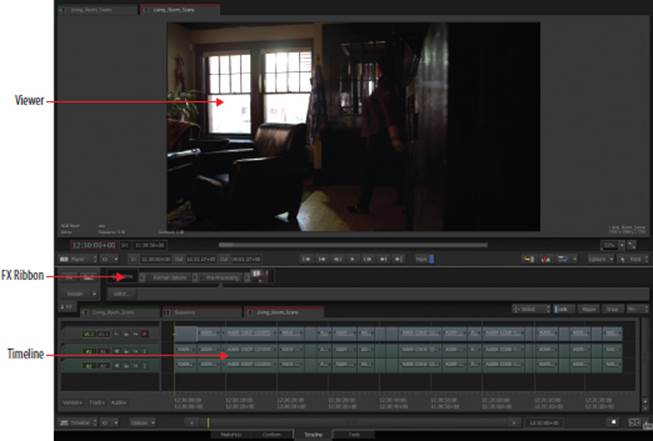
At this point, you can see that the Timeline panel is divided into three sections (excluding the Media Library, which is available from all of the panels), as shown in Figure 2.9.
FIGURE 2.9 The three sections of the Timeline panel: the viewer, the FX Ribbon, and the timeline
3. Click the FX button to close the FX Ribbon.
Using the Viewer
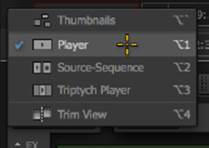
The viewer can be put into several modes. These modes are available from the View Mode pop-up menu, as shown in Figure 2.10.
FIGURE 2.10 Available viewer modes
1. Click the View Mode pop-up menu and choose Thumbnails. The viewer and controls disappear, replaced by an empty workspace containing two thumbnails. In Thumbnail mode, each clip and sequence in your project is visible as an icon. Since the current project only has two sequences, that’s all you see here.
2. Click the Gear pop-up menu, and choose Arrange ![]() Clean Up All to arrange the thumbnails so that they don’t overlap. Alternately, you can click the Gear pop-up menu and choose Arrange
Clean Up All to arrange the thumbnails so that they don’t overlap. Alternately, you can click the Gear pop-up menu and choose Arrange ![]() Fit All, both to arrange the thumbnails and to resize them to fit into the available width of the viewer space, as shown in Figure 2.11.
Fit All, both to arrange the thumbnails and to resize them to fit into the available width of the viewer space, as shown in Figure 2.11.
FIGURE 2.11 The result of using Fit All to arrange the available thumbnails automatically
3. The first thumbnail is black, since it’s an empty sequence, so shrink it to get it out of the way by clicking it and then pressing Option-Minus repeatedly until it’s shrunken down. You can resize individual thumbnails to different sizes in this manner.
4. Move the playhead over the bottom of the second thumbnail so that the pointer crosshairs appear with left and right arrows, and then click and drag to the left or right to scrub through the timeline. Dragging above the thin strip at the bottom that displays a tiny playhead moves you slowly through the clip, while dragging right on top of the bottom strip moves you much more quickly (see Figure 2.12).
FIGURE 2.12 Dragging the bottom of an icon to scrub through the video
Using each thumbnail’s navigation controls, you can identify specific frames in each clip and even set in and out points by pressing the I and O keys.
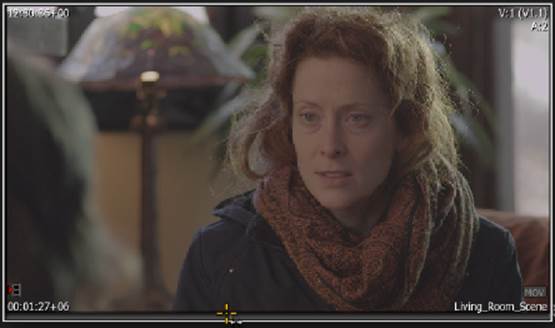
5. Double-click the large thumbnail to change the viewer to Player mode. (This is the same as choosing Player from the View Mode pop-up menu.) Player mode is useful for seeing the frame at the position of the playhead as large as possible, which is good for watching your edited sequence play through.
The User Interface panel of the Preferences has two buttons for turning on Swipe Bars and Layout Selection Overlay. When both are enabled, you can tap the upper-right corner of the screen to open an overlay for clicking the layout that you want to use.
6. To make the image in the viewer even larger, move the pointer to the dividing line between the transport controls and the FX Ribbon, and when the pointer changes to the resize cursor (see Figure 2.13), drag this border down to shrink the available vertical area of the timeline and enlarge the viewer.
FIGURE 2.13 Resizing the viewe
7. Click the full-screen button (the button with two diagonal arrows), or press Ctrl+Esc. This blows up the image to take over the full space of the primary display, with transport controls available if you move the pointer to the bottom of the screen. To get out of Full-Screen mode, press the Esc key, or move the pointer to the bottom of the screen and click the full-screen button again.
8. Drag the border between the viewer and timeline back up so that all three tracks of the timeline are fully visible. It’s time to examine the available transport controls.
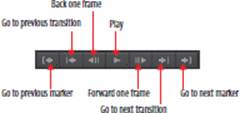
Each viewport appears with a set of transport controls, a scrubber bar that lets you quickly drag through the entire clip, a set of transport control buttons with obvious controls (see Figure 2.14), and a timecode display.
FIGURE 2.14 Transport controls in the Smoke viewer
9. Click and drag within the gray scrubber bar that appears underneath the image in the viewer to move the playhead. This is a good way to scrub quickly through an entire sequence. Next, click and drag within the red-outlined timecode field, and you’ll see that you can scrub this way as well, although scrubbing with the timecode field is much more precise.
10. There’s a third way to play using the pointer, and that is to move the pointer to the bottom third of the image itself. This lets you shuttle forward at various speeds by dragging to the right and shuttle backward at various speeds by dragging to the left (see Figure 2.15).
FIGURE 2.15 Shuttling with the pointer in the viewer
11. Click the timecode display, use the mouse to enter 1231.. (periods are a shortcut for entering pairs of zeroes), using the onscreen keypad that appears, and then click Enter. The playhead jumps to 12:31:00:00.
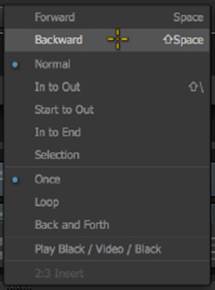
While the transport control buttons are fairly obvious, you might have noticed that three of these buttons have black dots at the bottom-right corner. These black dots mean that those buttons are also pop-up menus that you can use to alter their behavior.
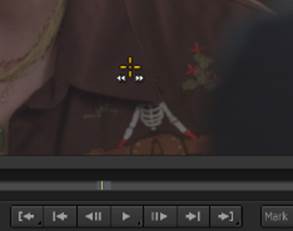
12. Click and hold the Play button down until a pop-up menu appears (see Figure 2.16), and then choose Backward. The sequence starts playing backward until you stop. There are other options within this pop-up menu to alter the behavior of the button as well as to change the playback looping behavior.
FIGURE 2.16 Opening the Play button’s option menu
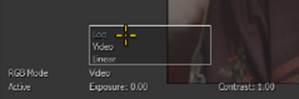
By now you must have noticed that the clips being linked to are pretty low-contrast and washed out. In fact, this is log-encoded media converted from the camera-original raw format. Workflows using log-encoded media are increasingly common, because they’re a good way to retain detail and data fidelity in your clips for compositing and grading. However, they don’t look very nice while you’re editing. Fortunately, Smoke has an easy way to monitor log-encoded media.
13. Click the word Video at the lower-left corner of the viewer, and choose Log from the pop-up menu that appears (see Figure 2.17). Log applies a temporary linearizing gamma curve to the image shown in the viewer, which has the effect of showing you a good approximation of how the image is supposed to look based on a Cineon to Rec.709 conversion of the image. This is only for display; this image adjustment is not rendered when outputting your final program.
FIGURE 2.17 The Viewer Gamma pop-up menu
There are also overlays you can enable in the viewer to help you as you work. These are found in the Options pop-up menu at the bottom right of the viewer.
14. Click the Options pop-up menu, and choose Show Overlays. A set of overlay controls appears in the viewer, to the right of the image (see Figure 2.18). These let you turn on various reference overlays like title and action safe, a grid, a center point, a custom working area, free guides, and letterboxing.
FIGURE 2.18 The viewer overlay controls
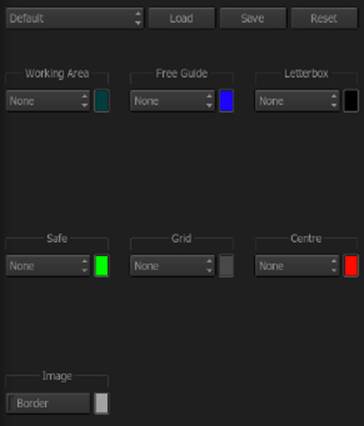
15. Click the Safe pop-up menu, choose Action & Title, and then click the Letterbox pop-up menu and choose 2.35:1. Notice how the safe guides automatically resize themselves to the letterboxing you’ve added. These overlays can be turned on or off at will, and they are never rendered as part of the image.
16. Set the Safe and Letterbox pop-up menus back to None, and then turn off Show Overlays in the Options pop-up menu.
17. Press Option+2 to set the viewer to Source-Sequence mode. This is the source-record mode available for editing, where the left-hand viewer is used for opening clips from the Media Library for setting in and out points in preparation for editing, and the right-hand viewer shows the frame at the current position of the positioner in the timeline.
![]()
NOTE View mode key shortcuts are memorable because they correspond to the number of displays you get: Option+1 is for the single player, Option+2 is for the dual Source-Sequence, and Option+3 is for the three-image Triptych.
There are two other viewer modes: Triptych player (for comparing three clips in a row) and Trim mode (for viewing edit points while making trim edits), which will be shown in later chapters.
Using the Timeline
Now that you’ve learned how to work with the viewer and how to control playback, it’s time to take a look at the timeline itself. If you’re familiar with other editing applications, there will be no surprises here. Nevertheless, the Smoke timeline does have some unique features worth exploring.
Multiple sequences can be opened into multiple tabs running along the top-left of the timeline area (see Figure 2.19). Click a tab to switch to that sequence. Additionally, whichever clip or sequence is currently open in the source viewer, when in Source-Sequence viewing mode, appears within a green tab at the left. As you can see now, it’s perfectly possible to open a sequence into the source viewer, in which case that sequence can be treated as any other clip and edited into another sequence, either whole or in part.
FIGURE 2.19 Multiple timeline tabs

A series of tool and mode controls to aid you while you’re editing appears at the upper right of the timeline. These will be covered in greater detail in Chapters 4 through 6.
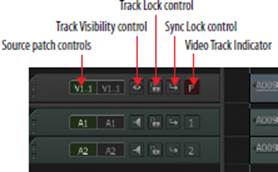
The timeline itself is split in half: video tracks appear above and are numbered in ascending order, while audio tracks appear below and are numbered in descending order. The Patch Panel area appears at the left, and it contains a variety of controls for controlling track content while editing, as explained in Figure 2.20.
FIGURE 2.20 The Patch Panel controls in the timeline
Keep this orientation in mind as you use the following exercise to walk through the various methods that are available for navigating and resizing the timeline:
1. Drag anywhere within the timeline ruler located underneath the timeline to scrub the positioner back and forth along the edited sequence. If you’re used to other applications, it’ll take a bit of time to get used to the ruler being at the bottom rather than at the top, but otherwise it works the same.
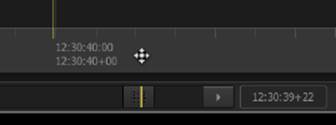
2. Drag within the timecode display at the right of the bottom scrollbar to scrub at a much slower rate, for precision positioning using your mouse or pen. Similarly, you can click the timecode display and use the onscreen calculator to enter a timecode value to which you want to jump.
You’ll notice that the positioner in the timeline is locked to the one in the scrubber bar of the Sequence viewer. Playback and transport controls in one work identically to playback and transport controls in the other.
3. While we’re investigating playback methods, press the spacebar to play forward through the sequence, and then press the spacebar again to stop. Press Shift+spacebar to play in reverse, and then press the spacebar again to stop. The spacebar is a common and easily remembered playback mechanism, but there’s an even more flexible set of keyboard shortcuts that are compatible with many other NLEs you may have experienced.
4. Press the L key to play forward at full speed, and then press L repeatedly to increase the playback speed. Each press of the L key increases the playback speed even more, such that pressing L 10 times will send the positioner rocketing through your sequence. Press K to stop playback. Pressing J plays in reverse at full speed, and pressing J repeatedly also increases the reverse playback speed.
5. Press and hold the K key and tap the L or J key to move the positioner forward or back one frame at a time. Hold the K key down along with the L or J key to move the positioner forward or backward in slow motion.
So far, you’ve been working with the timeline showing the entire sequence. However, if you want to do more detailed work, you’ll need to zoom in.
6. Press ![]() += to zoom into the timeline, and then press
+= to zoom into the timeline, and then press ![]() +- to zoom out again. To zoom using your mouse, click the bottom scrollbar so that the pointer displays a four-arrow cursor (see Figure 2.21), and then drag up to zoom into the timeline or drag down to zoom out of the timeline. In fact, while zooming with the scrollbar, you can zoom and scroll at the same time, which can make navigating the timeline really fast.
+- to zoom out again. To zoom using your mouse, click the bottom scrollbar so that the pointer displays a four-arrow cursor (see Figure 2.21), and then drag up to zoom into the timeline or drag down to zoom out of the timeline. In fact, while zooming with the scrollbar, you can zoom and scroll at the same time, which can make navigating the timeline really fast.
FIGURE 2.21 Zooming with the scrollbar
You can also resize the tracks displayed within the timeline, which can make it easier to see different track-based controls.
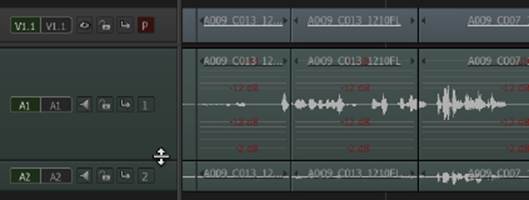
7. In the Patch Panel area, move the pointer to the bottom border of any timeline track so that the pointer turns into the resize cursor, and then drag up or down to resize just that track. If you increase the height of an audio track enough, you’ll see dB markers appear to indicate the volume of the waveform being displayed (see Figure 2.22).
FIGURE 2.22 Changing individual track height
8. Move the pointer to the vertical scrollbar on the left, and then click and drag to the left to increase the size of all the tracks relative to their individual sizes. Then drag to the right to decrease the size of all the tracks.
Pressing Shift+Z fits the entire sequence into the available width of the timeline. Pressing Shift+Z a second time returns the timeline to its previously zoomed state, so you can toggle back and forth.
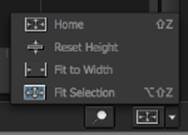
9. Now that your timeline looks thoroughly chaotic, click the Timeline Layout button to return all timeline tracks to their default sizes, and fit the entire sequence into the available width of the timeline. Clicking the arrow at the right of the Timeline Layout button opens a pop-up menu that presents several different options for resizing specific aspects of the timeline, as shown in Figure 2.23.
FIGURE 2.23 The timeline layout options
At the very bottom left of the timeline is an additional pop-up menu for configuring other aspects of the timeline.
10. Open the Options menu, and choose Hide Waveforms. There are additional options for controlling whether audio is scrubbed or not, how snapping behaves, and other intersections of editorial functionality with timeline behaviors.
With the basics of timeline navigation in hand, it’s time to look at one other aspect of the Smoke UI that affects the Timeline panel widths.
Resizing the Media Library
The Media Library is where all of the clips that you import and the sequences that you create are organized. You’ve probably noticed that, as you open each of the panels in Smoke, the Media Library is always available so that you can choose clips and sequences to work with.
You’ll work more intensively with the Media Library in the next chapter. For now, it’s useful to know that there’s a View Mode pop-up menu at the bottom of the Media Library (see Figure 2.24) that lets you choose different layouts or even hide the Media Library altogether if it’s not necessary.
By default, the Tall option is checked, giving you the maximum height for navigating a full Media Library. However, if you turn Tall off, the timeline will expand to the full width of your computer display, giving you more room to work. You also can turn on the Right Side option to display the Media Library to the right of the viewer.
FIGURE 2.24 The View Mode pop-up menu lets you choose different ways of displaying the Media Library.
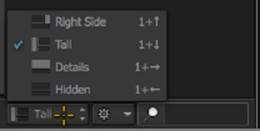
Furthermore, if you choose Hidden, the Media Library disappears altogether, giving you the maximum amount of space for the viewer and the timeline. You can always show the Media Library again by opening the View Mode pop-up menu and turning off Hidden.
Lastly, you’ve no doubt noticed that the Media Library is too narrow to display more than one or two columns of information. Turning on the Details option of the View Mode pop-up menu replaces the viewer (as well as the timeline if Tall is turned on) with a full-monitor-width Media Library panel with the same options for displaying and rearranging metadata columns that you saw in the MediaHub (see Figure 2.25). If necessary, you can use this view to sort the Media Library by any column you want before turning off the Details option to return to the Media Library’s Normal view.
FIGURE 2.25 The Media Library in Details mode
Throughout this book, the Media Library will be shown in its default Tall view, at the left of the screen.
A Quick Look at Timeline Effects
Smoke is known for its tight integration of visual effects and editing, and in this section we’ll take an overall look at how effects are accessed. All of this will be covered in much more detail in later chapters; for now, it’s enough to see where everything is located.
About the FX Ribbon
Clicking the FX tab, as shown in Figure 2.26, above the timeline and to the right of the timeline tabs, opens the FX Ribbon.
FIGURE 2.26 The FX tab that opens the FX Ribbon

When open, the FX Ribbon appears between the viewer area and the timeline. Many effects can be applied right within the timeline, and the FX Ribbon provides the controls for both adding effects to clips in the timeline and editing them. The following exercise provides a quick tour of adding and editing effects.
1. Move the playhead to the first clip in the timeline. By default, effects accessed from the ribbon controls are applied either to the current clip at the position of the playhead or to the selected clips.
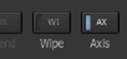
2. Click the FX button (different from the FX tab that opened the ribbon) to reveal a pop-out menu of all of the effects that are available (see Figure 2.27). These include ConnectFX, Time Warp, Resize, Colour Correct, Spark, Blend, Wipe, and Axis.
FIGURE 2.27 The Video Effects pop-out menu

3. Click the Axis button. Immediately, two things happen. The clip to which you’ve applied the Axis effect appears with a set of sprocket holes running along the top. This shows you that this clip has an effect that may require rendering. Second, the FX Ribbon becomes populated with a series of controls associated with the Axis effect. These controls let you make fast, simple changes to the timeline clip.
4. Click the Scale parameter, and drag it to the left to increase the size of the clip, zooming in to the women at the door. The Axis effect is an all-in-one effect that provides many different controls for transforming and compositing the clip to which it’s applied.
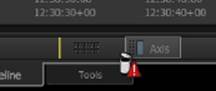
5. Click the blue “On” light of the Axis button, which appears at the top of the ribbon, to disable this effect (see Figure 2.28). Each ribbon effect you add to a clip adds a button at the top of this ribbon. Click this light again to turn the effect back on.
FIGURE 2.28 The Axis effect’s “On” light
As you can see, it’s actually pretty simple to add effects as you’re working in the timeline.
Accessing Custom Editors
Most of the ribbon effects have parameters that you can edit right within the Timeline panel. However, most effects have a more detailed set of controls, referred to as an editor, which can be accessed to create even more impressive effects.
1. Click the Editor button at the left of the FX Ribbon. The Axis editor replaces the Timeline panel, with the viewer showing the image you’re working on above and the Axis controls appearing below.
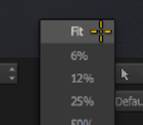
2. Click the Zoom button’s arrow control, and choose Fit from the pop-up menu in order to see the entire clip within the available size of the viewer (see Figure 2.29).
FIGURE 2.29 The Zoom menu
3. Now that all of the Axis controls are visible, click the Position Y control and drag it to the left, moving the image down to give the women more headroom in the shot.
There are many, many more controls found in the Axis editor, but that’s all we have time for right now. The full power of Axis will be explored in later chapters.
4. Click the EXIT button to return to the Timeline panel. At this point, perhaps you’ve changed your mind and decided that you don’t want to push into this clip after all.
5. Either click the Delete button at the far right of the FX Ribbon, or drag the Axis button from the FX Ribbon to the bottom of the screen until the trashcan icon appears (see Figure 2.30), and then drop it to delete the effect. Don’t worry; Smoke has multiple levels of undo, so you can always restore the effect if you didn’t mean to make this change.
FIGURE 2.30 Deleting an effect at the bottom of the screen
Each effect in the FX Ribbon has a dedicated editor that provides a more extensive set of controls. As you’ve seen, it’s really easy to get into and out of these editors to create the adjustments you need.
Getting a Glimpse of ConnectFX
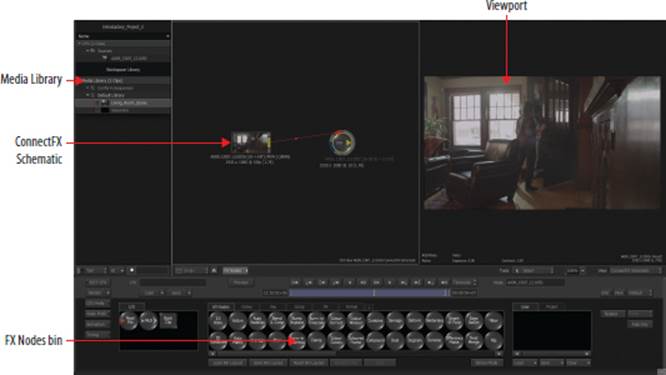
No tour would be complete without at least a quick look at ConnectFX, which is Smoke’s node-based compositing environment. ConnectFX is an incredibly powerful tool that lets you create nearly any effect you can imagine. It has been used in blockbuster movies and commercial spots the world over. In this exercise, you’ll learn how to create a simple ConnectFX (CFX) effect, in the process seeing how to access and exit the CFX editor.
1. With the first clip in the timeline selected, click the FX button and then click the Create ConnectFX button that appears in the pop-out menu. The Timeline panel is replaced by the CFX editor (see Figure 2.31), consisting of the ConnectFX Schematic, a viewer, and the ConnectFX editor along the bottom, which is displaying the nodes that you can use to apply effects to the current clip.
FIGURE 2.31 The initial three parts of the CFX editor
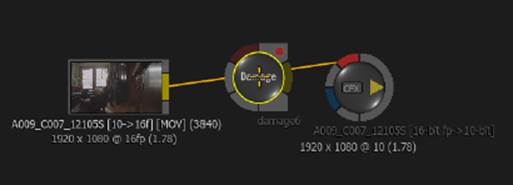
2. Drag the Damage node from the Node Bin at the bottom so that it appears over the red line that connects the two nodes in the schematic. When the red line is highlighted in yellow (see Figure 2.32), drop the node and it will be connected in between the two nodes. At this point, nothing has happened yet — you need to edit this node’s parameters to actually create an effect.
FIGURE 2.32 Connecting a node to create an effect
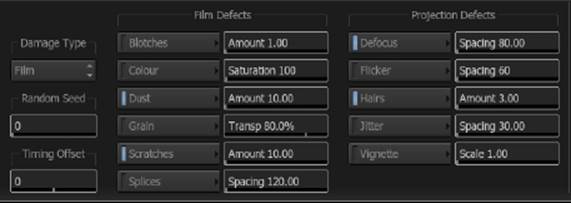
3. Double-click the Damage node in the schematic to open the node editor along the bottom of the screen. A series of buttons and fields appear corresponding to the effect that node is capable of creating.
4. Click the little “On” light at the left of the Dust, Scratches, Defocus, and Hairs buttons to turn them on (see Figure 2.33). As each of these buttons is enabled, the image in the viewer updates to show the effect being applied to the clip. If you like, scrub through the clip using the transport controls, or play it back to see how it looks.
FIGURE 2.33 Turning on options in the Damage node
5. With this simple effect completed, click the EXIT CFX button to go back to the Timeline panel. You should now see that a CFX button appears in the FX Ribbon for this clip.
Now that you see the rest of the scene, however, you decide that you don’t really want to use this effect.
6. Click the Remove CFX button. The CFX effect is removed, and the clip goes back to the way it was before.
As powerful as ConnectFX is, the fundamentals are actually fairly simple to use. Even if you decide to focus on the editorial aspects of Smoke, keep in mind that there are a lot of simple creative effects that you can add using CFX without the need to dig into the deepest parts of the application.
Using the Tools Panel
The last area of Smoke that we have yet to explore is the Tools panel. As described earlier, the Tools panel contains a variety of utilities that you can use to process clips as well as sequences for the purposes of creating alternate media with effects or format conversion permanently applied.
The following exercise shows one example of how to apply one of the functions in the Utilities tab to a sequence:
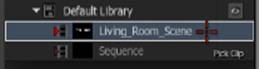
1. Click the Tools tab at the bottom of the Smoke window, and then click the Utilities tab and click the Burn-In Timecode button. The pointer now appears with the text “Pick Clip,” which is your cue to click the clip in the Media Library you want to add a timecode window to (see Figure 2.34). Click the Living_Room_Scene sequence.
FIGURE 2.34 The Pick Clip cursor
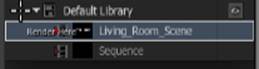
2. Next, the pointer appears with the text “Render Here,” which is your cue to click a library or bin icon in the Media Library to which you want to save the resulting processed clip (see Figure 2.35). The Tools functions all work by creating a duplicate of a piece of media that contains the processing that you’re applying.
FIGURE 2.35 The Render Here cursor
3. Click the Default Library icon. The Burn-In Timecode editor appears with controls for customizing the window burn effect by changing the text color, the background color, the font, and so forth. To go ahead and create the new, processed clip, click the Render button at the left. To cancel the procedure, click the EXIT button.
Most of the functions of the Clip Tools and Utilities tabs work this way, and once you’ve created your duplicate effected media, you’ll use those clips as you would any other that you imported into Smoke.
The Essentials and Beyond
Hopefully, this tour has served as a good orientation for you in terms of where everything in Smoke is located, and has provided you with a solid foundation for adjusting the viewer, playing and navigating your projects, and working within the timeline. With this in mind, subsequent chapters will focus on specific features, exploring each aspect of the Smoke workflow more deeply.
Additional Exercises
· Create a new, empty project file.
· Try importing the Lab Scene and Opening Scene EDLs using the Conform tab to get the hang of using it to import different projects.
All materials on the site are licensed Creative Commons Attribution-Sharealike 3.0 Unported CC BY-SA 3.0 & GNU Free Documentation License (GFDL)
If you are the copyright holder of any material contained on our site and intend to remove it, please contact our site administrator for approval.
© 2016-2026 All site design rights belong to S.Y.A.