Blender For Dummies (2015)
Part I
Getting Started with Blender
 Visit www.dummies.com for great Dummies content online.
In this part . . .
· Getting comfortable with Blender.
· Customizing the interface.
· Working in 3D.
· Managing .blend files.
· Visit www.dummies.com for great Dummies content online.
Chapter 1
Discovering Blender
In This Chapter
![]() Figuring out what Blender is and what it's used for
Figuring out what Blender is and what it's used for
![]() Understanding Blender's history
Understanding Blender's history
![]() Getting familiar with the Blender interface
Getting familiar with the Blender interface
In the world of 3D modeling and animation software, programs have traditionally been expensive — like, thousands-of-dollars-and-maybe-an-arm expensive. That's changed a bit in the last few years, with software companies moving to more subscription-based ways of selling their programs. The entry cost is lower, but paying each month can still add up pretty quickly. There are some valid reasons for the high prices. Software companies spend millions of dollars and countless hours developing these programs. And the large production companies that buy this kind of software for their staff make enough money to afford the high cost, or they hire programmers and write their own in-house software.
But what about us, you and I: the little guys? We are the ambitious dreamers with big ideas, high motivation … and tight budgets. How can we bring our ideas to life and our stories to screen, even if only on our own computer monitors? Granted, we could shell out the cash (and hopefully keep our arms) for the expensive programs that the pros use. But even then, animation is a highly collaborative art and it's difficult to produce anything in a reasonable amount of time without some help.
We need quality software and a strong community to work, grow, and evolve with. Fortunately, Blender can provide us with both of these things. This chapter is an introduction to Blender, its background, its interface, and its community.
Getting to Know Blender
Blender is a free and open source 3D modeling and animation suite. Yikes! What a mouthful, huh? Put simply, Blender is a computer graphics program that allows you to produce high quality still images and animations using three-dimensional geometry. It used to be that you'd only see the results of this work in animated feature films or high-budget television shows. These days, it's way more pervasive. Computer-generated 3D graphics are everywhere. Almost every major film and television show involves some kind of 3D computer graphics and animation. (Even sporting events! Pay close attention to the animations that show the scores or players' names.) And it's not just film and TV; 3D graphics play a major role in video games, industrial design, scientific visualization, and architecture (to name just a few industries). In the right hands, Blender is capable of producing this kind of work. With a little patience and dedication, your hands can be the right hands.
 One of the things that makes Blender different and special compared to other comparable 3D software is that it is freely available without cost and that it's Free and Open Source software.
Being free of cost, as well as free (as in freedom) and open source, means that not only can you go to the Blender website (www.blender.org) and download the entire program right now without paying anything, but you can also freely download the source, or the code that makes up the program. For most programs, the source code is a heavily guarded and highly protected secret that only certain people (mostly programmers hired by the company that distributes the program) can see and modify. But Blender is open source, so anybody can see the program's source code and make changes to it. The benefit is that rather than having the program's guts behind lock and key, Blender can be improved by programmers all over the world!
Because of these strengths, Blender is an ideal program for small animation companies, freelance 3D artists, independent filmmakers, students beginning to learn about 3D computer graphics, and dedicated computer graphics hobbyists.
Blender, like many other 3D computer graphics applications, has had a reputation for being difficult for new users to understand. At the same time, however, Blender is also known for allowing experienced users to bring their ideas to life quickly. Fortunately, with the help of this book and the regular improvements introduced in each new release of Blender, that gap is becoming much easier to bridge.
Discovering Blender's origins and the strength of the Blender community
The Blender you know and love today wasn't always free and open source. Blender is actually quite unique in that it's one of the few (and first!) software applications that was “liberated” from proprietary control with the help of its user community.
Originally, Blender was written as an internal production tool for an award-winning Dutch animation company called NeoGeo, founded by Blender's original (and still lead) developer, Ton Roosendaal. In the late 1990s, NeoGeo started making copies of Blender available for download from its website. Slowly but surely, interest grew in this less-than-2MB program. In 1998, Ton spun off a new company, Not a Number (NaN), to market and sell Blender as a software product. NaN still distributed a free version of Blender, but also offered an advanced version with more features for a small fee. There was strength in this strategy and by the end of 2000, Blender users numbered well over 250,000 worldwide.
Unfortunately, even though Blender was gaining in popularity, NaN was not making enough money to satisfy its investors, especially in the so-called “dot bomb” era that happened around that time. In 2002, NaN shut its doors and stopped working on Blender. Ironically, this point is where the story starts to get exciting.
Even though NaN went under, Blender had developed quite a strong community by this time, and this community was eager to find a way to keep their beloved little program from becoming lost and abandoned. In July of 2002, Ton provided a way. Having established a non-profit organization called the Blender Foundation, he arranged a deal with the original NaN investors to run the “Free Blender” campaign. The terms of the deal were that, for a price of €100,000 (at the time, about $100,000), the investors would agree to release Blender's source code to the Blender Foundation for the purpose of making Blender open source. Initial estimations were that it would take as long as six months to one year to raise the necessary funds. Amazingly, the community was able to raise that money in a mere seven weeks.
Because of the Blender community's passion and willingness to put its money where its metaphorical mouth was, Blender was released under the GNU General Public License on October 13, 2002. With the source in the community's hands, Blender had an avalanche of development and new features added to it in a very short time, including somewhat common features like Undo (a functionality that was conspicuously missing and highly desired since the initial releases of Blender by NeoGeo).
Eight years later, the Blender community is larger and stronger than ever. Blender itself is a powerful modern piece of software, competitive in terms of quality with similar software costing thousands of dollars. Not too shabby. Figure 1-1 shows screenshots of Blender from its early days to the Blender of today.
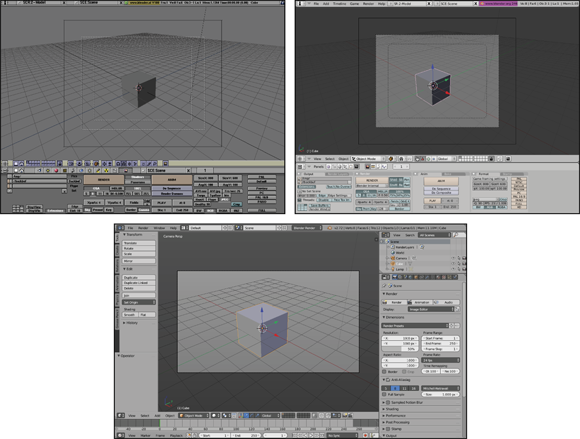
Figure 1-1: Blender through the years: Blender 1.8 (top left), Blender 2.46 (top right), and the major changes apparent in the Blender of today (bottom).
Making open movies and games
One of the cool things about the programmers who write Blender is that many of them also use the program regularly. They're writing code not just because they're told to do it, but because they want to improve Blender for their own purposes. Part of the programmers' motivation has to do with Blender's open-source nature, but quite a bit also has to do with the fact Blender was originally an in-house production tool, built for artists, based on their direct input, and often written by the artists themselves.
Seeking to get even more of this direct artist feedback to developers, the Blender Foundation launched “Project Orange” in 2005. The project's purpose was to create an animated short movie using open source tools, primarily Blender. A team of six members of the community were assembled in Amsterdam, in the Netherlands, to produce the movie. Roughly seven months later, Elephants Dream premiered and was released to the public as the first open movie. This means that not only was it created using open-source tools, but all the production files — 3D models, scenes, character rigs, and so on — were also released under a permissive and open Creative Commons Attribution license. These files are valuable tools for discovering how an animated film is put together, and anyone can reuse them in their own personal or commercial work. Furthermore, if you don't like Elephants Dream, you're free to change it to your liking! How many movies give you that luxury? You can see the film and all of the production files for yourself at the project's website, www.elephantsdream.org.
Due to the success of the Orange project, Ton established the Blender Institute in 2007 for the expressed purpose of having a permanent space to create open movie and game projects, as well as provide the service of training people in Blender. Since then, the Blender Institute has churned out open projects (each code-named with a type of fruit) every couple of years. Like with Elephants Dream, both the final product and the production files for each project are released under a permissive Creative Commons license.Table 1-1 summarizes each of the Blender Institute's open projects.
Table 1-1 Open Projects from the Blender Institute
|
Year |
Fruit |
Title |
Details |
|
2005 |
Orange |
Elephants Dream (www.elephantsdream.org) |
Animated Short Film (improved animation, basic hair, node-based compositing) |
|
2008 |
Peach |
Big Buck Bunny (www.bigbuckbunny.org) |
Animated Short Film (enhanced particles, large scene optimization, improved rendering, more animation and rigging tools) |
|
2008 |
Apricot |
Yo Frankie! (www.yofrankie.org) |
Video Game (asset creation pipeline, real-time viewport, updates to the Blender Game Engine) |
|
2010 |
Durian |
Sintel (www.sintel.org) |
Animated Short Film (battle-test Blender 2.5, detailed sculpting, large environments) |
|
2012 |
Mango |
Tears of Steel (www.tearsofsteel.org) |
Live Action Short Film (visual effects tools, motion tracking, Cycles rendering) |
|
TBD |
GooseberryCosmos Laundromat (www.gooseberry.blender.org) |
Animated Short Film (large scale internationally collaborative productions with Blender Cloud) |
Figure 1-2 shows rendered images from each of the open projects.
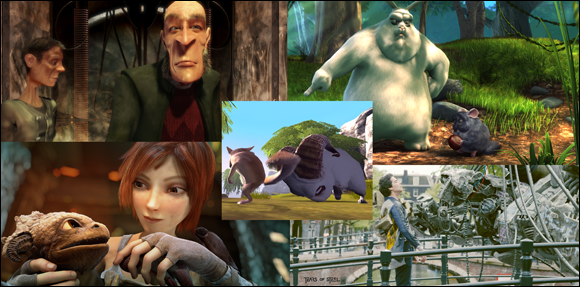
Figure 1-2: Open projects from the Blender Institute help drive Blender development (Blender Foundation, www.blender.org).
With the completion of each of these projects, the functionality and stability of Blender significantly increased. Much of the content of this book wouldn't even exist without these projects. For example, Chapter 13 starts with using Blender's particle system to achieve exciting effects along with hair and fur. Half of the content in Chapter 15 is focused on the node compositor, a way of combining and enhancing still images and animations. In fact, nearly all of Part III is devoted to features that were enhanced or directly added for one of these open projects.
All these projects continue to exhibit the strength of the Blender community. Each of them are financed in a large part by DVD pre-sales (and now Blender Cloud subscriptions) from users who understand that regardless of the project's final product, great improvements to Blender are the result, and everyone benefits from that.
Joining the community
Congratulations! As a Blender user, you're a part of our community. You're joining a diverse group that spans all age ranges, ethnicities, professional backgrounds, and parts of the globe. We are a passionate bunch: proud of this little 3D program and more than willing to help others enjoy using it as much as we do. Have a look at Chapter 18 for a list of community resources that are invaluable, not only for discovering the intricacies of using Blender, but also for improving yourself as an artist.
You can find innumerable opportunities for critique, training, discussion, and even collaboration with other artists, some of whom might also be Blender developers. I've made quite a few good friends and colleagues through the Blender community, both through the various community websites as well as by attending events like the annual Blender Conference. I go by the name “Fweeb” on these sites and I look forward to seeing you around!
Getting to Know the Interface
Probably one of the most daunting aspects of Blender for newcomers and long-time 3D professionals alike has been its unique and somewhat peculiar interface. It's arguably the most controversial feature Blender has. In fact, at one time, merely calling the interface a feature would raise the blood pressure of some of you who tried using Blender in the past, but gave up in frustration when it did not behave as expected.
Although the interface wasn't the primary focus, the interface updates to Blender added in the 2.5 series of release have made great strides toward alleviating that frustration, and the improvements continue through to today. As a small example, when you first launch Blender, the “splash image” provides you with quick links to online documentation, a list of recently opened files, and a choice of interaction presets if you're more familiar with other programs' hotkeys and mouse behavior. Figure 1-3 shows the splash image you're presented with when you start Blender for the first time.
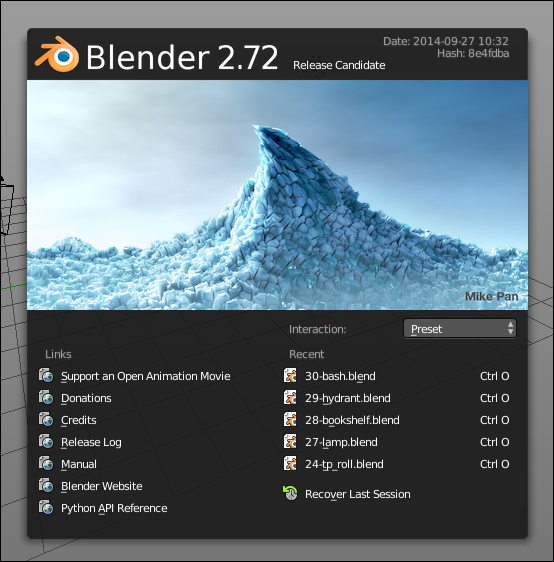
Figure 1-3: The Blender splash image.
If you click anywhere other than the links provided by the splash image, the splash image goes away, and you're greeted with Blender's default scene, shown in Figure 1-4. If you're looking at the interface for the first time, you may think it appears pretty daunting. However, the purpose of this book is to help you get the hang of Blender (and its interface) with a minimum of pain.
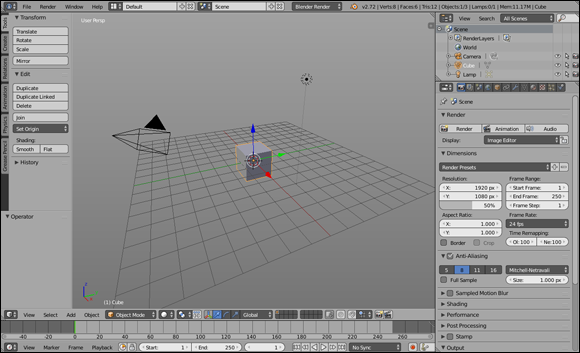
Figure 1-4: The default Blender interface.
This book explains some of the design decisions in Blender's interface and ultimately allows you to be productive with it. Who knows, you might even start to like it and wonder why other programs don't work this way!
Fast to use versus fast to learn
One of the key things to remember is that Blender was originally designed as an in-house tool for commercial production. Working in that industry (especially television production) involves very short turn-around times and extremely tight deadlines. For these reasons, 3D artists have to work very quickly to produce high quality work in a short period of time. Blender has always been designed with facilitating this need as a primary focus. And because artists worked side-by-side with the developers, they could tailor the whole program to match the way they worked.
The upside to this approach is that the program evolved with the artists and enabled them to successfully produce great work at a blazingly fast rate. The downside is that, as with most things that are customized, Blender became somewhat difficult for new people to understand. This trade-off is what I mean when I say “fast to use versus fast to learn.” You can be extremely productive with Blender after you understand how it thinks. However, your first few projects with Blender (especially true in earlier versions) might be arduous. Of course, alleviating that potential pain is what this book is all about.
Working with an interface that stays out of your way
The first thing to understand about Blender's interface is its basic organization. Figure 1-4 displays a single Blender window. Each Blender window can consist of one or more areas that you can split, resize, and join at will. In all cases, an area defines the space of an editor, such as the 3D View, where you actually make changes and modifications to your 3D scene. Each editor can include one or more regions that contain additional features or tools for using that editor. An example of a region that all editors have is a header region at the top or bottom of the editor; the header typically includes menus and buttons to give you access to features in that editor. Figure 1-5 illustrates each of these building blocks of the Blender interface.
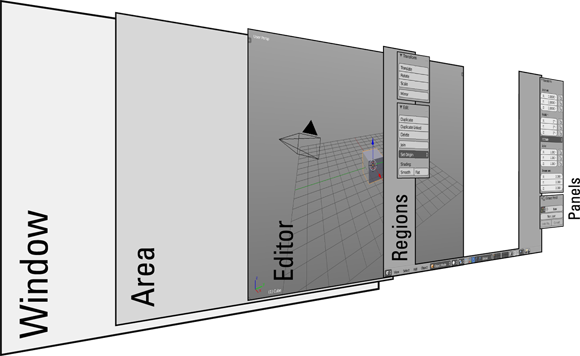
Figure 1-5: A Blender window contains areas populated by editors that include one or more regions.
Knowing this organizational structure, the next important thing to know is that Blender is designed to be as non-blocking and non-modal as possible. Areas in Blender never overlap one another (non-blocking) and using one feature of Blender typically won't restrict you from using any of the others (non-modal). As an example, in most software, if you want to open a new file or save your project, a file browser dialog pops up. This dialog is an overlapping window that not only blocks things behind it from view, but usually also prevents you from making any changes to your file. This scenario isn't the case with Blender. In Blender, the file browser is an editor just like any other, and it makes perfect sense to be able to make a couple of tweaks to your scene before hitting the Save button. Figure 1-6 shows what it might look like to have a file browser open while you make tweaks.
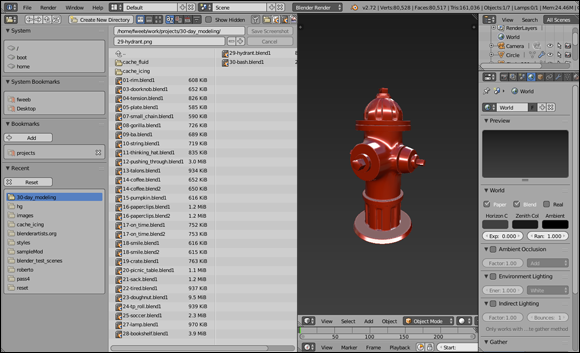
Figure 1-6: Doing those last couple of tweaks before finally saving.
 At first, working in a non-blocking, non-modal interface may seem to be really restrictive. How do you see different types of editors? Can you see them at the same time? Everything looks like it's nailed in place, so is it even possible to change anything? Fortunately, all these things are possible and you get the benefit of never having your view of one area obstructed by another. Having an unobstructed workspace is a great way to be able to see at a glance what's going on in your file. Furthermore, if you absolutely need multiple windows that can overlap, you can have them. For example, you might have two computer monitors that are different sizes and you'd like a full-sized Blender window in each. I show you how to do this task in this chapter in the “Duplicating an area to a new window” section.
 This non-blocking window philosophy, combined with the fact that Blender's entire interface is written in a standardized programming library for graphics called OpenGL, is the precise reason that Blender looks the same, no matter where you run it. Whether you run it from Linux, Windows, a Mac, or even an experimental build for Android devices, Blender looks and behaves like Blender. An additional benefit to being written in a 3D library like OpenGL is that many parts of Blender's interface allow you to zoom in on them. Try it! Hover your mouse cursor over the Properties editor (the editor on the right side) and press Numpad Plus (+) or Numpad Minus (-). You can make the panels in this editor much larger or smaller than they are by default. Pretty cool!
Resizing areas
Regardless of the type of editor that's contained in an area, you modify and change all areas in a Blender window the same way. To change the size of an area, left-click the border between two areas and drag it to a new position. This method increases the size of one area while reducing the size of those that adjoin it. If you have only one area in your Blender window, it's exactly the same size as that window. To resize it, you need to either adjust the size of its parent Blender window or split a new area into that space, as covered in the next section.
Splitting and removing areas
While working in Blender, it's pretty common that the default layout isn't quite what you need to work efficiently. Sometimes you may need an additional 3D View or you may want to see the UV/Image Editor in addition to the 3D View.
To create either of these layout changes, you need to split an existing area into two. You can split or join areas by right-clicking the border between two areas and choosing either Split Area or Join Area from the menu that pops up. However, there's a faster way. Look at the corners in the bottom left and top right of any area. These corner widgets are marked as a triangular region indicated by diagonal lines. To split any area into two, use the following steps:
1. Left-click one of the corner widgets and drag your mouse cursor away from the area's border.
2. Drag your mouse cursor left or right to split the area vertically.
Dragging it up or down splits the area horizontally.
As you drag your mouse, the areas update in real time so that you can see the result of the split while you're working.
 If you decide that you actually don't want to split the area, you can cancel the operation by right-clicking or pressing Esc.
If you want to remove an area, the process is similar. Rather than splitting an area in two, you're joining two areas together. So instead of left-clicking the corner widget and dragging your mouse cursor away from the area border, drag it towards the border of the area you want to join with. This action darkens the area your mouse is in and draws an arrow to indicate which area you want to remove.
Figure 1-7 shows the process of splitting an area and then removing that area. When I work in Blender, I find myself constantly changing the screen layout by splitting and joining new areas as I need them.
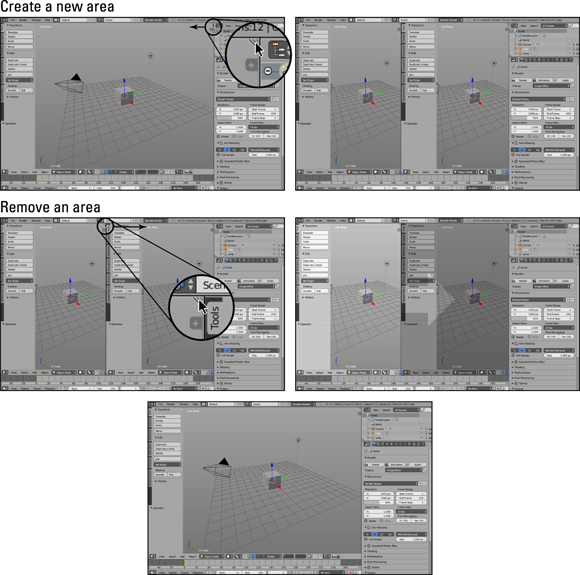
Figure 1-7: Creating a new area and then removing that area.
Duplicating an area to a new window
In addition to the new way of splitting and joining areas, you can use these corner widgets to duplicate any area into a new Blender window of its own. You can move that window to a separate monitor (if you have one), or it can overlap your original Blender window. And within this new Blender window, you can split the duplicated area into additional ones as you like. This area duplication feature is a slight violation of Blender's non-overlapping principles, but the benefits it provides for users with multiple computer screens make it very worthwhile.
To take advantage of this feature, follow these steps:
1. Shift+left-click one of the corner widgets in an area and drag your mouse cursor away from it in any direction.
This step duplicates the area you clicked in and creates a new Blender window to contain it.
You can also achieve this effect from the header menu of some editors by choosing View ⇒ Duplicate Area into New Window.
2. Close the additional Blender window by clicking the close button that your operating system adds to the border of the window.
Customizing Headers
All editors in Blender have a horizontal region called the header running along either the top or bottom of the editor. The header usually features specialized menus or buttons that are specific to the editor you're using. Here are some ways you can customize the header:
· Resize the header. Like any region, you can resize the header by left-clicking the seam between the header and the main work space of the editor and dragging it up or down.
· Hide the header. If you drag the seam all the way to the area border, then the header becomes hidden, leaving only a small plus icon (+) in the corner of the editor. If the header is at the bottom of the editor, the plus icon appears at the bottom right. If the header appears at the top, it's at the top left. Left-click this icon and the header reappears.
· Change the location of the header. You can also change the location of the header to either the top or bottom of the editor it belongs to. To do so, right-click the header and choose Flip to Top (or Bottom, depending on where your header currently is).
Maximizing an area
When working in Blender, you also occasionally need to maximize an area. Maximizing an area is particularly useful when you're working on a model or scene and you just want to get all the other areas out of your way so you can use as much screen space as possible to focus your attention on the task at hand.
To maximize any area, hover your mouse cursor over it and press Shift+Spacebar. You can toggle back to the tiled screen layout by either pressing Shift+Spacebar again or clicking the Back to Previous button at the top of the window. These options are available in the header menus of nearly all editor types by choosing View ⇒ Toggle Full Screen. You can also right-click the header and choose Maximize Area from the menu that appears. If the area is already maximized, then the menu item will say Tile Area.
 You may notice that the hot keys next to these menu items are Ctrl+Up Arrow for maximizing and Ctrl+Down Arrow for tiling, rather than Shift+Spacebar. Those hotkeys also work, but I find that I don't have to move my left hand as much to hit Shift+Spacebar, so that's much more convenient for me.
The menu that is a pie
 There's a recent addition to Blender's user interface that's worth mentioning. That addition is a feature called pie menus. Contrasted with the more conventional linear, list-type menu, a pie menu lists your menu options radially around your mouse cursor. This setup has a few advantages:
· Each menu item has a much larger click area.
With a typical list-type menu, once you find the menu item you want, there's a relatively small area that you need to precisely click. With a pie menu, you only need to have your mouse cursor in the general area around your menu selection (its slice of the pie). Because you don't need to be as precise with your mouse, you can navigate menus faster with less stress on your hand.
· Menu options are easier to remember.
As humans, we tend to naturally think about things spatially. It's much easier to remember that a thing is up or left or right than to remember that it's the sixth item in a list of things. Because the menu items are arranged in two-dimensional space, pie menus take advantage of our natural way of recalling information. Also helpful for memory is the fact that any given pie menu can only have as many as eight options.
· Selecting menu items is a gestural behavior.
A gestural interface relies on using mouse movement to issue a command. Pie menus are not purely gestural, but by arranging the menu items spatially, you get many of the same advantages provided by gestures. Most valuable among these advantages is the reliance on muscle memory. After working with a pie menu for an extended period of time, selecting menu items becomes nearly as fast as using hotkeys, and for essentially the same reasons. You're no longer thinking about the direction you're moving your mouse cursor (or which key you're pressing). You've trained your hands to move in a specific way when you want to perform that task. Once you get to that point (it doesn't take very long), you'll find that you're working very quickly.
 Before you get too excited about pie menus, they have a couple of limitations:
· Pie menus are basically limited to a maximum of eight menu items. (It's possible to have more items, but if a pie menu has more than eight items, it becomes cluttered and the speed and memory advantages of pie menus are lessened.) Blender has a number of menus that are very long; therefore, they don't translate nicely to the pie menu model. This means that some menus will be pies and others will not. Hopefully, as development continues on Blender, these menus will migrate to being more pie-like.
· Pie menus, as of this writing, aren't enabled by default. As Blender development progresses, the plan is that pie menus will eventually be enabled as a default option. For the time being, however, you need to manually enable them. As that's the direction that Blender is currently heading (and Blender development is fast; there's a new release nearly every two months), I recommend that you go ahead and enable pie menus so you can get comfortable with them early.
The process of enabling pie menus is easy:
1. Open User Preferences (File ⇒ User Preferences or Ctrl+Alt+U) and go to the Add-ons section.
2. On the category list on the left side of the window, choose the User Interface category (you may need to scroll down to see it).
The Pie Menus Official add-on should appear on the list to the right (as of this writing, this add-on is the only one in the User Interface category, so you may need to scroll back up to see it).
3. Enable the Pie Menus Official add-on by left-clicking its checkbox on the far right.
4. Pie menus are now enabled. Left-click the Save User Settings button at the bottom left of the User Preferences window.
That's it! Pie menus will be automatically enabled each time you start Blender. (Read more about Blender add-ons in Chapter 2.)
To try out pie menus, first close the User Preferences window. With your mouse cursor in the 3D View, press Q to show the View pie menu. You should see a menu like the one in Figure 1-8.
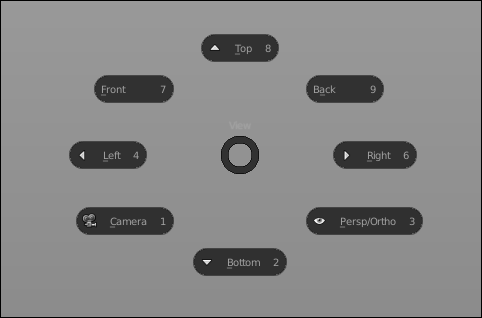
Figure 1-8: Your first pie [menu]!
With the menu still visible, move your mouse cursor around the screen. Notice that the highlighted area of the circular slice indicator at the center of the menu points to your mouse cursor. Also notice that as you move your mouse cursor, individual menu items highlight when you enter their slice of the menu. This highlighting is how you know which menu item is currently ready to be picked. Press Esc to close the menu without selecting anything.
There are two ways to choose menu items in a pie menu:
· Press, release, click: This can be considered the standard method:
1. Press and release the hotkey that activates the menu.
In this example, press and release Q.
2. Move your mouse cursor to your desired menu item's slice.
3. Choose that menu item by clicking anywhere within its slice.
The current active slice is indicated by the circular slice indicator at the center of the menu, as well as the highlighting of each menu item as your mouse cursor enters its slice.
· Press, hold, release: I think of this method as the fast way.
1. Press and hold the hotkey that activates the menu.
In this example, press and hold Q.
2. Move your mouse cursor to your desired menu item's slice.
3. Release the hotkey to choose that menu item.
As pie menus are still optional, you can always go back and disable them if you decide that you don't like using them. However, if you decide to keep them enabled, I try to help you throughout the rest of the book. For any given menu or operator, if there's an option for using a pie menu, I make it a point to let you know the hotkey and location of the various pie menu items.
All materials on the site are licensed Creative Commons Attribution-Sharealike 3.0 Unported CC BY-SA 3.0 & GNU Free Documentation License (GFDL)
If you are the copyright holder of any material contained on our site and intend to remove it, please contact our site administrator for approval.
© 2016-2026 All site design rights belong to S.Y.A.