Computer Forensics with FTK (2014)
Chapter 2. Working with FTK Imager
FTK Imager is a free tool that can be downloaded from AccessData on its website, mainly used for conducting acquisition of digital media. To ensure the integrity of the data collected, it creates exact copies (forensic images), known as bit-to-bit or bit stream.
FTK Imager is a powerful, free tool. It allows a preanalysis of the data, information search, and the collection of volatile data such as RAM, along with other features that will be covered through this chapter. You can download FTK Imager as well as other products athttp://www.accessdata.com/support/product-downloads.
This chapter discusses working with evidence using FTK Imager, allowing you to accomplish the creation of forensic images that meet your exact needs.
You will also be shown how to operate FTK Imager as well as an overview of all the features to understand the process of acquiring digital devices, which is considered one of the most critical factors.
Data storage media
It is important to realize that data acquisition may be performed not only on hard disks, but also across other devices that have the storage capacity, few of which are listed as follows:
· Magnetic media:
· Floppy disks
· Hard drives
· USB/PC cards
· ZIP and tape drives
· Optical media:
· CDs
· CD-Rs and CD-RWs
· DVDs
· Alternative media:
· MP3 players
· Tablets
· Smartphones
· Video games, TVs, and so on
FTK Imager has the ability to collect and analyze each of these devices.
During an investigative process, we must look at these items because they may have relevant evidence, not often found in hard disks.
Acquisition tools
FTK Imager makes a bit-for-bit duplicate image of the media, avoiding accidental manipulation of the original evidence. The forensic image is an identical copy of the original device, which includes the file slack and unallocated space, and allows for the recovery of deleted files. The forensic duplication allows you to conduct the investigation process using the image, preserving the original media.
The analysis of the acquired image can be performed later in the FTK, which allows for a much more detailed investigation and the generation of the final report of the information found.
When you use FTK Imager to create a forensic image of a hard drive or other electronic device, ensure that you are using a hardware-based write blocker. By doing this, you can be certain that the system does not alter the original source at the time of attaching it to your computer.
In the following picture, you can see a sample of the write blocker device:
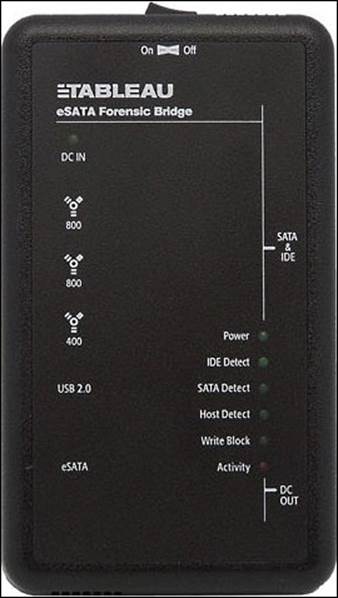
Image formats
FTK Imager can support almost all types of images used in the market. The main types are filesystems supported, Imager creates formats supported, and Imager read formats. These are listed as follows:
· Filesystems supported FTK Imager supports the following filesystems:
· DVD (UDF)
· CD (ISO, Joliet, and CDFS)
· FAT (12, 16, and 32)
· exFAT
· VXFS
· EXT (2, 3, and 4)
· NTFS (and NTFS compressed)
· HFS, HFS+, and HFSX
· FTK Imager can create evidence files of the following formats:
· E01, S01, and L01
· AFF
· AD1
· RAW/DD
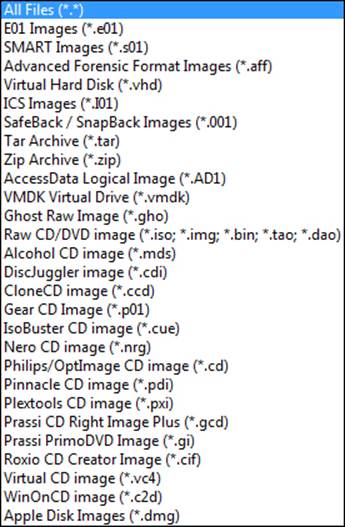
· FTK Imager read formats—in the following screenshot you can see all the formats that FTK Imager supports to read:
The FTK Imager interface
The installation of FTK Imager is very simple and you have the option of using the traditional version, with the need to install the product on your hard disk. Alternatively, you can use the Lite version, which does not need an installation. It has the advantage of allowing FTK Imager to run directly from a USB key, which helps a lot in the field collection process.
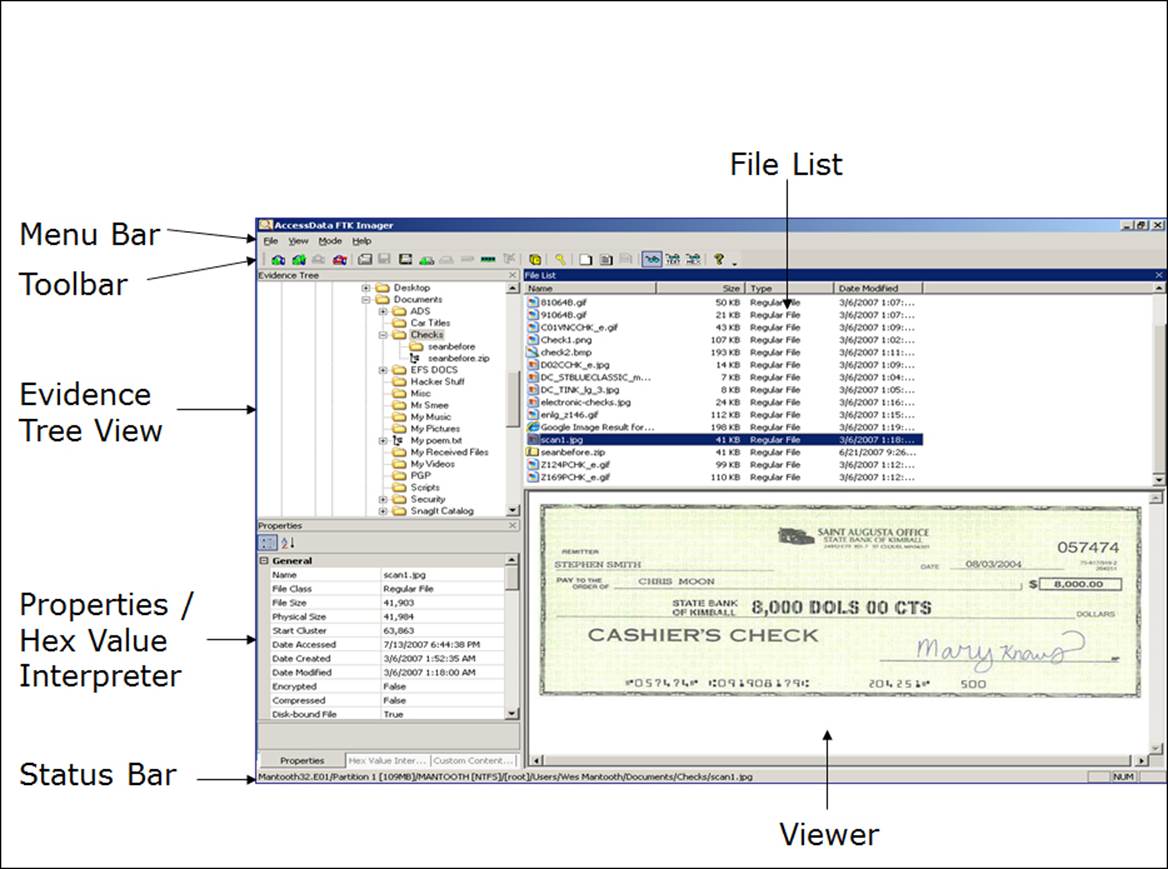
The FTK Imager user interface is divided into several panes. The Evidence Tree section, the File List section, the Properties section, and the Hex Value Interpreter pane, The Custom Content Sources panes, the menu, and the toolbar can all be undocked and resized to best suit your needs. Each can be redocked individually or you can reset the entire view for the next investigation as shown in the following screenshot:
The menu bar
The menu bar can be used to access all the features of FTK Imager. It is always visible and accessible. There are four items on the menu bar:
· File: The File menu provides access to all the features you can use from the toolbar.
· View: The View menu allows you to customize the appearance of FTK Imager, which includes showing or hiding panes and control bars.
· Mode: The Mode menu lets you select the preview mode of the viewer.
· Help: The Help menu provides access to the FTK Imager user guide, which gives information about the program version and more ways that can assist you.
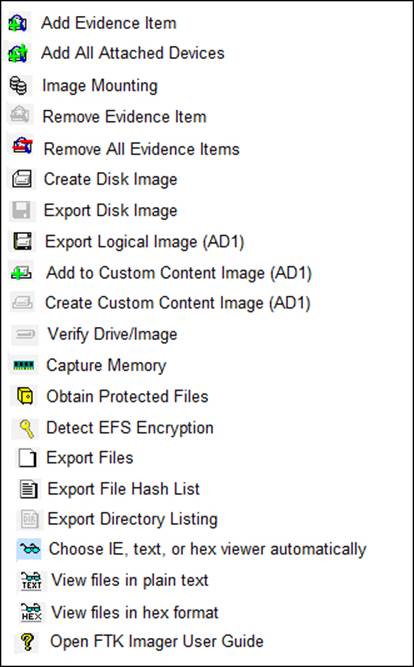
The toolbar
The toolbar contains all the tools and features that can be accessed from the File menu.
The following screenshot provides some basic information on each feature:
The view panes
There are several basic view panes in FTK Imager, which are listed as follows:
· Evidence Tree: This pane displays the added evidence items in a hierarchical tree.
· File List: This pane shows the files and folders contained in whichever item is currently selected in the Evidence Tree pane.
· Viewer: This pane shows the content of the currently selected file, based on the selected Preview Mode option: Natural, Text, or Hex.
· Properties/Hex Value Interpreter/Custom Content Sources: These panes display a variety of information about the object currently selected in either the Evidence Tree pane or the File List pane, convert hexadecimal values selected in the viewer into decimal integers and possible time and date values, and view the content that will be included in a Custom Content image, respectively.
The FTK Imager functionality
You can use FTK Imager to preview a piece of evidence prior to creating the image file(s). You can then choose to image the entire evidence object or choose specific items by selecting Add to Custom Content (AD1) image.
Adding and previewing an evidence item
You can either add a single evidence item or several items at one time. The following screenshot shows the procedure in a step-by-step format:
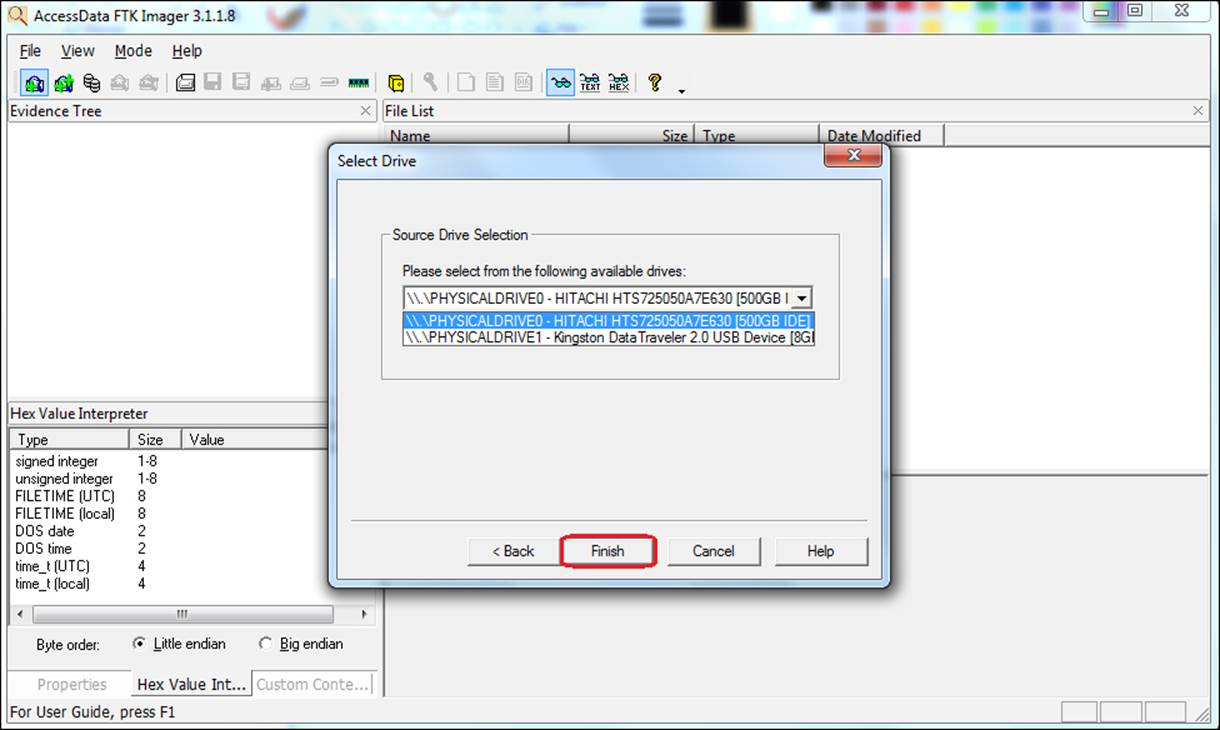
1. Click on the Add Evidence Item button on the toolbar.
2. Select the source type you want to preview and then click on Next.
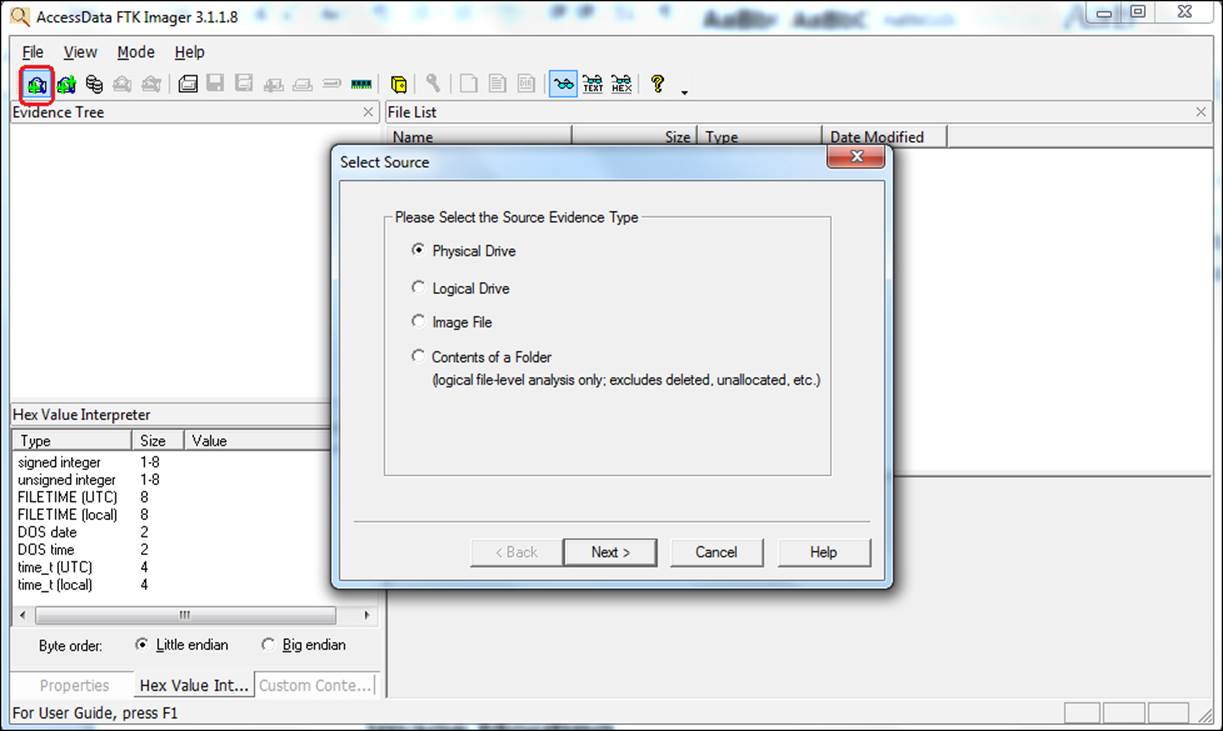
3. Select the drive or browse to the source you want to preview and then click on Finish:
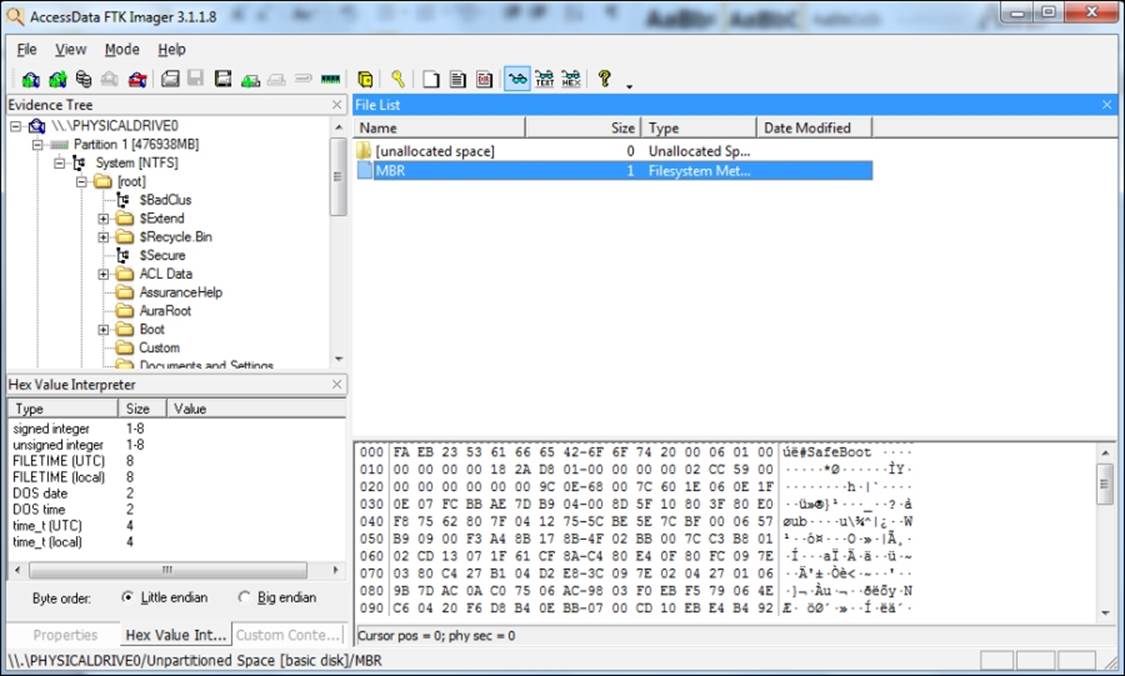
4. The evidence item appears in the Evidence Tree pane:
Creating forensic images
Once the item is added to the evidence, you can perform the process of creating a forensic image. FTK Imager allows you to make several different types of forensic images. In addition, drive content and hash lists can be exported.
To create the image, perform the following steps:
1. Click on the Export Disk Image button on the toolbar.
2. Click on the Add… button.
3. Select the image type and click on Next:

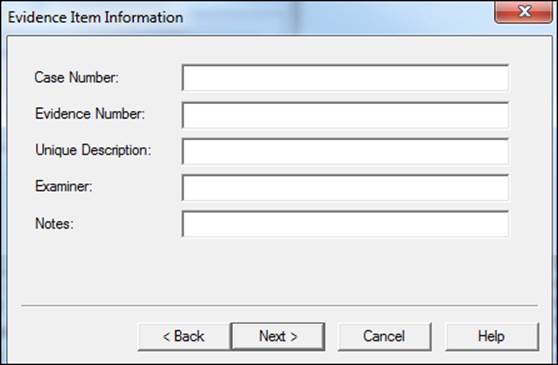
4. Fill the evidence item information and click on Next:
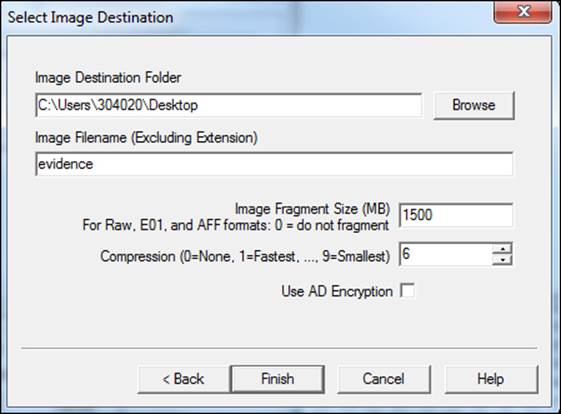
5. Select the destination folder, filename, fragment size, and compression options, and then click on Finish:
Mounting the image
With the feature of mounting, the forensic images will be allowed to be mounted as a drive or physical device with a read-only viewing option. This opens the image as a drive and allows you to browse the content in Windows and other applications. The types supported are RAW/dd images, E01, S01, AFF, AD1, and L01. Full disk images are RAW/dd, E01, and S01, and these can be mounted physically, simulating a physical disk connected to the computer.
This feature allows you to add the emulated physical disk to a virtual machine, as shown in the following screenshot:

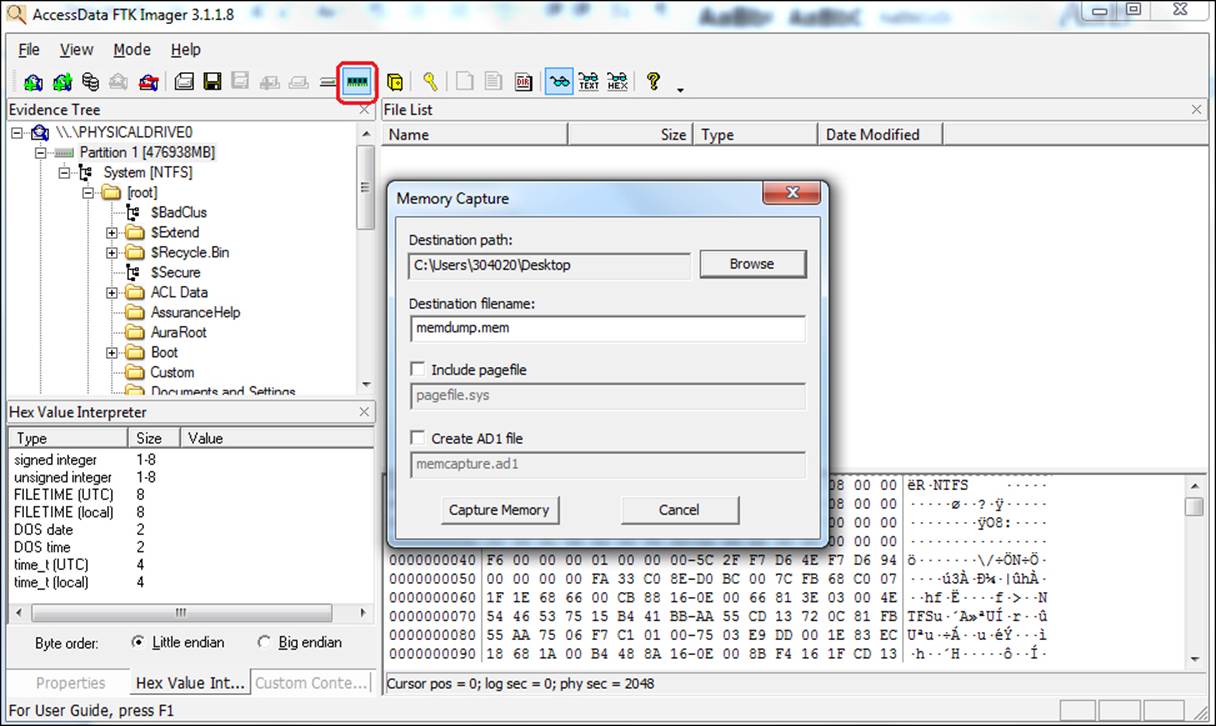
The Capture Memory feature
Volatile data, such as memory contents, has important evidence that must be analyzed.
Through the collection in the memory, you can extract information such as running processes, documents in use, websites accessed, username and password, and a lot more.
To execute the acquisition, perform the following steps:
1. Click on the Memory Capture button on the toolbar.
2. Select the destination path for the collected file.
3. As an optional step, you can include a Pagefile.sys file and create an AD1 evidence file format.
4. Click on Capture Memory to start the process as shown in the following screenshot:
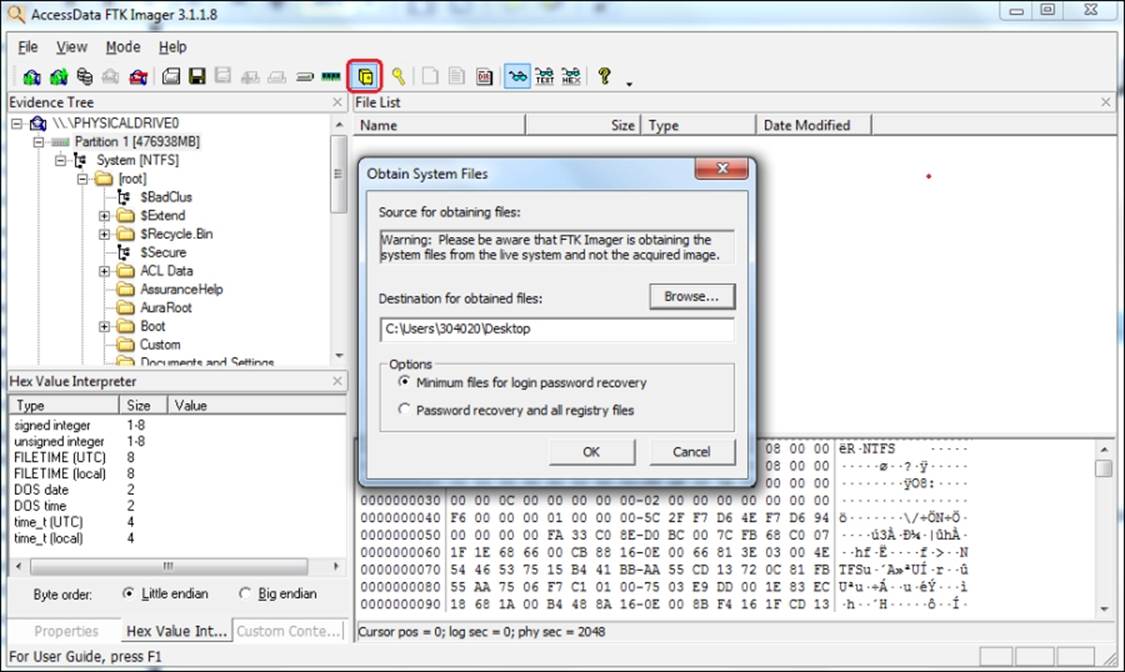
Obtaining the protected files
The Windows operating system does not allow you to copy or save live Registry files. You can acquire these protected registers running FTK Imager on the machine, which contains the records you want to copy as follows:
1. Click on the Obtain Protected Files button on the toolbar.
2. Select the destination folder for the obtained files.
3. Choose between the options of acquisition that are either needed to recover the password or the entire registry.
4. Click on OK, as shown in the following screenshot:
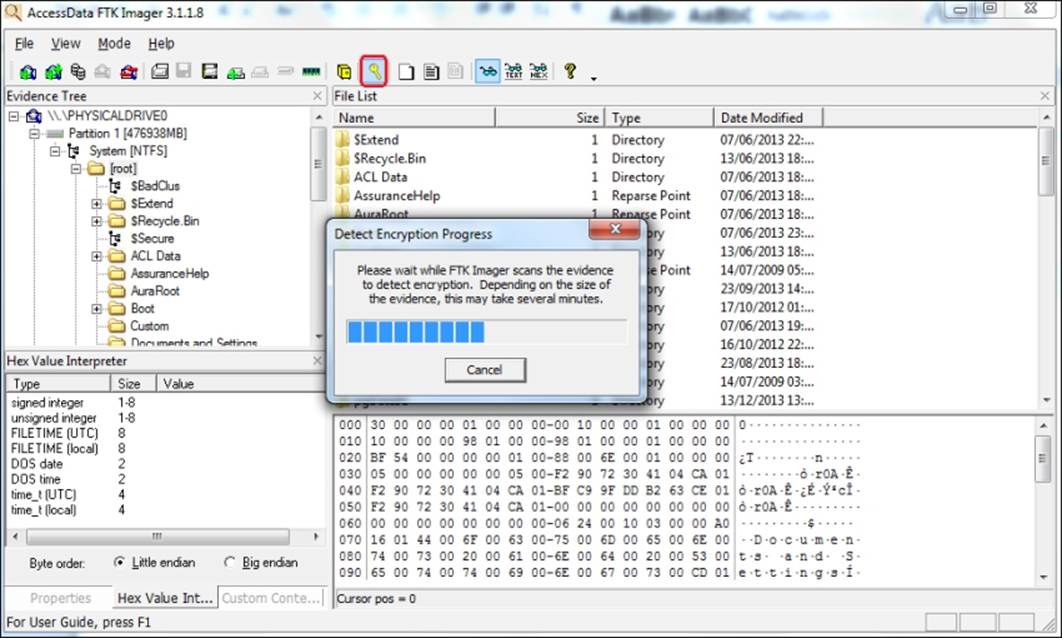
Detecting the EFS encryption
You can check for encrypted data on a physical drive or an image with FTK Imager just by clicking on the Detect Encryption button on the toolbar. The program scans the evidence and notifies you if the encrypted files have been located:
Summary
This chapter covered the main features of FTK Imager.
FTK Imager is a very important tool to produce forensic images and can support almost all evidence file formats. You can preview the evidence before the image. This is important because you can do a triage and collect only important information, considerably reducing the collection and analysis time.
You are able to understand the importance of using a write block device along with FTK Imager. In this way, it is possible to assure the integrity of a piece of evidence. You have learned about the interface in the solution and the main features of FTK Imager, as Add and Preview Evidence Item, Creating Forensic Images, Image Mounting, Capture Memory, Obtain Protected Files, and Detect EFS Encryption.
To summarize, FTK Imager is an essential tool for all experts and examiners. The best part of it is that it is free!
All materials on the site are licensed Creative Commons Attribution-Sharealike 3.0 Unported CC BY-SA 3.0 & GNU Free Documentation License (GFDL)
If you are the copyright holder of any material contained on our site and intend to remove it, please contact our site administrator for approval.
© 2016-2026 All site design rights belong to S.Y.A.