Computer Forensics with FTK (2014)
Chapter 4. Working with FTK Forensics
As mentioned in previous chapters, the FTK is a complete platform for digital investigations, and although it has a friendly interface, its use requires attention, especially during the preanalysis phase. A wrong setting of the case can generate negative impacts on the project and may require more time than planned.
This chapter will cover the process of computer forensics and the first steps of using the FTK.
You will notice that the correct understanding of the computer forensics process will help you with the use of the tool, and the right the FTK setup will save you a lot of analysis time and provide you with the best results.
Introducing computer forensics and FTK
Computer forensics is a digital forensic science that relates to the generation of legal evidence found in computers and the digital media. The computer forensics process aims at examining the digital media in a forensically sound manner with the goal of acquiring, preserving, analyzing, and presenting relevant facts about a specific case; for example, digital crime, fraud, misuse of resources, and so on.
The steps presented in the following diagram are intended to help drive the research process and get the evidence that could be presented in court, demonstrating that the best practices of computer forensics were followed. The computer forensics process can be explained using the steps shown in the following diagram:

Preparation
It is very important for the forensic analyst to be prepared to start a new digital investigation process and should take care of with the following points:
· Defined investigation processes are required
· A trained field and lab team that must include the following:
· Technical trainings: This is done to know how to use the main computer forensics tools
· Procedural trainings: This is done to understand the best practices, procedures, and flows to conduct a digital investigation
· Adequate software and hardware
Acquisition and preservation
Acquisition and preservation are considered as the most critical steps of the process since errors are not allowed at the time of evidence acquisition. The basic principle of computer forensics is preservation of the digital evidence integrity.
The acquisition can be done using the following tools:
· Write blockers (hardware or software)
· Forensic duplicators
· Boot disks
· Remote acquisition (through network)
Analysis
Analysis is the part of the investigation process that involves the most amount of technical aspects. Some of the reasons are listed as follows:
· Necessary technical knowledge about operation system, filesystem, network, and applications
· Specialized software is required
· Skill for creating filters and searching evidence in operational systems artifacts
Reports and presentation
This is the last step of the process. After we have found results and arrived at conclusions about the investigation, we need to perform the following steps:
· Adapt the report language for the target audience—use technical language for the technical team or more formal and appropriate language for lawyers or judges
· Take care that the reports and presentations are clear and conclusive and avoid opinions
· Provide the presentation in different kinds of file formats such as PDF, HTML, DOC, and so on
Managing groups and users
The FTK allows you to create multiple users and assign roles to them, providing a more collaborative solution.
To add a new user, we have to perform the following steps:
1. Click on Database and select Administer Users.
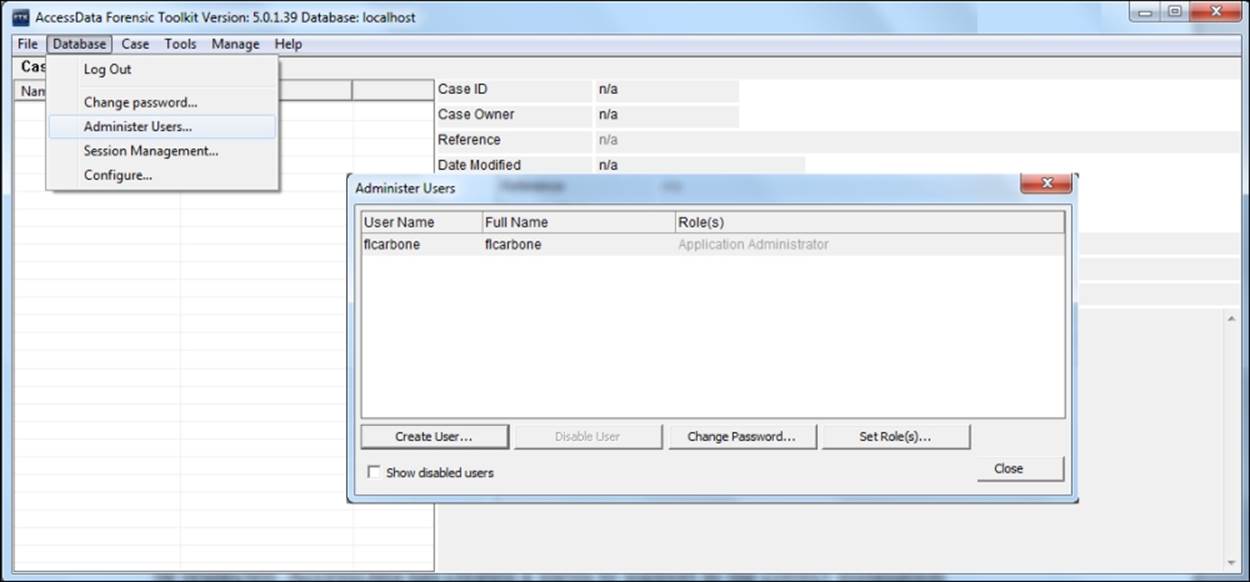
2. Click on the Create User… button.
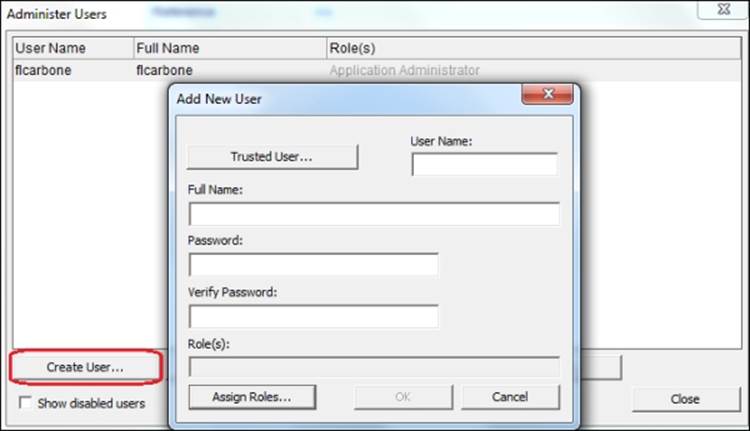
3. Fill in the presented fields as follows:
· User Name: In this field, enter the name that will be recognized by the FTK
· Full Name: In this field, enter the full name that should appear on case reports
· Password: In this field, enter the password for the user
· Verify Password: In this field, enter the same password for verification
4. After entering the required information into the fields, click on Assign Roles.
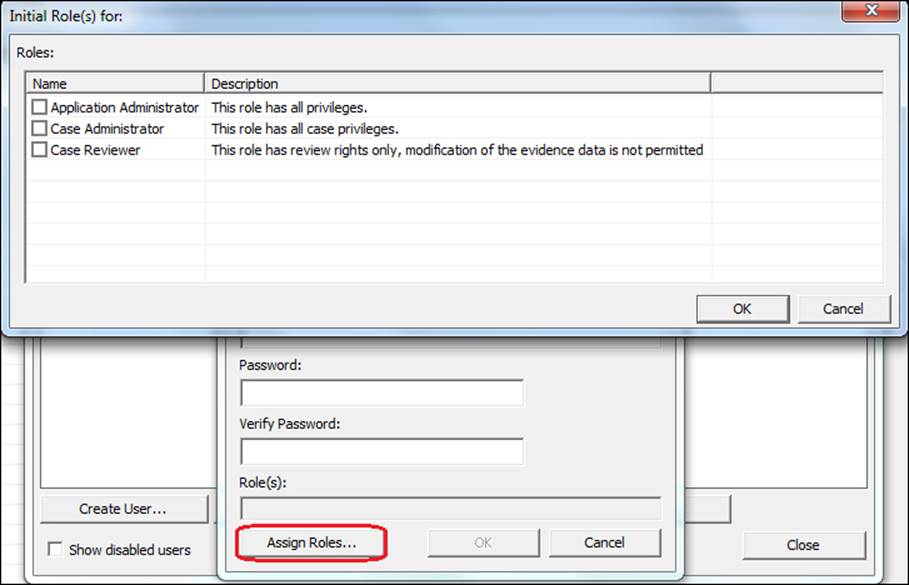
5. To assign rights to this user, use one of the roles presented as follows:
· Application Administrator: This performs all tasks, including adding and managing users
· Case Administrator: This performs all tasks that an application administrator can perform, except creating and managing users
· Case Reviewer: This cannot create cases; it only processes cases
6. After choosing the correct profile, click on OK to apply the role, and then click on OK again to create the user.
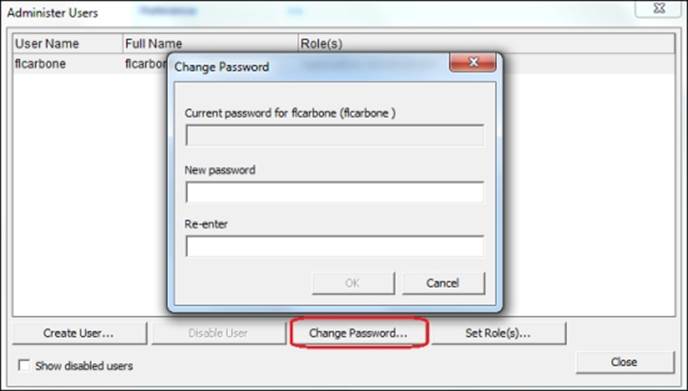
The user's passwords can be changed at any time. Just click on Change Password… to enter the new password, as shown in the following screenshot:
Creating a new investigation case
The FTK allows you to manage your investigations by assigning a case for each of them. The case information is stored in a database.
To create a new case, perform the following steps:
1. Click on New… and select New Case. The New Case Options dialog opens, as shown in the following screenshot:
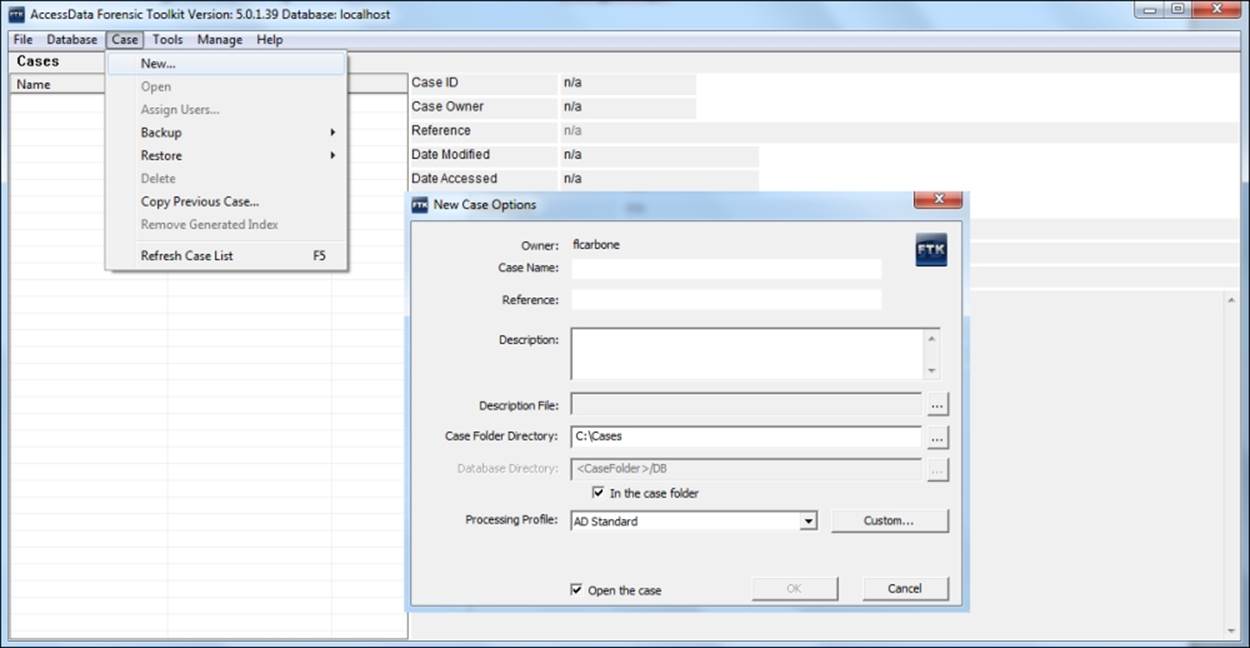
2. Fill in the fields that appear in the following manner:
· Case Name: In this field, enter the name of the case.
· Description: This field is optional and text free.
· Reference: This field is also optional and text free.
· Description File: In this field, you can attach a file to the case.
· Case Folder Directory: This holds the path where case files will be stored.
· Database Directory: This is the path where case database will be stored. Select the In the case folder checkbox to set the same folder of the case.
· Processing Profile: Configure the default processing options for the case by either using a processing profile or custom settings. This item will be detailed in the next topic.
· Open the case: Check this option if you wish to open the case as soon as it is created. After the fields are filled, click on OK to create the new case.
3. The next step is to add the evidence file, as shown in the following screenshot:
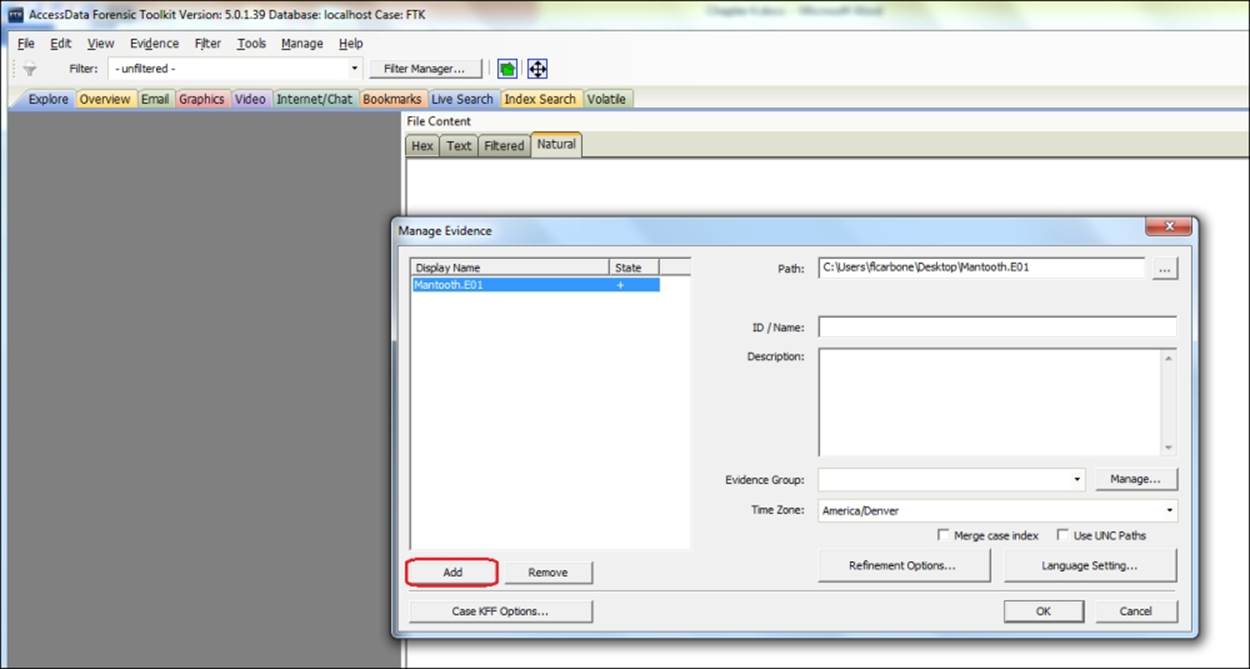
4. Click on Add and select one of the following evidence types:
· Acquired Image(s): Select this type to add an image file (dd, e01, AD1, and so on)
· All Images in Directory: Select this to add all images in a specific folder
· Contents of a Directory: Select this type to add all files in a specific folder
· Individual File(s): Select this to add a single file (docx, pdf, jpg, and so on)
· Physical Drive: Select this to add a physical device (a full hard disk)
· Logical Drive: Select this to add a logical volume or partition, for example, the C or D drive
5. Click on OK set the following items:
· Time Zone: Select the correct time zone of the location where the evidence was collected.
· Refinement Options: Select which items will be processed in evidence. This item will be detailed in the next topic.
· Language Settings: Select the correct language that corresponds to the alphabet used in the collected evidence.
6. Once all the parameters are configured, click on OK and wait for the evidence processing.
Tip
Incorrect use of the Time Zone option can produce inconsistent results because it changes all MAC time values of evidence. If you do not know the Time Zone option of the evidence, use the FTK registry viewer tool to identify it.
The FTK interface
The main feature of the FTK interface is the location, organization, and exportation of data. The interface contains tabs, each with a specific focus, and also contains a common toolbar and file list with customizable columns. New tabs can be added to help the localization of information as shown in the following screenshot:
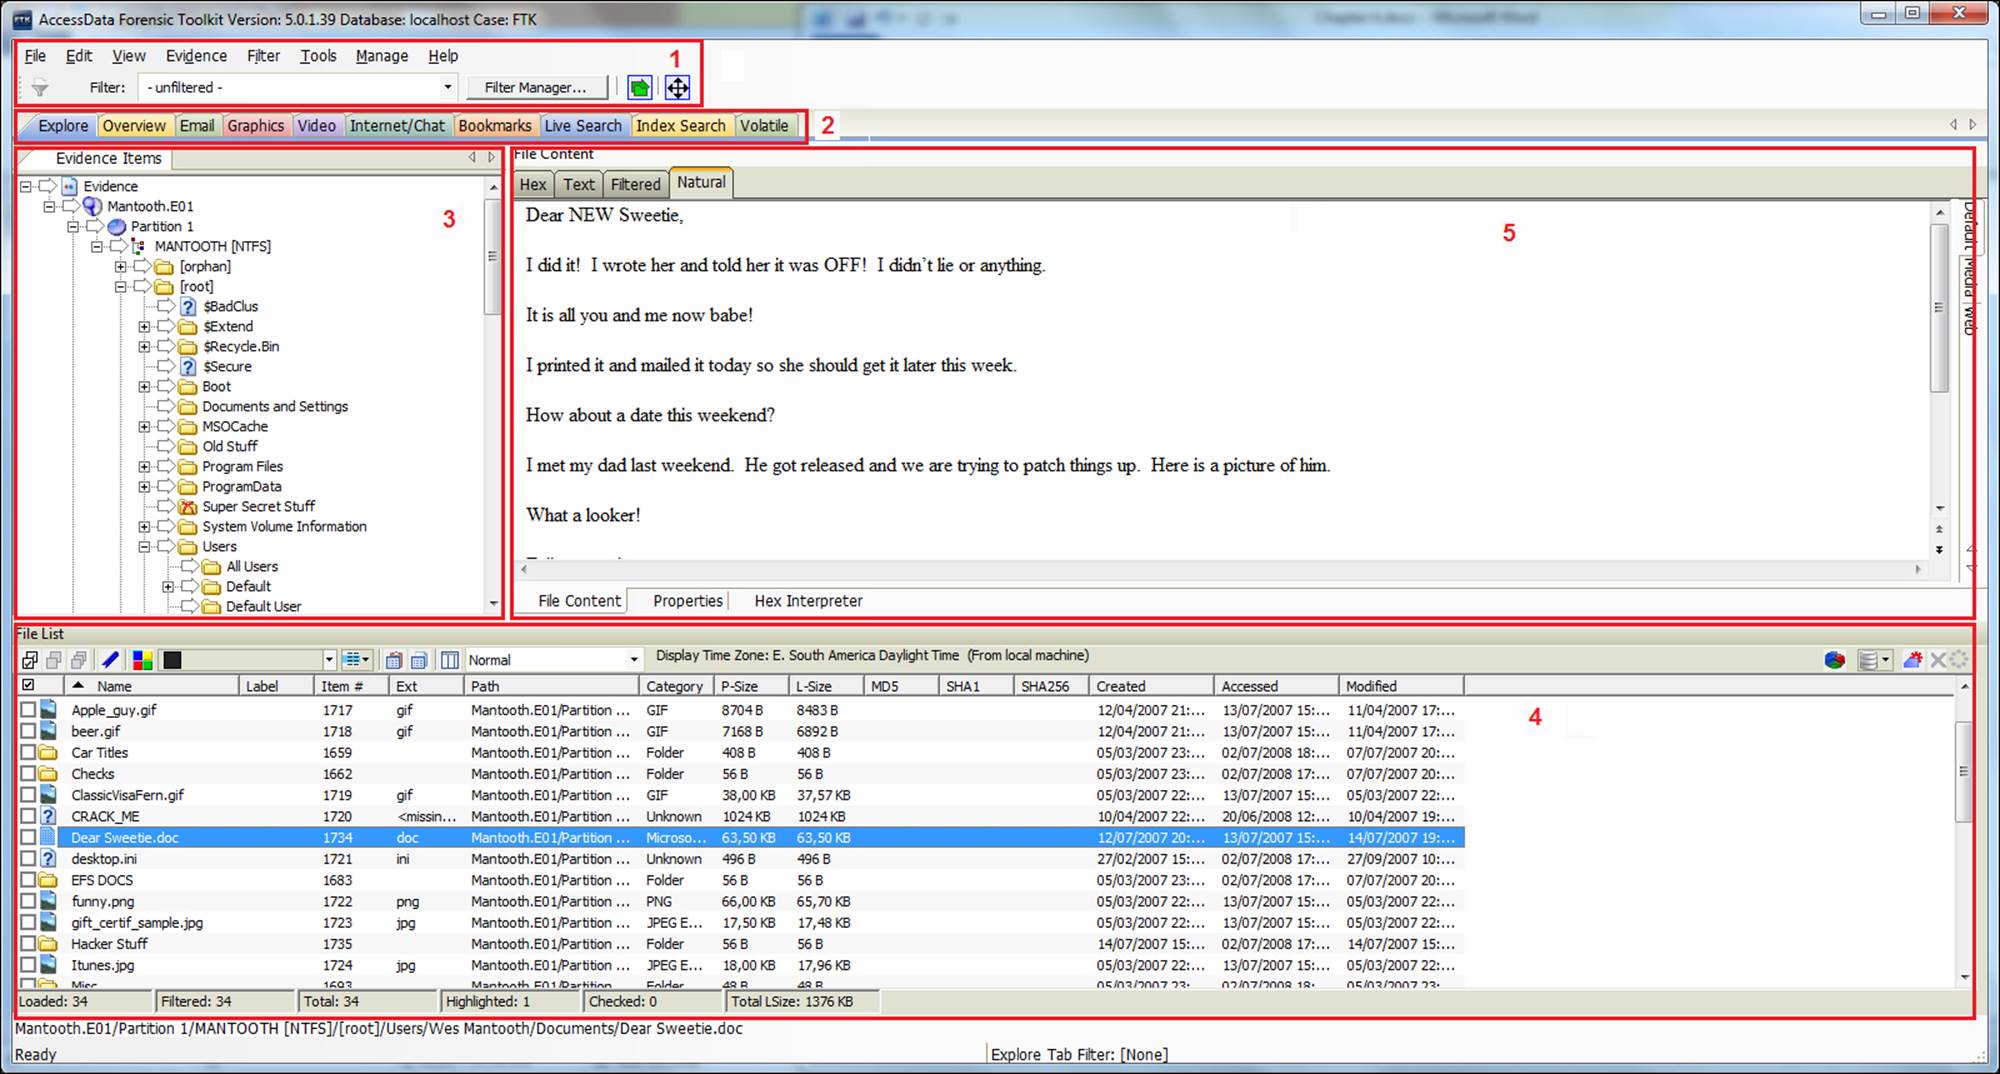
The tabs can be categorized as follows:
· Menus/Toolbar: In this option, all the functionalities and settings of the tools can be accessed. Use filters to find relevant evidence.
· Tabs: Each tab will display the data in different structures as follows:
· Explorer: This tab lists the evidence in a directory structure, similar to the Windows explorer. Evidence can be viewed in physical or logical drives.
· Overview: This tab narrows your search to look through specific document types or to look for items by the status or file extension.
· Email: This tab is used to view e-mails, mailboxes, and attachments.
· Graphics: This tab gives a quick view of the case graphics through thumbnails.
· Video: This tab is used to watch video contents and the detailed information about them. It is possible to create thumbnails from videos files.
· Internet/Chat: This tab is used to view detailed information about the Internet artifact data in your case.
· Bookmarks: This tab generates a group of files to be referenced in the case. All relevant information found during the investigation can be placed on the bookmark for the generation of reports.
· Live Search: This tab is used to search information in the case using keywords. This type of search processes the results slower as it involves a bit-by-bit comparison of the used keyword against the evidence.
· Index Search: As the data was previously indexed in the processing phase, in this tab the results will be provided quicker.
· Volatile: In this tab you can view and analyze data collected from volatile sources such as memory.
· Evidence tree viewer: This viewer presents the data structure, depending on the selections made in the tabs.
· File list viewer: This viewer displays case files and pertinent information about files, such as filename, file path, file type, and many others properties. The File List view reflects the files of the selected folder in the explorer tab.
· File content viewer: This viewer displays the content of the currently selected file from the File List view. The Viewer toolbar gives you the choice of different view formats.
Case processing options
To work better with your investigation case, the evidence data should be processed. When evidence is processed, data about the evidence is created and stored in the database. The processed data can be viewed at any time.
If you want to process the evidence as quickly as possible, you can use a predefined field mode that deselects almost all processing options. If you need an item for later, an additional analysis can be performed to enable additional processing options. Or, if you have time to categorize and index files, more options can be enabled. This step will take a significant amount of time for a large evidence set. Take a look at the options shown in the following screenshot:
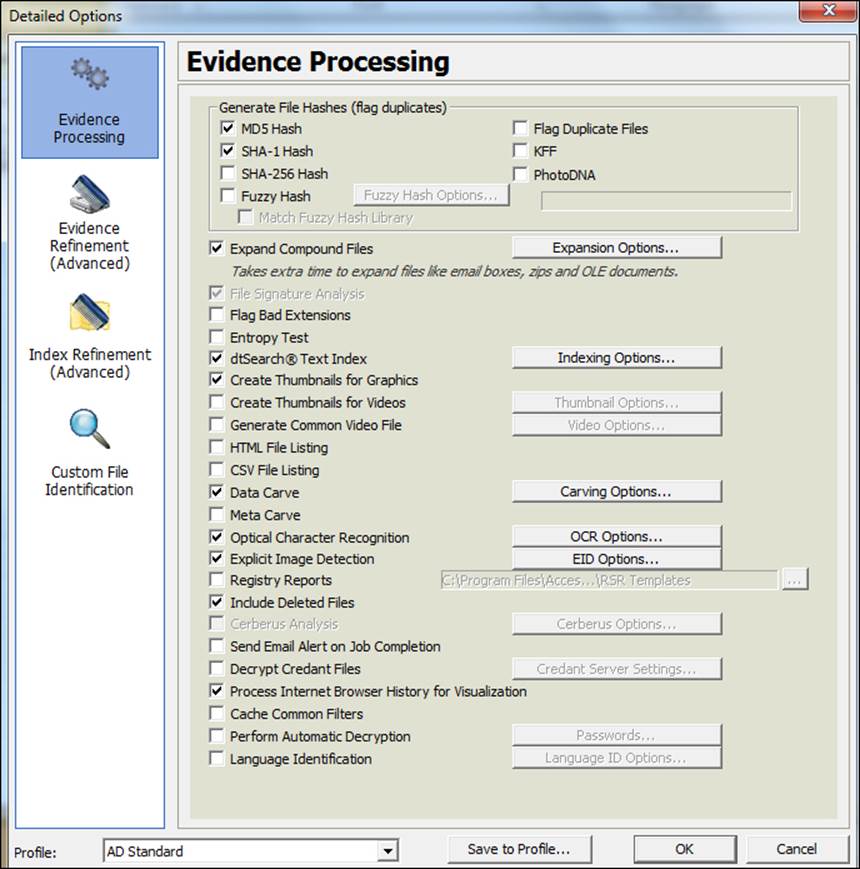
The following table presents a brief explanation of each item:
|
Options |
Description |
|
MD5 Hash |
Creates a digital fingerprint using MD5 |
|
SHA-1 Hash |
Creates a digital fingerprint using SHA-1 |
|
SHA-256 Hash |
Creates a digital fingerprint using SHA-256 |
|
Fuzzy Hash |
Compares hash values to determine the similar data |
|
Match Fuzzy Hash Library |
Matches new evidence against the Fuzzy hash library |
|
Flag Duplicate Files |
Identifies files that are found more than once in the evidence |
|
KFF |
Uses a database of hashes from known files |
|
PhotoDNA |
Compares images in your evidence against known images in a library |
|
Expand Compound Files |
Mounts and processes the contents of compound files such as ZIP, e-mails, and OLE files |
|
File Signature Analysis |
Analyzes files to indicate whether their headers match their extensions |
|
Flag Bad Extensions |
Identifies files whose types do not match their extensions |
|
Entropy Test |
Finds compressed or encrypted files |
|
dtSearch Text Index |
Indexes the case for a quick retrieval of the keyword search |
|
Create Thumbnails for Graphics |
Creates thumbnails for all the graphics in a case |
|
Create Thumbnails for Videos |
Creates thumbnails for all the videos in a case |
|
Generate Common Video File |
Creates a common video type for the videos in your case |
|
HTML File Listing |
Creates an HTML version of the File listing in the case folder |
|
CSV File Listing |
Creates a CSV version of the File Listing in the case folder |
|
Data Carve |
Identifies deleted files in the evidence based on file signatures |
|
Meta Carve |
Locates deleted directory entries and other metadata |
|
Optical Character Recognition (OCR) |
Extracts text from graphics files to be recognized during a keyword process |
|
Explicit Image Detection |
Identifies suspect explicit content |
|
Registry Reports |
Creates Registry Summary Reports (RSR) from case content automatically |
|
Include Deleted Files |
Shows deleted files in the case |
|
Cerberus Analysis |
Runs the Cerberus Malware Triage module |
|
Send Email Alert on Job Completion |
Sends a message once a job is completed when an e-mail address is inserted in this field |
|
Decrypt Credant Files |
Locates and decrypts files encrypted by the Credant solution |
|
Process Internet Browser History for Visualization |
Processes Internet browser history files to be seen in the detailed visualization timeline |
|
Cache Common Filters |
Caches commonly viewed files in the list of files |
|
Perform Automatic Decryption |
Attempts to decrypt files using a list of passwords provided by you |
|
Language Identification |
Automatically attempts to identify the evidence language |
The last option, located on the bottom the screen, is Profile. It is possible to use the default profiles or create a customized one.
These options can be changed or added later just by clicking on the Evidence option in the toolbar and selecting Additional Analysis.
Tip
It is important that you select only the necessary items for your case investigation because the selection of many items can greatly increase processing time.
Refining the case evidence
The evidence refinement process allows the specification of how the evidence is sorted and displayed, by adding or removing data according to date filters, file types, and status.
To set case evidence refining options, perform the following steps:
1. Click on the Evidence Refinement (Advanced) icon in the left-hand side pane. The following two dialog tabs will be seen:
· Refine Evidence by File Status/Type
· Refine Evidence by File Date/Size
2. Click on the corresponding tab as shown in the following screenshot:
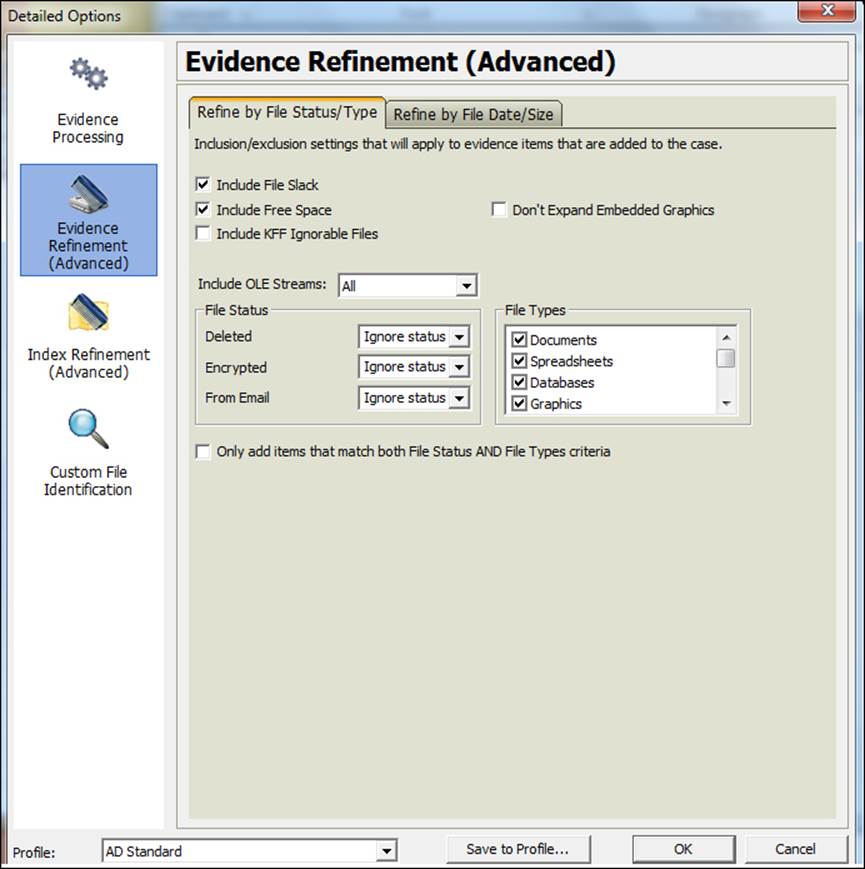
This first tab allows you to focus on specific files needed for a case, including or removing files by type or status. For example, if you only search for evidence in Word files, it is much more effective if you apply the filters and only select the Documents checkbox in the File Types list as shown in the following screenshot:
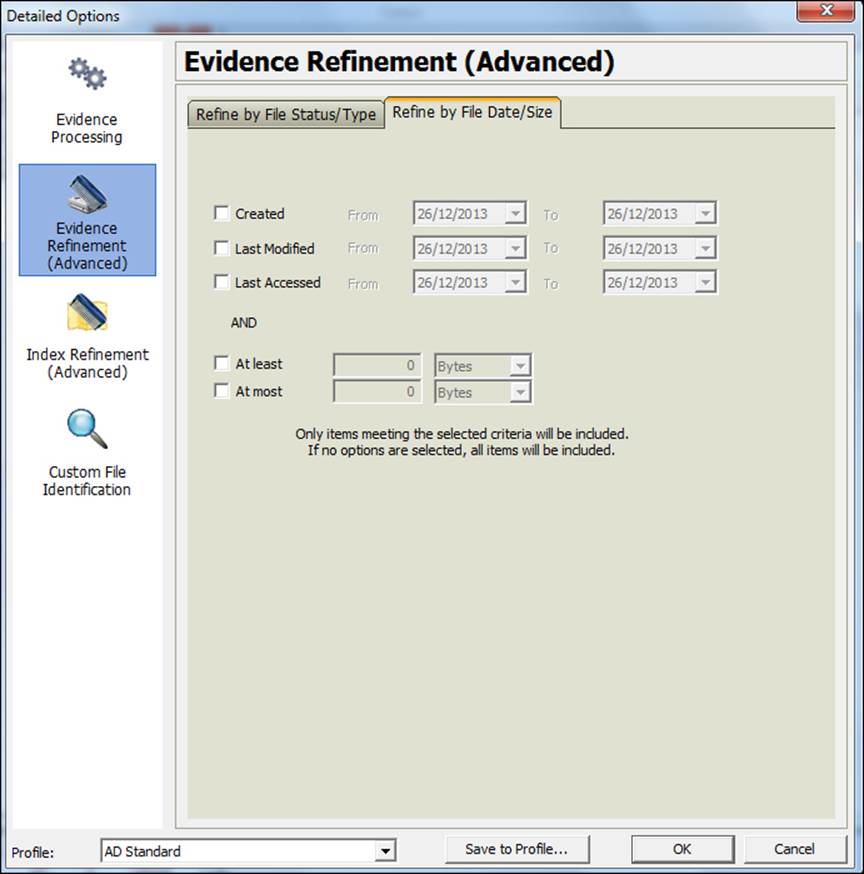
The second tab refines evidence by the date range or file size. In a scenario where you already know some information about the data you are seeking, it is recommended to apply this filter. A lot of processing time is saved.
Note
The Index Refinement (Advanced) feature is very similar to the Evidence Refinement (Advanced) feature and allows you to specify types of data that you do not want to index. Use it to exclude data to save time or increase searching efficiency.
Summary
This chapter covered the overview of the computer forensics process, showing its importance during the process of research and how it can help your organization with your case investigation. You were presented with the FTK interface, which will be worked out in detail in the next chapter. It also covered one of the most important processes used in the FTK tool; the processing options case. If configured correctly, it can improve processing time and the results of the analysis considerably.
In the next chapter, we will delve into the subject of processing and analyzing the artifacts using the FTK operating system and other advanced features of the tool.
All materials on the site are licensed Creative Commons Attribution-Sharealike 3.0 Unported CC BY-SA 3.0 & GNU Free Documentation License (GFDL)
If you are the copyright holder of any material contained on our site and intend to remove it, please contact our site administrator for approval.
© 2016-2026 All site design rights belong to S.Y.A.