QuickBooks 2014: The Missing Manual (2014)
Part II. Bookkeeping
Chapter 15. Doing Payroll
When you first start your business, you may be the proud owner of every job title in your company: receptionist, sales rep, technician, bookkeeper, janitor, and CEO. But if your company is like most, you’ll eventually hire people to help you with all those tasks.
Unless you run an all-volunteer operation, sooner or later, your employees are going to want to get paid. When that time comes, you face the daunting task of dealing with payroll, which is the name for all the financial records you have to keep for employees’ salaries, wages, bonuses, withholdings, and deductions. If you decide to process payroll in QuickBooks, you first have to sign up for one of the payroll services that Intuit offers. To keep expenses low, you can choose a bare-bones service that provides only updated tax tables. At the other end of the spectrum, you can opt for Intuit’s full-service payroll. Or you can compromise somewhere in the middle.
After you choose a payroll service, your next task is to set up everything QuickBooks needs to calculate payroll amounts. You can walk through each step on your own or use an interview feature. Either way, the Payroll Setup interview keeps track of what you’ve done and what you still have to do. This chapter takes you through every payroll step, from the initial setup to running a payroll, printing checks, and remitting payroll taxes and returns to the appropriate government agencies. This chapter uses Intuit’s desktop payroll service, as an example. (Intuit’s online payroll service provides a web-based version of the same features.)
Another option is to outsource the headaches of payroll to a payroll-service company other than Intuit. If you go that route, then you simply use values from the payroll-service company’s reports to create a couple of transactions in QuickBooks for each payroll—to allocate salaries and wages, payroll taxes, and any other payroll expenses to the accounts in your chart of accounts. This chapter explains how to record these payroll transactions.
If you run a one-person shop, like a sole proprietorship, partnership, or a small Sub-chapter S corporation, you can withdraw money from the company as compensation without fussing over payroll. But to take advantage of retirement savings options like a Simplified Employee Pension (SEP), you have to deal with special rules regarding eligible compensation. For sole proprietors and partners, all you have to do to determine your eligibility for a SEP is calculate your compensation, which is based on company net profits. However, a Subchapter S corporation has to pay you an actual salary for you to be eligible for a SEP plan. In this chapter, you’ll learn how to record do-it-yourself payroll transactions, and how to pay yourself without payroll.
Getting Started with QuickBooks Payroll
Shortly after you hire employees, you need to write their first paychecks, so setting up payroll can’t wait until employees are onboard. If you’re already running payroll with another payroll service, you probably have the info you need to set up QuickBooks’ payroll features. If that’s the case, skip to Intuit Payroll Services to learn about Intuit’s payroll services. But if you’re new to payroll, read on to learn about the tax agency items you need and the payroll decisions you need to make before you hire anyone.
What You Need from the Government
Part of the payroll process includes withholding taxes from employees’ paychecks and sending that money (along with your company’s payroll taxes) to the appropriate government agencies. Before you can do that, you need to get on the government’s radar. As you already know, anything tax-related spells paperwork, and payroll is no exception. Here are the IDs, accounts, and forms you need for payroll:
§ Employer Identification Number (EIN). If you’re a sole proprietor, your Social Security number acts as your business identification number when you fill out your tax return. For any other type of company, you need an EIN. If you don’t have one yet, head to www.irs.gov/pub/irs-pdf/fss4.pdf to download the Social Security-4 form. Fill it out, send it in, and wait for your EIN info to arrive in the mail.
§ An Electronic Federal Tax Payment System (EFTPS) account. The IRS requires that all federal taxes be paid electronically via EFTPS. (The box on Federal Taxes, Taxes, and More Taxes briefly describes the various payroll-related federal taxes you have to pay.) To sign up for EFTPS, head to www.eftps.gov/eftps and click the Enroll button. Sign up using your federal EIN (see the previous bullet point). After the IRS processes your enrollment, it mails you a four-digit PIN. Once you have that, back you go to the EFTPS website to log in again and use the PIN to create a password. That’s it! You’re now ready to pay your taxes electronically. When it’s time to remit taxes, you log into the EFTPS website, select the tax period and payment date, and fill in the amount.
§ A state payroll account. Each state is different, so call your state’s Department of Revenue to find out what you need to do.
UP TO SPEED: FEDERAL TAXES, TAXES, AND MORE TAXES
As an employer, you have to handle two types of payroll taxes: the ones that your employees have to pay and those that your company pays. Payroll withholdings get their name because you withhold those taxes from your employees’ paychecks. But the money you withhold isn’t yours to keep: You have to send it to the IRS, the Social Security Administration, and, in some cases, your state. In addition, your company has to pay employer payroll taxes.
Here’s a quick rundown of the federal taxes you have to deal with:
§ Federal income tax. You withhold this tax from employees’ paychecks each pay period. The withholding amount is based on the info on the W-4 form each employee fills out. How often you remit taxes depends on the amount of withholdings you owe the federal government (the remittance schedule starts monthly and is due the 15th of the following month). You report these taxes on Form 941 (www.irs.gov/pub/irs-pdf/f941.pdf), which is due quarterly.
§ Employee portion of Social Security and Medicare. Employees pay half the tab for these two taxes (6.2% for Social Security and 1.45% for Medicare; high earners pay an additional 0.9% for wages greater than $200,000). Report Social Security and Medicare withholdings on Form 941 and remit them on the same schedule as your federal income tax.
§ Employer portion of Social Security and Medicare. As an employer, you pay the other half of the tab for these taxes.
§ Federal Unemployment (FUTA). This unemployment tax is another employer expense, so you don’t withhold it from your employees’ paychecks. This tax is 6 percent of wages up to $7,000 and is due in the quarter your liability reaches $500.00. You report it on Form 940 (www.irs.gov/pub/irs-pdf/f940.pdf), which is due in January of each year.
Once you have your EIN and payroll tax accounts set up, you’re ready to report and pay payroll taxes. Now all you need are some employees.
Employee-Related Forms You Need
Hiring employees launches the paperwork journey. Here are the forms prospective employees have to fill out (and you have to keep on file):
§ W-4. Each employee fills out one of these forms to specify his withholding allowance, such as single, married, and number of dependents. If employees want additional taxes withheld, they can write in the amount. If they want to change their withholdings, they simply fill in a new copy of the form. You can download this form from www.irs.gov/pub/irs-pdf/fw4.pdf.
§ I-9 (Employment Eligibility Verification). Once you make a job offer to a prospective employee, that person has to fill out this form so you can verify her identity and employment authorization. Although you don’t have to submit this form to any agency, you need to keep it on file in case a government representative asks for it. (Not having it may cost you a fine.) Your employee fills in basic info like name, address, Social Security, birthdate, and so on. The form lists documents that are acceptable forms of identification, such as a driver’s license or Social Security card. After you check your employee’s document and say,“Yup, that’s you!” you’re done. To download this form, head to www.uscis.gov/files/form/i-9.pdf.
§ State withholding forms. Many states simply use the withholding allowances from employees’ W-4 forms as the state withholding allowance, whereas some require their own forms. If you live in Alaska, Florida, Nevada, South Dakota, Texas or Washington, you’re in luck: You don’t have to withhold state income taxes. If you’re in one of the other 43 states, check with your Department of Revenue to find out what your state requires.
TIP
To make sure that you get all the necessary paperwork from employees, create a new-hire packet that contains the W-4, I-9, any state forms, and a copy of your company’s policies. That way, you can hand packets to new employees and get all the filled-in forms back before they begin work.
GEM IN THE ROUGH: WHO IS AN EMPLOYEE?
Some employers think they can avoid the hassle of payroll by paying people as subcontractors instead. No such luck. Strict requirements determine who is and isn’t an employee—and you’ll pay severe penalties if you’re caught trying to beat the system.
The IRS has common law rules for determining employment status of people providing services to your business. If you answer yes to the following questions, the worker is probably an employee:
§ Behavioral. Does your company control or have the right to control what the worker does and how she does her job?
§ Financial. Do you control the business aspects of the worker’s job, such as how the worker is paid and whether his expenses are reimbursed? And do you provide the tools and equipment used on the job?
§ Type of relationship. Do you have a written contract with the worker? Do you provide her with benefits, such as health insurance, vacation pay, and a pension? Will the relationship continue? Is the work performed a key aspect of your business?
For more info on employees versus independent contractors, head to tinyurl.com/996aszl. If you still aren’t sure how to classify someone, ask your accountant or tax advisor. Another option is to fill out form SS-8 (www.irs.gov/pub/irs-pdf/fss8.pdf) and submit it to the IRS. The IRS then notifies you whether the person is an employee or independent contractor.
Keep in mind, a signed contract designating someone as an independent contractor doesn’t make it so if the person should be an employee instead. You can’t enforce an illegal contract.
Payroll Decisions You Need to Make
Before you can set up your payroll service, you need to make a few payroll-related decisions:
§ How much? You need to decide the salary or wages you’ll pay for each position, as well as other monetary aspects of positions, like benefits, overtime, commissions, and bonuses. One way to figure out how much to offer workers is to research what other employers in your area are paying and the benefits they offer for similar positions.
§ How often? Your employees rely on receiving their paychecks on a regular schedule, such as every other week or twice a month. Payroll frequency is up to you. However, once you choose a schedule, you have to stick to it.
§ Payroll cutoff date and payday. The payroll cutoff date is the day through which you pay people for the hours they work, and payday is, of course, the day you actually pay employees. For example, the paychecks you hand out could pay employees for hours worked through Sunday, but you don’t pay your employees for those hours until the following Friday. Make sure to allow enough time between the payroll cutoff date and payday to process payroll. In addition, if you use QuickBooks Direct Deposit (Entering Historical Payroll), it takes two days after you submit direct deposit requests for those funds to be available in employees’ accounts.
Intuit Payroll Services
Payroll comes with all sorts of important details, but you don’t have to remember them all. Intuit offers several payroll services that handle the nitty-gritty: After you set up your Payroll items and employees, you simply fill out the hours your employees work each pay period (or the salary you pay them) and the payroll service can calculate paychecks, withholdings, and your payroll tax liability (how much your company owes). After that, all you have to do is get the money to the right places, and those services make that easy, too.
Intuit offers three levels of payroll service: a do-it-yourself version, a more helpful option that pitches in with the majority of payroll tasks, and a full-service option that takes care of everything except filling in the hours your employees work. You can sign up for either a desktop or online version of any of these service levels. This section describes what each option offers.
With an online Intuit payroll service, you don’t have to be in the office on payday, and you don’t even have to run QuickBooks. These services are available 24/7, and you can access them from anywhere via the Internet. You could be on vacation and still pay your employees on time by running payroll from your laptop, iPad, iPhone, or Android device. Intuit’s online payroll services integrate with QuickBooks, so you can download your payroll info and import it into your QuickBooks company file. (To get the most current features and pricing, head tohttp://payroll.intuit.com/payroll_services/online_payroll.jsp).
If you use one of Intuit’s desktop payroll services, you prepare payroll from within QuickBooks, so the data is automatically recorded in your company file.
NOTE
Intuit payroll services charge by the month, not for each pay period, as many other services do. You pay the same fee whether you run payroll weekly, every two weeks, or bimonthly.
Here’s what each payroll service level offers and how much it costs (although the features and prices could change after this book is published):
§ Basic Payroll is a do-it-yourself option. You set everything up at the start. Then, for each payroll, you enter hours or payroll amounts, and QuickBooks uses tax tables to calculate payroll taxes and deductions for you. This service then spits out reports with the info you need to fill out the federal and state tax forms you have to file. Your job is to print the paychecks from QuickBooks (or use direct deposit), fill out the payroll tax forms, and then send the forms in with your payments. This option costs $25.00 per month, plus an additional $2.00 per employee per month.
TIP
Intuit payroll services offer free phone, chat, and email support to help you get set up. So if you have any questions on how to do things, all you have to do is ask.
§ Enhanced Payroll (the most popular) is a more robust version of do-it-yourself payroll. It can handle preparing federal and state payroll forms. You just print them, add your John Hancock, and mail them in. If the tax agencies you work with support e-file or e-pay services, Enhanced Payroll can file your tax forms and pay payroll taxes, and handle workers’ compensation. This service sends you emails to remind you when payroll, forms, and payroll taxes are due, and to tell you when payroll is direct deposited, taxes have been paid, and tax authorities have accepted your tax forms. The online version archives your tax forms (online, of course), so you can retrieve them at any time by logging into your Intuit payroll account. But you can also print the forms or save them as PDF files on your computer. This service costs $35.00 per month, plus an additional $2.00 per employee per month.
§ Full Service Payroll does it all. If you opt for this service, Intuit sets up payroll for you. (If you used another payroll service in the past, it transfers that data into Intuit payroll.) You don’t have to make federal and state payroll tax deposits, file required tax reports during the year, or prepare W-2 and W-3 forms at the end of the year—the service handles all these tasks for you. In addition, Intuit guarantees that your payroll and payroll tax deposits and filings wll be accurate and on time. Of course, you have to send Intuit the correct data on time in the first place. But if this service then makes a mistake or misses a deadline, Intuit pays the resulting payroll tax penalties. It costs $99.00 per month, plus an additional $2.00 per employee per month.
NOTE
Time Tracking is an additional service that Intuit Online Payroll offers. Employees can log in and enter their hours, either by clocking in and out or by filling in a timesheet on a password-protected website. In addition, this service sends emails to remind your employees of time reporting deadlines. You then review their hours and either edit or approve them. This feature can keep you compliant with overtime rules, too.
Signing Up for an Intuit Payroll Service
Before you begin the mechanics of setting up your payroll, you have to select and sign up for one of Intuit’s payroll services. Here are the steps:
1. In QuickBooks, choose Employees→Payroll→Order Payroll Service (or Employees→Payroll→“Turn on Payroll in QuickBooks”).
QuickBooks opens a browser window that summarizes the three levels of payroll service that Intuit offers:
o I want to pay & file my payroll taxes myself in a few clicks, with forms completed by QuickBooks Payroll. Choose this option to go with the most popular Intuit payroll service: Enhanced Payroll.
o I want Intuit payroll experts to pay & file my payroll taxes for me. This option represents the full-service payroll options: Full Service Payroll for the desktop.
o I want my accountant to pay & file my payroll taxes for me. This option represents Basic Payroll. Despite the option’s name, you can pay and file your payroll taxes without your accountant’s help if you want to.
2. Select the option you want, and then click the See My Plan button.
You’ll see a QuickBooks Payroll screen with a Buy Now button. Before you click that button to launch the online subscription process, click each of the tabs at the bottom of the screen to see if the service you selected is the right one for you. (Don’t worry, though: When you sign up, you get a 30-day free trial. If you aren’t satisfied with the service, simply cancel it before the 30 days are up and Intuit won’t charge your credit card.)
3. If you’re ready to sign up, select either the “Pay annually” or “Pay monthly” option, and then click Buy Now.
The “Item(s) in the Shopping Cart” screen shows you the service you selected and the initial purchase price.
4. Click “Proceed to Checkout” and fill out the payment method, billing address, contact info, and legal company info boxes.
The payroll service needs the legal name of your company, which is on your Articles of Incorporation or other legal documents you got when you formed your company, and your EIN (see Modifying Company Info). If that info is in your company file, the website pulls that info from your file and fills in the boxes for you.
5. At the bottom of the screen, click Place Order.
Be aware that Intuit uses an auto renewal program. So when you click Place Order, you authorize Intuit to charge the subscription price to your credit card until you cancel the subscription. After you submit the application, QuickBooks checks the company information and credit card number you provided. If it runs into any problems, a message tells you to contact Intuit (and conveniently lists the phone number to call).
You’re almost done. QuickBooks Payroll asks you to sign in with your Intuit account. On the Order Processing page that appears, you need to enter your bank account info and specify a few other bits of info—just follow the onscreen instructions. When you’re done, click Return To QuickBooks.
QuickBooks automatically downloads the latest tax table updates and other relevant updates, activates your payroll service key, and launches Payroll Setup so you can begin setting up payroll, as described in the next section.
Setting Up Payroll in QuickBooks
The easiest way to begin setting up payroll is by choosing Employees→Payroll Setup, which launches the Payroll Setup interview. Figure 15-1 shows how the interview helps you see where you are in the setup process. The following sections cover the payroll setup steps in detail.
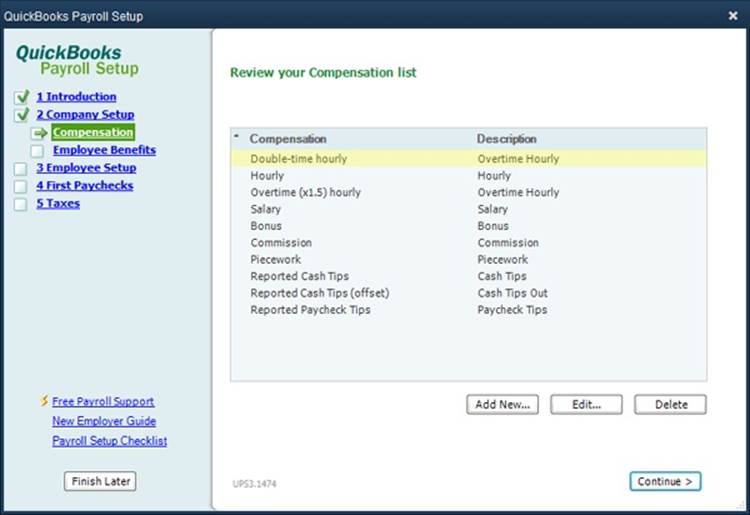
Figure 15-1. A green arrow on the left side of the window indicates which setup task you’re working on (here, that’s Compensation). As you complete the various steps for setting up payroll, the interview adds a green checkmark to the completed tasks.
The first time you open the QuickBooks Payroll Setup dialog box, the “Welcome to QuickBooks Payroll Setup” screen displays two options. Select “The company has never issued paychecks” option if you’ve never issued paychecks before. If you’ve issued paychecks and paid payroll taxes in the past, select the “The company is changing to QuickBooks Payroll” option instead. Click Continue, and the “How do you want to set up pay types and paycheck items?” screen appears. The easiest approach is to keep the “Typical new employer setup” option selected, and then click Continue. By doing so, QuickBooks automatically includes all the commonly-used pay types and benefits. If you want to set up unusual pay types or sick time, vacation time, and insurance benefits, select the “Custom setup” option instead.
You don’t have to go through the whole payroll setup process in one shot. Simply click the Finish Later button if you want to take a break, and the interview remembers everything you’ve done so far. (Yes, you have to complete every bit of payroll setup before you can run a payroll.)
WARNING
Don’t try to set up payroll the same day you want to run it for the first time. Intuit needs a few days to turn on your payroll service after you’ve completed your part of the setup process. The box below offers more advice about the right time to set up payroll.
Setting Up Compensation and Benefits
The first payroll task is telling QuickBooks how you compensate your employees—whether you pay them a salary, hourly wages, or additional income such as bonuses or commissions. You also specify employee benefits like retirement contributions and insurance premiums—no matter whether the company or the employees pay for them.
UP TO SPEED: CHOOSING THE RIGHT PAYROLL START DATE
QuickBooks doesn’t tell you this, but there’s a right and wrong time to start using QuickBooks for payroll. You have to file 941 reports (Employer’s Quarterly Federal Tax Returns) quarterly, as their name implies. Therefore, QuickBooks won’t let you summarize payroll data for the current quarter; instead, you have to enter individual pay period totals from the beginning of the current quarter up to the date you start using QuickBooks payroll.
You can save yourself a lot of data entry by starting to use QuickBooks for payroll at the beginning of a quarter. You still have to enter summary values for each quarter in the current year that has already passed (Fine-Tuning Payroll Items), but you don’t have to enter any individual payrolls.
QuickBooks’ Payroll Setup interview takes the guesswork out of choosing items for payroll. All you have to do is turn on checkboxes for the items you use and answer a few simple questions.
NOTE
If you’re intimidated by the Payroll Setup checklist and the number of choices you have to make, hire a QuickBooks ProAdvisor (to find one, head to http://proadvisor.intuit.com/find-a-proadvisor/search.jsp) or an accountant knowledgeable about QuickBooks payroll. Once payroll is set up, running payroll is easy.
Here’s how to set up payroll:
1. Choose Employees→Payroll Setup.
The QuickBooks Payroll Setup interview launches. Click Next to get past the introduction.
2. Click Company Setup, and then click Compensation. (If you selected the “Typical new employer setup” option when you first launched the interview, skip to the section Setting Up Employees.)
The interview displays the most common compensation items. You can add, edit, or delete items to reflect your payroll needs.
3. To add another Payroll item in the current category, click the Add New button below the list of compensation items.
The Add New window includes checkboxes for the available items in that category, as shown in Figure 15-2.
4. In the Add New dialog box, turn on the checkboxes for the compensation items you use, answer any questions that the interview asks, and then click Finish.
The selected items appear in the interview’s Compensation list, but behind the scenes they get added to the Payroll Item List (choose Lists→Payroll Item List to see it). QuickBooks also links those items to accounts in your chart of accounts so you can track your payroll expenses. For example, a salary Payroll item links to an Expense account, like Salaries & Wages. (To see these accounts, open the Payroll Item List, select the Payroll item, and then press Ctrl+E. Then click Next to see the expense account that goes with the item.) Likewise, if you deduct money from paychecks to pay taxes (Setting Employee Defaults), the interview connects the tax Payroll item to a vendor (that is, the tax agency) and a liability account, so you’re ready to send payroll taxes you owe.
If you don’t need a compensation item, like extra pay for overtime, then in the QuickBooks Payroll Setup dialog box, select the item in the Compensation list, and then click the Delete button.
5. To proceed to employee benefits, in the Payroll Setup interview, click either the Continue button at the window’s bottom right or the words “Employee Benefits” in the navigation bar on the window’s left.
In the navigation bar, you’ll see several subcategories of employee benefits: Insurance Benefits, Retirement Benefits, Paid Time Off, and Miscellaneous.
6. Click the Insurance Benefits link in the navigation bar.
The Insurance Benefits list shows any insurance benefits you’ve already set up, like pre-tax health insurance premiums.
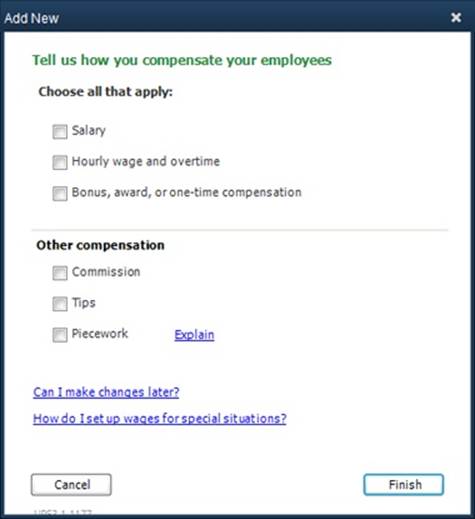
Figure 15-2. In the Payroll Setup interview, you don’t calculate each employee’s pay per payroll cycle. Instead, you set up an hourly or annual pay rate for each employee (even if they all get the same rate) as described on page 408. QuickBooks then uses these rates to calculate the values for each paycheck.
7. Click the Add New button, and then turn on the checkboxes for items like Health Insurance, Dental Insurance, Vision Insurance, Group Term Life, or Medical Care FSA (FSA stands for “flexible spending account”).
If you don’t know what a benefit represents, click the Explain link to the right of its name. If QuickBooks needs to know more about the benefit, like who pays for it and whether it’s tax-deductible, you’ll see the Next button instead of the Finish button. For example, for dental insurance, you pick whether you pay or the employee does, or whether you split the cost. You can also set up a scheduled payment to pay the insurance premiums.
8. When you’re done answering questions, click Finish to close the Add New dialog box and return to the interview.
The benefit(s) appear in the interview’s list. Notes about each benefit show up in parentheses after the benefit’s name, like “(company paid)” if your company pays the entire premium.
9. If you want to tweak an item that’s already on the list, click it, and then click the Edit button below the list.
An Edit dialog box like the one shown in Figure 15-3 opens.
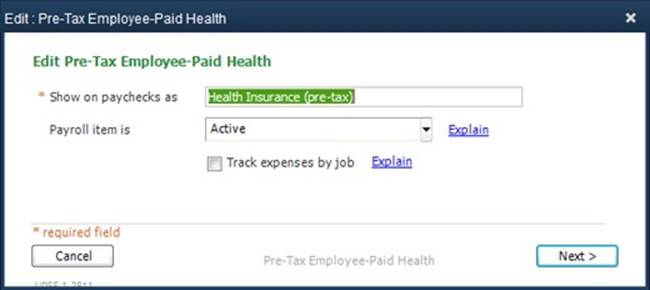
Figure 15-3. The Edit dialog box shows the name of the benefit you’re editing, such as “Edit Pre-Tax Employee-Paid Health.” Click Next or Previous to move through the screens of settings for the benefit.
10.Repeat steps 6–9 for each category of employee benefits.
Retirement benefits include things like 401(k) contributions and company matching. Paid time off covers things like sick time and vacation. The Miscellaneous category cleans up with anything else that’s added or deducted from paychecks, like cash advances, mileage reimbursements, or union dues. For additions or deductions that aren’t covered by any of the Miscellaneous Item checkboxes, click Add New, and then turn on either the “Miscellaneous addition” or “Miscellaneous deduction” checkbox.
You aren’t finished with the interview just yet, but you’re done setting up Payroll items for compensation and benefits. The next section explains how to set up employees with the interview.
Setting Up Employees
Before you dive into setting up employees with the Payroll Setup interview, completing a few other tasks first can speed up your work. Besides, after defining all your Payroll items, you could probably use a break. In the QuickBooks Payroll Setup dialog box, click Finish Later, and then perform these steps:
§ Gather employee information and records. You need personal info, such as Social Security numbers and hire dates, along with signed W-4 and I-9 federal forms. For employees already on the payroll, you need their pay rates, the total pay they’ve received, and deductions taken, along with sick time and vacation balances. If you’ve paid employees during the year, gather up the payroll summaries for each quarter and all tax deposits you made.
§ Have your tax information handy, like your state unemployment rate (contact your state for your amount) and payroll-related state account number(s).
§ Set up employee payroll defaults. If you have more than a few employees, you can save time by setting up the Payroll items that apply to every employee, like common deductions. That way, QuickBooks automatically fills in these items for you when you create a new employee record, and you make only any necessary modifications for that individual. QuickBooks has a feature designed especially for this timesaving scheme; it’s described next.
Setting Employee Defaults
Typically, you use a common set of Payroll items for all your employees, such as salary, tax deductions, health insurance, and 401(k) contributions. Instead of assigning the same Payroll items to each employee manually, you can save these standard items so that QuickBooks fills in most of the payroll fields for you. You can also specify the pay period you use and the class to apply if you track performance by class.
Here’s how to set up your standard Payroll items:
1. On the Home page, click the Employees button (or choose Employees→Employee Center).
The Employee Center window opens.
2. In the Employee Center window’s toolbar, choose Manage Employee Information→Change New Employee Default Settings.
The Employee Defaults dialog box opens. (You can also open this dialog box from the Preferences dialog box. To do that, choose Edit→Preferences→Payroll & Employees, click the Company Preferences tab, and then click the Employee Defaults button at the bottom of the dialog box. See Reminders to learn about other employee preferences you can set.)
3. In the Employee Defaults dialog box, set up standard items for every type of Payroll item you use, as shown in Figure 15-4.
The Employee Defaults dialog box includes the same set of fields and checkboxes that you’ll find in the Payroll Setup interview and on the Payroll Info tab in the New Employee window (in the Employee Center’s toolbar, click New Employee, and then click Payroll Info). When you edit an employee’s record, you can change any default payroll settings that don’t apply to that person.
Be sure to specify a state for withholding, because QuickBooks doesn’t fill this in automatically. To do this, in the Employee Defaults dialog box, click the Taxes button, and then, in the Taxes Defaults dialog box that opens (shown in Figure 15-4), click the State tab and choose a default state in the State Subject to Withholding drop-down list. If an employee’s record doesn’t include a state for withholding, you’ll underpay your state withholding and unemployment tax.
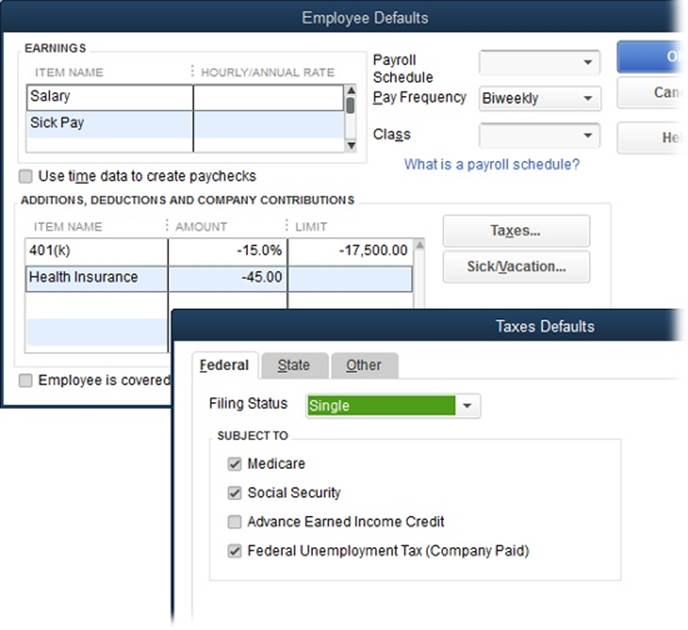
Figure 15-4. Although your standard items for taxes don’t appear in the “Additions, Deductions, and Company Contributions” list (background), when you click Taxes, you can see the payroll tax items assigned to each new employee (foreground). Similarly, by clicking the Sick/Vacation button, you can set how sick and vacation time accrue, the maximum accrued hours each year, and whether hours roll over from one year to the next. (Sick and vacation time can accrue at the beginning of the year, so the employee receives the entire allotment on January 1, or some of it can accrue each pay period.)
NOTE
When you create a new employee, QuickBooks automatically fills in the fields you specified in Employee Defaults. For example, if you add a Salary item without an hourly or annual rate, QuickBooks adds the Salary item to each new employee’s record but leaves the value field blank. On the other hand, if most people contribute 15% to their 401(k) plan, in the Employee Defaults dialog box’s “Additions, Deductions, and Company Contributions” table, choose 401(k) in an Item Name cell, and then type –15% in the Amount cell. That way, when you create a new employee, the 401(k) percentage deduction is automatically set to 15%, but you can change it to match the percentage the person chooses to contribute.
Creating Employee Records
You can create employee records either in the Payroll Setup interview or by creating new employee records outside of the interview (in the Employee Center toolbar, click New Employee to open the New Employee window). The info you have to provide is the same either way, but the Payroll Setup interview is easier to navigate.
TIP
You can run the Payroll Setup interview anytime you want. For example, if you hire a new employee, run the interview and add that person’s record right then and there.
With employee records in hand and payroll settings in place, choose Employees→Payroll Setup to open the interview once again. In the interview’s navigation bar, click Employee Setup→Employee List, and then click the Add New button. The interview prompts you to provide all the information it needs to process payroll, as Figure 15-5 shows.
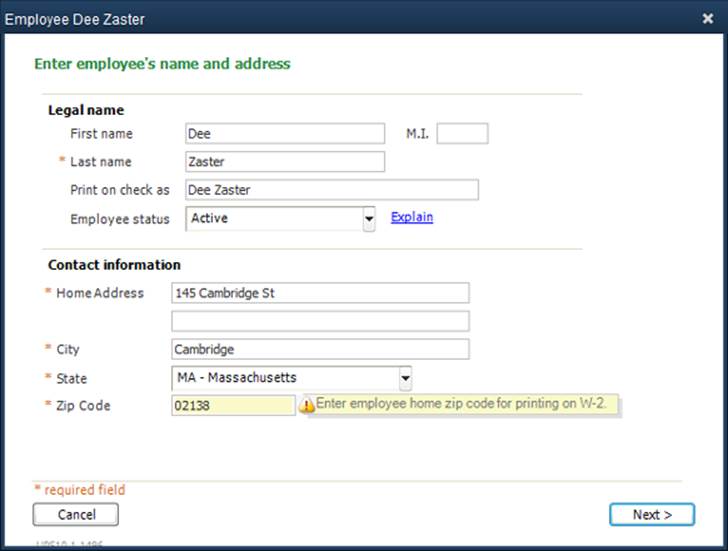
Figure 15-5. The Payroll Setup interview indicates required fields with an asterisk. If a required field isn’t filled in, you’ll see a warning explaining why QuickBooks needs the information (like the one to the right of the Zip Code box here).
TIP
You can also create new employees or edit existing employee records in the Employee Center (choose Employees→Employee Center). In the Employee Center window, the Employees Tab lists your employees. You can add or edit employees using the same techniques you use to add and edit customers (Creating Customers in QuickBooks). As in other centers, when you select an employee in the Employees tab, you can see transactions and info related to that employee on the Transactions, To Do’s, Notes, and Sent Email tabs.
Here’s how to fill out employee information in the Payroll Setup interview:
§ Contact information. The interview’s name and address screen collects the person’s contact information. (You should have all this info on the employee’s W-2 form.) This screen also includes the “Employee status” drop-down list, where you choose Active or Inactive depending on whether the person is working for you at the moment. If you want to add additional contact info, in the Employee Center, right-click an employee’s name and then choose Edit on the shortcut menu to display the Edit Employee dialog box, where you can enter that info.
§ Hiring information. When you click the Next button on the “Enter employee’s name and address” screen, this screen lets you fill in the basics about the person’s employment: whether he’s an officer, owner, or regular Joe; Social Security number; and hire date. You can also enter a release date, which is a diplomatic name for the last date the person worked for you.
NOTE
Corporations have to keep track of officer compensation separate from employee compensation, which you do by choosing Officer in the “Employee type” drop-down list. In addition, you’ll need two separate expense accounts for compensation, such as Salaries & Wages for your employees and Officer Salaries for the officers.
§ How you plan to pay the employee. This screen is where you specify the employee’s compensation and payroll frequency. In the “How often?” drop-down list, choose the frequency that you pay the person, such as “Every other week (Biweekly)” or Monthly. The interview automatically displays the default Payroll items for new employees. Turn on the checkboxes for the items that apply to this person. For example, if you choose the Salary option, then choose the pay period in the Per drop-down list and enter the amount you pay for that period in the “Salary amount” box. (The box below explains how to tell QuickBooks to use employee timesheets to calculate paychecks.)
GEM IN THE ROUGH: BUILDING PAYCHECKS FROM TIME WORKED
If you pay your employees by the hour and use one of QuickBooks’ payroll services to generate employee payroll checks, time tracking can automate your payroll process a bit.
When you link your employees to their QuickBooks timesheets, the program takes care of calculating how much they’ve earned. Here’s how to link employees and timesheets to take advantage of this feature:
1. On the Home page, click the Employees button to open the Employee Center (or choose Employees→Employee Center).
2. On the Employees tab, double-click an employee whom you pay by the hour (or click the employee’s name and then press Ctrl+E).
3. When the Edit Employee dialog box opens, click the Payroll Info tab.
4. Below the Earnings table, turn on the “Use time data to create paychecks” checkbox, and then click OK to save the record.
Employees can still track time without this checkbox turned on, which is ideal if you don’t need a connection between the hours worked and the employee’s paycheck. For example, leave the checkbox off if you bill customers for employee time but pay those employees a straight salary.
§ Additional items. On this screen, you specify the employee’s benefit deductions, like 401(k) and health insurance. Besides turning benefits on or off, you can specify the deduction as a dollar amount or percentage. For example, if the person wants to contribute 15 percent of her pay to her 401(k), you can type 15% in the Amount box. Fill in the Annual Limit box for 401(k) with the current annual limit set by the government (you can find this number on the IRS website, www.irs.gov). For other benefits that have limits, type them in, too.
§ Sick time. The sick time screen includes fields for specifying your sick-time policies: how much the employee earns and when, maximum amounts, and current balances.
§ Vacation time. This screen is almost identical to the sick time screen, except that it specifies the employee’s vacation earnings.
§ Direct deposit. If you offer direct deposit, you can turn it on for an employee here and specify whether the deposit goes to only one bank account or to two (checking and savings, for example). The box on Setting Up Direct Deposit tells you how to set up direct deposit.
§ State tax. This screen has two drop-down lists for telling QuickBooks where the employee lives and works. The choices you make determine the state tax and unemployment tax that the person pays. After you choose from this screen’s two drop-down lists, your next stop is the Federal tax screen described in the next bullet point. However, after you fill in the settings on that screen, you’ll see another state tax-related screen where you fill in the details about the state taxes for the state you chose on this screen.
§ Federal tax. On this screen, you tell the interview about the employee’s filing status, his number of allowances, extra withholdings, and whether he is subject to deductions like Social Security and Medicare.
At long last, you’ll see the Finish button in the bottom-right corner of the Employee dialog box. Click it to complete the setup. If you missed any info, an exclamation mark in a yellow triangle appears to the left of the employee’s name. An X in a red circle appears if there’s a serious problem with something you entered. (The Summary column tells you what’s missing.) Click Edit, and then fill in the missing information.
You can then add more employees. Or, to move on to tax settings, in the Payroll Setup interview’s navigation bar, click Taxes and then fill out the fields as described in the next section.
Setting Up Payroll Taxes
The next big step in setting up payroll is to tell QuickBooks your company’s tax information: your tax ID numbers, the tax agencies you pay, and any local payroll taxes. In the Payroll Setup interview’s navigation bar, click Taxes to see an overview of what you can expect. Then, also in the navigation bar, click “941/944 Form” to get down to work. On the “Tell us which federal tax form you file” screen, you can tell QuickBooks that you file Form 941 (the most commonly-used federal form), Form 944, or neither. Then, in the interview’s navigation bar, click “Federal taxes.” The Federal tax screen lists the federal taxes for which you’re responsible, so click Continue at the dialog box’s bottom right to jump to state taxes.
UP TO SPEED: SETTING UP DIRECT DEPOSIT
Direct deposit makes everyone’s life a little easier: You don’t have to worry about guarding cashable checks until you deliver them to your employees, and your employees don’t have to make a trip to the bank to deposit their earnings. The money gets transferred directly from your payroll account to the accounts that employees specify, such as checking and savings accounts.
Direct deposit is an add-on service that you can sign up for no matter which Intuit payroll service you choose. Once you complete the signup for your Intuit payroll service, you’re ready to sign up for direct deposit. To do that, choose Employees→My Payroll Service→Activate Direct Deposit.
You have to tell QuickBooks which bank and account gets the directly deposited money for each employee. To make direct deposit work, you need the nine-digit routing number for the employee’s bank and the employee’s account number(s) at that bank. Voided checks from employees are a great way to verify the routing and account numbers (and verify their accounts). When you split direct deposits between two accounts, the money that goes to each has to add up to the total amount of the paycheck. (Once your direct-deposit service is activated, QuickBooks removes the “Activate Direct Deposit” entry from the Employees menu.)
If you use a payroll service other than QuickBooks’, don’t sign up for QuickBooks’ direct deposit service. You have to set up direct deposit with your third-party payroll service instead.
NOTE
You specify your federal tax ID number (EIN) in the Company Information dialog box: Choose Company→My Company, and then click the Edit icon (it looks like a pencil) at the dialog box’s top right.
To add state taxes, in the navigation bar, click “State taxes.” Then, below the list of state taxes, click Add New. When you choose a state, the interview adds the typical taxes for that state, like income tax, unemployment tax, and so on. QuickBooks fills in tax rates that are standard for all companies. Because the unemployment tax rate depends on your payroll, in the Company Rate box, enter your rate. (You have to wait until after January 1 to enter tax rates for the next year.) Select a tax and then click Edit to change how the tax’s name appears on paychecks or to make it inactive (if you no longer employ people in a particular state, for instance).
TIP
If you use an Intuit payroll service, you can set up a schedule for your payroll tax payments. In the Payroll Setup interview’s navigation bar, click “Schedule payments.” Then, in the Schedule Payments dialog box, tell QuickBooks whom to pay and when. (In the “Payment (deposit) frequency” drop-down list, the typical frequency for that tax has the words “usual frequency” appended to its name.) If you have questions about which frequency you should use, call the IRS, your state, or your accountant. After you assign frequencies to payments, QuickBooks keeps track of what you owe to each tax agency and reminds you when it’s time to pay your taxes.
Entering Historical Payroll
It’s essential to enter all the payrolls you’ve processed since the beginning of the year. That’s the only way to produce W-2s at the end of the year with the correct totals for the whole year. In addition, entering previous payroll data means that the payroll calculations take into account deduction limits. For example, for 2013, Social Security taxes apply to only the first $113,700 of income; income that an employee earns beyond that is free of Social Security tax.
TIP
If it’s nearing the end of the year, the easiest route is to wait until January 1 to switch to Intuit payroll.
You have two ways of getting this year’s historical payroll information into your company file:
§ Run previous payrolls one by one. Using the payroll data from your previous payroll service, enter the info for each payroll you’ve run into QuickBooks as described on Running Payroll. The only difference between entering a historical payroll run and a current one is that you select the “Assign check numbers to handwritten checks” option in the Review and Create Paychecks dialog box (see Figure 15-9). This approach has an added bonus: You can take practice runs through the payroll process and verify the values against existing payroll reports from your other system. If you take this dummy-payroll approach, fill in the check numbers from those past payrolls.
§ Use the Payroll Setup interview to add amounts for the payrolls you ran without Intuits’ payroll services. Of course, you have to complete the interview setup steps described on the previous pages. In the QuickBooks Payroll Setup dialog box, when you see checkmarks in front of steps 1 (Introduction) through 4 (Taxes), you’re ready to enter the year-to-date amounts.
Gather your manual payroll records for the year so far and then, in the interview’s navigation bar, click Year-to-date Payrolls. (You won’t see this step if you told QuickBooks that you haven’t issued paychecks before [Setting Up Payroll in QuickBooks].) Then, in the “Enter Paychecks by Employee” window (see Figure 15-6), select an employee and fill in the values from her paychecks. (You can fill in individual paychecks or summaries. In the Pay Period Start and Pay Period End cells, simply choose the start and end date of the payroll period or summary period.) To view a report that summarizes your historical payroll, click the View Reports button below the table. Then compare the values in that report with the ones from your previous payroll service.
Fine-Tuning Payroll Items
When you use the Payroll Setup interview, behind the scenes, QuickBooks creates Payroll items, which are similar to the service and product items you add to invoices, except that they represent the things you need to produce payroll checks for, like compensation, benefits, taxes, and so on. All the data you see on paychecks and payroll reports comes from Payroll items. The Enter Payroll Information window (Employees→Pay Employees) and other payroll features use only Payroll items. On the other hand, in the Write Checks window’s Items tab, the Item drop-down list includes every type of item except Payroll items. To see the Payroll items that the program created during setup, choose Lists→Payroll Item List. This section steps you through adding and editing Payroll items and additional accounts for payroll.
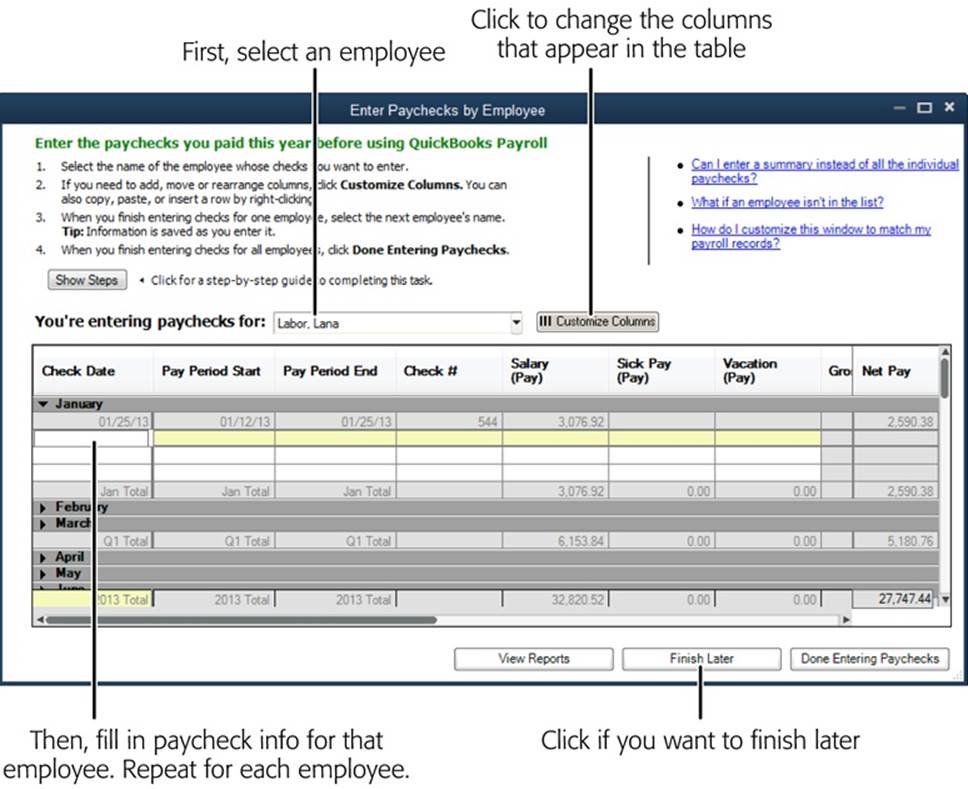
Figure 15-6. First, select the employee whose payroll you want to enter. Then, fill in the table with values from that employee’s paychecks. To shorten your data entry task, you can fill in summaries instead. In that case, fill in the Pay Period Start and Pay Period End cells with the start and end dates of the summary period, such as 1/1/14 and 1/31/14, respectively. If the table includes columns you don’t need or omits ones you do need, click Customize Columns to choose the fields you want to see.
Tracking Payroll in More Detail
When you use Payroll items to run payroll, QuickBooks creates a few accounts to track that info: Payroll Expense for expenses like salary and wages, and Payroll Liabilities for the payroll taxes you owe and company contributions you need to send in. When you run payroll, QuickBooks posts expenses to the Payroll Expense account and posts money you owe to the Payroll Liabilities account. Although your records are correct, your accounts don’t show you how much you paid for each type of expense or liability; to see that info, you have to run a payroll report. If you want to see more payroll details on your financial statements, you can set up additional accounts to track that detail.
TIP
Breaking down payroll into finer detail also makes it easier to find the culprit if you spot an error in payroll. Instead of looking through all your payroll expenses, you can focus on the one account whose total is off.
First, you need to decide which accounts you want to see on your financial statements. For example, you may want to see Payroll Taxes, Wages, Salaries, and Officers Salaries on your Project & Loss report (Generating Financial Reports). On the Balance Sheet (The Balance Sheet), you may want to add subaccounts to the Payroll Liabilities account for federal tax withholding, state tax withholding, Social Security, Medicare, Federal Unemployment, and State Unemployment. (Expenses appear on Profit & Loss reports, while liabilities show up on Balance Sheet reports.) Table 15-1 shows one way to break down accounts. You can create these accounts in the Chart of Accounts window or in the “Add payroll item” or “Edit payroll item” dialog boxes (choose Lists→Payroll Item List, and then press Ctrl+N or Ctrl+E, respectively) by choosing <Add New> in the corresponding Account drop-down list.
Table 15-1. Additional accounts you can create to track payroll info in more detail
|
PAYROLL ITEMS |
ACCOUNT |
WHEN IT’S USED |
|
Hourly, Salary, Commissions, Bonuses, Tips |
Salary and Wages expense account |
Running payroll |
|
Officers Salary |
Officers’ Salaries expense account |
Running payroll |
|
Federal Withholding Tax |
Employee Withholding liability account |
Running payroll |
|
Social Security Employee (employee paid) |
Employee Withholding liability account |
Running payroll |
|
Social Security Employee (company paid) |
Payroll Taxes Payable liability account |
Running payroll |
|
Social Security Employee |
Payroll Taxes expense account |
Remitting payroll taxes |
|
Medicare Employee (employee paid) |
Employee Withholding liability account |
Running payroll |
|
Medicare Employee (company paid) |
Payroll Taxes Payable liability account |
Running payroll |
|
Medicare Employee |
Payroll Taxes expense account |
Remitting payroll taxes |
|
Federal Unemployment, State Unemployment |
Payroll Taxes Payable liability account |
Running payroll |
|
Federal Unemployment, State Unemployment |
Payroll Taxes expense account |
Remitting payroll taxes |
|
Union Dues, Simple IRA, 401(K), HSA, Child Support, Wages Garnishments |
Employee Deductions liability account |
Running payroll |
|
Employer 401(K) match, Simple IRA match, HSA Contribution |
Employee Benefits Payable liability account |
Running payroll |
|
Employer 401(K) match, Simple IRA match, HSA Contribution |
Employee Benefits expense account |
Remitting employee benefits |
Adding and Editing Payroll Items
Say you’re offering a Simple IRA to your employees and you need a new Payroll item. Here are the steps for adding a new Payroll item:
1. Choose Lists→Payroll Item List. In the Payroll Item List window, click Payroll Item→New.
The “Add new payroll item” dialog box opens. QuickBooks automatically selects the EZ Setup option, which is usually what you want, so click Next.
2. On the “Payroll item type” screen, select the type of Payroll item you need, and then click Next.
Payroll items fall into seven categories: Compensation, Insurance Benefits, Retirement Benefits, Paid Time Off, Other Additions, Other Deductions, and Custom Setup.
When you click Next, the Add New dialog box (which is an abbreviated version of the Payroll Setup interview) opens.
3. Fill in the settings.
When you select a setting, the Finish button’s label changes to Next. Click it to step through the screens to fill in the info QuickBooks needs to know about the item, such as the vendor and account number for a 401(k) plan, the Tax Tracking type (which specifies whether the item shows up on your payroll tax returns and employee W-2s), and the taxes that the item affects. For example, if you select an expense item, QuickBooks asks for the expense account you want to use. For a Company Contribution Payroll item, QuickBooks needs to know which liability and expense accounts to use.
4. When you’re done, click Finish.
The Add New dialog box closes, and the new Payroll item appears in the Payroll Item List window. To make sure that your new item appears correctly on your financial statements, run a Profit & Loss report and a Balance Sheet report (Generating Financial Reports). And run a test payroll (Running Payroll) to see if the item shows up in the Enter Payroll Information window.
Running Payroll
Once your payroll setup is complete, generating payroll checks each pay period takes only a few minutes. This section explains the steps for running a payroll, from selecting which employees to pay to printing the checks.
NOTE
When you use direct-deposit services, you have to run payroll at least two banking days before the actual pay date so the service can process the payroll and transfer money into your employees’ accounts. The transmission date may change due to bank holidays, so be sure to check payroll messages from the bank to see if you need to transmit payroll data earlier than usual. If you pay employees by the hour, this processing period creates a lag in employees’ pay. For example, if you pay employees for the hours they work between the 1st and the 15th of the month, direct deposits wouldn’t appear in their accounts until the 17th at the earliest.
Here’s how to run a payroll:
1. Choose Employees→Employee Center, and then click the Payroll tab on the center’s left. (Or, on the Home page, click the Pay Employees icon.)
The right side of the center displays three tabs corresponding to the three main payroll tasks: Pay Employees, Pay Liabilities, and File Forms (see Figure 15-7).
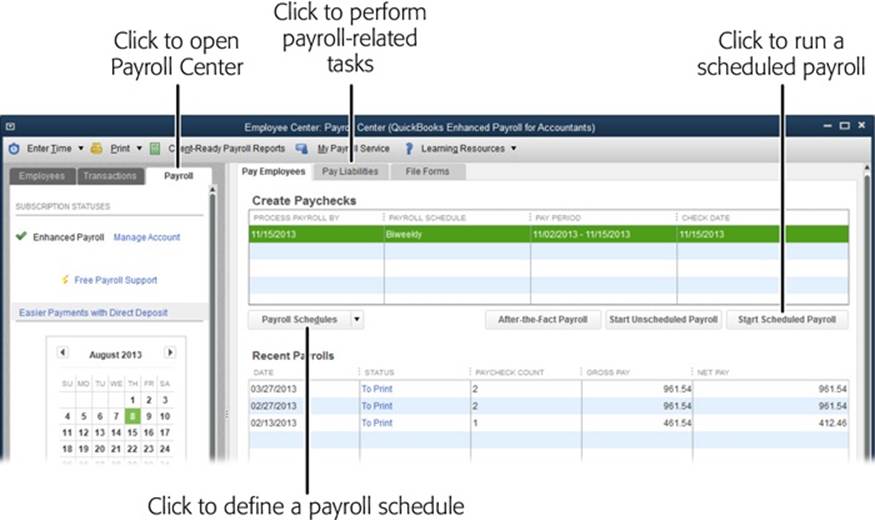
Figure 15-7. Payroll schedules make it easy to select the employees you want to pay, especially when you pay them on different schedules. To set up a payroll schedule, below the Create Paychecks table, click the down arrow on the Pay Schedules button, and then choose New.
2. If you’ve set up a payroll schedule, on the Pay Employees tab, select the scheduled payroll you want in the Create Paychecks table, and then click the Start Scheduled Payroll button (Figure 15-7). If you haven’t set up payroll schedules, click the Unscheduled Payroll button instead.
Payroll schedules come in handy if you pay employees on different schedules—for example, weekly for hourly employees and biweekly for salaried employees. When you run a scheduled payroll, QuickBooks automatically selects the employees who are paid on that schedule.
To set up a payroll schedule, on the Pay Employees tab, click the down arrow on the Pay Schedules button, and then choose New. Name the schedule and set its frequency, pay period end date, and the date that should appear on paychecks for that period. Click OK to save the schedule.
3. In the Enter Payroll Information window that opens, if the Pay Period isn’t correct, choose the dates you want. If the Check Date isn’t correct, type the right one. If you want to select different employees to pay, turn the checkmarks in the first column on or off (Figure 15-8).
Each time you run payroll, QuickBooks changes the date to the next payroll date based on the payroll frequency you set in Employee Defaults (Setting Employee Defaults).
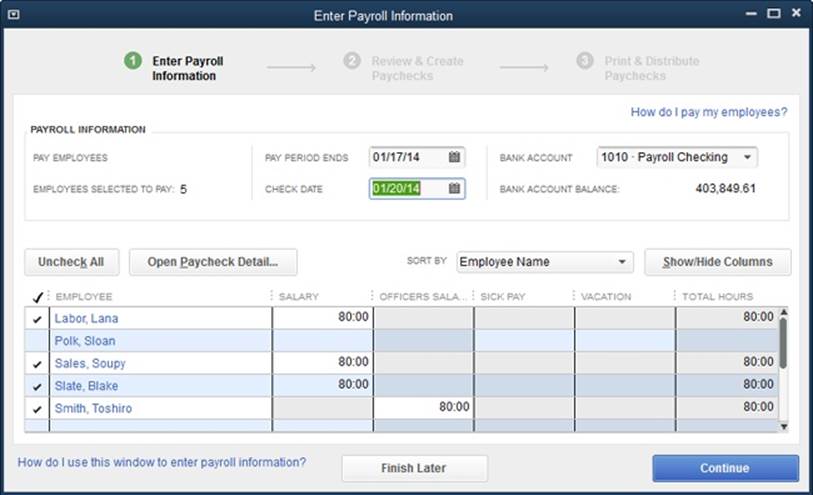
Figure 15-8. Employees who are set to inactive status in the Employees List don’t show up in this dialog box’s table. Neither do employees whose release dates (page 408) are prior to the date in the Pay Period Ends box.
NOTE
If you’ve set up payroll schedules, you can assign a schedule to each employee to tell your payroll service when that person should be paid. To do that, in the Employee Center, click the Employees tab. Double-click an employee’s name to open the Edit Employee dialog box. Click the Payroll Info tab and then, in the Payroll Schedule drop-down list, choose a schedule. If no schedules exist, choose <Add New> and then set up the schedule. If most of your employees are paid on the same schedule, set that schedule in Employee Defaults (Setting Employee Defaults).
4. If you want to see what the payroll service calculated for each employee’s paycheck, click the employee’s name in the Employee column.
The Preview Paycheck dialog box (a real monster, as Figure 15-9 shows) starts with the first selected employee’s earnings and Payroll items. You can change the values in white cells; gray cells like the ones for year-to-date values aren’t editable. If you need to add a one-time item like a mileage reimbursement, click a blank Item Name cell in the appropriate table, and then choose the item from the drop-down list. If any items are written in red, they’re late or past due.
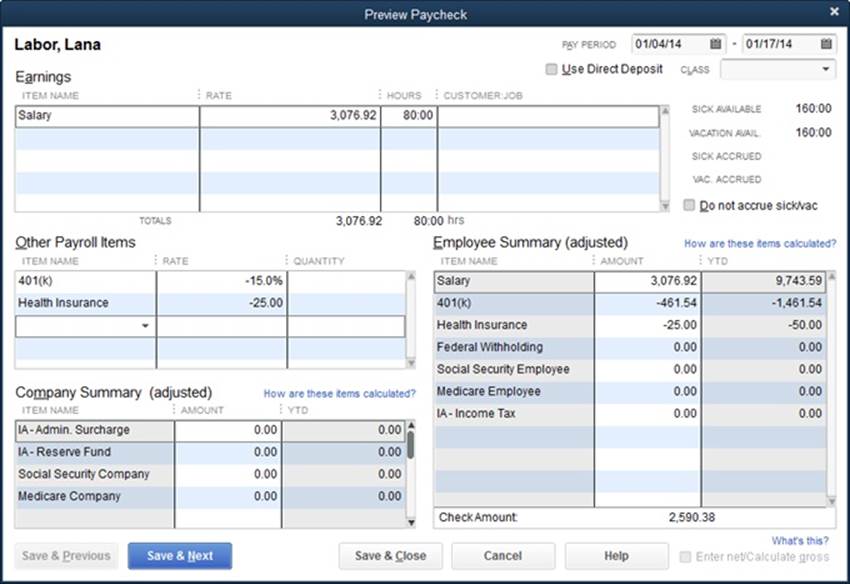
Figure 15-9. In this dialog box, the Earnings section shows the gross amount of the employee’s paycheck. For salaried employees, QuickBooks prorates the salary to the length of the pay period. In the Other Payroll Items and Company Summary sections, the program uses the tax tables and your Payroll items to calculate deductions or additions. Below the Class box is a list of available sick and vacation time. The Employee Summary section shows the entries you typically see on a pay stub.
5. Click Save & Next to view the next paycheck.
Or click Save & Close to return to the Enter Payroll Information window without reviewing other employees’ records.
6. Back in the Enter Payroll Information window, click Continue to move on to creating paychecks.
The “Review and Create Paychecks” window shown in Figure 15-10 opens. The employee table shows the values for each employee’s paycheck and the total for each category. If you see any numbers that don’t look right, click the Open Paycheck Detail button and repeat steps 4 and 5 to correct the values.
7. When everything looks good, in the “Review and Create Paychecks” window, click Create Paychecks.
QuickBooks creates the records for the paychecks, but you still have some printing to do, as the next section explains. The box on Deleting Duplicate Paychecks explains what you need to do if you create a duplicate set of paychecks by mistake.
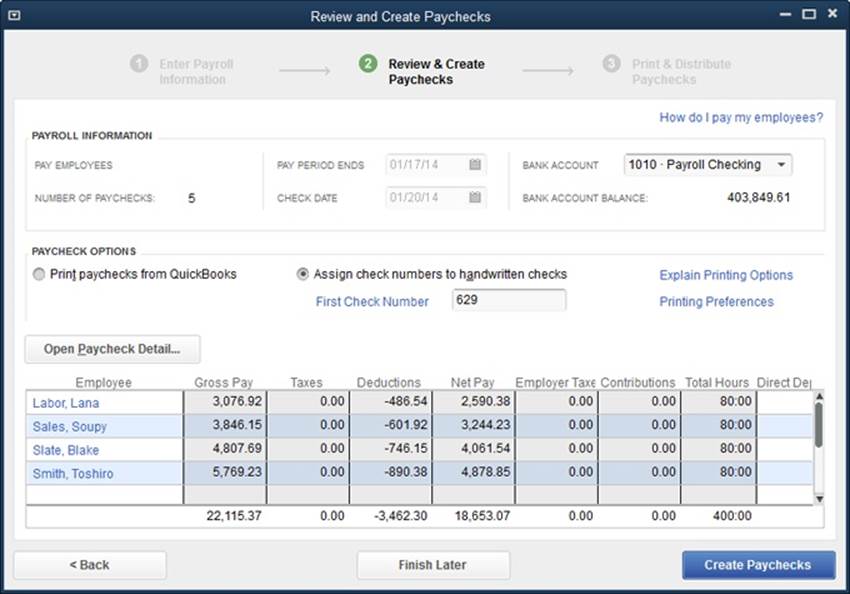
Figure 15-10. If you’re filling in payrolls you ran before using Intuits’ payroll services or you hand-write payroll checks, select the “Assign check numbers to handwritten checks” option, as shown here. Then, in the First Check Number box, type the starting check number for that payroll run. For current payroll runs, select the option for how you produce paychecks. For employees who have their paychecks deposited directly (page 410), click the employee’s Direct Dep. cell (in the rightmost column) to turn on its checkmark. If you print paychecks, select the “Print paychecks from QuickBooks” option instead.
TROUBLESHOOTING MOMENT: DELETING DUPLICATE PAYCHECKS
If you get called away to handle a crisis before you print paychecks, you might forget where you were and accidentally create a second batch of paychecks for the same pay period. When you return to printing paychecks, you’ll see the duplicates in the “Select Paychecks to Print” dialog box. What you won’t see is a way to delete those paychecks.
Getting rid of duplicate paychecks is one of the more obscure procedures in QuickBooks. Here’s what you do:
1. Choose Reports→Employees & Payroll→“Payroll Transactions by Payee” to run a report of paychecks for every employee.
2. In the report window, double-click a duplicate paycheck transaction to open the Paycheck window.
3. Press Ctrl+D (or right-click within the window and choose Delete Paycheck from the shortcut menu that appears) to delete that paycheck.
4. In the confirmation box that appears, click OK.
You have to repeat this process for each duplicate paycheck. The upside: After all that drudgery, you probably won’t make the mistake of duplicating paychecks ever again.
Printing Paychecks and Pay Stubs
If your employees want paper checks that they can deposit at the bank, you can print the paychecks you just created (which usually come with pay stubs that employees can keep for their records). But if your employees use direct deposit (Entering Historical Payroll) so the money goes straight into their bank accounts, you don’t have to print paychecks. In fact, you shouldn’t or you’ll end up with two QuickBooks transactions deducting money from your payroll account. Still, your employees likely want a record of their pay for the period, so you can print pay stubs instead.
NOTE
If you’ve signed up for QuickBooks’ direct-deposit service, you still have to create paychecks; you just don’t print them. After you create the direct-deposit paychecks, you process them in the “Confirmation and Next Steps” dialog box described in Figure 15-11.
Printing paychecks and pay stubs is almost identical to printing expense checks (Setting Up QuickBooks to Print Checks). Here’s the process:
1. If you print paychecks, load the printer with checks for the account you use for payroll, whether it’s your regular checking account or a separate one.
If you clicked Create Paychecks in the “Review and Create Paychecks” window, you see the “Confirmation and Next Steps” dialog box, which tells you how many paychecks are waiting to be printed and how many are going to be deposited directly, as shown in Figure 15-11.
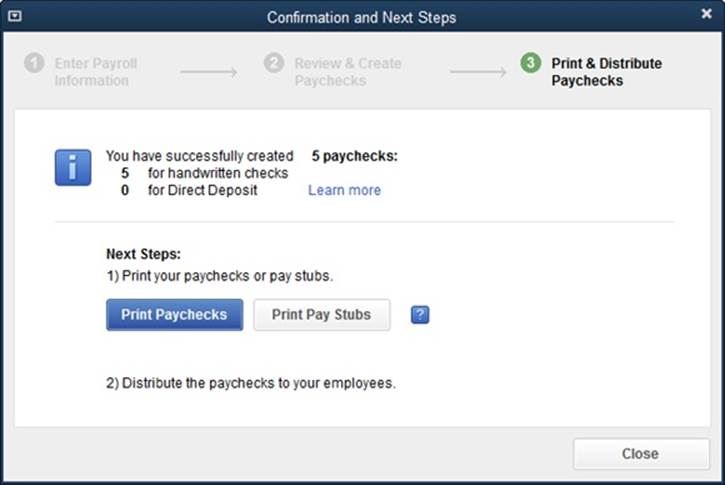
Figure 15-11. Just above the Next Steps section is a status message that tells you how many paychecks you’re printing and direct depositing. If you click the Print Paychecks button, the “Select Paychecks to Print” dialog box opens. Clicking the Print Pay Stubs button opens the “Select Pay Stubs to Print” dialog box instead.
2. To print paychecks, simply click the Print Paychecks button.
Paycheck forms typically come with detachable pay stubs, so printing paychecks in QuickBooks represents printing paychecks and pay stubs. If you want to print pay stubs for direct deposits, click the Print Pay Stubs button instead. (A pay stub is like a report of the employees’ payroll data that you can distribute.)
NOTE
If you forgot to load the printer with checks, click Close. You can print the checks or stubs later by choosing File→Print Forms→Paychecks or File→Print Forms→Pay Stubs.
3. In the “Select Paychecks to Print” (or “Select Pay Stubs to Print”) dialog box, QuickBooks selects all the unprinted checks (or pay stubs). Make sure that you’re using the correct bank account and check number.
If the account in the Bank Account box is wrong, choose the account you use for payroll from the drop-down list. In the First Check Number box, type the number on the first check in the printer.
The “Select Paychecks to Print” (or “Select Pay Stubs to Print”) dialog box automatically displays all paychecks (or pay stubs) waiting to print, both direct deposit and paper. If you process paychecks and direct deposit paychecks in different ways, choose one of the Show options (Paychecks or Direct Deposit) to list only one type at a time.
4. If you want to customize what appears on the paychecks, click Preferences.
In the Payroll Printing Preferences dialog box, you can specify whether to print used and available vacation and sick time and—if you’re security conscious—whether to omit all but the last four digits of employees’ Social Security and bank account numbers. Click OK to return to the “Select Paychecks to Print” (or “Select Pay Stubs to Print”) dialog box.
5. When you’re ready to print the paychecks or pay stubs, in the “Select Paychecks to Print” (or “Select Pay Stubs to Print”) dialog box, click OK.
The Print Checks (or Print Pay Stubs) dialog box opens with the same options you see when you print expense checks (Setting Up QuickBooks to Print Checks). You can choose the style of check to use and how many checks are on the first sheet in the printer. Click Print to begin printing.
6. After QuickBooks prints the paychecks, it opens the “Print Checks – Confirmation” dialog box. If a problem occurred, click the Reprint cell for each check that didn’t print properly, and then click OK to reprint those checks.
After the checks or stubs are printed, click Close and distribute the checks and pay stubs to your employees. If an employee loses a paycheck and wants you to print a new one, the box on Reissuing a Lost Paycheck explains what to do.
TROUBLESHOOTING MOMENT: REISSUING A LOST PAYCHECK
If an employee’s paycheck gets lost, that employee is bound to want a new one. Because payroll checks affect tax returns and payroll liabilities, reissuing a paycheck while keeping payroll info straight requires a few steps. You need to keep your payroll expenses and payroll liabilities intact and eliminate the duplicate net pay from the original, lost paycheck. Here’s what you do:
1. First, verify that the paycheck hasn’t cleared at your bank. If it hasn’t, request a stop payment on the check.
2. Open the register for your payroll checking account (in the Chart of Accounts window, double-click the account’s name) and find the lost paycheck. Jot down the original check number.
3. Double-click the paycheck to open the Paycheck window.
4. In the window’s Main tab, click Print→Print Paycheck. In the Printed Check Number box, type a new check number (the next one in the sequence for your payroll checks), and then click OK. You’ve now reissued the paycheck with a new check number, which moves the payroll taxes and liabilities to this check. But you still have to void the original, lost check.
5. Press Ctrl+W to open the Write Checks window.
6. Make out the new check to the employee, but use the original check number for the lost check and type the net pay amount from the lost check in the amount field. In the account cell, choose Payroll Expenses. This check represents only what you paid to the employee.
7. Click Save & Close.
8. Void the check you just created: Select the check in the payroll checking account’s register, and then choose Edit→Void Check. Voilà! This step removes the amount you paid the employee and the payroll taxes and liabilities from the original paycheck.
If you want to charge the employee for the stop-payment fee, you can add a payroll deduction to the paycheck to reduce the employee’s net pay. If the lost check was the bank’s fault, it’ll reimburse the employee for those fees.
Paying Payroll Liabilities
In addition to paying your employees, you also have to remit payroll taxes and withholdings to a number of government agencies. This book can’t tell you exactly which payroll taxes you have to pay and when you need to pay them, because it depends on where you are and the size of your payroll. The federal government has requirements; each state has its own rules and schedules; and, in some areas, local governments tack on their own payroll taxes as well.
NOTE
Intuit Payroll services provide tables for federal and state payroll taxes. You have to calculate local taxes yourself.
Because the penalties for late payroll liability payments are meant to hurt, you don’t want to miss a payment due date. You can see the payments coming up in the Payroll Center: Choose Employees→Employee Center, click the Payroll tab, and then click the Pay Liabilities tab on the window’s right. Scan the Status column for payments that are upcoming. Alternatively, the Payroll Liability Balances report (choose Reports→Employees & Payroll→Payroll Liability Balances) shows how much you owe for each type of payroll tax for the current quarter. And the Employee State Taxes Detail report (Reports→Employees & Payroll→Employee State Taxes Detail) includes the information you need to fill in state tax forms.
Government agencies send you letters telling you what your tax rates are and what payment schedule you have to follow. When you set up payroll in QuickBooks (Setting Up Payroll in QuickBooks), you enter these details. The tax tables that QuickBooks’ payroll services use update tax rates to reflect what agencies are demanding at the moment. Because the specifics of remitting payroll taxes vary from company to company, you need to follow the instructions you receive from the tax agencies, your bank, and your accountant.
NOTE
It’s essential that you choose Employees→Payroll Taxes and Liabilities→Pay Scheduled Liabilities (or the corresponding entry in the Payroll Center, as described in step 1 below) to remit payroll taxes and other payroll liabilities. The box on QuickBooks Doesn’t Recognize a Tax Payment explains why.
When it’s time to remit payroll taxes, here’s how you generate the payment checks:
1. In the Employee Center, click the Payroll tab, and then click the Pay Liabilities tab on the window’s right.
You’ll see the Pay Taxes & Other Liabilities table, where you can select the taxes and other liabilities you need to pay (see step 2).
2. In the Pay Taxes & Other Liabilities table, click the checkmark cells in the first column for the taxes and liabilities you need to pay. Then, at the bottom right of the Pay Taxes & Other Liabilities table, click View/Pay.
QuickBooks opens the Select Date Range For Liabilities dialog box, where you specify the starting and ending dates for the payment period for a payroll tax. For example, the federal government determines payment frequency by the amount that you withhold from your employees’ paychecks (the most common frequency is monthly).
NOTE
If your deposit frequency changes—perhaps because you’ve hired a gaggle of new employees—you’ll receive a letter from the IRS with your new deposit frequency.
3. In the Dates drop-down list, choose the period for which you’re paying payroll liabilities, such as Last Calendar Quarter or Last Month.
The Dates drop-down list includes the most typical date ranges you’ll need. However, if you have a special date range to cover, in the From and To boxes, choose the starting and ending dates.
4. Click OK.
The Pay Liabilities dialog box (Figure 15-12) opens, listing all the payroll liabilities you have to remit and the agencies or organizations to whom you send the payments. Turn on the “To be printed” checkbox to add these checks to the queue of checks waiting to be printed. If you plan to write the checks by hand, leave this checkbox turned off.
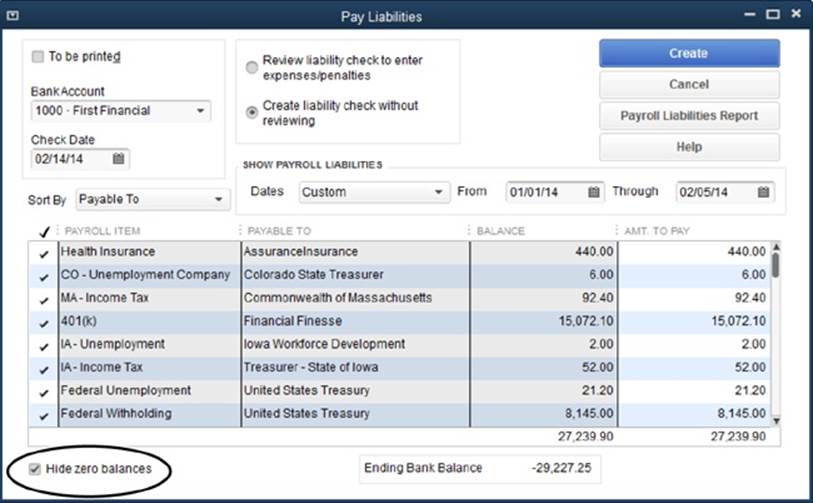
Figure 15-12. To keep this list as concise as possible, turn on the “Hide zero balances” checkbox (circled) to make QuickBooks display only the liabilities that have balances. But a payroll liability with a balance doesn’t mean a payment is due, so select only the Payroll items that require a payment now. (When you click one of the Medicare or Social Security Payroll items, QuickBooks automatically selects the other, because both are due at the same time.)
TIP
If you aren’t changing the values on the checks, select the “Create liability check without reviewing” option. If you select the “Review liability check to enter expenses/penalties” option instead, you can make changes to the checks before you print them.
5. If necessary, in the Bank Account box, choose the account you use for payroll.
QuickBooks fills in the account you specified in your payroll preferences (Payroll & Employees).
6. In the Check Date box, choose the date you want printed on the checks.
Make sure that this date meets the payment schedule requirements for the tax agency you’re paying.
7. Choose the payroll liabilities that you want to pay with one check by clicking the cell in the checkmark column for each Payroll item.
The government isn’t known for picking up on small details, such as two different payroll liabilities on the same check—unless the IRS is on an audit kick. So it’s a good idea to create separate checks for each payroll liability to the same agency. To separate payments to the same vendor, select one payroll liability for a vendor on your first pass. Then, after you’ve created one batch of payroll liability checks, open the Pay Liabilities window again and select another payment for the same vendor.
8. When you’ve chosen the items you want to pay, click Create at the window’s top right.
The window closes and QuickBooks creates checks for those payroll liabilities. If you turned on the “To be printed” checkbox, QuickBooks adds the checks to the queue of checks to be printed. If this checkbox is turned off, the program records the transactions in your company file, but you have to write the checks by hand.
9. To print the checks, choose File→Print Forms→Checks.
The “Select Checks to Print” dialog box opens.
10.In the Bank Account drop-down list, choose the account you use for payroll.
If necessary, in the First Check Number box, type the first check number in your printer. QuickBooks automatically selects all the checks in the queue. If you want to prevent a check from printing in this run, turn off its checkbox.
11.Click OK to open the Print Checks dialog box.
The options for payroll liability checks are the same as for paychecks and expense checks (Printing Paychecks and Pay Stubs).
NOTE
If you use Basic Payroll, you have to log into the EFTPS system (Getting Started with QuickBooks Payroll) and submit the tax payment yourself. Double-check that you enter the correct amount and the correct tax period. If you use Enhanced Payroll, you can submit your payments using EFTPS from within QuickBooks. (In the Employee Center, click the Payroll tab on the window’s left, and then click the File Forms tab. At the bottom right of the File Forms table, click File Form. Complete the tax-form interview, and then click Submit. In the Submit Form window, click E-File to send the form electronically.) If you use Assisted Payroll, the payroll service automatically makes your federal and state payroll tax liability payments, but you still have to send the payroll data to the service so it knows how much to send to the appropriate tax agencies.
Preparing Payroll Tax Forms
Tax agencies require that you regularly submit forms documenting the payroll taxes and withholdings you’re supposed to remit and how much you’ve already sent in. If you use Basic Payroll (Intuit Payroll Services) or a non-QuickBooks service, you can’t produce payroll tax forms in QuickBooks. However, some Intuit payroll services let you print or eFile payroll tax forms and W-2s. If you subscribe to Enhanced Payroll, for example, you can generate federal and state tax forms. Although the forms that QuickBooks produces aren’t exact replicas of the preprinted forms you might receive from the government, they’re close enough that you can send them in without fear of rejection.
TROUBLESHOOTING MOMENT: QUICKBOOKS DOESN’T RECOGNIZE A TAX PAYMENT
When you choose Employees→Payroll Taxes and Liabilities→Pay Payroll Liabilities, QuickBooks uses Payroll items to fill in the payroll liability checks it creates. That way, those liability checks move the money from your payroll liability accounts to the appropriate payroll expense accounts so QuickBooks no longer thinks you owe taxes or need to pay off other liabilities.
However, suppose you use the Write Checks or Pay Bills feature to pay payroll liabilities. Big mistake. Why? Because when you do that, QuickBooks won’t deduct those payments from the payroll taxes and liabilities you owe, so the payroll tax form you create (described in the next section) will still show that you owe taxes and other liabilities. Because a check you write in the Write Checks or Pay Bills windows doesn’t use Payroll items, QuickBooks won’t know that you made a payroll tax payment.
So if you do use the Write Checks or Pay Bills feature to pay payroll liabilities, you can correct that mistake by choosing Employees→Payroll Taxes and Liabilities→Adjust Payroll Liabilities. Fill in the Payroll items you want to adjust in the Item Name column, and type the adjustment amounts in the Amount column. Then click OK, and QuickBooks adjusts your payroll liability account balances to reflect your payroll tax payments.
Regardless of which tax form you want to generate, the steps are basically the same:
1. Choose Employees→Payroll Tax Forms & W-2s→Process Payroll Forms. Or, in the Employee Center, click the Payroll tab, and then click the File Forms tab. At the bottom right of the File Forms table on the window’s right, click the Process Payroll Forms button.
Either way, QuickBooks opens the Select Form Type dialog box.
2. Choose the “Federal form” or “State form” option, and then click OK. (If you select the “State form” option, select the state before you click OK.)
QuickBooks displays the Select Payroll Form dialog box, which lists the federal and state forms that the program can generate. Depending on the form you choose, you may have to specify the filing period.
How you specify the filing period varies by form. If you choose the Quarterly Form 941, for example, in the Quarter drop-down list, choose the quarter for which you want to generate a report. QuickBooks changes the date in the Quarter Ending box to match the quarter you choose. (Form 940 requires only the filing year, and W-2s don’t need anything.)
3. To export your payroll data to the form and display the filled-in form, click OK.
The form appears in the Payroll Tax Form window. Although QuickBooks formats the form so it’s easy for you to read and review, when you print it, it looks almost like the preprinted forms you receive from the tax agency. To print the form, in the Payroll Tax Form window, click Print. Now you’re ready to mail in the report. If you eFile, click E-File. You can also save a copy of the form as a PDF (choose Print→Save As PDF) so it’s available for your accountant or to respond to an audit.
Running Payroll Reports
QuickBooks comes with several payroll reports that can help you make sure your payroll runs are correct and that you’ve paid the payroll taxes and liabilities you owe. To run the program’s built-in payroll reports, choose Reports→Employees & Payroll, and then choose the report you want from the submenu. Here’s a quick intro to the payroll reports that the program offers:
§ The Payroll Summary report shows what you’ve paid on each Payroll item, such as employee wages, taxes and other withholdings, and employer payroll taxes. QuickBooks generates this report for the current calendar quarter to date, but you can change the date range to see how much you’ve paid for a month, quarter, or entire year. In the Payroll Summary report’s window, simply choose a date range in the Dates drop-down list, or type dates in the From and To boxes. (If you prefer to review payroll in Excel, choose Reports→Employees & Payroll→“Summarize Payroll Data in Excel” instead.)
§ The Payroll Item Detail report shows the transactions that contribute to the totals for each Payroll item you use. This report displays each Payroll item for every payroll transaction on its own line. (The report is grouped by Payroll item, so you can see the total for each one.)
§ The Payroll Detail Review report shows how QuickBooks calculates tax amounts on paychecks. For example, the percentage for Social Security remains the same, but Social Security deductions stop when the employee reaches the maximum Social Security wage.
§ The Payroll Transactions by Payee report lists paychecks for each employee and liability checks you wrote to pay payroll taxes or other liabilities.
§ To dig deep into payroll transactions, run the Payroll Transaction Detail report. In this report, each Payroll item in a transaction appears on its own line.
§ To make sure that you pay payroll taxes on time, look at the Payroll Liability Balances report, which shows the payroll taxes and other liabilities you owe to the government and other tax agencies.
§ The Employee Earnings Summary report shows the total earnings and deductions for each employee.
§ To get the info you need to fill out for state payroll tax returns, run the Employee State Taxes Detail report.
§ The Employee Withholding report shows the federal and state withholding info for each employee.
Recording Transactions from a Payroll Service
Lots of companies use outside payroll services (ADP and Paychex are two popular ones) to avoid the brain strain of figuring out tax deductions and complying with payroll regulations. When you use one of these services, you send it your payroll data. It then writes and distributes your company’s payroll checks and sends you reports about the transactions they processed. It even takes care of remitting payroll taxes and other withholdings to the appropriate agencies.
None of these payroll transactions appear in your QuickBooks company file until you add them. Fortunately, you don’t have to enter every last detail. You can simply create a journal entry debiting the payroll expense accounts and crediting your bank account (Reclassifying Payroll Withholdings). Or you can create a vendor for payroll and record a split transaction that distributes the money from your checking account into the appropriate expense accounts, as shown in Figure 15-13; here’s how:
1. Create a vendor for your payroll transactions.
On the QuickBooks Home page, click the Vendors button. In the Vendor Center’s toolbar, click New Vendor→New Vendor. You don’t have to fill in all the fields in the New Vendor window; simply type something like Payroll Service in the Vendor Name box, and then click OK.
NOTE
The example in Figure 15-13 and the numbered list in this section apply when your employees are paid using direct deposit, where the money is deposited into their bank accounts electronically. If you don’t use direct deposit, you also have to record the actual paychecks in QuickBooks (as explained on Preparing Payroll Tax Forms) in order to reconcile your bank account.
2. Press Ctrl+W or choose Banking→Write Checks.
In the Write Checks window’s Bank Account drop-down list, choose the account you use for your payroll.
3. In the No. field, type EFT for “electronic funds transfer.”
Most payroll services transfer the funds from your bank account electronically.
4. In the Pay To The Order Of field, type the name of the payroll vendor you just set up.
5. If necessary, on the window’s Expenses tab, fill in the Account and Amount fields for each payroll expense.
If the accounts are already in place but the values differ, simply edit the numbers in the Amount fields.
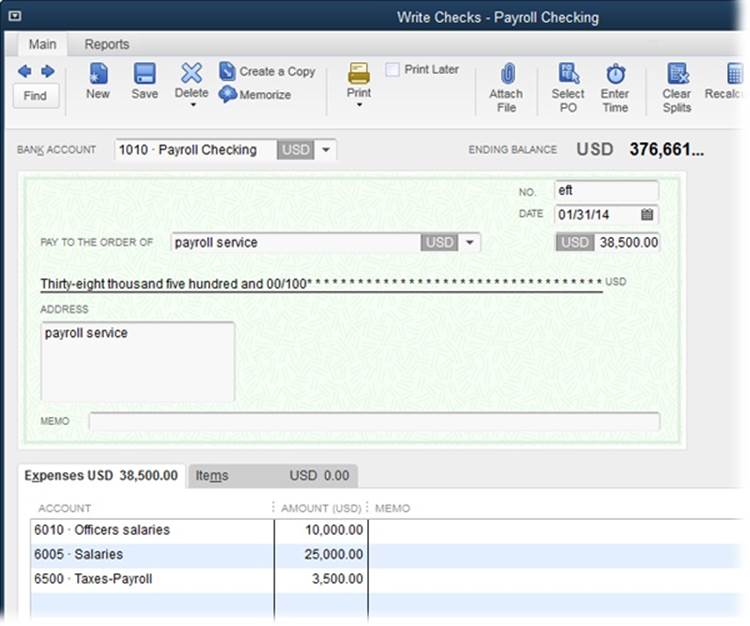
Figure 15-13. In most cases, your payroll falls into three categories: Salaries, as shown here (sometimes called “Salaries and wages”), represent the gross pay that employees receive on their paychecks. Officers’ salaries represent gross salaries for corporate officers. And payroll taxes are the employer payroll taxes that the company pays, such as Social Security and Medicare taxes.
NOTE
To record the payroll service’s fee, record a separate transaction in the payroll bank account, using the payroll service as the vendor. Assign the transaction to an expense account named something like Payroll Service Fees.
6. When the transaction is correct, click Save & Close.
TIP
If you turned on the preference to recall the last transaction (Tuning QuickBooks to Your Liking), QuickBooks automatically fills in the amounts and accounts the next time you record a transaction for the payroll service.
Paying Yourself
If you own a sole proprietorship, partnership, or Subchapter S corporation (named after Subchapter S of the U.S. tax code), you can take money out of the company for your personal use. These withdrawals go by different names depending on the type of company. For a sole proprietor, the money you withdraw is called owners’ draw, or simply draw. Partners withdraw money and call it partner’s draw. And if you’re a shareholder in a Subchapter S corporation, the money you withdraw is called shareholder’s distributions.
If you don’t pay yourself a salary, you pay taxes when the company’s profits flow through to your personal tax return. However, if you’re a Subchapter S shareholder, you can pay yourself using a combination of salary and shareholder’s distribution. That way, you can contribute to a pension plan, like a SEP, based on your corporate salary. This section explains how to pay yourself no matter which type of business structure you’ve established.
Taking a Draw
As your company makes money, you can withdraw funds. The easiest way to do this in QuickBooks is to write a check (Writing Checks Without Entering Bills) made out to you, as shown in Figure 15-14. If you’re a sole proprietor and own your own company, choosing the Owners’ Contribution/Draw account for the check tells QuickBooks to post the check to show that you’ve withdrawn equity from your company. You use the same process if you’re a partner except that you choose the Partners’ Contribution/Draw account instead. The Shareholders’ Distribution account shown in Figure 15-14 represents the draw account for shareholders in a Subchapter S corporation.
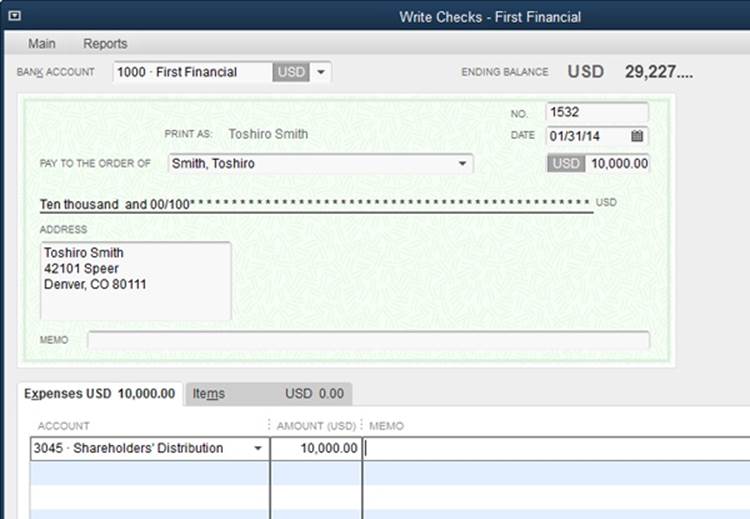
Figure 15-14. In the Write Checks window, on the Expenses tab, choose the draw account in the first blank Account cell, as shown here. When you save the check, QuickBooks debits that equity account, which decreases its balance.
NOTE
If you’re a sole proprietor, you typically make an initial investment of capital into your business. You record this investment into the Owners’ Contribution/Draw equity account as explained on Recording Owners’ Contributions. If your company runs low on cash later on, you can contribute more money and record this addition in the same account.
Reclassifying Shareholder’s Distribution to Salary
If you withdraw money from your Subchapter S corporation for personal use, you may want to turn some of that shareholder’s distribution into salary so, for example, you can qualify to contribute to a retirement account. To prepare your own payroll in this situation, you have to calculate the applicable payroll withholdings (like federal and state taxes, Social Security, and Medicare) and company payroll taxes. (Alternatively, you can ask your accountant or bookkeeper to calculate them for you.) You also have to record your payroll check (if you issue one) and checks that you send to federal and state tax agencies for withholdings and payroll taxes, as shown in Figure 15-15. (And don’t forget about preparing and filing federal and state payroll tax returns, including forms W-2 and W-3.)
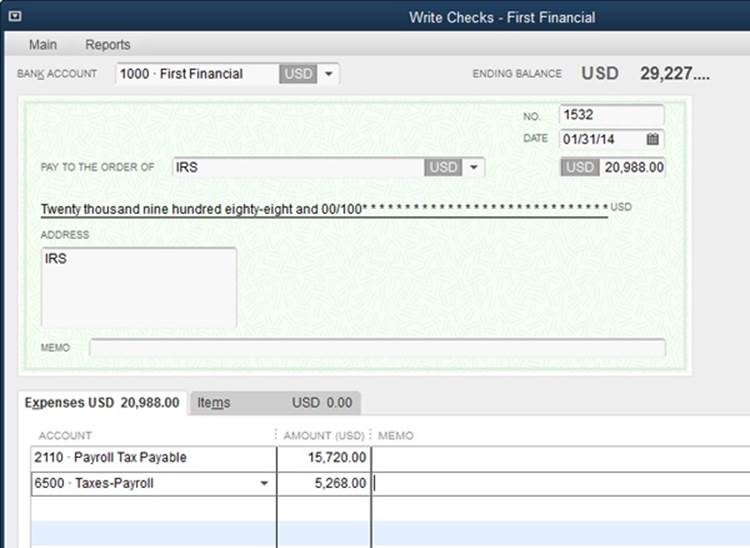
Figure 15-15. If you pay yourself a salary in a Subchapter S corporation, the payroll taxes you remit to the IRS are split between two different accounts, as shown here: a liability account for the employee’s payroll withholdings (here, Payroll Tax Payable) and an expense account for the employer payroll taxes (Taxes-Payroll).
If you take a shareholder’s distribution, you can use a journal entry to recategorize some of those dollars as salary. For example, you could assign the money to a salary expense account called Officers Salaries, as shown in Figure 15-16. (You’ll learn about the Payroll Tax Payable credit in the next section, and you can read about how to handle the employer portion of payroll tax on Paying Payroll Liabilities.)
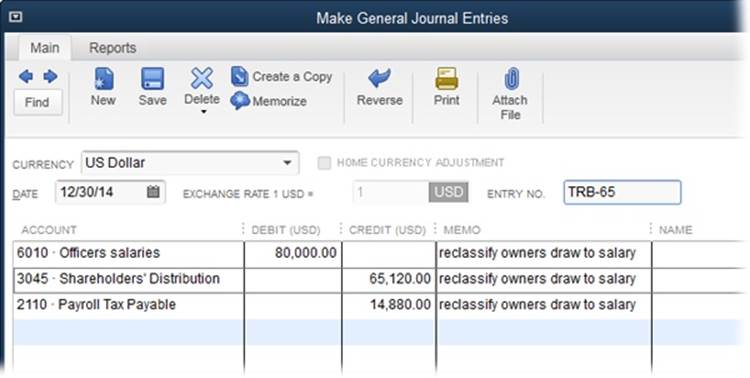
Figure 15-16. To recategorize a distribution as salary, you credit the Shareholder’s Distribution equity account and debit the salary expense account. The credit to the Shareholder’s Distribution equity account increases its balance (which decreased when you took the distribution), whereas the debit to the salary expense account shows your salary as an expense. The Payroll Tax Payable amount represents your employee portion of payroll tax withholdings.
Reclassifying Payroll Withholdings
After you reclassify your shareholder’s distribution as salary, you still have to account for your payroll withholdings (such as the federal and state income taxes you pay) and other payroll taxes. When you remit payroll taxes to tax agencies like the IRS, you have to allocate them to the correct payroll accounts in your company file.
The journal entry in Figure 15-16 set your salary to $80,000. However, companies and employees split the bill for Social Security taxes and Medicare taxes. Because employees don’t know anything about remitting payroll tax withholdings, they let their employers include those withholdings in the employer’s payroll tax payments. The credit to the Payroll Tax Payable account in Figure 15-16 allocates part of your salary to your employee payroll tax withholdings so it appears in the Payroll Tax Payable current liability account.
When you remit payroll taxes, the amount you pay includes both the employer payroll taxes and employees’ payroll tax withholdings. That’s why the IRS check in Figure 15-15 is split between two accounts. The line assigned to the Taxes-Payroll account represents the employer portion of federal payroll taxes (which includes the employer’s portion of Social Security and Medicare taxes, and the employer’s federal unemployment tax). The line for Payroll Tax Payable, on the other hand, represents the employees’ payroll tax withholdings (estimated federal income tax and the employees’ portion of Social Security and Medicare taxes).
All materials on the site are licensed Creative Commons Attribution-Sharealike 3.0 Unported CC BY-SA 3.0 & GNU Free Documentation License (GFDL)
If you are the copyright holder of any material contained on our site and intend to remove it, please contact our site administrator for approval.
© 2016-2026 All site design rights belong to S.Y.A.