QuickBooks 2014: The Missing Manual (2014)
Part III. Managing Your Business
Chapter 20. Managing Inventory
As you record inventory purchases and sales in QuickBooks, the program keeps track of your inventory, just as the point-of-service system at the grocery store does when a cashier scans items. This chapter begins by explaining how to turn on QuickBooks’ inventory features and set up inventory items in your company file so the program can work this magic.
Unless you practice just-in-time inventory management, you need inventory in your warehouse to fill customer orders. If you follow the lead of many companies, you start off by creating purchase orders for the inventory you buy, so you can verify that you receive what you’re supposed to. The next step in the inventory process is receiving the inventory and paying for it. Finally, all that work pays off when you sell products out of inventory to your customers. This chapter shows you how to create purchase orders, receive inventory, and pay for it. Recording inventory sales is just like recording any other sales. Behind the scenes, QuickBooks handles the extra money transfers between accounts. You’ll learn what the program does to track how much inventory you have (and what it’s worth) as you record all these transactions.
Good inventory management means more than just updating the number of items that QuickBooks thinks you have on hand. To keep the right number of items in stock, you also need to know how many you’ve sold and how many are on order. And to make decisions like how much to charge or which vendor to use, you have to evaluate your purchases and how much you pay for your inventory. QuickBooks’ inventory reports and Inventory Center help you look at your inventory items and transactions. In this chapter, you’ll learn how to make the most of both of these features.
NOTE
The Inventory Center is available only in QuickBooks Premier and Enterprise. If you have QuickBooks Pro, you can run inventory reports, but you don’t have access to the center.
Another important aspect of inventory is keeping your QuickBooks records in sync with what’s sitting on the shelves in your warehouse. Inventory can go missing due to theft or damage, so you might not have as many products in stock as you think you do. QuickBooks can’t help with the dusty business of rifling through boxes and counting carafes, coffee mugs, and the occasional centipede. But after the counting is complete, the program can help you adjust its records to match the reality in your warehouse. And adjusting inventory is useful for more than just inventory counts. You can also use this process to write off inventory that you have in your warehouse but can’t sell because it’s dented, dirty, or too darned ugly.
Following the Inventory Money Trail
Inventory Part items are the most complicated type of item because, in accounting, the cost of inventory moves from place to place as you purchase, store, and finally sell your products. Before diving into the details of setting up and recording inventory transactions, it’s a good idea to see how inventory works its way through various accounts in your chart of accounts. Table 20-1 and the following steps show the path that the inventory money trail takes:
1. You spend money to purchase products to sell in your store. Your checking or credit card account shows the money you pay going out the door.
2. Because the inventory you purchased has value, it represents an asset of your company. Hence, the value of the purchased inventory appears in an inventory asset account in your chart of accounts.
3. When you sell some products, QuickBooks posts the sale to an income account (such as Product Income), and the money your customer owes you shows up in Accounts Receivable.
4. The products leave inventory, so QuickBooks deducts their value from the inventory asset account. The value of the sold goods has to go somewhere, so QuickBooks posts it to a cost of goods sold account.
Table 20-1. Following inventory money through accounts
|
TRANSACTION |
ACCOUNT |
DEBIT |
CREDIT |
|
Buy inventory |
Checking Account |
$500 |
|
|
Buy inventory |
Inventory Asset |
$500 |
|
|
Sell inventory |
Product Income |
$1,000 |
|
|
Sell inventory |
Accounts Receivable |
$1,000 |
|
|
Sell inventory |
Inventory Asset |
$500 |
|
|
Sell inventory |
Cost of Goods Sold |
$500 |
In the financial reports you create, your company’s gross profit represents your income minus the cost of goods sold (in this example, $1,000 income minus $500 cost of goods sold for $500 gross profit). As soon as you turn on QuickBooks’ inventory-tracking preference as explained below, the program adds cost of goods sold and inventory asset accounts to your chart of accounts.
Setting Up Inventory Items
You set the stage for inventory tracking when you turn on QuickBooks’ inventory preference and create inventory items in your company file. Inventory item records in your Item List include purchase costs, sales prices, and accounts, all of which direct the right amount of money into the right income, expense, and cost of goods sold accounts as you buy and sell inventory. This section shows you how to turn on inventory and set up inventory items.
Turning on QuickBooks Inventory
If you want to track inventory in QuickBooks, your first task is turning on the preference for inventory and purchase orders if you didn’t do that when you created your company file. Although the program turns on purchase-order features as part of tracking inventory, you can skip purchase orders if you don’t use them in your business.
To turn on inventory in QuickBooks, choose Edit→Preferences→Items & Inventory, and then click the Company Preferences tab. Turn on the “Inventory and purchase orders are active” checkbox, and then click OK. (You need administrator privileges to turn on inventory features because they apply to everyone who logs into your company file.)
As soon as you turn on the inventory preference, the following changes occur:
§ Icons for purchase orders and inventory appear on the Home page.
§ Inventory-related features like Create Purchase Orders and Receive Items appear in the Vendors menu.
§ A non-posting account called Purchase Orders appears in your chart of accounts.
Creating Inventory Items
Creating inventory items is similar to creating other types of items: In the Item List window, press Ctrl+N and then fill in the Item Name/Number box with the item’s name. If you want to make the inventory item a subitem of another one, turn on the “Subitem of” checkbox, and then choose the parent item in the drop-down list. The difference is that you have to fill in more fields than you do for other item types, as you can see in Figure 20-1.
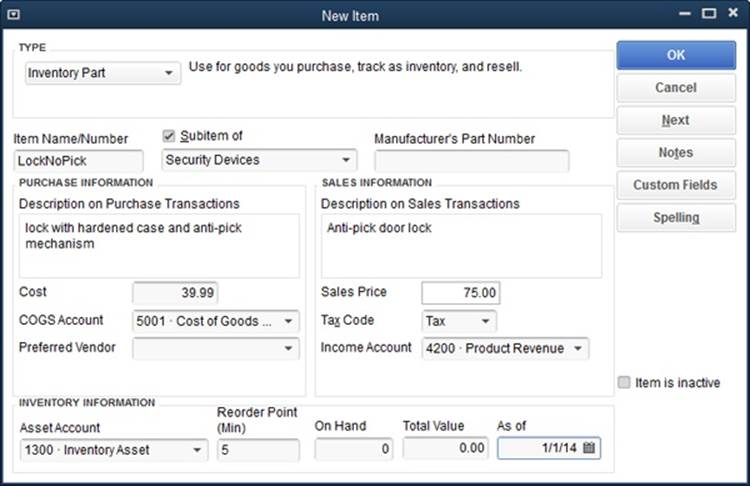
Figure 20-1. When you create a new Inventory Part item, QuickBooks displays fields for purchasing and selling that item. The fields in the Purchase Information section show up on purchase orders. The Sales Information section sets the values you see on sales forms, such as invoices and sales receipts. The program simplifies recording your initial inventory by letting you type in the quantity you already have on hand and its value.
NOTE
The box on Assembling Products explains one way to set up inventory items that you assemble from other inventory items, such as gift baskets. And the box on Turning Parts into Products describes another method for tracking large batches of products you assemble.
Here are the fields for an Inventory Part item and what they do to help you track inventory from initial order to final sale:
§ Manufacturer’s Part Number. If you want your purchase orders to include the manufacturer’s part number or unique identifier for the product, enter it here.
NOTE
If you use QuickBooks Premier or Enterprise, you’ll also see a “Unit of Measure” section, which lets you specify the units the inventory part comes in (bottles, cases, tons, cubic feet, or whatever). When you define units for an inventory part, they appear on invoices, sales forms, and reports. To turn this feature on, in the New Item (or Edit Item) dialog box, click the Enable button and then choose whether you want to assign one or several units of measure to each item. Once this feature is turned on, the New Item and Edit Item dialog boxes display the U/M box in the “Unit of Measure” section. Choose the appropriate unit from the drop-down list.
§ Description on Purchase Transactions. Whatever you type here appears on the purchase orders you issue to buy inventory items. Describe the product in terms that the vendor or manufacturer understands. (As explained in a moment, you can use a different and more customer-friendly description for the invoices that customers see.)
§ Cost. Enter what you pay for one unit of the product. QuickBooks assumes you sell products in the same units that you buy them. So, for example, if you purchase four cases of merlot but sell wine by the bottle, enter the price you pay per bottle in this field.
§ COGS Account. Choose the account to which you want to post the cost when you sell the product. (COGS stands for “cost of goods sold,” which is an account for tracking the underlying costs of the things you sell in order to calculate your gross profit, which you’ll learn about on The Profit & Loss Report.)
NOTE
If you don’t have a cost of goods sold account in your chart of accounts, QuickBooks creates one for you as soon as you type the name of your first Inventory Part item in the New Item window.
§ Preferred Vendor. If you choose a vendor in this drop-down list, QuickBooks selects that vendor when you add this Inventory Part item to a purchase order.
§ Description on Sales Transactions. QuickBooks automatically copies what you typed in the “Description on Purchase Transactions” field into this box, so it appears on sales forms like invoices, credit memos, and sales receipts. If your customers wouldn’t recognize that description, type a more customer-friendly one here.
§ Sales Price. Type in how much you charge for the product, and make sure that the Cost field uses the same units. For example, if you sell a bottle of merlot for $15, type 15 in this field and type the price you pay per bottle in the Cost field.
§ Tax Code. If you turned on the sales tax preference (Turning on QuickBooks Sales Tax) in your company file, then when you add an item to an invoice, QuickBooks checks this field to see whether the item is taxable. (QuickBooks comes with two tax codes: Non for nontaxable items andTax for taxable items.) Most products are taxable, although groceries are a common exception.
§ Income Account. This drop-down list includes all the accounts in your chart of accounts. Choose the income account for the money you receive when you sell one of these products.
§ Asset Account. Choose the asset account for the value of the inventory you buy. Suppose you buy 100 bottles of merlot, which are each worth the $8 a bottle you paid; QuickBooks posts $800 into your inventory asset account. When you sell a bottle, the program deducts $8 from the inventory asset account and adds that $8 to your COGS account.
POWER USERS’ CLINIC: ASSEMBLING PRODUCTS
In the Premier and Enterprise editions of QuickBooks, you can create an Inventory Assembly item that gathers Inventory Part items into a new item that you sell as a whole. As shown in Figure 20-2, the New Item window for an assembled item is similar to the one for an inventory part. The main difference is that you select other inventory items or Inventory Assembly items as the building blocks of your new item.
In the “Bill of Materials” section, you specify the components and the quantity of each, and QuickBooks then calculates the total cost of the bill of materials—that is, the list of all the materials that make up the assembled product. In the Sales Price field, type the price you charge for the entire ball of wax, regardless of the cost of the individual pieces.

Figure 20-2. The New Item (or Edit Item) window for an Inventory Assembly item includes minimum and maximum Build Point fields instead of the Reorder Point field that Inventory items have. The minimum reorder point for Inventory items tells QuickBooks when to remind you to reorder individual Inventory items. As you build Inventory Assembly items, QuickBooks keeps track of how many individual Inventory items you use, which can trigger a reorder reminder. Because you build an Inventory Assembly item out of individual components, you fill in the Build Point (Min) field with the minimum number of inventory assemblies you want on hand to tell QuickBooks when to remind you to build more. The Max field specifies the maximum number you want on hand.
§ Reorder Point (Min). Type the quantity on hand that would prompt you to order more. When your inventory hits that number, QuickBooks adds a reminder to reorder this product to the Reminders List (Reminders). If you use QuickBooks Premier or Enterprise, you’ll also see a Reorder Point (Max) box, where you can enter the maximum quantity you want to have after reordering. For example, if you want 20 on hand, type 20 in the Reorder Point (Max) box. Then, if you place an order and have 9 of the item on hand, the program tells you to reorder 11.
TIP
If you can receive products quickly, use a lower reorder point to reduce the money tied up in inventory and prevent write-offs due to obsolete inventory. If products take awhile to arrive, set the reorder point higher. Start with your best guess and then edit this field as business conditions change.
§ On Hand. If you already have some of the product in inventory, type the quantity in this field. From then on, as you record inventory you receive, you can trust QuickBooks to accurately post inventory values in your accounts.
§ Total Value. If you filled in the On Hand field, then fill in this field with the total value of the quantity on hand. QuickBooks increases the value of your inventory asset account accordingly.
§ As of. The program uses this date for the transaction it creates in the inventory asset account.
NOTE
You can enter values for the last three fields listed above only when you create a new item, not when you edit an existing one. From then on, QuickBooks calculates how many you have on hand based on the numbers you’ve received and sold.
Purchasing Inventory
Purchasing inventory involves three actions in QuickBooks:
§ Adding the inventory you purchase to an inventory asset account
§ Entering the bill you receive for the inventory you bought
§ Paying the bill for the inventory
What’s tricky is that you don’t know whether the bill or the inventory will arrive first. In many cases, the bill arrives with or after the shipment. But if Samurai Sam requires a deposit before he starts crafting your swords, you can record the deposit payment you make and then apply that payment when the final bill arrives. In the following sections, you’ll learn how to use QuickBooks’ features to handle any order of bill and inventory arrival.
WORKAROUND WORKSHOP: TURNING PARTS INTO PRODUCTS
Inventory Assembly items don’t work the way many manufacturers treat assembled items. Manufacturers and distributors often build batches of assembled items, pool the manufacturing costs for the batch, and then assign a value to the resulting batch of products that goes into inventory. To use this approach in QuickBooks, you track the parts you use to build products (Non-inventory Parts) as assets instead of Inventory Assembly items. Here’s how it works:
1. As you buy ingredients for a batch, assign the costs (via bills and so on) to an asset account specifically for inventory you build (such inventory is often referred to as WIP for “work in progress”).
2. When the batch is complete, make an inventory adjustment to add the items you made to inventory. Choose Vendors→Inventory Activities→Adjust Quantity/Value on Hand.
3. In the “Adjust Quantity/Value on Hand” window, in the Adjustment Type drop-down list, choose “Quantity and Total Value.”
4. In the Adjustment Account drop-down list, choose the asset account for your WIP.
5. In the New Quantity column, type the number of items you built from your pool of parts. In the New Value column, type the value of the parts you used.
6. Click Save & Close to save the adjustment, which places the value of the new inventory in your inventory asset account. Because the inventory value matches what you paid for parts, the value adjustment also reduces the WIP asset account’s balance to zero, in effect moving the value of your parts from the WIP asset account to your inventory asset account.
You have to know how many units you got out of the parts pool, so this approach works only if you build products in batches. If you constantly manufacture products, you need a program other than QuickBooks to track your inventory. To find one, go to http://marketplace.intuit.com. On the website’s menu bar, click Find Software→Find Solutions by Industry. Then, on the By Industry tab, click Manufacturing. Finally, on that same tab under the Manufacturing heading, click Inventory Management.
Creating Purchase Orders
Before you receive inventory and pay the corresponding bills, it’s a good idea to make sure that the shipments you receive match what you ordered—not unlike opening a pizza box before you leave the parlor to make sure you didn’t get an anchovy and garlic pie by mistake. Remembering what you ordered is tougher when products and quantities vary. Most businesses address this problem by creating purchase orders for the inventory they buy. That way, when an order arrives, they can compare the shipment with the purchase order to confirm that the items and quantities are correct.
NOTE
You can create all the purchase orders you want without altering the balances in your income, expense, and asset accounts, and the purchase orders won’t appear in your Profit & Loss or Balance Sheet reports, either. That’s because purchase orders are known as non-posting transactions: No money changes hands (or accounts), so there’s nothing to post in your chart of accounts. In QuickBooks, the first posting for purchased inventory happens when you receive either the inventory or the bill.
Because purchase orders are typically the first step in purchasing, the QuickBooks Home page places the Purchase Orders icon in the pole position in the Vendors panel. Click it to open the Create Purchase Orders window, which is like a mirror image of the Create Invoices window that you use to invoice your customers (Creating Invoices). You choose a vendor instead of a customer, and the Ship To address is your company’s address, as shown in Figure 20-3.
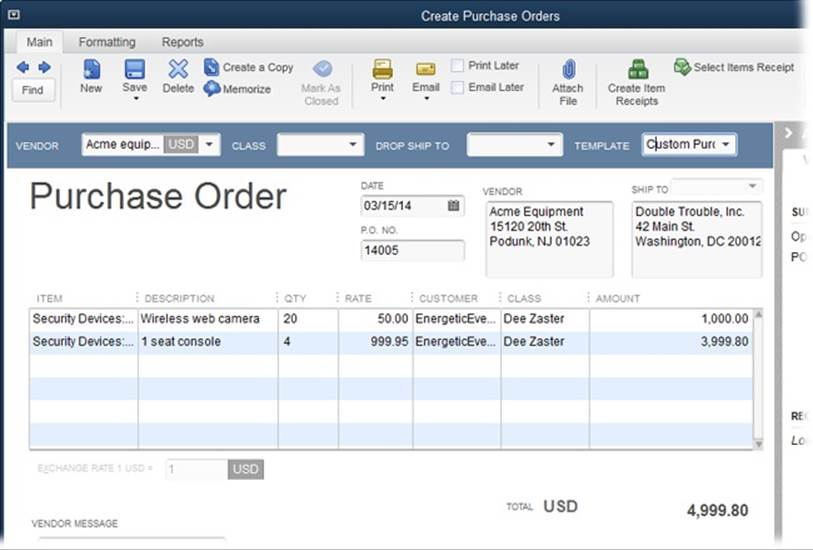
Figure 20-3. QuickBooks has one predefined template for purchase orders, although it’s called Custom Purchase Order. If you want to customize your purchase order form, at the top of the Create Purchase Orders window, click the Formatting tab, and then click Manage Templates. Page 711 tells the whole story of customizing templates.
Here’s how to create a purchase order:
1. On the Home page, click the Purchase Orders icon or choose Vendors→Create Purchase Orders.
In the Create Purchase Orders window, QuickBooks fills in the current date, and there’s no reason to change that because purchase orders are merely a paper trail of what you order.
2. In the Vendor box’s drop-down list, choose the vendor you’re ordering inventory from.
QuickBooks grabs the vendor’s name and address from the vendor’s record and uses it to fill in the Vendor address box (to the Date box’s right) as shown in Figure 20-3.
NOTE
If you use multiple currencies, the vendor’s currency appears to the right of the vendor’s name. The “Exchange Rate 1 [unit] =” box below the item table becomes active if the vendor is set up to use a currency different from your home currency.
3. If you use classes to categorize income and expenses (Categorizing with Classes), choose a class for the purchase order.
If you use classes and skip the Class box, when you try to save the purchase order, QuickBooks might remind you that you didn’t assign a class. If that happens, click Cancel to return to the purchase order so you can choose a class, or click Save Anyway to save the purchase order without a class.
4. If you’re ordering inventory that you want shipped directly to one of your customers, in the Drop Ship To drop-down list, choose that customer (or job).
If you select a drop-ship address, QuickBooks changes the address in the Ship To box from your company’s address to the customer’s or job’s address.
5. If you’re creating your first purchase order, in the P.O. No. box, type the number that you want to start with.
From then on, QuickBooks increments the number in the P.O. No. box by one. If you order your products over the phone or through an online system and the vendor asks for your purchase order number, give him this number.
6. In the first Item cell in the table, choose the item that corresponds to the first product you’re purchasing.
The Item drop-down list shows all the entries in your Item List, even though companies usually create purchase orders only for inventory items. (As you type the first few letters of an item’s name, QuickBooks displays matching entries. You can keep typing or click the item you want as soon as it appears.)
When you choose an item, QuickBooks fills in other cells in the row with information from that item’s record. The Description cell gets filled with the item record’s description, which you can keep or edit. The Rate cell grabs the value from the Cost field of the item’s record (that’s the price you pay for the item).
7. In the Qty cell, type the quantity you want to purchase.
Once you do that, QuickBooks fills in the Amount cell with the total purchase price for the item: the quantity multiplied by the rate.
8. If you’re purchasing inventory specifically for a customer or job, choose the customer or job in the Customer cell.
The Create Purchase Orders dialog box doesn’t include a cell for designating purchases as billable. Don’t worry: You’ll tell QuickBooks that an item is billable when you create a bill or receive the item into inventory.
9. Repeat steps 6–8 for each product you’re purchasing.
You can add, copy, and delete lines in a purchase order. To do so, right-click in the item table and then choose one of the entries on the shortcut menu:
o To add a line, choose Insert Line.
o To copy a line, choose Copy Line; then right-click another table row and choose Paste Line.
o To delete a line, choose Delete Line.
10.At the bottom of the Create Purchase Orders dialog box, in the Memo field, type a summary of what you’re ordering to help you identify the purchase order.
The contents of the Memo field show up when it’s time to apply a purchase order to a bill (which you’ll learn about shortly), so you can identify the right purchase order.
11.If you have additional purchase orders to create, click Save & New to save the current purchase order and start another.
To save the one you just created and close the Create Purchase Orders window, click Save & Close instead. Click Clear to throw out your choices or changes on the purchase order.
Receiving Inventory and Bills Simultaneously
For many orders, you’ll find the bill tucked into one of the boxes of your shipment like a bonus gift. Although a bill isn’t the most welcome of gifts, receiving a bill and inventory simultaneously is a bonus because you can record the inventory and accompanying bill in QuickBooks at the same time. Here’s how:
1. On the Home page, click Receive Inventory, and then choose “Receive Inventory with Bill,” or choose Vendors→“Receive Items and Enter Bill.”
Either way, QuickBooks opens the Enter Bills window that you first met on Entering Bills and automatically turns on the Bill Received checkbox (see Figure 20-4, background) just as it does when you create a regular bill.
2. In the Vendor drop-down list, choose the vendor who sent the bill.
QuickBooks looks for any open purchase orders for that vendor.
3. If there are any open purchase orders for that vendor and you want to apply the shipment you received to one of them, in the Open POs Exist message box, click Yes. (If the items you received don’t go with any open purchase orders, click No and skip to step 5.) If you don’t see this message box, skip to step 5.
When you click Yes, QuickBooks opens the Open Purchase Orders dialog box (Figure 20-4, foreground). This dialog box lists purchase order dates, numbers, and memos.
If the vendor’s bill includes the purchase order number, picking the correct one is easy. Or, if you filled in the Memo field when you created the purchase order, that note may help you identify the right one. But if you don’t know which one to pick, click Cancel to close the Open Purchase Orders dialog box. Then, to view a report of open purchase orders, head to the right side of the Enter Bills window and take a look at the Name tab’s Summary section. To the right of the “POs to be received” label, click the number, which is actually a link that opens a Vendor QuickReport containing the open POs for the vendor you selected in step 2. In the report window, double-click a purchase order to view its details. Once you’ve identified the correct PO, on the Enter Bills window’s Main tab, click Select PO to reopen the Open Purchase Orders dialog box.
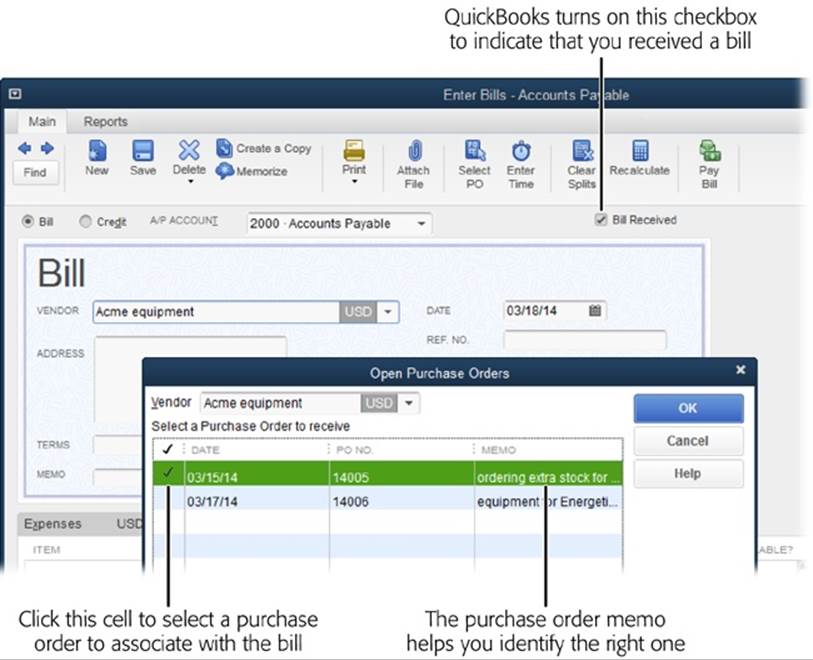
Figure 20-4. In the Enter Bills window, when you choose the vendor that shipped the items you’ve received (from the Vendor drop-down list), QuickBooks checks for any open purchase orders for that vendor. If it finds any, it displays the Open POs Exist message box (not shown here). If you click Yes in that box, the Open Purchase Orders dialog box appears so you can select a PO, which then applies the items you’ve received from that purchase order to the bill.
4. In the Open Purchase Orders dialog box’s table, select the existing purchase order that goes with the shipment you received by clicking the checkmark cell (the first column) for the purchase order you want, and then click OK.
QuickBooks displays a checkmark in the purchase order’s checkmark cell. When you click OK, the program closes the Open Purchase Orders dialog box and fills in the bill fields with purchase order info, like the amount and the items ordered, as shown in Figure 20-5. When you work from a purchase order, QuickBooks displays the order’s number in the PO No. column in the items table (this column appears only if you choose a purchase order). To open the selected purchase order in the Create Purchase Orders dialog box, click Show PO below the items table.
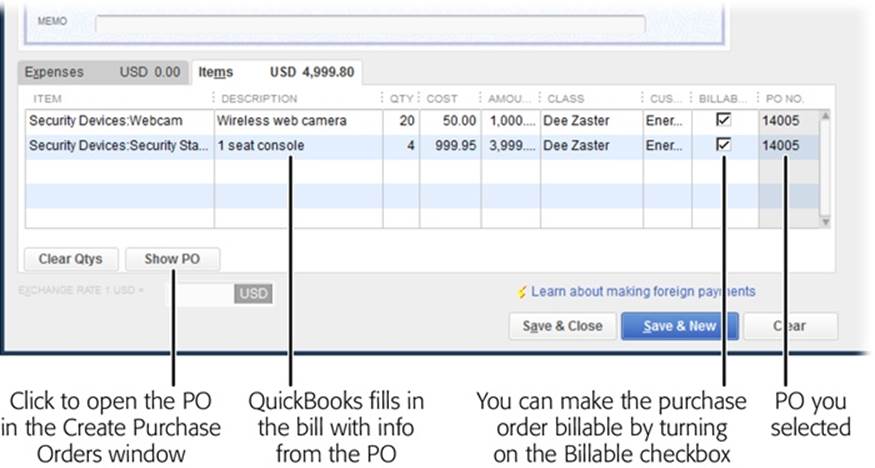
Figure 20-5. When you choose an open purchase order, QuickBooks uses the information from it to fill in fields in the Enter Bills window with most of the information about the items you ordered, such as the items table (shown here) and the Amount Due field in the header (not shown).
TIP
It’s always a good idea to compare the quantities you received in the shipment with the quantities on your purchase order. If you received fewer items than you ordered, in the Qty cell for the item, enter the number you actually received and adjust the amount due to match what you received.
5. In the Enter Bills window’s Date box, enter the date you received the bill.
If you’ve already defined the payment terms in the vendor’s record (Entering Address Information), QuickBooks fills in the Terms box and uses those terms to calculate the due date in the Bill Due box. If the bill you received shows different terms or a different due date, update the values in the Bill Due and Terms boxes to match the vendor’s bill. (When you save the bill, QuickBooks offers to save the new terms in the vendor’s record.)
6. If you didn’t create a purchase order for the shipment you received, fill in the fields as you would for a regular bill.
In the Amount Due field, type the amount due from the vendor’s bill. You’ll also have to fill in the items table manually: For each item you received, in a blank line of the table, specify the item, quantity, customer or job, and class (if you use that feature). QuickBooks fills in the Description and Cost cells by using the values in the item’s record, and then calculates the Amount by multiplying the quantity by the item’s cost.
7. Click Save & New or Save & Close.
When you save a combination inventory/bill transaction, QuickBooks goes to work behind the scenes. For the inventory you received, the program debits your inventory account the amount you paid for the items and updates the quantity on hand for the item. It also increases the balance in your Accounts Payable account by the amount of the bill.
TIP
If you want to see how many of a particular product you have on hand, on the Home page, click Items & Services. In the Item List window, look at the Total Quantity On Hand column for the item you’re interested in.
Receiving Inventory before the Bill
When you receive inventory, you want to record it in QuickBooks so you know that it’s available to sell. If you receive inventory without a bill, the best solution is to pretend that you received the bill. By creating the bill in QuickBooks, your Accounts Payable stays in sync with what you’ve purchased. Then you can edit the QuickBooks bill later to match the real one you receive.
Another approach is to record the received inventory in QuickBooks without a bill. (You can do this because the program has separate features for receiving inventory and entering bills when they arrive.) The box below explains how QuickBooks posts amounts to accounts when you receive inventory without a bill. The fields that you specify and the options at your disposal are the same as when you receive inventory with a bill (as described in the previous section); they just appear in different windows.
TROUBLESHOOTING MOMENT: POSTING INVENTORY RECEIVED
When you receive inventory before the bill arrives, your accountant might squawk about how QuickBooks posts inventory to your accounts. In standard accounting practice, only bills show up as credits to the Accounts Payable account. But QuickBooks credits the Accounts Payable account when you receive inventory items without a bill.
When you receive items without a bill, QuickBooks adds an entry for the items to the Accounts Payable register. (To view the register, press Ctrl+A to open the Chart of Accounts window, and then double-click the Accounts Payable account.) The program fills in the Type cell with the text “ITEM RCPT” to indicate that the entry isn’t a bill. Later, when you enter the bill, QuickBooks edits the same transaction, replacing “ITEM RCPT” with “BILL.”
The result in your company file is correct after you both receive inventory and enter bills. However, your accountant might complain about the incomplete audit trail because the transaction changes without some kind of record. If you want to track inventory, bills, and price differences between your purchase orders and the final bills, you can do so outside of QuickBooks. Then when you possess both the inventory and the corresponding bill, you can record the transaction in QuickBooks.
To receive inventory in your company file before the bill arrives:
1. On the Home page, click the Receive Inventory icon, and then choose “Receive Inventory without Bill,” or choose Vendors→Receive Items.
QuickBooks opens the Create Item Receipts window, which is a close relative of the Enter Bills window. In fact, other than the title of the dialog box, only three things are different, all of which are labeled in Figure 20-6.
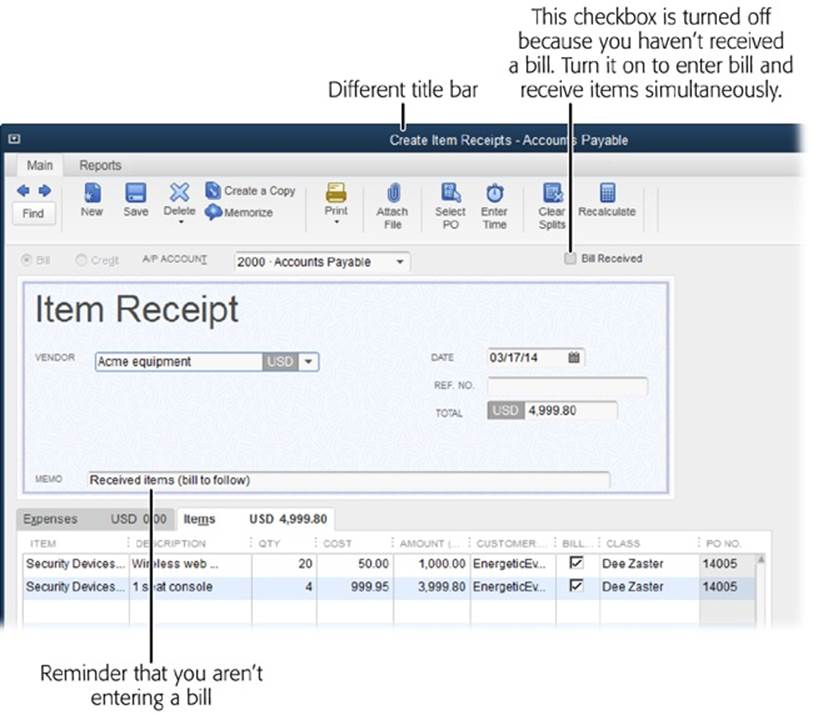
Figure 20-6. Because you’re only adding inventory to your company file, QuickBooks automatically turns off the Bill Received checkbox in the Create Item Receipts window. To make it crystal clear that you aren’t creating a bill, the program displays the words “Item Receipt” and, in the Memo box, adds the message “Received items (bill to follow).”
TIP
If you open the Create Item Receipts window and then realize that you do have the bill, there’s no need to close the window and choose a different feature. Simply turn on the Bill Received checkbox at the window’s top right. When you do, the window changes to the Enter Bills window so you can receive the items and create the bill (Receiving Inventory and Bills Simultaneously).
Similar to what happens when you receive inventory and a bill at the same time, the Create Item Receipts window reminds you about open purchase orders that you can select to fill in the items received automatically. The rest of the fields behave like the ones in the Enter Bills window, explained on Entering Bills.
2. When you’ve added all the items you received and updated any quantities that differ from those on your purchase order, click Save & Close.
QuickBooks records the inventory in your company file, as described in the box on Posting Inventory Received.
Then, when the bill for the items you received finally arrives, here’s what you do:
1. Choose Vendors→“Enter Bill for Received Items,” or on the Home page, click the Enter Bills Against Inventory icon.
The box on Double (Posting) Trouble tells you how to recover if you choose Vendors→Enter Bills by mistake.
2. In the Select Item Receipt dialog box, choose the vendor that sent the shipment; then select the shipment that corresponds to the bill you just received and click OK.
QuickBooks opens the Enter Bills window and fills in the fields with info from your Receive Items transaction.
TIP
The Select Item Receipt dialog box’s Ref. No. and Memo columns identify the shipments you’ve received. If those columns are blank, the Date column won’t be enough to let you select the right item receipt, so click Cancel and then choose Vendors→Receive Items. At the top of the Create Item Receipts window, click the left arrow (Previous) or right arrow (Next) to display the item receipt you want, and then fill in its Memo field or Ref. No. field with the purchase order number for the shipment or the carrier’s tracking number. After you save the item receipt with an identifying memo or reference number, choose Vendors→“Enter Bill for Received Items” once more.
3. If the prices and quantities on the vendor’s bill are different from those QuickBooks used, in the items table, update the prices and quantities.
When prices and quantities differ, don’t take the vendor’s bill as the final word—check your record to see where the discrepancy arose.
4. If the bill includes sales tax and shipping that you didn’t include on your purchase order, click the Expenses tab in the lower part of the window, and then fill in additional lines for those charges.
If you change anything on the window’s Items or Expenses tab, at the top of the Create Item Receipts window, click Recalculate to update the Amount Due field with the new total.
5. Click Save & Close.
You’ll see a message box asking if you want to save the changes you made—even if you didn’t make any. QuickBooks asks this question because it changed the item receipt transaction to a bill in your Accounts Payable account, as the box on Posting Inventory Received explains. Click Yes to save the changes.
Selling Inventory
You don’t have to jump through special hoops to sell inventory. When you add inventory items to invoices (Chapter 10), sales receipts (Chapter 13), or other sales forms (Chapter 11), QuickBooks deducts the units you sold from each item’s Total Quantity On Hand value. The income from the sale posts to an income account, while the cost of the units you sold moves from the inventory asset account to a cost of goods sold account.
TROUBLESHOOTING MOMENT: DOUBLE (POSTING) TROUBLE
When you want to enter a bill for items you received earlier, be extra careful to choose Vendors→“Enter Bill for Received Items” (or click Enter Bills Against Inventory on the Home page). If you choose Vendors→Enter Bills instead, you’ll end up with two postings for the same items in your Accounts Payable account. The first posting appears when you receive the items in QuickBooks (the one identified with the ITEM RCPT type); the second posting is for the bill.
If you accidentally create one of these double entries, here’s how to correct the problem:
1. In the Chart of Accounts window, double-click the Accounts Payable account.
2. In the Accounts Payable register, select the bill, and then choose Edit→Delete Bill; alternatively, right-click the bill, and then choose Delete Bill on the shortcut menu.
3. Recreate the bill using the “Enter Bill for Received Items” feature (Selling Inventory).
When you sell inventory, QuickBooks also compares the new Total Quantity On Hand value with your minimum reorder point (Purchasing Inventory). When the inventory on hand drops below this number, the program reminds you that it’s time to order more (Reminders). (If you use QuickBooks Premier or Enterprise, the program will tell you how many to order based on the item’s maximum reorder point.) The box below tells you how to shut off reminders for items you aren’t selling at the moment.
TROUBLESHOOTING MOMENT: MANAGING SEASONAL ITEMS
The Item List is home to items for every service and product you sell, and it can get really long really fast, especially if you sell different items at different times of the year. For example, if you stock your store with lawn furniture in the spring, you don’t want to scroll past dozens of outdoor items or see reminders to reorder them the other nine months of the year.
Fortunately, you can make seasonal items inactive, which temporarily hides them in the Item List and silences the reminders. In the Item List window (to open it, choose Lists→Item List), right-click the item and then choose Make Item Inactive from the shortcut menu. Hiding Items explains how to reactivate items when a new season rolls around.
Running Inventory Reports
Checking the vital signs of your inventory is the best way to keep it healthy. When products are hot, you have to keep them in stock or you’ll lose sales. And if products grow cold, you don’t want to get stuck holding the bag (or the lime-green luggage).
For all other temperatures, most companies keep tabs on inventory trends and compare them with what’s going on in sales. For example, when the value of your inventory asset account is increasing faster than sales, sales could be poor because your prices are too high, competition is encroaching on your market, or your spy-cam necklaces simply didn’t catch on.
Good inventory management means keeping enough items in stock to meet your sales, but not so many that your inventory grows obsolete before you can sell it. QuickBooks inventory reports aren’t fancy, but they tell you most of what you need to know. You can run any of these reports by choosing Reports→Purchases or Reports→Inventory, and then picking the one you want. The following sections describe what each report includes.
NOTE
QuickBooks inventory reports show only the active inventory items in your Item List. So if you run inventory reports without reactivating all your inventory items (Hiding Items), the inventory values in the reports won’t be accurate. By contrast, financial statements such as the Balance Sheet include your total inventory value for active and inactive inventory items alike.
Purchases Reports
These reports, not surprisingly, are listed under Reports→Purchases. When you run the Purchases by Vendor Summary report and see high dollar values, you might want to negotiate volume discounts or faster delivery times. This report can also show when you rely too heavily on one vendor—a big risk should that vendor go out of business.
The Purchases by Item Summary report shows how many inventory items you’ve bought and the total you paid. (This report also comes in handy if you want to use LIFO or FIFO to calculate inventory value, as explained on Adjusting Quantities and Values.) The Purchases by Item Detail report shows each purchase transaction, along with the quantity, cost, and vendor.
If your supplies are dwindling, the Open Purchase Orders report shows when more items are due. (You can also run this report from the Enter Bills window: Click the Reports tab at the top of the window, and then click the Open Purchase Order Detail icon.) The report displays the PO’s date, vendor, number, and delivery date. Double-click a purchase order to open the Create Purchase Orders window, which shows the products included in that order.
How Much Is Inventory Worth?
QuickBooks includes two reports that tell you how much your inventory is worth: Inventory Valuation Summary and Inventory Valuation Detail. Here’s what each one does.
Inventory Valuation Summary Report
The Inventory Valuation Summary report, shown in Figure 20-7, is an overview of the inventory you have on hand, what it’s worth as an asset, and what it will be worth when you sell it. (See Adjusting Quantities and Values to find out what to do if your inventory isn’t worth as much as it used to be.)
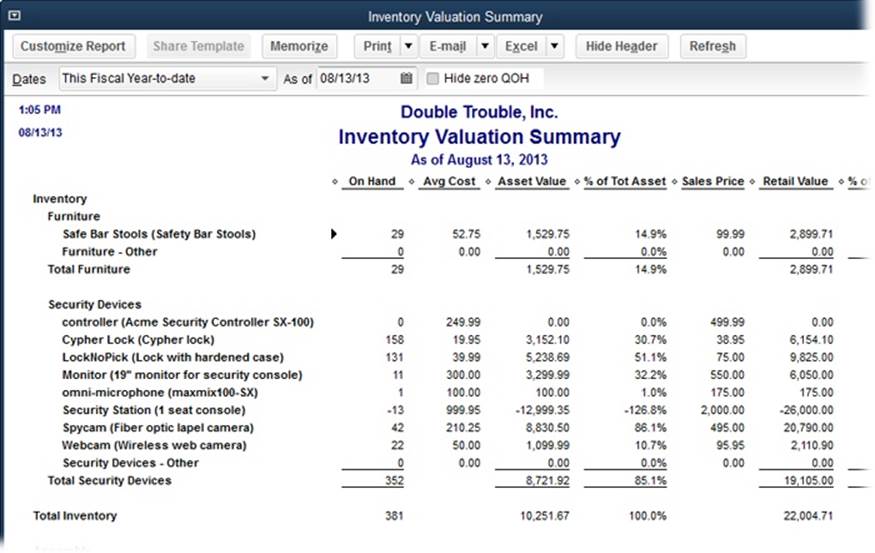
Figure 20-7. Because the report is a snapshot of inventory value, month-to-date, quarter-to-date, and year-to-date ranges all produce the same results. But if you want to see the inventory value as of a different date, in the Dates box, choose the one you want.
To run this report, choose Reports→Inventory→Inventory Valuation Summary or (if you have QuickBooks Premier or Enterprise) at the top right of the Inventory Center, click the Inventory Valuation Summary link. QuickBooks initially uses the current month to date as the date range for this report. The first column shows the names of the inventory items from your Item List; subitems appear indented beneath their parent items. Here are the report’s other columns and why they are (or aren’t) so important to inventory health:
§ On Hand. To calculate this value, QuickBooks subtracts the number of products you sold and adds the number of products you received. The values in this column can help you quickly check for items that are out of or close to being out of stock. However, because items sell at different rates, the reorder point reminder (Reminders) is a better indication than this column that something is perilously close to selling out.
NOTE
When you add an out-of-stock item to an invoice, QuickBooks warns that you don’t have inventory, but it doesn’t prevent you from invoicing for products you don’t have. When the On Hand value is negative, you know it’s time to order more—and to ask for express shipping.
§ Avg Cost. Average cost is the only way QuickBooks Pro and Premier value inventory. (QuickBooks Enterprise supports “first in/first out” valuation; see Adjusting Quantities and Values.) To calculate this value, the program uses the price you paid for every unit you’ve purchased of an inventory item along with any adjustment transactions you’ve recorded (Adjusting Inventory in QuickBooks). If you want to watch price trends so you can adjust your sales prices accordingly, review your most recent bills for inventory purchases.
§ Asset Value. This is the item’s average cost multiplied by the number on hand. Although changes in asset value over time are more telling, a snapshot of asset value can show trouble brewing. An excessive asset value for one item is a sign that inventory might be obsolete—the item hasn’t sold, so you have too many on hand. If you know that the item is selling, streamlining your purchasing process can reduce the number you need to keep in the warehouse.
§ % of Tot Asset. This column shows the percentage of an item’s asset value compared with the total asset value of all inventory items. Higher percentages might mean that a product is a significant part of your sales strategy or that it isn’t selling well and you have too many in stock. This measurement has meaning only in light of your business strategy and performance.
§ Sales Price. You set this price in the item’s record, but it’s meaningless if you regularly change the item’s price or charge different prices to different customers. If you didn’t set a sales price for an item, you’ll see “0.00” in this column.
§ Retail Value. Because an item’s retail value is its sales price multiplied by the number on hand, this number is useful only if the value in the Sales Price column is the typical sales price for the item.
§ % of Tot Retail. This percentage is what portion the item’s retail value represents of your total inventory’s retail value. Different products sell at different profit margins, which you can see when the value in this column differs from the value in the % of Tot Asset column.
Inventory Valuation Detail Report
The Inventory Valuation Detail report (Reports→Inventory→Inventory Valuation Detail) lists every transaction that increases or decreases the number of items you have on hand. Although it can grow lengthy, this report can help you figure out where your inventory went (and perhaps jog your memory about inventory transactions that you forgot to record in QuickBooks). As in other reports, you can double-click a transaction to see its details.
Inventory Stock Status
As you might expect, the Inventory Stock Status by Item report (Reports→Inventory→Inventory Stock Status by Item) tells you where your inventory stands today and how it will change based on your outstanding purchase orders. This report is a great way to see which items you need to reorder, as Figure 20-8 shows.
TIP
If you want to use a barcode reader to scan your inventory, go to Intuit’s marketplace (http://marketplace.intuit.com). In either Search Apps Now box, type barcode to find third-party barcode readers.
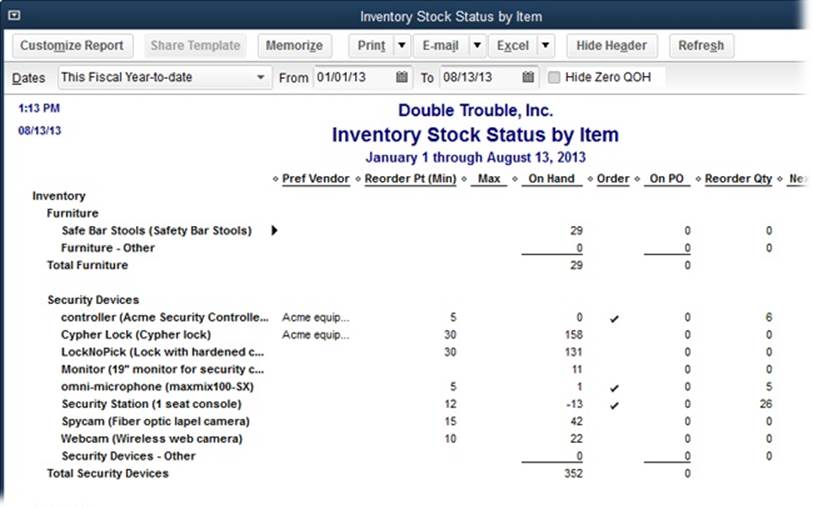
Figure 20-8. For every active inventory item, this report shows its minimum reorder point in the Reorder Pt (Min) column (and, if you use QuickBooks Premier or Enterprise, the maximum reorder point in the Max column) and the number you currently have in stock in the On Hand column. However, a checkmark in the Order column is the most obvious sign that you need to reorder. If you’ve added an item to a purchase order, the On PO column shows whether the quantity in that shipment is enough to restock your warehouse.
NOTE
If you upgrade to QuickBooks Premier or Enterprise, the Inventory Stock Status reports also show how many items you’ve added to sales orders for future delivery.
You can also run the Inventory Stock Status by Vendor report to see the same information that’s in the Inventory Stock Status by Item report, but grouped and subtotaled by vendor. If you seem to run low on products from a particular vendor, you might want to increase the minimum reorder point for those products to fine-tune your lead time. (If you use QuickBooks Premier or Enterprise, you might raise the minimum reorder point so you can get a new order in time, and also raise the maximum reorder point so the order that comes in lasts awhile.)
Viewing One Inventory Item
The Inventory Item QuickReport is a fast yet thorough way to see what’s going on with a particular item. To display this report, open the Item List window (Lists→Item List), select the item you want to review, and then press Ctrl+Q or, at the bottom of the window, click Reports→“QuickReport: [item name].” Alternatively, if you use QuickBooks Premier or Enterprise, in the Inventory Center, select the item, and then click the QuickReport link in the window’s upper right.
This report includes purchase and sales transactions for the item, such as bills and invoices (see Figure 20-9). In the On Hand As Of section, invoice transactions represent the sales you’ve made to customers, so the numbers are negative; bills and item receipts are your purchases from vendors, which increase the number on hand. The On Purchase Order As Of section includes the number of products you’ve ordered but haven’t yet received. The Total As Of figure at the bottom of the report tells you how many products you’ll have in stock when all your purchase orders are filled.
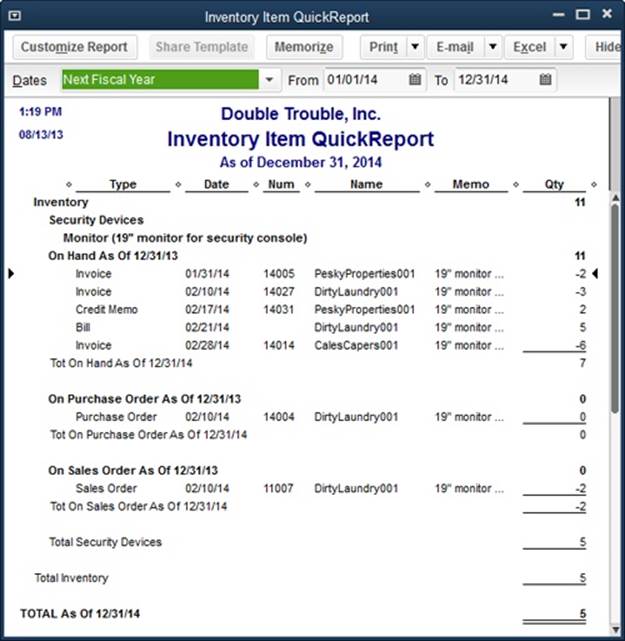
Figure 20-9. The Inventory Item QuickReport summarizes how many of an item you have on hand as well as the number that are on order. In the leftmost column, the headings at the beginning of each section show the last day of the previous fiscal year, such as “On Hand As Of 12/31/13” as shown here. Then the report lists the transactions during the current fiscal year that affect a total, such as invoice and item receipts for the On Hand As Of section. The Tot On Hand As Of and Total As Of labels show the actual as-of date for the report along with the final total for the inventory item.
Working with the Inventory Center
The Inventory Center (which is available only in QuickBooks Premier and Enterprise) provides information about items you keep in stock. Similar to the Customer Center and Vendor Center, it’s a quick way to answer questions like “How many items do I have on hand to sell?” and “What purchase orders and sales orders are open?” To open the Inventory Center (shown in Figure 20-10), choose Vendors→Inventory Activities→Inventory Center. Here’s how to use the center to see what’s going on with your inventory:
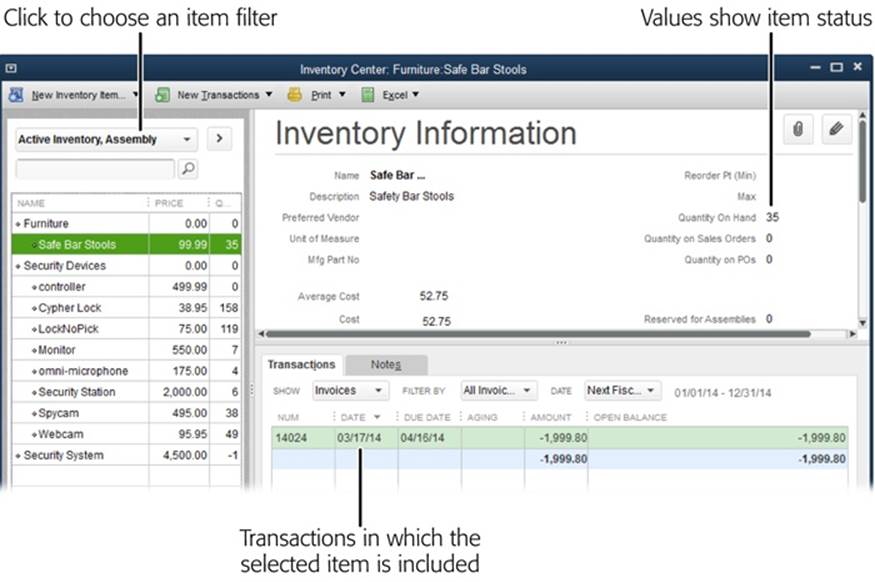
Figure 20-10. The left-hand panel lists the inventory items in your company file. You can control which fields appear in this panel by right-clicking it and choosing Customize Columns from the shortcut menu. Information about the selected item appears at the window’s top right, and transactions involving the item appear in the table at the bottom right. To edit an item’s fields, click the Edit button (the pencil icon). To run inventory reports, click one of the links in the window’s upper right (not shown here), such as Stock Status or Inventory Valuation Summary.
§ Display inventory items. When you first open the Inventory Center, QuickBooks displays your active inventory items (and assembly items, if you use them) in the panel on the left. Then, when you click the name of an inventory item in that panel, the Inventory Information section at the window’s top right shows info from that item’s record.
§ Filter the list of inventory items. To narrow the item list to those that fit the criteria you want, such as inventory items that are out of stock, in the center’s toolbar, click the unlabeled filter box that’s located immediately below the New Inventory Item entry (it’s labeled in Figure 20-10). In the drop-down list, choose one of the entries, like “QOH < = zero” which is shorthand for “quantity on hand is less than or equal to zero.”
§ Find an inventory item in the list. If you have scads of inventory items, you can quickly find the one you want with the find box, which is the second unlabeled box in the left-hand panel. Simply type part of the item’s name and then press Enter or click the Search button, which has a magnifying glass on it.
§ Change the fields that appear in the center’s list. To display different fields in the list, right-click the panel on the window’s left side, and then choose Customize Columns. In the Customize Columns dialog box’s Available Columns list, select the fields you want to display and then click Add to move them to the Chosen Columns list. To remove a column, select it in the Chosen Columns list and click the Remove button. When the Chosen Columns list includes the fields you want, click OK.
§ Review inventory status. In the upper-right part of the Inventory Center are several links you can use to see various things about your inventory:
§ — Click QuickReport to see all transactions for the selected item.
§ — Click Stock Status to generate a Stock Status report (Inventory Valuation Detail Report).
§ — Click Inventory Valuation Summary to generate this report (Purchases Reports).
§ Display transactions for an item. When you select an item in the list on the window’s left side, the transactions involving that item appear in the table at the window’s bottom right. To see only a specific type of transaction, in the Show drop-down list above the table, choose a type such as Invoices or Purchase Orders.
TIP
You can filter the transactions shown in the table using the same techniques that work in the Customer Center, which are described on Customers.
Performing a Physical Inventory
QuickBooks calculates how many products you have on hand based on your purchases and sales, but it has no way of knowing what’s actually happening in your warehouse. Employees may help themselves to products; fire can consume some of your inventory; or a burst pipe could turn your India ink sketches into Rorschach tests. Only a physical count of the items in stock can tell you how many units you really have on hand.
QuickBooks does the only thing it can to help you count your inventory: provide the Physical Inventory Worksheet report, which lists each inventory item in your Item List and how many units should be on hand. To see it, choose Reports→Inventory→Physical Inventory Worksheet (or, if you have QuickBooks Premier or Enterprise, click the Physical Inventory Worksheet link in the Inventory Center’s upper right). The worksheet’s Physical Count column has blank lines so you can write in how many you find, as you can see in Figure 20-11. (The box on Freezing Inventory While You Count explains how to count inventory while business continues to chug along.)
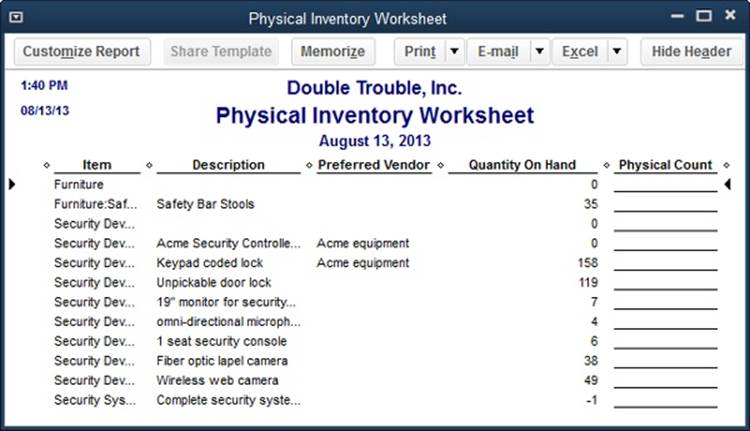
Figure 20-11. Your preferred vendor has nothing to do with counting inventory, yet a column with that info appears on this report. To hide that column, click Customize Report in the report window’s toolbar. On the Display tab, in the Columns list, click the checkmark to the left of the Preferred Vendor entry (you may have to scroll to see it) to turn it off. To sort the inventory items so they’re listed by the warehouse aisles where they’re kept, in the Columns list, turn on the Location of Fixed Asset field, and then, in the “Sort by” drop-down list, choose Location.
TROUBLESHOOTING MOMENT: FREEZING INVENTORY WHILE YOU COUNT
It’s sheer madness to ship customer orders out and receive inventory shipments while you’re trying to count the products you have on hand. QuickBooks doesn’t have a feature for freezing inventory while you perform the physical count, but you can follow procedures that do the same thing.
Because a physical inventory count disrupts business operations, most companies schedule it during slow periods and off hours. To keep the disruption to a minimum, print the Physical Inventory Worksheet just before you start the count. Then, until the count is complete, do the following to keep your inventory stable:
§ Sales. In QuickBooks, create invoices for inventory sales as you would normally. After you save each invoice, edit it to mark it as pending (Using Pending Invoices for Backorders). When you finish the count, edit the pending invoices again to mark them as final, fill the orders, and then send the invoices.
§ Purchases. If you receive inventory shipments during the count, don’t unpack the boxes or use any of QuickBooks’ features for receiving inventory (Receiving Inventory and Bills Simultaneously) until you’re done with the count.
Adjusting Inventory in QuickBooks
Your inventory records in QuickBooks may not match your real-world inventory for several reasons:
§ Damage. Inventory can succumb to breakage or damage from a flood, an out-of-control forklift, or a paintball fight in the warehouse. When these accidents happen, the first thing to do is report the loss to your insurance company. Adjusting the quantity of inventory in QuickBooks should follow close behind.
§ Obsolete products. If you have several cases of oversized, low-resolution webcams, the true value of that inventory is almost worthless. Writing them off as unsellable turns that inventory into a business expense, which reduces your net profit and, therefore, the taxes you pay. Adjust the inventory in QuickBooks when you take the products to the recycling center.
§ Theft. An inventory adjustment is in order after almost every physical inventory count you perform, because the quantities for inventory in the real world rarely match the quantities in QuickBooks. Shrinkage is the polite term for the typical cause of these discrepancies. To be blunt, employees, repair people, and passersby attracted by an unlocked door may help themselves to a five-finger discount. And you not only take the hit to your bottom line—you’re also stuck adjusting QuickBooks’ records to account for the theft.
It’s no surprise, then, that QuickBooks has a feature for this multipurpose accounting task. You adjust both the quantity of inventory and its value in the aptly named “Adjust Quantity/Value on Hand” window.
You purchase inventory from vendors, so QuickBooks keeps all inventory features in the same place: the Vendors menu. To open the “Adjust Quantity/Value on Hand” window, choose Vendors→Inventory Activities→“Adjust Quantity/Value on Hand” or, on the Home page, in the Company panel, click Inventory Activities→“Adjust Quantity/Value On Hand.”
Adjusting Quantities
You need to adjust quantities when you’re writing off obsolete inventory or updating your company file to reflect the number of items in stock. When you adjust inventory quantities, QuickBooks fills in or calculates some of the fields for you. Here are guidelines for filling in the remaining fields of the “Adjust Quantity/Value on Hand” window:
§ Adjustment Type. To adjust inventory items’ quantities to match what’s in your warehouse or reflect what you’re writing off, choose Quantity from this drop-down menu, as shown in Figure 20-12. QuickBooks uses the average cost of each item to calculate the dollar value that the new quantities represent.
§ Adjustment Date. QuickBooks puts the current date in this box. If you like to keep your journal entries and other bookkeeping adjustments together at the end of a quarter or year, type the date when you want to record the adjustment.
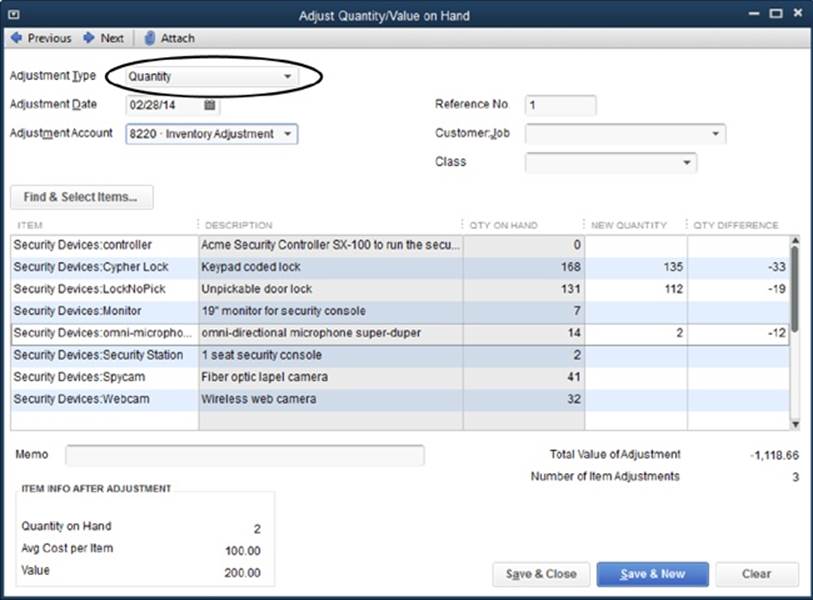
Figure 20-12. In this window’s table, QuickBooks shades the columns you can’t change. When you choose Quantity in the Adjustment Type box, as shown here, the Item, New Quantity, and Qty Difference columns are the only ones you can edit.
§ Adjustment Account. Choose an expense account you created to track the cost of inventory adjustments. For example, if you adjust an item’s quantity to match the physical count, choose an expense account such as Inventory Adjustment. If you’re writing off obsolete or damaged inventory, choose an expense account such as Unsalable Inventory. (Because you can assign only one account to each inventory adjustment, adjust the quantity once for physical count changes, and then click Save & New to create a separate adjustment for write-offs.)
TIP
If the expense account you want to use doesn’t exist, at the top of the Adjustment Account drop-down list, choose <Add New>, and then fill in the boxes in the Add New Account window. When you click Save & Close, QuickBooks fills in the Adjustment Account box with the account you just created.
§ Reference Number. You don’t have to enter reference numbers, but they come in handy when discussing your books with your accountant. If you don’t type anything in this box, QuickBooks sets it to 1 and then increments the number here by one each time you adjust inventory.
§ Customer:Job. If you want to record products you send to a customer or job at no charge—without adding those items to an invoice—choose that customer or job in this drop-down list. QuickBooks then assigns the cost of the adjustment to that customer or job.
TIP
A better way to give products to a customer or job is to add them to an invoice with a price of $0.00. That way, your generosity remains on the record lest your customer forgets.
§ Class. If you use classes to track sales, choose the appropriate one in this box. For example, if one partner handles sales for the item you’re adjusting, choose the class for that partner so the expense applies to her.
§ Item. To adjust a single item, click the first item cell in the table, click the down arrow that appears, and then choose the inventory item you want to adjust. To adjust several items, click the Find & Select Items button above the table. In the Find & Select Items dialog box, turn on the checkmark cells for each item you want to adjust (or click Select All to select all your inventory items after a physical count), and then click Add Selected Items.
§ New Quantity/Qty Difference. When you choose Quantity in the Adjustment Type box, you can type a number in either the New Quantity or the Qty Difference cell. If you’re making an adjustment after a physical count, in the New Quantity cell, type the quantity from your physical count worksheet. On the other hand, if you lost two cases of webcams, it’s easier to type the number you lost as a negative number (such as –20) in the Qty Difference cell. When you type a value in one of these columns, QuickBooks automatically calculates the value in the other column.
TIP
If you’re ready to admit that the pet rock fad isn’t coming back, you can write off your entire inventory by putting 0 in an item’s New Quantity cell. In the Adjustment Account drop-down list, choose an expense account such as Unsalable Inventory.
§ Memo. To prevent questions from your accountant, in the Memo cell, type the reason for the adjustment, such as “2013 end-of-year physical count.”
After you fill in all the boxes, click Save & Close (or Save & New if you want to create a second adjustment for write-offs, say). If you decreased the quantity on hand, QuickBooks decreases the balance in your inventory asset account (using the average cost per item). To keep double-entry bookkeeping principles intact, the decrease in the inventory asset account also shows up as an increase in the expense account you chose. Conversely, if the adjustment increases the quantity or value of your inventory, the inventory asset account’s balance increases and the expense account’s balance decreases.
Adjusting Quantities and Values
Calculating inventory values by using the items’ average cost is convenient—and in QuickBooks Pro and Premier, it’s your only option. Using other methods for calculating inventory value, like “first in/first out” (FIFO) and “last in/first out” (LIFO) costing (explained in the box on FIFO and LIFO Inventory Costing), quickly turn into a full-time job. But if that’s what you want, you can do so manually.
NOTE
You can value inventory by using FIFO if you upgrade to QuickBooks Enterprise and subscribe to Intuit’s Advanced Inventory service (which costs extra).
Because QuickBooks can handle only average cost for inventory, your sole workaround for achieving LIFO or FIFO costing is to adjust dollar values by hand in the “Adjust Quantity/Value on Hand” window. When you choose Total Value in the window’s Adjustment Type box, QuickBooks displays the New Value column. You can then change the asset value of the quantity on hand simply by typing the new value in that column.
You can also change both quantities and values to, for example, make the quantity reflect what’s in your warehouse and the value reflect the items’ poor condition. To do this, in the Adjustment Type box, choose “Quantity and Total Value.” QuickBooks then activates the New Quantity, Qty Difference, and New Value columns. To change the number you have, type the value in the New Quantity cell. To adjust an item’s value, in the New Value cell for that item, type the dollar value for the quantity on hand.
Mimicking LIFO or FIFO costing takes some effort because you have to review the bills for all your purchases of the inventory item. Here’s how to value your inventory using LIFO:
1. Choose Reports→Purchases→Purchases by Item Detail.
QuickBooks generates a report that shows your purchase transactions grouped by inventory item.
2. For the quantity of the item that you have on hand, add up the prices you paid for your earliest purchases.
The Purchases by Item Detail report’s Cost Price column shows how much you paid for an item with each purchase. Say you need to know the LIFO value for 10 security stations for your tax return. As shown in Figure 20-13, the first 21 security stations cost $999.95 each and the last 4 cost $750.00 each. So the LIFO value for the last 10 security stations would be 4 multiplied by $750.00 and 6 multiplied by $999.95, or $8,999.70.
3. In the “Adjust Quantity/Value on Hand” window (Vendors→Inventory Activities→“Adjust Quantity/Value on Hand”), type the amount you just calculated into the New Value cell.
When you click Save & Close, QuickBooks decreases the balance in your inventory asset account using the value in the New Value cell instead of the average cost per item.
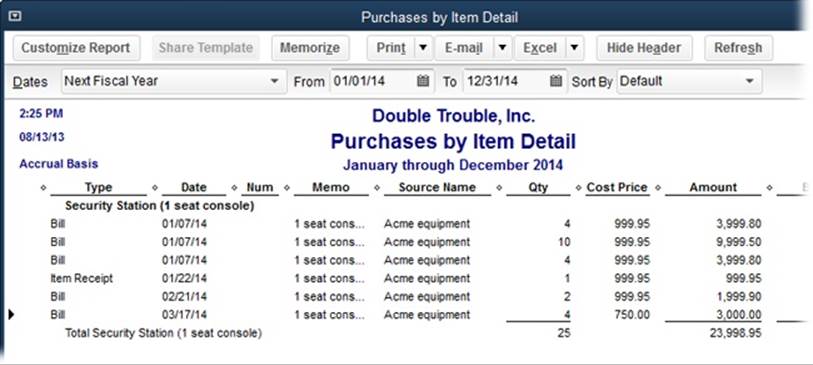
Figure 20-13. To value the inventory by using FIFO, start with the costs for the items purchased first: all 10 monitors at $999.95, or $9,999.50.
UP TO SPEED: FIFO AND LIFO INVENTORY COSTING
First in/first out (FIFO) costing means that a company values its inventory as if the first products it receives are the first ones it sells. (Your grocery store always puts the milk closest to its expiration date at the front of the refrigerator, right?)
Last in/first out (LIFO) costing, on the other hand, assumes that the last products in are the first ones sold. This method is like unpacking a moving van: The last valuables you packed are the first ones that come out.
The costing method you use doesn’t have to match the order in which you sell products. When you start a business, you can choose whichever costing method you want—but you have to stick with it. For example, when prices are on the rise (as they almost always are), LIFO costing reduces your profit and taxes owed because you’re selling the products that cost the most first. However, with the steady decrease in electronics prices, FIFO costing probably produces the least profit. Unless you’re sure which method you want to use, you’re better off asking your accountant for advice.
Unfortunately, even with the “Adjust Quantity/Value on Hand” window, you can’t achieve true LIFO or FIFO costing in QuickBooks Pro or Premier. The program always uses average cost to move money from your inventory asset account to your cost of goods sold account when you add products to an invoice or sales receipt.
All materials on the site are licensed Creative Commons Attribution-Sharealike 3.0 Unported CC BY-SA 3.0 & GNU Free Documentation License (GFDL)
If you are the copyright holder of any material contained on our site and intend to remove it, please contact our site administrator for approval.
© 2016-2026 All site design rights belong to S.Y.A.