QuickBooks 2014: The Missing Manual (2014)
Part I. Setting Up QuickBooks
Chapter 2. Getting Around in QuickBooks
You have more than enough to do running your business, so you don’t want bookkeeping to take any more time than necessary. QuickBooks’ left icon bar and top icon bar both offer shortcuts to your favorite features. Each icon bar has its pros and cons, so you have to decide which one you prefer (or you can turn them off completely). This chapter shows you how to access QuickBooks’ features from the menu bar and icon bars.
During a rousing bookkeeping session, you might end up with several QuickBooks windows open at the same time. In this chapter, you learn how to work with all the windows you open. If you prefer to focus on one task, you can tell QuickBooks to display only one window at a time. As its name implies, Supermax view supersizes a window so you can see more info without scrolling. You’ll learn lots of window tricks in this chapter.
Another way to get your accounting done quickly and efficiently is by accessing features via the QuickBooks Home page. The page not only provides a visual roadmap of the bookkeeping tasks you perform regularly, but it also gives you quick access to tasks and information related to vendors, customers, and employees, along with the features and overall financial info you use most often. Click an icon, and the corresponding window or dialog box appears, such as Chart of Accounts, Item List, Write Checks, or everyone’s favorite—Make Deposits.
This chapter explains how to use the workflow icons on the Home page, as well as the Vendor, Customer, and Employees Centers that open when you click the corresponding buttons in the Home page’s panels. (The Inventory Center, which is available in QuickBooks Premier and Enterprise, is described on Working with the Inventory Center.) You’ll also see how to review your company’s finances in the Company Snapshot window.
Menus and the Icon Bars
The menu bar at the very top of the QuickBooks window (Figure 2-1) is a convenient way to launch different activities. It’s handy because it’s always visible and serves up every feature QuickBooks has to offer.
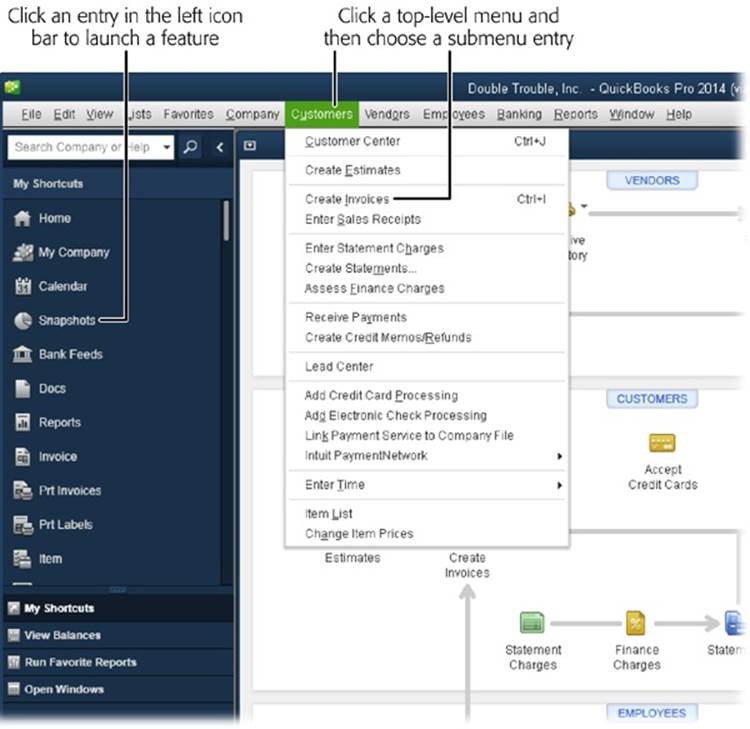
Figure 2-1. Every feature in QuickBooks is always within reach via the menu bar. Choose a top-level menu like Customers (shown here), and then choose an entry from the drop-down menu or a submenu. For one-click access to your favorite features, use the left icon bar (shown here) or top icon bar, both of which you can customize to include the features and reports you use the most (page 708).
You can use the View menu to choose between two icon bars: the top icon bar and the left icon bar. The top icon bar (View→Top Icon Bar) has been around for years. It sits just below the menu bar and displays your favorite features as icons with brief identifying labels. Click an icon, such as Home, Calendar, or Bill, and the corresponding feature launches. If you haven’t graduated to a large, widescreen monitor, this icon bar is both convenient and space-saving. (If you really need more space, you can hide the icon bar by choosing View→Hide Icon Bar.)
The left icon bar (View→Left Icon Bar), shown in Figure 2-2, appears the first time you launch QuickBooks 2014 and offers access to every feature QuickBooks has to offer. The categories in the middle section of this icon bar determine what’s displayed in its top section. Here’s what the entries in the middle section of the left icon bar do:
§ My Shortcuts. This category, which appears at the top of the left icon bar whenever you launch QuickBooks, is a great way to keep your favorite features within easy reach. This category includes features that most people use frequently. But you can customize it to add other features youuse all the time and get rid of shortcuts you don’t use simply by right-clicking anywhere within the My Shortcuts section (except on the My Shortcuts heading), and then clicking Customize Shortcuts.
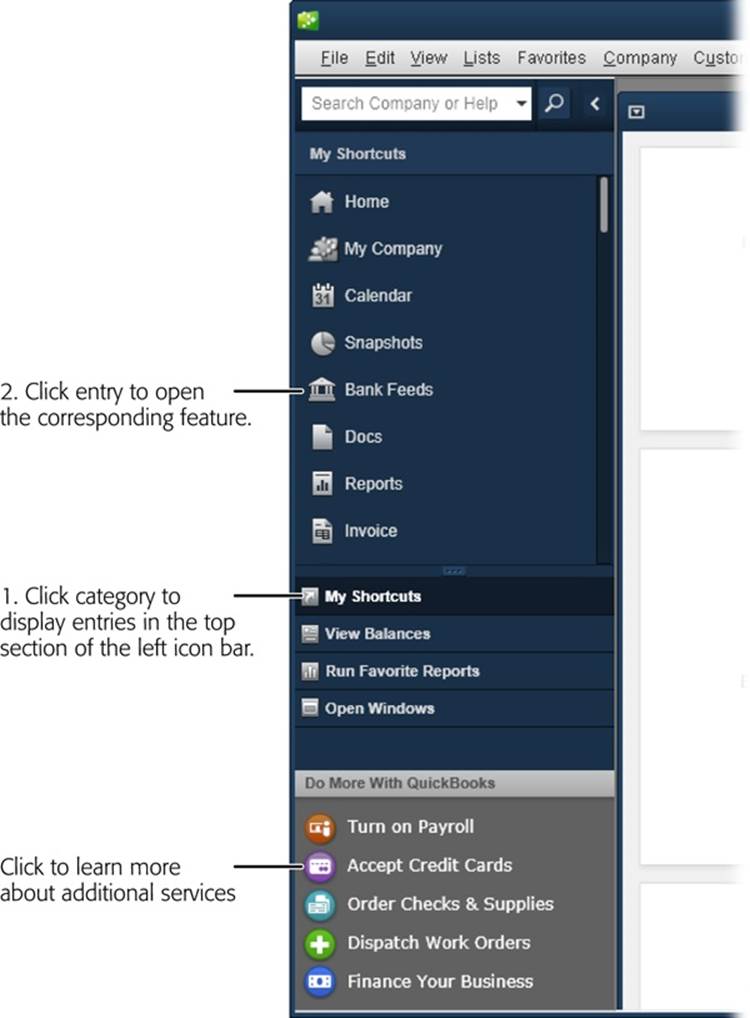
Figure 2-2. The left icon bar includes three sections that help you access your favorite features. The unlabeled middle section contains categories like My Shortcuts and View Balances. When you click an option in this section, the top section displays the entries for that category, like the shortcuts shown here. The bottom section contains links to other products and services that Intuit offers, such as payroll, payment solutions, and so on.
NOTE
The shortcuts in the My Shortcuts list are the same ones you see as icons if you display the top icon bar.
§ View Balances. When you use the left icon bar, the Home page doesn’t display account balances on the right side as it does when you use the top icon bar. To see your account balances at the top of the left icon bar, click this category. (Account Balances explains how to customize which account balances you see.)
§ Run Favorite Reports. Clicking this category lists the reports that you’ve flagged as your favorites (Finding Frequently Used Reports). The reports you see are the same ones that appear on the Favorites tab of the Report Center.
§ Open Windows. If you turn on the preference to use multiple windows (Desktop View), you can click this category to see a list of open windows at the top of the left icon bar. Click a window’s name to make it active. This category displays the same windows you see if you choose View→Open Window List when you use the top icon bar.
TIP
The left icon bar takes up a couple of inches on the left side of the main QuickBooks window, so it’s more useful if you have a widescreen monitor. With older and smaller monitors, you’ll have trouble fitting the left icon bar and your transactions windows onscreen at the same time. In that case, the menu bar, top icon bar, and Home page (which you’ll learn about in a sec) are ready to assist you.
After shortcut menus and keyboard shortcuts (see Appendix C, online at www.missingmanuals.com/cds), icon bars are the fastest way to launch your favorite features. You can add features, memorized reports, and windows you open often to them—and remove features you don’t use.Customizing the Icon Bar tells you how to customize the icon bars.
Switching among Open Windows
If you tend to work on one bookkeeping task for hours on end, you can set QuickBooks up to display one full-size window at a time (Desktop View). That way, when you open additional windows, they get stacked on top of each other so you see only the last one you opened. Desktop Viewexplains how to tell QuickBooks which window setup you prefer.
If you go with the one-window approach, you can choose the window you want to see in several ways:
§ Click Open Windows in the middle section of the left icon bar, as shown in Figure 2-3. Then, in the top section of the left icon bar, click the name of the window you want.
§ If you use the top icon bar, you can see a list of open windows by choosing View→Open Window List. Then, in the list, simply click the name of the window you want to work with.
§ On the menu bar, choose Window, and then choose the name of the one you want to see.
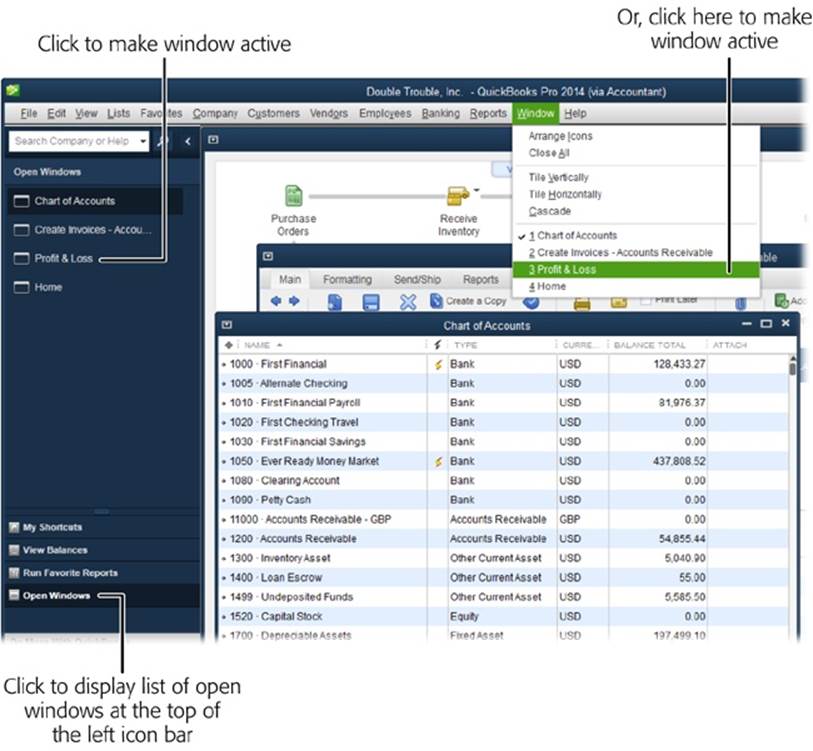
Figure 2-3. You can switch to another window by clicking the Window menu at the top of the screen and then choosing the window you want to display. When you have multiple windows open, the Window menu includes entries for arranging them, such as Cascade and Tile Vertically.
If, on the other hand, you flit between bookkeeping tasks like a honeybee in an alfalfa field, you probably want to display several windows at a time. QuickBooks can do that. Like windows in other programs, simply click a window to bring it to the front, or use the buttons in its upper right to minimize, maximize, or close it. You can reposition windows by dragging their title bars, or resize them by dragging their edges and corners. If the window you want is hidden behind other windows, choose the one you want in the Open Windows list or from the Window menu on the menu bar, as described at the beginning of this section.
Supermax View
When you want to see as much information as possible in a transaction window, such as Create Invoices, Supermax view, shown in Figure 2-4, is just the ticket. To switch a transaction window to Supermax mode, at the top right of the window, click the icon that looks like a four-headed arrow.
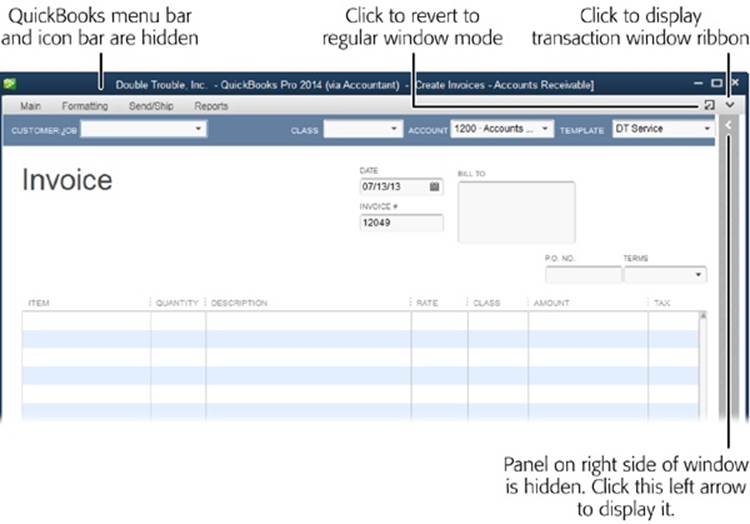
Figure 2-4. Supermax view hides the menu bar, the left icon bar or top icon bar, and the ribbon at the top of the transaction window. It also hides the transaction history panel on the right side of the window. You can restore or hide the ribbon and transaction history panel by clicking the appropriate arrows (labeled here).
This view does several things so you can see more of the data entry lines:
§ Hides the QuickBooks menu bar and icon bar (if you use one)
§ Minimizes the ribbon (which is similar to the ribbons in Microsoft programs) at the top of the window
§ Fills the entire QuickBooks window with the transaction window you Supermaxed
§ Hides the transaction history panel on the right side of the window
To revert to regular window mode, click the icon that looks like a square with an arrow pointing to its lower left (see Figure 2-4). When you revert to regular window mode, the menu bar, icon bar, and feature panel at the top of the transaction window all reappear.
The Home Page
The QuickBooks Home page (Figure 2-5, background) is a slick way to work through your company’s bookkeeping tasks. (If it isn’t visible, choose Company→Home Page or click Home in the My Shortcuts section of the left icon bar or the left end of the top icon bar to display it.) This section shows you how to use the Home page to best advantage.
The settings you chose when you created your company file determine what appears on the Home page. Depending on what choices you made during setup, you’ll see several panels—Vendors, Customers, Employees, Company, and Banking—that each contain various icons. For example, if you tell QuickBooks during setup that you invoice customers and send statements, the Customers panel includes icons for invoicing and preparing statements. Or if you run a one-person shop with no employees, you won’t see the Employees panel.
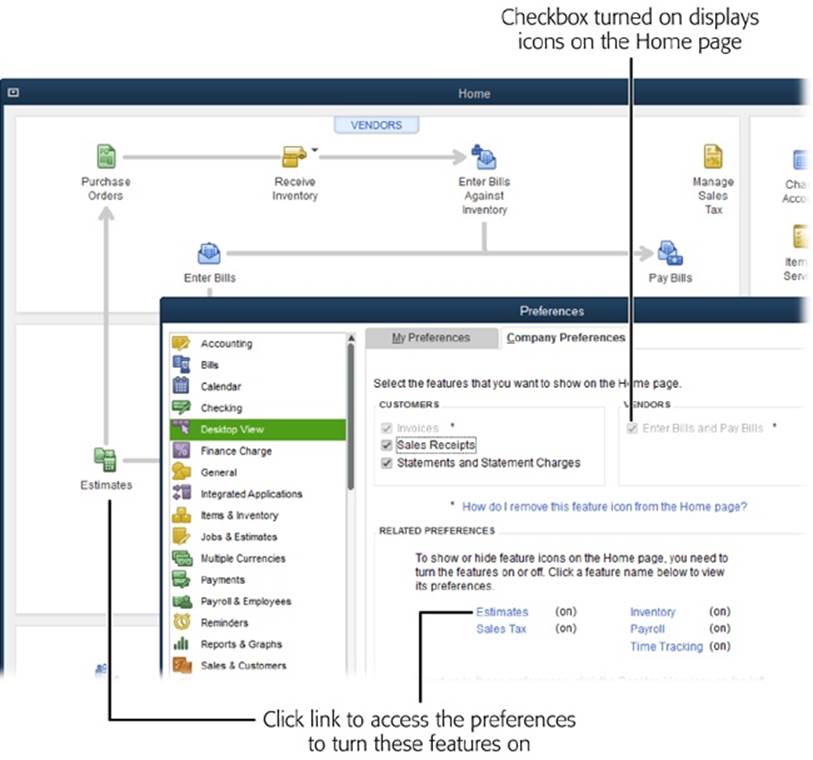
Figure 2-5. If a feature you use doesn’t appear on the Home page, choose Edit→Preferences→Desktop View and then click the Company Preferences tab (foreground). For example, if you want to enter sales receipts, turn on the Sales Receipts checkbox, as shown here. Some features (like Estimates and Sales Tax) have their own section of preferences. For example, the Invoices and “Enter Bills and Pay Bills” checkboxes are both grayed out here. To turn one of these features on or off or to adjust its settings, click its icon on the left side of the Preferences window to see the corresponding settings. The Related Preferences section at the bottom of the Company Preferences tab includes links you can click to jump to the corresponding preferences.
The Home page also has icons for other important features, like the Chart of Accounts icon in the Company panel, which opens the Chart of Accounts window, and the Check Register icon in the Banking panel, which opens your checking account register window.
TIP
The Home page appears each time you log into a company file. If you prefer to keep the Home page hidden, choose Edit→Preferences→Desktop View, click the My Preferences tab, and then turn off the “Show Home page when opening a company file” checkbox. Then, when you want to see the Home page, simply choose Company→Home Page.
Vendors, customers, and employees each have their own panel on the Home page. The various arrows on the Home page show how bookkeeping tasks fit together so you can follow your money from start to finish. The bookkeeping tasks for each group are laid out like breadcrumbs you can follow. However, each company is different, so you don’t have to use every icon you see. This section outlines the tasks you can perform from each panel and where to find detailed instructions elsewhere in this book.
Vendors
Whether you purchase products and services to run your company or to sell to your customers, the Home page’s Vendors panel steps you through purchasing and paying for the goods and services you use; these steps are described in detail in Chapter 9.
The Vendor Center (Figure 2-6) is the best place to create, edit, and view what’s going on with your vendors and vendor-related transactions. To open it, click the Vendors button at the top of the Vendors panel or choose Vendors→Vendor Center. Here’s what you can do there:
§ Create a new vendor. In the Vendor Center toolbar at the top of the window, click New Vendor→New Vendor and the New Vendor window opens so you can create a new vendor record, as described on Setting Up Vendors. If you click New Vendor→Add Multiple Vendors instead, QuickBooks lets you create several vendors in one window (Adding and Editing Multiple Records).
§ Find a vendor. If you have a bazillion vendors, you can shorten the vendor list that you see in the Vendors tab on the window’s left side. The tab’s unlabeled drop-down list is initially set to Active Vendors. If you want to see active and inactive vendors alike, click the field and choose All Vendors instead. If you’d rather see only the vendors you owe money to, choose “Vendors with Open Balances.” Choose Custom Filter to specify exactly the criteria you want.
To do a quick search of vendor records, type part of a vendor’s name in the Vendors tab’s second unlabeled box and then click the Find button, which has a magnifying glass on it. (The Find button then changes to a red X, which you can click to clear the value in the Find box and redisplay the full list.)
§ Review a vendor’s record. When you select a vendor on the Vendors tab, basic info about that vendor appears at the top right of the window, as shown in Figure 2-6.
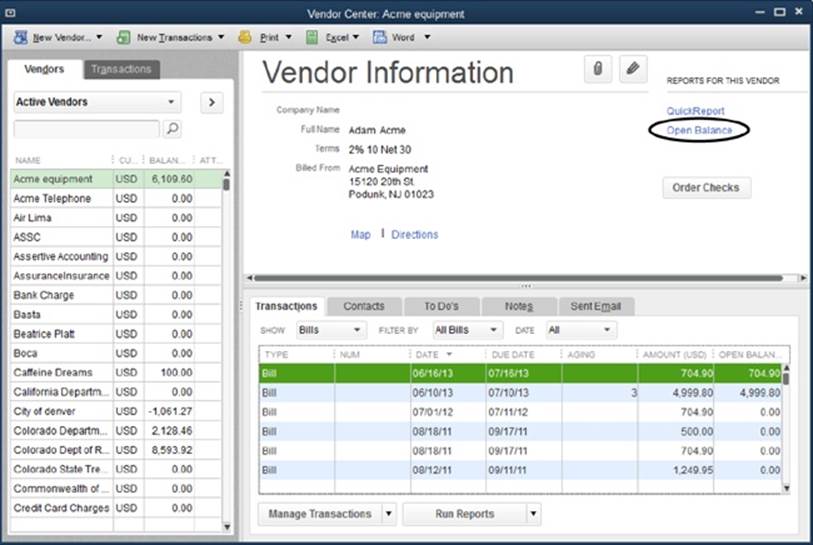
Figure 2-6. The Vendor Center puts all vendor-related tasks in a single window. When you choose a vendor in the list on the left, the Vendor Information pane on the right displays info about that vendor. Click the Open Balance link (circled) to see the transaction’s that contribute to your balance with that vendor. You can even click the Map or Directions link to find out how to get to your vendor. To see more details, like transaction history, vendor contact info, to-dos related to the vendor, notes you’ve made, and emails you’ve sent, click the tabs below the Vendor Information pane.
§ Edit an existing vendor’s record. To change a vendor’s record, on the Vendors tab, right-click the vendor’s name and then choose Edit Vendor; or, on the right side of the Vendor Center, click the Edit button (its icon looks like a pencil tip). Either way, the Edit Vendor window opens with the same fields you filled in when you created the record (Setting Up Vendors).
§ Attach an electronic document to a vendor record. You can add attachments to a vendor’s record as described on Choosing a Print Method.
§ Create transactions for a vendor. In the Vendor Center toolbar, click New Transactions to display a drop-down menu of vendor-related features like Enter Bills, Pay Bills, and Receive Items. (These do the same thing as the icons in the Home page’s Vendors panel.) If you need to review and record several transactions for the same vendor, this drop-down menu is a real timesaver. After you select the vendor in the Vendors tab and then choose an entry on this drop-down menu, the corresponding transaction window opens with that vendor already selected.
§ Review and manage transactions, contacts, to-dos, notes, and sent email for a vendor. When the Vendors tab is displayed, the bottom-right part of the Vendor Center displays tabs for transactions, contacts, to-dos, notes, and sent email.
When you select a vendor in the Vendors tab, the Transactions tab at the bottom right of the Vendor Center lists that vendor’s transactions. By filtering these transactions, you can find out which purchase orders are still open, whether any bills are overdue, and what payments you’ve made. To see a specific kind of transaction, in the Show drop-down list, choose a type, like Bills or Bill Payments. The Filter By drop-down list lets you restrict the transactions in the table by their status, such as Open Bills or Overdue Bills. To track down transactions within a specific date range, choose an option from the Date drop-down list. (The options in this menu are the same as the ones available in report windows; see Date Ranges.)
TIP
To view a transaction in its corresponding window, double-click the transaction in the list.
Click the Contacts, To Do’s, Notes, or Sent Email tab to create, edit, or view contacts, to-dos, notes, or sent email for the selected vendor.
§ Review transactions for all vendors. When you click the Transactions tab on the left side of the window (not the bottom right) and then click a type of transaction, such as Bills or Bill Payments, you’ll see transactions of that type for all vendors on the right side of the window. You can filter these transactions by status (such as open or overdue), by date, and, if you use multiple currencies, by currency.
§ Print or export vendor information. When you click the Vendors tab on the left side of the window, you can easily print, copy, import, or export vendor info. In the Vendor Center toolbar, click Print to print vendor lists, vendor info, or vendor transactions. Click Excel to paste, import, or export vendor info and transactions (Importing with the Excel Import Wizard Templates). If you click the Transactions tab instead, you can print or export transactions.
§ Prepare vendor letters. When the Vendors tab on the left side of the window is selected, click Word in the Vendor Center toolbar to create letters to vendors (Mail Merge to a Word Document).
Customers
The Home page’s Customers panel has icons for customer-oriented features like creating invoices, statements, sales receipts, and so on. (Chapter 10 describes how to work with invoices, estimates, sales orders, refunds, and customer credits. Chapter 11 covers creating statement charges and statements. Receiving payments and sales receipts for cash sales are both described in Chapter 13.) Click the Customers button at the top of the panel (or choose Customers→Customer Center) to open the Customer Center, where you can perform the following tasks:
§ Create a new customer or job. In the Customer Center toolbar at the top of the window, click New Customer & Job. In the drop-down menu, choose New Customer to create a new customer record (Creating a New Customer), or choose Add Multiple Customer:Jobs to add severalcustomers. If you want to add a job to an existing customer, first select the customer in the Customers & Jobs tab on the left side of the Customer Center and then click New Customer & Job→Add Job (Creating Jobs in QuickBooks).
§ Find a customer. You can filter the list in the Customers & Jobs tab to show active customers, only customers who owe you money (customers with open balances), and so on, simply by choosing an option in the tab’s unlabeled drop-down list (it’s initially set to Active Customers). Choose Custom Filter to specify criteria for the customers you want to see. To search for a specific customer, type part of the customer’s name in the tab’s second unlabeled box, and then click the Find button (it has a magnifying glass on it). The Find button then changes to a red X, which you can click to clear the value in the Find box and redisplay the complete list.
§ Review a customer record. When you select a customer in the Customers & Jobs tab, the right side of the center displays the basic 411 about that customer. In the Customer Information section, shown in Figure 2-7, you can get directions to its location, look at key information like the customer’s open balance, attach electronic documents to the record, or run reports about the customer.
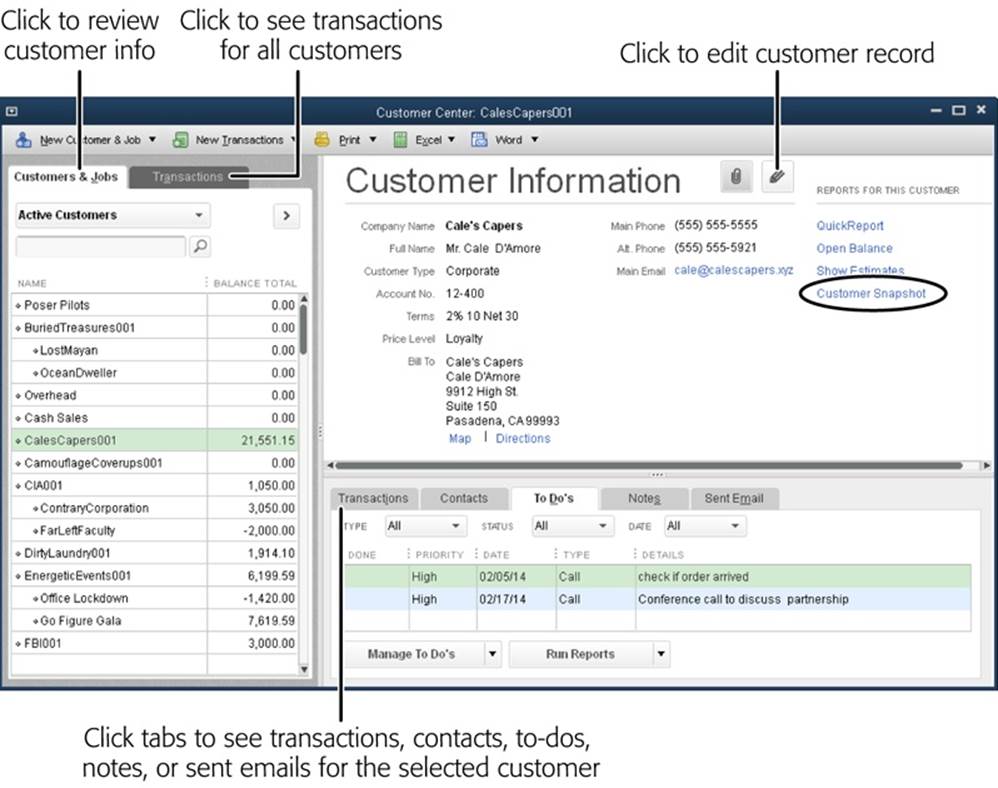
Figure 2-7. To open or edit a customer’s record, in the Customers & Jobs tab, select the customer so it appears in the Customer Information section. Then click the Edit button labeled here. To see more info about the selected customer, click the Transactions, Contacts, To Do’s, Notes, or Sent Email tabs at the bottom right of the window. To see transactions for all customers, click the Transactions tab on the left side of the window.
§ Review a customer’s status. Suppose you want to look at a bar graph of sales you’ve made to a customer by time period, review the items that customer buys the most, and then scan a customer’s recent invoices and payments. First, select the customer in the Customers & Jobs tab. Then, on the right side of the Customer Center, click the Customer Snapshot link (circled in Figure 2-7) to open the Company Snapshot window (The Company Snapshot) to the Customer tab.
§ Edit an existing customer’s record. To open the Edit Customer window, in the Customers & Jobs tab, either right-click a customer’s name and then choose Edit Customer, or select a customer and then click the Edit button that’s labeled in Figure 2-7.
§ Attach an electronic document to a customer record. You can add attachments to a customer’s record or scan images of them into QuickBooks, as described on Choosing a Print Method.
§ Create transactions for a customer. If you’re reviewing a customer’s transactions and realize you forgot to record an invoice or other transaction, you can easily create transactions from the Customer Center window. After you select the customer on the left side of the Center, in the window’s toolbar, click New Transactions and then choose a transaction type from the drop-down menu, such as Estimates, Invoices, or Receive Payments. The items in this menu are the same as the icons in the Home page’s Customers panel and open the corresponding window to record that type of transaction.
§ Review and manage transactions, contacts, to-dos, notes, and emails for a customer. When the Customers & Jobs tab is displayed on the left side of the window, the bottom right of the Customer Center includes tabs for transactions, contacts, to-dos, notes, and sent emails. If you click the Transactions tab, you’ll see a table at the bottom right of the window with the transactions for the customer you selected in the Customers & Jobs tab. You can filter these transactions by type (estimates or invoices, for example), status, and date. Double-click a transaction in the list to open a window with details about it. Click the Contacts, To Do’s, Notes, or Sent Email tab to create, edit, or view contacts, to-dos, notes, or emails for the selected customer.
§ Review transactions for all customers. When you click the Transactions tab on the left side of the window and then click a type of transaction (such as Estimate, Invoices, or Received Payments), the right side of the window displays transactions of that type for all customers. Depending on the type you choose, you can filter these transactions by status (such as open or overdue), payment method, date, and—if you use multiple currencies—currency.
§ Print or export customer information. When you click the Customers & Jobs tab on the left side of the window, you can print, copy, import, or export customer info. In the center’s toolbar, click Print to print customer information (Printing Lists) or click Excel to import or export customer and job info (Exporting Addresses). If you click the Transactions tab instead, you can print or export customer transactions.
§ Prepare customer letters. In the Customer Center toolbar, click Word to create letters to customers (Mail Merge to a Word Document).
Employees
The Home page’s Employees panel has only a few icons. The devilish details arise when you click one of these icons to enter time, set up paychecks, or pay payroll tax liabilities. The Employee Center works the same way as the Vendor and Customer centers you just learned about. To open it, click the Employees button at the top of the panel on the Home page or choose Employees→Employee Center.
In the Employee Center, you can create new records for employees, update info for existing employees, and view transactions like paychecks. On the Employees tab on the left side of the center, you can filter the list to view active employees, released employees (ones who no longer work for you), or all employees. See Chapter 8 to learn how to record the time that employees work. Chapter 15 covers the process for paying employees and other payroll expenses.
Company Features
The Company panel is on the right side of the Home page. The two icons in this panel that you’ll probably click most often are Chart of Accounts and Items & Services, which open the Chart of Accounts (Creating Accounts and Subaccounts) and Item List (Creating Items) windows, respectively. Click Calendar to review transactions and to-dos in the Calendar window (Your Financial Calendar).
If you’re interested in other apps and services that Intuit has to offer, click the “Web and Mobile Apps” icon; a browser window opens to the QuickBooks App Center. If you track inventory, click the Inventory Activities icon and then choose a feature, such as Adjust Quantity/Value On Hand, which lets you change the quantity and value of your inventory (Adjusting Inventory in QuickBooks). If you use QuickBooks Premier or Enterprise, click Inventory Center to open a window similar to the Customer Center, except that it focuses on the status of—and transactions involving—your inventory items (Working with the Inventory Center).
Banking
The Home page’s Banking panel is a one-stop shop for banking tasks. Whether you visit this panel frequently or rarely depends on how you like to record transactions. For example, you can click the Write Checks icon to open the Write Checks window (Writing Checks Without Entering Bills) or simply press Ctrl+W to do the same thing. (Or, if you like to record checks in a check register window, you might prefer to double-click your bank account in the Chart of Accounts window instead.) Similarly, clicking the Enter Credit Card Charges icon opens the Enter Credit Card Charges window (Paying Using Other Payment Methods), though you can also record credit card charges directly in a credit card account’s register (Entering Transactions in an Account Register).
Clicking the Record Deposits icon opens the “Payments to Deposit” window so you can record bank deposits (Making Deposits). The Reconcile icon opens the Begin Reconciliation dialog box so you can reconcile your QuickBooks records to your bank’s (Reconciling Accounts). And the Print Checks icon opens the “Select Checks to Print” dialog box so you can choose the ones you want to print and send them to a printer loaded with blank checks.
NOTE
If you use the top icon bar (View→Top Icon Bar), the top-right part of the Home page shows account balances. Below those is a Do More with QuickBooks section with a few links to additional services that Intuit offers. You also see a Backup Status section that tells you when your last backup ran and includes info about the Intuit Data Protect backup service (Automated Backups). If any of these sections are collapsed, click the section’s down arrow to expand it. Click a section’s up arrow to collapse it.
If you use the left icon bar (View→Left Icon Bar), you can see account balances by clicking View Balances in the bar’s middle section. (See Menus and the Icon Bars for more about the icon bars.)
The Company Snapshot
The Company Snapshot window (Figure 2-8) is a dashboard that shows important aspects of your company’s financial state, like account balances, income breakdown (by top-level income accounts), customers who owe you money, best-selling items, and reminders. Choose Company→Company Snapshot or click the Snapshots icon in either icon bar to open it. You can choose from 12 different views (Changing an Icon’s Appearance) to see the information you care most about.
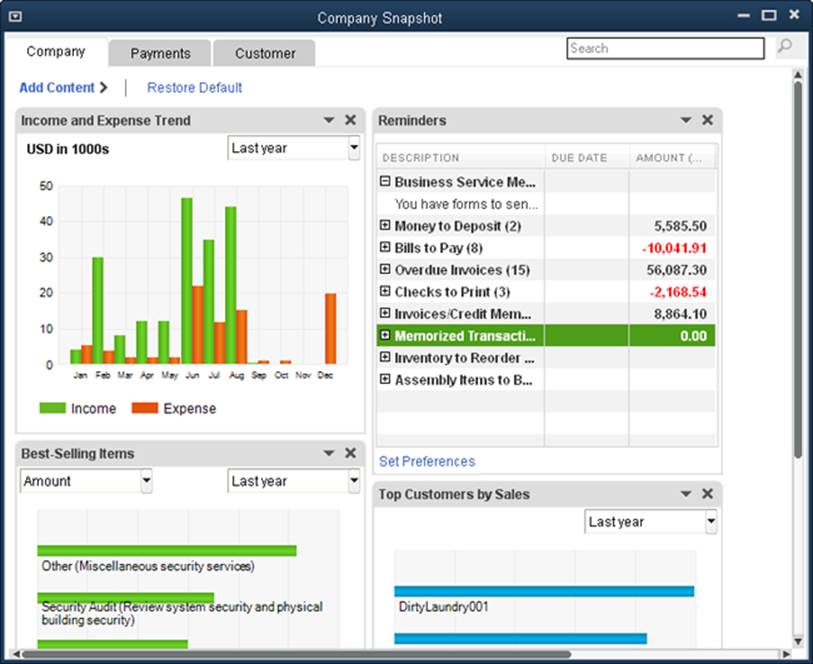
Figure 2-8. Not only can you quickly scan your company’s financial status in this window, but you can also double-click entries here to dig into the details. You can even add or remove items from this window or drag items to rearrange them, as described on page 709.
All materials on the site are licensed Creative Commons Attribution-Sharealike 3.0 Unported CC BY-SA 3.0 & GNU Free Documentation License (GFDL)
If you are the copyright holder of any material contained on our site and intend to remove it, please contact our site administrator for approval.
© 2016-2026 All site design rights belong to S.Y.A.