Marketing Automation For Dummies (2014)
Part III. Running Automation Campaigns
Chapter 9. Creating Forms and Landing Pages
In This Chapter
![]() Creating and publishing forms
Creating and publishing forms
![]() Building landing pages
Building landing pages
![]() Avoiding common mistakes
Avoiding common mistakes
Aside from email, forms and landing pages are the most common use of HTML in a marketing department. It also can be one of the most technically demanding projects in a marketer’s day if she has to create the forms, deploy them, and manage the hosting of these pages. Forms usually require IT to create the fields and place them online. Landing pages usually require IT to help create and launch these online microsites as well.
Marketing automation solutions have created a very easy way to create, deploy, and manage these key marketing assets. In this chapter, I show you how to think about forms in a new way, how to create forms that convert more leads, and how to work with landing pages that are easy to create.
Publishing Forms
After your marketing automation system is loaded with a full database, your email templates, and your content, you should build your first form and publish your form to your website or a landing page.
Building your first form should not take a significant amount of time unless you like messing with CSS or HTML. I suggest that you refrain from coding when building your first forms and instead stick to the form builder in your marketing automation tool.
Connecting forms into your existing marketing workflows can be time consuming, usually because you are trying to upload a form to a website, connect the fields to your CRM, or figure out how to respond to all queries. The following sections help you focus on building the forms correctly to help minimize the time required to get your forms up and running.
Identifying your questions
Choose the questions you want to ask in your form. Asking a lot of questions isn’t necessary if your marketing automation system is set up to collect behavioral data on prospects. So consider omitting the following fields from your forms because you will get it from your behavioral tracking:
· How Did You Hear about Us?: Your marketing automation tool will tell you.
· Job Title: You can easily get this information from a third-party source.
· Phone Number: Marketing Sherpa states that 65 percent of people lie when asked this question.
· Company: You’ll get the prospect’s email, which has his company name in it.
· Last Name: You don’t need the prospect’s last name to email her.
· Company Size: Consider using data augmentation to help with this.
Placing fields in your forms
Select the fields that map to your questions. For example, if you need “First Name,” select “first name” from your data points. You need to have all your custom fields set up before this step. This setup should involve only a simple drag-and-drop process at this point if you set up the fields beforehand.
When placing the fields in your form, start with the most logical ones first. These are usually Name and Email, with custom questions following. Custom questions are those outside the standard Name, Address, and Contact information.
Developing form look and feel
Many solutions let you control the look and feel of your form, either by controlling the CSS and HTML or by giving you a WYSIWYG editor to control the form styling. Some solutions let you create forms that automatically take on the look and feel of your website when placed on your site.
Setting form automations
You might be able to set up automations on your form submissions, or you might have to set up a campaign that’s attached to your form. Standard automations accompanying a form submission are as follows:
· Auto-responder email
· Score change
· Segmentation
· Lead assignment
· Campaign attribution
Placing lead capture forms on your website
You have two ways to place live forms on your website:
· Marketing automation hosted placement: Your marketing automation tool can host both your form and landing page. This placement is usually set up during the process of building your landing page or form. The benefit of this option is that you can publish your form instantly after you are finished building it, and no other steps are required to get your form live and online.
· Live website placement: If you want your form on your own hosted website, you need to copy the HTML code for your form using your marketing automation tool and paste the code into your website (see Figures 9-1 and 9-2). The code for your form is usually provided to you after you have built your form. Where and how you can copy the HTML code for your form depends on your tool.
 Some applications don’t allow you to place the form on your own website, requiring instead that it be built on a landing page and hosted in your marketing automation tool. Make sure to spend time educating yourself so that you know what your tool supports.
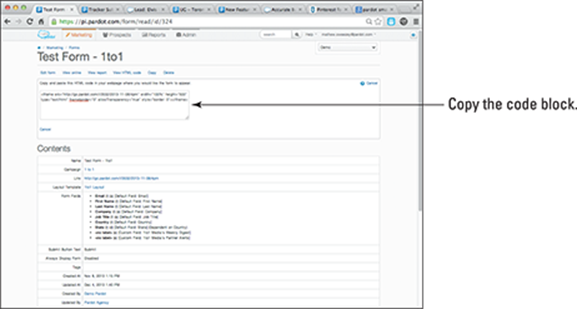
Figure 9-1: This block of HTML code is what you copy and paste to your landing page or website.
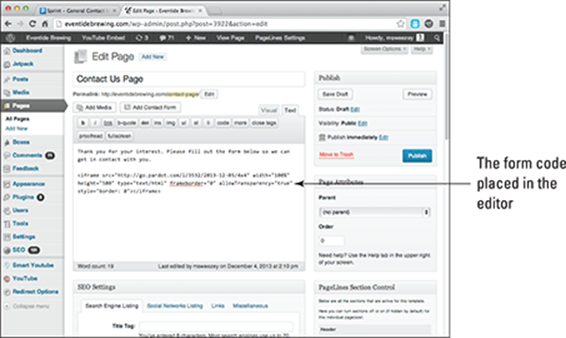
Figure 9-2: Place the form code into the HTML editor of a page (a WordPress site, in this case).
Knowing the importance of short forms with inbound marketing
The more questions you ask, the lower your engagement rates will be. In its report “The Science of Lead Generation,” HubSpot looked at 40,000 landing pages and determined that the more fields you ask people to fill out, the lower your engagement rates. The HubSpot study suggests that each question you have beyond three decreases your engagement rates. The engagement rates were at about 30 percent at only three questions and down to 10 percent by eight questions.
So keep your forms short. You can use progressive profiling to help you get the information you need. Progressive profiling is a technology provided by almost all marketing automation tools and allows your forms to ask different questions based on what your database knows about a person. Your form can change each time a person is asked to fill it out.
The form using progressive profiling asks a limited set of questions each time, allowing you to increase your engagement rates by capturing a lot of information over many interactions. You must utilize progressive profiling as much as you can because it helps you to keep your forms short and increases your engagement rates.
Publishing Your First Landing Page
If you choose to build a basic landing page within your marketing automation tool, simply follow the instructions in your tool. Most applications walk you through a series of fool-proof steps. This is the best approach for most people, but issues sometimes arise with building a landing page in a marketing automation tool:
· Limited functionality: Depending on your tool, your landing page creation and functionality may not be as robust as your current website solution.
· Limited SEO control: Some companies have very heavy SEO needs and optimize their landing pages for inbound marketing. Your marketing automation tool may not be able to meet certain special needs.
You should investigate your marketing automation’s landing page tool to see whether these issues might arise. Many landing page tools don’t have limitations in these areas. If your marketing automation tool’s landing page builder is not up to par for your needs, you should consider the following options for building your landing page.
All the following options will still work with the rest of your marketing efforts, and having to use one of them should not deter you from choosing a marketing automation solution. Just understand that some additional amount of work is required.
· Build it from scratch: When building your landing page from scratch, you need to use your tools and incorporate a form from your marketing automation tool. This is the best option for those who have an existing website with landing pages and don’t want to re-create them in a marketing automation tool, or those companies that have such complex requirements that their marketing automation tool does not suffice.
· Upload an HTML template. When you upload HTML, you can easily copy the look of your web page by simply copying the raw HTML file. Right-click the page you want to mimic and then copy the page source. You can then paste the source code into a raw HTML editor and save the file. This process is not fool-proof, though, and will probably get you only 90 percent of the way to a fully functional page.
· Use your content management system (CMS) to build a landing page. For the most customizable option, use your CMS. Your CMS gives you the greatest control and is already set up to look like the rest of the pages in your website. The capability to build a landing page is not available with all marketing automation tools, but a majority of them include this feature.
Most marketing automation tools allow you to have special pages added to your website. Adding pages is easy and maintains all automation options for your future campaigns. You create the landing page in your CMS and then post the URL into your marketing automation tool, making sure that it recognizes the URL as a landing page.
Avoiding landing page mistakes
Creating forms and landing pages is easy, but you want to watch out for common mistakes when publishing your landing page. For example, when you use a lead capture form, make sure that it’s capturing the leads correctly. Test your form as soon as the page goes live to see that it works as you intend.
Verify that your landing page renders correctly. Also, WYSIWYG editors are not 100 percent perfect, so you should check your live landing page for correct rendering in all browsers. When you check the form submission feature of your landing page, make sure that the page is being tracked on your lead records: Create a dummy lead and visit your landing page.
You should also verify that the text on your form clearly explains what will happen when the user fills out the form, as shown in Figure 9-3.
Your competition is going to get their hands on your content regardless of what you do to try to stop them, so don’t try to create ways to stop them. You’ll just create barriers for the people you care about reaching. So when someone in your organization complains that a form is too easy or that the competition is going to get your great information, assure the worrier that the competition already has it!

Figure 9-3: Clearly describe what will happen when your form is filled out and submitted.
Building a Best-of-Breed Landing Page
The landing page is a key tool in any online marketing campaign. Usually it is used as a conversion point and is attached to an advertisement. The advertisement goes through a paid search campaign, a banner ad, or an email. The prospect is then driven to a special place where he can receive the offer. Usually, the prospect fills out a form on the landing page. Landing page theory is very basic; however, applying this theory in modern times can get a bit complicated.
Optimizing for a single goal
The main thing you need to know about landing page theory is the idea of optimizing the page to achieve a single goal. Take a look at two different landing pages. Figure 9-4 shows a landing page that is not optimized for a single goal. Notice how many actions a person can take on this page. The top alone has a lot of links. This is BAD. If you have taken all this time to set up a campaign and have paid to get someone to this page, you have a goal, and you should optimize this page for that goal.
In 2005, a University of Minnesota study titled “Three options are optimal when conducting multiple-choice items” was concerned with the concept of how people make decisions when given options. The study found that the fewer options you give people, the easier it is for them to make a decision. This is where the idea of optimizing a landing page for a single goal comes into play. Figure 9-5 shows a landing page that has only one option on the page. You can convert on the form or leave the page.
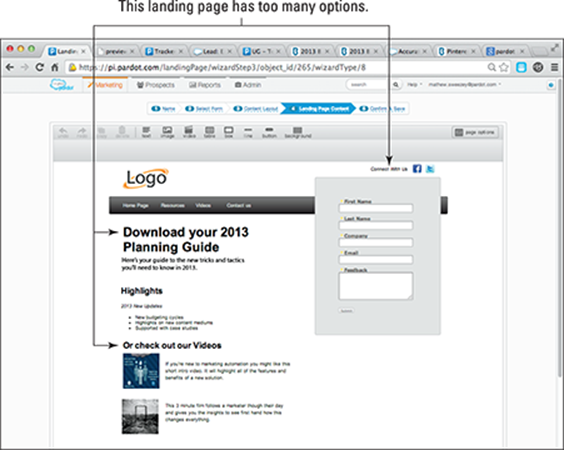
Figure 9-4: A landing page with multiple links is not an optimized page.
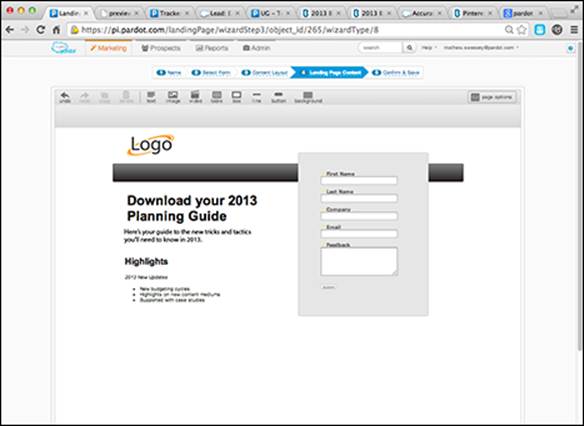
Figure 9-5: An optimized landing page with a simple choice.
Using dynamic content to increase conversions
The concept of optimizing for a single goal is great, but you also need to understand the concept of relevance. If you’re successfully driving lots of people to a single landing page, how do you make it relevant to each person with only a single call to action?
The answer is, you don’t; that is, you use dynamic content to make the single landing page different for each person. Dynamic content is a feature that reads a variable pertaining to each visiting prospect and changes the offer based on this variable. You have a few different ways to create dynamic content, as follows:
· Embedding dynamic content blocks: The dynamic content block is something your marketing automation tool may have. If you have this advanced feature, you can take your landing pages and website to a new level. Using dynamic content will be the same for landing pages and your website. Here are a few things you need to know before adding dynamic content to your landing page:
· Data point: You need to have a data point that you want to use to change your content. This data point is the trigger to show different content. Good data points to use are lead score, job title, or stage in the buying cycle.
· Content created: You need to have your different content pieces created; your dynamic content will render the correct piece of content based on the data point you choose. For example, if a VP shows up to your landing page, the page will show a different piece of content than it would to a manager.
· Content blocks and automations: You set these elements up in your marketing automation tool. If your tool allows for the creation of dynamic content blocks, your vendor can walk you through the steps of setting up these blocks. Make sure that your automation rules are based on the same data point to ensure consistent results.
Figure 9-6 shows a dynamic content block on a landing page, which is based on the lead score as the data point. Notice how the content being shown is tailored to the early stage of the buying cycle.
Figure 9-7 shows the same landing page with a dynamic content block running off of lead score as the data point. This time, the content shown is tailored to someone with a higher score. This is the power of using dynamic content, making your content relevant to someone at all times.
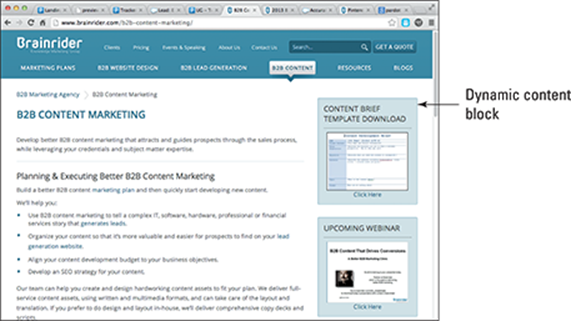
Figure 9-6: A landing page with dynamic content being driven off of the lead score data point.

Figure 9-7: The same landing page showing a different piece of content tailored to a person with a higher lead score.
· Using a dynamic CMS: Your marketing automation tool might not be capable of offering dynamic content. This feature is currently found only in the higher-end tools or as an expensive add-on to your existing marketing automation tool. Despite this, you still might be able to get the effect of dynamic content through functionality in your CMS. Some CRMs offer plug-ins to create your landing pages and use dynamic messaging. The WordPress CMS system is a good example of a CMS that offers plug-ins to help accomplish some dynamic actions.
A plug-in is a basic tool that you can add to your CMS to get more out of it. Plug-ins are usually built by other people who use WordPress, and they’re offered for free or at very little cost. Be aware that plug-ins offer a wide variety of functions and more are being added daily, so make sure to check on what’s available. Consider each one’s strengths and limitations. Some plug-ins can track users and suggest content for them; others can help you create content to ensure that yours is always fresh. Do note that a plug-in specific to your CMS might not connect to your marketing automation tool — because it is a feature of your CMS, not your marketing automation tool.
 The more advanced you are looking to get with dynamic content, the higher the likely cost to your organization because of the level of technology required by fully automated and highly customized dynamic content.
Video embedded for increased engagement
I tell you about working with video as content in Chapter 8, but you can also use it specifically to drive higher conversions. To create more advanced video, make sure that you have a few basic options with your video-hosting tool:
· Auto play: This option allows your video to begin playing the moment someone lands on a page. This is not a super-advanced option, but it’s a feature that you will need to test for more advanced tactics. Having auto play allows you to remove the need for a person to click a button, thereby getting a prospect deeper into your content, faster. Auto play can help increase engagement by reducing the number of steps required to engage with your content.
· In-video call to action: I tell you about embedding a call to action in video in Chapter 8. Make sure that your video-hosting solution has this feature if you want to use video to drive higher prospect engagement.
There are three basic levels of video embedding to increase your engagement rates: basic, advanced, and expert:
· Basic: To drive increased engagement rates with embedded video, start by simply testing auto play on your video. As soon as someone lands on your landing page, the video begins to play. The idea here is instead of requiring people to read about what they are about to download, you show them with a video. The video should be above your form so that visitors can fill out the form at any time. Figure 9-8 shows a landing page with the basic auto play feature and form.

Figure 9-8: A landing page with an embedded video set to auto play, and a form.
· Advanced: To have visitors step into a more advanced landing page experience with video, consider combining video calls to action with auto play. Figure 9-9 shows a landing page using these techniques. Notice that the page has no form. The conversion point is an in-video call to action, which means that the video will stop after a set amount of time and prompt the watcher to fill in her email address. This is a more advanced option because you need to combine your video-hosting solution and your marketing automation tool.
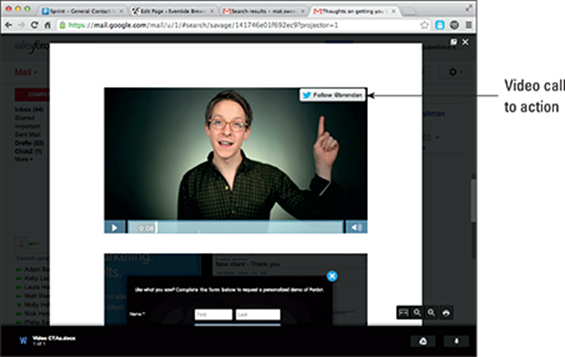
Figure 9-9: An auto play video embedded on a landing page with a video call to action.
· Expert: This level uses the most advanced option offered by most technologies and is something for you to consider when you’re looking to drive maximum engagement or test new techniques. This level combines dynamic content, video, and in-video calls to action and works as follows:
· Set up your dynamic content: Your dynamic content is in video form. Depending on your data point, a video tailored to the visitor pops up on the landing page.
· Use a form to protect the video: You may want to protect your video rather than play it automatically. This means that the form has to be completed before the video plays. Different marketing automation tools have this feature, so ask your vendor how to accomplish this. Consider just asking for the prospect’s email address on this form.
· In-video call to action: If you ask only for an email address, you might need more information. With an in-video call to action, you can have your video ask for a different piece of information after a set period of time. This approach allows you to gain more information as the video plays.
Microsite landing pages
Another way to look at a landing page is as an experience in itself. Some marketing automation vendors allow for the creation of microsite. A microsite is a small website that sits outside your company’s main website. Microsites are very popular for events, new products, or other offerings. If your marketing automation tool does not have a microsite feature, it likely has a landing page feature. The purpose of the microsite is to create a highly customized experience on a very specific topic. Here are some ways you can build a custom experience outside your website:
· Microsites: Microsites are a great way to give people a custom experience around a central idea without distracting them with other information. In fact, this is the purpose of the microsite. As with a landing page, you should optimize it for a single goal, such as announcing an event. Salesforce.com does a great job with this with its Dreamforce microsite (see Figure 9-10). Dreamforce is a single website dedicated to an event. It does not talk about the software, only the event. If your marketing automation tool allows for microsites, use them; they are very powerful and functional.
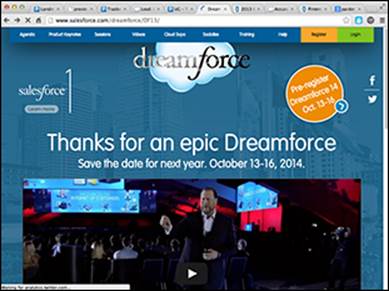
Figure 9-10: Salesforce.com’s Dreamforce microsite.
· Tying landing pages together: If your marketing automation tool does not support true microsites, you can still provide a similar experience, with just a bit more work being involved. If you can create a landing page in your marketing automation tool, you can connect a few of them by linking them with hyperlinks or by automations. Figure 9-11 shows conceptually how this may look. Here is more detail on how to connect landing pages:
· Using hyperlinks: To connect landing pages using hyperlinks, you first need to create your landing pages. Next, on each page, create your navigation to another page. Simply use the URL of the other landing page and you have connected them.
· Using automations: If you want to try something more advanced, you can connect sites with automations. For example, when someone completes a form, he should be directed to another page. You create this redirect in the automation section of your marketing automation tool, and you can easily direct people to where you want them to go without any effort on their part.
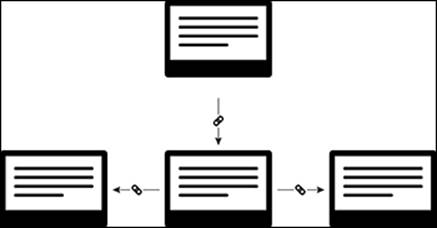
Figure 9-11: A diagram of how many landing pages can be tied together to create a micro site.
· Using another tool: If your marketing automation solution does not allow for stringing landing pages together, you may want to consider a tool such as ion interactive (see Figure 9-12). A specific tool such as ion interactive allows you to build a microsite with dynamic features. Tools made specifically to build microsites are great because for the marketer who isn’t tech savvy, microsites are usually easier to set up than using your CMS, and the result can be much more robust than a landing page created in a marketing automation tool. Such tools also can be integrated into your marketing automation tool very easily.
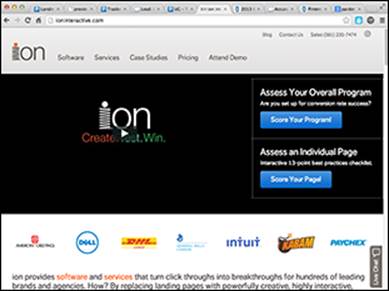
Figure 9-12: The ion interactive tool can create microsites.
 You can connect any website to your marketing automation tool as long as you can place JavaScript on the page. When building microsites outside your marketing automation tool, remember to add your tracking code to them so that you can track a prospect’s engagement with microsites. I cover how to attach JavaScript to a web page in Chapter 4.
Adding Advanced Forms to Your Campaigns
As discussed earlier in this chapter, forms are a part of your landing pages; however, you can easily increase the engagement of a landing page just by optimizing your forms. The following sections present some easy ways to increase landing page engagement by optimizing your forms.
Pondering progressive profiling
Progressive profiling is an amazing topic. Seth Godin first conceived it in his book Permission Marketing (Simon & Shuster, 1999). The technology, however, is only now reaching the mainstream in the marketing world. Progressive profiling is a form’s capability to recognize an individual and ask only questions he hasn’t already been asked.
Not every marketing automation tool has progressive profiling. All such tools will have this feature some day, but currently it is reserved for the more advanced tools. It also may require different levels of expertise to set up, depending on the tool. Following are the basics of progressive profiling to help you determine whether using this feature will help you increase your conversion rates:
· Shorter forms: Shorter forms have higher engagement rates. This is a basic fact that does not need much research to back it up. The question becomes, how do you know which questions to ask? Or how do you ask those questions? You can answer these questions by using progressive profiling on your forms or landing pages. Each time a person comes to your landing page, she is asked a few questions, and they are different questions each time based on what you know about the person.
· Good questions: For progressive profiling to work, you need to have a firm understanding of which questions to ask. Here are some good questions to ask and some to avoid:
· First name: This is the first question you should ask. You never need last name until you pass the lead to sales. Remember that you don’t use the last name in any communication.
· Email address: Requesting an email address is the only question you MUST ask. Usually you can use a data augmentation tool to fill in all the blanks based on a single field.
· Special questions: If there are questions whose answers you can’t get from a data vendor and that you can’t infer from a prospect’s web page visits or content engagement, you need to ask these. Consider not making them mandatory (see the next item in this list for why).
· Bad questions: A bad question asks for information that people don’t want to provide, such as their phone number. People also dislike any question that you make mandatory. If you require a field to be filled out, people will lie. Remember: Bad data only hurts your marketing efforts.
Your progressive profiling will look different to each prospect but will give you the best odds at having people fill out your form. Figure 9-13 shows a progressive profiling form in action.
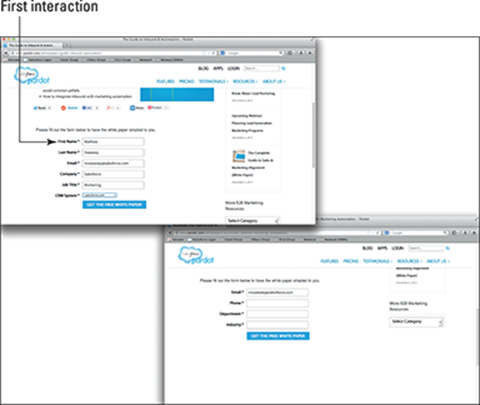
Figure 9-13: A form using progressive profiling over the course of multiple interactions.
Data augmentation and its place in forms
Data augmentation is a key factor when you want to increase your engagement rates. Data augmentation is the capability for a third-party software to fill in the blanks with your data set. The key point here is that if you can buy the information from a third party, you have no reason to ask people for it. So if you were thinking of having a question such as company size on your form, you might be better off leaving this question out and getting the information from a third party. The fewer questions you ask of people, the more likely they are to engage. After they fill out the form, you can then augment their record from third-party data sources to fill in the missing blanks, which gets you the information you need and increases engagement rates at the same time. Here are some data points for which I suggest using data augmentation:
· Last name: This information is most likely in a prospect’s email address and can easily be gained from data augmentation.
· Company name: Likewise, this information is usually contained in the prospect’s email address and is easily provided by a data augmentation tool. Also, keep in mind that very large companies are highly unlikely to give you their company name when trying to remain covert.
· Phone number. A recent study from MarketingSherpa found that 65 percent of the time, people lied when asked to provide their phone number. If you want it, you’ll probably have to get it by some other means anyway, so you might as well not ask to begin with.
· Company size: Company size is an easy question to gain from data augmentation, and most people don’t fill out this question anyway.
· Location: Location can be tricky, especially if the prospect has multiple locations. Using an email address and a data augmentation tool, you can usually find this out.
· Revenue: This is a very invasive question to ask anyone. Just as you don’t ask individuals how much they make, it is rude to ask someone how much money their company takes in.
Creating Better Conversion Goals
Many companies still base their goals on the number of people who fill out a form. This is a good way to gauge whether your changes made it easier for a person to engage, but it is not the best way to see whether you are converting the correct prospects. This section covers a few topics that you need to understand to take your form conversions to the next level.
Quality vs. quantity
Creating more quality rather than quantity is the basis of why you got marketing automation in the first place. You want better leads, not just more of them. This idea goes hand in hand with forms and landing pages. If you judge yourself on the number of conversions you have, you’re seeing only half the picture. Read on for a few tips to help you ensure that you’re getting quality, not just quantity.
Your conversion rate is a leading indicator of possible future outcomes. It shows you what is possible in the future. If 100 people convert on your form, this indicates that you may have more quality leads in the future; however, it does not measure the quality of those leads — just the possibility of them. You should also measure the number of those 100 who closed as opportunities. This is a lagging indicator, which means that you can see it only after the fact. Consider looking at your form in two ways: initial conversions and percentage of total opportunities created. For each form, go back and evaluate your form based on how many of those leads were converted to sales. Some marketing automation tools contain this information as a built-in report.
Be prepared for the big dip
If you are refining your forms for better quality and less quantity, you’ll see a dip in the number of leads that come in. This is a standard effect that almost all companies implementing marketing automation will see. I’ve included this topic in the chapter because when you get into more advanced forms and landing pages, this dip becomes more apparent.
Following are some tips to help you prepare for the inevitable dip:
· Prep stakeholders: You should set expectations about the big dip with sales and upper management before you implement marketing automation. If you are being measured only on the quantity of leads, your numbers will go down for a period of time. Make sure to let stakeholders know why so that they don’t think you are doing a bad job.
· Don’t panic: If you panic during these improvements, you’ll likely not do a lot of them, which can mean staying in the back of the pack. The biggest piece of advice I can give you is to remember that the elements you change can all be changed back to where they were. If you find out that your idea wasn’t that great, just revert back to your old form. All marketing automation tools save your old forms, so you can easily just swap them in and out.
· Prove your value: To prove that the dip in the quantity of leads was worthwhile, make sure that you can look at the number of sales generated by the fewer leads. The number of sales is the only way you can demonstrate that your tactic was worthwhile, so make sure that you have set up reports to track your sales from it. This capability is standard with some tools; others require you to set it up. Make sure that you know which kind of tool you have.