The Maker's Manual: A Practical Guide to the New Industrial Revolution 1st Edition (2015)
Part III. From Bits to Atoms
“God took the mud, spat on it, and Adam was born. And Adam, wiping his face, said: “Good start...”
Giobbe Covatta, Parola di Giobbe
§ Chapter 10, Managing Project Files
§ Chapter 11, This Is Not a Pipe
§ Chapter 12, 3D Printing
§ Chapter 13, Milling
§ Chapter 14, Laser Cutting
Chapter 10. Managing project files
A current-day maker, unlike the artisans of the past centuries, doesn’t spend the time locked up in their workshop far from prying eyes. The maker paradigm (and business model) is all about sharing: sharing ideas, sharing designs, sharing code. Since nowadays nearly all that information is digital, we are really talking about the management of project files.
How can you keep control over a project when so many people can take part in its development? You need to establish some kind of process that allows for the evolution of the product, preventing the project from devolving into chaos. Fortunately, there are tools that can help.
Distributed Design
Probably the first solution that comes to mind is to maintain a revision of your project files designated as “the active version”, while still maintaining all previous versions as backup copies. The project manager, or someone especially assigned to the task, collates all the inputs, archives all the old versions, and declares the latest iteration to be “the active version”.
It sounds pretty simple, but this method is awfully prone to mistakes. Contributors sometimes make changes and forget to document them, or the project manager might miss a critical update. Even if all the records are kept in perfect order, and all the backups are maintained, it can still be difficult to track a change from its origin. Who gave the order to change all the ball bearings to cubes? You’ll find the answer somewhere in that nest of archives.
If this sounds familiar, don’t worry: you’re not alone. Other people have had the same problems, and they’ve come up with quite a number of solutions.
In the software world, managing all the contributions from the community is an old problem which has been solved with a number of tools that allow a manager to keep control of all different versions of a project. This is generically called VCS, or Version Control System.
Even though VCSs were created for software, we can use them for any kind of file, for example, to manage the chapters of a book.
These systems allow for clear tracking of all changes made to models, documents, source code, or other data of a project so that we can follow its development throughout time. Hence with a VCS it is possible, and easy, to restore a specific version of a particular file, or even of the whole project. You can use a VCS to recover data that have been deleted by mistake. You can also track how a specific problem in the project was identified, diagnosed, and solved. You can also try out alternative solutions, without running the risk of permanently damaging the project.
The early version control tools were centralized (Figure 10-1), i.e. there was one single repository which kept track of all project files, whereas each client (the computers of people participating in the project) only kept a copy of the most recent version. They worked fine, and products like CVS and Subversion, which were two of the most popular VCS in the industry, still work in that same way.
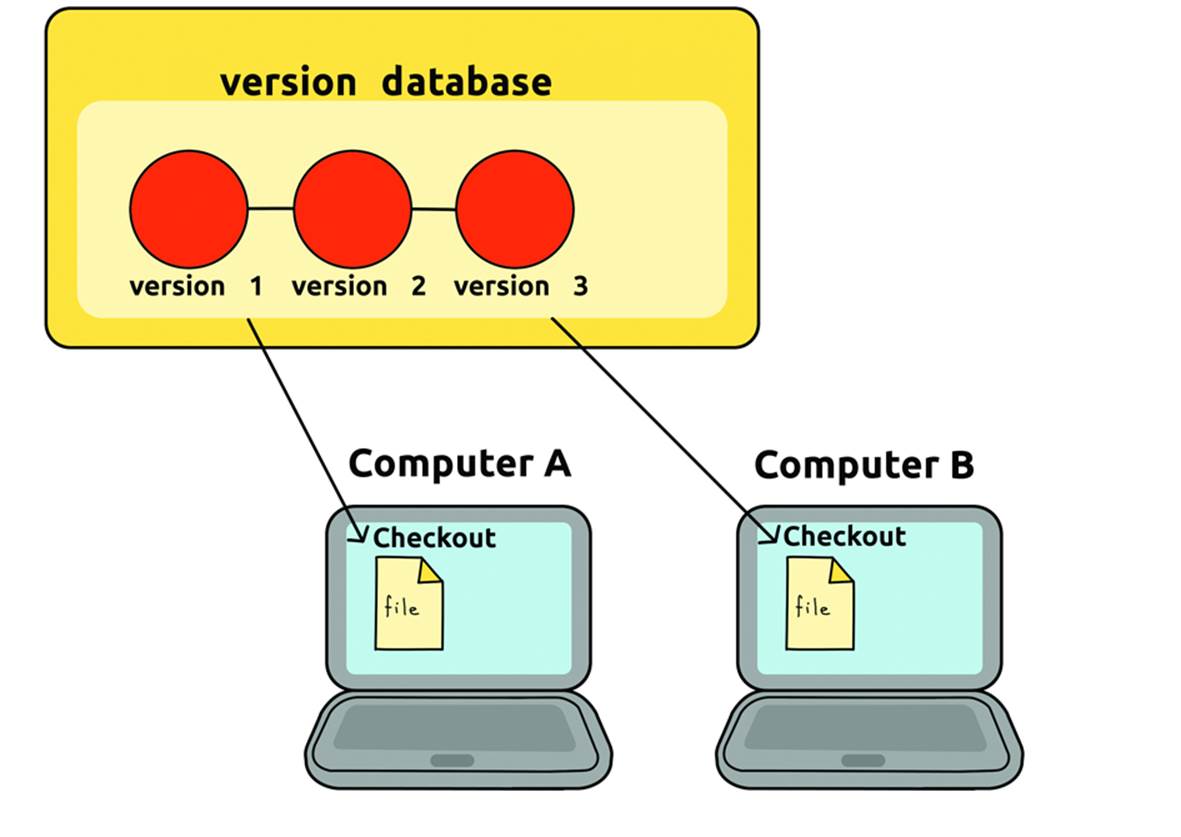
Figure 10-1. A centralized version control system.
This system proved to be a little restrictive, so in recent years distributed version control tools (Figure 10-2) like Mercurial and Git have gained popularity. The latter, together with the online interface GitHub, seems to be the most popular and beloved by the community, as of this writing.
In a distributed control system, even if all our data were destroyed and we didn’t have a backup copy (which is surely not the case... right?), we could recover them from a colleague’s data, without going crazy tracking the history of every file. The software will do that for us.

Figure 10-2. A distributed version control system.
Git and GitHub
Git was created to meet a project’s distributed design needs, though any individual can benefit of the great power of this tool, as well.
Without going in depth on how the versioning software manages its files and data, all we need to know is that each repository knows exactly the internal status of the document at any moment, as if it took a picture of each single file, as shown in Figure 10-3.
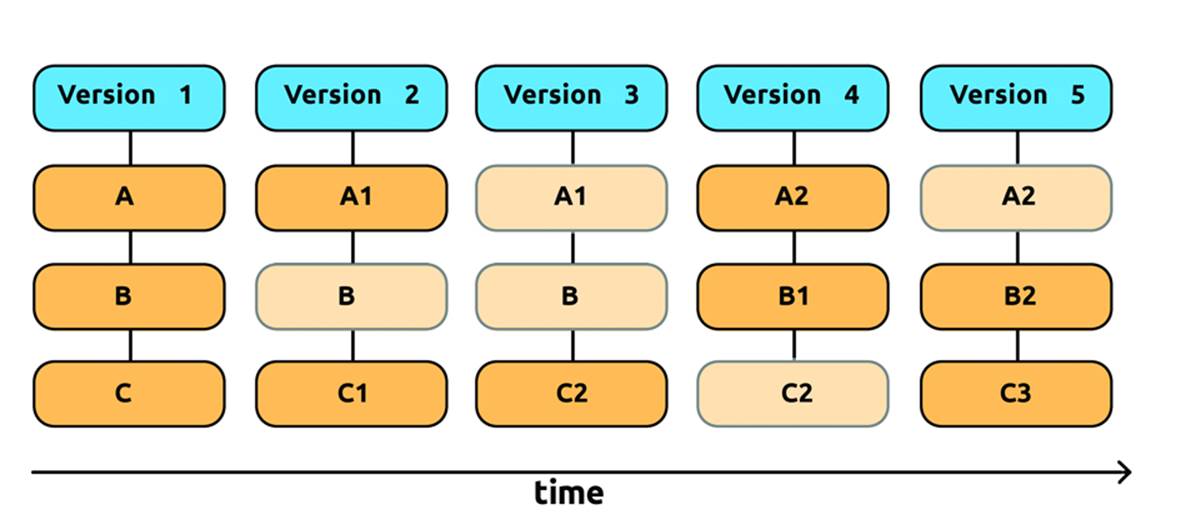
Figure 10-3. Git keeps a series of instant pictures of the project throughout time.
Creating a New Project
GitHub puts at your disposal a totally free system for all open source projects. Actually, GitHub is a freemium service: if you want to use GitHub for private projects that aren’t open the world, you need to pay; however, the software is free, so you could always set up your own private Git server for no cost. You only pay a premium for hosting private workspaces on Git’s own servers. In the previous chapters we tried to convince you that sharing is a winning choice, so we’ll show you how to use this service to host the main version of your project’s repositories, open to the public.
Before starting to use GitHub you need to create an account. Open the browser, go to https://github.com, enter your e-mail address, choose a username and password, and click on the registration button, as shown in Figure 10-4.
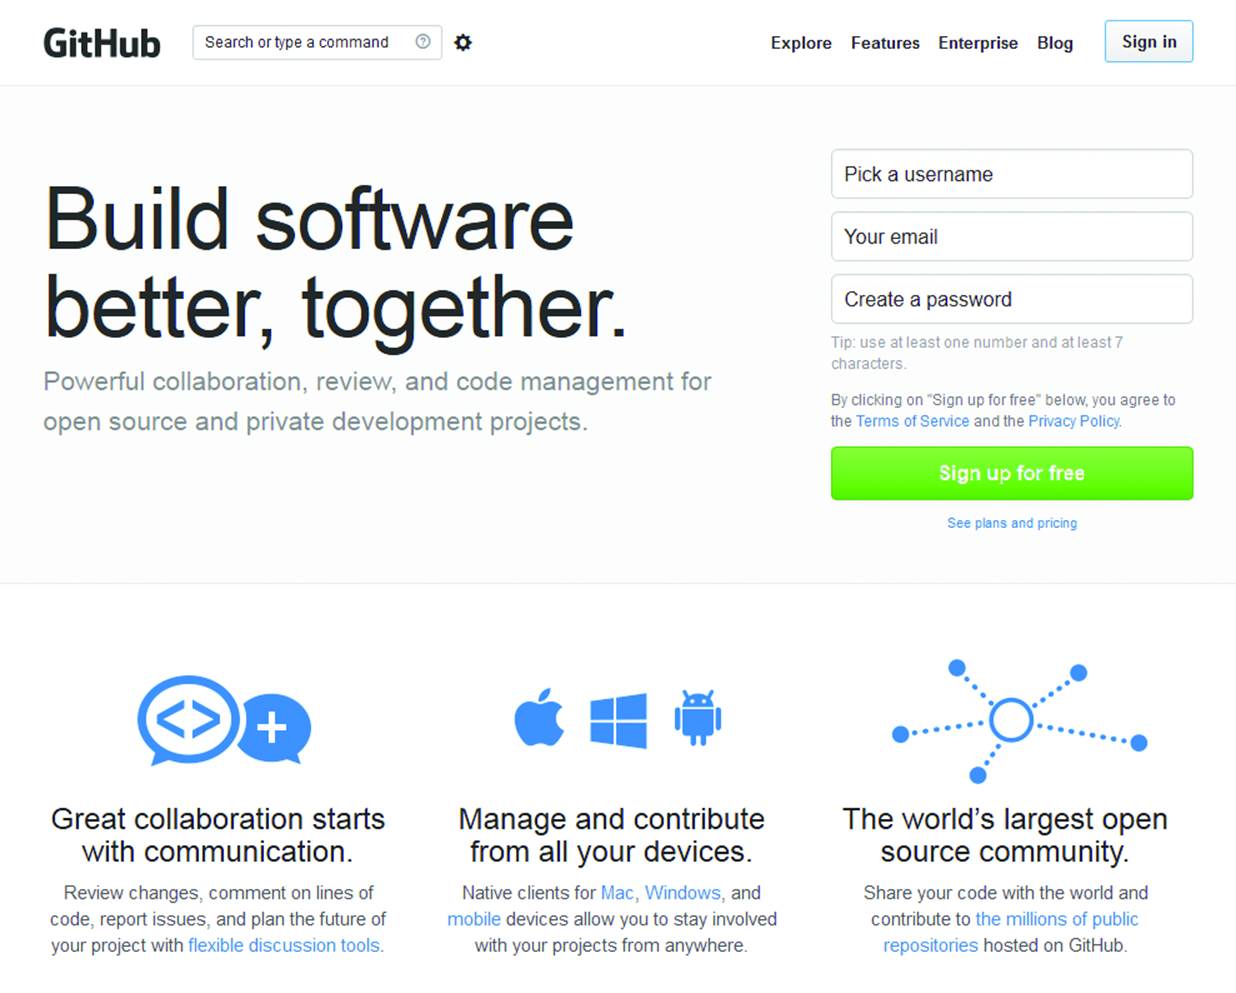
Figure 10-4. The registration page on GitHub.
After registration, you can access your main page, where you can create a new repository by clicking the “plus sign” icon, at the top of the page next to your username, and choosing “New Repository”, as shown in Figure 10-5.
On the page that comes up, you can enter a name for the repository. A good rule is to choose a short name, easy to remember. If you are short of ideas, you can for example take the project name and turn it into camel case--a single word where you put the original words together, with capital initial letters.
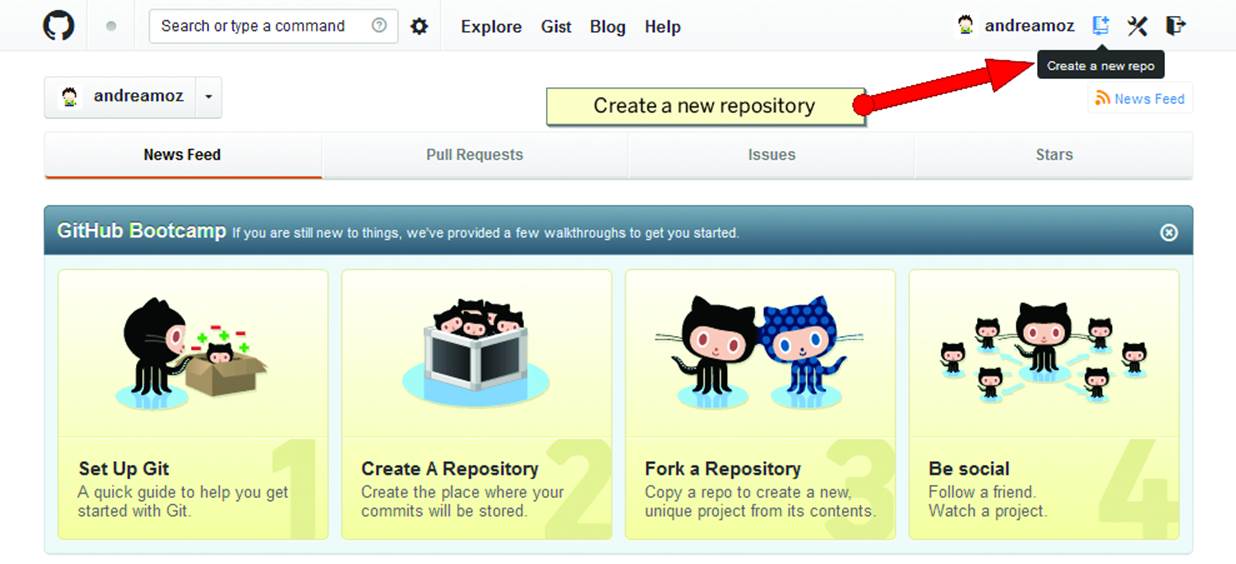
Figure 10-5. The GitHub main page.
If you like, you can enter a short description. If you check the box to Initialize this repository with a README, you will be able to clone the repository later, i.e. create a full copy on our computer.
Click the Create repository button (Figure 10-6) and you have created your first repository!
Now you are ready to start working (Figure 10-7).
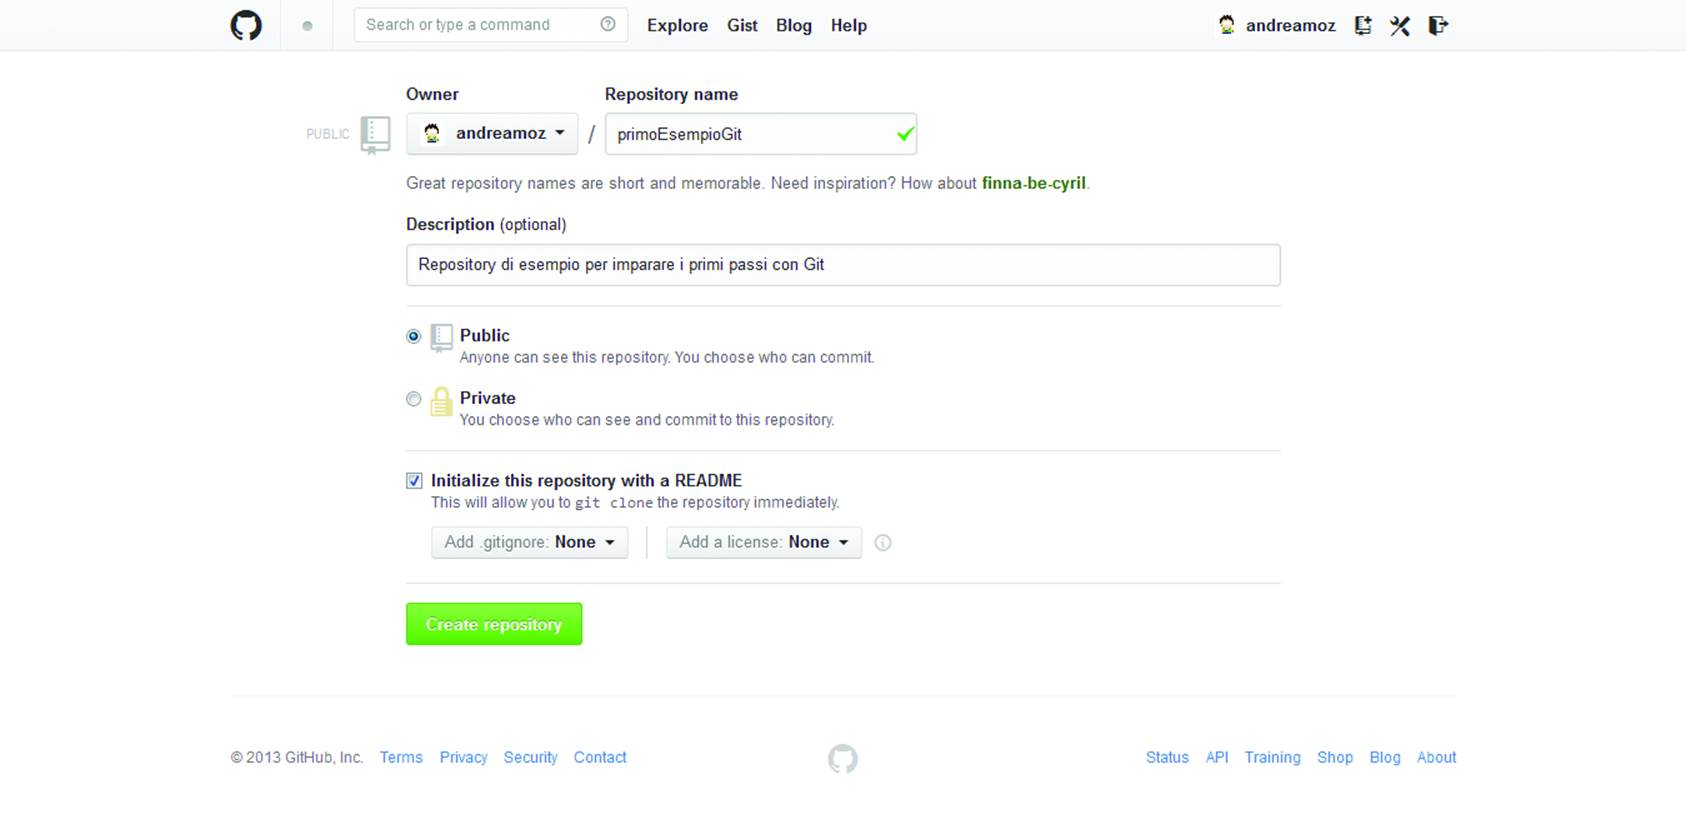
Figure 10-6. Creating a new project
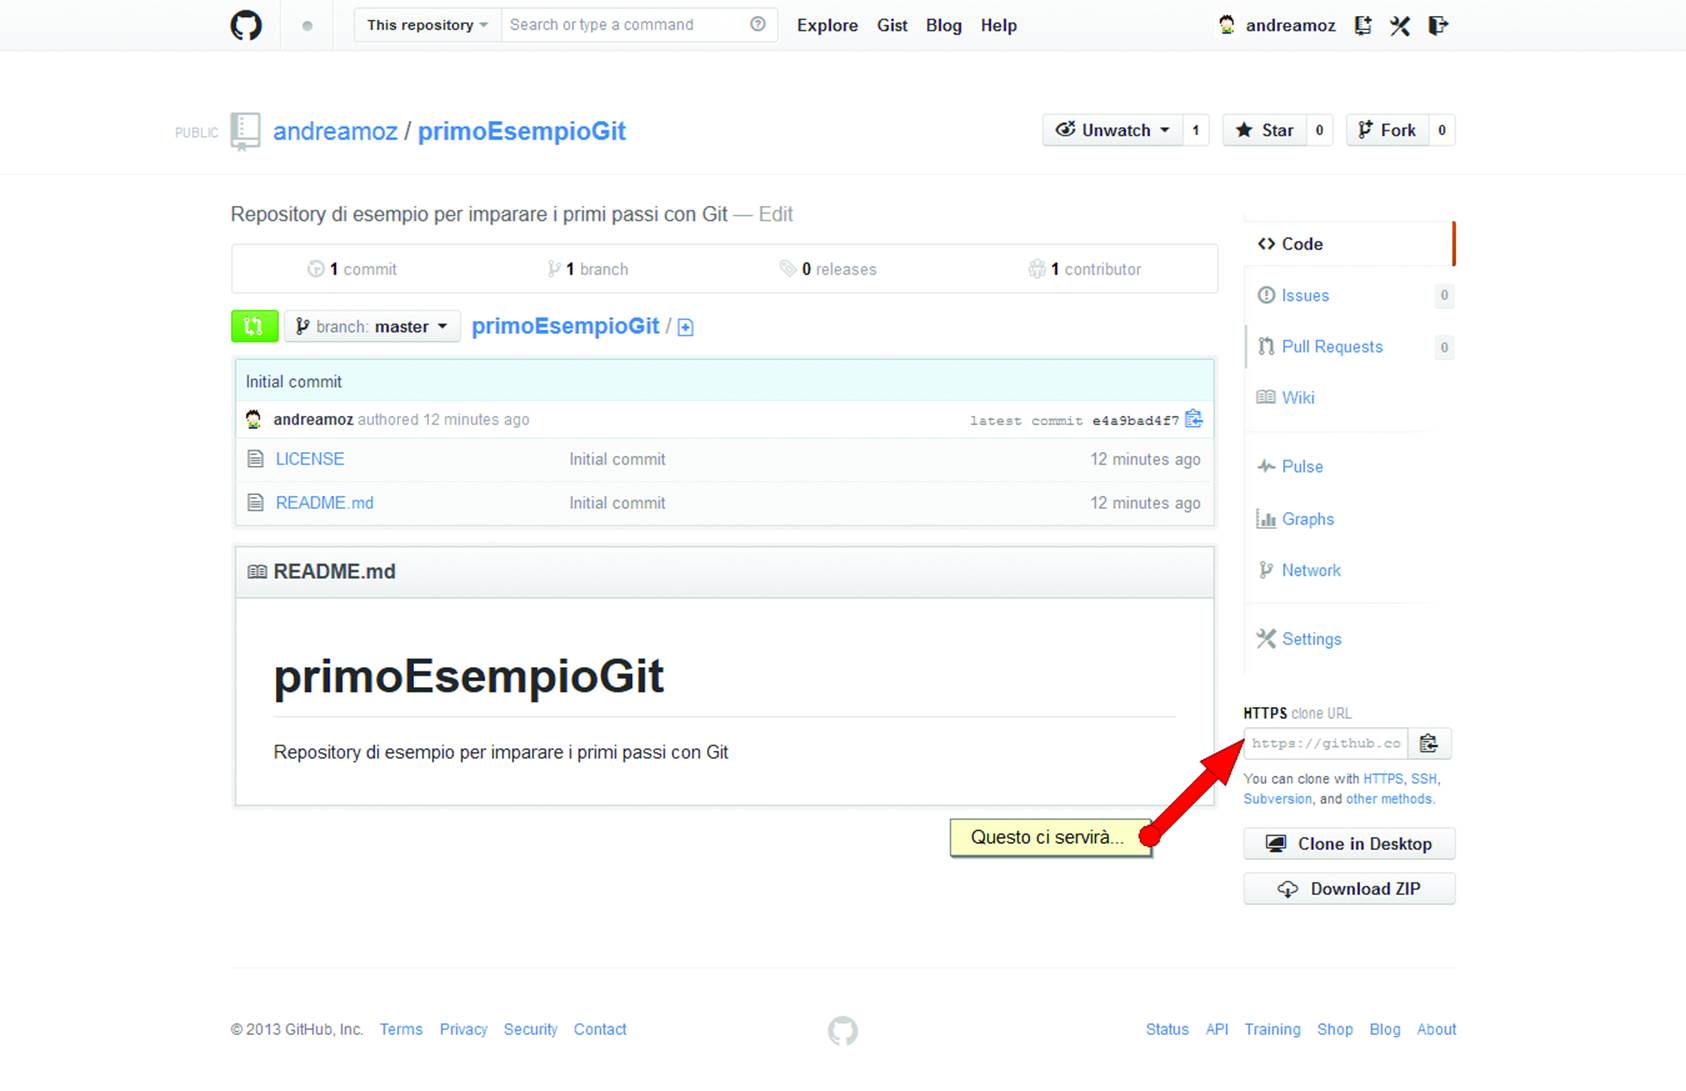
Figure 10-7. The new project, ready for use!
The Three Areas of the System
The work that you perform in git can exist in one of three states, shown in Figure 10-8. It can be modified, it can be staged, or it can be committed. Each of the stages is different from the others, and understanding and is important to smoothly use git.
Modified means that you have performed a change on some file in your project, but you have not yet committed those changes to your database. A modified file exists in a kind of limbo; it is no longer part of your project’s history, but it is not yet part of your project’s future.
A staged file is a modified file that has been marked to go into your project database the next time you commit your work. This is your way of telling the system that the file will be part of your project’s future, but not yet.
A committed file is a staged file that has finally been safely stored in the project’s database. From now on (until you or someone else changes this file) this version of your file is the “official” version of the file.
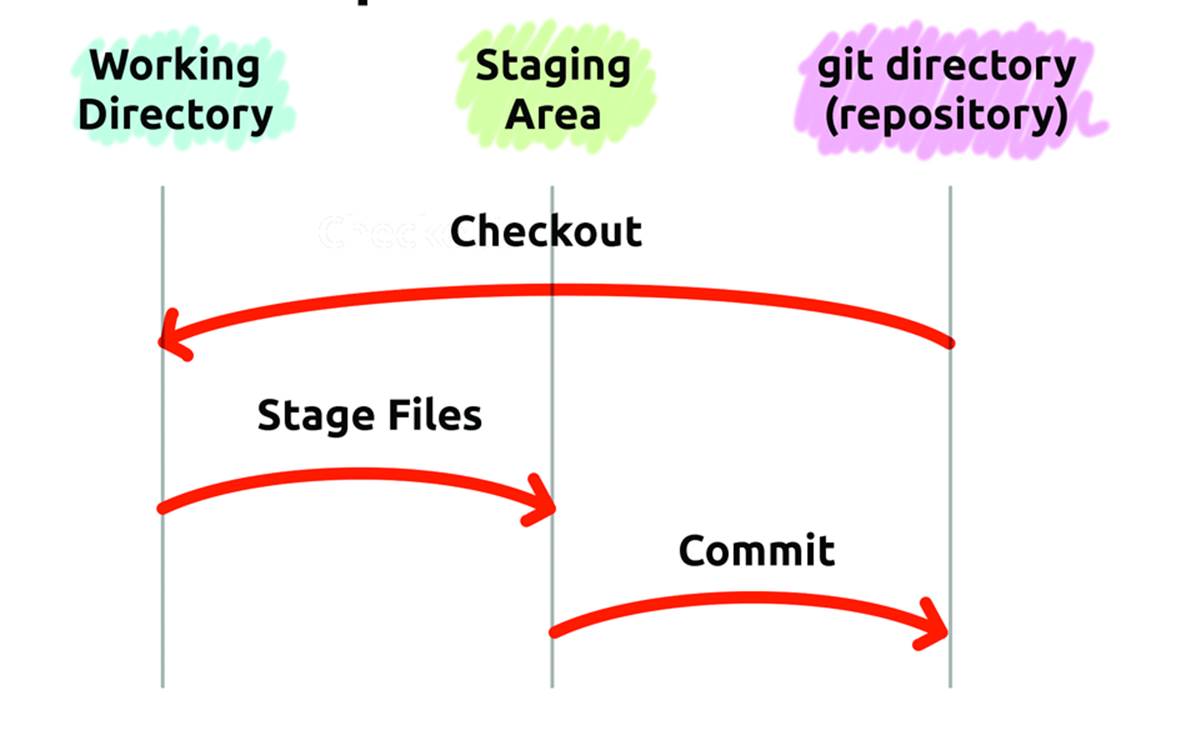
Figure 10-8. The three states in local operations.
The basic workflow is rather simple:
1. Download the documents from the central git repository into the working directory on your computer,
2. Make all the necessary changes,
3. Put all the files we want to store in the repository into the staging area,
4. Perform a “commit”, the operation which finally saves the files to the history of the project.
5. Perform a “push”, which pushes your local project history and state to the central repository.
Installing Git locally
Because there are plenty of books reporting obsolete installation processes, please refer to the Git website and the official guide.
Git can be used with a text interface--called a command line interface, or CLI--or with a graphical client. The CLI gives you more direct access to git commands, and is the first choice of many people who work on software professionally.
There are many graphic git clients available for all the most popular operating systems. Let’s see how to use Atlassian SourceTree on a Windows system. It’s also available for Mac.
We first need to download the software and install it, leaving the default settings. After the installation, launch the application.
The Workflow
The first thing you need to do is to clone a copy of the project on your computer: click the icon labeled Clone/New or choose File→Clone→New on the menu. Paste the public address of the repository, as shown in Figure 10-7, in the Source Path/URL field. In the Destination Path field, type the complete path of the location where you want to save the project files on your computer.
Click the Clone button (Figure 10-9) and after a short time you’ll have a full copy of the central repository on your computer. In the central bottom area of the screen you can see the project files, at the moment restricted to an (empty) license and a text file with the introduction message you used upon creation of the repository in GitHub (Figure 10-10).
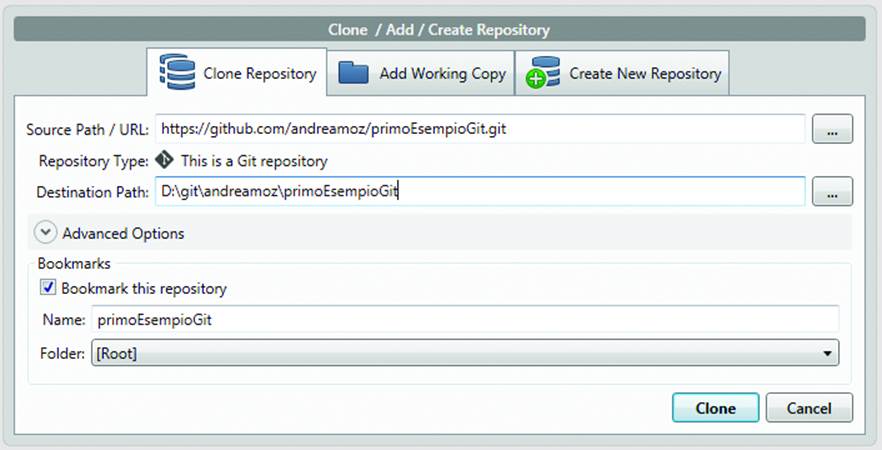
Figure 10-9. Cloning your first repository
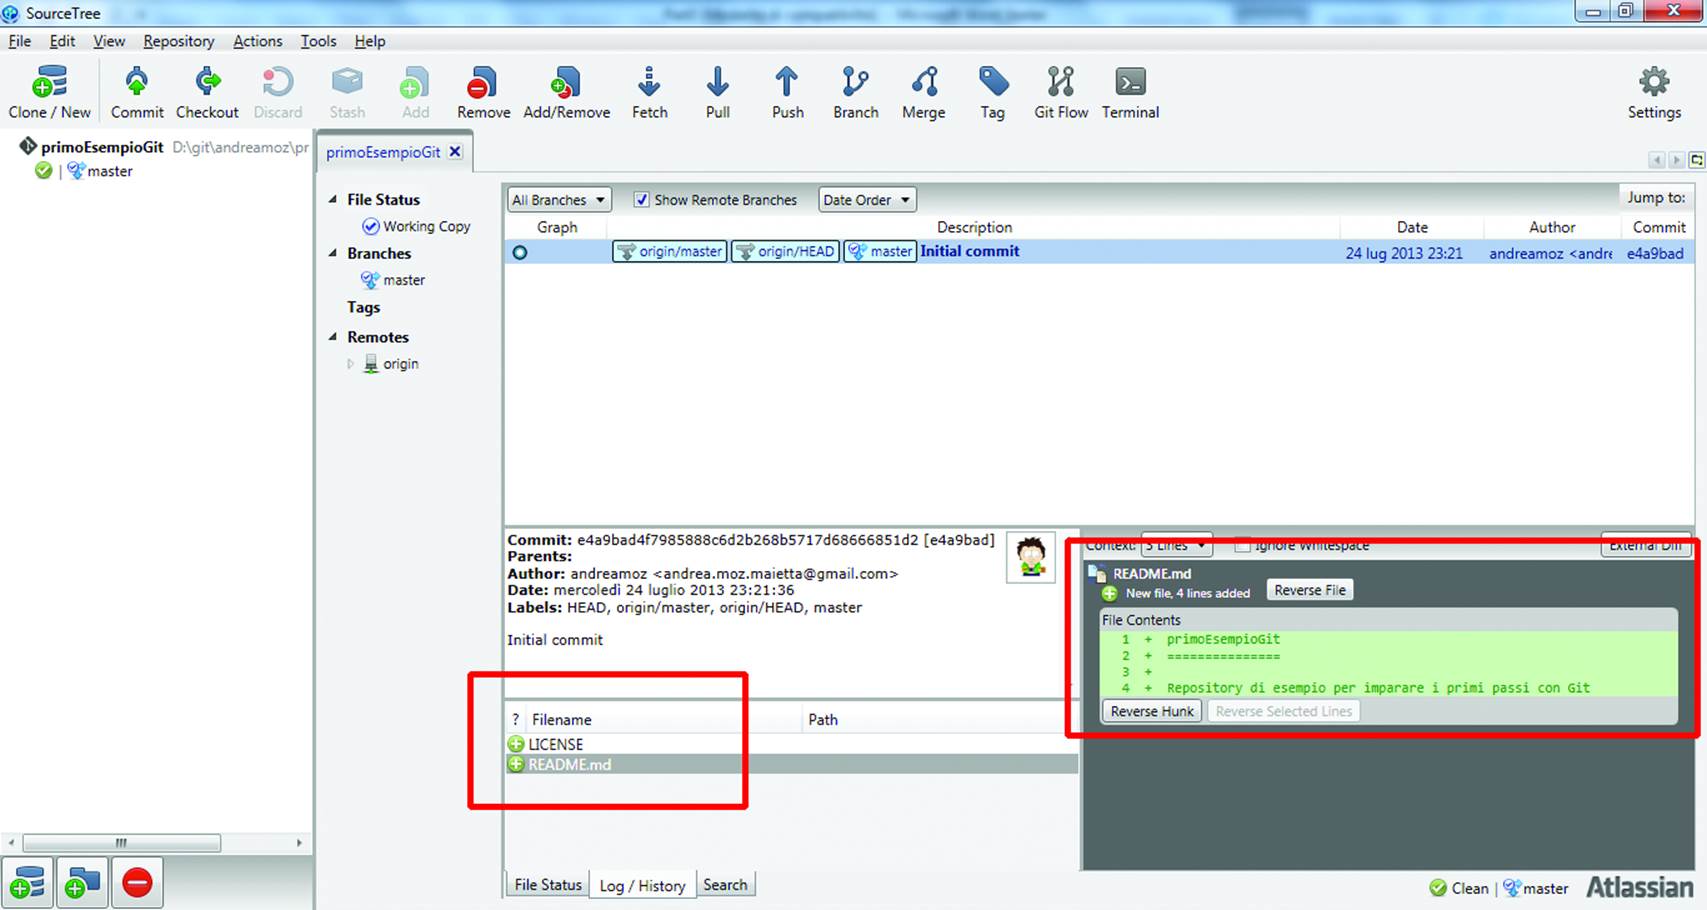
Figure 10-10. The repository on your computer
Now, you can edit the README.md text file with any text editor. Add the line “This has been changed for sourcetree”, and then save the file and close the editor. When you go back to SourceTree, you’ll see that SourceTree noticed that you made some changes: a new notice has appeared toward the canter of the screen, reading “Uncommitted Changes”. Click on those words, and at the bottom right of the screen, you can see exactly what has changed (Figure 10-11).
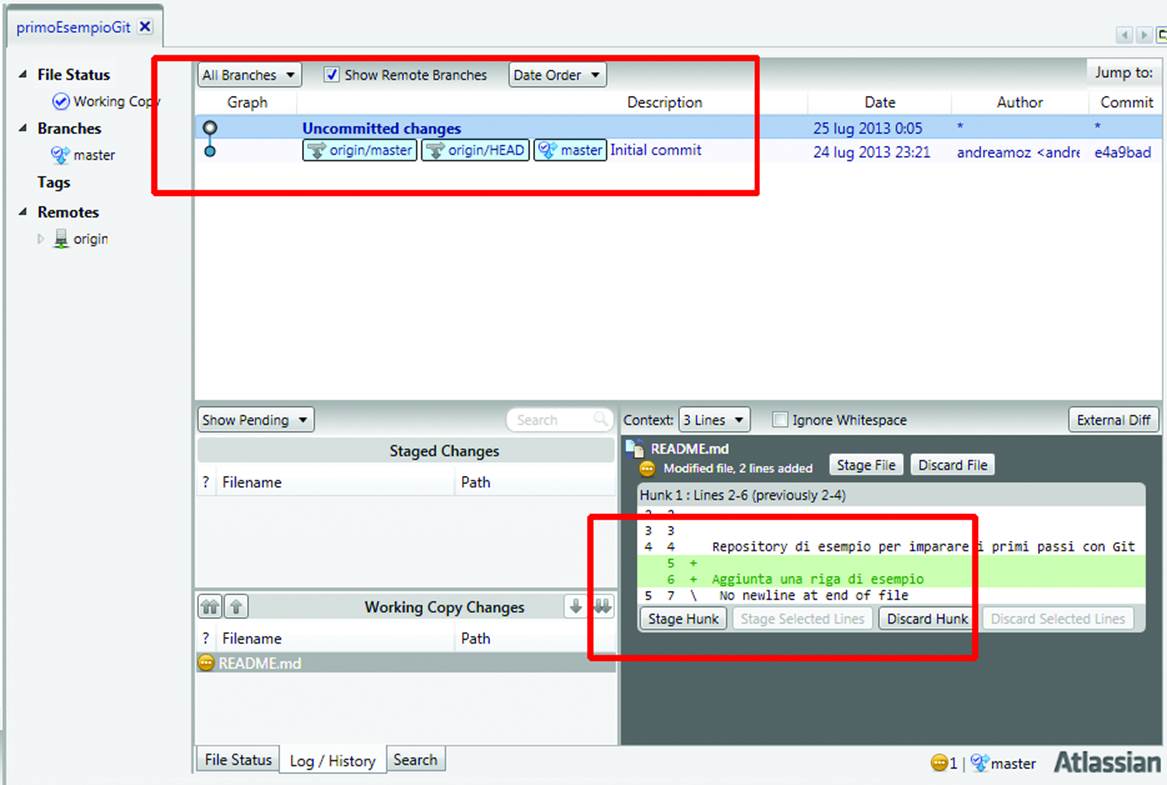
Figure 10-11. Nothing gets past git’s watchful eye...
The edited lines are colored green to show they have been added. If we had deleted lines, they would be still be visible, but highlighted red. This feature is not available for binary files, such as images or videos.
At the moment, the change you made to the README.md file exists only in you working directory. To move the file to the staging area, you need to click the Add button or choose Actions→Add from the menu.
This action causes the the README.md file, which before was in the Working Copy Changes section, to move into the Staged Changes section. If you had edited more files, they would all have moved from Working into Staged when you clicked Add.
Now you are ready to transfer the edited README.me file from the staging area to your local repository, as shown in Figure 10-12. You have to click the Commit icon on the toolbar, and type a message that explains the reason for the commit so the other people working on the project know what you did (or so you will know when you look at it later). Describing the individual changes made (such as “inserted ‘word’ at line 5”, etc.) makes little sense; git makes it easy for the other people in your project to see what you’ve done. The commit message is where you tell thenwhyyou did it.
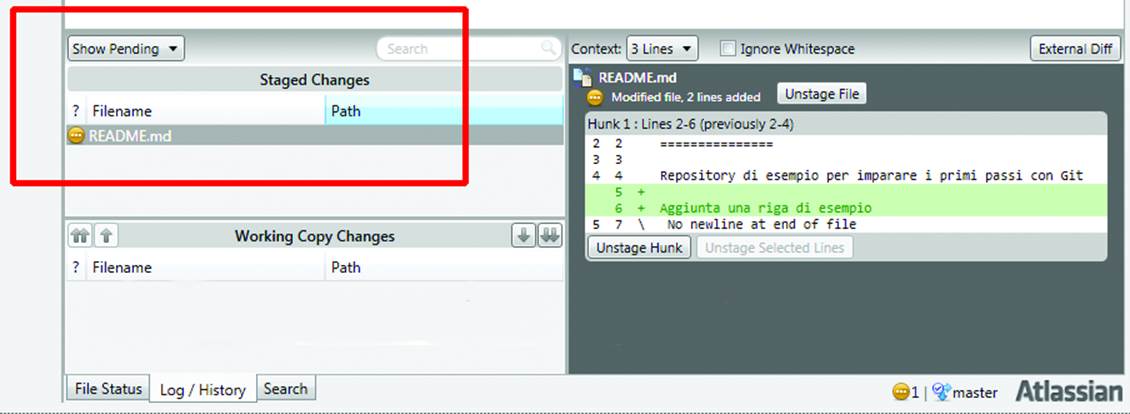
Figure 10-12. Changes ready to be transferred to the local repository
A good commit message shows a high-level view along with the reasons for the change, like “Split the subscription plans into 6 because of the phone call with Alice”. While the first line should be 70 characters or less, you can add newlines and more paragraphs; having some keywords in a commit message makes finding this specific commit later on much easier. When we’ve finished explaining what we did, click the small Commit button at the bottom right side of the screen (Figure 10-13).
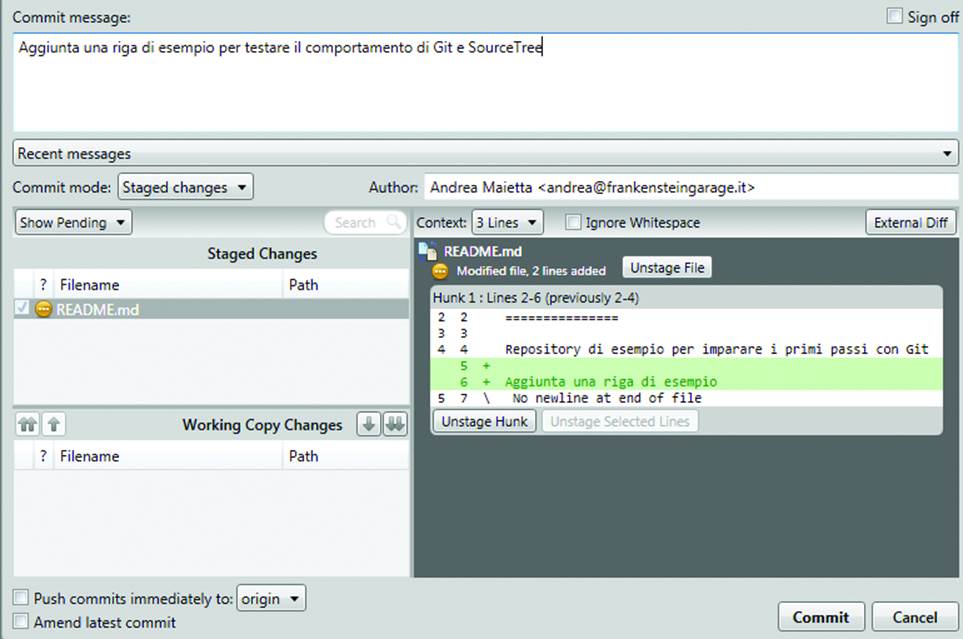
Figure 10-13. Your first commit
When you click the commit button, SourceTree tells you that the edited file has been put in the local repository. Up on the toolbar, the Push icon now shows a “1”. This means that that the changed file is not available in the remote repository yet, i.e. on GitHub, but is instead ready to be pushed there. (Figure 10-14).
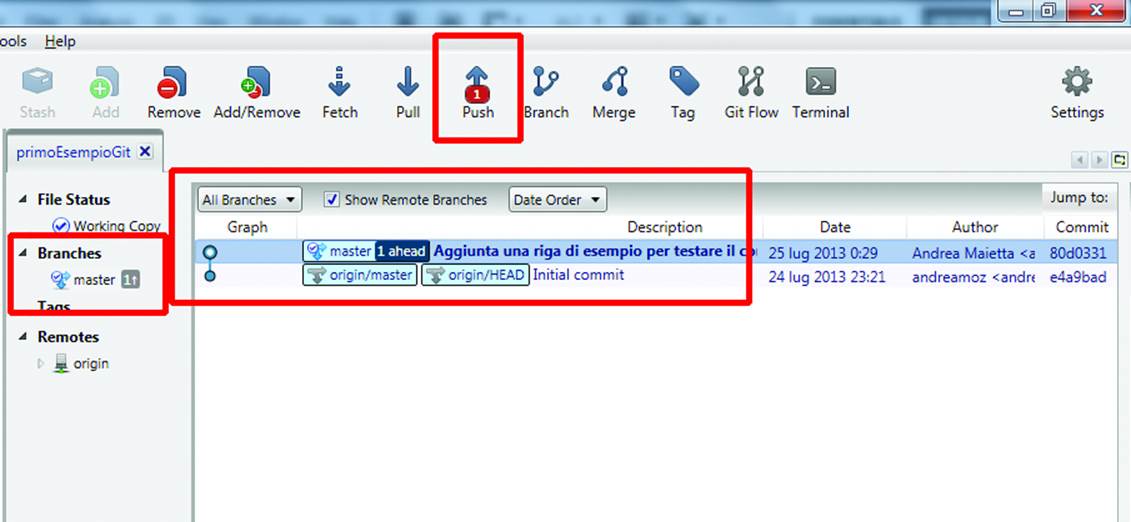
Figure 10-14. Ready to push
To copy the changed file to the remote repository, click the Push button. You are shown the address of the repository you cloned, which by default is named origin (Figure 10-15).
If you now click OK to end the operation, you get a message asking you to input your GitHub username and password. You don’t want anybody to be able to edit your data without permission, right? Type both in, click Login, and your changes will be on their way to the server!
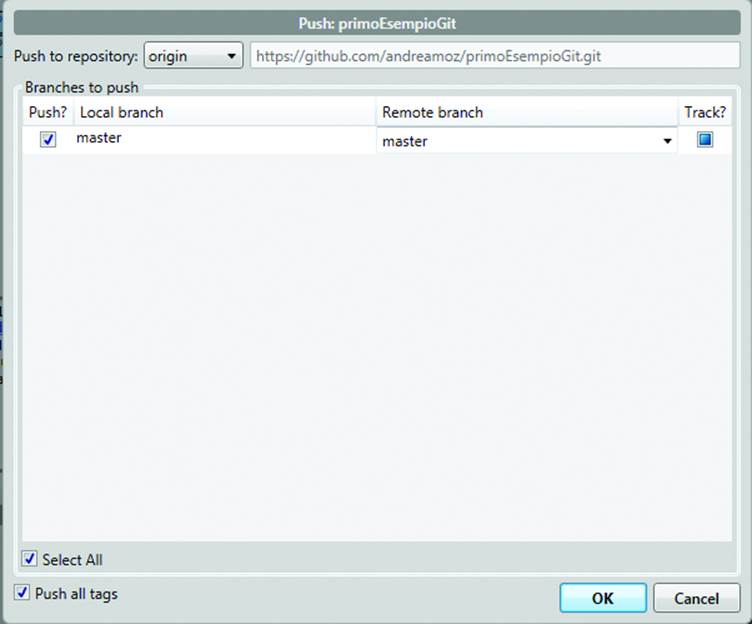
Figure 10-15. Sending the changes to the remote repository
You are done, finally! Now SourceTree is happy because you have synchronized your changes to the remote repository (Figure 10-16).
To check if the change has been transmitted, you can open the file in GitHub (Figure 10-17).
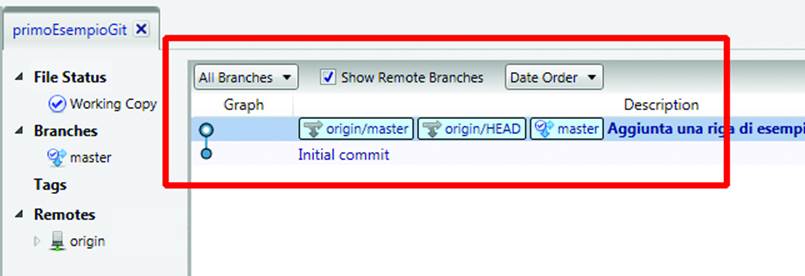
Figure 10-16. Now we are in sync with GitHub
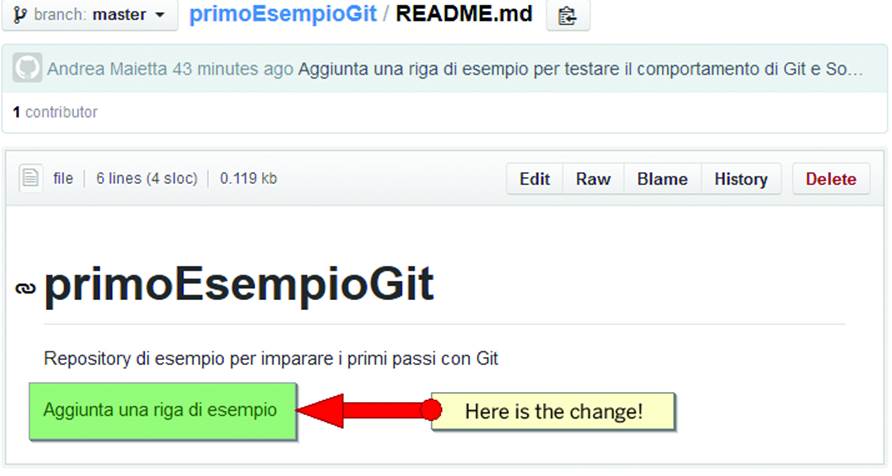
Figure 10-17. Ensuring the change is visible on GitHub
Let’s try this action from the other direction. You’re going to make a change to the README.me file in GitHub, and download the change onto your computer. The reason for this is simple: if you’ve got a number of people working on a project, some of them will be editing a file via one method (say, directly into GitHub), while others will be working offline in SourceTree and uploading their changes later. Before you start working on that same file, you need to synchronize your computer with all those remote edits.
Staying in GitHub, click the Edit button on README.me, then make another edit to the file. It doesn’t really matter what you do, you just have to change it in some way. Click the Commit Changes button.
Then go back to SourceTree and click the Pull icon on the toolbar. When the Pull window opens, click OK. (Figure 10-18).
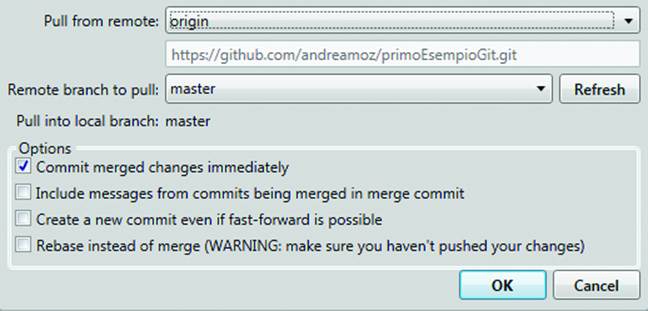
Figure 10-18. Pulling from GitHub
After doing this, your local repository will be synchronized with GitHub again, and you will be able to see locally the changes you have made in the remote repository. If you forget to synchronize our database before starting work, nothing serious would happen. However, the chance of a conflict--i.e. different people editing the same thing in the same file--would increase. In this case, GitHub would show both versions, leaving you responsible to choose the correct one. So... don’t forget to synchronize often!
Not Only Trees Have Branches
Throughout the lifecycle of a project, there may be several instances where you can choose between alternative development paths. Say, for instance, you’re building a scooter that’ll come in two models: one that runs on fossil fuels, and one that runs on electricity. The bulk of the scooter’s design--the frame, the seats, the brakes, the tires, etc--will be exactly the same for both versions. The only differences will be the powertrain. Git can help you control the different versions with its branch feature.
In Git, a branch is used to develop an isolated alternate version of a project. The default branch--the body of the scooter, with a gasoline engine--is named master, as shown in Figure 10-19.

Figure 10-19. Which branch are we in?
You must first create various files representing the different parts of the scooter. You can see how SourceTree notices that you’ve added new files (Figure 10-20).
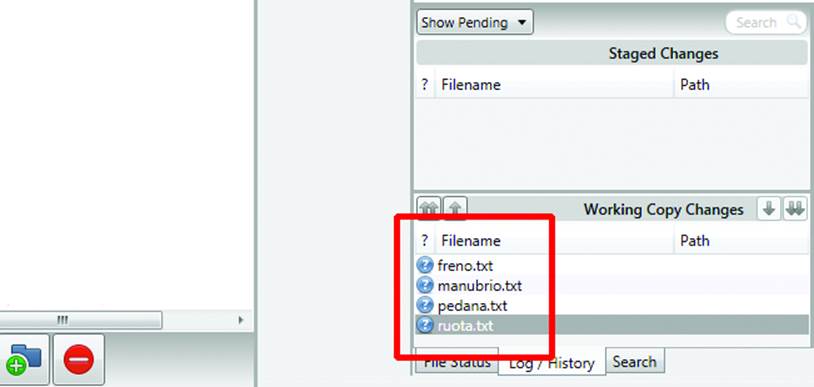
Figure 10-20. New files added to git
As you did before, you must first Add and then Commit. Next, Push to synchronize GitHub and let your collaborators see the most recent version of the project. Now you have our scooter in its “standard” version.
Now you can work on its powertrain. Instead of duplicating the project folder, create a branch: click the Branch button (Figure 10-21), type in a name and click Create Branch.
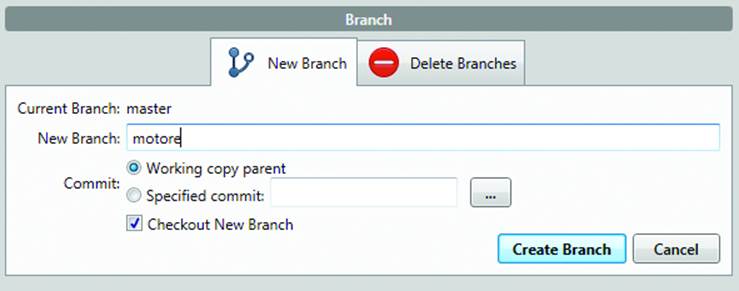
Figure 10-21. Create the branch
We can see that, in the Branches section, there are now a master and a powertrain folder, which is the branch we just created. The latter is flagged, because it is where we are now (Figure 10-22).
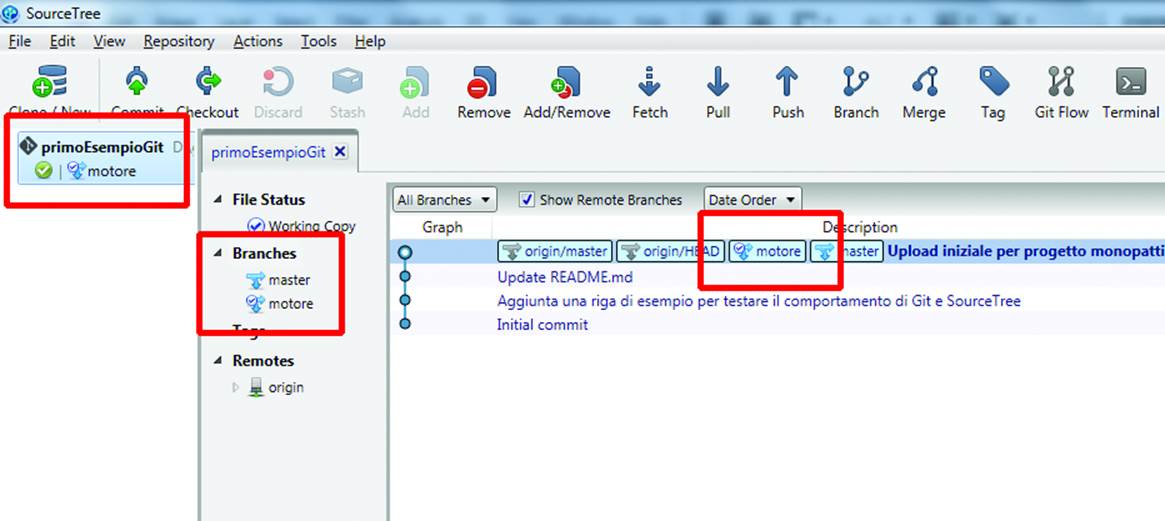
Figure 10-22. You are in the new branch
Now you can edit the project. Create a new file for the powertrain data and modify the files to create an electric version of the scooter. You can see that the two branches, which were identical at the time of creation, will proceed on separate paths until you decide to merge them (Figure 10-23).
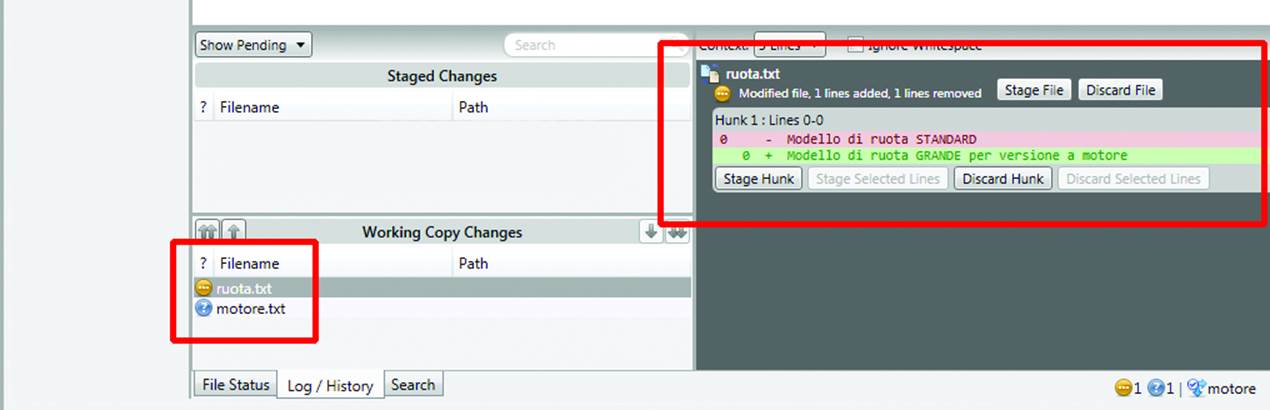
Figure 10-23. The changes for the powertrain scooter
As usual, you need to Add and Commit. In order to see all files in the working directory, click the File Status tab, at the center bottom; you can see that the powertrain branch comprises the new electric engine model. (Figure 10-24).
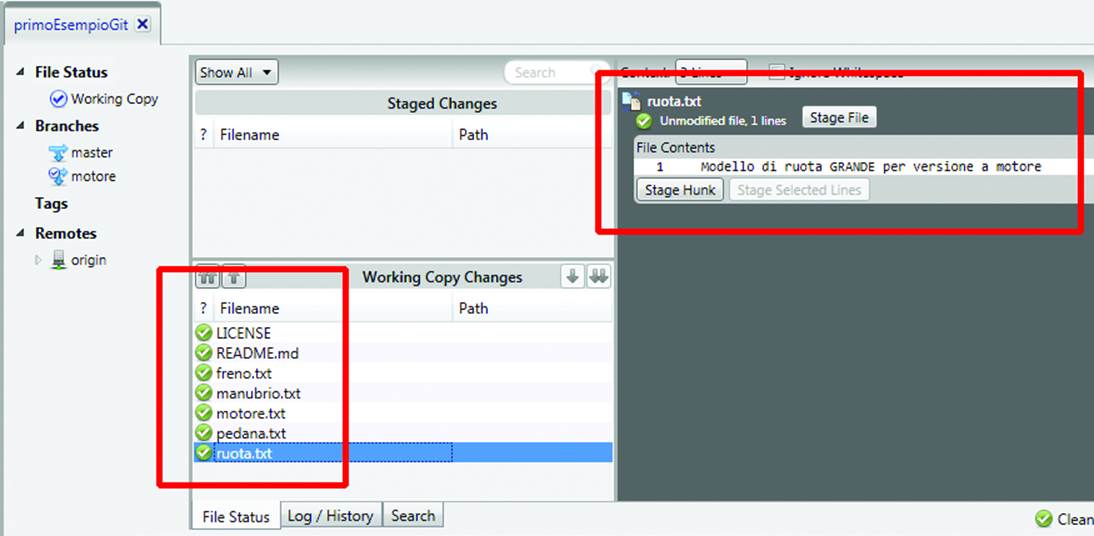
Figure 10-24. The powertrain branch contains the new model
To go back to the main branch, double click Master under Branches; we can see that the design is for a gasoline powered scooter, meaning that the two branches are actually distinct (Figure 10-25).
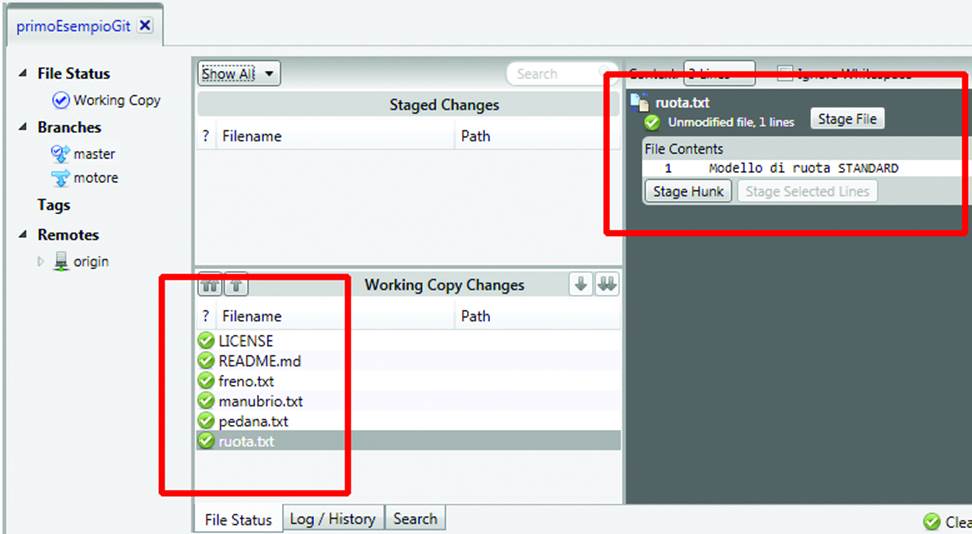
Figure 10-25. Back in the main branch, there’s no trace of the powertrain version
To join the two branches, click on the Merge button, then select the branch that you want to merge with the current branch, and click OK. Figure 10-26 shows the merge.

Figure 10-26. Bring two branches together with a merge
With this process, everything is much simpler than archiving versions manually, because Git manages all the data behind the scenes.
You have only explored a tiny part of Git’s potential, though it can already meet your most common needs. Most of all, you know enough to download a project and use it as a starting point for your own work.
What are you waiting for, then?
Let’s start making something, now!
All materials on the site are licensed Creative Commons Attribution-Sharealike 3.0 Unported CC BY-SA 3.0 & GNU Free Documentation License (GFDL)
If you are the copyright holder of any material contained on our site and intend to remove it, please contact our site administrator for approval.
© 2016-2026 All site design rights belong to S.Y.A.