Learning Qlik Sense The Official Guide (2015)
Chapter 8. Administering Qlik Sense
Having established how to develop attractive and engaging applications with Qlik® Sense, it's time to turn our attention from authors and business users. Instead, we will consider the requirements of administrators. In this chapter, we will move away from data and analysis to what's needed to run a Qlik® Sense installation.
In this chapter, you will find information about the following topics:
· Architecture
· Clustering and nodes
· Licenses and tokens
· Streams and security concepts
The Qlik Sense architecture
Qlik Sense has an architecture that is different from the QlikView® Server architecture. Some components are very similar; others are very different. Hence, even if you know the QlikView architecture, you need to look at the following sections. In them, you will find an overview of some of the concepts in Qlik Sense.
Services
When you install the Qlik Sense server, you will install five services. These are the cornerstones of the architecture. They can be deployed in different ways to suit different deployment purposes.
The Qlik Sense services are as follows:
· Qlik Sense Engine Service (QIX): This is the application service, which handles all application calculations and logic. Everything that concerns the data analysis is handled by this service.
· Qlik Sense Proxy Service (QPS): This manages the Qlik Sense authentication, session handling, and load balancing.
· Qlik Sense Repository Service (QRS): This manages persistence and the synchronization of licensing, security, and service configuration data.
· Qlik Sense Repository Database (QRD): This service runs a relational database used by the QRS.
· Qlik Sense Scheduler Service (QSS): This manages the scheduled reloads of Qlik Sense apps as well as other types of events, for example, task chaining.
In a standard installation, all five services run on the same computer, and this works fine as long as the load on the server doesn't become too heavy.
The services can run under any account, but should preferably run under an account dedicated to the Qlik Sense services.
Clients
Qlik Sense has two different clients: the hub and the management console (QMC).
The hub is used to access, edit, and publish apps. It always runs in a web browser, regardless of whether you use a desktop computer, tablet, or smartphone to access it.
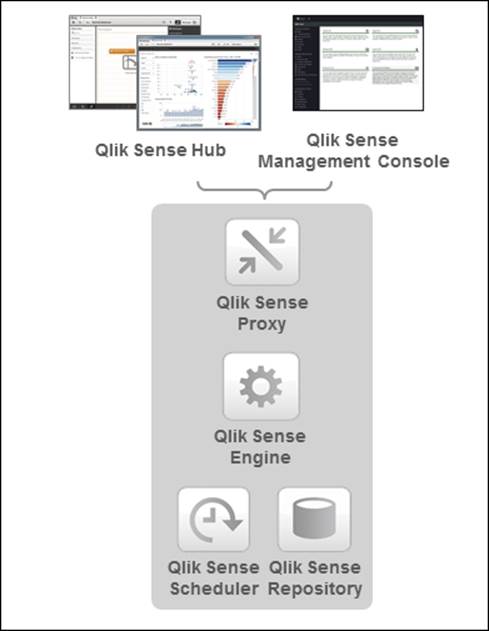
The basic Qlik Sense architecture
Qlik Management Console (QMC) is used for all types of administration. QMC is a web page found at https://<computer_name>/qmc/.
A link to this is installed in your Start menu during the installation.
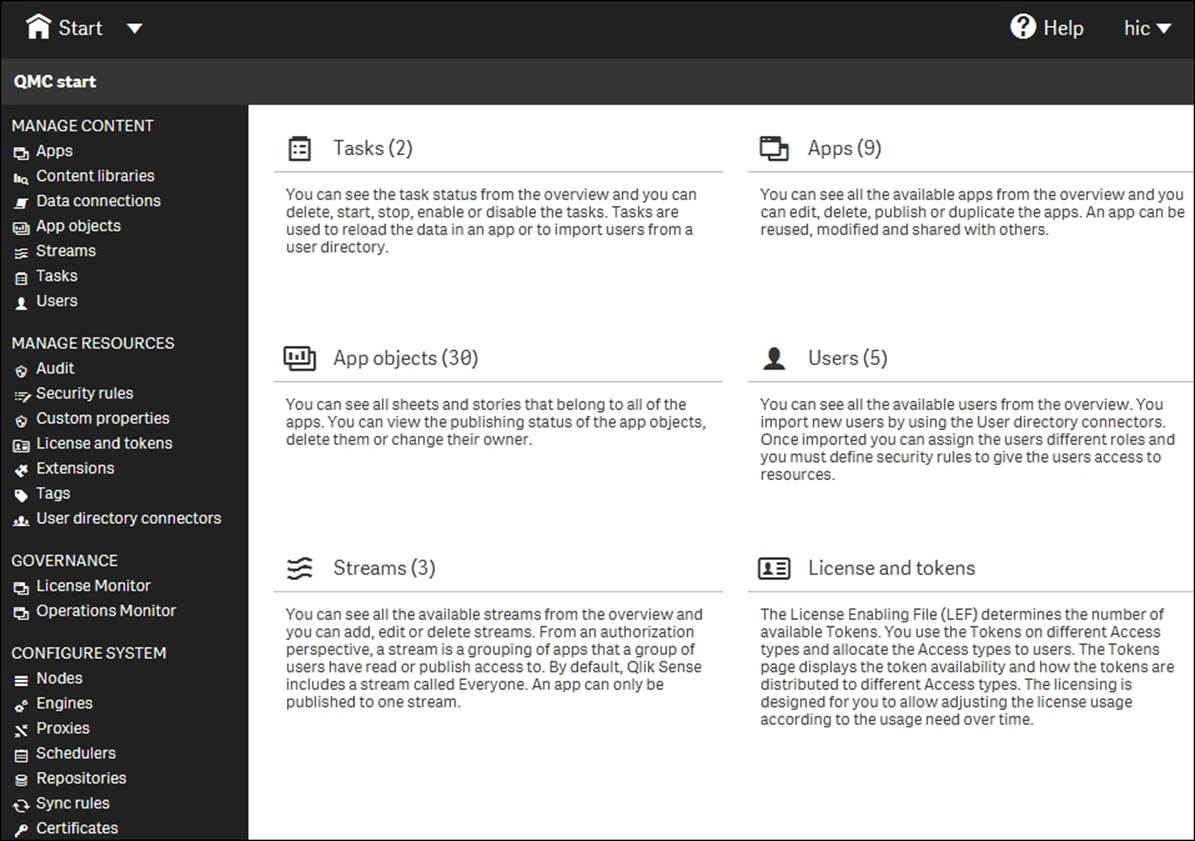
The QMC start page
In QMC, you can manage and monitor everything for your installation: apps, streams, security, users, and so on.
To the left, you have the four main groups: tools to manage the content, tools to manage resources, tools to monitor, and tools to configure the system.
It is important to understand that QMC is a multiuser environment, designed for the delegation of administration of, for example, streams to authors, if this fits a company's work process.
Applications
The apps are subject-specific; files that contain data, prepared visualizations, load script, and so on. This is where the analysis is done. From a user's perspective, an app is organized into sheets, sheet objects (visualizations), bookmarks, and stories. An app can be private or published to a stream.
If you want to access an app to do analysis, you can access it through the hub. However, if you want to perform any administrative task, such as importing or publishing an app, you can do it through QMC.
Nodes
Qlik Sense's site has an architecture that allows a distributed deployment. In other words, you can have several computers, each with a Qlik Sense installation, that work together and are managed as one coherent server. In such a configuration, each computer is called a node and the entire installation is called a cluster.
The installation can be configured so that data is synchronized between the different nodes, and so that the appropriate server is used for the client request. The purpose is, of course, to increase the system resilience and deployment flexibility.
Streams
The next important concept in Qlik Sense is streams. A stream is a dynamic, collaborative workgroup that is used when publishing applications. Hence, when you publish an app to a stream, you publish to a group of people.
A stream has members, security rules, and tags. It enables the user to read or publish apps, sheets, and stories. The users who have publishing rights to a stream create the content for that specific stream, and the users who have read access are the consumers of the apps.
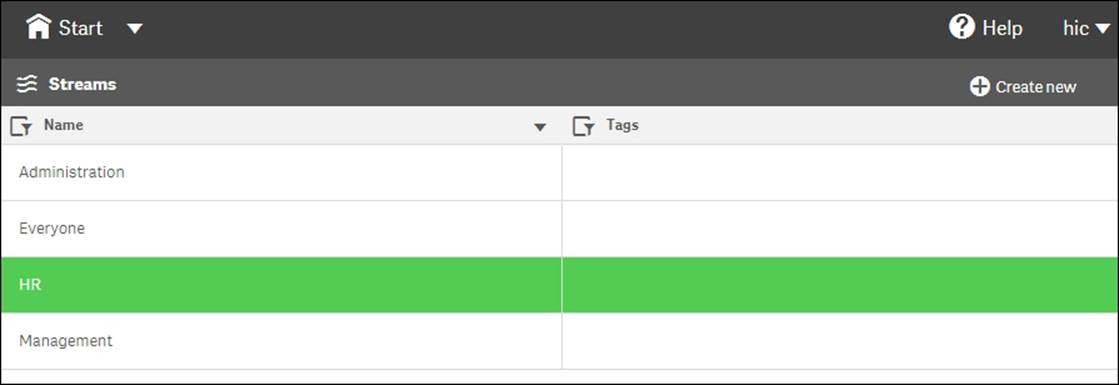
The Streams sheet
Deployment and licensing
Deploying a Qlik Sense server is usually straightforward, but there are still a couple of things to think of. The first question is about clustering.
Single node or multinode?
Normally, you should just install the Qlik Sense server making sure that it is set as a central node during the installation. Then, you will get a single node installation. However, sooner or later you need to ask yourself a question about clustering: how many servers do you want in your cluster? This book is not a comprehensive guide to clustering issues; it will only point out the basics and the questions you need to ask.
In a standard installation, all five services run on the same computer, and this works fine as long as the load on the server doesn't become too heavy. However, as soon as your installation starts to grow, you may need more computers to handle the load. If so, youcan set up a cluster so that you have additional computers running only some of the services, and still manage the entire cluster as if it were only one computer.
By far the most common case is that Qlik Sense has a very large load, either due to many users or because some applications are large. Then, it might be a good idea to add one or several computers and use a separate Qlik Sense engine on each computer.
Another case is that you have several physical locations and want one node in each location, with the same content on each node. This way, the users always use the local node.
One of the computers must be set as the central node, that is, as the master. Here, you enter your license key and manage the entire cluster. Data will be synchronized from this node to other nodes.
It is possible to use the same entry point—the Qlik Sense proxy—for the entire cluster so that users don't notice that there are, in fact, several computers.
On the central node, it is recommended that you have a dedicated QPS and QIX that are used specifically for the QMC and not for the hub.
In addition, the central node must have the QSS installed even if other nodes with schedulers are added. This is because the scheduler on the central node is considered to be the master scheduler, which coordinates all scheduler activities within the site.
Hence, when defining your deployment strategy, you should try to answer some questions:
· What is the estimated number of computers needed to handle the number of apps and users you expect?
· Should the users use the same proxy so that you can set up rules for load balancing? Or should they use different entry points in the different locations?
· Do you want/need separate computers that are only used to run jobs, for example, to refresh the apps?
The answers will help you decide whether you should build a cluster of Qlik Sense servers. If you don't know, or if it is your first server in a cluster, you should just install the Qlik Sense server making sure that it is set as the central node during the installation.
License and access passes
The first thing you need to do after installing Qlik Sense is to enter the license key and make sure that you get a valid License Enabling File (LEF) from the Qlik license activation server. However, this is not enough to get going. You also need to assign a license to yourself. Alternatively, to express this in the correct terminology, you need to allocate a token as a user access pass for yourself.
This is done by navigating to License and tokens | User access. Here, you can click on the Allocate button, select a user, and click on Allocate. This means that you have given this user "unlimited" access to the Qlik Sense server. "Unlimited" means unlimited from a license perspective—you may still have restrictions on this user from a security perspective.
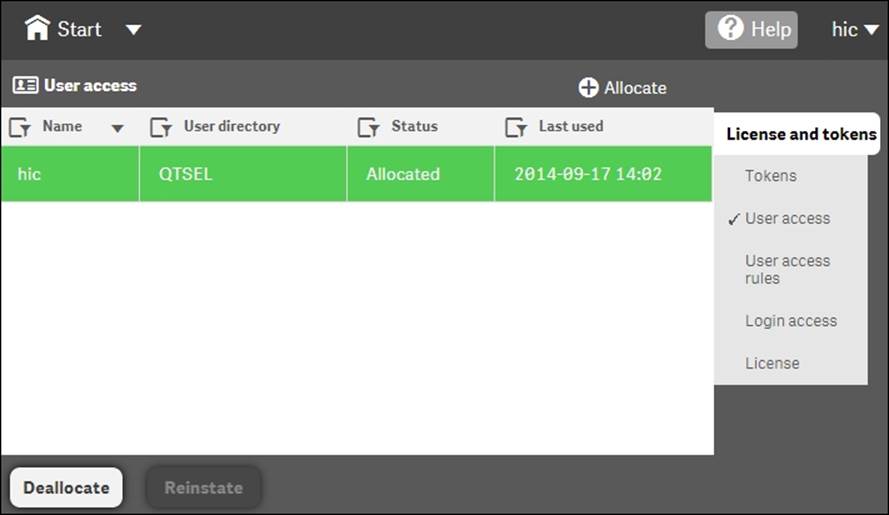
User access has been granted to the user hic
Tokens
The reason for this procedure is Qlik Sense's flexible licensing model. In the old license model, you bought Named CALs or some other license from Qlik, and that was then the license you had. To convert from one type of CAL to another was not possible, unless you contacted Qlik.
In the new model, you instead decide how you want to allocate the licenses you bought. Some are allocated to the equivalent of a Named CAL, while some are allocated to another license type. As a consequence, you don't buy licenses. Instead you buy tokens, which is a kind of currency that you can convert into licenses at a later stage. In the initial configuration, no tokens are assigned to be used and hence, the need to allocate a token to yourself.
Another consequence is that the terminology has changed. A Named CAL is no longer called Named CAL. Instead, it is called user access pass. So in the preceding case, you have effectively given yourself a Named CAL.
The Qlik Sense user access pass—and the QlikView Named CALs for that matter—is a general unlimited license that should be given to frequent users, that is, users that analyze data regularly, many times every month.
In Qlik Sense, there is a second license type that is designed to cover the needs of infrequent users. It is similar to the Usage CAL that exists in QlikView. It is called login access pass. A login access pass is equivalent to one login per month, that is, the login counter is refreshed so that a new login is possible every 28th day.
You can create login access passes in batches of 10, and 10 login access passes cost 1 token. These 10 logins can be used any way you want. They can, for example, be used by 10 different people that log in once per month or by one single user who logs in 10 times every month.
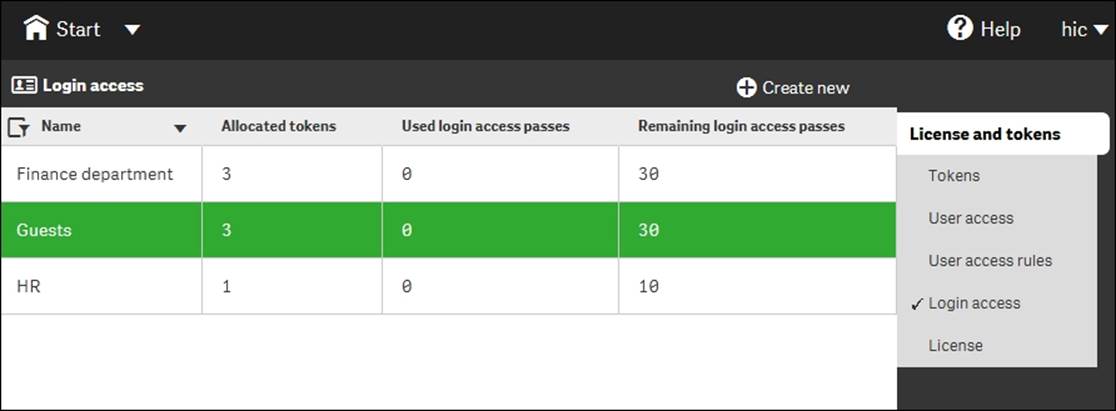
Login access passes can be created in pools for different groups of people
Access rules
Typically, you would use several tokens to create a pool of logins that can be dedicated for a group of people within your domain. You can create access rules both for user access passes and login access passes, and you should do this for your own benefit. This means that you can, for instance, say that anyone in the Finance department will get a user access pass when logging on, whereas the users of another department will share the login access passes of a specific pool.
Hence, when you create the user and login accesses you want, you can get an overview of the Tokens page, where you can clearly see the number of used tokens and how many you have left to allocate.
You can clearly see how many tokens you allocated to licenses, and how these are distributed over the two access types in the following screenshot:
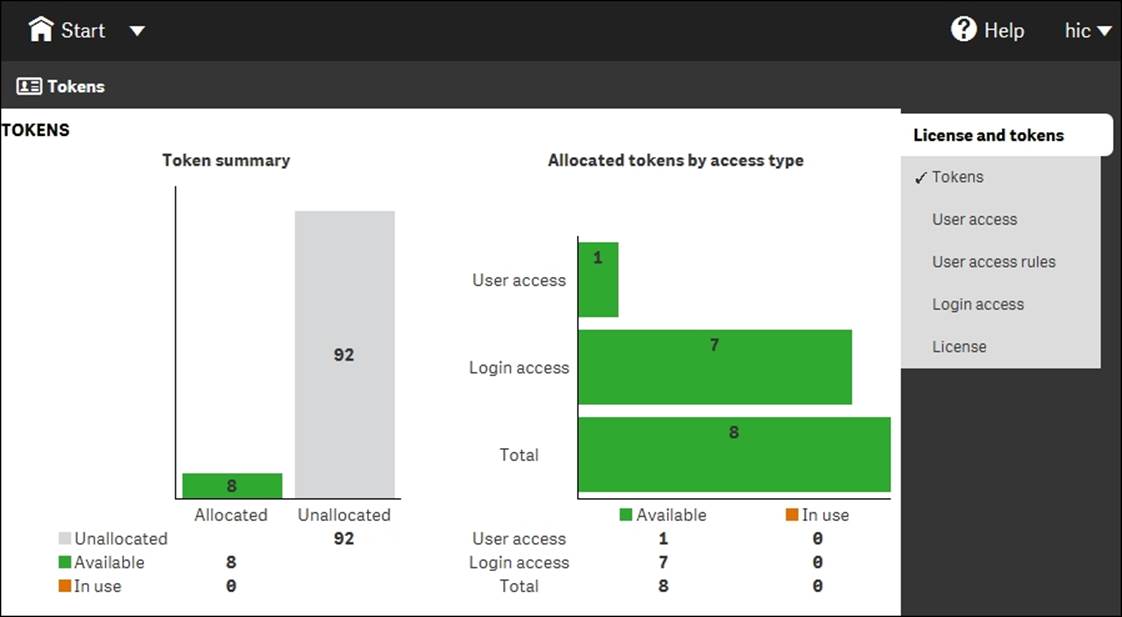
The Tokens screen in QMC
Management and monitoring
So far, this chapter has dealt with managing the installation and the licenses, but very little has been mentioned about the real purpose of the Qlik Sense administration, which is how to handle data and the analysis of data. In other words, how to handle applications, users, data connections, distribution, and so on. This section will cover these areas.
Importing and managing apps
Once the Qlik Sense server is deployed, perform the following steps:
1. Import an app that you created in Qlik Sense Desktop. This is something that you can do in the Apps sheet. Look for the Import button in the upper-right corner of the screen.
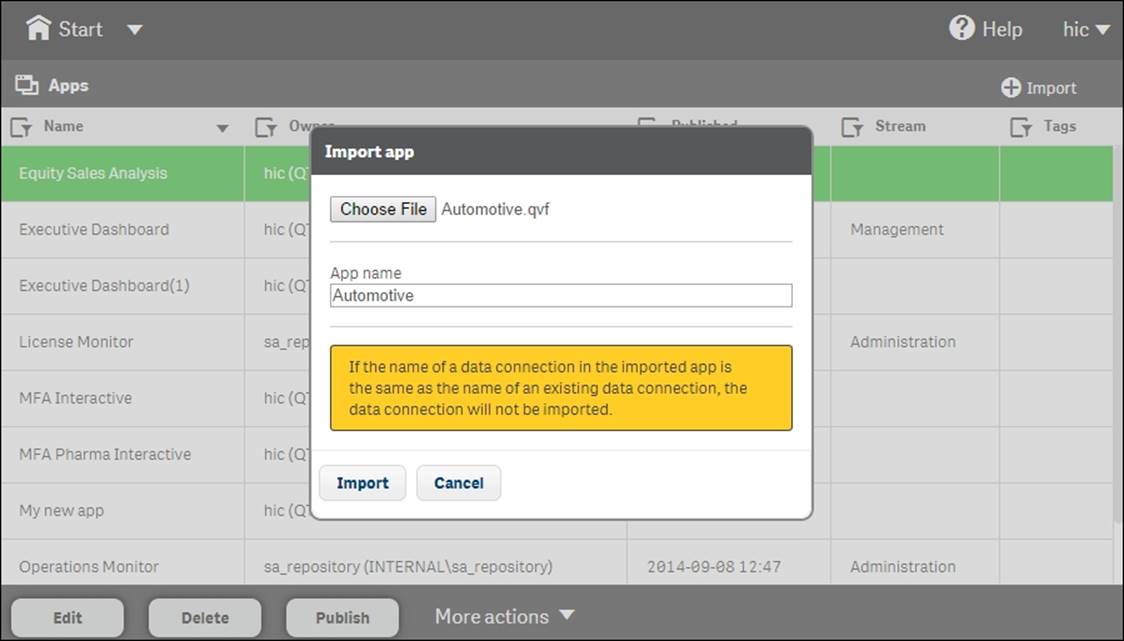
Importing an app created in Qlik Sense Desktop in the Apps screen
2. Once imported, you can set the owner of the app. Then, it will appear in the My work area in the hub of the owner. However, the app is still not published, which means that other users cannot see it.
3. When you publish it, you move the app from My work to another stream, and once it is published, its layout is fixed and cannot be changed.
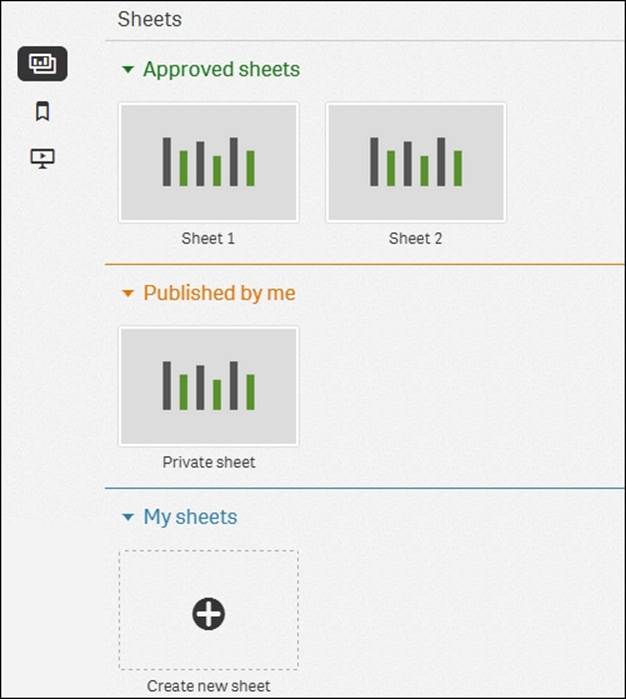
Once an app is published, the app overview in the hub changes
This is obvious if you look at the app overview in the hub. Here, you now have two rows of sheets: one with sheets that are fixed and public, and another with private sheets that aren't visible to other people.
You can also see this difference on the sheet listing the app objects. This sheet lists all sheets and stories, and QMC clearly indicates whether an object is public and who the owner is.
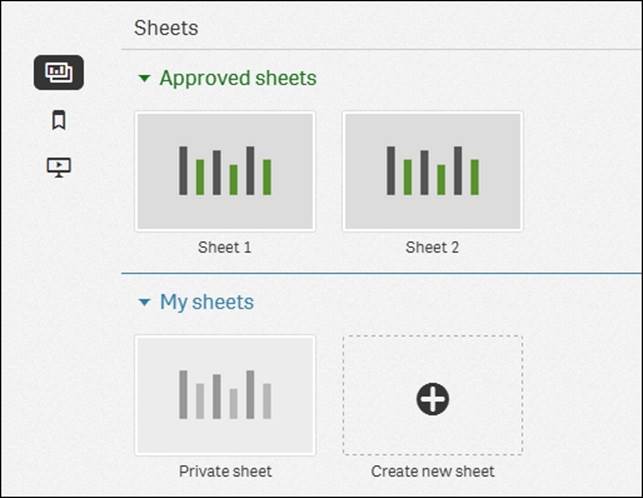
The user who creates an app is automatically designated as the owner of the app and its app objects. The app objects are published when the app they belong to is published. However, the users can add private app objects to the apps and share them by publishing the app objects from Qlik Sense. When this is done, the app overview in the hub gets three rows of sheets, as shown in the following screenshot:
Users and user directories
As soon as you want to manage the Qlik Sense server in terms of ownership and access rights, you need to have your users defined. Normally, these are already defined in a user directory, for example, in Windows Active Directory. Hence, you want to reuse these definitions.
On the User directory connectors page, you can define several sources for your users and user groups. You need to do this and sync at least one of them before you can start distributing licenses and access rights to your user groups.
The users are managed on the Users sheet. However, when you first start Qlik Sense, the list of users is fairly short: just you and a couple of system users. To populate the list of users, you have two options:
· Define a user directory connector and sync the users in it
· Define rules for the access passes, so that the users can assign licenses to themselves without you having to do it
Defining streams
Once you have created or imported an app, you may want to publish it. Publishing an app means that you move it from your personal workspace to a stream of your choice.
You have already seen the streams in the hub, where they appear to the left as groups of apps. My work is your personal stream that no one else can see.
Streams, as seen from the hub
An app can be published to only one stream. By default, Qlik Sense includes a stream called Everyone, and you can create any number of additional streams from the Streams sheet. You should most likely create one stream for each distinct user group. Use theCreate new button in the upper-right corner of the screen.
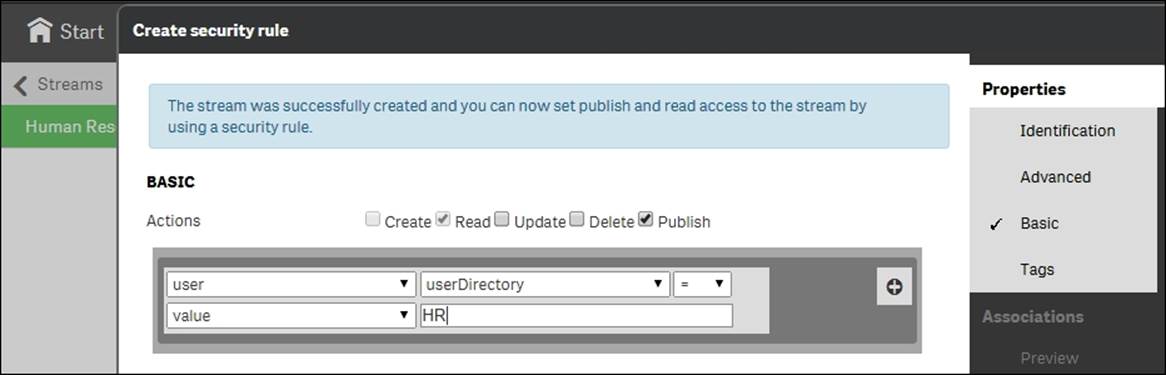
When creating your stream, you have the option to add a security rule, making the stream available only to some users. This is a very important security feature. One obvious example is if you have a set of apps that should be seen only by the Human Resources department. Then, you should create a stream for this group and use the user information from the directory service to give access to this stream.
Another common case is if you want to delegate the administration of a stream to a group of users. The following screenshot shows a security rule that grants access to the Human Resources stream and to all users belonging to the HR user directory:
Connectivity management
Connectivity means the connection to source data. Source data can be ERP systems of different kinds, file folders, web addresses containing tables, and so on. When running a Qlik Sense script, data is pulled from the different sources into the Qlik Sense app, so that it can be analyzed at a later stage.
With Qlik Sense, it is easy to get an overview of all data connections used, something that used to be a challenge. By opening the Data Connections sheet, you get a list of the data connections used in the different apps.
The data connections can be managed and security can be set separately for the different connections. It is, for example, possible to prevent some users from using a specific data connector. This way, you can control the usage and ensure that data is used in the correct way.
Tasks
On the Tasks page, you define the jobs that need to run in the background. These are of two kinds: reload tasks and user synchronizations.
The reload tasks are necessary to refresh data in the apps, which means that you need to set up tasks so that they are refreshed with the frequency you want. Most apps should be refreshed once a day, but some others only need to be refreshed once a month. There are both advantages and disadvantages with a frequent refresh of the data. If it is refreshed rarely, for example, once per month, the users will not have the latest data.
On the other hand, if you refresh data too often, such as once per hour, you will have a heavy load on your server handling the reload tasks. You will also create a situation where two users in a meeting may have different opinions about what the correct number for a specific KPI is, since they looked at two different versions of the app. One looked at the app an hour ago, and the other just 10 minutes ago. This does not create an understanding; rather, it creates confusion, since you have two "versions" of the truth.
You should ask yourself if the users benefit most from having as fresh data as possible, or if they benefit more from having "one truth". A good balance is to have one refresh per day. The users will learn this, and refer to the numbers as "today's numbers" and "yesterday's numbers".
User synchronization is necessary to refresh data from the directory service, so that Qlik Sense is aware of any changes made to groups and users.
A task can be triggered by either a scheduler or the completion of another task. This way, you can get task chaining.
System management
The group to the bottom-left in QMC relates to system settings. Here, you can configure the nodes, engines, proxies, schedulers, repositories, sync rules, and certificates. With these, you can configure how the Qlik Sense server would work on different computers. You can do really advanced things here, but this is outside the scope of this book.
Security rules
You can set access control for most of the preceding settings, for example, only some users should be able to see a specific application; only some users should be allowed to use a specific data connection; all users should be allowed to create data connectors to databases, but not to file folders; only some users are allowed to log in using a specific pool of login access passes; and so on.
When doing so, you should think of the following user types:
· Developer: These are users who are allowed to create apps, sheets, stories, objects, and who can use and create data connections
· Contributor: These are users who are allowed to create stories and sheets for published apps but are not allowed to create new apps
· Consumer: These are users who can only use apps, sheet, stories, objects, and so on and are not allowed to create content
These rules are called security rules, even though they do not always pertain to true security. They can be edited on each sheet, for example, the rules for streams can be edited on the Streams sheet, but there is also an overview: the security rules have a sheet of their own.
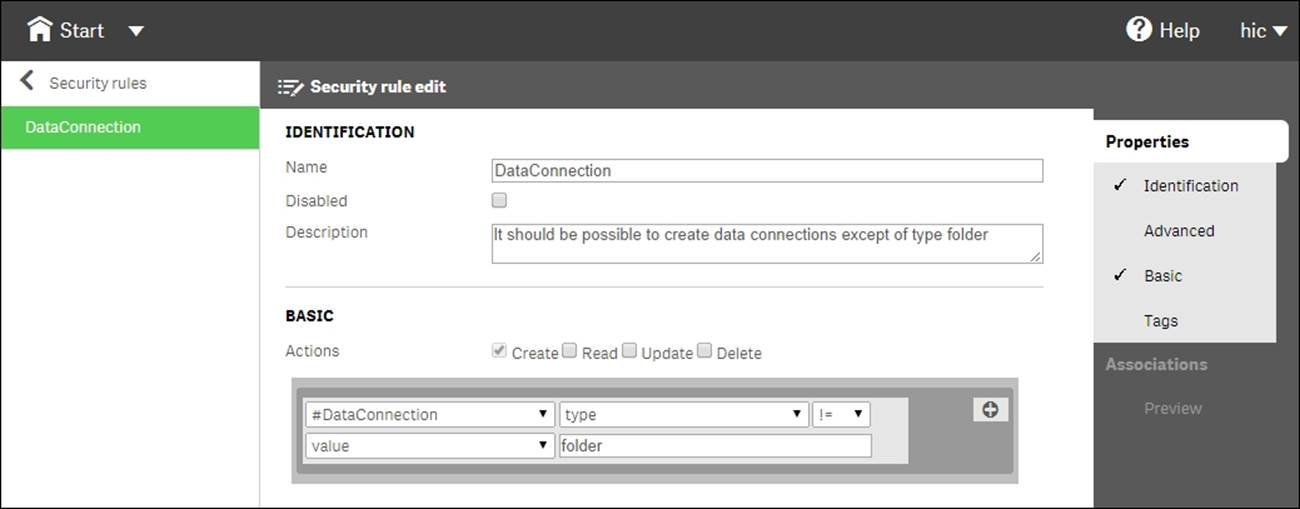
When you create a security rule using the basic interface, you create a property-value pair that grants users the right to do something. In the preceding screenshot, all users are granted the right to create data connections that aren't file folders.
The rules are property-based and the properties are used to describe the parties involved in an access request. In the usual case, the parties involved are the user making the request, the environment the request is made from, and the resource the request applies to.
Each property is defined in a property-value pair such as group = Sales or resourcetype = App. Each request, in turn, includes the property-value pairs for the users, environments, and resources involved in the request together with the action that the the person making the request wishes to perform on the resource, for example create, update, or delete.
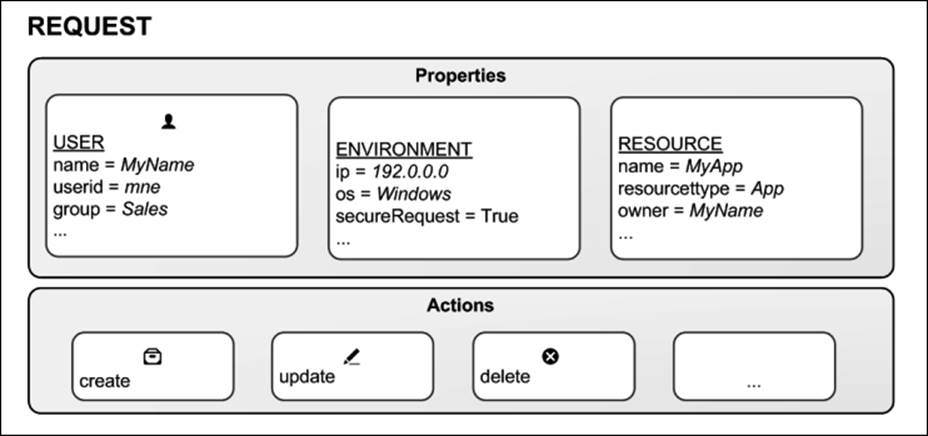
The four components in security rules: user, environment, resource, and action
You can create rules based on the property-value pairs. This means that requests for an action on a resource are granted only if the property value of the requester matches the property-value conditions defined in a security rule for that resource.
A rule can read as a sentence in the following way: Allow the requester to [action] the [resource] provided that [conditions].
Each rule must describe the action and the resource or resources the action should be applied to. If you don't define any rules for a resource, no users will have access to that resource.
By design, security rules are written to include, not exclude, users. Users who are not included in security rules will be denied access. So, security rules must be created to enable users to interact with Qlik Sense content, data connections, and other resources.
Hence, the rules define when access is granted, and there is no rule that can deny a user access. If there is a rule that allows the user to do something, they are allowed to do so. So if you want to deny a user something, you must delete the rule that grants access, or edit the rule.
Monitoring
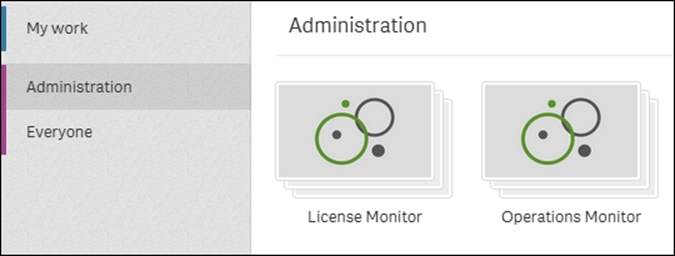
Delivered together with Qlik Sense, you will also find two monitoring Qlik Sense applications: License Monitor and Operations Monitor. These read the logfiles of Qlik Sense and will give you a good overview of the state of the Qlik Sense server.
The following screenshot shows Operations Monitor:
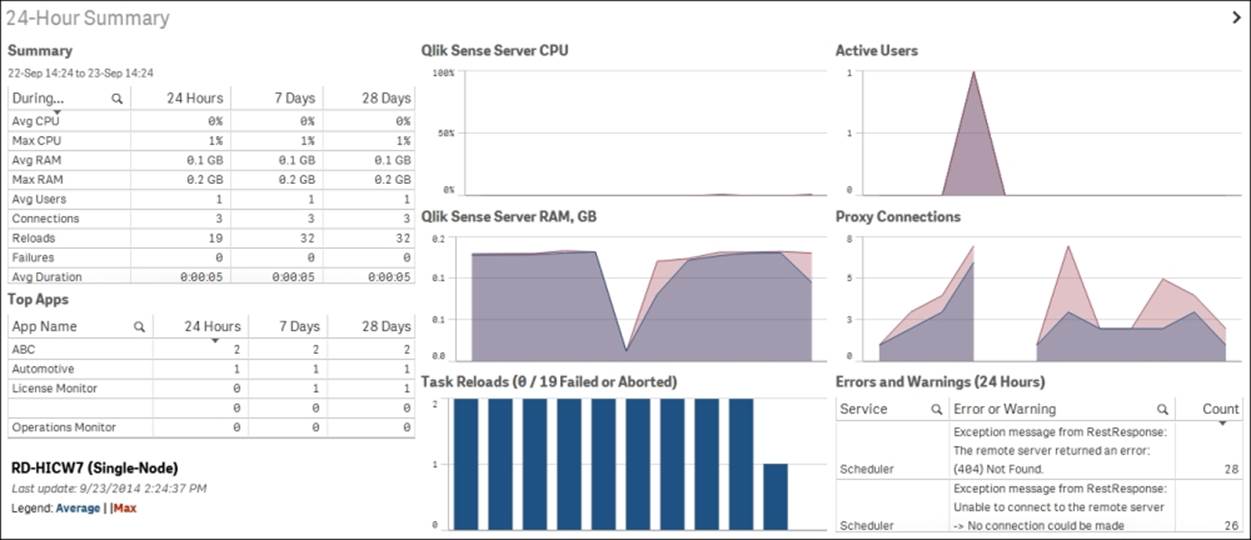
Operations Monitor
The following screenshot shows License Monitor:
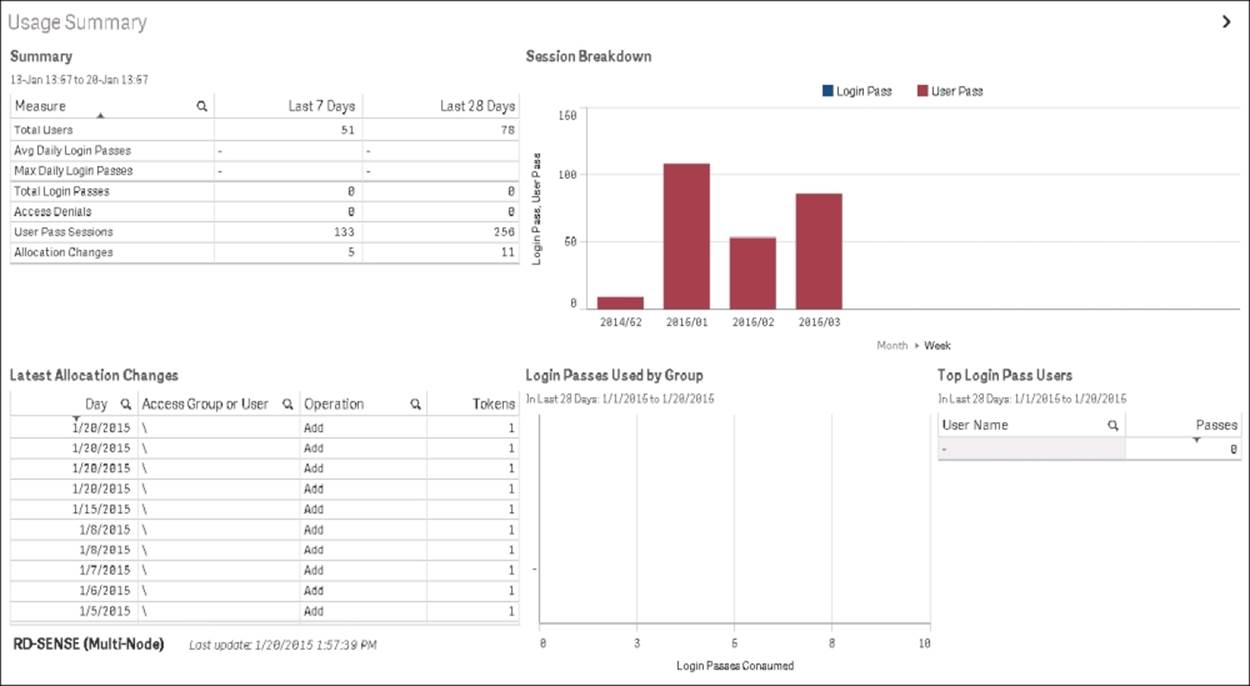
Lincense Monitor
Security
The security in Qlik Sense consists of many parts. In QMC, there is a system with security rules for almost everything you can do, not only data access; it also has the rights to change the setup or publish apps or sheets. This implies protection of the platform, that is, how the Qlik Sense platform itself is protected and how it communicates and operates.
However, security, as a concept, goes beyond that. So let's start from the beginning.
Authentication and authorization
The two most basic concepts in security are authentication and authorization. Authentication answers this question: who is the user and how can the user prove it? Authorization answers this question: what does this specific user have access to, and what are they allowed to do?
In Qlik Sense, authentication and authorization are two distinct, unconnected actions. In addition, the sources of information used for authentication do not have to be the same as for authorization, and vice versa.
Qlik Sense uses standard authentication protocols (for example, Integrated Windows Authentication, HTTP headers, and ticketing) to authenticate every user requesting access. If you want a customized authentication, you can configure this in the proxy, but the details of this are outside the scope of this book.
Authorization is the procedure of granting or denying user access to resources, but this can be done on several levels:
· First, there is the administrator access control. Which rights are needed for the different roles and responsibilities of the administrators? This is controlled in the security rules as previously described.
· Secondly, there is the app level authorization: is the user allowed to access the app? Which functions in the app is the user allowed to use (for example, printing, exporting, and snapshots)?
Content security
Content security is a critical aspect of setting up and managing your Qlik Sense system. QMC enables you to centrally create and manage security rules for all your Qlik Sense resources. Security rules define what a user is allowed to do with a resource, for example, read, update, create, or delete.
Additionally, there is data reduction by a section access in the script. For example, with data level authorization, is the user allowed to see all of the data or just parts of it? The section access is an app-defined, data-driven security model, intimately connected with the data model. It allows the implementation of row- and field-level data security.
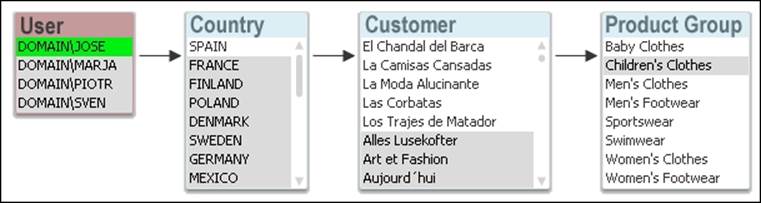
In data level authorization, the authentication information also exists in the data model (albeit in a hidden part of it). It could be, for example, a username.
The selection propagates to all the other tables in the standard QlikView manner, so that the appropriate records in all tables are excluded, wherein Qlik Sense reduces the scope for this user to only the possible records. This way, the user will only see data pertaining to the countries to which they are associated.
Summary
In this chapter, we have seen that with QMC, you can manage a Qlik Sense installation very efficiently. It includes a wide range of functions that allow you to configure your system the way you want it, and it allows you to set access rights on not only apps, but also on streams, licenses, and data connectors.
Since QMC is based on standard web technology, you can, in principle, use any browser to run it, and it integrates well with other systems used to manage software and hardware components. In addition, you can use APIs to create custom management utilities.
To end this book, we'll be looking at putting Qlik Sense into practice for active data discovery, as we spend the last chapters analyzing the examples of sales, HR, travel expenses, and demographics.
All materials on the site are licensed Creative Commons Attribution-Sharealike 3.0 Unported CC BY-SA 3.0 & GNU Free Documentation License (GFDL)
If you are the copyright holder of any material contained on our site and intend to remove it, please contact our site administrator for approval.
© 2016-2026 All site design rights belong to S.Y.A.