Salesforce CRM – The Definitive Admin Handbook Third Edition (2015)
Chapter 9. Best Practices for Enhancing Productivity
In this chapter, we will look at ways to improve the return on investment from the Salesforce CRM application, by adding further values and improving the experience of users in the system.
We will look at user adoption and describe ways to maximize the benefits of CRM within your organization, by introducing additional functionalities using external applications from the AppExchange Marketplace. These include the Salesforce Adoption Dashboards app, which is a free app provided by Salesforce through their Force.com Labs AppExchange listing.
As businesses evolve and processes change, new functionalities and information requirements are often identified. Here, we will look at the importance of planning and scheduling the release of changes to your application and provide some best practices relating to change management.
It will be seen how achieving successful user adoption can enhance your business processes and increase productivity, and the more the business's teams use Salesforce CRM, the more valuable the data and information analysis becomes.
We will discuss how successful user adoption can be achieved by empowering users and making their working lives easier. By providing users with information relevant to their daily tasks, keeping data clean and keeping functionality simple, users are not overburdened with unnecessary actions that overcomplicate and reduce productivity.
Salesforce AppExchange marketplace
The Salesforce AppExchange Marketplace is a website provided by Salesforce.com that enables organizations to select additional applications, known as apps, to add new features to their Salesforce CRM application.
Both the Salesforce CRM application and the AppExchange provide web-delivered platforms to use and build applications. This integrated web-delivered approach allows for the installation of applications and new functionalities from AppExchange into Salesforce, which is often far simpler and more cost-effective than traditional software update mechanisms. The benefits of the AppExchange are that system administrators can easily extend the Salesforce CRM application as your company's business requirements change.
There is a wealth of solutions available from the Salesforce AppExchange marketplace to help achieve most requirements. In this section, we will describe and step through the process of installing an example app.
The apps and services listed on AppExchange are provided by the Salesforce community of third-party developers and system integrators. Many of the apps are also provided by Salesforce themselves, through their team known as the Force.com Labs.
Apps can sometimes incur additional costs, but there are many that are provided for free or for a small fee. In general, apps provided by the Salesforce.com Force.com Labs team tend to be free. To access AppExchange, navigate to Setup | AppExchange Marketplace, as shown in the following screenshot:
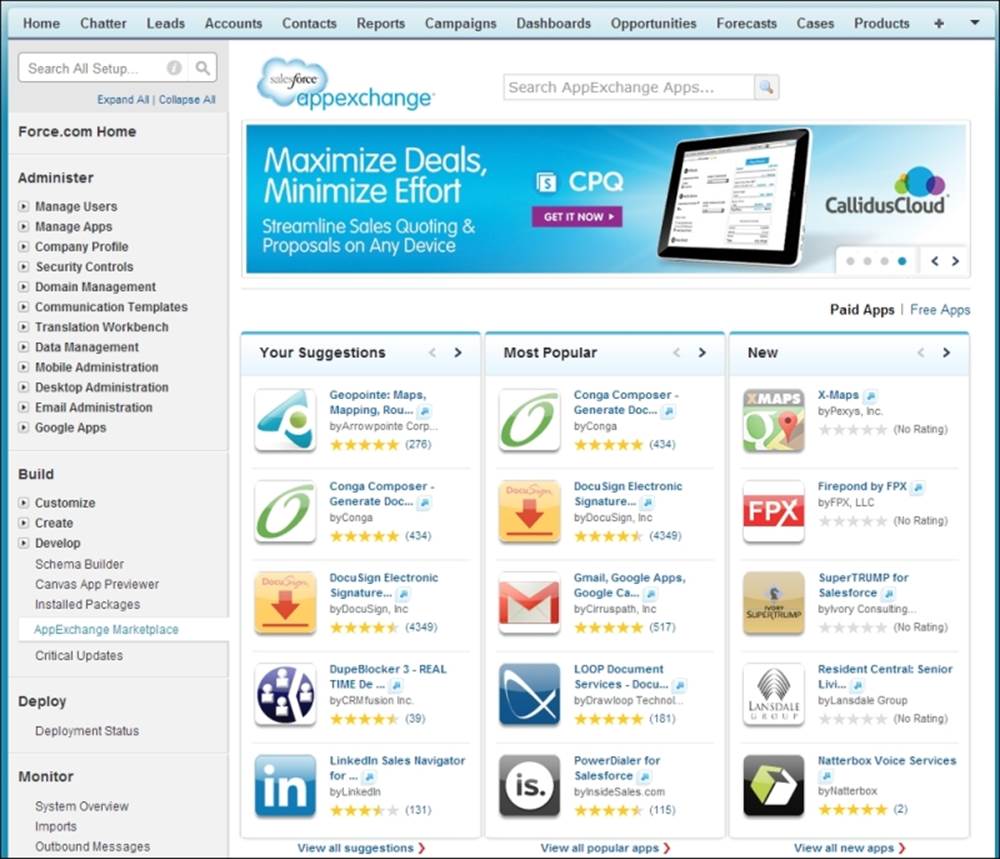
You can also access the AppExchange Marketplace website directly outside Salesforce CRM by navigating to http://www.appexchange.com/, as shown in the following screenshot:

As a directory, Salesforce AppExchange is similar to consumer websites, such as App Store from Apple, in the way that it seeks to provide an open, community-based channel for the distribution, retrieval, and installation of applications.
AppExchange differs, however, in that it provides not only the facilities for third-party distribution of apps, but also the listing of services by system integrators. This enables the Salesforce community to search for and review both apps and services from a central site.
Managed and unmanaged packages
Salesforce terms the collection of components and applications that are distributed through AppExchange as a package. There are two types of packages, namely managed and unmanaged.
Managed packages differ from unmanaged packages by the use of protected components that allow the managed packages to be upgraded by the developers, perhaps to add new functionality or to refactor in any changes in the Salesforce environment. By protecting certain components such as Apex Code, managed packages also serve to protect the intellectual property of the developer organization.
Unmanaged packages, on the other hand, do not protect components, and are therefore static within your organization as they cannot be upgraded by the publishing developer. They allow you to access all of the implemented customization or code and can be useful if you want to change or extend the functionality yourself.
Note
Users with the download AppExchange packages permission enabled for their profile can install or uninstall the AppExchange packages from the AppExchange website.
Sometimes, the apps are distributed by Independent Software Vendors (ISVs), which use the AppExchange package as a channel to advertise their presence and to showcase their range of products.
External and third-party tools
By showcasing on the AppExchange Marketplace website, ISVs often provide free apps, which help drive traffic and interest toward their core products, which in turn complement Salesforce CRM and are usually provided as web-based solutions in the same way as Salesforce.
These complementary applications are typically deployed alongside Salesforce CRM in support of a specific business process or function. For example, incentive and commission management, project management, product configuration, expense management, address checking, and so on are all examples of Salesforce apps that are available from AppExchange.
App security
Salesforce inspects all registered apps to be sure that they have no obvious security risks. However, it is worth noting that since the apps are developed by third-party providers, you should also carry out extensive testing and due diligence to eliminate any risk before installing the app into your production instance.
After an app has passed the Salesforce inspection, the core functionality and code can no longer be changed. However, custom links and web tabs are allowed to be changed because they might need to be altered after the installation. For example, simple target URLs might need to be changed from one organization to another.
You need to be aware how these links might introduce risks as part of your decision whether to trust the source of an app before installing to production. This is described in more detail in the upcoming sections.
Before installing an app
The following steps are recommended to help you understand more about the app and to determine any risks or need for further setup for your organization before actually installing the app into your production instance:
· Read specifications and reviews
· Review screenshots and customization guides
· Take a test drive
Read specifications and reviews
Before installing, read the specification associated with the app, where you will see these details: which Salesforce editions are supported, which languages are supported, component summary, and package details.
It is often worth looking at the reviews that have been left by others who have attempted to install the app. Although there is no guarantee that the reviews are 100 percent accurate and they may be subjective, it can give you an indication of the complexity of use and the successful installation of an app by other system administrators.
Review screenshots and customization guides
Most apps that have been listed on the AppExchange website provide screenshots and guides for any post-installation customization that might be required. These are useful and provide a quick indicator of whether the app will be of use to you and your organization.
Take a test drive
Apps typically offer a test drive option (especially the more complex apps), where you are directed to an external Salesforce application and can use the app as a read-only user before actually having to install it. A test drive gives you a far better way to determine whether the app is suitable for your organization before installing.
Within the test drive, you have the opportunity to check the app and its components to ensure that they are suitable and pose no security risks. For example, components such as custom links, formula fields, and web tabs can send Salesforce session IDs to external web services.
Note
Session IDs are tokens that allow users to access Salesforce CRM without re-entering the login name and password.
Salesforce.com recommends that you check all links to external services that include a session ID merge field, because if these session IDs are shared with an external service, they expose your data, and there can be a significant security risk that need to be aware of.
Installing an app
The following steps describe the process of how to install an app into your Salesforce CRM application from the AppExchange Marketplace:
1. Get it now
2. Examine the package
3. Review the security
4. Install
5. Perform the post-installation configuration
The best way to guide you through the use of new technology is by demonstrating it with an example.
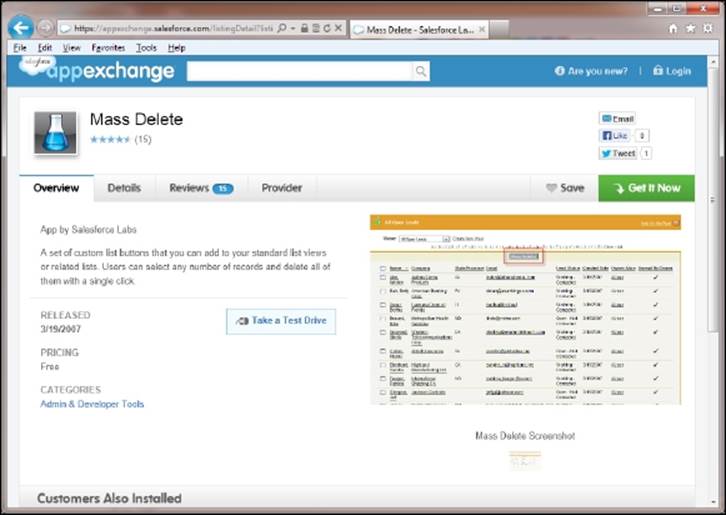
Here, we are going to install an application called Mass Delete, which has been developed and published by Salesforce.com's Force.com Labs team. This is a free app that provides a set of custom buttons that allow users to select any number of records and delete all of them with a single click.
Note
The Mass Delete app from Force.com Labs is available from the AppExchange Marketplace directly through the following URL:
http://appexchange.salesforce.com/listingDetail?listingId=a0N300000016YuDEAU
The Mass Delete app page looks as follows:
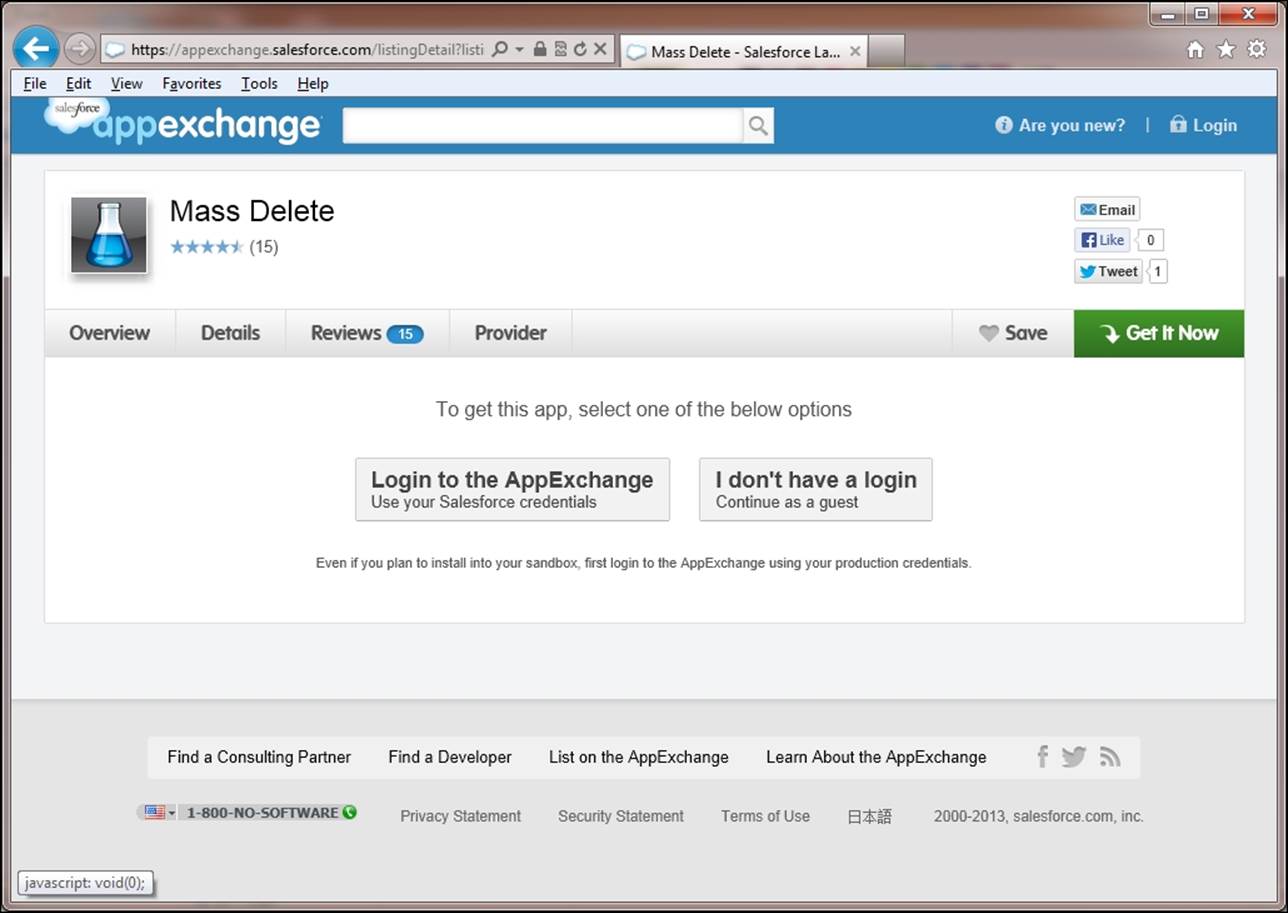
Get It Now
By clicking on the Get It Now button, you will start the process of installing the application where you will be prompted to log in to AppExchange using your Salesforce credentials, as shown in the following screenshot:
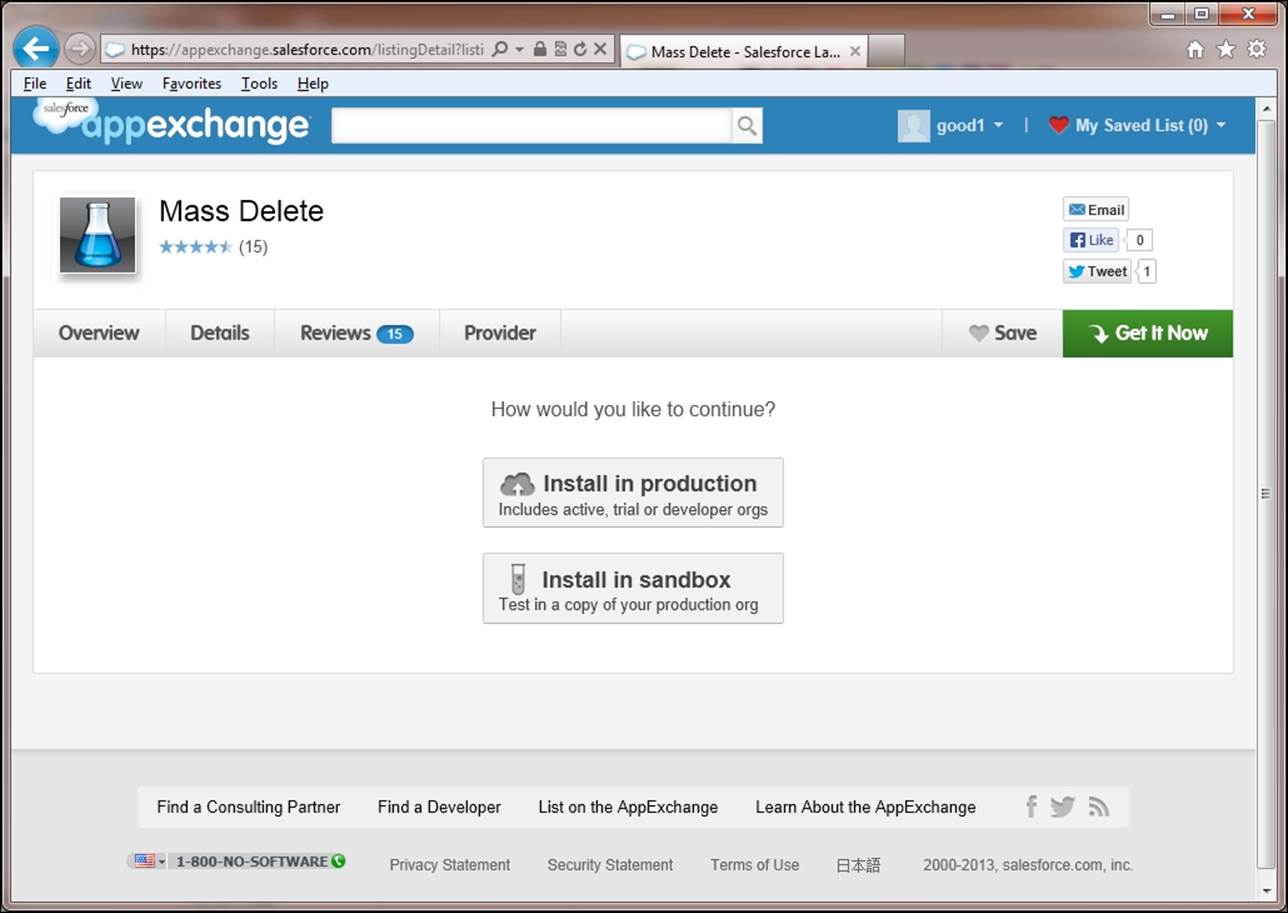
You will then be asked to select the location for the installation, where the options are set to either Install in production or Install in sandbox, as shown in the following screenshot:
You will then be presented with details of the app that will be installed (listed in the What you are installing section) and the Salesforce organization where the app will be installed (listed in the Where you are installing section), as shown in the following screenshot:
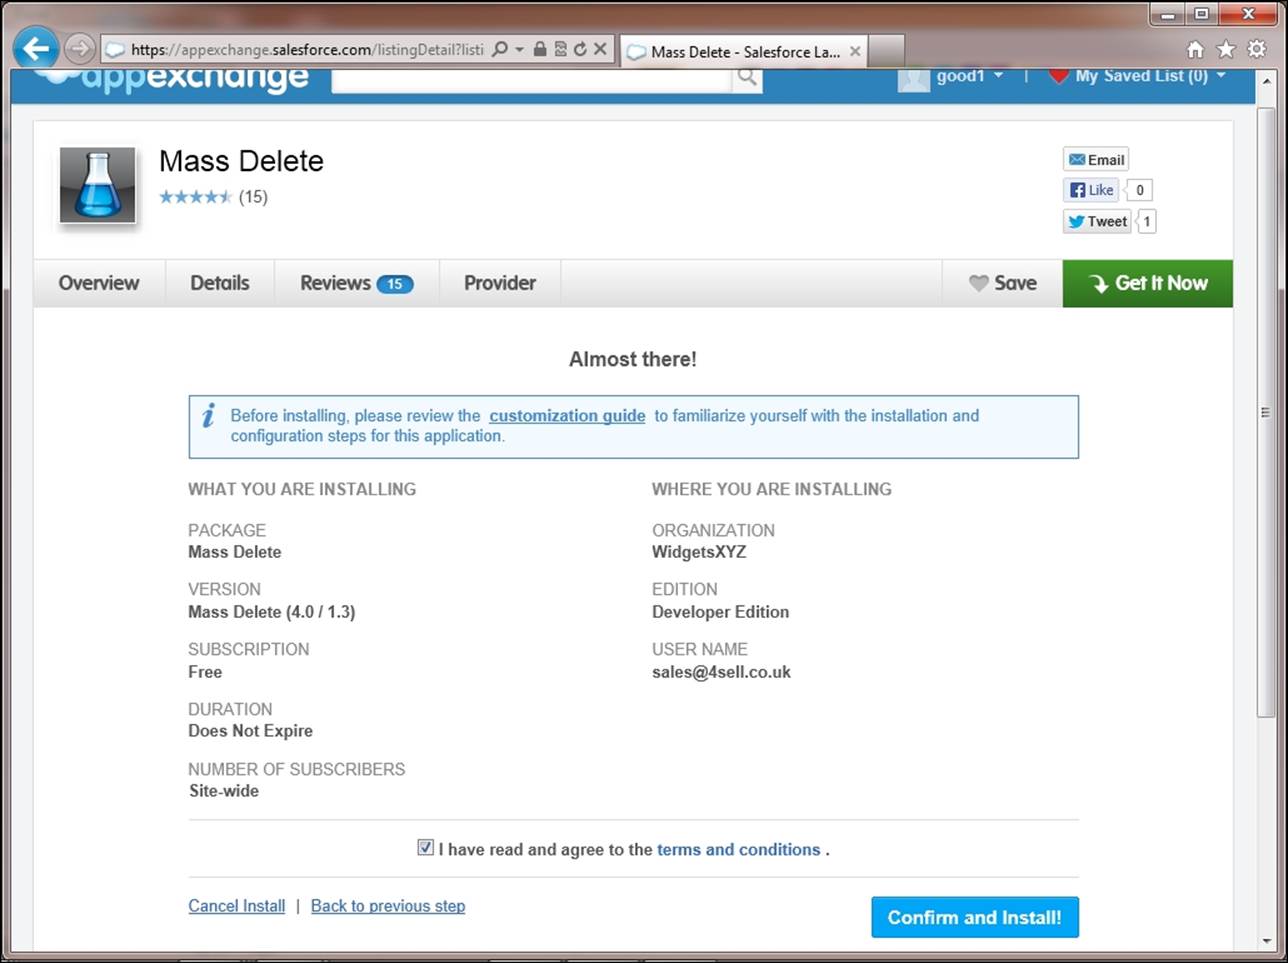
This page shows you information about Package and Version, along with the Subscription, Duration, and Number of Subscribers information, which is a part of the app package.
Click on the checkbox labeled I have read and agree to the terms and conditions to confirm that you agree to proceed with the installation, and then click on the Confirm and Install! button to continue to the Salesforce login screen, as shown in the following screenshot:
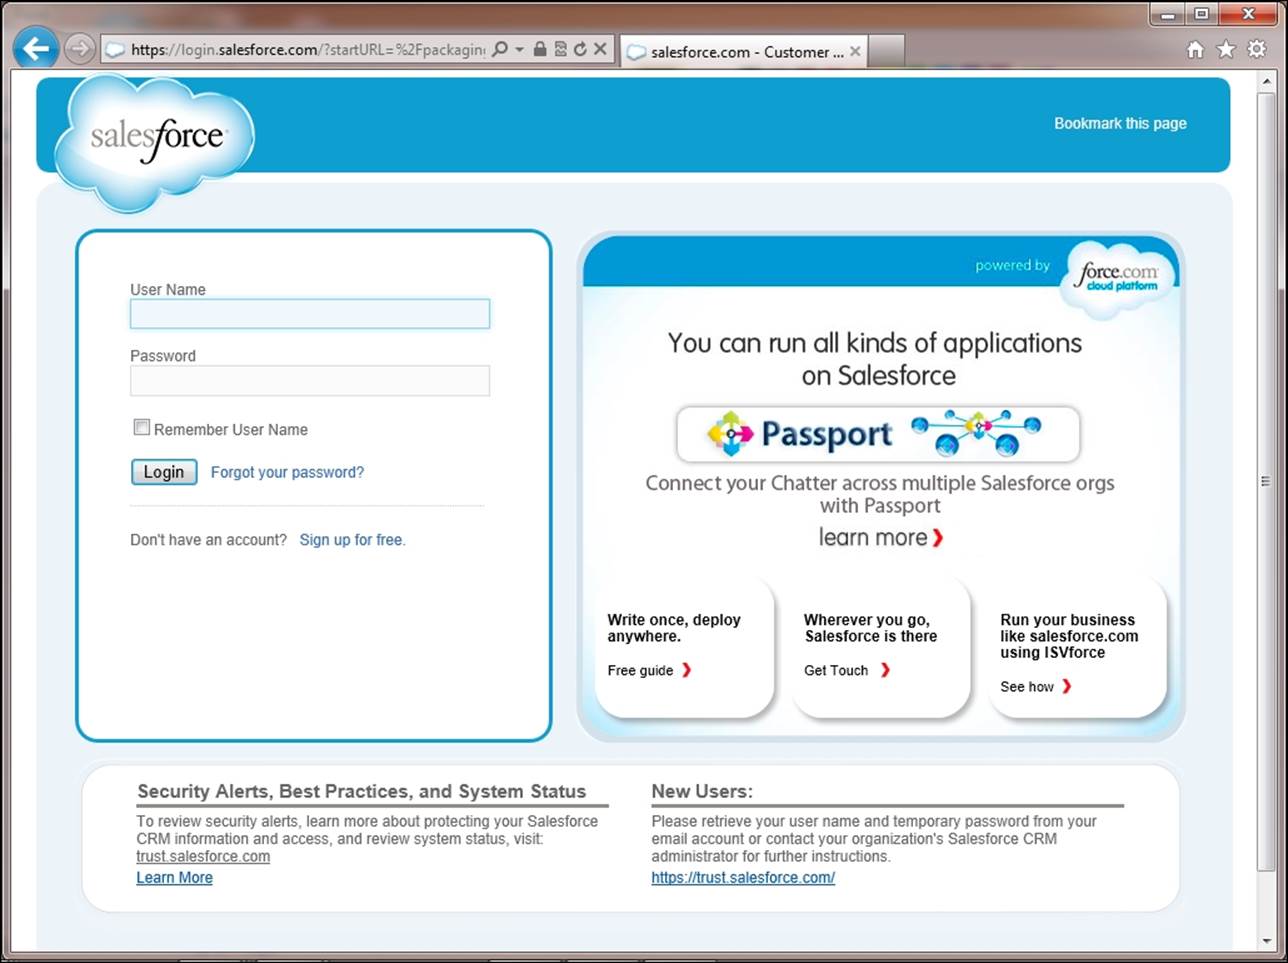
This screen allows you to log in to the Salesforce app. If you wish to install the app into your production org, you would use your production login details along with the Salesforce production URL, which might be https://login.salesforce.com. If you want to install the app into a sandbox org, you must change the login URL to that of the sandbox, which is https://test.salesforce.com, and use you sandbox login details.
Now, enter the User Name and Password fields, and then click on Login to proceed to the next screen.

In this pre-install screen, you are presented with an option, termed What if existing component names conflict with ones in this package?, the purpose of which is to handle a situation when an existing component's name conflicts with a component being installed. Here, the options available are Do not install or Rename conflicting components in package.
Also within this pre-install screen you are presented with three options to either Install for Admins Only, Install for all Users, or Install for Specific Profiles...
Choosing the third option Install for Specific Profiles... will allow you select which profiles profiles are given access to the package contents.
Now, click on the Install button to proceed with the installation.
Upon successful installation you will be presented with the following Installation Complete! Screen:
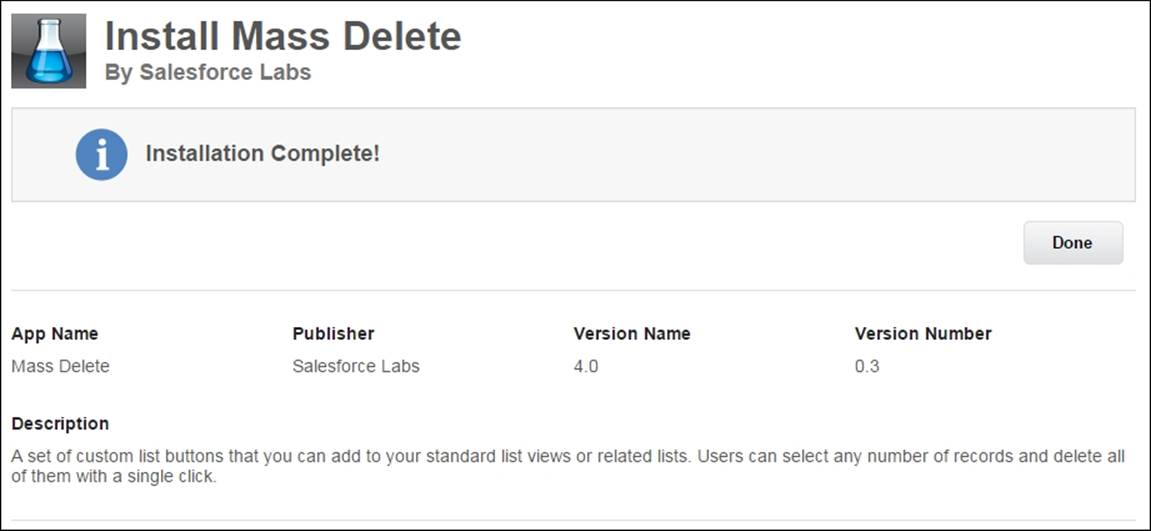
The final Installation Complete! screen shows you information about App Name, Publisher, Version Name, and various other details that make up the app package.
This screen provides confirmation that the app package has been successfully installed.
On In this final confirmation screen, clicking on the Done button will navigate from the confirmation page to a screen showing all installed packages for your Salesforce organization.
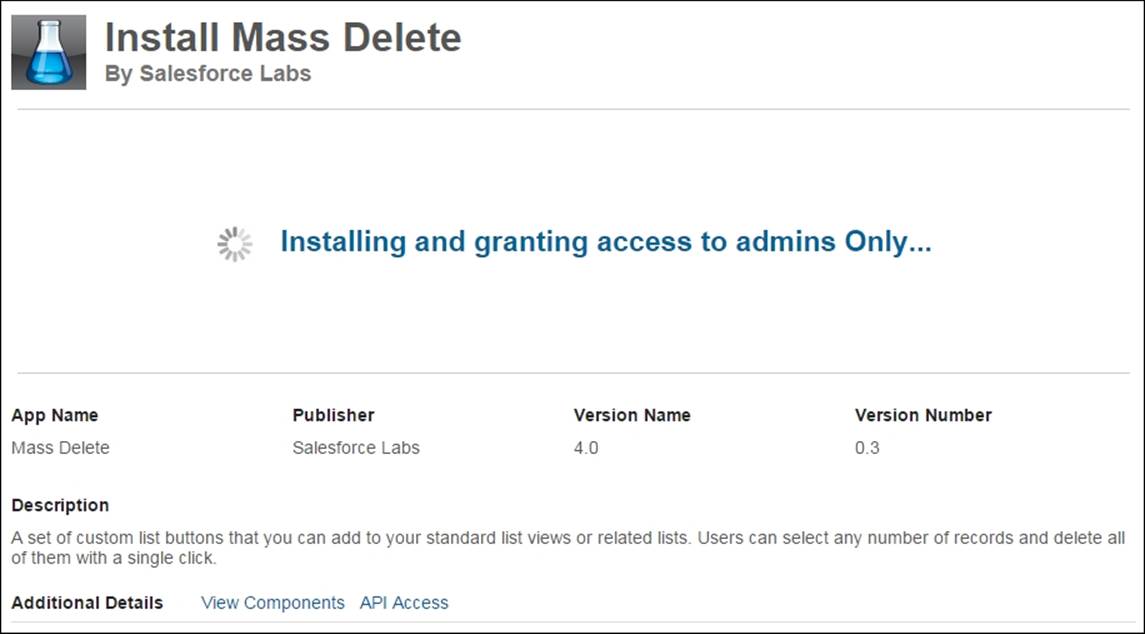
For large and complex apps, you might not see the Installation Complete Confirmation screen straightaway. Instead, either a screen that shows a message that the installation has been scheduled is displayed, for which you later receive an e-mail notification when complete, or a screen is shown indicating the installation is in progress, as shown in the following screenshot:
Post-installation configuration
In this Mass Delete app, included in the package components, is a PDF guide that describes the post-installation configuration that must be applied to the app before the functionality can be used. The guide can be accessed from within the Documents tab, as shown in the following screenshot:
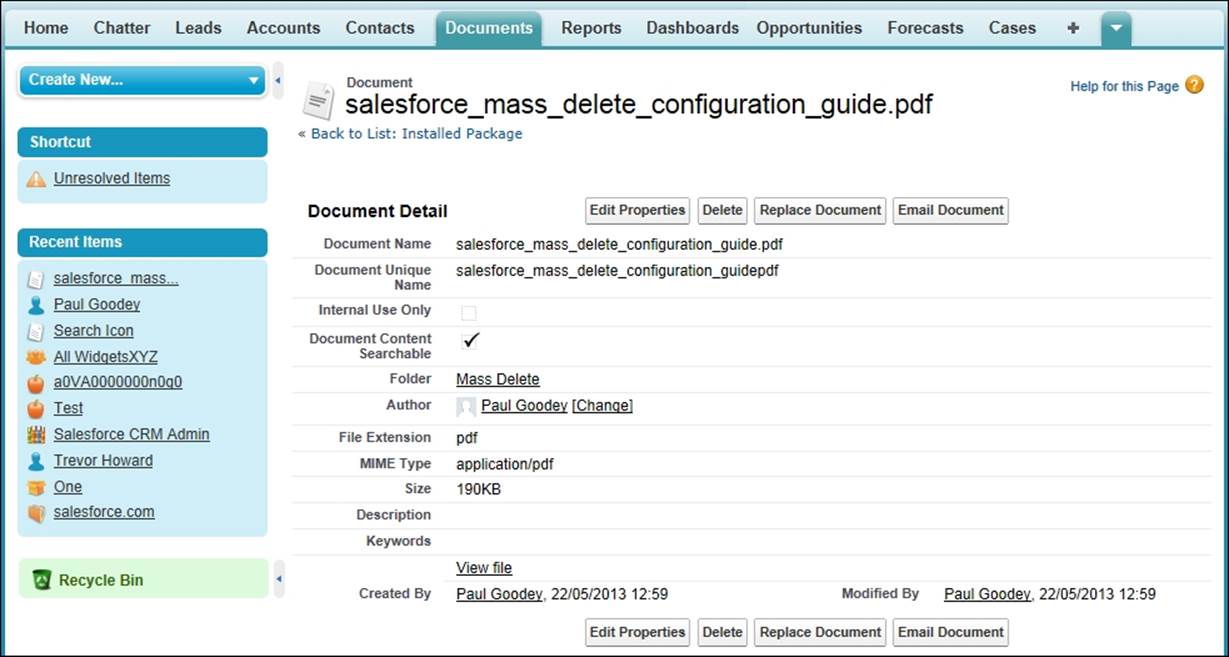
If you do not see the Document tab in your list of tabs, you can add this tab by referring to the section Hiding and showing tabs in Chapter 3, Configuration in Salesforce CRM.
Alternatively, to find the document you could instead use the Global Search option, as described in Chapter 1, Organization Administration, and type the following search term salesforce_mass_delete_configuration_guide.pdf.
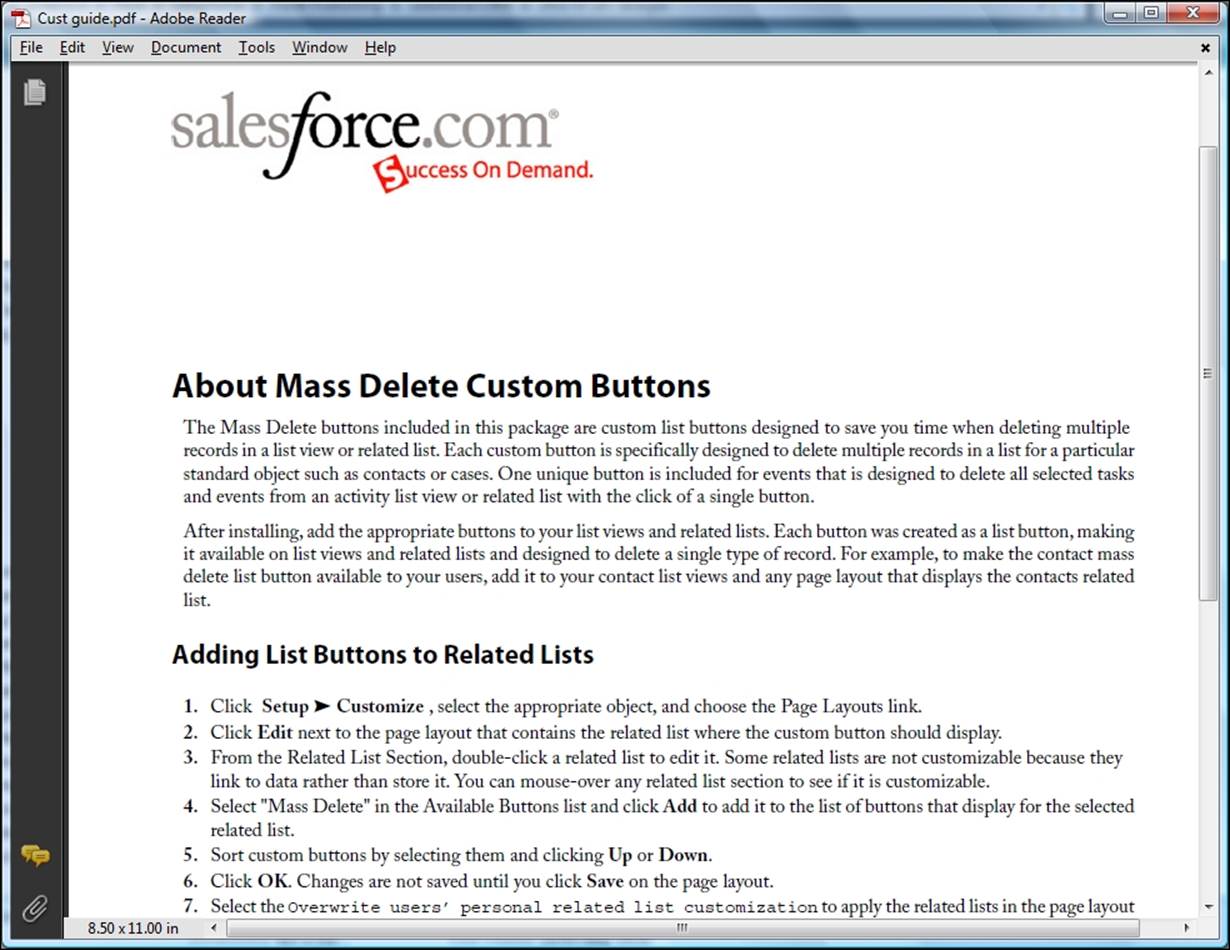
The guide describes how to complete the installation and customization of the app:
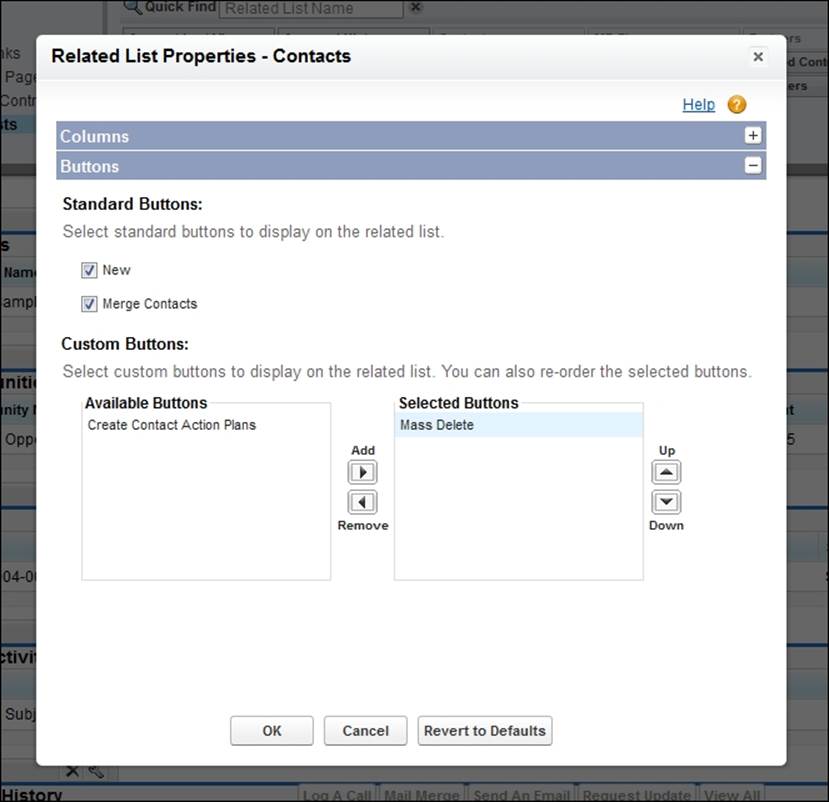
Using the guide, we add the custom list button to the Contacts related list within the Accounts detail page, as shown in the following screenshot:
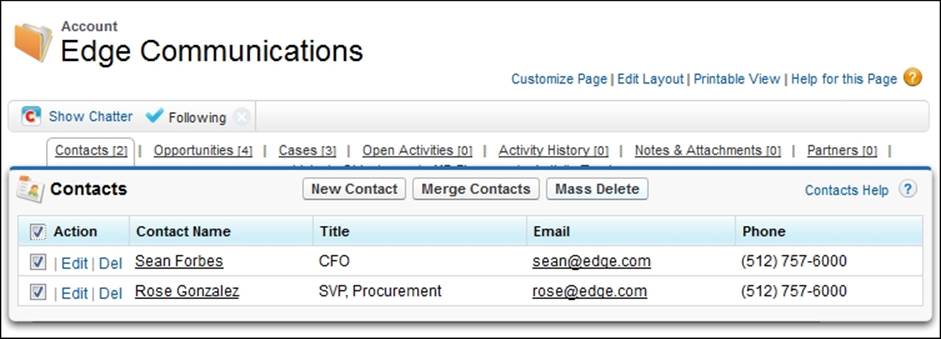
Finally, to verify the installation and customization, we can navigate to the Accounts detail page and access the Contacts related list section, whereupon we can access the Mass Delete custom button and the associated functionality.
Note
In the Salesforce CRM Unlimited Edition, you can install an unlimited number of apps. In the Enterprise Edition, there is a maximum limit of 10 apps.
Uninstalling an app
You can uninstall an app that has been installed from the AppExchange, there are some considerations however. If you uninstall a package that includes a custom object, all components associated with that custom object are deleted, such as custom fields, validation rules, workflow rules, approval processes, custom buttons and links, and so on.
Note
You cannot uninstall a package if any component in the package is referenced by a component that will not be included in the uninstall operation, or if a field added by the package is being updated by a scheduled job, such as a time-based workflow field update (you must wait until the background job finishes and retry).
After an uninstall operation, Salesforce automatically creates an export file containing the package data. When the uninstall operation is complete, Salesforce sends an e-mail containing a link to the admin user who is carrying out the uninstall operation.
The export files (plus related notes and attachments) are listed below the list of installed packages.
Tip
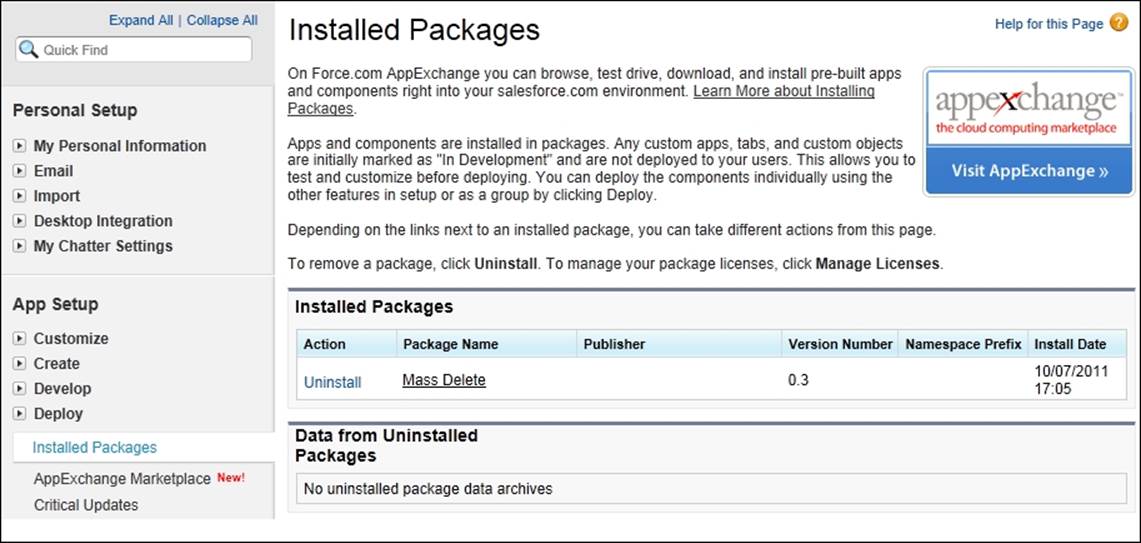
Salesforce recommends that you back up and store the export file elsewhere because it will only be available for a limited period after the uninstall operation. To uninstall an AppExchange app, navigate to Setup | Installed Packages, as shown in the following screenshot:
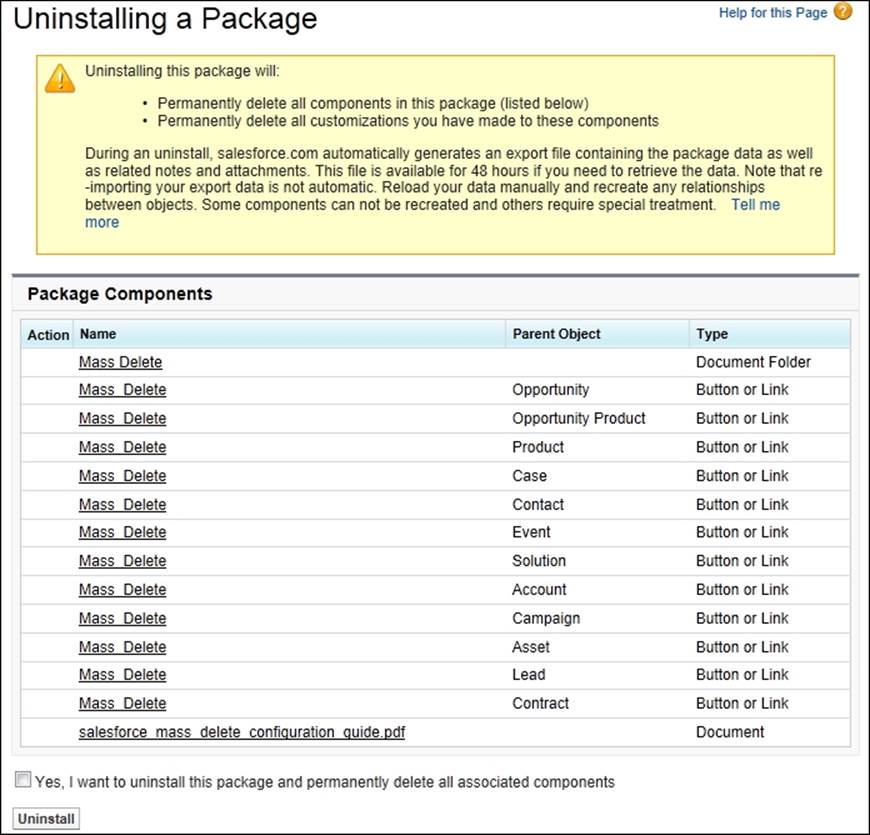
Now, select the installed package and either click on the Uninstall action or click on the package name to review the details of the package. Then set the uninstall confirmation checkbox. Finally, click on the Uninstall button as shown in the following screenshot:
AppExchange best practices
The following best practices should be applied as part of the installation of apps from the AppExchange Marketplace website:
· Clarify that the specification for the app meets the requirements and assess any reviews and comments
· Take a test drive, if available
· Review all the components that are included in the package and be aware of any security issues concerning links and session IDs
· Test the app in a sandbox before deploying it into production
· Try to enlist business support to own and validate the app before deploying it into production
· Consider undertaking a pilot deployment for selected users if the app is particularly complex
· Communicate the app to the business prior to deployment and activation in production
· Prepare training material for all affected users if the app is particularly complex
Change management overview
As outlined in the section on installing apps from AppExchange Marketplace, you should properly evaluate the functionality and results of deploying an app within your Salesforce CRM organization. This concept is part of a wider concern, which addresses the way changes are applied to the Salesforce CRM application.
With the use of Salesforce sandboxes, you can properly evaluate and perform due diligence for new Salesforce functionality, before deciding to roll it out to your users in the production system. In the case of an AppExchange app, if the app proves to be unsuccessful, then it need not be uninstalled.
Salesforce sandboxes
Sandboxes are separate Salesforce CRM environments that are isolated from your Salesforce production organization, so actions that you carry out in your sandboxes do not affect your Salesforce production environment and vice versa.
To view and manage your existing sandboxes or create new ones in Salesforce CRM, navigate to Setup | Data Management | Sandboxes.
Note
The Sandbox feature is only available in a licensed, production instance of Salesforce.com.
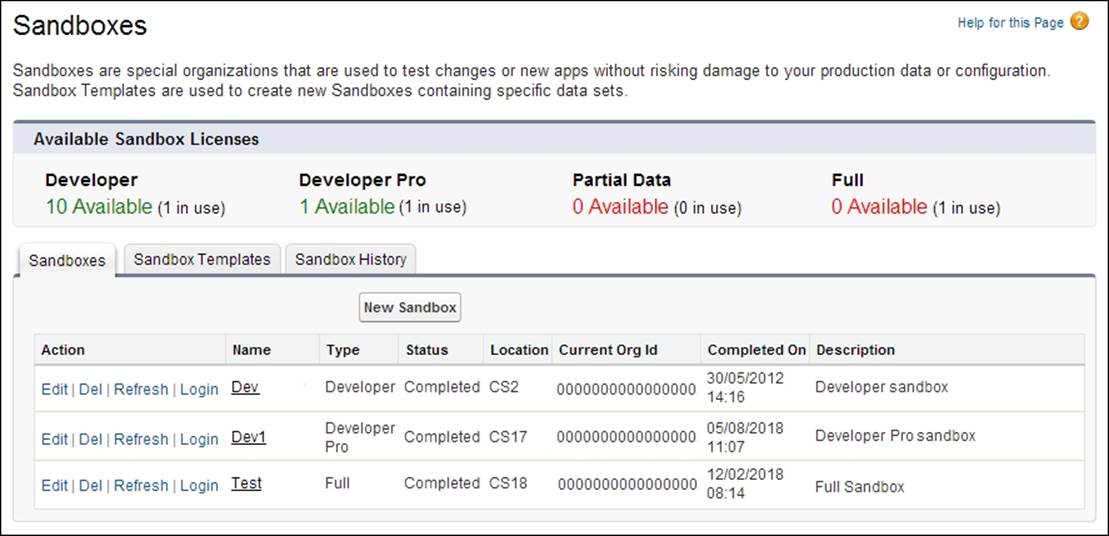
You can view the list of any existing sandboxes that have been created, and clicking on a sandbox name allows you to view details about the sandbox, showing when it was created.
In Sandbox List, you can see the sandbox's Name, Type, Status, Location, Current Org Id, Completed On, and Description fields, where there are these types: Developer, Developer Pro, Partial Copy, and Full, as shown in the following screenshot:
Note
Sandbox availability is dependent on your edition of Salesforce CRM. Some types are provided as standard while others are available at additional cost.
Developer sandbox
A Developer sandbox is intended to be used for coding and testing, and contains a copy of all the configuration setup from your production system. It does not, however, contain any of the data. There is a maximum of 200 MB of data storage and 200 MB of file storage that can be created. The Developer sandbox can be refreshed once per day.
Developer Pro sandbox
A Developer Pro sandbox is intended to be used for coding, testing, and user training, and contains a copy of all the configuration setup from your production system. It does not, however, contain any of the data. There is a maximum of 1 GB of data storage and 1 GB of file storage that can be created. The Developer Pro sandbox can be refreshed once per day.
Partial Copy sandbox
A Partial Copy sandbox is intended to be used as a testing environment and contains a copy of your production organization's configuration setup. Unlike the Developer and Developer Pro sandboxes, a Partial Copy sandbox permits a sample of your production organization's data that you define using a sandbox template.
To create a Partial Copy sandbox, you must apply a sandbox template at creation time, although there is a maximum of 5 GB of data storage and 5 GB of file storage that can be stored. For each selected object in the sandbox template, up to 10,000 records are brought over from the production environment. For example, if you have a template that includes only accounts to create a Partial Copy sandbox, up to 10,000 account records will be copied into the new sandbox, but no other records will be copied. Unlike theDeveloper and Developer Pro sandboxes, the Partial Copy sandbox can only be refreshed once every five days.
Full copy sandbox
A Full copy sandbox contains a copy of your entire production setup, including all the data. Because the data is also copied over during a refresh operation, there is a limit of refreshing the Full copy sandbox once every 29 days. Full copy sandboxes have the same storage limit as the production organization.
Note
The Full copy sandbox is generally used for User Acceptance Testing (UAT).
Clicking on the New Sandbox button allows you to create a new sandbox.
The Sandbox Templates tab is used with Partial Copy sandboxes and determines the types of record and data that is to be copied over from the production environment.
The Sandbox History tab allows you to see the sandbox refresh history, showing when the sandboxes were created and who created them.
The Refresh link allows you to replace an existing sandbox with a new copy. The existing copy of the sandbox remains available while the refresh operations is complete and until you activate the new copy.
When creating or refreshing a Full sandbox, you can reduce the time taken for the refresh by reducing the amount of data that is copied. The following options allow you to reduce the amount of data that is copied:
· Case History: This allows you to select the number of days of case history from your production organization to copy to your sandbox. You can copy from 0 to 180 days in 30-day increments. The default value is 30 days.
· Opportunity History: This allows you to select the number of days of opportunity history from your production organization to copy to your sandbox. Here, you can copy from 0 to 180 days in 30-day increments. The default value is 0 days.
Note
By default, Chatter data is not copied to your sandbox. Chatter data includes feeds, messages, and discovery topics. Select the Copy Chatter Data checkbox if you wish to copy it.
Salesforce does not recommend that you increase the default selections, as too much data can cause delays in the time it takes to copy or refresh the sandbox.
The Refresh option is only shown for each sandbox that is available for refreshing.
An Activate link allows you to activate a refreshed sandbox, which must be done before you can start using the new sandbox.
Note
The Activate option is only displayed for refreshed sandboxes that are yet to be activated.
Activating a refreshed sandbox replaces the existing sandbox with the refreshed version and permanently deletes the old version and any data in it.
The Login option allows you to log in to a sandbox.
Note
The Login button is only displayed for system administrators and might not always be available. Users can log in to an active sandbox using the https://test.salesforce.com URL and entering a modified username, which is <username>, from production, with a suffix for the name of the sandbox. So, for a sandbox called Test, the URL would be martin.brown@widgetsXYZ.com.test.
Sandboxes that no one has logged in to for 180 days are deleted. Users who have created or most recently refreshed any sandbox within your organization will be notified that the sandbox is scheduled for deletion. These users will receive at least three e-mail notifications over 30 days prior to the deletion.
Note
Salesforce recommends that you keep a sandbox active by logging in periodically to avoid e-mail notifications.
By using a sandbox, you can ensure that changes are deployed in a structured and controlled manner, and any change can be undone more easily. This is known as change management.
Effective change management reduces the risk when introducing new areas of functionality and when making changes to existing functionality. It obviously depends on the amount and complexity of the planned change, but for risk-free and successful implementation of changes in Salesforce CRM, there needs to be a change-management strategy, which typically covers the following steps:
1. Change requests.
2. Configure, develop, and deploy.
Change requests
When working with a change-management process in an organization, change requests are typically gathered from ideas and requests from management and application users.
Note
Case management for change requests
One method to gather and store change requests is by utilizing the case-management features within Salesforce CRM itself. This feature can be set up to enable users to enter their required changes directly. You can even consider building an approval process, so that the change is approved by the user's manager before being considered in any release cycle.
However, the change requests are captured, you need a process to analyze and prioritize the lists of requests and assess the scope of the work required. It can be useful to classify the changes that are requested for inclusion in either an immediate, a minor, or a major release.
Immediate release
Change items, which are suitable for immediate release, are very small changes that can be quickly implemented. They carry no risk and can be made directly into the production environment. Changes such as new dashboards or reports, modifications to existing dashboards and reports, and field positioning on page layouts and related lists, are considered small changes. This category of release also includes simple data changes, such as data imports and exports.
Changes can be configured, tested, and deployed with minimal impact, and therefore, these changes do not usually need to go through the change control process.
Note
It is worth considering, however, how the changes are applied in any other sandbox such as a developer, user acceptance, or test environment to ensure that all the sandbox environments are kept in sync.
Minor release
Minor releases are for larger changes that can be grouped and scheduled, perhaps every 30 or 60 days. The types of change that fall into this category include new fields, new page layouts, new custom objects, and so on, which are more complicated than the immediate release change items.
Minor release change items are medium-level changes that can be implemented with minor impact on the production environment and typically require less than a day of additional training for users, and overall less than a week of customization or code changes.
Note
It is worth considering, however, how the changes are applied in any other sandbox such as a Developer, User acceptance, or Test environment to ensure that all the sandbox environments are kept in sync.
Major release
Major releases are large changes that carry risk and have a major impact on the business or environment. These changes are the ones that require modification to the user interface, the way data is updated, data migrations, and any integration projects. These types of changes include new or modified role hierarchies, profiles, page layouts, record types, sales and support processes, workflow and approvals, and custom code. These changes can be introduced with the introduction of new AppExchange apps, process-impacting configuration changes, data migrations, and integration.
Note
Major release change items carry a high level of risk and are obviously more complicated than a minor release change.
These changes might require additional time to train users and in general require more than a week of customization or code changes.
Configure, develop, and deploy
Typical compliance requirements for change management are that changes are appropriately tested and validated, and only approved changes are deployed into production.
Configuration, development, and testing should always typically be carried out using a sandbox environment, and a record should be maintained to record the successful testing, validation, and approval of any changes prior to deployment or production. Depending on the scope and scale of the change request, as described previously, you might need to consider using a different environment for development and testing.
A complex change often sees the need for a developer sandbox and separate testing sandbox. When the changes are finished in the developer sandbox, they are migrated to the testing sandbox, and only when approved are they deployed into the production environment.
Only after appropriate review and agreement by the approval authority can the changes ever be deployed into the production environment.
User adoption
In Chapter 7, Salesforce CRM Functions, we looked at the core functionality that Salesforce CRM provides and also at how the complete sales process, from campaign and lead capture right through to customer service and support, can be captured.
There, we looked in detail at how Salesforce provides the facilities to obtain a full 360-degree view of the customer's past, present, and future relationships within our organization.
We looked at how this information enables marketing to measure the return on investment for marketing campaigns, sales to optimize the sales pipeline and sell more to each customer, support to track customer support incidents, and requests to ensure that each one is resolved appropriately and in a timely fashion.
Having this process in place is one thing, but to ensure that the information is captured to support the process is another issue altogether. After all, processes and technologies are only as good as the people who use them so it is vital that users regularly log in, create, and update information into Salesforce CRM.
CRM technology, therefore, must be easy to use, accessible, and scalable to ensure that the efforts of using the system provide significant enhancements in productivity, efficiency, and information accessibility. Once the business goals have been established and can be measured, organizations generally need to address methods to ensure or increase user adoption. Here, you can cultivate active product advocates or evangelists from within your business to support certain initiatives for any relevant areas of the business.
A significant factor for successful adoption is to give users incentives to use the system by providing them with functionality that improves the way they work and offers valuable information and tools that are not available elsewhere within the organization.
Another important consideration is to encourage feedback from the user community. By encouraging feedback and instilling a sense of collaboration, a collective ownership for Salesforce CRM can be obtained, which will instill trust. Responding to good suggestions, customizing, and communicating enhancements to the application can lead to better acceptance of changes and makes people more likely to want to spend their time working with the application.
In spite of the positives mentioned, user adoption cannot be assumed or taken for granted, and your company might need to consider reinforcing adoption with rules as well as rewards.
User adoption seeks to ensure that the business communities, as described previously, are effectively using Salesforce CRM and that the features that have been implemented are being properly utilized and continue to successfully address the business challenges.
To enable the monitoring of user adoption, there need to be effective reports and dashboards to capture adoption metrics where the following areas can be considered when building user adoption metrics:
· Usage
· Data quality
· Business performance
Usage
The first key requirement to ensure that Salesforce CRM is being appropriately used is by measuring the number and frequency of users logging in to the system. You also need to ensure that users are actively and consistently updating data and creating newLeads, Contacts, Opportunities, Cases depending on their roles in the organization.
Having a well-implemented business application should help make the business processes simple and hide complexity; this all helps increase user adoption. However, making a computer application appear simple often requires a considered approach and sometimes, takes far more effort than leaving it in its natural complex state. Removing obstacles and unnecessary features takes time and effort, but it is time and effort well spent, and will hopefully result in higher adoption rates.
Simplicity
As a platform, Salesforce CRM has proven to be highly successful since its conception a decade ago, and the number of organizations and subscriptions to the service grows year on year. Much of this success can be attributed to the simplicity, ease of use, and focus on user productivity that the platform affords.
While you might feel justified in introducing new mandatory fields and enforcing data capture requirements in the application, this can sometimes make the system less user friendly. Sometimes, applications that offer the simplest solution for a given problem are more likely to be rewarded with acceptance and adoption by your Salesforce community.
Connectivity
Enabling users to connect information from other tools, such as Microsoft Outlook, and fully integrating Salesforce CRM with other such business systems provides a mechanism to access all the information users need.
Salesforce Mobile
In the past, mobile devices that were capable of accessing software applications were very expensive. Often, these devices were regarded as a nice to have accessory by management and were seen as a company perk by field teams. Today, mobile devices are far more prevalent within the business environment, and organizations are increasingly realizing the benefits of using mobile phones and devices to access business applications.
Salesforce.com provides several mobile apps and solutions to keep your users connected and productive when using their mobile devices. These solutions are covered in detail in the next chapter, which is Chapter 10, Mobile Administration.
Communications
Users are far more likely to adopt Salesforce CRM when they know that their peers and colleagues are achieving results from its use. By communicating both the business and personal results—for example, an increase in company sales and the resulting sales commissions paid to the sales team—you can encourage others to adopt the system.
Data quality
Data quality is a valuable metric to measure adoption. Although, it is advisable not to overcomplicate the entering of information with needless validation, it is important that any critical fields be complete.
When certain fields are consistently filled out, user acceptance will increase, as it provides good data integrity and reliability, which translates into higher user confidence and higher adoption.
Business performance
Usage should also reflect business performance and compliance metrics that are used to ensure that users are not just using the application, but are using it in a way that enhances business effectiveness. Here, metrics that will uncover patterns and trends that track performance levels can be built, and can then identify areas that need improvement.
This has been a quick overview of areas that can be used to generate metrics that you can track, and there is an enormous quantity of metrics that can be generated.
There is a balance, however, in getting accurate views without overcomplicating and spawning too many metrics. Here, it is often best to create the minimum number of metrics that can adequately capture and track the success of the business performance objectives.
Certain performance indicators can be established to identify business sales revenues, which are listed as follows:
· Compare the current fiscal year with the last year's sales by month, say, to measure cyclical variances.
· Compare sales from existing customers against new customers to measure which type of customer revenue is coming in, and enhance CRM activities accordingly.
· Compare won and lost sales ratios to measure the effectiveness of deal closure, see why deals are being lost, and learn from the reasons.
· Measure the sales pipeline by sales stage to identify where new opportunities are appearing.
· Measure key opportunities in the sales pipeline to identify the current key opportunities and ensure they get the right attention.
· Measure closed sales actuals against quota. Here, you can introduce a closed sales leader board to identify who your top deal-closers are. This can sometimes be seen as a way to shame bad performers, but sales management can use this information positively to get the top performers to share knowledge and best practices to help the organization.
For marketing specific metrics, the following examples can be performed:
· Measure campaigns by Return On Investment (ROI), Actual ROI, by campaign type, and average opportunity amount per campaign.
· Measure lead conversion rates.
There are many dashboards that you can install from AppExchange that give metrics for how Salesforce is being used. The following is called Salesforce Adoption Dashboards, which is an example from Force.com Labs:

Note
The Salesforce Adoption Dashboards app from Labs is available from the AppExchange Marketplace directly through the following URL:
http://appexchange.salesforce.com/listingDetail?listingId=a0N30000004gHhLEAU
Summary
In this chapter, we looked at ways to improve the experience of users in Salesforce CRM, by providing additional functionality using external applications from the Salesforce AppExchange.
We looked at the importance of planning and scheduling the release of changes into the Salesforce application and provided some best practices related to change management.
We also looked at how to improve user adoption by giving users incentives to use the system. We can do this by providing them with functionality that improves the way they work and offering valuable information and tools that are not available elsewhere within the organization.
In the next chapter, we will look at the capabilities and features of the various mobile solutions available from Salesforce.
These mobile offerings can significantly improve productivity and user satisfaction, and allow users to access data and application functionality while away from their computer.
We will cover the administration and system requirements for the two varieties of mobile solutions, mobile browser apps and downloadable apps, and look at the devices that are currently supported by Salesforce.
All materials on the site are licensed Creative Commons Attribution-Sharealike 3.0 Unported CC BY-SA 3.0 & GNU Free Documentation License (GFDL)
If you are the copyright holder of any material contained on our site and intend to remove it, please contact our site administrator for approval.
© 2016-2026 All site design rights belong to S.Y.A.