Developing Web Components (2015)
Part I. UI Core Concepts
Chapter 4. Understanding and Managing z-index
Jason Strimpel
How many times have you seen CSS similar to the following?
.some-selector {
position: relative;
z-index: 3870814; /* do NOT change!!! */
}
It is probably safe to assume that the element in question is not competing with 3,800,000+ elements to be the top element on the page. If so, the developer has an amazing mental map of a massive page that would likely crash any browser!
Typically when you encounter CSS and comments like these it is because there was confusion not about the z-index property and value itself, but rather about the other factors that contribute to the stacking order of an element on a page—stacking contexts, positioning, opacity, etc.
Certain steps can be taken to prevent CSS and comments like those in the previous example, but first one must have a solid understanding of the z-index property and all the contributing factors that ultimately determine how elements are layered.
What Exactly Is the z-index Property?
Per the W3C, the z-index property is used to specify:
1. The stack level of the box in the current stacking context
2. Whether the box establishes a stacking context
The W3C definition is concise and accurate. However, the definition assumes knowledge of stacking contexts, which is not an introductory z-index topic. The W3C also provides an elaborate explanation of stacking contexts. This information, while accurate, does not make a good basis for fully understanding the z-index property unless you already have intimate knowledge of other specifications that describe how a browser renders a page. A better place to begin understanding z-index is to first understand rendering layers and stacking order.
Rendering Layers, Stacking Order, and z-index
The previous chapter introduced normal flow and described how elements are rendered in the normal flow. It also described how positioned elements are taken out of the normal flow. The removal of positioned elements from the normal flow is an excellent starting point for understanding z-index because it is related to the concept of rendering layers.
A web page is often thought of in terms of two dimensions: the horizontal axis, x, and the vertical axis, y. However, there is a third dimension, which is the z-axis. The z-index value of an element represents the layer in which the element is rendered on the z-axis.
TIP
The default rendering layer (z-axis) is 0. Setting a negative z-index value places the rendering layer behind the default rendering layer, making it “invisible.” This technique is often used for performing calculations on an element that the developer does not want the user to see, but that require an element to have dimensions.
When an element is positioned, it is removed from the normal flow but remains in the same rendering layer. The positioning impacts the element’s placement in the stacking order.
Default Stacking Orders
Elements without a z-index are positioned in order from bottom to top within a stacking context as follows:
1. Background and borders of the root element
2. Descendant blocks in the normal flow, in order of appearance (in HTML)
3. Descendant positioned elements, in order of appearance (in HTML)
Figure 4-1 illustrates the default stacking order for various positioned and nonpositioned elements.
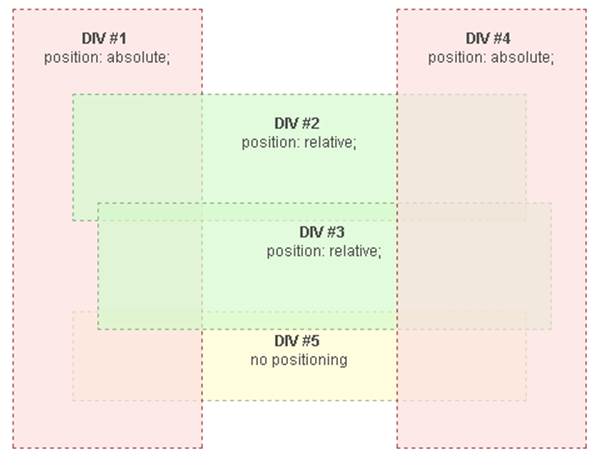
Figure 4-1. Default stacking order for positioned and nonpositioned elements (source: http://bit.ly/dwc-stacking-z)
The default stacking order must also take floated elements into account. Floated elements are stacked between non-positioned (static) elements, and positioned elements. Figure 4-2 shows how they fit into the default stacking order.
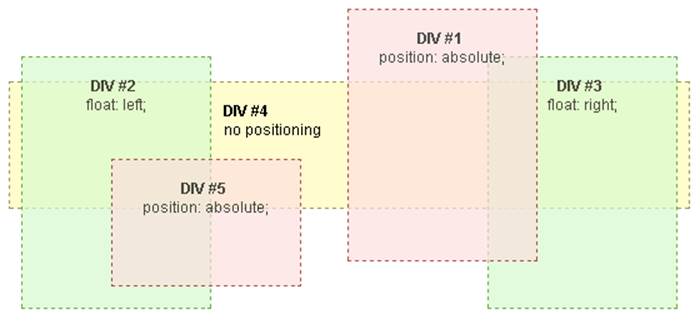
Figure 4-2. Default stacking order for positioned, nonpositioned, and floated elements (source: http://bit.ly/dwc-stackfloat-z)
Overriding the Default Stacking Order
z-index is used to specify a stacking order other than the default. To move an element closer to the top of the stack (i.e., visually closer to the user), a positive integer value is assigned to the z-index property of the element. If no other values in the same stacking context have a z-indexproperty, then a value of 1 will move an element to the top. If other elements have z-index values assigned to them, then a value higher than the highest z-index value in the same stacking context will place the element at the top of the stack. A negative value will position an element below the default rendering layer.
TIP
Elements with the same z-index follow the default stacking rules.
Seems pretty simple, right? If you read the last paragraph carefully, though, you will notice that there was always a qualifying condition to the effect of the z-index value: the elements must be within the same stacking context.
Caution
z-index only has an effect on positioned elements.
Stacking Contexts
The default stacking order and the effects of z-index values apply only to child elements of the element that creates a stacking context. Figure 4-3 shows an example of a stacking context with nested elements. Note how <div> 1 overlays <div> 4, even though it has a lower z-indexvalue.
How Is a Stacking Context Created?
The default stacking context is the root element, <html>. A stacking context is created when an element is positioned and assigned a z-index value other than auto, or when an element has an opacity value less than 1. In WebKit and Chrome 22+ an element with a fixed position always creates a stacking context, even when the z-index value is auto. In addition to these properties and values, newer CSS properties and values, such as transform with a value other than none, also create stacking contexts.
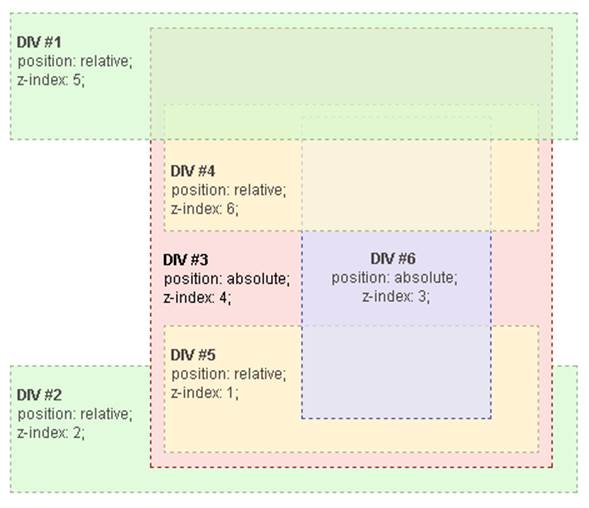
Figure 4-3. A stacking context with nested elements (source: http://bit.ly/dwc-stacking-context)
TIP
It is helpful to think of stacking contexts as establishing a new page in the sense that they have a self-contained normal flow and rendering layers.
Increasing Complexity
The significance of stacking contexts is that they create an independent set of rendering layers that are not impacted by the default stacking orders and z-index values of elements that reside outside them. In a simple web page stacking contexts usually are not a concern because there is often only one stacking context: the root element, <html>. However, as an interface becomes more sophisticated—e.g., as richer UI controls (dialogs, sliders, tooltips, etc.) are added—the likelihood of multiple stacking contexts existing increases. As more stacking contexts are introduced, the complexity of z-index management increases.
Managing z-indexes
A common approach to minimizing the z-index complexities that arise in dynamic web applications is to assign ranges to different types of controls. For example, if you look at some web advertising specifications, they provide ranges for different layers to help ensure that the layer in question is placed on top. The Interactive Advertising Bureau (IAB) z-index guidelines are reproduced in Table 4-1, to give you an idea of what these guidelines may look like.
|
Z-Index Range |
Content Type |
Details |
|
< 0 |
Background Elements |
|
|
0 - 4,999 |
Main Content, Standard Ads |
Standard ad tags in place with regular content. Includes OBA Self Regulation Message (CLEAR Ad Notice) |
|
5,000 - 1,999,999 |
Expanding Advertising |
The entire expandable ad unit should be set within this range |
|
2,000,000 - 2,999,999 |
Floating Advertising |
Over The Page ads (OTP’s) |
|
3,000,000 - 3,999,999 |
Pop-up Elements |
Chat windows, message notifications |
|
4,000,000 - 4,999,999 |
Non-anchored Floating Elements |
Survey recruitment panels |
|
5,000,000 - 5,999,999 |
Expanding Site Navigation Elements |
Drop down navigation, site warnings, etc. Only the expanding portion of navigation elements should be included on this level. |
|
6,000,000+ |
Full-page Overlays |
Full-window Over-the-Page (OTP) ads and Between-the-Page ads IF they cover page content |
|
Table 4-1. IAB Display Advertising z-index Guidelines |
||
This approach works well in less dynamic environments, such as ecommerce sites, but it falls short in web applications where the DOM and z-index values are constantly being modified by application-layer JavaScript and third-party plugins. A more reliable approach is to take your knowledge of z-indexes and manage them programmatically within your components and application code, in addition to assigning ranges to larger, static containers such as <header>, <footer>, <aside>, and <article> elements, or other logical groupings that makes sense within the context of your application.
z-index Manager
This section will cover the creation of a z-index manager. The manager will have the ability to send an element to the front or the back of a stacking context, get an element’s stacking context, and determine if an element creates a stacking context.
API stub
The first step I always take when creating a new component is stubbing out an API. I then use this as a guide for implementing the functionality. Here, we’ll create a z-index manager called Jenga:
// from this point forward all code examples will assume this closure
// and that jenga will be a property on the global window object
//
// AMD and jQuery versions are available at https://github.com/jstrimpel/jenga
var jenga = (function (global) {
'use strict';
return {
isStackingCtx: function (el) {},
getStackingCtx: function (el) {},
bringToFront: function (el, createStackingCtx, root) {},
sendToBack: function (el, createStackingCtx, root) {}
};
})(this);
Utilities
Before stacking contexts can be determined and z-indexes managed, functions for identifying properties that create stacking contexts need to be written. This is done for reusage and to make the code that relies on these functions easier to read.
The rules for determining stacking contexts vary across browsers and browser versions. Accounting for these variations using feature detection would be next to impossible to maintain, because the implementation across browsers is constantly in flux. For this reason, the z-index manager utilizes browser detection:
// this will be used for addressing all the browser- & version-specific
// items that impact stacking contexts
// fixed - the version where position: fixed started creating a stacking context
var browsers = {
chrome: {
fixed: 22
}
};
// get browser version and name
// (we did not write this; if someone knows who did please let us know
// so we can attribute the code to the author!)
var browser = (function () {
var N = navigator.appName;
var ua = navigator.userAgent;
var tem;
var M = ua.match(
/(opera|chrome|safari|firefox|msie)\/?\s*(\.?\d+(\.\d+)*)/i);
if (M && (tem = ua.match(/version\/([\.\d]+)/i)) != null) {
M[2] = tem[1];
}
M = M ? [M[1], M[2]] : [N, navigator.appVersion, '-?'];
return {
name: M[0].toLowerCase(),
version: M[1]
};
})();
The following functions are used to determine if an element creates a stacking context:
// use browser and version to determine if position: fixed
// creates a stacking context
var isFixedStackingCtx = (function () {
return browsers[browser.name].fixed >= parseInt(browser.version, 10);
})();
// is a value a function?
function isFunction(thing) {
return typeof thing === 'function';
}
// if element is positioned and has a z-index other than 0
// it creates a stacking context
function isPosAndHasZindex(el) {
return el.style.position !== 'static' && el.style.zIndex !== 'auto';
}
// these values cause an element to create a stacking context
function doesStyleCreateStackingCtx(el) {
var styles = el.style;
if (styles.opacity < 1) {
return true;
}
if (styles.transform !== 'none') {
return true;
}
if (styles.transformStyle === 'preserve-3d') {
return true;
}
if (styles.perspective !== 'none') {
return true;
}
if (styles.flowFrom !== 'none' && styles.content !== 'normal') {
return true;
}
if (styles.position === 'fixed' && isFixedStackingCtx) {
return true;
}
return false;
}
Determining if an element creates a stacking context
The first thing our z-index manager needs to be able to do is determine if an element creates a stacking context. So, we need to translate the stacking context rules to code.
NOTE
All Jenga method code examples will omit other methods except the one currently being described. A completed Jenga object example will be provided later.
Our isStackingCtx function looks like this:
var jenga = {
isStackingCtx: function (el) {
return el.tagName === 'HTML' ||
(isPosAndHasZindex(el) && doesStyleCreateStackingCtx(el));
}
};
Finding an element’s stacking context
We can now use the function from the previous section to find an element’s stacking context. This information is useful for adjusting an element’s z-index within a stacking context:
var jenga = {
getStackingCtx: function (el) {
var parentNode = el.parentNode;
// recurse up the DOM tree until a stacking
// context is found
while (!jenga.isStackingCtx(parentNode)) {
parentNode = parentNode.parentNode;
}
return parentNode;
}
};
Modifying an element’s z-index
This is where things get interesting! This section will describe adjusting an element’s z-index to move it to the top or bottom of a stacking context.
The first step is to create a function, moveUpDown, that will move an element to the top or bottom of the stack, creating a stacking context along the way if that is the desired behavior. The reason for creating a stacking context is that the element that is being moved to the top or the bottom may be part of another stacking context much further up the tree. If this is the case, then it is necessary to adjust the last ancestor of the element whose z-index is to be adjusted that is the first descendant of the current stacking context. This option is specified through thecreateStackingCtx argument, which can have either a Boolean or a function value. If it is a Boolean and the value is true, then it will create a stacking context by setting the element’s parent’s position to relative and setting the z-index to 0. If the value is a function, then it will be called and passed the element that should become a stacking context. It is then this function’s responsibility to create a stacking context.
The moveUpDown function will also take three other parameters. The first is the element to move to the top or bottom, el. The next is the root element at which to stop adjusting z-indexes.
The root element argument is optional. It is useful for complex UI cases where there are several stacking contexts and simply raising the element in its direct stacking context may not bring it to the top because it could be nested in several other stacking contexts. One of the nested stacking contexts could cause the element to be hidden, because an ancestor could be toward the bottom of that context.
The last argument is increment. This accepts a Boolean value. true will send the element to the top of the stacking context and a falsy value will send it to the bottom (back) stacking context.
The moveUpDown function looks like this:
function moveUpDown(el, createStackingCtx, root, increment) {
var stackingCtxEl = jenga.getStackingCtx(el);
// if element's parent node does not create a stacking context
// and createStackingCtx is defined, then force a stacking
// context to be created on the element's parent node
if (createStackingCtx && stackingCtxEl !== el.parentNode) {
// if developer provided a custom function for creating
// a stacking context, then use it
if (isFunction(createStackingCtx)) {
createStackingCtx(el.parentNode);
// create a stacking context in the least impactful
// way to the DOM possible
} else {
el.parentNode.style.position = 'relative';
el.parentNode.style.zIndex = 0;
}
}
modifyZindex(el, increment); // defined in the next code block
if (root && (root !== jenga.getStackingCtx(el) &&
stackingCtxEl.tagName !== 'HTML')) {
moveUpDown(stackingCtxEl, createStackingCtx, root, increment);
}
}
Now for the really, really fun part! If you read the previous code block carefully, you probably noticed a reference to the modifyZindex function. This is where all the magic happens!
The modifyZindex function takes an element, finds the element that creates a stacking content, gets the child nodes of the stacking context, and then raises or lowers the z-index value of el until it is at the top or bottom of the stack:
function modifyZindex(el, increment) {
var stackingCtxEl = jenga.getStackingCtx(el);
var siblings = stackingCtxEl.childNodes;
var siblingsMaxMinZindex = increment ? 0 : -1;
var siblingZindex;
// loop through element's siblings
for (var i = 0; i < siblings.length; i++) {
// if current element has a z-index and is not el...
if (siblings[i].nodeType === 1 && isPosAndHasZindex(siblings[i]) &&
siblings[i] !== el) {
// check if sibling has a z-index value
siblingZindex = parseInt(siblings[i].style.zIndex, 10);
if (isNaN(siblingZindex)) {
continue;
}
if (increment) {
// update max z-index value for siblings
siblingsMaxMinZindex = siblingZindex > siblingsMaxMinZindex ?
siblingZindex : siblingsMaxMinZindex;
} else {
// update min z-index value for siblings
siblingsMaxMinZindex = siblingsMaxMinZindex < 0 ||
siblingZindex < siblingsMaxMinZindex ?
siblingZindex : siblingsMaxMinZindex;
}
}
}
// if adjusted z-index is 0 and we're sending to the back, bump
// all other elements up by 1
if (!siblingsMaxMinZindex && !increment) {
for (i = 0; i < siblings.length; i++) {
if (siblings[i].nodeType === 1 && siblings[i] !== el) {
siblingZindex = parseInt(siblings[i].style.zIndex, 10);
if (isNaN(siblingZindex)) {
continue;
}
siblings[i].style.zIndex = ++siblingZindex;
}
}
}
// adjust element's z-index
el.style.zIndex = increment ? siblingsMaxMinZindex + 1 :
(siblingsMaxMinZindex ? siblingsMaxMinZindex - 1 : 0);
}
Now that we can determine an element’s stacking context, we can bring it to the top of its stacking context:
// Bring an element to the top of stacking context
var jenga = {
bringToFront: function (el, createStackingCtx, root) {
moveUpDown(el, createStackingCtx, root, true);
}
};
And now that we can send an element to the top of a stacking context, we can just as easily send it to the back by inverting the rules:
var jenga = {
sendToBack: function (el, createStackingCtx, root) {
moveUpDown(el, createStackingCtx, root, false);
}
};
Example usages
Now that we have a fully functioning z-index manager, let’s take a look at some example calls:
var el = document.getElementById('some-id');
var rootEl = document.getElementsByTagName('body')[0];
// bring an element to the top
// create stacking contexts
jenga.bringToFront(el, true);
// bring an element to the top
// do NOT create stacking contexts
jenga.bringToFront(el, false);
// bring an element to the top, including all ancestor stacking contexts
// create stacking contexts
jenga.bringToFront(el, true, rootEl);
// send an element to the back
// create stacking contexts
jenga.sendToBack(el, true);
// send an element to the back
// do NOT create stacking contexts
jenga.sendToBack(el, false);
// send an element to the back, including all ancestor stacking contexts
// create stacking contexts
jenga.sendToBack(el, true, rootEl);
Summary
We now have a nice API for determining stacking contexts and adjusting an element’s z-index, ensuring that it is placed in the top rendering layer or the bottom rendering layer. This functionality is very useful when creating components where we need to ensure an element is on the top of a stack, such as a dialog or tooltip. It is also useful in complex applications in which stacking contexts and z-indexes frequently change. It ensures that the element in question will still render in the correct layer even if a z-index range guideline is not followed or a third-party plugin modifies the DOM.
Converting to a jQuery Plugin
As pervasive as jQuery is on the Web, it is sometimes a good idea to create a plugin wrapper for code in order to reach a larger audience. However, a plugin wrapper should only be created if the code provides a limited and specific set of functionality on an element or a collection of elements. The z-index manager is a good candidate because it is only concerned with adjusting z-indexes (limited and specific) on a single element or its ancestors (a collection of elements).
TIP
The jQuery website provides an excellent introductory tutorial for creating plugins. It covers the basic structure, chaining, options, etc.
Following is the code we use to create the plugin wrapper for our z-index manager:
// account for AMD
(function (factory) {
if (typeof define === 'function' && define.amd) {
define(['jquery'], factory);
} else {
factory(jQuery);
}
}(function ($) {
// Jenga code is here
// https://github.com/jstrimpel/jenga/blob/master/dist/jenga.plugin.js
$.fn.bringToFront = function (options) {
options = options || {};
if (this[0]) {
jenga.bringToFront(this[0], options.createStackingCtx, options.root);
}
return this;
};
$.fn.sendToBack = function (options) {
options = options || {};
if (this[0]) {
jenga.sendToBack(this[0], options.createStackingCtx, options.root);
}
return this;
};
$.fn.isStackingCtx = function () {
return this[0] ? jenga.isStackingCtx(this[0]) : false;
};
$.fn.getStackingCtx = function () {
return this[0] ? jenga.getStackingCtx(this[0]) : undefined;
};
}));
NOTE
Vanilla JavaScript and native DOM APIs were used for the z-index manager, as opposed to leveraging jQuery. This was done for a few different reasons. First, native DOM APIs are faster than jQuery, and speed is of the essence when code impacts rendering. Second, there was not much to gain by leveraging jQuery—there were no browser quirks to abstract, nor was there a need to encapsulate or simplify native APIs. Lastly, plugin wrapper aside, I completely removed the dependency on jQuery. As difficult as it is to imagine, some people do not use jQuery (an alternative is AngularJS). I am not opposed to using jQuery—I actually advocate its usage. However, I believe that developers should always weigh the pros and cons of adding a dependency to a project, and in this case the pros did not outweigh the cons of including jQuery as a dependency.
Adding z-index Management to the Dialog Widget
We will now be applying the information from this chapter to our dialog widget. If you remember, the dialog widget had a show method. This method should show the dialog and bring it to the top of the stack:
Dialog.prototype.show = function () {
jenga.bringToFront(this.$el[0]);
};
NOTE
This example strictly shows the application of the code from this chapter to a specific method of the dialog widget. Other details, such as positioning the dialog and packaging, will be covered in later chapters. However, if you absolutely, positively cannot wait, the completed dialog example from Part I can be viewed on GitHub.
Summary
In this chapter we took a deep dive into the layering of elements on the z-axis. We discovered why the seemingly simple z-index property baffles even the seasoned frontend engineer. We gained an understanding of stacking order rules, stacking contexts, and how changing the values of certain element properties can greatly impact the layering of an element on a web page. Armed with this information, we explored why simply increasing or decreasing the z-index value of an element does not necessarily have the outcome one would expect. We then formulated a strategy for properly managing the layering of elements in a web application by classifying and assigning z-index ranges for UI elements. Next, we looked at a programmatic approach for layering elements in nondeterministic UIs, creating a library, Jenga, that we can use to manage the layering of elements in any application. We looked briefly at how to create a jQuery plugin for our code, and finally, we incorporated the Jenga library into the dialog widget.
All materials on the site are licensed Creative Commons Attribution-Sharealike 3.0 Unported CC BY-SA 3.0 & GNU Free Documentation License (GFDL)
If you are the copyright holder of any material contained on our site and intend to remove it, please contact our site administrator for approval.
© 2016-2026 All site design rights belong to S.Y.A.