Enterprise Web Development (2014)
Part II. Enterprise Considerations
Chapter 8. Upgrading HTTP to WebSocket
This chapter is about upgrading from HTTP to the more responsive HTML5 WebSocket. It begins with a brief overview of the existing legacy web networking, and then you’ll learn why and how to use WebSocket.
We’re going to show that the WebSocket protocol has literally no overhead compared to HTTP. You might consider using WebSocket to develop the following types of applications:
§ Live trading/auctions/sports notifications
§ Live collaborative writing
§ Controlling medical equipment over the Web
§ Chat applications
§ Multiplayer online games
§ Real-time updates in social streams
For the next version of the Save The Child application, we’re going to use WebSocket to implement an online auction communication layer. The goal is to let individuals and businesses purchase handmade arts and crafts made by children. All proceeds will go to Save The Child.
The goal is to let you see the advantages of changing the protocol for client-server communications on the Web. You’ll clearly see the advantages of WebSocket over regular HTTP by monitoring network traffic with such tools as Wireshark and Google Chrome Developer Tools.
All the server-side functionality supporting this chapter is written in Java, using the Java API for WebSocket reference implementation, which is a part of the Java EE 7 specification. We are using the latest release of the GlassFish application server. If you don’t know Java, just treat this server-side setup as a service that supports the WebSocket protocol. For Java developers interested in diving into the server side, we provide the source code and brief comments as a part of the code samples that come with this book.
We show and compare the server-side data push done with server-sent events and WebSocket. Also, you’ll see a brief overview of chosen frameworks such as Portal and Atmosphere that can streamline your WebSocket application development.
Using HTTP for Near Real-Time Applications
The HTTP protocol is the lingua franca of today’s web applications, whereby client-server communications are based on the request-response paradigm. On a low level, web browsers establish a TCP/IP connection for each HTTP session. Currently there are three basic options that developers use for browser-server communication: polling, long polling, and streaming. These options are hacks on top of a half-duplex (a one-way street) HTTP protocol to simulate real-time behavior. (By real-time we mean the ability to react to some event as it happens.) Let’s discuss each of them.
Polling
With polling, your client code sends requests to the server based on some preconfigured interval (for example, by using the JavaScript setInterval() function). Some of the server’s responses will be empty if the requested data is not ready yet, as illustrated in Figure 8-1. For example, if you’re running an online auction and send a request to see the updated bids, you won’t receive any data back unless someone placed a new bid.
Visualize a child sitting in the back seat of your car and asking every minute, “Have we arrived yet?” And you politely reply, “Not just yet.” This is similar to an empty server response. There is no valuable payload for this kid, but she’s still receiving some “metadata.” HTTP polling can result in receiving verbose HTTP response headers bearing no data load, let alone distracting the driver (think, the server) from performing other responsibilities.
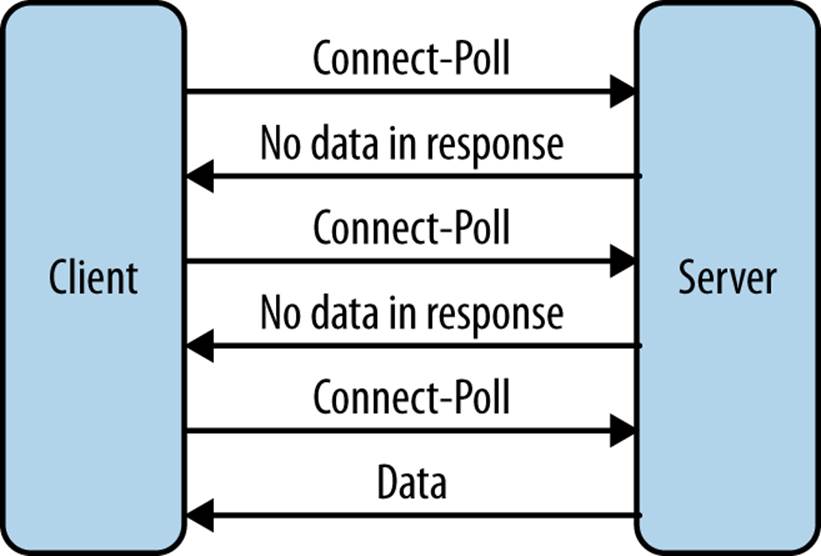
Figure 8-1. Polling
Long Polling
Long polling (see Figure 8-2 ) begins similarly to polling: the client sends the HTTP request to the server. But in this case, instead of sending an empty response back, the server waits until the data for the client becomes available. If the requested information is not available within the specified time interval, the server sends an empty response to the client, closes, and reestablishes the connection.
We’ll give you one more analogy to compare polling and long polling. Imagine a party at the top floor of a building equipped with a smart elevator that goes up every minute and opens the door just in case one of the guests wants to go down to smoke a cigarette. If no one enters the elevator, it goes to the ground level and in 60 seconds goes up again. This is the polling scenario. But if this elevator went up and waited until someone actually decided to go down (or got tired of waiting), we could call it a long polling mode.
From the HTTP specification perspective, it’s legitimate: the long polling mode might seem as if we deal with a slow-responding server. That is why this technique also is referred to as Hanging GET. If you see an online auction that automatically modifies prices as people bid on items, it looks as if the server pushes the data to you. But the chances are, this functionality was implemented by using long polling, which is not a real server-side data push, but its emulation.
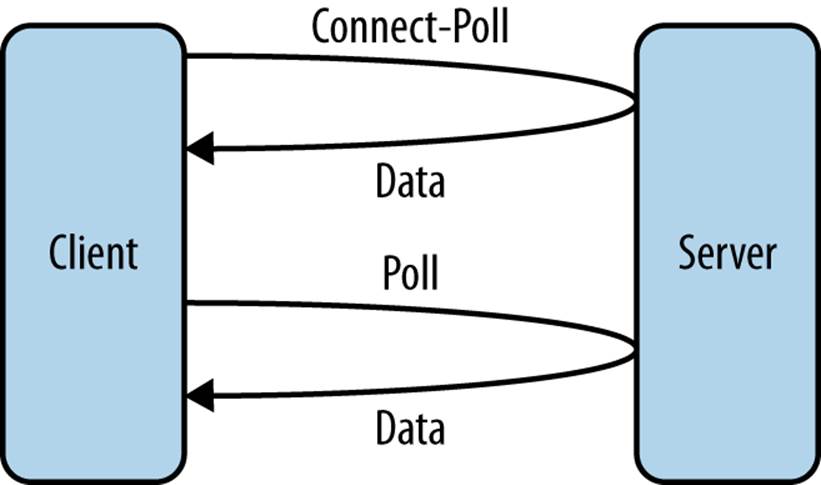
Figure 8-2. Long polling
HTTP Streaming
In HTTP streaming (see Figure 8-3), a client sends a request for data. As soon as the server gets the data ready, it starts streaming (adding more and more data to the response object) without closing the connections. The server pushes the data to the client, pretending that the response never ends. For example, requesting a video from YouTube results in streaming data (frame after frame) without closing the HTTP connection.
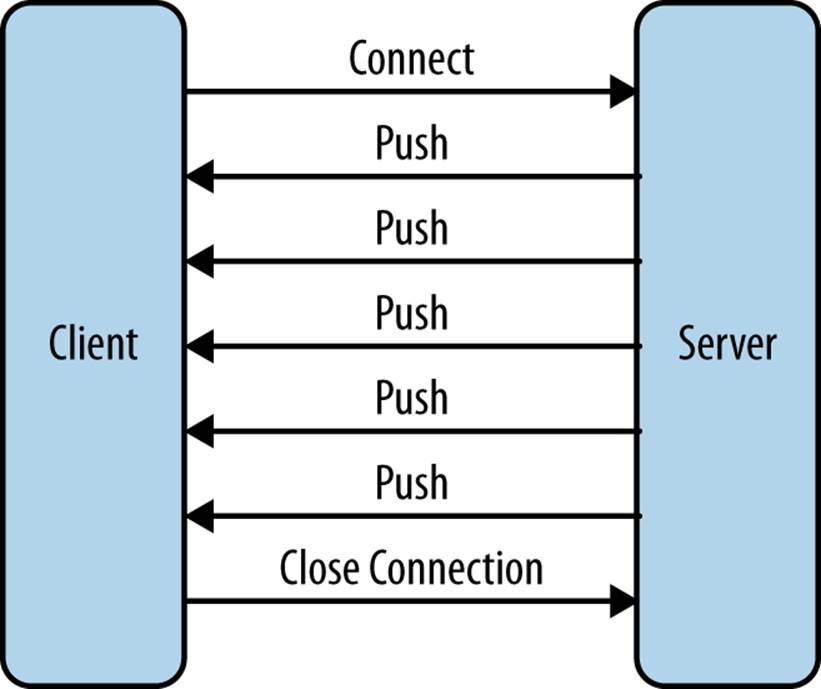
Figure 8-3. HTTP streaming
Polling and streaming can be used as a fallback for legacy browsers that don’t support the HTML5 API’s server-sent events and WebSocket.
Implementing Server-Sent Events
Before diving into the WebSocket protocol, let’s become familiar with the standardized way of implementing server-sent events (SSE). The World Wide Web Consortium (W3C) has published an API for web browsers to allow them to subscribe to events sent by a server. All modern browsers support the EventSource object, which can handle events arriving in the form of DOM events. This is not a request-response paradigm, but rather a unidirectional data push, from server to browser. Example 8-1 shows how a web browser can subscribe and listen to server-sent events.
Example 8-1. Subscribing to server-sent events
var myEventSource = (function() {
'use strict';
var eventSource;
if ( !! window.EventSource) {
eventSource =
new EventSource
('http://localhost:8080/donate_web/api/donations/events'); ![]()
} else {
// notify use that her browser doesn't support SSE
}
eventSource.addEventListener('open', function() { ![]()
// Connection was opened.
}, false);
eventSource.addEventListener('create', function() { ![]()
// do something with data
}, false);
eventSource.addEventListener('update', function() { ![]()
// do something with data
}, false);
eventSource.addEventListener('error', function(e) {
if (e.readyState === EventSource.CLOSED) {
// Connection was closed.
}
}, false);
return eventSource;
})();
![]()
Create a new EventSource object. At this point, the browser will send the GET request to the specified server-side endpoint to register itself on the server.
![]()
Add handlers for the open and error events.
![]()
Handle messages in create events by processing the e.data content.
![]()
Handle messages in update events by processing the e.data content.
The preceding samples create listeners to subscribe specifically to create and update events, but if you’d like to subscribe to any events, you could use the following syntax:
eventSource.onmessage(function(e){
// process the content of e.data here
});
SSE is a good technique for the use cases in which the client doesn’t need to send the data to the server. A good illustration of such a server might be Facebook’s News Feed page. A server can automatically update the client with new data without the client’s request.
In the preceding example, the server sends two types of custom events, create and update, to notify subscribed clients about updated donation data so that the active clients can monitor the fundraising process. You can create as many custom events as needed by the application.
The server sends events as text messages that start with data: and end with a pair of newline characters. For example:
'data: {"price": "123.45"}/n/n`
SSE is still HTTP based, and it requires the server’s support of the combination of HTTP 1.1 keep-alive connections and the text/event-stream content type in the HTTP response. The overhead is minimal: instead of hundreds of bytes in request and response headers, the server sends responses only when the data has changed.
Introducing the WebSocket API
Reducing kilobytes of data to 2 bytes is more than “a little more byte efficient,” and reducing latency from 150 ms (TCP round trip to set up the connection plus a packet for the message) to 50 ms (just the packet for the message) is far more than marginal. In fact, these two factors alone are enough to make WebSocket seriously interesting to Google.
— Ian Hickson HTML spec editor at Google (http://bit.ly/1oGOzfN)
WebSocket is a bidirectional, full-duplex, frame-based protocol. According to RFC 6455—the Internet Engineering Task Force (IETF) standard document—the goal of WebSocket technology is to provide a mechanism for web applications that need two-way communication with servers. This technology doesn’t rely on HTTP hacks or on opening multiple connections by using XMLHttpRequest or <iframe> and long polling. The idea behind WebSocket is not overly complicated:
§ Establish a socket connection between the client and the server using HTTP for the initial handshake.
§ Switch the communication protocol from HTTP to a socket-based protocol.
§ Send messages in both directions simultaneously (a.k.a., full-duplex mode).
§ Send messages independently. This is not a request-response model because both the server and the client can initiate the data transmission that enables the real server-side push.
§ Both the server and the client can initiate disconnects, too.
You will get a better understanding of each of the preceding statements after reading this section.
The WebSocket protocol defines two new URI schemes, ws and wss, for unencrypted and encrypted connections, respectively. The ws (WebSocket) URI scheme is similar to the HTTP URI scheme and identifies that a WebSocket connection will be established by using TCP/IP without encryption. The wss (WebSocket Secure) URI scheme identifies that the traffic over that connection will be protected via Transport Layer Security (TLS). The TLS connection provides such benefits over TCP connection, as data confidentiality, integrity, and endpoint authentication. Apart from the scheme name, WebSocket URI schemes use generic URI syntax.
The WebSocket Interface
The W3C expert group uses Interface Description Language to describe what the WebSocket interface should look like. Example 8-2 shows how it is defined.
Example 8-2. The WebSocket interface
[Constructor(DOMString url, optional (DOMString or DOMString[]) protocols)] ![]()
interfaceWebSocket : EventTarget {
readonly attribute DOMString url;
const unsigned short CONNECTING = 0; ![]()
const unsigned short OPEN = 1;
const unsigned short CLOSING = 2;
const unsigned short CLOSED = 3;
readonly attribute unsigned short readyState;
readonly attribute unsigned long bufferedAmount;
// networking
[TreatNonCallableAsNull] attribute Function? onopen; ![]()
[TreatNonCallableAsNull] attribute Function? onerror;
[TreatNonCallableAsNull] attribute Function? onclose;
readonly attribute DOMString extensions;
readonly attribute DOMString protocol; ![]()
void close([Clamp] optional unsigned short code, optional DOMString reason);
// messaging
[TreatNonCallableAsNull] attribute Function? onmessage;
attribute DOMString binaryType;
void send(DOMString data); ![]()
void send(ArrayBufferView data);
void send(Blob data);
};
![]()
The constructor requires an endpoint URI and optional subprotocol names. A subprotocol is an application-level protocol layered over the WebSocket protocol. The client-side application can explicitly indicate which subprotocols are acceptable for the conversation between the client and server. That string will be sent to the server with the initial handshake in the Sec-WebSocket-Protocol GET request header field. If the server supports one of the requested protocols, it selects at most one and echoes that value in the same header parameter Sec-WebSocket-Protocol in the handshake’s response. The server thereby indicates that it has selected that protocol. It could be a custom protocol or one of the standard application-level protocols (see Creating the Save The Child Auction Protocol). For example, it’s possible to transfer the SOAP or XMPP messages over the WebSocket connection. We discuss the handshake in WebSocket handshake.
![]()
At any given time, the WebSocket can be in one of four states.
![]()
These are the callback functions of the WebSocket object that will be invoked by the browser after the appropriate network event is dispatched.
![]()
This property contains the name of the subprotocol used for the conversation. After a successful handshake, this property is populated by the browser with the value from the server’s response parameter Sec-WebSocket-Protocol, as described in ![]() .
.
![]()
The WebSocket object can send text or binary data to the server by using one of the overloaded send() methods.
The Client-Side API
Now that we have introduced the WebSocket interface, take a look at the code in Example 8-3, illustrating how the client’s JavaScript can use it.
Example 8-3. Using WebSocket in a JavaScript client
var ws;
(function(ws) {
"use strict";
if (window.WebSocket) { ![]()
console.log("WebSocket object is supported in your browser");
ws = new WebSocket("ws://www.websocket.org/echo"); ![]()
ws.onopen = function() {
console.log("onopen");
}; ![]()
ws.onmessage = function(e) {
console.log("echo from server : " + e.data); ![]()
};
ws.onclose = function() { ![]()
console.log("onclose");
};
ws.onerror = function() {
console.log("onerror"); ![]()
};
} else {
console.log("WebSocket object is not supported in your browser");
}
})(ws);
![]()
Not all web browsers support WebSocket natively as of yet. Check whether the WebSocket object is supported by the user’s browser.
![]()
Instantiate the new WebSocket object by passing an endpoint URI as a constructor parameter.
![]()
Set the event handlers for open, message, and close events.
![]()
MessageEvent is dispatched when the data is received from the server. This message will be delivered to the function assigned to the WebSocket object’s onmessage property. The e.data property of the message event will contain the received message.
![]()
Handle the closing connection (more details in Closing the connection).
![]()
Handle errors.
WebSocket handshake
Any network communications that use the WebSocket protocol start with an opening handshake. This handshake upgrades the connection from HTTP to the WebSocket protocol. It’s an upgrade of HTTP to message-based communications. We discuss messages (a.k.a. frames) later in this chapter.
Why upgrade from HTTP instead of starting with TCP as a protocol in the first place? The reason is that WebSocket operates on the same ports (80 and 443) as do HTTP and HTTPS. It’s an important advantage that the browser’s requests are routed through the same ports, because arbitrary socket connections may not be allowed by the enterprise firewalls for security reasons. Also, many corporate networks allow only certain outgoing ports. And HTTP/HTTPS ports are usually included in so called white lists.
TIP
High Performance Browser Networking by Ilya Grigorik (O’Reilly) provides more information about TCP and HTTP.
The protocol upgrade is initiated by a client request, which also transmits a special key with the request. The server processes this request and sends back a confirmation for the upgrade. This ensures that a WebSocket connection can be established only with an endpoint that supports WebSocket. Here is what the handshake can look like in the client’s request:
GET HTTP/1.1
Upgrade: websocket
Connection: Upgrade
Host: echo.websocket.org
Origin: http://www.websocket.org
Sec-WebSocket-Key: i9ri`AfOgSsKwUlmLjIkGA==
Sec-WebSocket-Version: 13
Sec-WebSocket-Protocol: chat
This client sends the GET request for the protocol upgrade. Sec-WebSocket-Key is just a set of random bytes. The server takes these bytes and appends to this key a special globally unique identifier (GUID) string 258EAFA5-E914-47DA-95CA-C5AB0DC85B11. Then, it creates the Secure Hash Algorithm SHA1 hash from it and performs Base64 encoding. The resulting string of bytes needs to be used by both the server and the client, and this string won’t be used by network endpoints that do not understand the WebSocket protocol. Then, this value is copied in the Sec-WebSocket-Accept header field. The server computes the value and sends the response back, confirming the protocol upgrade:
HTTP/1.1 101 Web Socket Protocol Handshake
Upgrade: WebSocket
Connection: Upgrade
Sec-WebSocket-Accept: Qz9Mp4/YtIjPccdpbvFEm17G8bs=
Sec-WebSocket-Protocol: chat
Access-Control-Allow-Origin: http://www.websocket.org
The WebSocket protocol uses the 400 Bad Request HTTP error code to signal an unsuccessful upgrade. The handshake can also include a subprotocol request and the WebSocket version information, but you can’t include other arbitrary headers. We can’t transmit the authorization information. There are two ways around this. You can either transmit the authorization information as the first request (for example, the unique clientId can be passed as part of the HTTP request header or HTML wrapper) or put it into the URL as a query parameter during the initial handshake. Consider the following example:
var clientId = "Mary1989"; ![]()
ws = new WebSocket("ws://www.websocket.org/echo/"+clientID); ![]()
![]()
The clientId value, which can be obtained from a Lightweight Directory Access Protocol (LDAP) server.
![]()
The client connects to the WebSocket endpoint with an extra URI parameter that will be stored on the server for future interactions.
Because the WebSocket protocol creates a bidirectional (socket-to-socket) connection, the server has access to the conversation session associated with such a connection. This session can be associated with clientId and be stored on the server.
NOTE
A client can have as many WebSocket connections with the server as needed. But servers can refuse to accept connections from hosts/IP addresses with an excessive number of existing connections or can disconnect from resource-hogging connections in case of high data load.
WebSocket frame anatomy
The WebSocket handshake is the first step in switching to the message framing protocol, which will be layered over TCP. In this section, we’re going to explore how WebSocket data transfer works. WebSocket is not a stream-based protocol like TCP—it’s message based. With TCP, a program sends a stream of bytes, which has to have a specific indication that the data transfer ends. The WebSocket specification simplifies this by putting a frame around every chunk of data, and the size of the frame is known. JavaScript can easily handle these frames on the client because each frame arrives packaged in the event object. But the server side has to work a little harder because it needs to wrap each piece of data into a frame before sending it to the client. A frame can look like this:
+-+-+-+-+-------+-+-------------+-------------------------------+
0 1 2 3
0 1 2 3 4 5 6 7 8 9 0 1 2 3 4 5 6 7 8 9 0 1 2 3 4 5 6 7 8 9 0 1
+-+-+-+-+-------+-+-------------+-------------------------------+
|F|R|R|R| opcode|M| Payload len | Extended payload length |
|I|S|S|S| (4) |A| (7) | (16/64) |
|N|V|V|V| |S| | (if payload len==126/127) |
| |1|2|3| |K| | |
+-+-+-+-+-------+-+-------------+ - - - - - - - - - - - - - - - +
| Extended payload length continued, if payload len == 127 |
+ - - - - - - - - - - - - - - - +-------------------------------+
| |Masking-key, if MASK set to 1 |
+-------------------------------+-------------------------------+
| Masking-key (continued) | Payload Data |
+-------------------------------- - - - - - - - - - - - - - - - +
: Payload Data continued ... :
+ - - - - - - - - - - - - - - - - - - - - - - - - - - - - - - - +
| Payload Data continued ... |
+---------------------------------------------------------------+
The parts of the frame are as follows:
FIN (1 bit)
This bit indicates whether this frame is the final one in the message payload. If a message has under 127 bytes, it fits into a single frame and this bit will always be set.
RSV1, RSV2, RSV3 (1 bit each)
These bits are reserved for future protocol changes and improvements. They must contain zeros because they are not being used at this time.
opcode (4 bits)
The frame type is defined by using opcode. Here are the most-used opcodes:
0x00
This frame continues the payload.
0x01
This frame includes UTF-8 text data.
0x02
This frame includes the binary data.
0x08
This frame terminates the connection.
0x09
This frame is a ping.
0xA
This frame is a pong.
mask (1 bit)
This indicates whether the frame is masked.
NOTE
The client must mask all the frames being sent to the server. The server must close the connection upon receiving a frame that is not masked. The server must not mask any frames that it sends to the client. The client must close a connection if it detects a masked frame. In case of an error, the client or server can send the Close frame containing the status code 1002 (the protocol error). All these actions are done automatically by web browsers and web servers that implements WebSocket specification.
payload_len (7 bits, 7 + 16 bits, or 7 + 64 bits)
The length of the payload. WebSocket frames come in the following length brackets:
§ 0–125 indicate the length of the payload.
§ 126 means that the following 2 bytes indicate the length.
§ 127 means the next 8 bytes indicate the length.
masking-key (32 bits)
This key is used to XOR the payload.
payload data
This indicates the actual data. The length of the block is defined in the payload_len field.
The heartbeats
A properly designed distributed application has to have a way to ensure that each tier of the system is operational even if there is no active data exchange between the client and the server. This can be done by implementing so-called heartbeats—small messages that simply ask the other party, “Are you there?” For example, proxy servers and content-filtering hardware can terminate idle connections, or the server could simply go down. If a client doesn’t send any requests, say, for 20 seconds, but the server went down, the client will know about it only when it does the nextsend(). Heartbeats will keep the connection alive to ensure that it won’t appear to be idling. In WebSocket jargon, heartbeats are implemented with ping and pong frames. The browser sends the ping opcode 0x9 at any time to ask the other side to pong back (the opcode 0xA).
A web browser can ping the server when required, but a pong can be sent at the server’s discretion. If the endpoint receives a ping frame before responding to the previous one, the endpoint can elect to send just one pong frame for the most recently processed ping. The ping frame may contain the application data (up to 125 bytes), and the pong must have identical data in its message body.
There is no JavaScript API to send pings or receive pong frames. Pings and pongs may or may not be supported by the user’s browser. There is also no API to enable, configure, or detect whether the browser supports pings and pongs.
Data frames
Because the WebSocket protocol allows data to be fragmented into multiple frames, the first frame that transmits data will be prepended with one of the following opcodes indicating the type of data being transmitted:
§ The opcode 0x01 indicates UTF-8–encoded text data.
§ The opcode 0x02 indicates binary data.
When your application transmits JSON over the wire, the opcode is set to 0x01. When your code emits binary data, it will be represented in a browser-specific Blob object or an ArrayBuffer object and sent wrapped into a frame with the opcode 0x02. The following example shows how the WebSocket message listener checks the data type of the incoming message:
NOTE
You must choose the type for the incoming binary data on the client by using webSocket.binaryType = "blob" or webSocket.binaryType = "arraybuffer" before reading the data. It’s a good idea to check the type of the incoming data because the opcodes are not exposed to the client.
webSocket.onmessage = function(messageEvent) {
if (typeof messageEvent.data === "string"){
console.log("received text data from the server: " + messageEvent.data);
} elseif (messageEvent.data instanceof Blob){
console.log("Blob data received")
}
};
Closing the connection
The connection is terminated by sending a frame with the close opcode 0x08.
There is the pattern to exchange close opcodes first and then let the server shut down. The client is supposed to give the server time to close the connection before attempting to do that on its own. The close event can also signal why it has terminated the connection.
A CloseEvent is sent to clients using WebSocket when the connection is closed. This is delivered to the listener indicated by the WebSocket object’s onclose handler. CloseEvent has three properties—code, reason, and wasClean:
code
This property represents the close code provided by the server.
reason
A string indicating the reason why the server closed the connection.
wasClean
This property indicates whether the connection was cleanly closed.
The following example illustrates how to handle the connection closing:
webSocket.onclose = function(closeEvent) {
console.log("reason " + closeEvent.reason + "code " + closeEvent.code);
};
Using WebSocket Frameworks
Working with the vanilla WebSocket API requires you to do some additional “housekeeping” coding on your own. For example, if the client’s browser doesn’t support WebSocket natively, you need to make sure that your code falls back to the legacy HTTP. The good news is that there are frameworks that can help you with this task. Such frameworks lower the development time, allowing you to do more with less code. In this section, we include brief reviews of two frameworks that can streamline your web application development with WebSocket.
These frameworks try to utilize the best supported transport by the current web browser and server while sparing the developer from knowing the internals of the used mechanism. The developer can concentrate on programming the application logic, making calls to the framework API when the data transfer is needed. The rest will be done by the framework.
The Portal
The Portal is a server-agnostic JavaScript library. It aims to utilize a WebSocket protocol and provides a unified API for various transports (long polling, HTTP streaming, WebSocket). Currently, after you’ve decided to use WebSocket for your next project, you need to remember those users who still use earlier browsers such as Internet Explorer 9 or older, which don’t natively support WebSocket. In this case, your application should gracefully fall back to the best available networking alternative. Manually writing code to support all possible browsers and versions requires lots of time, especially for testing and maintaining the code for different platforms. The Portal library could help, as illustrated in Example 8-4.
Example 8-4. Simple asynchronous web application client with Portal
portal.defaults.transports = ["ws", "sse", "stream", "longpoll"]; ![]()
portal.open("child-auction/auction").on({ ![]()
connecting: function() {
console.log("The connection has been tried by '"
+ this.data("transport") + "'");
},
open: function() { ![]()
console.log("The connection has been opened");
},
close: function(reason) {
console.log("The connection has been closed due to '" + reason + "'");
},
message: function(data) {
handleIncommingData(data);
},
waiting: function(delay, attempts) {
console.log("The socket will try to reconnect after " + delay + " ms");
console.log("The total number of reconnection attempts is " + attempts);
}
});
![]()
The Portal framework supports different transports and can fall back from a WebSocket connection to streaming or long polling. The server also has to support a fall-back strategy, but no additional code is required on the client side.
![]()
Connecting to the WebSocket endpoint.
![]()
The Portal API is event-based, similar to the W3C WebSocket API.
The Portal framework generalizes client-side programming. When defining an array of transports, you don’t have to worry about how to handle messages sent by a server with a different transport. The Portal doesn’t depend on any JavaScript library.
Atmosphere
A web application that has to be deployed on several different servers (for example, WebSphere, JBoss, and WebLogic) might need to support different WebSocket APIs. At the time of this writing, a plethora of implementations of server-side libraries support WebSocket, and each uses its own proprietary API. The Java EE 7 specification intends to change the situation. But Atmosphere is a framework that allows you to write portable web applications today.
Atmosphere is a portable WebSocket framework supporting Java, Groovy, and Scala. The Atmosphere framework contains both client and server components for building asynchronous web applications. Atmosphere transparently supports WebSocket, server-side events, long polling, HTTP streaming, and JSONP.
The client-side component Atmosphere.js uses the Portal framework internally and simplifies the development of web applications that require a fallback from the WebSocket protocol to long polling or HTTP streaming. Atmosphere hides the complexity of the asynchronous APIs, which differ from server to server, and makes your application portable among them. Treat Atmosphere as a compatibility layer that allows you to select the best available transport for all major Java application servers.
The Atmosphere framework supports a wide range of Java-based server-side technologies via a set of extensions and plug-ins. Atmosphere supports the Java API for WebSocket, so you can have the best of two worlds—the standard API and application portability.
NOTE
WebSocket can be used not only for the Web, but in any applications that use networking. If you’re developing native iOS or OS X applications, check the SocketRocket library developed by the Square engineering team.
Square uses SocketRocket in its mobile payments application. If you’re developing native Android applications and want to use WebSocket protocol goodies in Android-powered devices, check the AsyncHttpClient framework.
Choosing the Format for Application-Level Messages
Although WebSocket is a great solution for real-time data transmission over the Web, it has a downside, too: the WebSocket specification defines only a protocol for transporting frames, but it doesn’t include an application-level protocol. Developers need to invent the application-specific text or binary protocols. For example, the auction bid has to be presented in a form agreed upon by all application modules. Let’s discuss our options from a protocol-modeling perspective.
Selecting a message format for your application’s data communications is important. The most common text formats are CSV, XML, and JSON. They are easy to generate and parse, and are widely supported by many frameworks in most development platforms. Although XML and JSON allow you to represent data in a hierarchical form that is easily readable by humans, they create a lot of overhead by wrapping each data element into additional text identifiers. Sending this additional textual information requires extra bandwidth and might need additional string-to-type conversion on both the client and server’s application code. Let’s discuss the pros and cons of these message formats.
CSV
CSV stands for comma-separated values, although the delimiter can be any character; you’re not restricted to only a comma. This depends on the parser design and implementation. Another popular type of delimiter is | (a pipe).
The pros of this format are as follows:
§ This format is very compact. The overhead of the separator symbol is minimal.
§ It’s simple to create and parse. The CSV message can be turned into an array of values by using the standard JavaScript String.split().
These are the cons of using CSV:
§ It’s not suitable for storing complex data structures and hierarchies. In the case of our auction application, we need to transfer the client auction items’ attributes for each auction. We can’t simply use String.split() and have to design and implement a more complex parser.
XML
XML nicely represents any hierarchal data structures.
These are its pros:
§ It’s a human-readable format.
§ Most browsers have built-in XML readers and parsers.
§ XML data can be validated against XSD or DTD schema.
An XML schema is a useful language feature because it defines the structure, content, and semantics of an XML document. Because of its human-readability, the XML schema can be used used by people who are not software developers and can be used to integrate systems written in different programming languages.
Its cons are as follows:
§ XML is very verbose. To send the name of a customer, you’d need something like this: <cust_name>Mary</cust_name>.
§ The XML validation on the client is a complex task. As of now, there are no platform-independent solutions or an API to perform validation programmatically based on XSD or DTD.
NOTE
XML in a Nutshell by Elliotte Rusty Harold and W. Scott Means (O’Reilly) is a well-written book describing the full spectrum of XML features and tools.
JSON
As explained in Chapter 2, JSON stands for JavaScript Object Notation, and it’s a way of representing structured data, which can be encoded and decoded by all web browsers. JSON is widely accepted by the web community as a popular way to serialize data. As stated earlier, it provides a more compact way than XML to represent data, and all modern web browsers understand and can parse JSON data.
Google Protocol Buffers
A Google protocol buffer (or protobuf) is a language and platform-neutral extensible mechanism for structured data serialization. After you define how you want your data to be structured, you can use special generated source code to easily write and read your structured data to and from a variety of data streams. Developers can use the same schemas across diverse environments.
A developer needs to specify how the serializable information has to be structured by defining the protocol buffer message types in .proto files. Each protocol buffer message is a small, logical record of information containing a series of name/value pairs. This protocol buffer message file is language agnostic. The protoc utility compiles proto files and produces language-specific artifacts (for example .java and .js files).
For example, you can create a protocol buffer proto file for Save The Child to represent the information about donors, as shown in Example 8-5.
Example 8-5. Protocol buffer for donation message (donation.proto)
package savesickchild; ![]()
option java_package = "org.savesickchild.web.donation"; ![]()
message Donor{ ![]()
required string fullname = 1;
required string email = 2; ![]()
required string address = 3;
required string city = 4;
required string state = 5;
required int32 zip = 6;
required string country = 7;
message Donation{ ![]()
required Donor donor = 1; ![]()
required double amount = 2;
optional bool receipt_needed = 3;
}
}
![]()
The protobuf supports packages to prevent naming conflicts among messages from different projects.
![]()
Here we’re using a Java-specific protobuf option to define the package in which the generated code will reside.
![]()
Start defining our custom message with the message keyword.
![]()
Each message field can be required, optional, or repeated. The required and optional modifiers are self-explanatory. During the serialization-deserization process, the protobuf framework checks the message for the existence of fields, and if a required property is missing, will throw a runtime exception. The repeated modifier is used to create dynamically sized arrays.
![]()
The protobuf supports nested messages.
![]()
Many standard field types are available in protobuf: string, int32, float, double, and bool. You can also define a custom type and use it as a field type.
After creating the donation.proto file, you can use the protoc compiler to generate Java classes according to this file’s definitions:
protoc -I=. --java_out=src donation.proto # ![]()
.
├── donation.proto
└── src
└── org
└── savesickchild
└── web
└── donation
└── Donation.java # ![]()
![]()
The Java code will be generated in the src directory.
![]()
All required code for serialization-deserilization of the Donation message will be included in Donation.java. We’re not going to publish the generated code here, but you can generate this code by yourself from the previous message declaration.
Check the availability of the protobuf compiler for your preferred language at the protobuf wiki page. To become familiar with protobuf technology, check the documentation and tutorials.
Here are some protobuf pros:
§ The message is encoded into a compact and optimized binary format. You can find details of the encoding format at the Protocol Buffers documentation website.
§ Google supports protocol buffers for a wide range of programming languages (Java, C++, Python). The developer’s community supports it, too.
§ The use of protocol buffers is well documented.
The following are some of the cons:
§ The binary format is not human readable.
§ Although protobuf is compact, especially when a lot of numeric values are transferred by an encoding algorithm, the JSON is natively supported by the JavaScript and doesn’t require any additional parser implementation.
§ Protobuf requires web browsers to support binary format, but not all of them do just yet. You can find which browsers support raw binary data at Can I Use….
Using WebSocket with Proxies
The WebSocket protocol itself is unaware of intermediaries such as proxy servers, firewalls, and content filters. Proxy servers are commonly used for content caching, security, and enterprise content filtering.
HTTP has always supported protocol upgrades, but many proxy servers seem to have ignored that part of the specification. Until WebSocket came around, the Upgrade attribute was not used. The problem with web applications that use a long-lived connection like WebSocket is that the proxy servers might choose to close streaming or idle WebSocket connections because they appear to be trying to connect to an unresponsive HTTP server. Additionally, proxy servers might buffer unencrypted HTTP responses, assuming that the browser needs to receive the HTTP response in its entirety.
If you want more details on how a WebSocket-enabled application has to deal with proxies, check out the comprehensive research paper by Google’s Peter Lubbers, WebSocket and Proxy Servers.
TIP
The authors of this book use NGINX, a hugely popular load balancer and proxy and HTTP server to serve static resources (for example, images and text files), balance the load between Java servers, and perform SSL offloading (turning the web browser’s HTTPS requests into HTTP). NGINX uses a small number threads to support thousands of concurrent users, as opposed to traditional web servers that use one worker thread per connection. Recently, NGINX started supporting the WebSocket protocol.
Adding an Auction to Save The Child
We gave you just enough theory to whet your appetite for implementing WebSocket in our Save The Child application. The goal is to create an auction so that people can bid and purchase various goods and have the proceeds go to Save The Child. Auctions require real-time communications: everyone interested in the particular auction item must be immediately notified of being overbid or of winning. So we’ll use WebSocket as a means for bidding and providing notifications of the changes in the auction.
To start the auction, the user has to select the Auction option under the menu Way To Give (see Figure 8-4). We realize that only a small number of users will decide to participate in the auction, which from an architectural point of view means that the code supporting the auction should be loaded on demand only if the user chooses to visit the auction. This is why we need to write this code as a loadable module, and you will get a practical example of how a web application can be modularized.
In this chapter, we continue to use RequireJS (see Chapter 6) as a framework for modularization. Using RequireJS, we’re going to lazy-load some modules if and only if they are requested by the user.
This book is about development of the user interface and client side of web applications, so we’re not going to cover all the details of server-side implementation but will make our server-side code available for download. We’ll keep our server up and running so that you can test the UI by visiting http://savesickchild.org:8080/websocket-auction/, but our main goal in this section is to show you how you can exchange auction data with the server and process it on the client side by using WebSocket. We’ll use the Java application server GlassFish 4, which is a reference implementation of the Java EE 7 specification.
TIP
The authors of this book are Java developers and we have recorded a screencast (see readme.asciidoc) highlighting the WebSocket server API. If you are not a Java developer, you might want to learn on your own which WebSocket servers exist for your favorite programming language or platform.
Chapter 6 demonstrates how a web application can be sliced into several modules by using the RequireJS framework. We’ll use that project as a base and create a new one, project-16-websocket-auction, adding to it the new modules supporting the auction. Example 8-6 shows the code of theWayToGive module.
Example 8-6. WayToGive module (js/modules/way-to-give.js)
define([], function() {
var WayToGive;
console.log("way-to-give module is loaded");
WayToGive = function() {
return {
render: function() { ![]()
// rendering code is omitted
console.log("way-to-give module is rendered");
rendered = true;
return
},
startAuction: function(){ ![]()
},
rendered: false ![]()
};
};
return WayToGive;
});
![]()
This function lazy-loads the auction application content and renders it to the top main section of the web page.
![]()
The function startAuction() starts the auction.
![]()
The module stores the rendering state in the property rendered.
After the application starts, RequireJS loads only the essential modules, login and donation, as shown in Figure 8-4.
In the Google Chrome Developer Tools console, you can see that the login and donation modules are reporting about successful loading. Figure 8-5 confirms that these modules perform fine; clicking the Donate Now button reveals the form, and clicking the Login button makes the ID and Password fields visible.

Figure 8-4. Initially only two modules are loaded
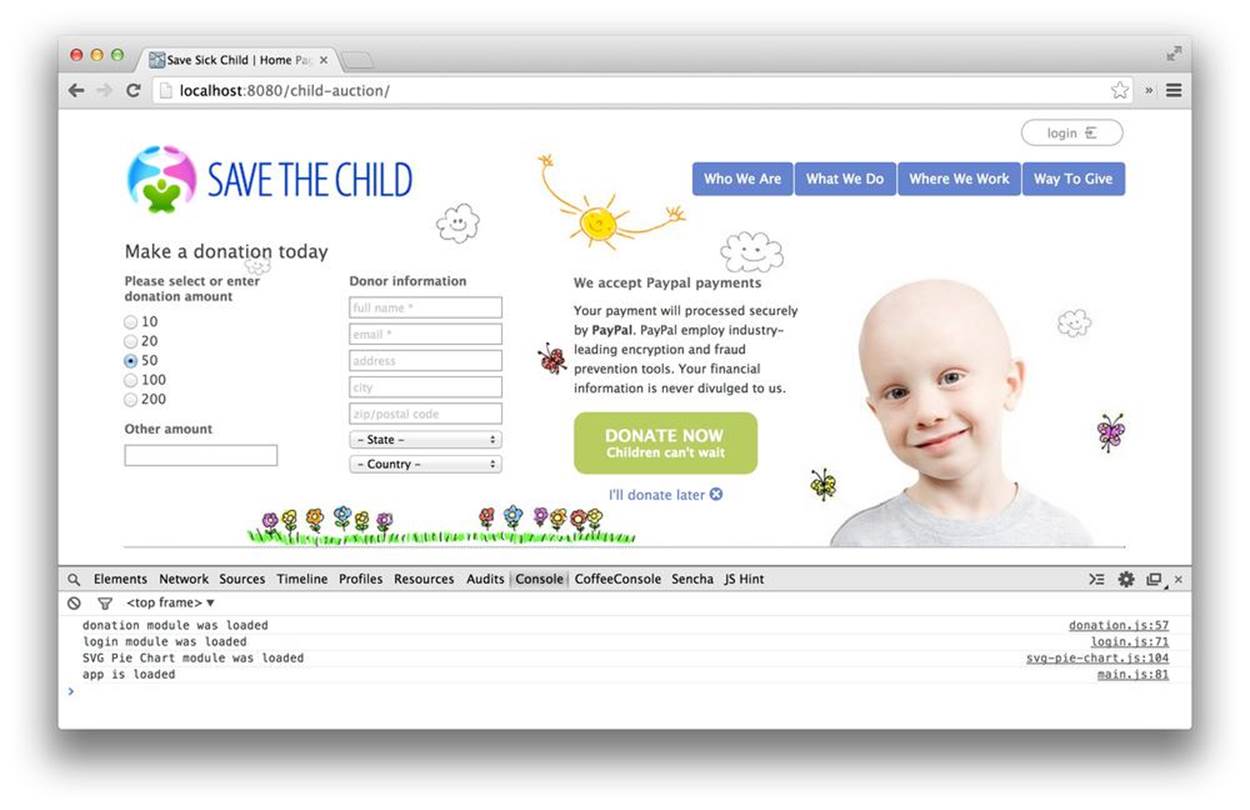
Figure 8-5. Two modules are loaded during the Save The Child application startup
Now click the Way To Give menu and keep an eye on the Developer Tools console (see Figure 8-6). You will see the WayToGive module reporting about its loading and rendering.
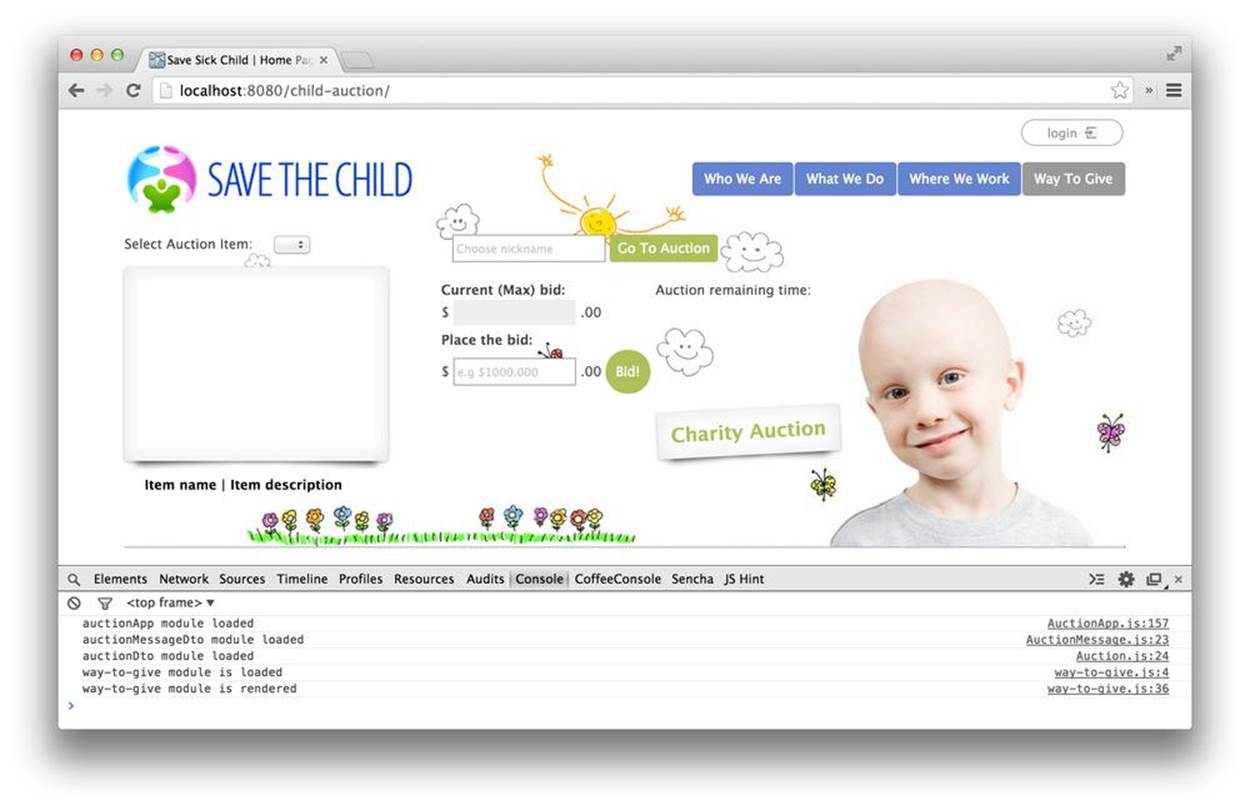
Figure 8-6. The auction controls are loaded and rendered
When the user clicks Way To Give, the RequireJS framework has to load the code of the WebSocket-based auction module. Example 8-7 presents the code snippet from the JavaScript file app.js, the entry point of our Save The Child application. This is how it loads the module on demand(see Chapter 6 for a RequireJS refresher).
Example 8-7. Loading the Way to Give module
require([], function() { ![]()
'use strict';
return (function() {
var lazyLoadingEventHandlerFactory, wayToGiveHandleClick, wayToGiveModule,
way_to_give;
way_to_give = document.getElementById('way-to-give');
wayToGiveModule = null; ![]()
lazyLoadingEventHandlerFactory = function(module, modulePath) {
var clickEventHandler;
clickEventHandler = function(event) {
console.log(event.target);
if (module === 'loading') { ![]()
return;
}
if (module !== null) {
return module.startAuction(); ![]()
} else {
module = 'loading'; ![]()
return require([modulePath], function(ModuleObject) { ![]()
module = new ModuleObject();
return module.render(); ![]()
});
}
};
return clickEventHandler;
};
wayToGiveHandleClick = lazyLoadingEventHandlerFactory(wayToGiveModule,
'modules/way-to-give');
way_to_give.addEventListener('click', wayToGiveHandleClick, false); ![]()
})();
});
![]()
This anonymous function will be lazy-loaded only if the user clicks the Way To Give menu.
![]()
The variable wayToGiveModule has a value of null until loaded.
![]()
If the user keeps clicking the menu while the way-to-give module is still being loaded, simply ignore these clicks.
![]()
If the module has been loaded and the UI has been rendered, start the auction application.
![]()
Set an intermediary value to the way-to-give module so that subsequent requests don’t try to launch the module more than once.
![]()
Load the module asynchronously and instantiate it.
![]()
Render the UI component to the screen for the first time.
![]()
Register the click event listener for the Way To Give menu.
After the UI elements have rendered, the client can connect to the WebSocket server and request the list of all available auction items, as shown in Example 8-8.
Example 8-8. Connecting to the WebSocket server
if (window.WebSocket) {
webSocket = new WebSocket("ws://localhost:8080/child-auction/auction");
webSocket.onopen = function() {
console.log("connection open..."); ![]()
getAuctionsList();
};
webSocket.onclose = function(closeEvent) {
// notify user that connection was closed
console.log("close code " + closeEvent.code);
};
webSocket.onmessage = function(messageEvent) {
console.log("data from server: " + messageEvent.data);
if (typeof messageEvent.data === "string") {
handleMessage(messageEvent.data);
}
};
webSocket.onerror = function() {
// notify user about connection error
console.log("websocket error");
};
}
![]()
After establishing the connection, the code requests the list of available auctions. We’ll see details of getAuctionsList() method in the next snippet:
var getAuctionsList = function() {
'use strict';
var auctionListMessage = {
type: 'AUCTIONS_LIST',
data: 'gime',
auctionId: '-1'
}; ![]()
if (webSocket.readyState === 1) { ![]()
webSocket.send(JSON.stringify(auctionListMessage));
} else {
console.log('offline');
}
};
![]()
Form the request message. You can find the details of the message format in Creating the Save The Child Auction Protocol.
![]()
Check the WebSocket object state. If WebSocket is open (readyState===1), the application can send a message. If not, this code just simply logs the “offline” mesage on the console. In the real world, you should always display this message on the user’s UI. Also, if your users work on unstable networks such as cellular or 3G, you definitely don’t want to lose any bits of data. It’s a good idea to use the local storage API (see Chapter 1) to persist the data locally until the application gets back online and resubmits the data.
The user can select the auction lot from the combo box and see its images. Figure 8-7 shows what’s displayed on the console, while Figures 8-8 and 8-9 show the content of the Network tab for both images.
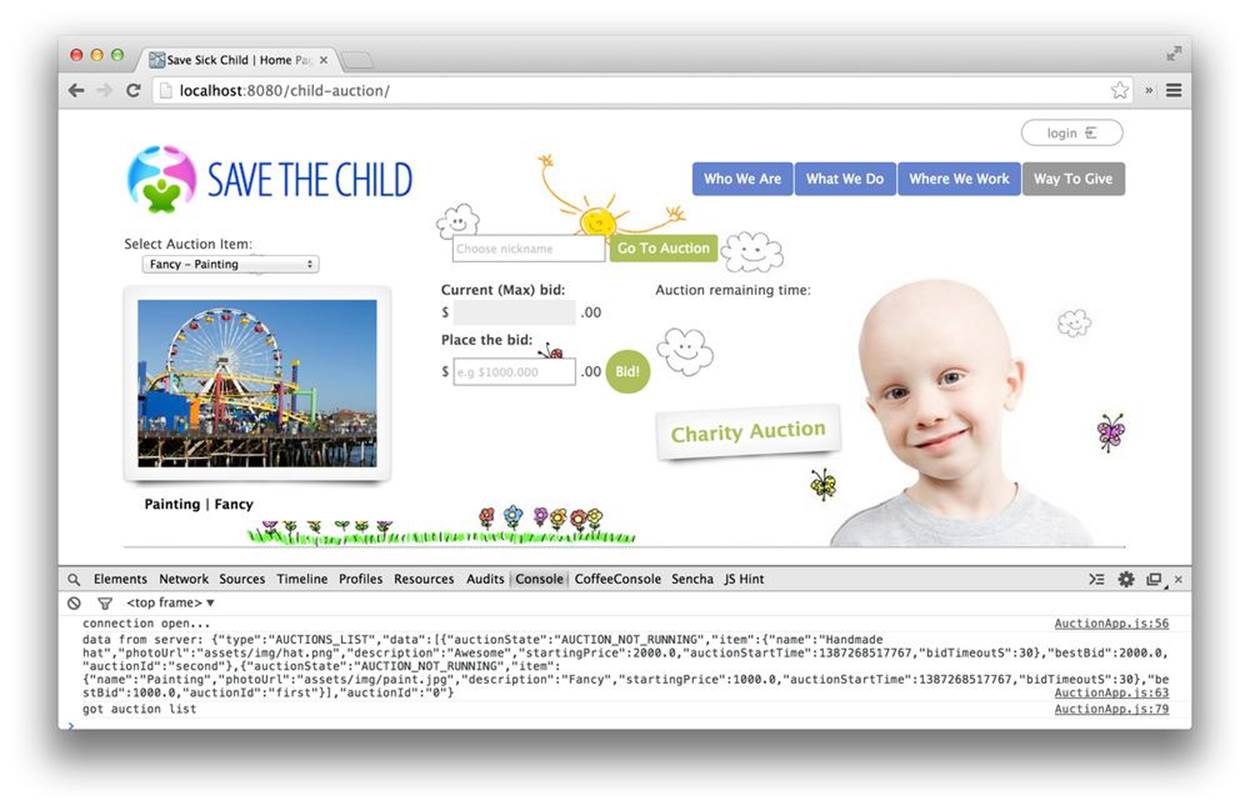
Figure 8-7. The console logs incoming messages containing a list of auction items
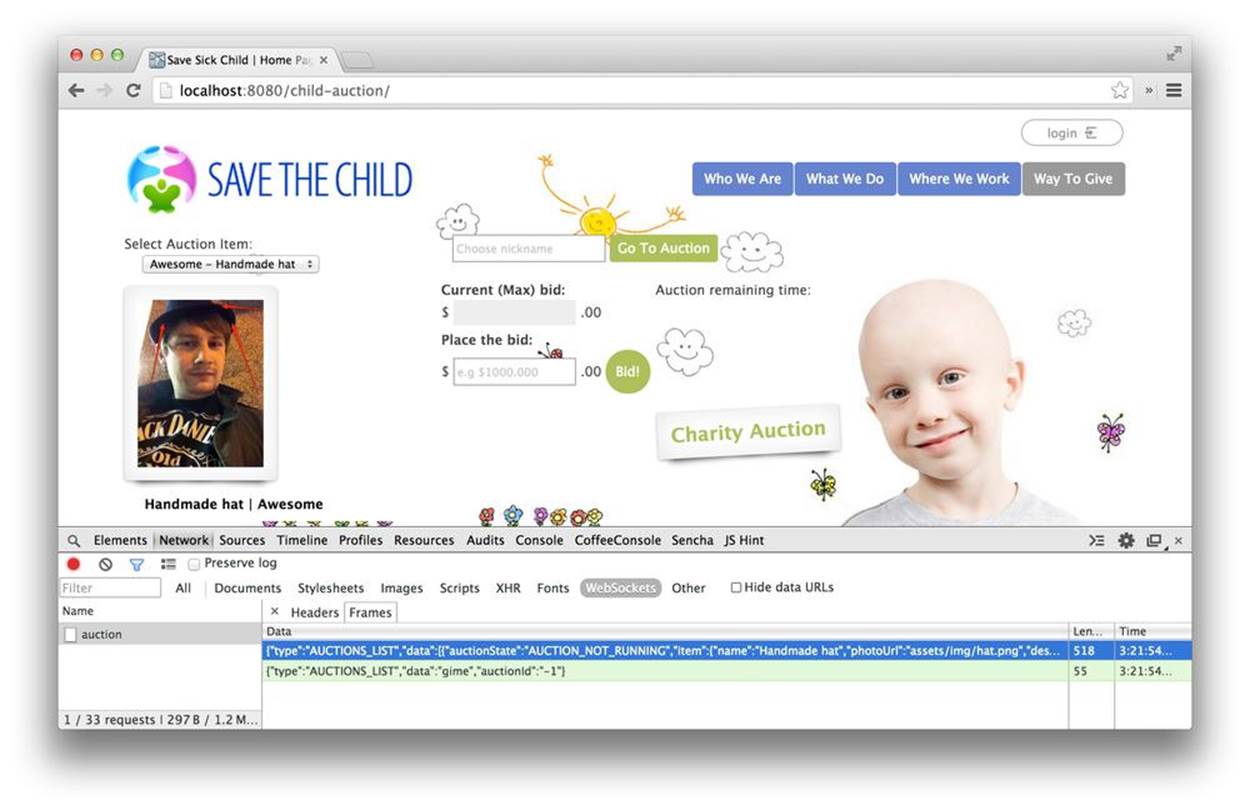
Figure 8-8. By using the Network feature of DevTools, we can monitor WebSocket frames

Figure 8-9. The buyer can choose another item on which to bid
Monitoring WebSocket Traffic by Using Chrome Developer Tools
Let’s review the practical use of the theory described in WebSocket handshake. With the help of Chrome Developer Tools, you can monitor information about the initial handshake, as shown in Figure 8-10. Monitoring WebSocket traffic in Chrome Developer Tools is, in some ways, not that different from monitoring HTTP requests. The traffic can be viewed in the Network tab after selecting the path of the WebSocket endpoint in the left panel.
You can also click WebSockets at the lower right to show only the WebSocket endpoints. Click the Frames tab in the right panel to view the actual frames being exchanged between the client and server, as shown in Figure 8-11. The white-colored rows represent incoming data; those in green (or gray on paper) indicate outgoing data.
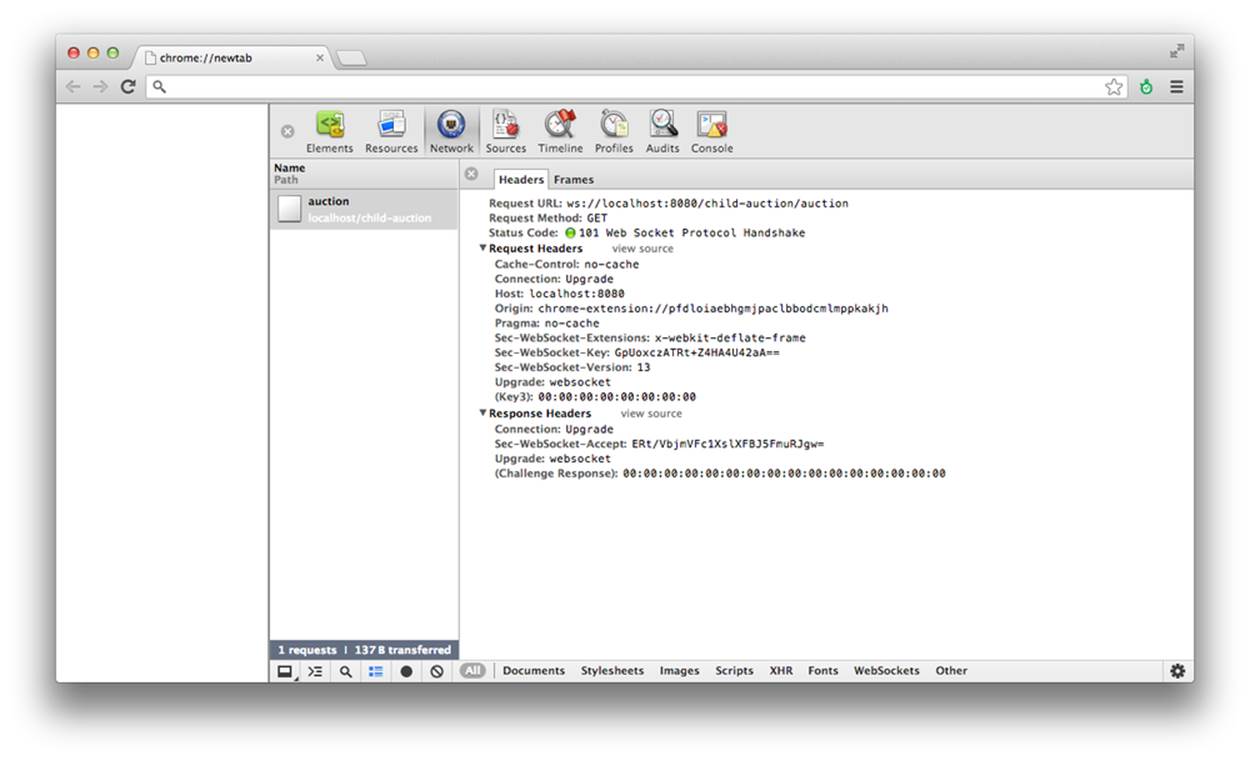
Figure 8-10. Initial WebSocket handshake in Chrome DevTools
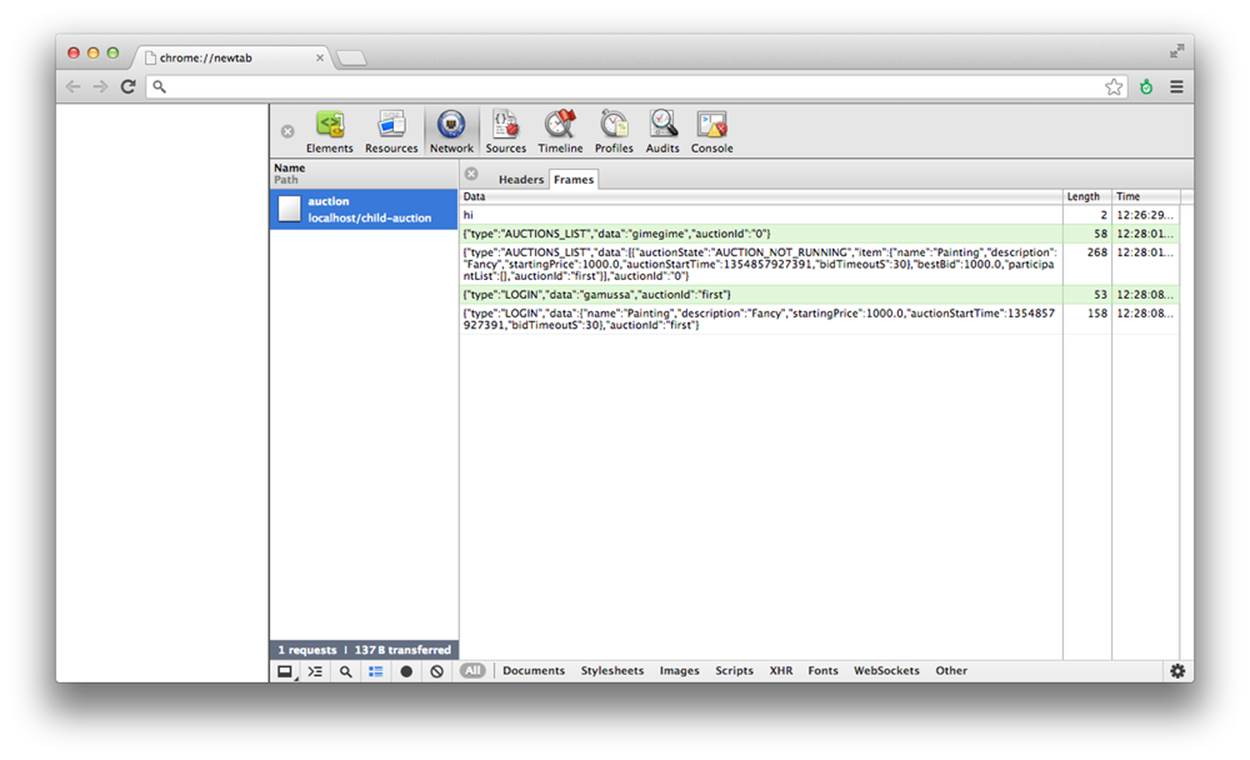
Figure 8-11. Monitoring WebSocket frames in Chrome Developer Tools
For more details, you can navigate Google Chrome to the secret URL chrome://net-internals, which provides a lot of useful information (see Figures 8-12 and 8-13). You can find documentation about net-internals in Chromium Design Documents.
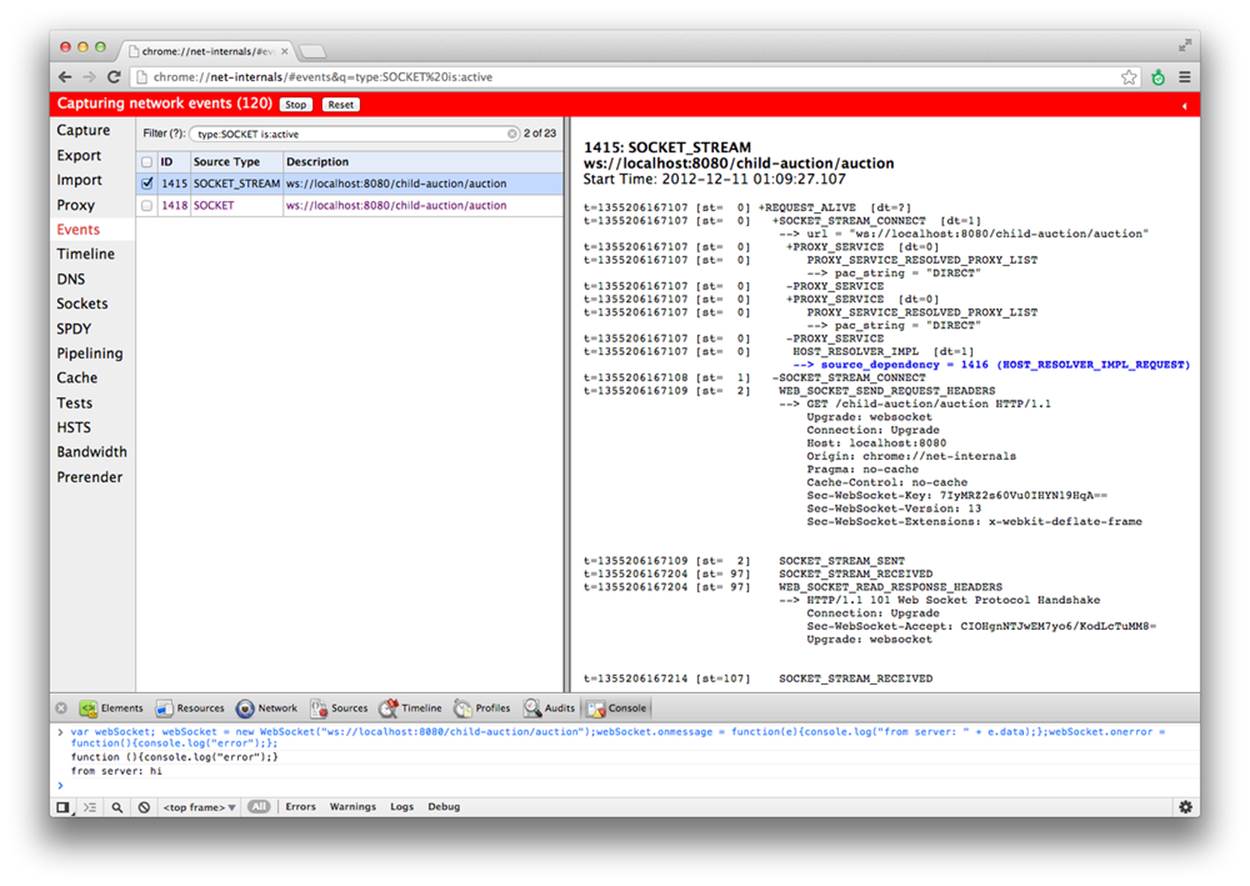
Figure 8-12. Details of the initial handshake in Chrome net-internals
Google Developer Tools show just the length of the data. But chrome://net-internals shows the size of the WebSocket frame, too. Figure 8-14 compares the views of net-internals and Developer Tools. As you learned earlier in this chapter, the total size of the frame is slightly different from the size of the payload. There are a few more bytes for the frame header. Moreover, all outgoing messages will be masked by the browser (see WebSocket frame anatomy). This frame’s mask is going to be transferred to the server as a part of the frame itself, which creates an additional 32 bits (4 bytes) of overhead.
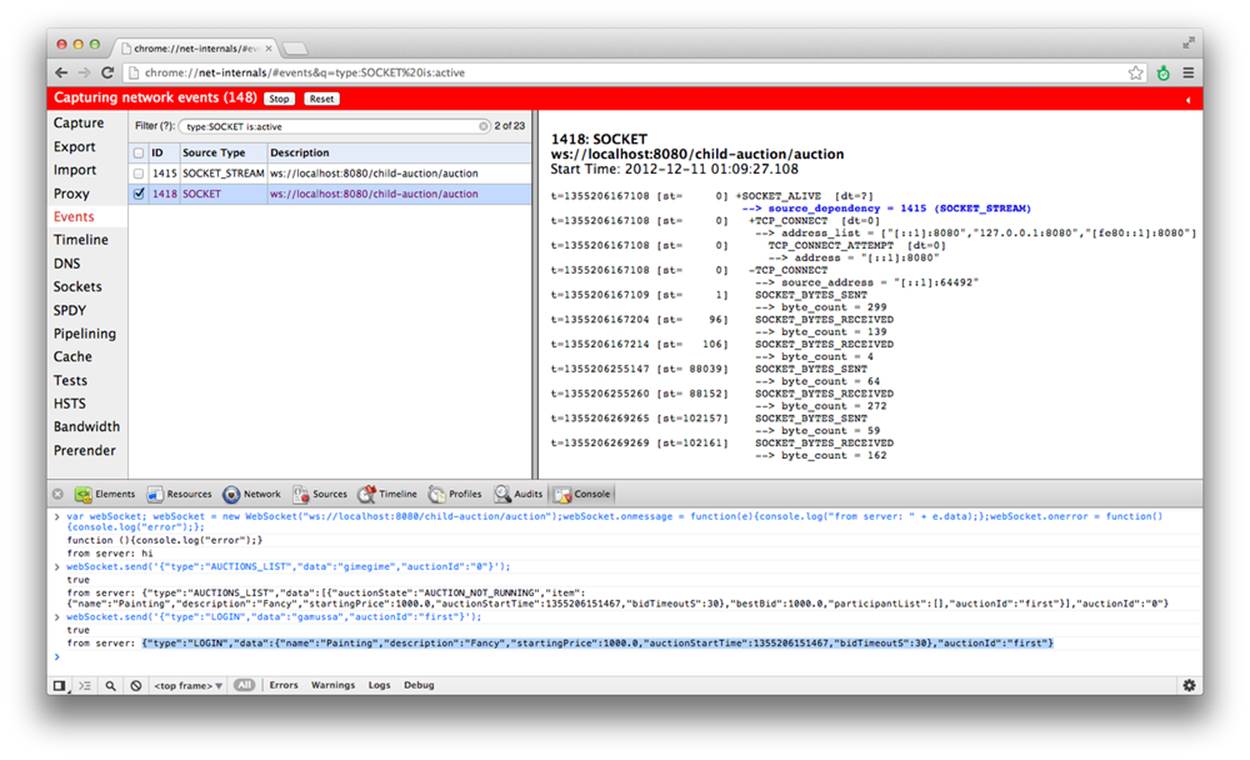
Figure 8-13. Details of the socket connection
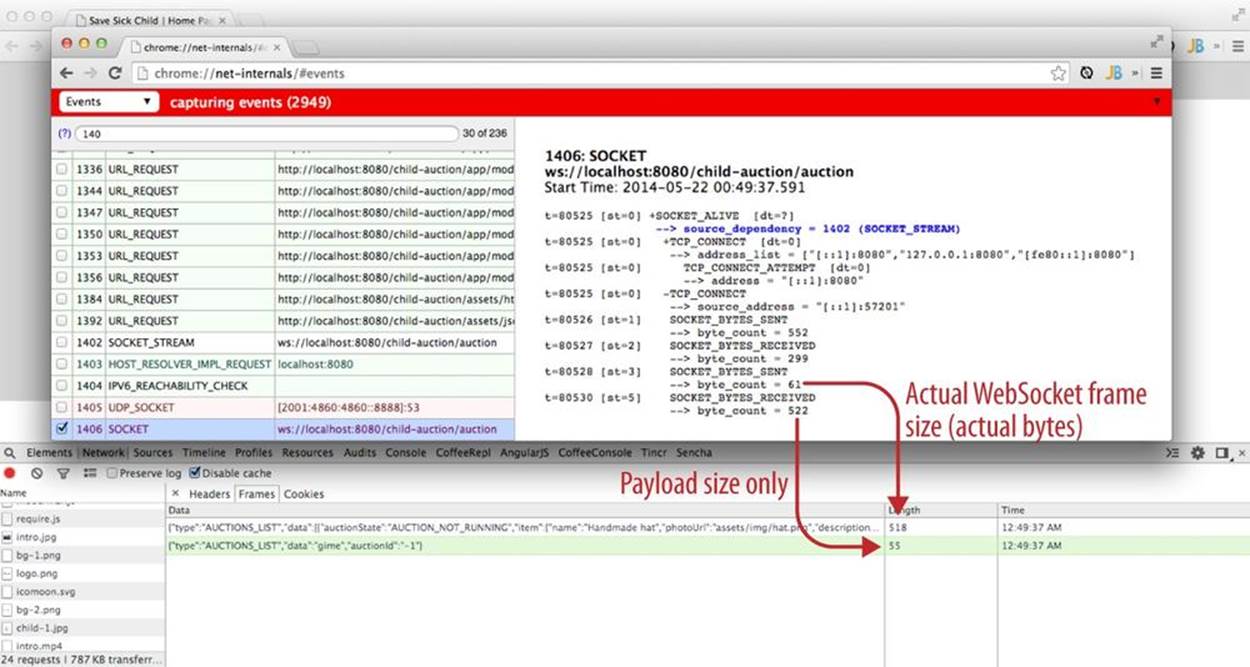
Figure 8-14. Developer Tools and net-internals, side by side
Sniffing WebSocket Frames by Using Wireshark
Wireshark is a powerful and comprehensive monitoring tool for analyzing network traffic. You can download it from Wireshark’s website. To begin capturing WebSocket traffic on localhost, select the loopback network interface from the left panel and click Start (see Figure 8-15).

Figure 8-15. The Wireshark application main view
Wireshark captures all network activity. You can set up a filter to see only the data in which you are interested. We want to capture HTTP and TCP traffic on port 8080 because our WebSocket server (Oracle’s GlassFish) runs on this port (see Figure 8-16). Enter http && (tcp.dstport==8080) in the filter text box and click Apply.

Figure 8-16. Filter setup
Now Wireshark is ready to sniff out the traffic of our application. You can start the auction session and place bids. After you’re done with the auction, you can return to the Wireshark window and analyze the results. You can see the initial handshake (GET request in Figure 8-17 and theUpgrade response in Figure 8-18).
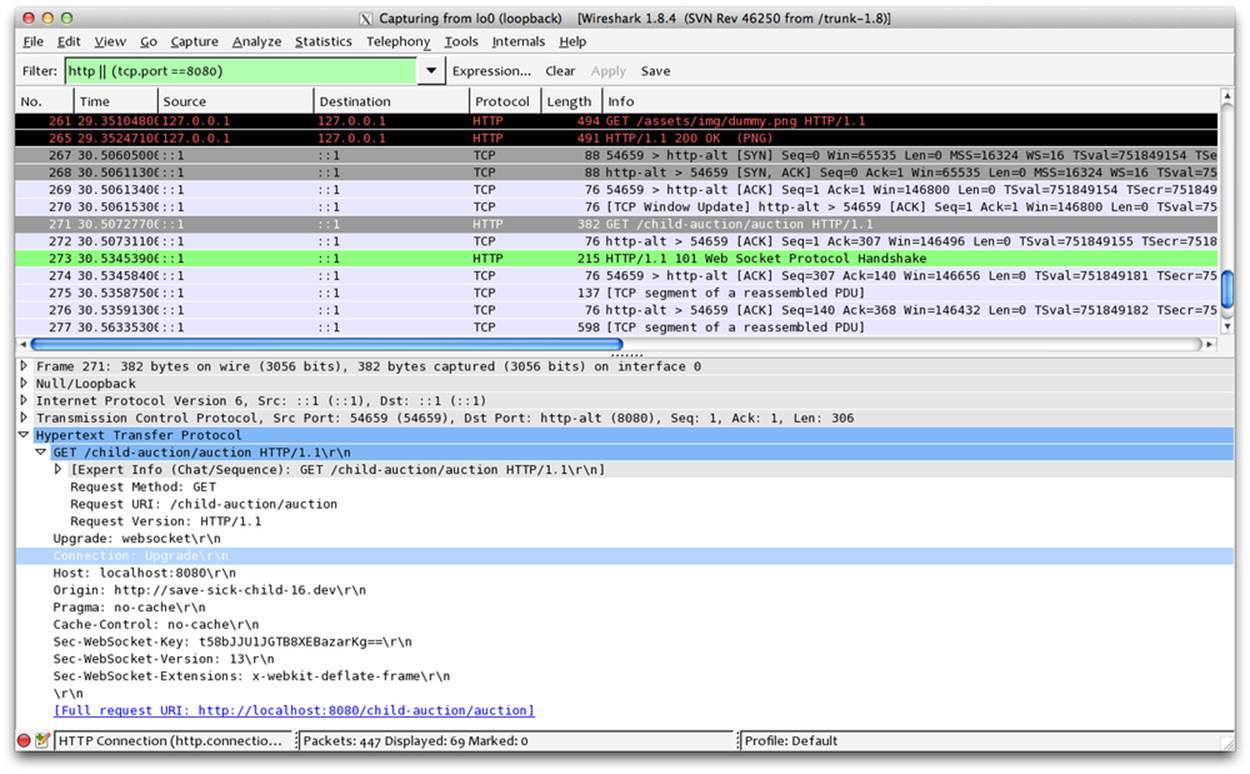
Figure 8-17. The GET request for protocol upgrade
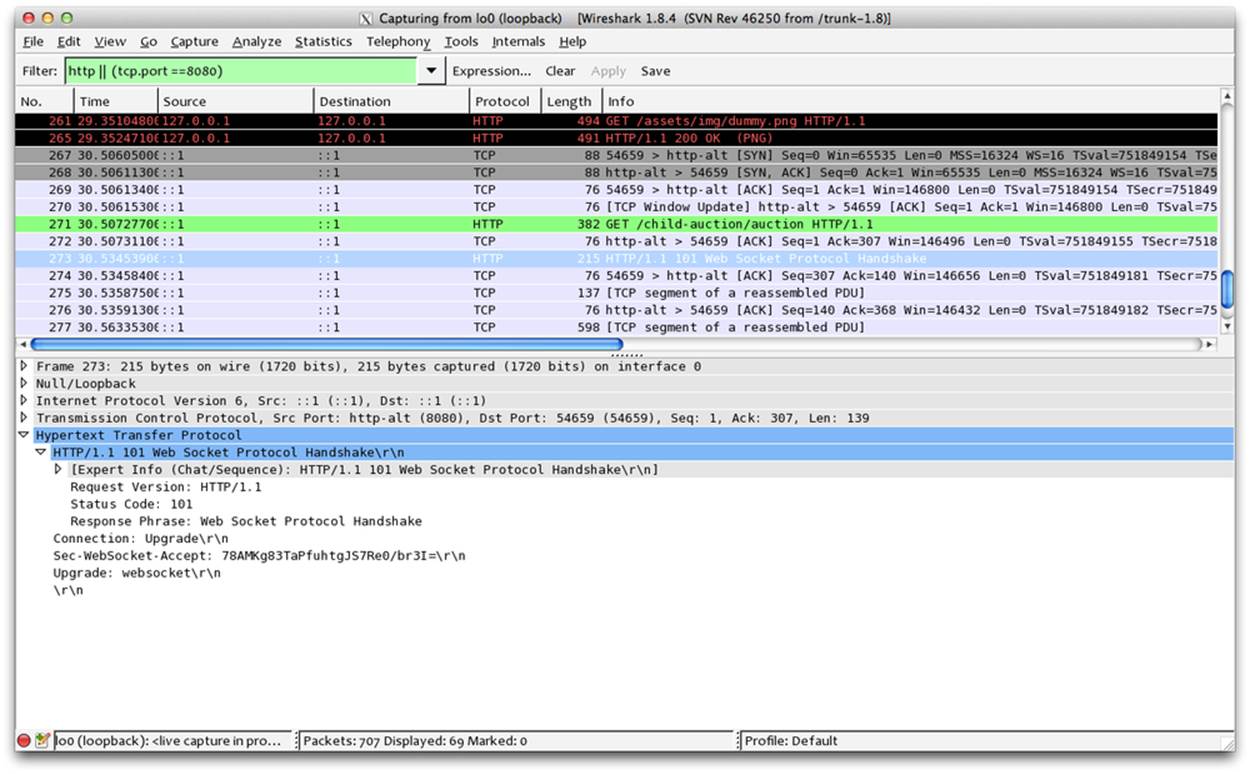
Figure 8-18. The GET response with protocol upgrade
After the successful connection upgrade, Wireshark captures the http-alt stream (this is how it reports WebSocket’s traffic) on the 8080 port. Right-click this row and select Follow TCP Stream, as shown in Figure 8-19.
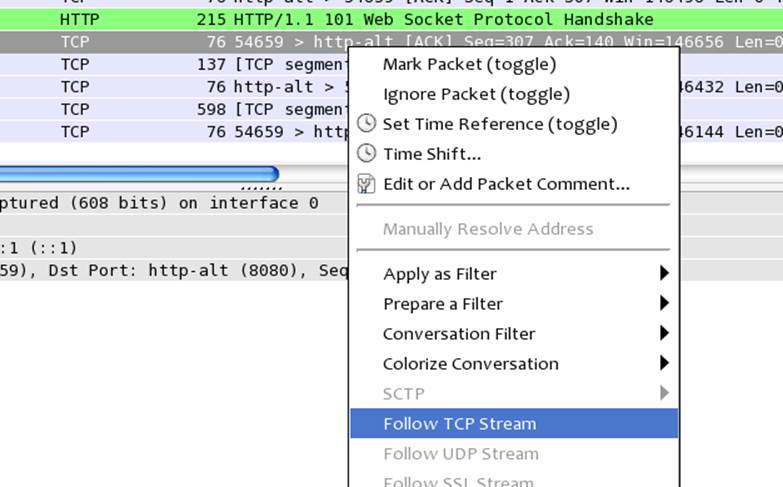
Figure 8-19. The Follow TCP Stream menu
On the next screen, you can see the details of the WebSocket frame (see Figure 8-20). We took this screenshot right after the auction application started. You can see the data with the list of available auctions. The outgoing data appears in red, and the incoming data is shown in blue.
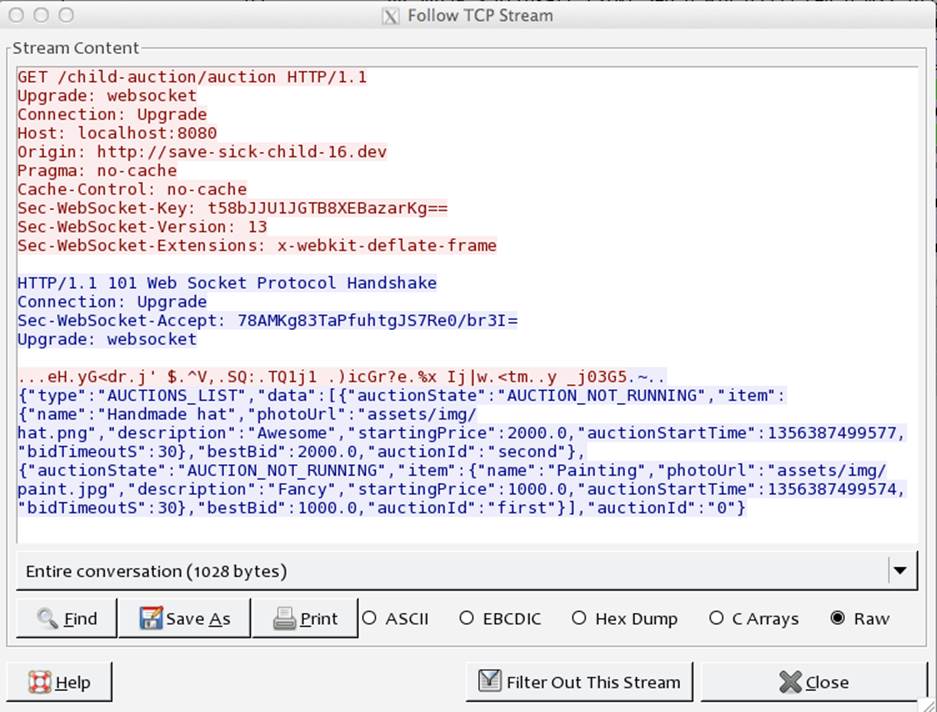
Figure 8-20. A WebSocket frame
The screenshot shown in Figure 8-21 was taken after the auction closed. You can see all the data sent over the WebSocket connection.
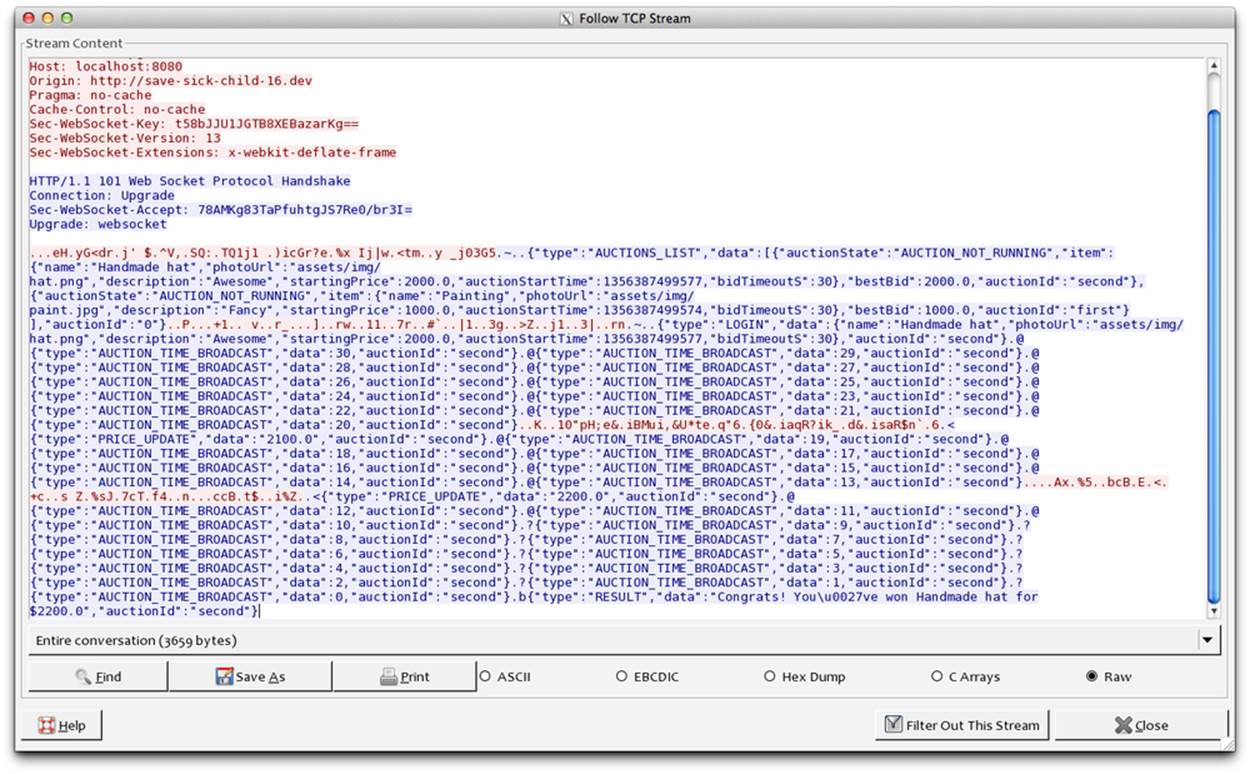
Figure 8-21. The entire auction conversation
Creating the Save The Child Auction Protocol
Because WebSocket is just a transport protocol, we need to come up with an application-level protocol indicating how auction messages should be formatted in the client-server interaction. This is how we decided to do it:
1. The client’s code connects to the WebSocket endpoint on the server.
2. The client’s code sends the AUCTION_LIST message to retrieve the list of currently running auctions:
3. {
4. "type": "AUCTIONS_LIST", ![]()
5. "data": "empty", ![]()
6. "auctionId": "-1" ![]()
}
![]()
The type of the message is AUCTION_LIST.
![]()
This message doesn’t send any data.
![]()
This message doesn’t request any specific auction ID, so we just send -1.
Let’s review the JSON object that will arrive from the server as the auction’s response:
{
"type": "AUCTIONS_LIST", ![]()
"data": [ ![]()
{
"auctionState": "AUCTION_NOT_RUNNING",
"item": { ![]()
"name": "Painting",
"description": "Fancy",
"startingPrice": 1000.0,
"auctionStartTime": 6000,
"bidTimeoutS": 30
},
"bestBid": 1000.0,
"participantList": [],
"auctionId": "first" ![]()
},
{
"auctionState": "AUCTION_RUNNING",
"item": {
"name": "Handmade hat",
"description": "Awesome",
"startingPrice": 2000.0,
"auctionStartTime": 6000,
"bidTimeoutS": 30
},
"bestBid": 2000.0,
"participantList": [],
"auctionId": "second"
}
],
"auctionId": "0"
}
![]()
The message type is AUCTION_LIST.
![]()
The data property of the response object contains the list of all running auctions. An auction can be in one of three states: not running, running, or finished.
![]()
The item property of the response object is a nested object that represents the auction item.
![]()
The auctionId property contains a unique identifier of the selected auction.
7. The user picks the auction from the list, enters a desired nickname, and joins the auction. The client-side application sends the following login message:
8. {
9. "type": "LOGIN", ![]()
10. "data": "gamussa", ![]()
11. "auctionId": "second" ![]()
}
![]()
The message type is LOGIN.
![]()
The data property of the request contains the user’s nickname.
![]()
The auctionId property helps the server-side code to route the message to the correct auction.
NOTE
As soon as the handshake completes successfully, the server-side code that implements the WebSocket protocol exposes the WebSocket Session object. This object encapsulates the conversation between the WebSocket endpoint (server side) and remote endpoint (browser). Check the documentation for your server-side framework for details about how it handles and exposes the remote endpoints in the API.
12.Each time a user enters a bid price, the client’s code sends the following BID message:
13.{
14. "type": "BID",
15. "data": "1100.0",
16. "auctionId": "second"
}
This is the outgoing message. When user clicks the Bid! button, the value from the Bid text box is wrapped into the BID message. On the server, when the new higher BID message arrives, the message PRICE_UPDATE has to be broadcast to all active clients.
17.The PRICE_UPDATE message looks like this:
18.{
19. "type": "PRICE_UPDATE", ![]()
20. "data": "1300.0", ![]()
21. "auctionId": "second"
}
![]()
If an auction participant outbids others, the rest of the participants will receive an update.
![]()
Such an update will contain the current highest bid.
22.The RESULT message looks like this:
23.{
24. "type": "RESULT",
25. "data": "Congrats! You\u0027ve won Painting for $1300.0",
26. "auctionId": "first"
}
After the auction ends, the server broadcasts the message with the final auction results. If the wining user is online and connected to the auction server, that user will receive a message with congratulations. Other participants will get the “Sorry, you didn’t win” notification.
This is pretty much it. The amount of code needed to implement the client’s side of the auction is minimal. After the connection and upgrade are done, most of the processing is done in the message handler of the WebSocket object’s onmessage.
Summary
After reading this chapter, you should see the benefits of using the WebSocket protocol in web applications. In many cases, WebSocket is an ultimate means for improving application performance, by reducing network latency and removing the overhead of the HTTP headers. You learned how to integrate WebSocket-based functionality into the existing HTTP-based application Save The Child. There is no need to make communication of the web application over WebSocket. Use this powerful protocol when it improves the performance and responsiveness of your application.
As a side benefit, you’ve learned how to use the network monitoring capabilities of Google Chrome Developer Tools and Wireshark by sniffing the WebSocket traffic. You can’t underestimate the importance of monitoring tools, which are the best friends of web developers.
All materials on the site are licensed Creative Commons Attribution-Sharealike 3.0 Unported CC BY-SA 3.0 & GNU Free Documentation License (GFDL)
If you are the copyright holder of any material contained on our site and intend to remove it, please contact our site administrator for approval.
© 2016-2026 All site design rights belong to S.Y.A.