Enterprise Web Development (2014)
Part I. Building Your Application
Chapter 2. Using Ajax and JSON
This chapter is about bringing external data to our HTML web pages. In Chapter 1, we used only hardcoded data because our goal was to show how to lay out the web page and how to change that layout in response to certain events (for example, the user clicking a menu button). Now we’ll make sure that our single-page application, Save The Child, can request data from external sources and send data, too. This comes down to two questions:
§ How does an HTML web page exchange data with web servers?
§ What format do we use to present the application data?
Even though there could be different answers to these questions, we’ll be using Ajax techniques as an answer to the first question and JavaScript Object Notation (JSON) data format as an answer to the second one. We’ll start this chapter by explaining why Ajax and JSON are appropriate choices for the Save The Child web application and many others.
Understanding Ajax
In the early days of the Internet, every new page, whether it was hosted on the same or separate website, required a new request and response to the web server. This, in turn, would re-render the entire contents of the new page. If a user points her web browser to one URL and then changes it to another, the new request will be sent to the new URL, and the new page will arrive and will be rendered by the browser. The URL might have been changed not because the user decided to go to visit a different website, but simply because the user selected a menu item that resulted in bringing a new web page from the same domain. This was pretty much the only way to design websites in the ’90s.
Back in 1999, Microsoft decided to create a web version of Outlook, its popular email application. Microsoft’s goal was to be able to modify the Input folder as new emails arrived, but without refreshing the entire content of the web page. It created an ActiveX control called XMLHTTP that lived inside Internet Explorer 5 and could make requests to the remote servers to receive data without needing to refresh the entire web page. Such a Web Outlook client would make periodic requests to the mail server, and if the new mail arrived, the application would insert a new row on top of the Inbox by directly changing the DOM object from JavaScript.
In the early 2000s, other web browsers implemented their own versions of XMLHTTPRequest. Its Working Draft 6 is published by W3C. Google created its famous email client, Gmail, and its Maps web application. In 2005, Jesse James Garrett wrote an article titled “AJAX: A New Approach to Web Applications.” The web developer community liked the term AJAX, which stands for Asynchronous JavaScript and XML (it was originally presented as an acronym; today, it’s considered as a name, hence the now more common spelling, “Ajax”), and this gave birth to a new breed of web applications that could update the content of just a portion of a web page without re-retrieving the entire page. Interestingly enough, the last letter in the AJAX acronym stands for XML, although presenting the data in XML form is not required, and currently is seldom used as a data format in client-server exchanges. JSON is used a lot more often to represent data, but apparently AJAJ didn’t sound as good as AJAX.
Visit the Google Finance or Yahoo! Finance web pages when the stock market is open, and you’ll see how price quotes or other financial indicators change while most of the content remains the same. This gives an illusion of the server pushing the data to your web client. But most likely, it is not a data push but rather periodic polling of the server’s data using Ajax. In modern web applications, we expect to see more of real server-side data push using the HTML5 WebSocket API, which is described in detail in Chapter 8.
Understanding JSON
JSON stands for JavaScript Object Notation. Compared to XML, it’s a more compact way to represent data. Besides, all modern web browsers understand and can parse JSON data. Now that you’ve learned about JavaScript object literals in Chapter 1, you’ll see that presenting data in JSON format is almost the same as writing JavaScript object literals.
Figure 2-1 depicts a high-level view of a typical web application. All of the code samples from Chapter 1 (and the online bonus chapter, Appendix A, and Appendix B) were written in HTML, JavaScript, and CSS. In this chapter, we add to the mix the XMLHttpRequest object that will send and receive the JSON content wrapped into HTTPRequest and HTTPResponse objects.

Figure 2-1. Anatomy of a web application
When a web page is loaded, the user doesn’t know (and doesn’t have to know) that the page content was brought from several servers that could be located thousands of miles apart. More often than not, when the user enters the URL requesting an HTML document, the server-side code can engage several servers to bring all the data requested by the user. Some data is retrieved by making calls to one or more web services. The legacy web services were built using SOAP + XML, but the majority of today’s web services are built using lighter RESTful architecture (REST standing for Representational State Transfer), and JSON has become a de facto standard data exchange format for REST web services.
Working with Ajax
Imagine a single-page application that needs some data refreshed in real time. For example, our Save The Child application includes an online auction where people can bid and purchase goods as a part of a charity event. If John from New York places a bid on a certain auction item, and some time later Mary from Chicago places a higher bid on the same item, we want to make sure that John knows about it immediately, in real time. This means that the server-side software that received Mary’s bid has to push this data to all users who expressed their interest in the same item.
But the server has to send, and the browser has to modify, only the new price while the rest of the content of the web page should remain the same. You can implement this behavior by using Ajax. First, however, the bad news: you can’t implement real-time server-side push with Ajax. You can only emulate this behavior by using polling techniques, whereby the XMLHttpRequest object sits inside your JavaScript code and periodically sends HTTP requests to the server asking whether any changes in bids occurred since the last request.
If, for instance, the last request was made at 10:20:00A.M., the new bid was placed at 10:20:02A.M., and the application makes a new request (and updates the browser’s window) at 10:20:25A.M., this means that the user will be notified about the price change with a 3-second delay. Ajax is still a request-response–based way of getting the server’s data, and strictly speaking, doesn’t offer true real-time updates. Some people use the term near real-time notifications.
Other bad news is that Ajax uses HTTP for data communication, which means that substantial overhead in the form of an HTTPResponse header will be added to the new price, and it can be as large as several hundred bytes. This is still better than sending the entire page to the web browser, but HTTP adds a hefty overhead.
NOTE
We implement such an auction in Chapter 8 by using a much more efficient protocol called WebSocket, which supports a real-time data push and adds only several extra bytes to the data load.
Retrieving Data from the Server
Let’s try to implement Ajax techniques for data retrieval. The process of making an Ajax request is well defined and consists of the following steps:
1. Create an instance of the XMLHttpRequest object.
2. Initialize the request to your data source by invoking the method open().
3. Assign a handler to the onreadystatechange attribute to process the server’s response.
4. Make a nonblocking request to the data source by calling send().
5. In your handler function, process the response when it arrives from the server. This is where asynchronous comes from: the handler can be invoked at any time, whenever the server prepares the response.
6. Modify the DOM elements based on the received data, if need be.
NOTE
Most likely you are going to be using one of the popular JavaScript frameworks, which will spare you from knowing all these details, but knowing how Ajax works under the hood can be beneficial.
In most books on Ajax, you’ll see browser-specific ways of instantiating the XMLHttpRequest object (a.k.a. XHR). Most likely you’ll be developing your application by using a JavaScript library or framework, and all browser specifics in instantiating XMLHttpRequest will be hidden from you. Chapter 3 and Chapter 4 include such examples, but let’s stick to the standard JavaScript way implemented by all modern browsers:
var xhr = new XMLHttpRequest();
The next step is to initialize a request by invoking the method open(). You need to provide the HTTP method (for example, GET or POST) and the URL of the data source. Optionally, you can provide three more arguments: a Boolean variable indicating whether you want this request to be processed asynchronously (which is the default), and the user ID and password if the authentication is required. Keep in mind that the following method does not request the data yet:
xhr.open('GET', dataUrl);
TIP
Always use HTTPS if you need to send the user ID and password. Using secure HTTP should be your preferred protocol in general (read more in Chapter 9).
XHR has an attribute called readyState, and as soon as it changes, the callback function assigned to onreadystatechange will be invoked. This callback should contain your application-specific code to analyze the response and process it accordingly. Assigning such a callback is pretty simple:
xhr.onreadystatechange = function(){...}
Inside such a callback function, you’ll be analyzing the value of the XHR’s attribute readyState, which can have one of the values listed in Table 2-1.
Table 2-1. States of the request
|
Value |
State |
Description |
|
0 |
UNSENT |
The XHR has been constructed. |
|
1 |
OPENED |
open() was successfully invoked. |
|
2 |
HEADERS_RECEIVED |
All HTTP headers have been received. |
|
3 |
LOADING |
The response body is being received. |
|
4 |
DONE |
The data transfer has been completed. |
Finally, send the Ajax request for data. The method send() can be called with or without parameters, depending on whether you need to send the data to the server. In its simplest form, the method send() can be invoked as follows:
xhr.send();
The complete cycle of the readyState transitions is depicted in Figure 2-2.
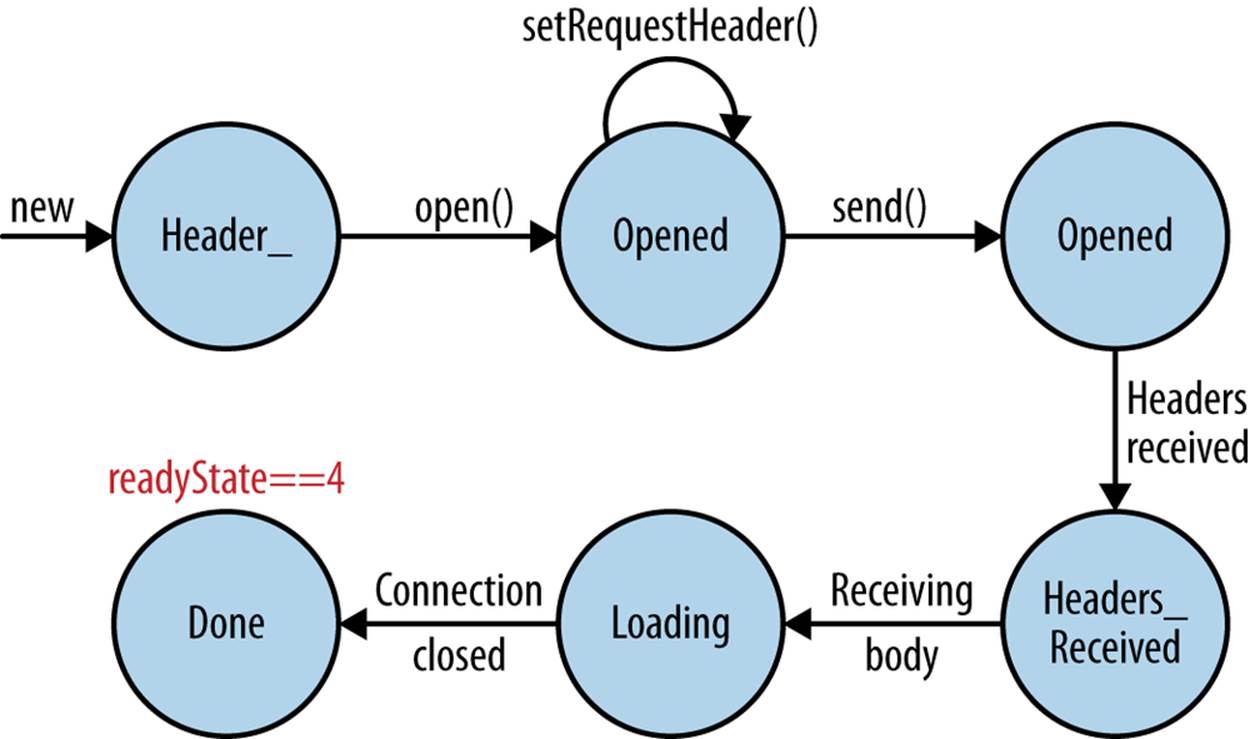
Figure 2-2. Transitions of the readyState attribute
Let’s spend a bit more time discussing the completion of this cycle when the server’s response is received and the XHR’s readyState is equal to 4. This means that we’ve received something, which can be either the data we’ve expected or an error message. We need to handle both scenarios in the function assigned to the onreadystatechange attribute (see Example 2-1). This is a common way to do it in JavaScript without using frameworks.
Example 2-1. Processing an Ajax response
xhr.onreadystatechange = function(){
if (xhr.readyState == 4) {
if((xhr.status >=200 && xhr.status <300) || xhr.status===304) {
// We got the data. Get the value from one of the response attributes
// e.g. xhr.responseText and process the data accordingly.
} else {
// We got an error. Process the error code and
// display the content of the statusText attribute.
}
}
};
One note about the third line of this code. Here we’re checking the HTTP status code received from the server. W3C splits the HTTP codes into groups. The codes numbered 1xx are informational, 2xx are successful codes, 3xx are about redirections, 4xx represent bad requests (such as the infamous 404 for Not Found), and 5xx indicate server errors. That’s why the preceding code fragment checks for all 2xx codes and for 304: the data was not modified and taken from cache.
NOTE
If your application needs to post the data to the server, you need to open the connection to the server with the POST parameter. You’ll also need to set the HTTP header attribute Content-type to either multipart/form-data for large-size binary data or to application/x-www-form-urlencoded (for forms and small-size alphanumeric data). Then prepare the data object and invoke the method send():
var data="This is some data";
xhr.open('POST', dataUrl, true);
xhr.setRequestHeader('Content-type', 'application/x-www-form-urlencoded');
...
xhr.send(data);
TIP
XMLHttpRequest Level 2 adds new functionality including FormData objects, timeouts, ArrayBuffers, and more. It’s supported by most web browsers.
Ajax: Good and Bad
Ajax techniques have their pros and cons. You saw how easy it is to create a web page that doesn’t have to refresh itself but can provide users with a means of communicating with the server. This certainly improves the user experience. The fact that Ajax allows you to reduce the amount of data that goes over the wire is important, too. Another important advantage of Ajax is that it works in a standard HTML/JavaScript environment and is supported by all web browsers. The JavaScript frameworks hide all the differences in instantiating XMLHttpRequest and simplify making HTTP requests and processing responses. Because the entire page is not reloaded, you can create fat clients that keep certain data preloaded so that it can be reused in your JavaScript in different use cases. With Ajax, you can lazy-load content as needed rather than loading everything at once. Finally, the autocompletion feature, which is often taken for granted, would not be possible in an HTML/JavaScript application without Ajax.
On the bad side, with Ajax, the user loses the functionality of the browser’s Back button, which reloads the previous web page in a way that enables the user to see the previous state of that page.
Because Ajax brings most content dynamically, search engines might not rank your web pages as high as if the content were statically embedded in the HTML. If discoverability of your web application is important, extra steps should be taken to make it more Search Engine Optimization (SEO)–friendly (for example, using an SEO Server).
Increasing the number of Ajax interactions means that your application will have to send more JavaScript code to the web browser, which increases the complexity of programming and decreases the scalability of your application.
TIP
Using the HTML5 History API (see Chapter 1) will help you teach the old dog (the browser’s Back button) new tricks.
Ajax applications are subject to the same origin policy (the same protocol, hostname, and port), which allows XMLHttpRequest to make HTTP requests only to the domains where the web application was loaded from. It’s a security measure to limit the ability of JavaScript code to interact with resources that arrive to the web browser from a different web server.
TIP
W3C has published a working draft of Cross-Origin Resource Sharing (CORS), a mechanism to enable client-side cross-origin requests.
Populating States and Countries from HTML Files
To see the first example for which we use Ajax in our Save The Child application, run project-01-donation-ajax-html. In this example, we’ve removed the hardcoded data about countries and states from HTML and saved it in two separate files: data/us-states.html and data/countries.html. In this project, the file index.html has two empty combo boxes (<select> elements), as shown in Example 2-2.
Example 2-2. State and Country drop-downs
<select name="state" id="state">
<option value="" selected="selected"> - State - </option>
<!-- AJAX will load the rest of content -->
</select>
<select name="country" id="counriesList">
<option value="" selected="selected"> - Country - </option>
<!-- AJAX will load the rest of content -->
</select>
The resulting Save The Child page will look the same as the last sample from the previous chapter, but the Country and State drop-downs are now populated by the data located in these files (later in this chapter, in the section on JSON, we replace this HTML file with its JSON version).Example 2-3 presents the first three lines (out of 241) from the file countries.html.
Example 2-3. A fragment from the file countries.html
<option value="United States">United States</option>
<option value="United Kingdom">United Kingdom</option>
<option value="Afghanistan">Afghanistan</option>
The JavaScript code that reads countries and states from files (text and HTML markup) and populates the drop-downs comes next. Example 2-4 demonstrates that the content of these files is assigned to the innerHTML attribute of the given HTML <select> element.
Example 2-4. Loading HTML content into the Country and State drop-downs
function loadData(dataUrl, target) {
var xhr = new XMLHttpRequest();
xhr.open('GET', dataUrl, true);
xhr.onreadystatechange = function() {
if (xhr.readyState == 4) {
if((xhr.status >=200 && xhr.status <300) ||
xhr.status===304){
target.innerHTML += xhr.responseText;
} else {
console.log(xhr.statusText);
}
}
}
xhr.send();
}
// Load the countries and states using XHR
loadData('data/us-states.html', statesList);
loadData('data/countries.html', counriesList);
NOTE
The preceding code has an issue, which might not be so obvious, but can irritate users. The problem is that it doesn’t handle errors. Yes, we print the error message on the developer’s console, but the end user will never see it. If for some reason the data about countries or states doesn’t arrive, the drop-downs will be empty, the donation form won’t be valid, and the users will become angry that they can’t make a donation and don’t know why. Proper error handling and reports are important for any application, so never ignore it. You should display a user-friendly error message on the web page. For example, the else statement in the preceding example can display the received message in the page footer, as demonstrated in Example 2-5.
Example 2-5. Displaying the Ajax error in the page footer
else {
console.log(xhr.statusText);
// Show the error message on the Web page
footerContainer.innerHTML += '<p class="error">Error getting ' +
target.name + ": "+ xhr.statusText + ",code: "+
xhr.status + "</p>";
}
This code uses the CSS selector error (see Example 2-6) that will show the error message on the red background. You can find it in the file styles.css in project-02-donation-error-ajax-html.
Example 2-6. Styling an error message with CSS
footerp.error {
background:#d53630;
text-align:left;
padding: 0.9em;
color: #fff;
}
Example 2-7 shows how to add the received data to a certain area on the web page. This code creates an HTML paragraph <p> with the text returned by the server and then adds this paragraph to the <div> with the ID main.
Example 2-7. Styling a paragraph
if (xhr.readyState == 4) {
// All status codes between 200 and 300 mean success
// and 304 means Not Modified
if((xhr.status >=200 && xhr.status <300) || xhr.status===304){
var p = document.createElement("p");
p.appendChild(document.createTextNode(myRequest.responseText));
document.getElementById("main").appendChild(p);
}
}
Using JSON
In any client-server application, one of the important decisions to be made is about the format of the data that goes over the network. We are talking about application-specific data. Someone has to decide how to represent the data about an auction item, customer, donation, and so forth. The easiest way to represent text data is by using the comma-separated value (CSV) format, but it’s not easily readable by humans, is hard to validate, and re-creation of JavaScript objects from a CSV feed would require additional information about the headers of the data.
Sending the data in XML form addresses the readability and validation issues, but it’s very verbose. Every data element has to be surrounded by an opening and closing tag describing the data. Converting the XML data to/from JavaScript objects requires special parsers, and you’d need to use one of the JavaScript libraries for cross-browser compatibility.
Douglas Crockford popularized a new data format called JavaScript Object Notation, or JSON, which has become the most popular data format on the Web today. It’s not as verbose as XML, and JSON’s notation is almost the same as JavaScript object literals. It’s easily readable by humans, and every ECMAScript 5–compliant browser includes a native JSON object: window.JSON. Even though JSON-formatted data looks like JavaScript object literals, JSON is language independent. Example 2-8 illustrates some JSON-formatted data.
Example 2-8. Sample JSON-formatted data
{
"fname":"Alex",
"lname":"Smith",
"age":30,
"address": {
"street":"123 Main St.",
"city": "New York"}
}
Anyone who knows JavaScript understands that this is an object that represents a person, which has a nested object that represents an address. Note the difference with JavaScript literals: the names of the properties are always strings, and every string must be represented in quotation marks. Representing the same object in XML would need a lot more characters (for example, <fname>Alex</fname>).
There are some other important differences between JSON and XML. The structure of an XML document can be defined by using Document Type Definitions (DTDs) or XML Schema, which simplifies data validation, but requires additional programming and schema maintenance. On the other hand, JSON data has data types—for example, the age attribute in the preceding example is not only a Number, but will be further evaluated by the JavaScript engine and will be stored as an integer. JSON also supports arrays, whereas XML doesn’t.
For parsing JSON in JavaScript, you use the method JSON.parse(), which takes a string and returns a JavaScript object. For example:
var customer=JSON.parse('{"fname":"Alex","lname":"Smith"}');
console.log(“Your name is ” + customer.fname + “ “ + customer.lname);
For a reverse operation—turning an object into a JSON string—use JSON.stringify(customer). The older browsers didn’t have the JSON object, and an alternative way of parsing JSON is with the help of the script json2.js, which creates the JSON property on the global object. This script is freely available on GitHub. In Chapter 1, you learned about feature detection with Modernizr, and you can automate the loading of this script if needed:
Modernizr.load({
test: window.JSON,
nope: 'json2.js',
complete: function () {
var customer = JSON.parse('{"fname":"Alex","lname":"Smith"}');
}
});
Usually, JSON-related articles and blogs are quick to remind you about the evil nature of the JavaScript function eval(), which can take arbitrary JavaScript code and execute it. The JSON.parse() method is pictured as a protection against the malicious JavaScript that can be injected into your application’s code and then executed by eval() via the web browser. The main argument is that JSON.parse() will not process the incoming code unless it contains valid JSON data.
Protecting your application code from being infected by means of eval() can be done outside your application code. Replacing HTTP with secure HTTPS helps a lot in this regard. Some web applications eliminate the possibility of cross-origin scripting by routing all requests to third-party data sources via proxying such requests through your trusted servers. But proxying all requests through your server may present scalability issues—imagine if thousands of concurrent users are routed through your server—so do some serious load testing before making this architectural decision.
TIP
There are several JSON tools useful for developers. To make sure that your JSON data is valid and properly formatted, use JSONLint. If you paste ugly one-line JSON data, JSONLint will reformat it into a readable form. The add-on JSONView is also available both for Firefox and Chrome browsers. With JSONView, the JSON objects are displayed in a pretty, formatted, collapsible format. If errors exist in the JSON document, they will be reported. At the time of this writing, Chrome’s version of JSONView does a better job of reporting errors.
Populating States and Countries from JSON Files
Earlier in this chapter, you saw an example of populating states and countries in the donate form from HTML files. Now you’ll see how to retrieve JSON data by making an Ajax call. In the web browser, open project-04-2-donation-ajax-json, which reads the countries and states from the filescountries.json and us_states.json, respectively. The beginning of the file countries.json is shown here:
{
"countrieslist": [
{
"name": "Afghanistan",
"code": "AF"
}, {
"name": "Åland Islands",
"code": "AX"
}, {
"name": "Albania",
"code": "AL"
},
The JavaScript code that populates the countries and states combo boxes comes next. Note the difference in creating the <option> tags from JSON versus HTML. In case of HTML, the received data is added to the <select> element as is: target.innerHTML += xhr.responseText;. In JSON files, the data is not wrapped into the <option> tags, so it’s done programmatically, as shown in Example 2-9.
Example 2-9. Loading JSON-formatted countries and states
function loadData(dataUrl, rootElement, target) {
var xhr = new XMLHttpRequest();
xhr.overrideMimeType("application/json");
xhr.open('GET', dataUrl, true);
xhr.onreadystatechange = function() {
if (xhr.readyState == 4) {
if (xhr.status == 200) {
//parse jsoon data
var jsonData = JSON.parse(xhr.responseText);
var optionsHTML = ''
for(var i= 0; i < jsonData[rootElement].length; i++){
optionsHTML+='<option value="'+jsonData[rootElement][i].code+'">'
+ jsonData[rootElement][i].name+'</option>'
}
var targetCurrentHtml = target.innerHTML;
target.innerHTML = targetCurrentHtml + optionsHTML;
} else {
console.log(xhr.statusText);
// Show the error on the Web page
tempContainer.innerHTML += '<p class="error">Error getting ' +
target.name + ": "+ xhr.statusText + ",code: "+ xhr.status + "</p>";
}
}
}
xhr.send();
}
loadData('data/us-states.json', 'usstateslist', statesList);
loadData('data/countries.json', 'countrieslist', counriesList);
As shown in Example 2-9, we call the method XMLHttpRequest.overrideMimeType() to ensure that the data will be treated by the browser as JSON even if the server won’t report it as such.
Using Arrays in JSON
JSON supports arrays, and Example 2-10 shows you how the information about a customer can be presented in JSON format. A customer can have more than one phone, which can be stored in an array.
Example 2-10. Accessing an array of phones in JSON data
<script >
var customerJson = '{"fname":"Alex",
"lname":"Smith",
"phones":[
"212-555-1212",
"565-493-0909"
]
}';
var customer=JSON.parse(customerJson);
console.log("Parsed customer data: fname=" + customer.fname +
" lname=" + customer.lname +
" home phone=" + customer.phones[0] +
" cell phone=" + customer.phones[1]);
</script>
This code creates an instance of the JavaScript object referenced by the variable customer. In this example, the phones array holds just two strings. But you can store objects in a JSON array the same way as you would in a JavaScript object literal—just don’t forget to put every property name in quotes:
var customerJson = '{"fname":"Alex",
"lname":"Smith",
"phones":[
{"type":"home", "number":"212-555-1212"},
{"type":"work","number":"565-493-0909"}]
}';
Loading Charity Events by Using Ajax and JSON
The last example in Chapter 1 displays various charity events by using the Google Maps API. But the data about these events is hardcoded in HTML files. After becoming familiar with Ajax and JSON, it should not be too difficult to create a separate file with the information about charities in JSON format and load them by using the XMLHTTPRequest object
The next version of Save The Child displays the charity events via Google Maps by using the information about the events that’s stored in the file campaigndata.json, which is shown in Example 2-11.
Example 2-11. The events information in campaignsdata.json
{
"campaigns": {
"header": "Nationwide Charity Events",
"timestamp":"10/04/2014",
"items": [
{
"title": "Lawyers for Children",
"description":"Lawyers offering free services for the children",
"location":"New York,NY"
},
{
"title": "Mothers of Asthmatics",
"description":"Mothers of Asthmatics - nationwide asthma network",
"location": "Dallas,TX"
},
{
"title": "Friends of Blind Kids",
"description":"Semi-annual charity events for blind kids",
"location":"Miami,FL"
},
{
"title": "A Place Called Home",
"description":"Adoption of the children",
"location":"Miami,FL"
},
{
"title": "Marathon for Survivors",
"description":"Annual marathon for cancer survivors",
"location":"Fargo, ND"
}
]
}
}
Run project-03-maps-json-data and you’ll see the map with the markers for each of the events loaded from the file campaigndata.json (see Figure 2-3). Click a marker to see an overlay with the event details.

Figure 2-3. Markers built from JSON data
Note that this JSON file contains the object campaigns, which includes the array of objects representing charity events. Example 2-12 shows that the XMLHttpRequest object loads the data and the JSON parses it, assigning the campaigns object to the variable campaignsData that is used in showCampaignsInfo() with the Google Maps API (we’ve omitted the mapping part for brevity).
Example 2-12. Displaying campaigns data
function showCampaignsInfo(campaigns) {
campaignsCount = campaigns.items.length;
var message = "<h3>" + campaigns.header + "</h3>" +
"On " + campaigns.timestamp +
" we'll run " + campaignsCount + " campaigns.";
locationUI.innerHTML = message + locationUI.innerHTML;
resizeMapLink.style.visibility = "visible";
createCampaignsMap(campaigns);
}
function loadCampaignsData(dataUrl) {
var xhr = new XMLHttpRequest();
xhr.open('GET', dataUrl);
xhr.onreadystatechange = function() {
if (xhr.readyState == 4) {
if ((xhr.status >= 200 && xhr.status < 300) ||
xhr.status === 304) {
var jsonData = xhr.responseText;
var campaignsData = JSON.parse(jsonData).campaigns;
showCampaignsInfo(campaignsData);
} else {
console.log(xhr.statusText);
tempContainer.innerHTML += '<p class="error">Error getting ' +
target.name + ": "+ xhr.statusText +
",code: "+ xhr.status + "</p>";
}
}
}
xhr.send();
}
var dataUrl = 'data/campaignsdata.json';
loadCampaignsData(dataUrl);
TIP
Some older web browsers may bring up a File Download pop-up window when the content type of the server’s response is set to application/json. Try to use the MIME type text/html, instead, if you run into this issue.
NOTE
For simplicity, in this section we’ve been loading JSON-formatted data from files, but in real-world applications, the JSON data is created on the server dynamically. For example, a browser makes a RESTful call to a Java-based server, which queries a database, generates a JSON-formated result, and then sends it back to the web server.
Using JSON in CMS
Large-scale web applications could be integrated with content management systems (CMSs), which could supply content such as charity events and sales promotions. CMS servers can be introduced into the architecture of a web application to separate the work of preparing the content from the application, delivering it as shown in Figure 2-4, which depicts a web application integrated with the CMS server.
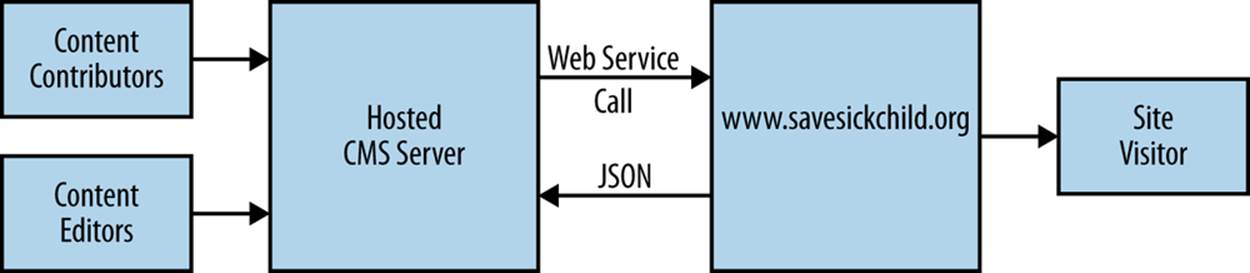
Figure 2-4. CMS in the picture
The content contributors and editors prepare the information on the charities and donation campaigns by using a separate application, not the Save The Child page. The CMS server and the web application server www.savesickchild.org may be located in the same or separate data centers. The server-side code of Save The Child makes a call to a CMS server whenever the site visitor requests information about charity events. If you get to pick a CMS for your future web application, make sure it offers a data feed in JSON format.
Some time ago, one of the authors of this book was helping Mercedes Benz USA develop its consumer-facing web application, with which users could search for, review, and configure their next car. Figure 2-5 shows a snapshot taken from mbusa.com. Three rectangular areas at the bottom were created by web designers to display the deals and promotions of the day. The up-to-date content for these areas (in JSON format) is retrieved from a CMS server when the user visits mbusa.com.

Figure 2-5. Current Mercedes deals from CMS
TIP
There’s a side benefit of learning JSON: it’s used as the data format in NoSQL databases such as MongoDB.
Handling JSON in Java
If a web browser receives a JSON stream from the server, the application needs to turn it into JavaScript objects. If a web client needs to send JavaScript objects to the server, they can be converted into JSON strings. Similar tasks have to be performed on the server side. Our Save The Child application uses a Java application server. Various third-party Java libraries can consume and generate JSON content.
Java Enterprise Edition 7 includes Java API for JSON Processing. Also, Several Java libraries can convert Java objects into their JSON representation and back—for example, Google’s Gson, Jackson, and json-simple.
Google’s Gson is probably the simplest one to use. It provides the methods toJson() and fromJson() to convert Java objects to JSON and back. Gson allows pre-existing un-modifiable objects to be converted to and from JSON and supports Java Generics. Gson works well with complex objects with deep inheritance hierarchies.
Let’s say JavaScript sends to Java the following JSON string:
{"fname": "Alex", "lname":"Smith","skillLevel": 11}
The Java code can turn it into an instance of the Customer object by calling the method Gson.fromJson(). Similarly, Java code can create a JSON string from an object instance. Both of these operations are illustrated here:
public Customer createCustomerFromJson(String jsonString){
Gson myGson = new Gson();
Customer cust = myGson.fromJson(jsonString, Customer.class);
return cust;
}
public String createJsonFromCustomer(Customer cust){
Gson gson = new Gson();
return gson.toJson(cust, Customer.class);
}
Of course, the declaration of the Java class Customer must exist in the classpath, and don’t forget to include gson.jar in your Java project.
The JSON data format is often used in non-JavaScript applications. For example, a Java server can exchange JSON-formatted data with a .NET server.
NOTE
The Java EE 7 specification includes JSR 353, which defines a standardized way for parsing and generating JSON. JSR 353 defines the Java API from JSON Processing (JSON-P) that shouldn’t be confused with another acronym, JSONP or JSON-P, which is JSON with Padding (we’ll discuss it at the end of this chapter).
Compressing JSON
JSON format is more compact than XML and is readable by human beings. But when you are ready to deploy your application in production, you still want to compress the data so fewer bytes will travel over the wire to the user’s browser. Server-side libraries that generate JSON will make the data sent to the client compact by removing the tab and the newline characters.
If you want to turn the pretty-print JSON into a more compact one-line format, just use such websites as JavaScript Compressor or JSON Formatter. For example, after running the 12 KB file countries.json through this compressor, its size was decreased to 9 KB. JSONLint can also compress JSON if you provide this URL: http://jsonlint.com?reformat=compress.
Like most content that is sent to browsers by web servers, JSON data should be compressed. Gzip and Deflate are the two main compression methods used today. Both use the same compression algorithm Deflate, but whereas with Deflate the compressed data is being streamed to the client, Gzip first compresses the entire file, calculates the size, and adds some additional headers to the compressed data. So Gzip might need some extra time and memory, but you are more protected from getting incomplete JSON, JavaScript, or other content. Both Gzip and Deflate are easily configurable by major web servers, but it’s hard to say which one is better for your application. Set up some tests with each of them and decide which one works faster or takes less system resources, but don’t compromise on reliability of the compressed content.
We prefer using Gzip, which stands for GNU zip compression. On the server side, you’d need to configure the Gzip filters on your web server. You need to refer to your web server’s documentation for instructions on the configuration, which is done by the MIME type. For example, you can request to Gzip everything except images (you might want to do this if you’re not sure whether all browsers can properly uncompress certain MIME types).
For example, applying the Gzip filter to the 9 KB countries.json file will reduce its size to 3 KB, which means serious bandwidth savings, especially for web applications with lots of concurrent users. This is even more important for mobile web clients, which might be operating in areas with slower connections. Web clients usually set the HTTP request attribute Accept-Encoding: gzip, inviting the server to return Gzipped content, and the web server may compress the response if it does support it or unzipped content otherwise. If the server supports Gzip, the HTTP response will have the attribute Content-Encoding: gzip, and the browser will know to unzip the response data before use.
Gzip is being used for compressing all types of content: HTML, CSS, JavaScript, and more. If your server sends JSON content to the client by setting the content type to application/json, don’t forget to include this MIME type in your server configuration for Gzip.
Web browsers support Gzipping, too, and your application can set Content-Ecoding: gzip in the HTTP request while sending the data from the web client to the server. But web clients usually don’t send massive amounts of data to the server, so the benefits of the compression on the client side might not be as big.
Adding Charts to Save The Child
Let’s consider yet another use case for JSON in Save The Child. We want to display charts with statistics about donations. By now, our application doesn’t look exactly like the original mockup from Figure 1-2, but it’s pretty close. There is an empty space to the left of the maps, and the charts showing donation statistics can fit right in. Now we need to decide how to draw the charts by using nothing but HTML5 elements. Note that we are not talking about displaying static images by using the <img> element. The goal is to draw the images dynamically in the client’s code. You can accomplish this by using the HTML5 elements <canvas> or <svg>.
The <canvas> element provides a bitmap canvas, where your scripts can draw graphs, game graphics, or other visual images on the fly without using any plug-ins such as Flash Player or Silverlight. To put it simply, <canvas> defines a rectangular area that consists of pixels, where you can draw. Keep in mind that the DOM object can’t peek inside the canvas and access specific pixels. So if you are planning to create an area with dynamically changing graphics, you might want to consider using <svg>.
The <svg> element supports Scalable Vector Graphics (SVG), the XML-based language for describing two-dimensional graphics. Your code has to provide commands to draw the lines, text, images, and so forth.
Adding a Chart with the Canvas Element
Let’s review some code fragments from project-04-canvas-pie-chart-json. The HTML section defines <canvas> as 260 x 240 pixels. If the user’s browser doesn’t support <canvas>, the user won’t see the chart, but will see the text “Your browser does not support HTML5 Canvas” instead. You need to give an ID to your <canvas> element so your JavaScript code can access it:
<div id="charts-container">
<canvas id="canvas" width="260" height="240">
Your browser does not support HTML5 Canvas
</canvas>
<h3>Donation Stats</h3>
<p> Lorem ipsum dolor sit amet, consectetur</p>
</div>
Run project-04-canvas-pie-chart-json, and you’ll see the chart with donation statistics by city, as shown in Figure 2-6. We haven’t styled our <canvas> element, but we could add a background color, border, or other bells and whistles if required.
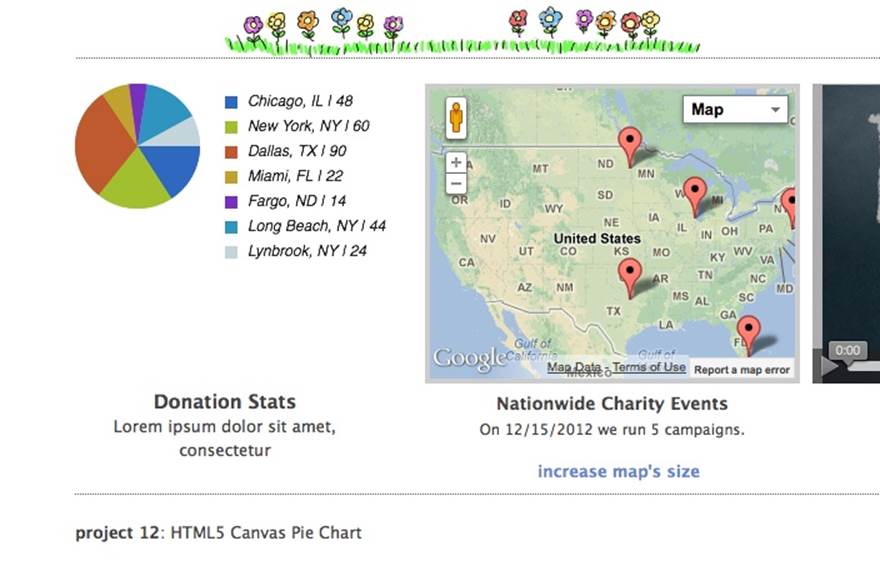
Figure 2-6. Adding a chart
The data to be used for drawing a pie chart in our canvas is stored in the file data/chartdata.json, but in the real world, the server-side code could generate it based on the up-to-the-second donation data and send it to the client. For example, you could do it as explained previously in Handling JSON in Java. Example 2-13 presents the contents of our chartdata.json file.
Example 2-13. The contents of chartdata.json
{
"ChartData": {
"items": [
{
"donors": 48,
"location":"Chicago, IL"
},
{
"donors": 60,
"location": "New York, NY"
},
{
"donors": 90,
"location":"Dallas, TX"
},
{
"donors": 22,
"location":"Miami, FL"
},
{
"donors": 14,
"location":"Fargo, ND"
},
{
"donors": 44,
"location":"Long Beach, NY"
},
{
"donors": 24,
"location":"Lynbrook, NY"
}
]
}
}
Loading chartdata.json is done by using Ajax techniques as explained earlier. Although in our example we’re loading the chart immediately when the Save The Child page loads, the code in Example 2-14 could be invoked only when the user requests to see the chart by clicking a menu item on the page.
Example 2-14. Loading chartdata.json
function getChartData(dataUrl, canvas) {
var xhr = new XMLHttpRequest();
xhr.open('GET', dataUrl, true);
xhr.onreadystatechange = function() {
if (xhr.readyState == 4) {
if ((xhr.status >= 200 && xhr.status < 300) ||
xhr.status === 304) {
var jsonData = xhr.responseText;
var chartData = JSON.parse(jsonData).ChartData; ![]()
drawPieChart(canvas, chartData, 50, 50, 49); ![]()
} else {
console.log(xhr.statusText);
tempContainer.innerHTML += '<p class="error">Error getting '
+ target.name + ": "+ xhr.statusText +
",code: "+ xhr.status + "</p>";
}
}
}
xhr.send();
}
loadData('data/chartdata.json', document.getElementById("canvas"));
![]()
Parse JSON and create the ChartData JavaScript object.
![]()
Pass the data to the drawPieChart() function that will draw the pie in the <canvas> element with the center coordinates x=50 and y=50 pixels. The upper-left corner of the canvas has coordinates (0,0). The radius of the pie will be 49 pixels. The code of the function that draws the pie on the canvas goes next (see Example 2-15).
Example 2-15. Drawing the pie chart in <canvas>
function drawPieChart (canvas, chartData, centerX, centerY, pieRadius) {
var ctx; // The context of canvas
var previousStop = 0; // The end position of the slice
var totalDonors = 0;
var totalCities = chartData.items.length;
// Count total donors
for (var i = 0; i < totalCities; i++) {
totalDonors += chartData.items[i].donors; ![]()
}
ctx = canvas.getContext("2d"); ![]()
ctx.clearRect(0, 0, canvas.width, canvas.heigh);
var colorScheme = ["#2F69BF", "#A2BF2F", "#BF5A2F", ![]()
"#BFA22F", "#772FBF", "#2F94BF", "#c3d4db"];
for (var i = 0; i < totalCities; i++) { ![]()
//draw the sector
ctx.fillStyle = colorScheme[i];
ctx.beginPath();
ctx.moveTo(centerX, centerY);
ctx.arc(centerX, centerY, pieRadius, previousStop, previousStop +
(Math.PI * 2 * (chartData.items[i].donors/totalDonors))
,false);
ctx.lineTo(centerX, centerY);
ctx.fill();
// label's bullet
var labelY = 20 * i + 10;
var labelX = pieRadius*2 + 20;
ctx.rect(labelX, labelY, 10, 10);
ctx.fillStyle = colorScheme[i];
ctx.fill();
// label's text
ctx.font = "italic 12px sans-serif";
ctx.fillStyle = "#222";
var txt = chartData.items[i].location + " | " +
chartData.items[i].donors;
ctx.fillText (txt, labelX + 18, labelY + 8);
previousStop += Math.PI * 2 *
(chartData.items[i].donors/totalDonors);
}
}
![]()
Count the total number of donors.
![]()
Get the 2D context of the <canvas> element. This is the most crucial element to know for drawing on a canvas.
![]()
The color scheme is the set of colors used to paint each slice (sector) of the pie.
![]()
The for loop paints one sector on each iteration. This code draws lines, arcs, and rectangles, and adds text to the canvas. Describing the details of each method of the context object is out of the scope of this book, but you can find the details of the context API in the W3C documentationavailable online.
TIP
To minimize the amount of manual coding, consider using one of the JavaScript libraries that helps with visualization (for example, D3.js).
Adding a Chart by Using SVG
What if we want to make this chart dynamic and reflect the changes in donations every five minutes? If you’re using <canvas>, you’ll need to redraw each and every pixel of our canvas with the pie. With SVG, each element of the drawing would be the DOM element so we would have to redraw only those elements that have changed. If with <canvas> your script draws using pixels, the SVG drawings are done with vectors.
To implement the same donation statistics pie with the <svg> element, you’d need to replace the <canvas> element with the following markup:
<div id="charts-container">
<svg id="svg-container" xmlns="http://www.w3.org/2000/svg">
</svg>
<h3>Donation Stats</h3>
<p>
Lorem ipsum dolor sit amet, consectetur
</p>
</div>
Running project-05-svg-pie-chart-json would show you pretty much the same pie, because it uses the file chartdata.json with the same content, but the pie was produced differently. The code for the new version of drawPieChart() is shown in Example 2-16. We won’t discuss all the details of the drawing with SVG but will highlight a couple of important lines of code that illustrate the difference between drawing on <canvas> versus <svg>.
Example 2-16. Drawing the pie chart in <svg>
function drawPieChart(chartContainer, chartData, centerX, centerY,
pieRadius, chartLegendX, chartLegendY) {
// the XML namespace for svg elements
var namespace = "http://www.w3.org/2000/svg";
var colorScheme = ["#2F69BF", "#A2BF2F", "#BF5A2F", "#BFA22F",
"#772FBF", "#2F94BF", "#c3d4db"];
var totalCities = chartData.items.length;
var totalDonors = 0;
// Count total donors
for (var i = 0; i < totalCities; i++) {
totalDonors += chartData.items[i].donors;
}
// Draw pie sectors
startAngle = 0;
for (var i = 0; i < totalCities; i++) {
// End of the sector = starting angle + sector size
var endAngle = startAngle + chartData.items[i].donors
/ totalDonors * Math.PI * 2;
var x1 = centerX + pieRadius * Math.sin(startAngle);
var y1 = centerY - pieRadius * Math.cos(startAngle);
var x2 = centerX + pieRadius * Math.sin(endAngle);
var y2 = centerY - pieRadius * Math.cos(endAngle);
// This is a flag for angles larger than than a half circle
// It is required by the SVG arc drawing component
var big = 0;
if (endAngle - startAngle > Math.PI) {
big = 1;
}
//Create the <svg:path> element
var path = document.createElementNS(namespace, "path"); ![]()
// Start at circle center
var pathDetails = "M " + centerX + "," + centerY + ![]()
// Draw line to (x1,y1)
" L " + x1 + "," + y1 +
// Draw an arc of radius
" A " + pieRadius + "," + pieRadius +
// Arc's details
" 0 " + big + " 1 " +
// Arc goes to (x2,y2)
x2 + "," + y2 +
" Z";
// Close the path at (centerX, centerY)
// Attributes for the <svg:path> element
path.setAttribute("d", pathDetails);
// Sector fill color
path.setAttribute("fill", colorScheme[i]);
chartContainer.appendChild(path); ![]()
// The next sector begins where this one ends
startAngle = endAngle;
// label's bullet
var labelBullet = document.createElementNS(namespace, "rect");
// Bullet's position
labelBullet.setAttribute("x", chartLegendX);
labelBullet.setAttribute("y", chartLegendY + 20 * i);
// Bullet's size
labelBullet.setAttribute("width", 10);
labelBullet.setAttribute("height", 10);
labelBullet.setAttribute("fill", colorScheme[i]);
chartContainer.appendChild(labelBullet); ![]()
// Add the label text
var labelText = document.createElementNS(namespace, "text");
// label position = bullet's width(10px) + padding(8px)
labelText.setAttribute("x", chartLegendX + 18);
labelText.setAttribute("y", chartLegendY + 20 * i + 10);
var txt = document.createTextNode(chartData.items[i].location +
" | "+chartData.items[i].donors);
labelText.appendChild(txt);
chartContainer.appendChild(labelText); ![]()
}
}
![]()
Create the <svg:path> HTML element, which is the most important SVG element for drawing basic shapes. It includes a series of commands that produce the required drawing. For example, M 10 10 means move to the coordinate 10,10 and L 20 30 means draw the line to the coordinate 20,30.
![]()
Fill the details of the <svg:path> element to draw the pie sector. Run project-05-svg-pie-chart-json to see the Save The Child page, and then right-click the pie chart and select Inspect Element (this is the name of the menu item in Firefox). Figure 2-7 shows the resulting content of our<svg> element. As you can see, it’s not pixel based but a set of XML-like commands that drew the content of the chart. If you run the previous version of our application (project-04-canvas-pie-chart-json) and right-click the chart, you will be able to save it as an image, but won’t see the internals of the <canvas> element.
![]()
Add the internal elements of the chart container to the DOM: path, bullets, and text. These elements can be modified if needed without redrawing the entire content of the container.
TIP
In our code example, we have written the path commands manually to process the data dynamically. But web designers often use tools (Adobe Illustrator or Inkscape) to draw and then export images into SVG format. In this case all paths will be encoded as <svg:path> automatically.
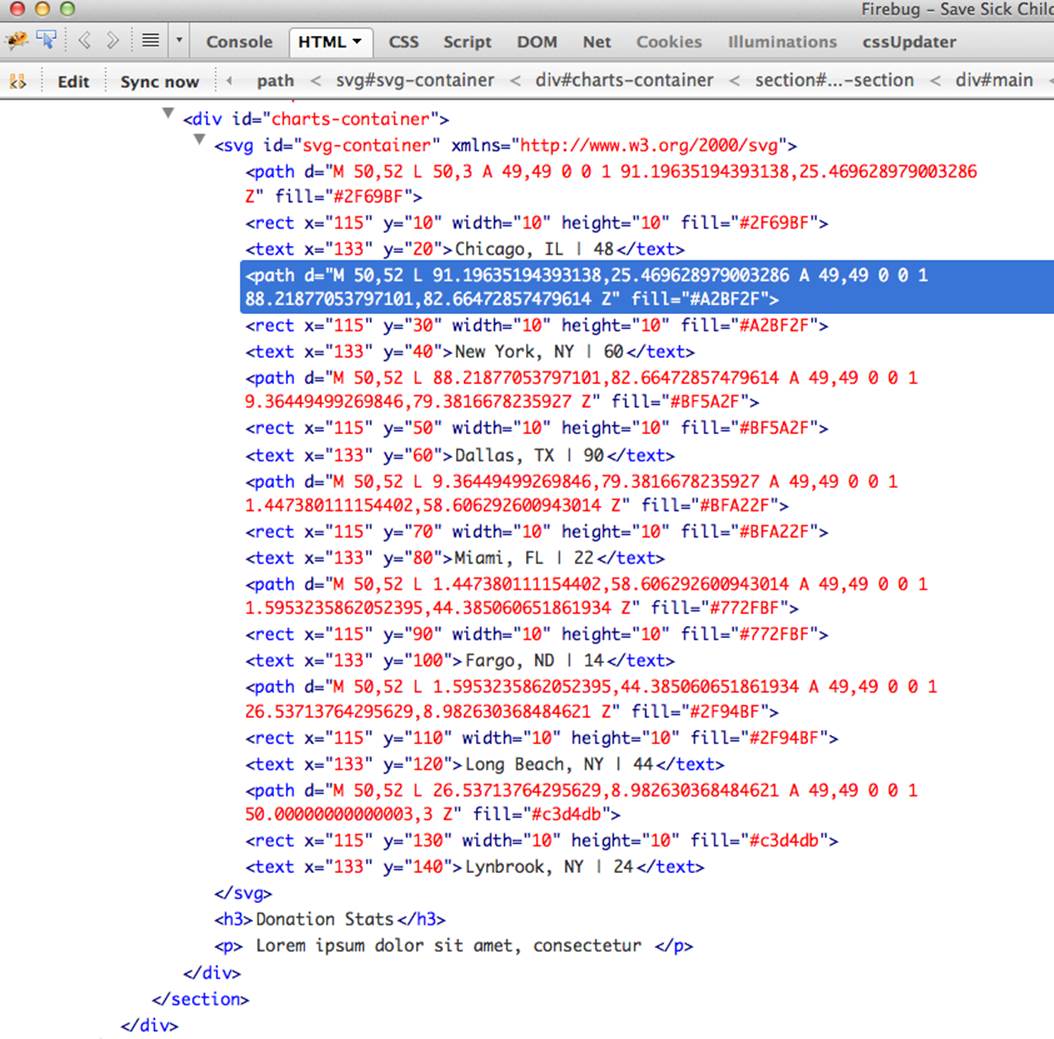
Figure 2-7. The chart content in SVG
Because the SVG is XML-based, it’s easy to generate the code shown in Figure 4-7 on the server, and lots of web applications send ready-to-display SVG graphics to the users’ web browsers. But in our example, we are generating the SVG output in the JavaScript from JSON received from the server, which provides a cleaner separation between the client and the server-side code. The final decision on what to send to the web browser (ready-to-render SVG or raw JSON) has to be made after considering various factors such as available bandwidth, and the size of data, the number of users, and the existing load on server resources.
TIP
SVG supports animations and transformation effects, whereas canvas doesn’t.
Loading Data from Other Servers by Using JSONP
Imagine that a web page was loaded from the domain abc.com, and it needs JSON-formatted data from another domain (xyz.com). As mentioned earlier, Ajax has cross-origin restrictions, which prevent this. JSONP is a technique used to relax the cross-origin restrictions. With JSONP, instead of sending plain JSON data, the server wraps it up into a JavaScript function and then sends it to the web browser for execution as a callback. The web page that was originated from abc.com might send the request http://xyz.com?callback=myDataHandler, technically requesting the serverxyz.com to invoke the JavaScript callback named myDataHandler. This URL is a regular HTTP GET request, which may have other parameters so that you can send some data to the server, too.
The server then sends to the browser the JavaScript function that might look as follows:
function myDataHandler({"fname": "Alex", "lname":"Smith","skillLevel": 11});
The web browser invokes the callback myDataHandler(), which must exist in the web page. The web browser passes the received JSON object as an argument to this callback:
function myDataHandler(data){
// process the content of the argument data - the JSON object
// received from xyz.com
}
If all you need is to retrieve data from a different domain on the page, just add the following tag to your HTML page:
<script src="http://xyz.com?callback=myDataHandler">
But what if you need to dynamically make such requests periodically (for example, get all tweets with a hashtag #savesickchild by sending an HTTP GET using the Twitter API at http://search.twitter.com/search.json?q=savesickchild&rpp=5&include_entities=true&with_twitter_user_id=true&result_type=mixed)? You add a change handler to the option that is called and passes or grabs the value needed.
You can dynamically add a <script> tag to the DOM object from your JavaScript code. Whenever the browser sees the new <script> element, it executes it. The script injection can be done like this:
var myScriptTag = document.createElement("script");
myScriptTag.src = "http://xyz.com?callback=myDataHandler";
document.getElementsByTagName("body").appendChild(myScriptTag);
Your JavaScript can build the URL for the myScriptTag.src dynamically and pass parameters to the server based on a user’s actions.
Of course, this technique presents a danger if there is a chance that the JavaScript code sent by xyz.com is intercepted and replaced by a malicious code (similarly to the JavaScript eval() danger). But it’s not more dangerous than receiving any JavaScript from a nontrusted server. Besides, your handler function could always make sure that the received data is a valid object with expected properties, and only after that handle the data.
If you decide to use JSONP, don’t forget about error handling. Most likely you’ll use one of the JavaScript frameworks, which usually offer a standard mechanism for JSONP error handling, dealing with poorly formatted JSON responses, and recovery in cases of network failure. One such library is called jQuery-JSONP.
Beer and JSONP
In this section, you’ll see a small code example illustrating the data retrieval from the publicly available Open Beer DataBase, which exists to help software developers test code that makes RESTful web service calls and works with JSON and JSONP data. Our Save The Child page won’t display beer bottles, but we want to show that in addition to the retrieval of the donations and charts data from one domain, we can get the data from a third-party domain openbeerdatabase.com.
First, enter the URL http://api.openbeerdatabase.com/v1/breweries.json in the address bar of your web browser; it will return the following JSON data (only two out of seven breweries are shown for brevity):
{
"page": 1,
"pages": 1,
"total": 7,
"breweries": [
{
"id": 1,
"name": "(512) Brewing Company",
"url": "http://512brewing.com",
"created_at": "2010-12-07T02:53:38Z",
"updated_at": "2010-12-07T02:53:38Z"
},
{
"id": 2,
"name": "21st Amendment Brewing",
"url": "http://21st-amendment.com",
"created_at": "2010-12-07T02:53:38Z",
"updated_at": "2010-12-07T02:53:38Z"
}
]
}
Now let’s request the same data, but in a JSONP format, by adding to the URL a parameter with a callback name myDataHandler. Entering http://api.openbeerdatabase.com/v1/breweries.json?callback=processBeer in the browser returns the following (it’s a short version):
processBeer({"page":1,"pages":1,"total":7,"breweries":[{"id":1,"name":"(512)
Brewing Company","url":"http://512brewing.com","created_at":
"2010-12-07T02:53:38Z", "updated_at":"2010-12-07T02:53:38Z"},
{"id":2,"name":"21st Amendment Brewing","url":"http://21st-amendment.com",
"created_at":"2010-12-07T02:53:38Z","updated_at":"2010-12-07T02:53:38Z"}]})
Because we haven’t declared the function processBeer() yet, it won’t be invoked. Let’s fix that now. The function first checks whether the received data contains information about the breweries. If it does, the name of the first brewery prints on the JavaScript console. Otherwise, the console output will read, “Retrieved data has no breweries info.”
var processBeer=function (data){
// Uncomment the next line to emulate malicious data
// data="function evilFunction(){alert(' Bad function');}";
if (data.breweries == undefined){
console.log("Retrieved data has no breweries info.");
} else{
console.log("In the processBeer callback. The first brewery is "
+ data.breweries[0].name);
}
}
var myScriptTag = document.createElement("script");
myScriptTag.src =
"http://api.openbeerdatabase.com/v1/breweries.json?callback=processBeer";
var bd = document.getElementsByTagName('body')[0];
bd.appendChild(myScriptTag);
Figure 2-8 is a screen snapshot taken in Firebug when it reached the breakpoint placed inside the processBeer callback on the console.log(in the processBeer callback"). You can see the content of the data argument: the beer has arrived.
As a training exercise, try to replace the data retrieval from the beer web service with the data feed from Twitter based on certain hash tags. See if you can find a place in the Save The Child web page to display (and periodically update) this Twitter stream.
TIP
json-generator.com is a handy website that can generate a file with JSON or JSONP content based on your template. You can use this service to test Ajax queries—the generated JSON can be saved on this server to help test your web application.
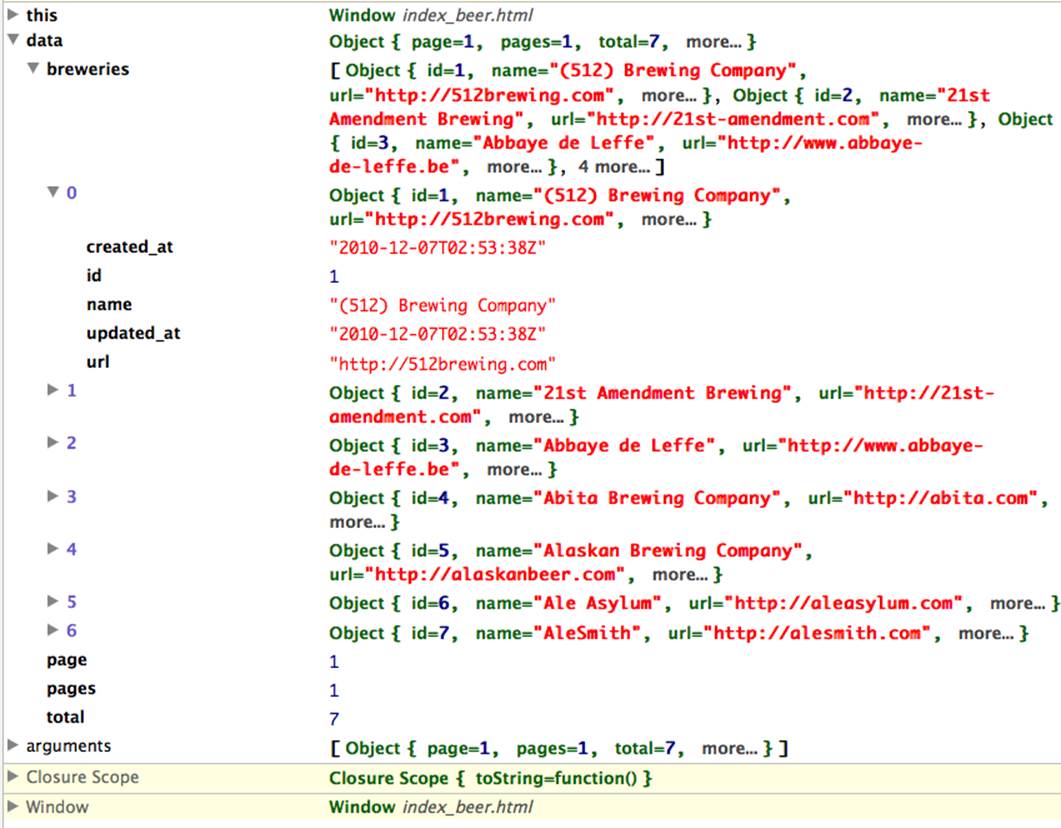
Figure 2-8. The beer has arrived
Summary
In this chapter, you learned about using Ajax as a means of providing communication between your web browser and servers. Ajax also deserves credit for making the JavaScript language popular again by showing a practical way of creating single-page web applications. Over the years, JSON became the standard way of exchanging data on the Web. The current version of the Save The Child application cleanly separates the code from the data, and you know how to update the content of the web page without needing to re-retrieve the entire page from the server. In the next chapter, you’ll learn a more productive way of developing web applications by using a library called jQuery.
All materials on the site are licensed Creative Commons Attribution-Sharealike 3.0 Unported CC BY-SA 3.0 & GNU Free Documentation License (GFDL)
If you are the copyright holder of any material contained on our site and intend to remove it, please contact our site administrator for approval.
© 2016-2026 All site design rights belong to S.Y.A.