Enterprise Web Development (2014)
Part II. Enterprise Considerations
Chapter 6. Modularizing Large-Scale JavaScript Projects
Reducing an application’s startup latency and implementing lazy loading of certain parts of an application are the main reasons for modularization.
A good illustration of why you might want to consider modularization is the well-designed web application of Mercedes Benz USA. This web application serves people who live in the United States and either own or are considering purchasing cars from this European car manufacturer.
One of the purchasing options is called European Delivery. An American resident who chooses this particular package can combine a vacation with her car purchase. She flies to the Mercedes Benz factory in Europe, picks up her car, and has a two-week vacation, driving her new vehicle throughout Europe. After the vacation is over, the car is shipped to her hometown in the US.
Needless to say, this program adds several thousand dollars to the price of the car. Of course, Mercedes Benz wants to ensure that visitors to its site view accurate vehicle prices. So, from an application design point of view, we don’t want or need to include the code that supports the European Delivery to each and every user who decides to visit mbusa.com. If the user visits the menu Owners and clicks the European Delivery link, then and only then the required code and resources are pushed to the user’s computer or mobile device.
The snapshot in Figure 6-1 was taken after clicking this link with the Chrome Developer Tools panel open.
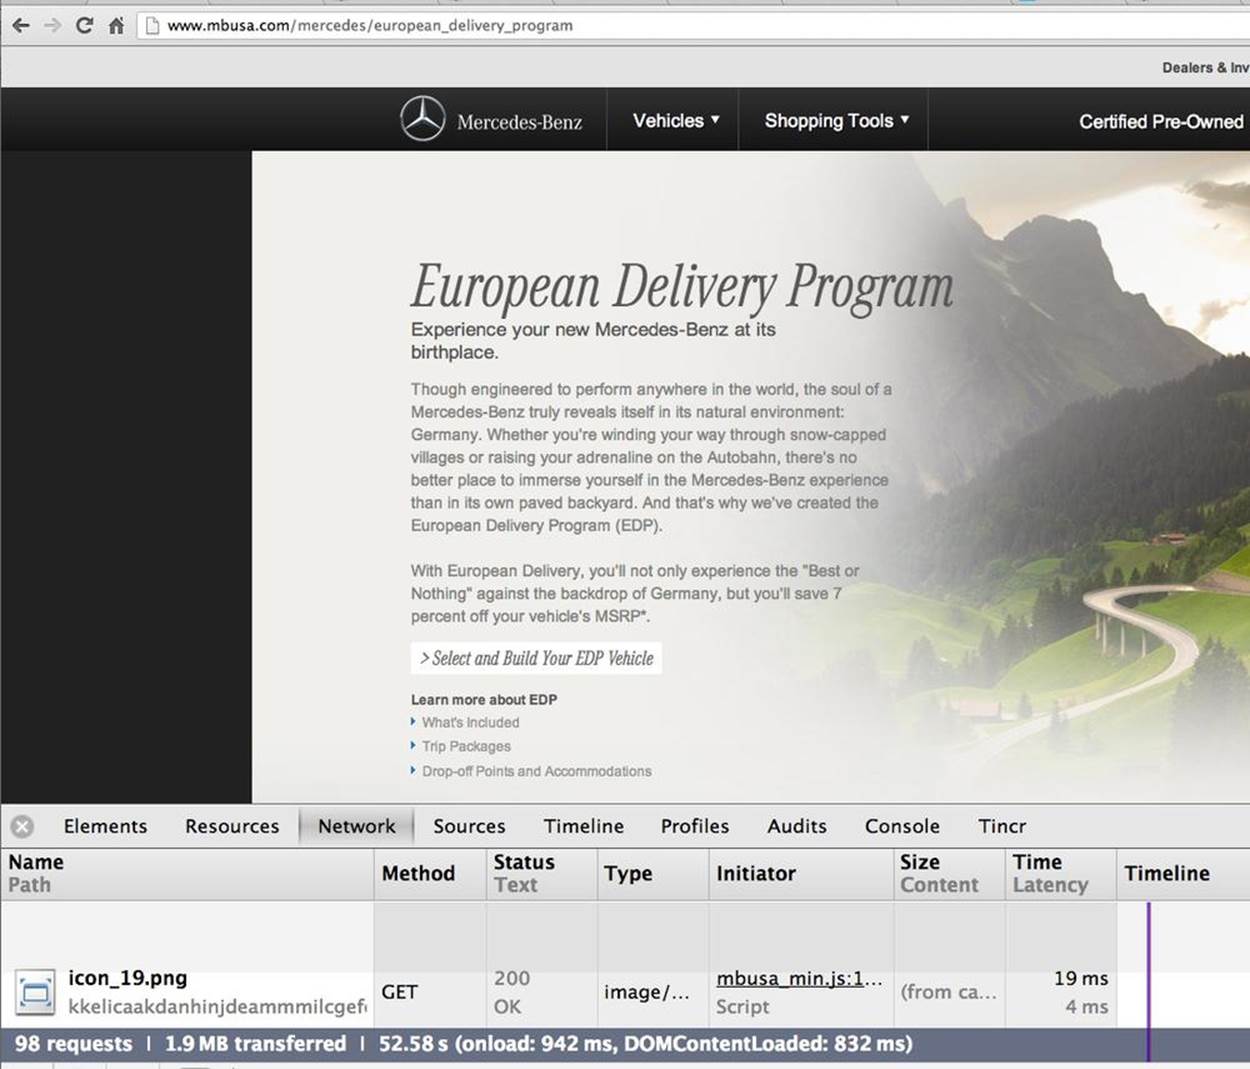
Figure 6-1. MB USA: European Delivery
In addition, as you can see, 1.9 MB worth of code and other resources have been downloaded as a result of this click. Were the application architects of MB USA to decide to bring this code to the user’s device on the initial load of http://mbusa.com, the wait time would increase by another second or more. This additional latency is unnecessary because only a tiny number of American drivers would be interested in exploring the European Delivery option. This example illustrates a use case for which modularization and lazy loading is needed.
Our Save The Child application is not as big as the one by Mercedes Benz. But we’ll use it to give you an example of how to build modularized web applications that won’t bring large blocks of monolithic code to the client’s machine, but will load the code on an as-needed basis. We’ll also give an example of how to organize the data exchange between different programming modules in a loosely coupled fashion.
Users consider a web application fast for one of two reasons: either it’s actually fast or it gives an impression of being fast. Ideally, you should do your best to create a web application that’s very responsive.
TIP
No matter how slow your web application is, it should never feel like it’s being frozen.
This chapter covers modularization techniques that will enable quick rendering of the first page of your web application by the user’s browser while loading the rest of the application in the background or on demand. We will continue refactoring the Save The Child application to illustrate using modules.
In this chapter, we’re going to discuss the following frameworks for modularization of JavaScript projects:
§ Browserify
§ RequireJS and RequireJS Optimizer (r.js)
§ ECMASctipt 6 (ES6) Module Transpiler
Understanding Modularization Basics
Modules are code fragments that implement certain functionality and are written by using specific techniques. There is no out-of-the box modularization scheme in the JavaScript language. The upcoming ECMAScript 6 specification tends to resolve this by introducing the module concept in the JavaScript language itself. This is the future.
You might ask, “Aren’t .js files modules already?” Of course, you can include and load each JavaScript file by using the <script> tag. But this approach is error prone and slow. Developers have to manually manage dependencies and file-loading order. Each <script> tag results in an additional HTTP call to the server. Moreover, the browser blocks rendering until it loads and executes JavaScript files.
As the application becomes larger, the number of script files grows accordingly, which is illustrated in Example 6-1.
Example 6-1. Multiple <script> tags complicate controlling application dependencies
<!DOCTYPE html>
<html lang="en">
<head>
<meta charset="utf-8">
<title>Save The Child | Home Page</title>
<link rel="stylesheet" href="assets/css/styles.css">
</head>
<body>
<!-- page body -->
<!-- body content is omitted -->
<script src="components/jquery.js></script> ![]()
<script type="text/javascript" src="app/modules/utils/load-html-content.js">
</script>
<script type="text/javascript" src="app/modules/utils/show-hide-div.js"></script>
<script type="text/javascript" src="app/modules/svg-pie-chart.js"></script>
<script type="text/javascript" src="app/modules/donation.js"></script>
<script type="text/javascript" src="app/modules/login.js"></script>
<script type="text/javascript" src="app/modules/utils/new-content-loader.js">
</script>
<script type="text/javascript" src="app/modules/generic-module.js"></script>
<script type="text/javascript" src="app/modules/module1.js"></script> ![]()
<script type="text/javascript" src="app/modules/module2.js"></script>
<script type="text/javascript" src="app/config.js"></script>
<script type="text/javascript" src="app/main.js"></script> ![]()
</body> ![]()
</html>
![]()
Load the jQuery script first because all other modules depend on it.
![]()
Other application components may also have internal dependencies on other scripts. Those scripts need to be loaded before the respective components. Having the proper order of these script tags is very important.
![]()
The script for the main web page should be loaded after all dependencies have finished loading.
![]()
We’re putting script elements at the end of the document, as it blocks as little content as possible.
As you can see, we need a better way to modularize applications than simply adding <script> tags. As our first step, we can use the Module design pattern and use the so-called immediately invoked function expressions.
Next, we’ll introduce and compare two popular JavaScript solutions and modularization patterns, CommonJS and Asynchronous Module Definition (AMD), which are alternative approaches to modularization. Both CommonJS and AMD are specifications defining sets of APIs.
You’ll learn the pros and cons of both formats later in the chapter, but the AMD format plays nicely with the asynchronous nature of the Web. You’ll see the use of the AMD format and RequireJS framework to implement the modularized version of the Save The Child application.
Also, you’ll see how to use the RequireJS APIs to implement on-demand (lazy) loading of the application components (for example, What We Do, Ways To Give, and so forth).
The upcoming ECMAScript 6 specification suggests how to handle modules, and how to start using ES6 module syntax today with the help of third-party tools such as transpiler. The ES6 module syntax can be compiled down to existing module solutions like CommonJS or AMD. You can find more details about CommonJS, AMD, and the ES6 module format in the corresponding sections of this chapter.
After application modules are asynchronously loaded, they need to communicate with one another. You can explicitly specify the component dependencies, which is fine as long as you have a handful of components. A more generic approach is to handle inter-module communications in a loosely coupled fashion by using the Mediator pattern, CommonJS, or AMD formats. By loosely coupled, we mean that components are not aware of one another’s existence.
The next section reviews various approaches and patterns of modular JavaScript applications.
Exploring Roads to Modularization
Although JavaScript has no built-in language support of modules, the developers’ community has managed to find a way for modularization by using existing syntax constructs, libraries, and conventions to emulate module-like behavior. In this section, we’ll explore the following options for modularizing your application:
§ The Module pattern
§ CommonJS
§ Asynchronous Module Definition (AMD)
Of these three, the Module pattern doesn’t require any additional frameworks and works in any JavaScript environment. The CommonJS module format is widely adopted for server-side JavaScript, whereas the AMD format is popular in applications running in web browsers.
The Module Pattern
In software engineering, the Module pattern was originally defined as a way to implement encapsulation of reusable code. In JavaScript, the Module pattern is used to emulate the concept of classes. We’re able to include both public and private methods as well as variables inside a single object, thus hiding the encapsulated code from other global scope objects. Such encapsulation lowers the likelihood of conflicting function names defined in different scripts that could be used in the same application’s scope.
Ultimately, it’s just some code in an immediately invoked function expression (IIFE) that creates a module object in the internal scope of a function and exposes this module to the global scope by using the JavaScript language syntax. Consider the following three code samples illustrating how the Module pattern could be implemented using IIFEs (see Examples 6-2, 6-3, and 6-4).
Example 6-2. Creating a closure that hides implementation of the login module
var loginModule = (function() { ![]()
"use strict";
var module = {};
var privateVariable = 42;
var privateLogin = function(userNameValue, userPasswordValue) { ![]()
if (userNameValue === "admin" && userPasswordValue === "secret") {
return privateVariable;
}
};
module.myConstant = 1984;
module.login = function(userNameValue, userPasswordValue) {
privateLogin(userNameValue, userPasswordValue);
console.log("login implementation omitted");
};
module.logout = function() {
console.log("logout implementation omitted");
};
return module;
})();
![]()
Assign the module object that was created in the closure to the variable loginModule.
![]()
Because of the JavaScript’s function scoping, other parts of the code can’t access the code inside the closure. With this approach, you can implement encapsulation and private members.
Example 6-3. Injecting the module into the global object
(function(global) { ![]()
"use strict";
var module = {};
var privateVariable = 42;
var privateLogin = function(userNameValue, userPasswordValue) {
if (userNameValue === "admin" && userPasswordValue === "secret") {
return privateVariable;
}
};
module.myConstant = 1984;
module.login = function(userNameValue, userPasswordValue) {
privateLogin(userNameValue, userPasswordValue);
console.log("rest of login implementation is omitted");
};
module.logout = function() {
console.log("logout implementation omitted");
};
global.loginModule = module;
})(this); ![]()
![]()
Instead of exporting the module to a variable as in the previous example, we’re passing the global object as a parameter inside the closure.
![]()
Attach the newly created object to the global object. After that, the loginModule object can be accessed from the external application code as window.loginModule or just loginModule.
Example 6-4. Introducing namespaces in the global object
(function(global) {
"use strict";
var ssc = global.ssc; ![]()
if (!ssc) {
ssc = {};
global.ssc = ssc;
}
var module = ssc.loginModule = {}; ![]()
module.myConstant = 1984;
module.login = function(userNameValue, userPasswordValue) {
console.log("login implementation for " + userNameValue + "and" +
userPasswordValue + "omitted");
};
module.logout = function() {
console.log("logout implementation omitted");
};
})(this);
![]()
Here we have modification of the approach described in the previous snippet. To avoid name conflicts, create a namespace for our application called ssc. Note that we check for this object existence in the next line.
![]()
Now we can logically structure application code using namespaces. The global ssc object will contain only the code related to the Save The Child application.
The Module pattern works well for implementing encapsulation in rather small applications. It’s easy to implement and is framework-agnostic. However, this approach doesn’t scale well because, when working with an application with the large number of modules, you might find yourself adding lots of boilerplate code, checking objects’ existence in the global scope for each new module. Also, you need to be careful with managing namespaces: because you are the one who put an object into the global scope, you need to think about how to avoid accidental names conflicts.
The Module pattern has a serious drawback: you still need to deal with manual dependency management and manually arrange <script> tags in the HTML document.
CommonJS
CommonJS is an effort to standardize JavaScript APIs. People who work on CommonJS APIs have attempted to develop standards for various JavaScript APIs (similar to standard libraries in Java, Python, and so forth), including standards for modules and packages. The CommonJS module proposal specifies a simple API for declaring modules, but mainly on the server side. The CommonJS module format has been optimized for nonbrowser environments since the early days of server-side JavaScript.
On the web-browser side, you always need to consider potentially slow HTTP communications, which is not the case on the server. One solution suitable for browsers is to concatenate all scripts into a handful of bundles to decrease the number of HTTP calls, which is not a concern for server-side JavaScript engines because file access is nearly instantaneous. On the server side, separation of the code allows us to dedicate each file to exactly one module for ease of development, testing, and maintainability.
In brief, the CommonJS specification requires the environment to have three free variables: require, exports, and module (see Example 6-5). The syntax to define the module is called authoring format. To make the module loadable by a web browser, it has to be transformed intotransport format.
Example 6-5. A CommonJS sample module
"use strict";
var loginModule = {};
var privateVariable = 42;
var ldapLogin = require("login/ldap"); ![]()
var otherImportantDep = require("modules/util/strings"); ![]()
var privateLogin = function(userNameValue, userPasswordValue) {
if (userNameValue === "admin" && userPasswordValue === "secret") {
ldapLogin.login(userNameValue, userPasswordValue);
return privateVariable;
}
};
loginModule.myConstant = 1984;
loginModule.login = function(userNameValue, userPasswordValue) {
privateLogin(userNameValue, userPasswordValue);
console.log("login implementation omitted");
};
loginModule.logout = function() {
console.log("logout implementation omitted");
};
exports.login = loginModule; ![]()
// or
module.exports = loginModule; ![]()
loginModule.printMetadata = function(){
console.log(module.id); ![]()
console.log(module.uri);
};
![]()
![]()
If a module requires other modules, declare references to those modules inside the current module’s scope by using the require function. You need to call require(id) for each module it depends on. The module ID has slashes defining the file path or a URL to indicate namespaces for external modules. Modules are grouped into packages.
![]()
The exports object exposes the public API of a module. All objects, functions, and constructors that your module exposes must be declared as properties of the exports object. The rest of the module’s code won’t be exposed.
![]()
![]()
The module variable provides the metadata about the module. It holds such properties as id and a unique uri for each module. The module.export exposes the exports object as its property. Because objects in JavaScript are passed as references, the exports and module.exportpoint at the same object.
WARNING
The preceding snippet might give you the impression that the module’s code is executed in the global scope, but it’s not. Each module is executed in its own scope, which helps to isolate them. This works automatically when you write modules for a NodeJS environment running on the server. But to use the CommonJS module format in the web browser, you need to use an extra tool to generate transport format from authoring format. Browserify takes all your scripts and concatenates them into one large file. Besides the module’s code, the generated transport bundle will contain the boilerplate code that provides CommonJS modules runtime support in the browser environment. This build step complicates the development workflow. Usually, developers perform the code/save/refresh browser routine, but it doesn’t work in this case and requires extra steps as you need to install the additional build tool and write build scripts.
The following are pros of using CommonJS:
§ It’s a simple API for writing and using modules.
§ Such a pattern of organizing modules is widespread in server-side JavaScript, for example, NodeJS.
Cons to using CommonJS:
§ Web browsers don’t automatically create the scoped variables require, exports, and module, so the additional build step is required.
§ The require method is synchronous, but there is no exact indication if a dependent module’s values are fully loaded because of the asynchronous nature of web browsers. There is no event to notify the application that 100 percent of the required resources are loaded.
§ The CommonJS API is suitable for loading .js files, but it can’t load other assets such as CSS and HTML.
NOTE
If you want to write modules in a format that can be used in both browser and server environments, read our suggestions in Universal Module Definition.
NOTE
You can find additional materials on CommonJS by following these links:
§ CommonJS Modules 1.1 specification
§ Node.js Modules Reference
§ Browserify
Asynchronous Module Definition
The AMD format itself is a proposal for defining modules, whereby both the module and dependencies can be asynchronously loaded. The AMD API is based on this specification.
AMD began as a draft specification for module format in CommonJS, but because full agreement about its content was not reached, further work on the module’s format moved to the amdjs GitHub page.
The AMD API has the following main functions:
§ define for defining the module
§ require for loading the module and its dependencies
The define function takes three arguments, as shown in Example 6-6:
§ The optional module ID
§ An optional array of IDs of the dependencies
§ A callback function (a.k.a., factory function), which will be invoked when dependencies are loaded
Example 6-6. The signature of the define function
define(
module_id, ![]()
[dependencies], ![]()
function {}
);
![]()
This string literal defines module_id, which will be used by the AMD loader to load this module.
![]()
An optional array of the dependencies’ IDs.
The preceding factory function{} will be executed only once.
For example, the Save The Child application has a Way To Give menu, which in turn depends on another module called otherContent. If the user clicks this menu, we can load the module that can be defined in the wayToGive.js file, as shown in Example 6-7.
Example 6-7. The definition of the wayToGive module
define(["otherContent"], function(otherContent) { ![]()
var wayToGive;
console.log("otherContent module is loaded");
wayToGive = function() {
return {
render: function() {
var dataUrl, newContainerID, whatWeDoButton;
whatWeDoButton = "way-to-give";
newContainerID = "way-to-give-container";
dataUrl = "assets/html-includes/way-to-give.html";
otherContent.getNewContent(whatWeDoButton, newContainerID,
dataUrl); ![]()
return console.log("way-to-give module is rendered");
},
init: function() {
return console.log("way-to-give init");
}
};
};
return wayToGive; ![]()
});
![]()
This code doesn’t have the optional module_id. The loader will use the filename without the .js extension as module_id. Our module has one dependency, called otherContent. The dependent module instance will be passed in the factory method as the variable otherContent.
![]()
We can start using the dependency object immediately. The AMD loader has taken care of loading and instantiation of this dependency.
![]()
The module returns a constructor function to be used for creation of new objects.
The require function takes two arguments:
§ An array of module IDs to load. The module ID is a string literal.
§ A callback to be executed after those modules are available. The modules loaded by IDs are passed into the callback in order. Example 6-8 shows the require function usage.
Example 6-8. An example of require function usage
require(["main"], function() {
console.log("module main is loaded");
});
The following are pros of using AMD:
§ It’s a simple API that has only two functions: require and define.
§ A wide variety of loaders is available. You’ll find more coverage on loaders in Dicing the Save The Child Application into Modules.
§ The CommonJS module authoring format is supported by the majority of loaders. You’ll see an example of modules later in Example 6-23.
§ Plug-ins offer an immense amount of flexibility.
§ AMD is easy to debug.
Consider the following error messages that the JavaScript interpreter may throw:
There was an error in /modules/loginModule.js on line 42
versus
There was an error in /built-app.js on line 1984
In modularized applications, you can more easily localize errors.
§ Performance: Modules are loaded only when required; hence, the initial portion of the application’s code become smaller.
The following are cons of using AMD:
§ The dependency array can get rather large for complex modules:
§ define(
§ ["alpha", "beta", "gamma", "delta", "epsilon", "omega"],
§ function(alpha, beta, gamma, delta, epsilon, omega){
§ "use strict";
§ // module's code omitted
});
In real-world enterprise applications, the array of dependency modules might be pretty large.
§ Human errors can result in a mismatch between the dependency array and callback arguments:
§ define(
§ ["alpha", "beta", "gamma", "delta", "epsilon", "omega"],
§ function(alpha, beta, gamma, delta, omega, epsilon){
§ "use strict";
§ // module's code omitted
});
The mismatch of module IDs and factory function arguments will cause module usage problems.
Universal Module Definition
Universal Module Definition (UMD) is a series of patterns and code snippets that provide compatibility boilerplate to make modules environment-independent. These patterns can be used to support multiple module formats. UMD is not a specification or a standard. You need to pay attention to UMD patterns if your modules will run in more than one type of environment (for example, in a web browser and on the server-side engine running NodeJS). In most cases, it makes a lot of sense to use a single module format.
Example 6-9 shows a module definition in UMD notation. In this example, the module can be used with the AMD loader and as one of the variations of the Module pattern.
Example 6-9. The module in UMD notation
(function(root, factory) {
"use strict";
if (typeof define === "function" && define.amd) { ![]()
define(["login"], factory);
} else {
root.ssc = factory(root.login); ![]()
}
}(this, function(login) { ![]()
"use strict";
return {
myConstant: 1984,
login: function(userNameValue, userPasswordValue) {
console.log("login for " + userNameValue + " and " + userPasswordValue);
},
logout: function() {
console.log("logout implementation omitted");
}
};
}));
![]()
If the AMD loader is available, proceed with defining the module according to the AMD specification.
![]()
If the AMD loader isn’t present, use the factory method to instantiate the object and attach it to the window object.
![]()
Passing in the top-level context and providing an implementation of a factory function.
You can find more information about UMD and commented code snippets for different situations in the UMD project repository.
ECMAScript 6 Modules
The ECMAScript 6 (ES6) specification is an evolving draft outlining changes and features for the next version of the JavaScript language. This specification is not finalized yet, so browser support for anything defined in ES6 will be experimental at best. You cannot rely on ES6 for web applications that must be deployed in production mode in multiple browsers.
One of the most important features of the ES6 specification is module syntax. Example 6-10 provides a login module definition.
Example 6-10. Login module definition
exportfunction login(userNameValue, userPasswordValue) {
return userNameValue + "_" + userNameValue;
}
The keyword export specifies the function or object (a separate file) to be exposed as a module, which can be used from any other JavaScript code, as shown in Example 6-11.
Example 6-11. Main application module
import {login} from './login'
var result = login("admin", "password");
With the import keyword, we assign an instance of the login() function imported from the login module.
ES6 Module Transpiler
Although the ES6 standard is not implemented yet by most browsers, you can use third-party tools to get a taste of upcoming enhancements in the JavaScript language. The ES6 Module Transpiler library developed by Square engineers helps use the module authoring syntax from ES6 and compile it down to the transport formats that you learned earlier in this chapter.
Consider the module circle.js, shown in Example 6-12.
Example 6-12. A circle.js module
function area(radius) {
return Math.PI * radius * radius;
}
function circumference(radius) {
return 2 * Math.PI * radius;
}
export {area, circumference};
This module exports two functions: area() and circumference(), as shown in Example 6-13.
Example 6-13. The main application’s script main.js can use these functions
import { area, circumference } from './circle'; ![]()
console.log("Area of the circle: " + area(2) + " meter squared"); ![]()
console.log("Circumference of the circle: " + circumference(5) + " meters");
![]()
The import keyword specifies the objects we want to use from the module.
![]()
A sample use of the imported functions
The ES6 Module Transpiler’s command compile-module can compile the module to be compliant with CommonJS, AMD, or the code that implements the Module pattern. With the type command-line option, you can specify that the output format will be amd, cjs, or globals:
compile-modules circle.js --type cjs --to ../js/
compile-modules main.js --type cjs --to ../js/
Example 6-14 shows the resulting circle.js module in CommonJS format.
Example 6-14. circle.js
"use strict";
function area(radius) {
return Math.PI * radius * radius;
}
function circumference(radius) {
return 2 * Math.PI * radius;
}
exports.area = area;
exports.circumference = circumference;
Example 6-15 shows the resulting main.js module in CommonJS format.
Example 6-15. main.js
"use strict";
var area = require("./circle").area;
var circumference = require("./circle").circumference;
console.log("Area of the circle: " + area(2) + " meter squared");
console.log("Circumference of the circle: " + circumference(5) + " meters");
If we compile the modules into AMD format by using the option amd, we would receive a different output in AMD format.
Example 6-16 shows the resulting circle.js module in AMD format. Example 6-17 shows the resulting main.js module in AMD format.
Example 6-16. circle.js
define("circle",
["exports"],
function(__exports__) {
"use strict";
function area(radius) {
return Math.PI * radius * radius;
}
function circumference(radius) {
return 2 * Math.PI * radius;
}
__exports__.area = area;
__exports__.circumference = circumference;
});
Example 6-17. main.js
define("main",
["./circle"],
function(__dependency1__) {
"use strict";
var area = __dependency1__.area;
var circumference = __dependency1__.circumference;
console.log("Area of the circle: " + area(2) + " meter squared");
console.log("Circumference of the circle: " + circumference(5) + " meters");
});
Using the globals option in the compile-modules command line produces the code that can be used as described in The Module Pattern.
In Example 6-18, the resulting circle.js module uses browser globals (the Module pattern) as its module format.
Example 6-18. circle.js
(function(exports) {
"use strict";
function area(radius) {
return Math.PI * radius * radius;
}
function circumference(radius) {
return 2 * Math.PI * radius;
}
exports.circle.area = area;
exports.circle.circumference = circumference;
})(window);
In Example 6-19, the resulting main.js module uses browser globals (the Module pattern) as its module format.
Example 6-19. main.js
(function(circle) {
"use strict";
var area = circle.area;
var circumference = circle.circumference;
console.log("Area of the circle: " + area(2) + " meter squared");
console.log("Circumference of the circle: " + circumference(5) + " meters");
})(window.circle);
For up-to-date information on ES6 browser support, visit the ECMAScript 6 compatibility table.
NOTE
TypeScript is an open source language from Microsoft that compiles to JavaScript and brings object-oriented concepts such as classes and modules to JavaScript. It has a module syntax, which is similar to what the ES6 standard proposes. The TypeScript compiler can produce CommonJS and AMD formats. You can learn more about TypeScript from its language specification.
Dicing the Save The Child Application into Modules
Now that you know the basics of AMD and different modularization patterns, let’s see how you can dice our Save The Child application into smaller pieces. In this section, we’ll apply the AMD-compliant module loader from the framework RequireJS.
TIP
curl.js offers another AMD-compliant asynchronous resource loader. Both curl.js and RequireJS have similar functionality, and to learn how they differ, follow this thread on the RequireJS group.
Let’s start with a brief explanation of the directory structure of the modularized Save The Child application. Figure 6-2 shows this directory structure.
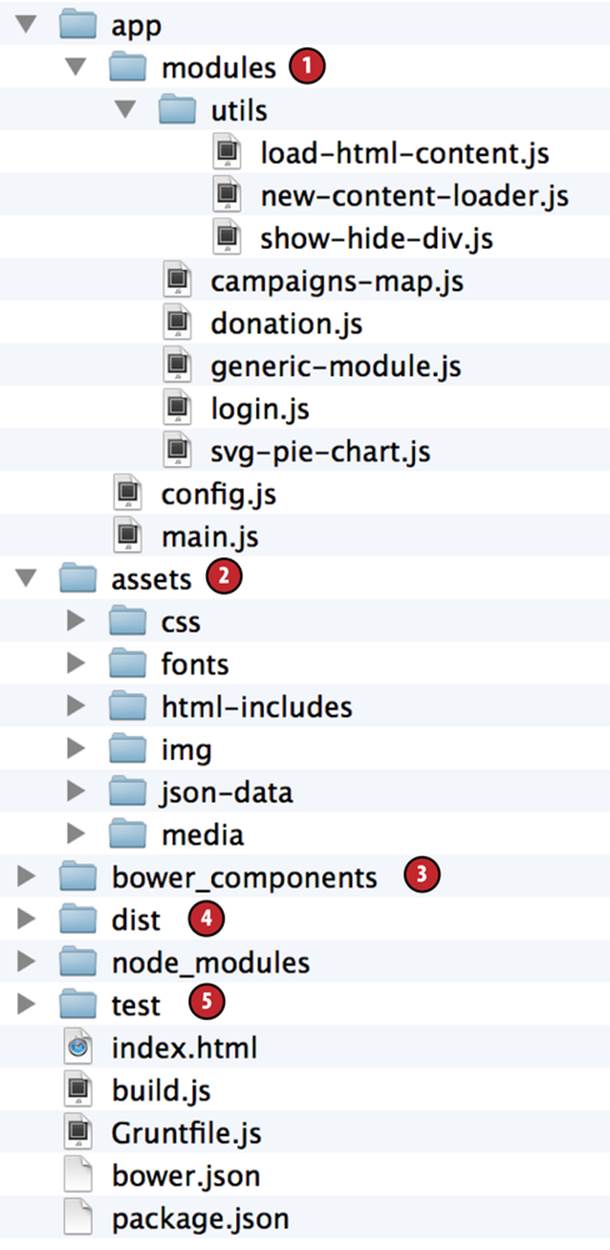
Figure 6-2. A directory structure of Save The Child
The content of the project folders is listed here:
1. All application JavaScript files reside in the app/modules directory. Inside the modules directory, you can have as many nested folders as you want (for example, utils folder).
2. The application assets remain the same as in previous chapters.
3. We keep all Bower-managed dependencies in the bower_components directory (such as RequireJS and jQuery).
4. The dist directory serves as the location for the optimized version of our application. We cover optimization with r.js in the section Using RequireJS Optimizer.
5. The QUnit/Jasmine tests reside in the test directory. Testing is covered in Chapter 7.
We are not going to dice the Save The Child application into multiple modules, but will show you how to start the process. Figure 6-3 illustrates the modules’ dependencies. For example, the main module depends on login, svg-pie-chart, campaigns-map, donation, and generic. There is also a group of modules that will be loaded on demand: whereWeWork, whatWeDo, wayToGive, whoWeAre.
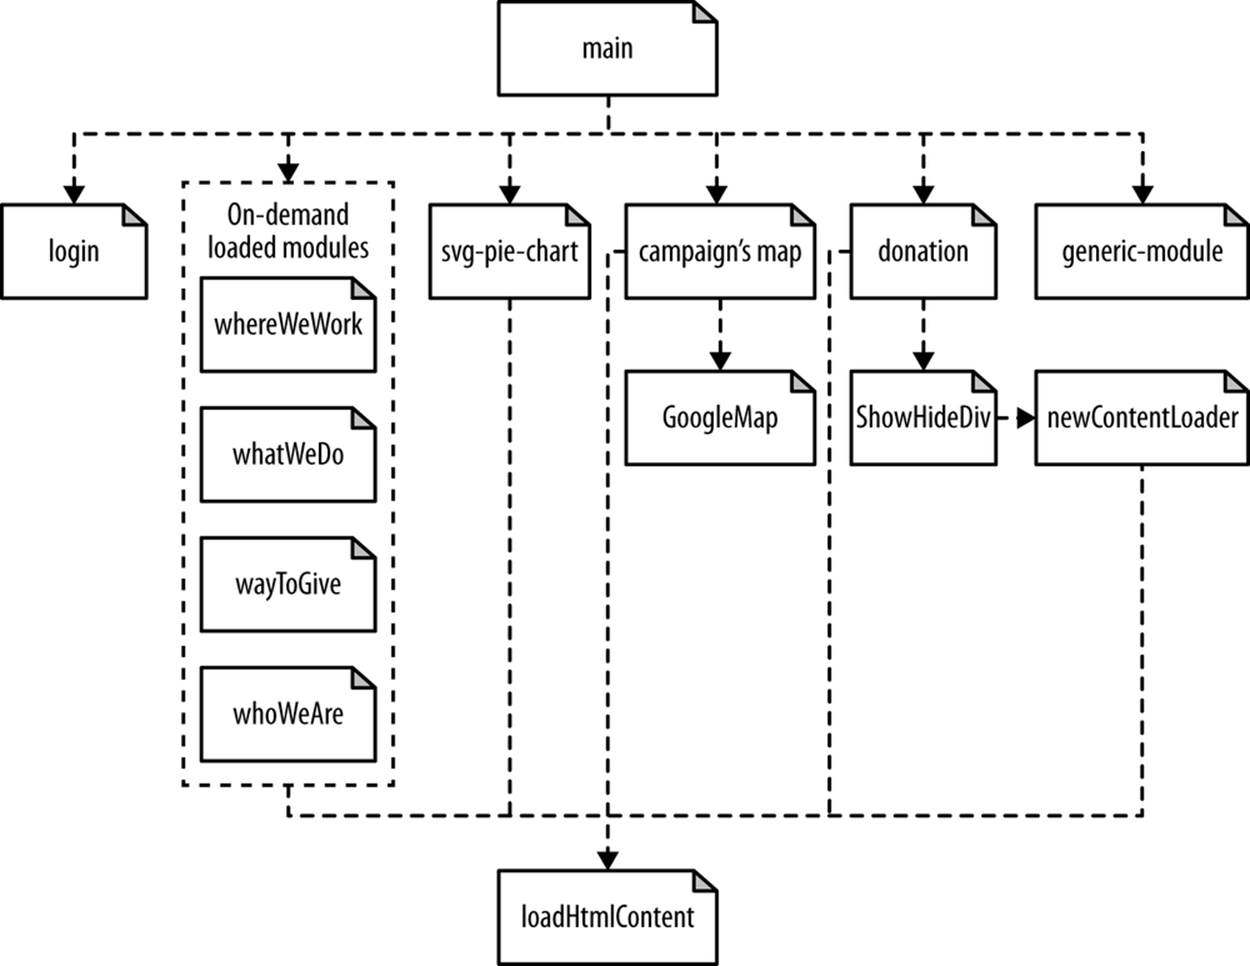
Figure 6-3. The modules graph of Save The Child
To dice the application into modules, you need the modularization framework RequireJS, which can either be downloaded from its GitHub repository or you can install it by using the package manager Bower that was explained in Chapter 5.
After RequireJS is downloaded and placed into the project directory, add it to the index.html file, as demonstrated in Example 6-20.
Example 6-20. Adding RequireJS to the web page
<!DOCTYPE html>
<head>
<!-- content omitted -->
</head>
<body>
<!-- page body -->
<script src="bower_components/requirejs/require.js"
data-main="app/config"></script> ![]()
</body>
</html>
![]()
When the RequireJS library is loaded, it will look for the data-main attribute and attempt to load the app/config.js script asynchronously. The app/config.js script will become the entry point of our application.
Inside the RequireJS Configuration: config.js
RequireJS uses a configuration object that includes modules and dependencies that have to be managed by the framework, as shown in Example 6-21.
Example 6-21. The config.js file from the Save The Child app
require.config({ ![]()
paths: { ![]()
'login': 'modules/login',
'donation': 'modules/donation',
'svg-pie-chart': 'modules/svg-pie-chart',
'campaigns-map': 'modules/campaigns-map',
'showHideDiv': 'modules/utils/show-hide-div',
'loadHtmlContent': 'modules/utils/load-html-content',
'newContentLoader': 'modules/utils/new-content-loader',
'bower_components': "../bower_components",
'jquery': '../bower_components/jquery/jquery',
'main': 'main',
'GoogleMap': '../bower_components/requirejs-google-maps/dist/GoogleMap',
'async': '../bower_components/requirejs-plugins/src/async'
}
});
require(['main'], function () { ![]()
});
![]()
The RequireJS documentation has a comprehensive overview of all configuration options. We’ve included some of them here.
![]()
The paths configuration option defines the mapping for module names and their paths. The paths option is used for module names and shouldn’t contain file extensions.
![]()
After configuring the modules’ paths, we’re loading the main module. The navigation of our application flow starts there.
Writing AMD Modules
Example 6-22 provides a closer look at the module’s internals that make it consumable by the RequireJS module loader.
Example 6-22. Generic module loader: generic-module.js
define(["newContentLoader"], function(contentLoader) { ![]()
"use strict";
var genericModule;
genericModule = function(moduleId) { ![]()
return {
render: function(button, containerId, dataUrl) {
contentLoader.getNewContent(button, containerId, dataUrl); ![]()
console.log("Module " + moduleId + " is rendered...");
}
};
};
return genericModule;
});
![]()
As we discussed in the section Asynchronous Module Definition, the code that you want to expose as a module should be wrapped in the define() function call. The first parameter is an array of dependencies. The location of dependency files is defined inside the config file. The dependency object doesn’t have the same name as the dependency string ID. The order of arguments in the factory function should be the same as the order in the dependencies array.
![]()
In this module, we export only the constructor function, which in turn returns the render function to draw the visual component on the screen.
![]()
The contentLoader object loaded from app/modules/util/new-content-loader.js (see the paths property in the RequireJS config object), is instantiated by RequireJS and is ready to use.
RequireJS also supports the CommonJS module format with a slightly different signature for the define() function. This helps bridge the gap between AMD and CommonJS. If your factory function accepts parameters but no dependency array, the AMD environment assumes that you wish to emulate the CommonJS module environment. The standard require, exports, and module variables will be injected as parameters into the factory.
Example 6-23 shows the CommonJS module format with RequireJS.
Example 6-23. Using CommonJS module format in RequireJS
define(function(require, exports, module) { ![]()
"use strict";
module.exports = (function() { ![]()
var dependency = require("dependencyId"); ![]()
function AuctionDTO(_arg) {
this.auctionState = _arg.auctionState;
this.item = _arg.item;
this.bestBid = _arg.bestBid;
this.auctionId = _arg.auctionId;
dependency.doStuff();
}
AuctionDTO.prototype.toJson = function() {
return JSON.stringify(this);
};
return AuctionDTO;
})();
});
![]()
The factory receives up to three arguments that emulate the CommonJS require, exports, and module variables.
![]()
Export your module rather than return it. You can export an object in two ways: assign the module directly to module.exports, as shown in this snippet, or set the properties on the exports object.
![]()
In CommonJS, dependencies are assigned to local variables by using the require(id) function.
Loading Modules On Demand
As per the Save The Child modules graph, some components shouldn’t load when the application starts. Similar to the Mercedes Benz website example, some functionality of Save The Child can be loaded later, when the user needs it. The user might never want to visit the Where We Work section. Hence, this functionality is a good candidate for the load on-demand module. You might want to load such a module on demand when the user clicks a button or selects a menu item. Example 6-24 shows the code for loading a module on demand (on a button click).
At any given time, a module can be in one of three states:
§ Not loaded (module === null)
§ Loading is in progress (module === 'loading')
§ Fully loaded (module !== null)
Example 6-24. Loading the module on demand
var module;
var buttonClickHandler = function(event) {
"use strict";
if (module === "loading") { ![]()
return;
}
if (module !== null) { ![]()
module.render();
} else {
module = "loading"; ![]()
require(["modules/wereWeWork"], function(ModuleObject) { ![]()
module = new ModuleObject();
module.render();
});
}
};
![]()
Checking whether module loading is in progress.
![]()
Don’t reload the same module. If the module was already loaded, just call the method to render the widget on the web page.
![]()
Setting the module into the intermediate state until it’s fully loaded.
![]()
After the whereWeWork module is loaded, the callback will receive the reference to this module—instantiate whereWeWork and render it on the page.
Let’s apply the technique demonstrated in Example 6-24 for the Save The Child application to lazy-load the Who We Are, What We Do, Where We Work, and What To Give modules only if the user clicks the corresponding top bar link. See Example 6-25.
Example 6-25. The main module
define(['login',
'donation',
'campaigns-map',
'svg-pie-chart',
'modules/generic-module' ![]()
], function() {
var initComponent, onDemandLoadingClickHandlerFactory;
onDemandLoadingClickHandlerFactory = function(config) {
returnfunction(event) { ![]()
if (config.amdInstance === 'loading') {
return;
}
if (config.amdInstance != null) {
config.amdInstance.render(event.target.id, config.containerId,
config.viewUrl);
} else {
config.amdInstance = 'loading';
require(['modules/generic-module'], function(GenericModule) {
var moduleInstance;
moduleInstance = new GenericModule(config.moduleId);
moduleInstance.render(event.target.id, config.containerId,
config.viewUrl);
config.amdInstance = moduleInstance;
});
}
};
};
initComponent = function(config) {
config.button.addEventListener('click',
onDemandLoadingClickHandlerFactory(config), ![]()
false);
};
return (function() {
var componentConfig,
componentConfigArray,
way_to_give, what_we_do,
where_we_work,
who_we_are, _i, _len;
way_to_give = document.getElementById('way-to-give');
what_we_do = document.getElementById('what-we-do');
who_we_are = document.getElementById('who-we-are');
where_we_work = document.getElementById('where-we-work');
componentConfigArray = [{ ![]()
moduleId: 'whoWeAre',
button: who_we_are,
containerId: 'who-we-are-container',
viewUrl: 'assets/html-includes/who-we-are.html'
}, {
moduleId: 'whatWeDo',
button: what_we_do,
containerId: 'what-we-do-container',
viewUrl: 'assets/html-includes/what-we-do.html'
}, {
moduleId: 'whereWeWork',
button: where_we_work,
containerId: 'where-we-work-container',
viewUrl: 'assets/html-includes/where-we-work.html'
}, {
moduleId: 'wayToGive',
button: way_to_give,
containerId: 'way-to-give-container',
viewUrl: 'assets/html-includes/way-to-give.html'
}];
for (_i = 0, _len = componentConfigArray.length; _i < _len; _i++) {
componentConfig = componentConfigArray[_i];
initComponent(componentConfig); ![]()
}
console.log('app is loaded');
})();
});
![]()
The first argument of the define function is an array of dependencies.
![]()
Here, we’re using the approach described in Example 6-24. This factory function produces the handler for the button click event. It uses the RequireJS API to load the module after the user clicks the button.
![]()
Instantiate the click handler function by using onDemandLoadingClickHandlerFactory and assign it to the button defined in the module config.
![]()
An array of modules that can be loaded on demand.
![]()
In the last step, we need to initialize each module button with the lazy-loading handler.
Using RequireJS Plug-ins
RequireJS plug-ins are special modules that implement a specific API. For example, the text plug-in allows you to specify a text file as a dependency, and cs! translates CoffeeScript files into JavaScript. The plug-in’s module name comes before the ! separator. Plug-ins can extend the default loader’s functionality.
In the Save The Child application, we use the order.js plug-in that allows us to specify the exact order in which the dependencies should be loaded. You can find the full list of available RequireJS plug-ins at the wiki page.
Using RequireJS Optimizer
RequireJS comes with the optimization tool called r.js, which is a utility that performs module optimization. Earlier in this chapter, we specified the dependencies as an array of string literals that are passed to the top-level require and define calls. The optimizer will combine modules and their dependencies into a single file based on these dependencies.
Furthermore, r.js integrates with other optimization tools such as UglifyJS and Closure Compiler to minify the content of script files. We are going to use the JavaScript task runner Grunt that you learned about in Chapter 5.
Let’s configure our Grunt project to enable the optimization task. Example 6-26 shows the command to install RequireJS, and Grunt’s task packages clean, concat, and uglify, and save them as development dependencies in the file package.json.
Example 6-26. Adding dependencies to package.json
> npm install grunt-contrib-requirejs\
grunt-contrib-concat grunt-contrib-clean\
grunt-contrib-uglify --saveDev
Example 6-27 describes the script to set up the RequireJS optimizer and the related optimization tasks for Grunt. You’ll need to run this script to generate an optimized version of the Save The Child application.
Example 6-27. Script to set up RequireJS optimizer
"use strict";
module.exports = function (grunt) {
// Project configuration.
grunt.initConfig({
// Task configuration.
clean: {
files: ["dist"] ![]()
},
requirejs: { ![]()
compile: {
options: {
name: "config",
mainConfigFile: "app/config.js",
out: "<%= concat.dist.dest %>",
optimize: "none"
}
}
},
concat: { ![]()
dist: {
src: ["components/requirejs/require.js",
"<%= concat.dist.dest %>"],
dest: "dist/require.js"
}
},
uglify: { ![]()
dist: {
src: "<%= concat.dist.dest %>",
dest: "dist/require.min.js"
}
}
});
grunt.loadNpmTasks("grunt-contrib-clean"); ![]()
grunt.loadNpmTasks("grunt-contrib-requirejs");
grunt.loadNpmTasks("grunt-contrib-concat");
grunt.loadNpmTasks("grunt-contrib-uglify");
grunt.registerTask("default", ["clean", "requirejs", "concat", "uglify"]); ![]()
};
![]()
The clean task cleans the output directory. In the files section of the task config, we specify folder that should be cleaned.
![]()
The requirejs task. The configuration properties of the requrejs task are self-explanatory. mainConfigFile points at the same file as the data-main attribute of the RequireJS script tag. The out parameter specifies the output directory where the optimized script will be created.
![]()
The concat task combines/concatenates optimized module code and RequireJS loader code.
![]()
The uglify task minifies files using UglifyJS—a compressor/minifier tool. Input and output of this task is configured with src and dest properties of uglify object.
![]()
Loading plug-ins that provide necessary tasks.
![]()
The default task to execute all tasks in order.
Run the Save The Child application built with RequireJS and monitor the network traffic in Chrome Developer Tools. You’ll see many HTTP requests that load modules asynchronously. As you can see in Figure 6-4, 12 out of 24 of the browser’s requests are for loading all required modules. The modules that may be loaded on demand are not here.
Figure 6-5 shows the loading of the Save The Child application, optimized with the RequireJS optimizer. We’ve managed to pack all our modules, their dependencies, and the loader’s code into a single file, which considerably decreases the number of server-side calls.

Figure 6-4. Unoptimized version of the Save The Child application
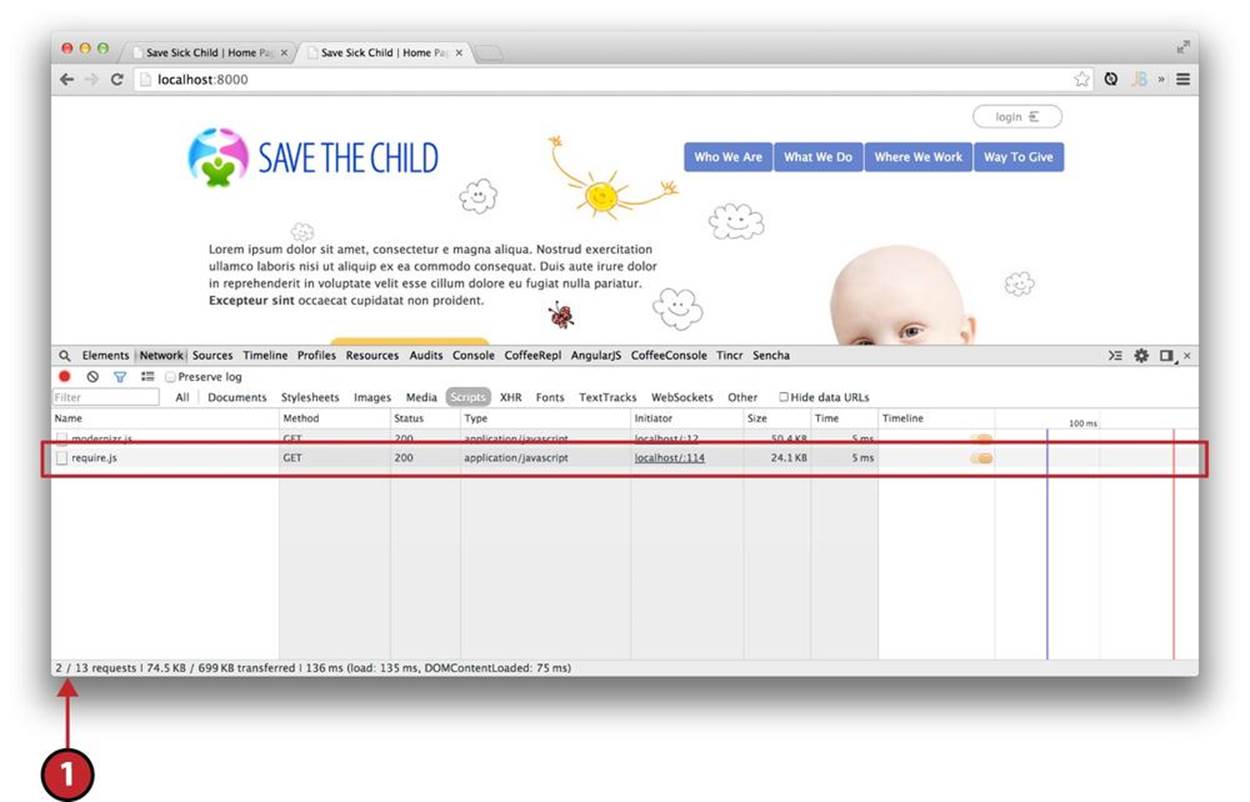
Figure 6-5. Loading the optimized version of Save The Child
TIP
You can read more on optimization topics at the RequireJS documentation site under Optimization.
RequireJS took care of the optimal module loading, but you should properly arrange the intermodule communication. The Save The Child application doesn’t have modules that heed to exchange data, so we’ll describe how to properly arrange intermodule communications in a separate application.
TIP
Google has created PageSpeed Insights, a web tool that offers suggestions for improving the performance of your web application on all devices. Just enter the URL of your application and a second later you’ll see some optimization suggestions.
Loosely Coupled InterModule Communications with Mediator
Almost any complex enterprise web application consists of various components and modules. A simple approach of arranging communication among components is to allow all components to directly access the public properties of one another. This would produce an application with tightly coupled components that know about one another, but removal of one component could lead to multiple code changes in the application.
A better approach is to create loosely coupled components that are self-contained, do not know about one another, and can communicate with the “outside world” by sending and receiving events.
Creating a UI from reusable components and applying messaging techniques requires creation of loosely coupled components. Say you’ve created a window for a financial trader. This window gets a data push from the server, showing the latest stock prices. When the trader likes the price, he may click the Buy or Sell button to initiate a trade. The trading engine can be implemented in a separate component, and establishing inter-component communications the right way is really important.
As you learned from Chapter 2, Mediator is a behavioral design pattern that allows you to unify communication of the application components. The Mediator pattern promotes the use of a single shared object that handles (mediates) communication between other objects. None of the components is aware of the others, but each of them knows about a single object—the mediator.
In Chapter 2 we introduced an example of a small fragment of a trader’s desktop. Let’s reuse the same example—this time not with postMessage, but with the Mediator object.
In Figure 6-6, the Price panel on the left gets the data feed about the current prices of IBM stock. When the user clicks the Bid or Ask button, the Price panel just sends the event with the relevant trade information (for example, a JSON-formatted string containing the stock symbol, price, buy or sell flag, or date).
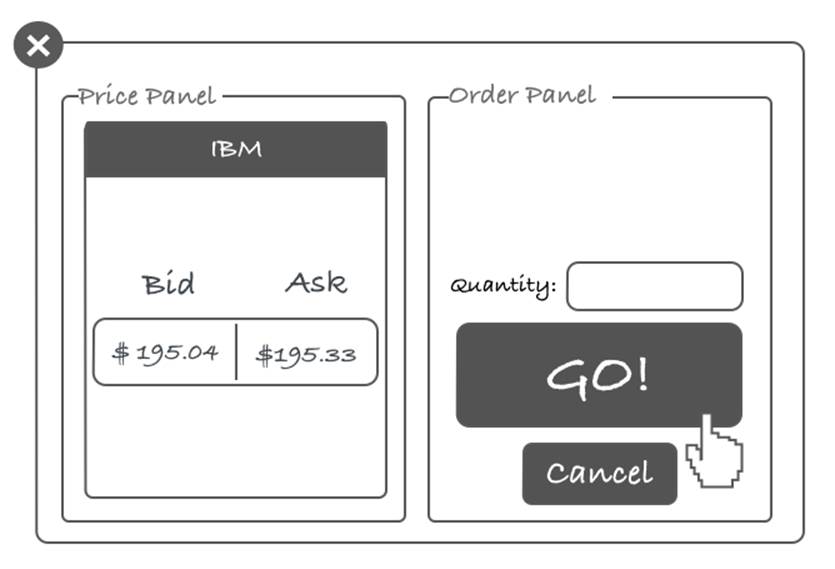
Figure 6-6. Before the trader clicks the Price panel
Figure 6-7 shows the wire after the user clicks the Price panel.
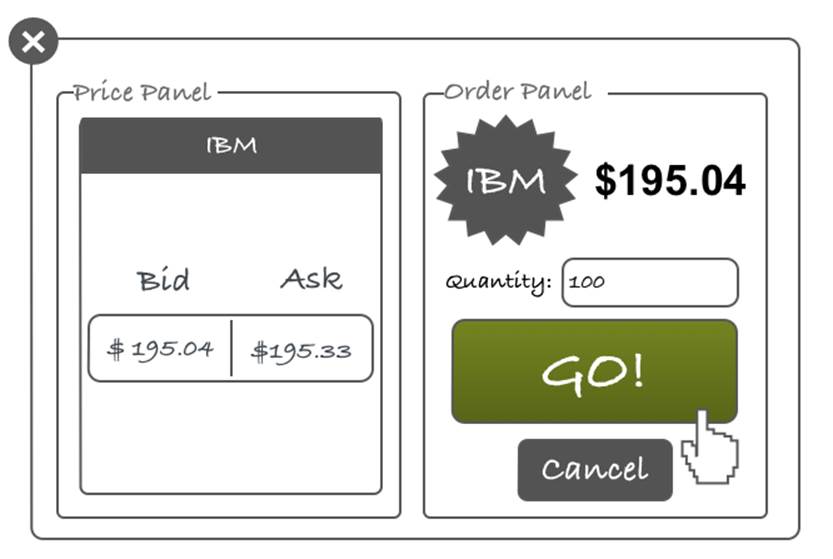
Figure 6-7. After the trader clicks the Price panel
Example 6-28 shows an HTML code snippet that implements this scenario.
Example 6-28. Implementation of Mediator Design Pattern
<!DOCTYPE html>
<html>
<head>
<meta charset="utf-8">
<title>An example of Mediator Design Pattern</title>
<script data-main="app/config" src="bower_components/requirejs/require.js">
</script>
</head>
<body>
<h1>mediator and RequireJS example</h1>
<div id="pricePanel"> ![]()
<p>IBM</p>
<label for="priceInput">Bid:</label>
<input type="text" id="priceInput" placeholder="bid price"/>
<label for="priceInput">Ask:</label>
<input type="text" id="priceInput" placeholder="bid price"/>
</div>
<div id="orderPanel"> ![]()
<p id="priceText"></p>
<label for="quantityInput">Quantity:</label>
<input type="text" id="quantityInput" placeholder=""/>
<button id="goButton">Go!</button>
<button id="cancelButton">cancel</button>
</div>
</body>
</html>
![]()
This div element contains Price Panel with Bid and Ask controls.
![]()
This div element contains Order Panel with Quantity, Go, and Cancel controls.
As we stated earlier, we need a mediator to handle communication among application components. The components need to register themselves with the mediator so that it knows about them and can route communications. Example 6-29 is a sample mediator implementation (we use defineand require from RequireJS here).
Example 6-29. The implementation of the Mediator pattern
define(function() {
"use strict";
return (function() { ![]()
var components = {};
function Mediator() {}
Mediator.registerComponent = function(name, component) { ![]()
var cmp;
for (cmp in components) {
if (components[cmp] === component) {
break;
}
}
component.setMediator(Mediator); ![]()
components[name] = component; ![]()
};
Mediator.broadcast = function(event, args, source) { ![]()
var cmp;
if (!event) {
return;
}
args = args || [];
for (cmp in components) {
if (typeof components[cmp]["on" + event] === "function") { ![]()
source = source || components[cmp];
components[cmp]["on" + event].apply(source, args);
}
}
};
return Mediator;
})();
});
![]()
Return the private object that stores registered components.
![]()
With the Mediator.register() function, we can store components in the associative array. The mediator is a singleton object here.
![]()
Assign the mediator instance to the component being registered.
![]()
Register the component in the array by using the provided name as key.
![]()
The component can invoke Mediator.broadcast() when it has some information to share with other application components.
![]()
If a component has a function property with the name matching the pattern "on" + event`—for example, ++onClickEvent++—the mediator will invoke this function in the context of the `source object.
Example 6-30 shows the main entry point of the application that uses the mediator.
Example 6-30. The application entry point
define(["mediator", "pricePanel", "orderPanel"], function(Mediator, PricePanel,
OrderPanel) { ![]()
"use strict";
return (function() {
Mediator.registerComponent("pricePanel", new PricePanel()); ![]()
Mediator.registerComponent("orderPanel", new OrderPanel());
document.getElementById("priceInput").addEventListener("click",
function() { ![]()
if ( !! this.value) {
return Mediator.broadcast("BidClick", [this.value]); ![]()
}
});
})();
});
![]()
Required modules will be loaded by RequireJS.
![]()
Register our components with the mediator.
![]()
Add the click event listener for the Bid Price component.
![]()
When the user clicks the bid price, the mediator will broadcast the BidClick event to all registered components. Only the component that has this specific event handler with the name matching the pattern "on" + event will receive this event.
Examples 6-31 and 6-32 show the code of the PricePanel and OrderPanel components, respectively.
Example 6-31. The PricePanel module
define(function() {
"use strict";
return (function() {
var mediator;
function PricePanel() {
}
PricePanel.prototype.setMediator = function(m) { ![]()
mediator = m;
};
PricePanel.prototype.getMediator = function() { ![]()
return mediator;
};
PricePanel.prototype.onBidClick = function(currentPrice) { ![]()
console.log("Bid clicked on price " + currentPrice);
this.getMediator().broadcast("PlaceBid", [currentPrice]);
};
PricePanel.prototype.onAskClick = function() { ![]()
console.log("Ask clicked");
};
return PricePanel;
})();
});
![]()
The setter of the Mediator object. The mediator injects its instance during component registration (refer to Example 6-29).
![]()
The getter of the Mediator object.
![]()
The onBidClick event handler. The mediator will call this function when the BidClick event is broadcast. Using the getter getMediator, we can broadcast the PlaceBid event to all registered components.
![]()
The onAskClick event handler. The mediator will call this function when the AskClick event is broadcast.
Example 6-32. The OrderPanel module
define(function () {
"use strict";
return (function () {
var mediator;
function OrderPanel() {
}
OrderPanel.prototype.getMediator = function () { ![]()
return mediator;
};
OrderPanel.prototype.setMediator = function (m) {
mediator = m;
};
OrderPanel.prototype.onPlaceBid = function (price) { ![]()
console.log("price updated to " + price);
var priceTextElement = document.getElementById("priceText");
priceTextElement.value = price;
};
return OrderPanel;
})();
});
![]()
The mediator’s getter and setter have a purpose similar to that described in previous snippet.
![]()
Defining the PlaceBid event handler, onPlaceBid().
As you noticed, both OrderPanel and PricePanel don’t know about the existence of each other, but nevertheless they can send and receive data with the help of an intermediary—the Mediator object.
The introduction of the mediator increases reusability of components by decoupling them from each other. The Mediator pattern simplifies the maintenance of any application by centralizing the navigational logic.
Summary
The size of any application tends to increase with time, and sooner or later you’ll need to decide how to cut it into several loadable blocks of functionality. The sooner you start modularizing your application, the better.
In this chapter, we reviewed several options for writing modular JavaScript by using modern module formats. These formats have advantages over using just the classical Module pattern. These advantages include avoiding creating global variables for each module and better support for static and dynamic dependency management.
Understanding various technologies and frameworks available in JavaScript, combined with the knowledge of different ways of linking modules and libraries, is crucial for developers who want their JavaScript applications to be more responsive.
All materials on the site are licensed Creative Commons Attribution-Sharealike 3.0 Unported CC BY-SA 3.0 & GNU Free Documentation License (GFDL)
If you are the copyright holder of any material contained on our site and intend to remove it, please contact our site administrator for approval.
© 2016-2026 All site design rights belong to S.Y.A.