Implementing NetScaler VPX (2014)
Chapter 1. NetScaler VPX 10.1 Basics and Setup
Welcome to the first chapter of this book. Throughout the course of this book, we will cover most of the different areas where NetScaler serves its purpose. The first chapter will cover a little introduction of what NetScaler is and some of its features. Throughout this book, we will be focusing mostly on how to set up and deploy a NetScaler VPX in a Hyper-V and System Center environment. This is because in the Nordic market, most of the deployments run on Hyper-V; however, the process is not so different for other hypervisors. So to sum it up, here's what we will cover throughout this chapter:
· Introduction to NetScaler
· The definition of Application Delivery Controller
· NetScaler Gateway
· Differences between VPX, MPX, and SDX
· Editions and models
· Setup and configuring the basics
· Some deployment scenarios
Getting started with NetScaler®
NetScaler was an acquisition that Citrix made back in 2005, and it is one of the best selling products in their portfolio today and is pivotal in many large enterprises. Today, many of the largest IT organizations, such as Microsoft, Google, and eBay to mention a few, are using NetScaler in front of their websites and services to ensure availability.
Note
We can check the kind of solution an organization is using on their website by using a free web tool from www.netcraft.com. For example, for eBay, go to http://searchdns.netcraft.com/?restriction=site+contains&host=ebay.com.
NetScaler can be defined as a network appliance with the primary role of delivering services to the end clients who are connecting to it. It does this through the use of different features, such as load balancing, proxy, gateway solutions, and so on. The commonly used term for it is Application Delivery Controller (ADC), as users in many cases connect to their services through, for example, a load-balanced web service such as NetScaler. It also has many features to optimize network traffic, such as web caching, compression, and SSL offloading, to give a service optimal performance. It also includes features such as application firewall, URL rewrite and responder, global server load balancing, and gateway function for XenApp/XenDesktop to name a few. We will cover some of these features in greater detail in a later chapter.
So its whole purpose is to ensure that a service or an application is delivered through different availability and performance features. The following diagram is an example of some of the different uses of NetScaler, and how users can access their different applications and services:
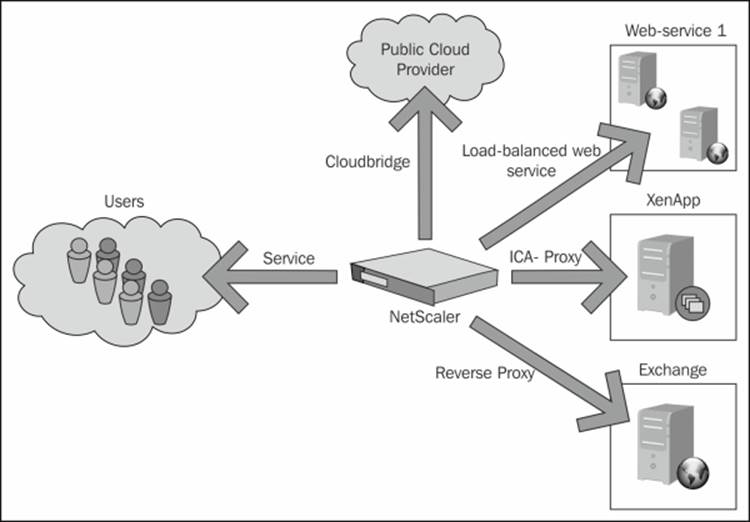
As we can see in the diagram, there are many ways in which we can deliver and ensure content is delivered to the users. Also, there are features that allow us to bridge different infrastructures such as public cloud providers. We will delve into some of the features throughout the rest of the chapters.
There are a variety of features included in NetScaler; some information about the different features and the product itself can be found in the Citrix eDocs available at http://support.citrix.com/proddocs/topic/netscaler/ns-gen-netscaler-wrapper-con.html. eDocs is an ideal place for knowledge and support documentation about setup and configuration of the different features included in NetScaler.
NetScaler comes in three different types of appliances. They are:
· MPX
· SDX
· VPX
MPX
The MPX is a physical appliance of the NetScaler, which again comes in different models. As an example, the MPX 5550 is the starting platform that consists of an Intel CPU with 8 GB of RAM, and can handle up to 5,000 concurrent SSL VPN sessions and up to 175,000 HTTP requests every second. The MPX 5550 has a maximum throughput of 0.5 Gbps, but it can be upgraded to the 5650 which has 1 Gbps throughput. This only requires a change of license as it still runs on the same hardware. There is a long list of different models that suit most business needs depending on how many users, what kind of services, and what kind of bandwidth are required. The largest physical appliance available is the MPX 21550, which has up to 50 Gbps of throughput.
Note
One of the benefits of NetScaler is that if we need better performance or more bandwidth, we can, in many cases, just upgrade the platform license to the next edition. You can refer to the NetScaler datasheet to see which platforms can be upgraded and also check the specifications of the different platforms at http://www.citrix.com/content/dam/citrix/en_us/documents/products-solutions/netscaler-data-sheet.pdf.
All of the MPX models come with special SSL chips, which are specifically used to handle encrypted traffic (SSL traffic). The NetScaler uses an architecture called nCore, which allows it to intelligently load balance the SSL operations among the chips available on the hardware. This allows for faster handling of the SSL traffic on the regular load balancers. Also, an important point to remember is that each platform has a limit on how many SSL-based operations and throughput it can handle each second, which can be viewed in the earlier mentioned datasheet.
SDX
The SDX is a special kind of platform available on many of the same models as the MPX as it uses the same underlying hardware. The difference is that the SDX itself cannot do load balancing or any other NetScaler functions as it is just a virtualization platform that runs a virtual NetScaler (VPX) on top of itself. By default, when purchasing an SDX, it ships with five VPXs. SDX runs a customized version of XenServer at the bottom of the appliance, and there we can create multiple VPX instances running on top of it, which have the NetScaler features. This platform is better suited for multitenant environments or when we want to isolate the traffic into separate instances.
VPX
The VPX is the virtual edition of NetScaler. It has the same features as the MPX; the only difference is that it runs as a virtual appliance instead of as a hardware appliance. There are four different editions of this platform, VPX 10, VPX 200, VPX 1000, and VPX 3000, where the number stands for the throughput of the device in Mbps.
Note
There is also a free edition of the VPX called VPX Express. The VPX Express has the same functionality as VPX standard, but has a limit of 5 Mbps of throughput and is valid for one year at a time. It also gives you access to running up to five users with NetScaler Gateway, which we will go through in the next chapter.
The VPX is available for XenServer, VMware, and Hyper-V, or as an instance on the SDX platform. There is a minor difference between running VPX in a regular virtual environment or as a part of an SDX environment. In an SDX environment, the VPX has access to the onboard SSL chips and is able to handle SSL traffic accordingly. In a regular virtual environment, the VPX can handle only limited SSL traffic as it is dependent on the virtualization host CPUs. Regular CPUs are not designed to handle SSL offload very well as compared to SSL chips; therefore, they have a soft limit on how many SSL connections they can handle. This can be seen in the NetScaler datasheet mentioned earlier.
Barry Schiffer has written an excellent article regarding NetScaler sizing and what model to choose, which I would recommend taking a look at if you are unsure of what to use. It is available at http://www.barryschiffer.com/citrix-NetScaler-platform-sizing-guide/.
NetScaler also has different types of editions, and depending on the level will grant access to the different features. The three editions are Standard, Enterprise, and Platinum.
Standard is the most basic edition, and contains most of the basic features, such as load balancing, SQL load balancing, NetScaler Gateway (formerly known as Access Gateway), network optimization, HTTP/URL rewrite, and more. The Enterprise edition gives usGlobal Server Load Balancing (GSLB), HTTP compression, AAA management, and surge protection. Lastly, the Platinum edition gives us CloudBridge, full NetScaler Insight Center functionality, application firewall, and more. An important point to note here is that on an SDX appliance, all the VPX appliances have Platinum edition features.
Now, many of these features may be unfamiliar to you, but these will be covered throughout the later chapters.
Note
The complete feature set of NetScaler and its different editions can be found in the NetScaler datasheet available at http://www.citrix.com/content/dam/citrix/en_us/documents/products-solutions/netscaler-data-sheet.pdf?accessmode=direct. There is also another edition called NetScaler Gateway VPX, which is a virtual appliance containing only the gateway feature.
One of the things that I mentioned earlier was that in case we needed more bandwidth or better performance, we could just upgrade the license to another platform. The same goes for features as well; if we need features that are available in the Enterprise edition and we have only the Standard edition, we just have to buy a license upgrade to access those features. If, for example, we are in a situation where we need more bandwidth for a period of time, we can also purchase something called burst licenses. Burst licenses allow us to extend our bandwidth on the appliance, for example, for 90 days.
Licensing
When we want to set up or deploy a NetScaler, we need a license in place in order to access the features we want to use. An important point to note here is that there are three types of licenses available for NetScaler:
· Platform license: This license is used for NetScaler features and defines the bandwidth.
· Universal license: This license is used for NetScaler Gateway features such as SSL VPN, CVPN, SmartAccess, and Endpoint analysis.
· Feature license: This license is used for features such as clustering, caching, and so on.
Licenses can be allocated and downloaded from www.mycitrix.com under Licensing. Here, we need to enter our hardware information, so that the license can be bound to the appliance. An important point to remember is that you need to have a valid Citrix account to be given access to the licenses.
Note
If you do not have access to a regular license, you can download a trial version of the latest NetScaler VPX Platinum edition from Citrix, available at http://www.citrix.com/products/netscaler-application-delivery-controller/try.html.
If you want to download a platform license for NetScaler from www.mycitrix.com, you need to enter the MAC address of the first NIC on your appliance in the Host ID field on the website.
Note
If you are deploying a NetScaler Gateway VPX, and you want to download a platform license for it, or generate universal licenses, both of these can be created with the hostname of the appliance instead of the MAC address. These licenses can be generated from the same website.
The MAC address can be found either via the CLI of the appliance, or by using a hypervisor. We will learn more about CLI throughout this chapter. To get the hardware information from the CLI of the appliance, we have to first log in to the NetScaler System CLI, and then switch to the FreeBSD shell by typing shell and running the following command:
lmutil lmhostid
When using a hypervisor, such as the virtual machine manager PowerShell, run the following command:
Get-VM | Where { $_Name -match "VM" } | Get-SCNetworkAdapter | Select MACAddress
If you are using VMware and have PowerCLI available, we can use a similar command, as follows, to get the same result:
Get-NetworkAdapter –VM NameofVM
This will give you the host ID/MAC address of the appliance, which needs to be entered on mycitrix.com to generate a platform license. We will cover installing the license a bit later.
Setup scenarios
When thinking about the deployment of NetScaler, there are a couple of things that need to be taken into consideration, which are listed here:
· How is the network layout between the users and the service?
· What kind of network security is in place?
· Is the business using NAT or any other kind of firewall that requires configuration to allow traffic?
· What service or application is going to be published?
A common scenario is load balancing some sort of a web service to external users. In such a scenario, a business might have a DMZ zone and an intranet zone. One topology that can be used here is that NetScaler can be placed with one interface in the DMZ zone and one interface in the intranet zone. This is also known as a two-armed setup. It is important to note that a two-armed setup is not necessarily two NICs connected to different networks; it might also be multiple VLANs trunked to the same NIC. This is practical for load balancing internal resources as well because the traffic does not need to flow back and forth through the firewall multiple times.
In some cases, because of business requirements, you might have NetScaler attached to only one interface or only one VLAN, which resides in the same zone. This is known as a one-armed setup. Here, NetScaler is placed, for example, in only the DMZ zone and routing tables are in place to allow NetScaler to access the backend services. This type of topology emphasizes security. We will cover a sample scenario later in this chapter.
Now that we have gone through the different editions, features, and licensing, let us continue with the initial setup.
Creating our first setup
Before setting up the VPX, we need to make sure that we have the following resources available in our virtual environment:
· 2 GB RAM
· Two vCPUs
· 20 GB disk space
· One vNIC
Note
NetScaler VPX supports a maximum of eight virtual network interfaces, and as of now it supports Windows Server Hyper-V 2008 R2 and Windows Server Hyper-V 2012. It also supports XenServer 6.0, XenServer 6.1, and VMware Vsphere from version 4.0 up to 5.1.
After downloading NetScaler from www.mycitrix.com, we can import the virtual machine using the Hyper-V manager by selecting Import Virtual Machine… and browsing to the download location of NetScaler VPX.
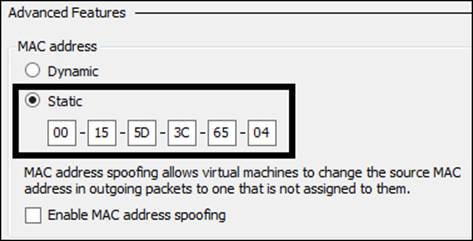
After the appliance is imported, we should change the MAC address of the network adapter to static, as the license is based on the MAC address. Hyper-V manages MAC allocation for virtual machines, and in some scenarios, a virtual machine might generate a new MAC address. Therefore, it is important to set the MAC address as static.
This can be done by navigating to Virtual Machine | Network | Advanced Features, as shown in the following screenshot:
Note
Note that the same applies for VMware and XenServer as well.
After we are done changing the MAC address to static, we can boot the virtual appliance. The initial setup needs to be done using the CLI to connect the virtual machine console to the appliance console. The first thing we need to enter is the NetScaler IP Address(NSIP), which is used for management purposes, then a subnet mask, and finally a default gateway. Now we can press 4 to save the settings. After this is done, we can then access the console using HTTP through the NSIP address that we entered earlier. The default username and password for the web administration GUI is nsroot and nsroot. Prior to logging in, make sure that the deployment type is set to NetScaler ADC.
Before continuing with more configuration using the web interface, we need to make sure that we have Java Runtime Engine (JRE) installed. This can be downloaded from http://java.com/en/download/. Also make sure that our client computer or management computer has firewall opened for TCP port 3010 and TCP port 3008 for a secure session because the web interface uses these ports to parse commands via the Java applet to the NetScaler appliance. Citrix has made a list of all the ports and functions used in their products, which you can view at http://support.citrix.com/servlet/KbServlet/download/2389-102-704421/CTX101810_28th_June_2013.pdf.
Note
Throughout the last few years, there have been some issues related to the NetScaler GUI and the use of Java. If you are having issues such as the Java applet not loading when you want to do some configuration inside NetScaler, then there are a couple of things that you can do. They are:
· Disable Keep temporary files on my computer in the Java settings under the control panel.
· Lower the security settings from Medium to Low in the same menu
· Add a site exception under the Edit site list
When logging in to the web console for the first time after the initial setup, we are presented with a wizard that allows us to enter information such as DNS, time zone, and SNIP, and to change password settings. We can enter that information or we can click on theSkip button in the upper right-hand corner of the window. This will bring us to the main dashboard. For the purpose of this book, I am going to show you how to add different configurations using regular GUI and CLI instead of using the wizard. An important point to note here is that the initial setup wizard will always pop up until we have added a platform license, subnet IP, and NetScaler IP.
You can restart the initial setup in the CLI by typing the following command:
Configns
Note
When altering the configuration of NetScaler, the configurations are put into the running configuration file. If we do not save the configuration, the settings that we changed will be lost when we restart. Make sure to save the configuration using the CLI commandsave config, or by clicking on the Save button (represented as a disk drive) in the GUI, after performing the changes to the configuration.
Now, inside the main administration GUI, we are presented with three main panes:
· Dashboard
· Configuration
· Reporting
We are directly transferred to the Dashboard pane, as shown in the following screenshot:
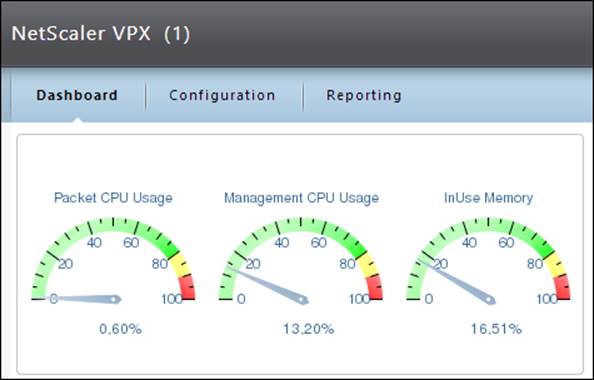
Dashboard
The Dashboard pane gives us an overview of what is happening in NetScaler, how much CPU is used, how much memory is in use, what the throughput is, and so on. We can also view how many active sessions are using our services such as load-balanced web services or VPN connections.
Reporting
We also have the Reporting pane, where we can run different built-in reports or create our own reports based upon different criteria. There are more than 100 built-in reports that we can use, for example, to see how many SSL connections have been used in the last day. We also have a link for documentation that redirects us to eDocs on Citrix, and a Downloads pane where we can download the SNMP MIB files, Nitro SDK, and some other files such as integrations for System Center.
Configuration
The Configuration pane is where we do our configuration of services and also of NetScaler; this is where we will spend most of our time.
Now, there are some basic features we should set up before deploying any services to NetScaler.
· DNS: This feature allows for name resolution.
· NTP: This feature allows for time synchronization.
· Syslog: This feature allows for central logging of states, auditing, and status information.
· SNMP: This feature allows NetScaler to send alarms to a designated SNMP server.
Syslog and SNMP features are not needed but should be evaluated in larger deployments, and for auditing and monitoring purposes. For example, NetScaler can be monitored using SNMP with System Center Operations Manager. You can read more about it athttp://msandbu.wordpress.com/2013/04/02/monitoring-netscaler-with-operations-manager-2012/.
The first thing we are going to add is a DNS server to allow for name resolution. This setting can be found by navigating to Configuration | Traffic Management | DNS | Name Servers. Here, click on Add and enter the IP address of our DNS server, and leave the rest as default values. After we have added the DNS server, NetScaler will automatically start monitoring it. Make sure that ICMP is also opened in the firewall to the DNS servers; NetScaler uses ICMP with UDP to monitor, if the DNS servers are available. For redundancy, you should add more than one DNS server to the list. After you have added the DNS servers, you can verify the state of the servers by going back to the Name Servers pane.
Note
DNS using TCP is only needed for zone transfers and therefore it is not used for regular name resolution. We also have the ability to use both UDP and TCP; this is used for TCP-enabled DNS systems.
After each configuration, I am going to show the CLI-based option to perform the same action. To add a DNS server using the CLI, we can use the following command:
add dns nameServer IPaddress
Next, you should add an NTP server; this is important because of logging purposes, timestamps, certificates, reporting, and so on. The NTP server's configuration can be found by navigating to System | NTP Servers. Here, click on Add and enter the IP information and a key if you are using authentication. If you do not have an NTP server available in your network, you can use a public one. For example, you can find a public NTP server at http://www.pool.ntp.org/en/.
We can also add an NTP server using the following command:
add ntp server IPaddress
After we have added the NTP server, we have to do a sync using the following CLI command:
enable ntp sync
We also need to change the time zone of NetScaler to reflect our own time zone. This can be done by navigating to System | Settings | Change time zone.
Another important feature that we should look closer at is Syslog. Syslog is a common open standard logging feature, which allows us to place logs on a central host instead of on NetScaler itself; this makes it easier to view logs from different devices that use Syslog from a single repository. This is not something that I consider as required, but it makes it easier to access and view logs. If we do not set up Syslog, we have to view the different logs locally on NetScaler. The Syslog feature can be enabled by navigating toSystem | Auditing | Servers. This requires that we have a central Syslog server in place.
If we have a central monitoring solution, we should consider configuring SNMP. SNMP consists of alarms and traps. If any abnormalities happen, such as high usage of RAM or, for example, Syslog, an alarm will trigger on NetScaler and the SNMP agent on it would send the alarm to an SNMP trap listener (which could be a central SNMP solution such as Microsoft System Center Operations Manager).
In order to allow NetScaler to be queried by an SNMP server for information, we need to enter the following information. This can be added in the GUI by navigating to System | SNMP.
· SNMP manager: This is the IP address of the host that is allowed access.
· SNMP community string: This is used for authentication of the appliance.
In order for NetScaler to send traps whenever a critical event occurs, we need to enter the following information:
· Enable/Disable SNMP alarms: This defines which alarms should create a trap.
· SNMP traps: This defines which host should get the traps and the conditions for the traps.
We can also change the hostname of the appliance; by default, it comes with the name ns. We can change it using the following CLI command:
set ns hostname
We should also change the default password as nsroot is the default password for all NetScaler appliances. This can be done using the following CLI command:
set system user nsroot password
This can also be done through the GUI by navigating to System | User Administration | Users | nsroot | Choose Action and clicking on Change password.
After we are done with this setup, we also need to add our platform license to the appliance. This can be done through the GUI by navigating to System | Licenses. Here, just click on Add license and upload the license that was generated from www.mycitrix.com.
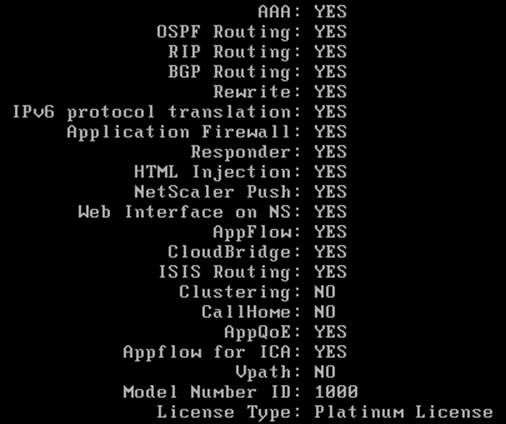
After we have added the license, we need to reboot the appliance. We can verify that the license is properly applied by checking under the Licenses tab or by using the CLI command show license, as this will list all the features that are licensed along with the model type, as shown in the following screenshot:
NetScaler® modes and features
Now that we have added the license and configured most of the basic features, such as DNS, NTP, and SNMP, we need to take a closer look at the different modes through which NetScaler can process traffic. The different modes can be found by navigating toSystem | Settings | Change Modes.
Here, there are modes that we can configure depending on the following parameters:
· How do we want NetScaler to process network traffic such as L2 and L3?
· Where is NetScaler placed?
Not all the advanced features are covered here as some of them are not relevant for every environment. Information about the remaining features can be found in the Citrix article located at http://support.citrix.com/article/CTX121149. The different modes here decide how NetScaler should handle different kinds of traffic. So, a quick overview of the different modes is as follows:
· Fast Ramp: This mode bypasses the slow-start mechanism of the TCP protocol and allows for a faster increment of TCP windowing, thereby allowing for faster packet transmission. This feature is enabled by default.
· Layer 2 mode: This mode allows NetScaler to behave as a switch and should only be used if servers are directly attached to NetScaler, or if it is being used as a transparent bridge, for example, CloudBridge.
· Use Source IP: By default, when NetScaler connects to a backend server, it uses one of its own addresses to establish a connection. By enabling the Use Source IP mode, the end client IP address is used to connect to the backend server. This should only be used in deployments where you need direct connections from the clients, or when you have an IDS environment. Make sure that when this feature is enabled, the backend servers need to have one of NetScaler's IP addresses to be used as the Gateway IP address.
· Client Keep-Alive: This feature is mostly useful when the backend server or service does not support client keep-alive. It allows clients to maintain connectivity to the appliance even if the backend server closes the connection. This eliminates the need to reestablish the connection between the client and the backend server, and will reduce the time needed for a client to reopen the connection. This feature should only be enabled if there are performance issues with a service.
· TCP buffering: This feature allows the adjustment of speed between a high-speed server and a slow client. If a backend server responds too fast for a client, the appliance will buffer the packets and adjust the sending based upon the speed of the client. This allows the backend server to devote the CPU resources to other tasks. This mode should be enabled if there are performance issues or if the TCP window scaling is not working.
· MAC based forwarding: This mode allows NetScaler to return packets based upon the MAC address of the received packet. For example, in environments where you have multiple routers, and you need to make sure that the packets are returned through the same path, we need to enable the MAC-based forwarding mode. If this feature is disabled, the return path is based upon the route look up.
· Edge Configuration: We need to enable this feature if clients are using the link load balancing feature.
· Use Subnet IP: This feature allows for the use of subnet IP addresses.
· Layer 3 mode: When the Layer 3 mode is enabled, the NetScaler appliance performs route table look ups and forwards all packets that are not destined for any NetScaler-owned IP addresses. This mode is enabled by default, but should be disabled if not used for security purposes.
· Path MTU Discovery: This mode allows network devices to share information to determine the largest layer size that can be allowed on a network. This mode is enabled by default.
· Static Route Advertisement: This mode allows for the advertisement of static routes when using dynamic routing protocols.
· Direct Route Advertisement: This mode allows for the advertisement of direct routes when using dynamic routing protocols.
· Intranet Route Advertisement: This mode allows for the advertisement of intranet routes when using dynamic routing protocols.
· IPv6 Static Route Advertisement: This mode allows for the advertisement of IPv6 static routes when using dynamic routing protocols.
· IPv6 Direct Route Advertisement: This mode allows for the advertisement of IPv6 direct routes when using dynamic routing protocols.
· Bridge BDPUs: This mode is used for the Spanning Tree Protocol, allowing NetScaler to participate or not participate in the STP state.
Note
When using NetScaler at the edge of the network as a firewall, we should uncheck all the boxes regarding route advertisement and Path MTU discovery.
NetScaler® networking
We have gone through the basic setup of NetScaler, its different modes, and its basic features. Now, we will go deeper into the different IP addresses that can be used in NetScaler and how they operate. NetScaler can have the following different IP addresses:
· NSIP: This is the NetScaler IP address.
· MIP: This is the mapped IP address.
· SNIP: This is the subnet IP address.
· VIP: This is the virtual IP address.
· GSLBIP: This is the Global Server Load Balancing site IP address.
· CLIP: This is the cluster IP address.
We will not cover the GSLBIP and CLIP addresses as part of this book.
NSIP
As we have discussed earlier, this IP address is used for management purposes in the local NetScaler and when authenticating against services such as AD, LDAP, and Radius. We need to make sure that the NSIP address is allowed to talk to these services in the firewall.
By default, the NSIP address is allowed to be used for management services using several protocols such as SSH, HTTP, and HTTPS. We can restrict the security level to only allow secure access by navigating to System | Network | IPs | NSIP, and then choosingSecure Access. Remember that this requires that we import a trusted certificate, as by default it uses a self-signed certificate. If we try to connect it with a browser when running a self-signed certificate, we will get browser warnings stating it cannot verify the publisher.
MIP
Next we have the MIP address, which is used for backend server connectivity. When we add an MIP address to a network, it automatically creates a route entry with its address as the gateway to reach that particular network.
SNIP
The SNIP address is also used for backend server connectivity. When setting up a NetScaler appliance, the startup wizard requires you to enter an SNIP address. The SNIP address also creates a route entry with its address as the gateway to reach that particular network. The SNIP address is also used for connectivity against DNS/WINS servers. In order to use an SNIP address, the Use Subnet IP (USNIP) feature must be enabled.
The common feature of both these addresses is that they are used for proxy connections by users connecting to a service via a VIP address to a backend server. Most of the time, MIP was used to set up an address on the same subnet in which the NSIP was placed, and the SNIP address was used to contact backend servers, which were located on another subnet. But with the latest releases of NetScaler, there is no need to use the MIP address feature. So, in common deployments, we can use the SNIP address.
When we want to add an SNIP or an MIP address to NetScaler, we can do this from the same pane where we saw the NSIP address, that is, by navigating to System | Network | IP addresses | Add. If we want, we can also use the following CLI command:
add ns ip 10.0.0.0 255.255.255.0 –type SNIP
We can change the type name depending on what we need. Valid parameters here are SNIP, VIP, MIP, and NSIP.
VIP is a virtual IP address. It represents a service or different services by an IP address, port, and a protocol, and depending on the configuration, it might be a load-balanced service. This is the IP address that clients connect to for accessing a service. We will have a detailed look at how the VIP address works in Chapter 2, NetScaler Gateway™, and Chapter 3, Load Balancing.
Now, let us tie this together to understand the concept of how NetScaler processes traffic for a service. In this example, we have a web service running on a couple of web servers located on our intranet subnet 10.0.0.x. We want this service to be accessible to our external users by using NetScaler. We will place it in the DMZ with a two-arm topology, with one NIC in the intranet, and define the different IP addresses to be used. In this example, we set up an SNIP with the address as 10.0.0.2, which is used for server connectivity at the backend. Our users are placed on the Internet and will access the service using www.service1.company.com. This FQDN resolves into the VIP address on NetScaler, which is 80.80.80.80. Remember that VIP is a virtual address, and in our example it is used to load balance the connection between the two web servers that are placed on the intranet.
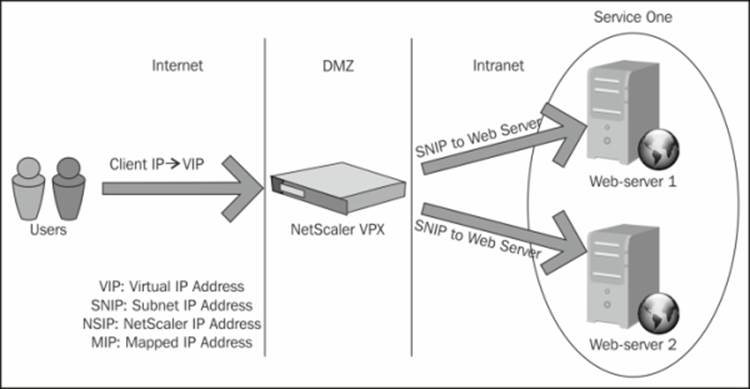
So, when a client connects to the VIP of NetScaler, it terminates the connection and establishes a connection with the backend web server using its SNIP client connection to the VIP address www.service1.company.com, as shown in the earlier example. The following table shows how the packets are routed.
|
HTTP request |
Source |
Destination |
|
IP |
Client IP address |
NetScaler VIP address |
|
MAC |
Default router |
NetScaler MAC |
From here, NetScaler establishes a connection to the backend server on behalf of the client requesting the content.
|
HTTP request |
Source |
Destination |
|
IP |
NetScaler SNIP address |
Backend web server 1 |
|
MAC |
NetScaler MAC |
Backend web server 1 |
And the return traffic goes in the same direction back to the client.
This is a simple overview of how the traffic flow might be with a load-balanced service. There are, of course, many factors here that decide how the traffic flows, and it is also dependent on how the network is configured.
One thing that is important to note is that the IP addresses are not associated with an interface as they are with a regular network appliance. They are active on all the interfaces so NetScaler behaves more like a hub. This might be a problem in some cases, where TCP packets are sent and received on different interfaces, and it might cause a loop. This is where VLANs come in. We can associate an IP address with a VLAN, which we can again associate with an interface. First, we need to create a VLAN. This can be done through the GUI by navigating to Network | VLANs | Add. From here, we can enter an ID for the VLAN and give it an alias name. Then, we can bind an interface and an IP address to the VLAN. This allows an IP address to be bound to a specific virtual interface.
We can also do this via the CLI by using the following commands. First, we need to create the VLAN.
add vlan 20 –aliasName "Network 1"
Next, we need to bind it to an interface.
bind vlan 2 -ifnum 1/8
Note
We have an option to choose the Tagged VLAN. This uses the 802.1 standard, but it is not supported by NetScaler VPX, and it is recommended to leave this to the hypervisor layer. If we need to tag a particular VLAN to NetScaler, we can do this under the network settings for NetScaler VPX in the Hyper-V manager. To define a tagged VLAN, enable the option for virtual LAN identification for a management operation system and define a VLAN ID.
Summary
We have now gone through the basics of NetScaler, covering the basics and the definition of an ADC, how it works, and also a bit on the different models and editions we can choose from. We also went through some advanced feature modes, and how NetScaler processes traffic for a sample web service. Lastly, we looked at how NetScaler handles traffic for a load-balanced service, and how we can add VLANs.
So, to sum it up, this is what we did to get NetScaler up and running:
· Imported the virtual machine on the virtual environment
· Initial setup of NetScaler using CLI by setting the NSIP
· Changed the default password from nsroot
· Added a platform license to enable more features
· Added additional IP addresses such as SNIP to enable backend communications
· Added a DNS server for name look up and an NTP server for time synchronization
· Configured modes depending on the network topology
· Saved the configuration
In the next chapter, we will look more into the NetScaler Gateway feature, which is commonly used for XenApp/XenDesktop environments, and we will also have a look at the different modes it can operate in.
All materials on the site are licensed Creative Commons Attribution-Sharealike 3.0 Unported CC BY-SA 3.0 & GNU Free Documentation License (GFDL)
If you are the copyright holder of any material contained on our site and intend to remove it, please contact our site administrator for approval.
© 2016-2026 All site design rights belong to S.Y.A.