Implementing Samba 4 (2014)
Chapter 3. Managing the Samba Active Directory Server
In this chapter, we will present the different possible roles for the Samba 4 Server in the network, and learn how to manage it in the Active Directory Domain Controller role using a Microsoft Windows Server 2008 machine. In this chapter, we will cover the following points:
· The tools that are needed to manage the Samba 4 Server, the process to install them, and some basics about how to implement centralized change and configuration management for users and machines using Group Policy Objects (GPO). We will also learn how to create a custom management console to have every management tool quickly accessible and organized.
· Implementing authentication and authorization working on Samba 4 for GNU/Linux Systems (for example, the Debian 7 client) using the Samba software. We will also learn how to implement the standard subsystems from the GNU/Linux operating system for the authentication and name resolution, Pluggable Authentication Modules (PAM), and the Name Service Switch (NSS).
· Automating the managing tasks on the Samba 4 Server as well as on the GNU/Linux operating system.
· The replication and trust relationship characteristic of Active Directory Domain Controller when running the Samba 4 Server.
At the end of the chapter, we should have a good knowledge of the Samba 4 Server usecases and strengths, its roles, and how to obtain the best from the software. We will have plenty of command-line examples and step-by-step procedures to help the understanding of each configuration directive, so the reader will know exactly what each setting does (or does not) for each specific case.
Understanding the possible roles of the Samba 4 Server on the network
When we are planning to implement a Samba 4 Server, one point to have in mind is to determine the role that this new server will play on our network. Samba 4 has many server roles, and these roles are tied to one of these two options:
· The NT4-like domain operation mode from Samba 3
· The Active Directory Services mode from new Samba 4
Looking at the documentation of the Samba 4 software, we can have a detailed explanation of each role, and we will briefly describe it in the following list:
· Auto: This is the default, and if we use this option (server role = auto) at the command-line tool (for example, samba-tool), we are actually telling Samba to follow the configuration specified on the security setting of the smb.conf file (for example,/usr/local/samba/etc/smb.conf).
· Standalone: This is an operation mode that can be selected in the following two ways:
· Explicitly using server role = standalone on the command line
· Leaving server role (command line) and the security directive (for example, /usr/local/samba/etc/smb.conf file) untouched
In this configuration, the Samba 4 Server will run as a simple (standalone) file/printer server, and the clients will need to authenticate (encrypted username/password by default) directly on it to gain access. So, the Samba 4 Server in this mode of operation will not be connected to a particular domain.
· Member Server: This is the server role configuration that will make Samba 4 operate as a server that is a member of one domain. Then, the authentication (username/password) will be validated by a Domain Controller (DC) on the network. The Samba 4 Server will forward the authentication/authorization task to a DC so it expects the encrypted passwords option to be configured to yes. We need to have in mind that this machine needs to be part of a Windows Domain (for example, it should have joined a valid Windows Domain). Another important point stated on the manual page is the fact that there is a need to still have valid Unix accounts to map file access and not just the accounts on the DC (Samba provides us with the Winbind service for this purpose).
· Classic Primary Domain Controller: This is one mode of the NT4-like domain operation, and in this mode, Samba 4 will provide logon services to the clients who have successfully joined the domain (for example, a single LAN/NetBIOS scope). We can have just one Primary Domain Controller (PDC) for each NetBIOS scope that is different from the next server role.
· Netbios Backup Domain Controller: As a Netbios Backup Domain Controller (NBDC), the Samba 4 Server will add redundancy and resiliency to an NT4-like domain logon service, as adding servers in this role will add a fault tolerance to our network service. As we can have just one server as the Classic Primary Domain Controller for each NetBIOS scope, the ability to have multiple NBDCs is vital for the availability of the NT4-like domain logon services.
· Active Directory Domain Controller: This is brand new functionality and a great feature of the Samba 4 Server. This server role gives us the ability to run the Samba 4 Server as an Active Directory Domain Controller (AD DC) on the network, providing us with a multitude of services (for example, logon, configuration management, and so on) as well as great administrative power for system administrators. In the previous chapter, we had gone through all the steps required to successfully deploy a Samba 4 Server in this role, and had a close look at the procedure required to set up a Samba 4 Server as an AD DC.
Implementing the AD authentication and authorization for GNU/Linux systems
When we start to talk about GNU/Linux operating systems' authentication and authorization mechanisms, we need to understand more about two important subsystems of this environment: PAM and NSS.
Pluggable Authentication Modules (PAM) is a modern system that relies on specific libraries to provide us with authentication services. As a general Application Programming Interface (API), all applications that are PAM-aware (for example, builds supporting PAM) can be integrated by the system administrator and can be authenticated using any authentication method that the PAM is configured to. This gives a lot of flexibility to the system administrators and also provides a centralized point to handle the users' authentication very effectively.
In an example scenario where an application is built to use PAM for authentication and the PAM subsystem is configured to authenticate users accessing local files (for example, /etc/passwd), switch the authentication mechanism for that application to authenticate in a LDAP server; for example, all we need to do is to reconfigure PAM to authenticate it on the LDAP server instead of reconfiguring this specific application. A more important point is that any other application that is configured to use the same PAM configuration will automatically be able to authenticate itself on the LDAP server too.
The Name Service Switch (NSS), on the other hand, is a scheme that will provide the name resolution for different services for the operating system when looking for specific database sources such as users, groups, hosts, networks, mail aliases, and so on. The NSS works by implementing specific services to access the different databases through separated modules. This is similar to the pluggable module approach by PAM, but very different in its purposes and the kind of services provided to the operating system.
As an example, in the case of users and groups, the operating system needs to map UID/GID for authorization to grant or deny access. The same application that had authenticated the user (for example, using PAM) will call functions from the NSS subsystem to inquire about the operating system to get such credentials (for example, getent(1)). GNU/Linux systems use both (PAM and NSS) facilities to provide us with the authentication/authorization, and we will learn how to configure them both to get our Debian GNU/Linux client fully integrated on our Active Directory network.
Now that we know about the subsystems that are involved in the authentication and name resolution of the operating system, we need to take a look at the applications that will integrate with these facilities, so we can have our GNU/Linux system work seamlessly within our Active Directory environment.
The GNU/Linux world as an open source environment is full of flexibility. So, we have many options to accomplish its integration with the AD DC, but we will focus on the pure Samba 4 approach. Using the same method through which we were able to integrate a Microsoft Windows machine with just a few configurations and without the complexity of many pieces of different software, the Samba 4 Project integrates all the features that are needed by the Samba software to facilitate the adoption and operation of the system administrators.
So, the program that integrates Samba with the PAM and NSS subsystems is called Winbind. The daemon (winbindd) is responsible for answering the inquiries from PAM (for the authentication requests); it is also responsible for answering specific requests from the operating system's NSS (for example, users and groups UID/GID). Winbind is part of the Samba Project and is fully integrated with the underlying protocols used by the Active Directory (for example, Kerberos).
To start our configuration tasks on PAM, NSS, and Winbind, we need Samba 4 installed on our Debian 7 GNU/Linux client machine. To make things easier, we can follow the instructions from Chapter 1, Installing the Samba 4 Server, to install the dependencies and the Samba 4 software itself. The only difference is that we don't need packages such as dhcp-server. With the help of the Samba 4 configuration commands, the default for the ads security support is described as auto, and with the LDAP libraries and all dependencies properly installed on the system, we will have no issues and don't need to explicitly use the options --with-ads during the Samba 4 installation.
Tip
ADS support is needed for our configuration, and if it's not available in our Samba 4 build, we need to take a look at our Samba 4 installation instructions before trying to explicitly enable it, in Chapter 1, Installing the Samba 4 Server, and fixing the issues as it should be enabled automatically.
After the configure phase, make, and make install processes are done, we can go ahead and integrate our system into our Active Directory environment. In this procedure, we will also learn how to deploy a GNU/Linux system as a Domain Member Server, as we will join it into the Active Directory Domain. Let's get started!
As we already know, Kerberos is a central point for the Active Directory services. So, task number 1 is to make sure that the time and date are fine and our DNS resolver is configured to be our Active Directory Domain Controller. In our example system, the Debian GNU/Linux system is configured to get all the network configurations through DHCP (for example, our AD DC).
In our network, just the Domain Controller has access to the Internet; because of that, to install the dependencies and clone the Samba 4 software, we have our AD DC providing Network Address Translation (NAT) for our LAN. This configuration can be quite handy, so here is a simple command-line procedure example to accomplish this (remember that it needs to be persisted if you want a permanent configuration):
leal@debian7:~$ sudo su
[sudo] password for leal:
root@debian7:~# sysctl -w net.ipv4.conf.all.forwarding=1
root@debian7:~# iptables -t nat -A POSTROUTING -s 192.168.1.0/24 -o eth0 -j MASQUERADE
root@debian7:~# iptables -A FORWARD -s 192.168.1.0/24 -i eth1 -j ACCEPT
root@debian7:~# exit
leal@debian7:~$
Tip
In the previous example, eth0 is the Internet interface.
When time, date, and DNS are checked, we can configure and test Kerberos. To do that, we'll just copy our Kerberos configuration from our AD DC (/etc/krb5.conf):
[libdefaults]
default_realm = POA.MSDCBRZ.EALL.COM.BR
dns_lookup_realm = false
dns_lookup_kdc = true
Task done, we can test it:
leal@debianclt:~$ kinit administrator@POA.MSDCBRZ.EALL.COM.BR
Password for administrator@POA.MSDCBRZ.EALL.COM.BR:
Warning: Your password will expire in 22 days on Sun Jul 14 17:55:04 2013
leal@debianclt:~$ klist
Ticket cache: FILE:/tmp/krb5cc_1000
Default principal: administrator@POA.MSDCBRZ.EALL.COM.BR
Valid starting Expires Service principal
22/06/2013 12:53 22/06/2013 22:53 krbtgt/POA.MSDCBRZ.EALL.COM.BR@POA.MSDCBRZ.EALL.COM.BR
renew until 23/06/2013 12:53
The result of the previous commands confirms that our Kerberos configuration is okay, and we can move on to the next steps. As we will need to configure our PAM and NSS system files to use specific modules, it's a good idea to have these libraries in place before such configuration. This is crucial because if we do the configuration without having the libraries configured, we can leave the system in an unresolved situation and many parts of the operating system (login included) might stop working.
Configuring the PAM and NSS libraries
The Samba 4 software that we compiled and installed has the PAM and NSS libraries that we need to use. The standard place for the PAM modules on Debian 7 (i386) is: /lib/i386-linux-gnu/security/. If we list the content of that directory, we will see many files following the same pattern such as pam_* (for example, pam_unix.so). The PAM module provided by the Samba 4 software has the same pattern and is located in /usr/local/samba/lib/security/ with the name: pam_winbind.so.
We will not mix the Debian 7 distribution files and programs with the Samba 4 software we installed (not using the distribution official packages), so we will just add a link on the standard location to reference our PAM Winbind module in our Samba 4 installation directory.
Let's just execute the following command at the Debian GNU/Linux client:
leal@debianclt:~$ ls /usr/local/samba/lib/security/pam_winbind.so/usr/local/samba/lib/security/pam_winbind.soleal@debianclt:~$
If the output of the previous command is the pam_winbind.so PAM module, we are good to go. If the result is No such file or directory or any other error, we need to review our Samba installation procedure from Chapter 1, Installing the Samba 4 Server, and check if all the dependencies described in that chapter were properly installed prior to our Samba 4 installation. Just go ahead to continue the configuration after the PAM module is ready and available on the system.
With the PAM module ready, we can inform the system of its presence. Just execute the following commands at one terminal at the Debian GNU/Linux client machine (in this example, we are listing the 32 bit library version):
leal@debianclt:~$ cd /lib/i386-linux-gnu/security/
leal@debianclt:~$ sudo ln -s /usr/local/samba/lib/security/\
pam_winbind.so
[sudo] password for leal:
leal@debianclt:~$ ls -l pam_winbind.so
lrwxrwxrwx 1 root root 44 Jun 21 08:33 pam_winbind.so -> /usr/local/samba/lib/security/pam_winbind.so
leal@debianclt:~$
Double-check the output of the preceding code to make sure that the link is pointing to the right location. If you have changed the default Samba 4 installation directory (for example, using a specific location with the -- prefix), you will need to change the previous command to reflect your setup.
After the PAM module link is created, we can create the link for the NSS. The standard location for the NSS libraries on the Debian 7 GNU/Linux is /lib (for example, /lib/x86_64-linux-gnu for 64 bit systems), and the name pattern is libnss_*. We should have thelibnss_winbind.so library in the Samba 4 installation directory, /usr/local/samba/lib/, so we will do a similar procedure to validate our Samba 4 installation before creating the link.
In one terminal window, just issue the following command:
leal@debianclt:~$ ls -l /usr/local/samba/lib/libnss_winbind*
lrwxrwxrwx 1 root staff 19 Jun 22 02:03 /usr/local/samba/lib/libnss_winbind.so -> libnss_winbind.so.2
-rwxr-xr-x 1 root staff 34223 Jun 22 00:04 /usr/local/samba/lib/libnss_winbind.so.2
leal@debianclt:~$
Notice the two lines that we have in the preceding output. One is for the libnss_winbind.so.2 file (the library itself), and the other is for compatibility/noversion purposes (libnss_winbind.so). Again, it is important to make sure that these two lines are present in the output of the previous command before moving on to the next steps. If we see any errors or the absence of any of the lines of the preceding code, we need to review our Samba 4 installation based on the procedure of Chapter 1, Installing the Samba 4 Server, and make sure that all the dependencies are properly installed on the system.
If everything is just fine, we can create the links for the NSS libraries—a procedure that is similar to the one we did for the PAM modules. We can do this by issuing the following commands:
leal@debianclt:~$ cd /lib/
leal@debianclt:~$ sudo ln –s /usr/local/samba/lib/\
libnss_winbind.so* /lib/
[sudo] password for leal:
leal@debianclt:~$ ls -l libnss_winbind.so*
lrwxrwxrwx 1 root root 38 Jun 21 08:33 libnss_winbind.so -> /usr/local/samba/lib/libnss_winbind.so
lrwxrwxrwx 1 root root 40 Jun 21 08:33 libnss_winbind.so.2 -> /usr/local/samba/lib/libnss_winbind.so.2
leal@debianclt:~$
Once again, it is important to double-check whether the links are right in place before going to the next phase of the OS configuration. As we confirm that the libraries for PAM and NSS are available on the system, we can configure the files to make use of them. Before that, we will create a minimal smb.conf file to configure our Samba 4 software and join Debian 7 GNU/Linux into our Active Directory Domain.
Here, we have a simple and fully functional smb.conf file to work with:
[global]
workgroup = POA
security = ADS
realm = POA.MSDCBRZ.EALL.COM.BR
encrypt passwords = yes
template shell = /bin/bash
idmap config *:backend = rid
idmap config *:range = 100000-200000
winbind use default domain = yes
winbind enum users = yes
winbind enum groups = yes
The workgroup and realm are the same as our AD DC. Note that the encrypt passwords option is configured to yes as we mentioned it as a requirement when configuring a Samba 4 Server as a Domain Member Server. We have a general template configuration for the login shell configured to /bin/bash. Without this configuration, our users will not be able to log in, as the login shell attribute will be translated by the Samba 4 Server to the default value /bin/false.
Tip
In our configuration, we have a Samba 4 Server in the AD role, but we can join Samba 4 as a member server of Microsoft Windows AD Domain Controller too.
Next, we have two lines starting with the directive idmap. As we mentioned at the beginning of this topic, there are many ways to integrate GNU/Linux into an Active Directory Domain, and one of the options is related to the approach of handling the users and groups IDs. Samba controls these options through the directive idmap config backend, and in this example, we are using rid. The reasons for this choice are basically related to the following three rid backend characteristics that we want for our environment:
· Simple: With this backend, Winbind doesn't need to maintain a local database to persist the users' and group's ID translations. This is a great feature as we want to add more GNU/Linux systems to our Active Directory Domain, but to maintain all the systems with the DBs in sync is not a task we want. This is why we have an AD DC in the first place.
· Deterministic: The translation of the users' and groups' IDs is deterministic; by these means, it follows a formula to actually have the translation consistent between different GNU/Linux Domain Member Servers. The translation is made on the fly and cached locally, not needing a local idmap database as a point of failure and an administration headache.
· No need to manage UID/GID on the AD DC: Another great advantage of this backend is that we don't need to populate the UID and GID numbers in our Active Directory Schema. As the translation is made following a formula on the fly, we don't have to worry about creating UID or GID during the creation of the user and group, and we don't need to handle complexities such as collision.
Every solution is based on trade-offs and features that system administrators may or may not want (or need) for their environments. This is why Samba provides us with many options, and flexibility is the mother of all good software. The second idmap config line is the range that the rid backend will utilize in its formula to generate the user and group IDs. From the Samba Project Documentation [1], this is the formula for the rid backend UID/GID translation:
UNIX ID for a RID:
ID = RID - BASE_RID + LOW_RANGE_ID
RID from a UNIX ID:
RID = ID + BASE_RID – LOW_RANGE_ID
Tip
We gave a 100,000 ID range for the rid backend utilization of the translations.
The last three lines are Winbind directives and the first one (use default domain = yes) is a configuration option that lets the users be referenced using just the username (for example. striping the domain part). As our environment is one domain only, we can use it without any problem. If we were deploying a multidomain solution, we probably would not be able to use this feature as we could potentially have username collisions.
The enum users and enum groups options are needed, so Winbind is able to enumerate domain users and/or groups. This is an important feature and is crucial for the operating system to work properly (for example, Name Service Switch), to obtain detailed information about users and/or groups.
As we can see, our configuration file is very practical and simple; we have used the excellent Samba project's documentation to understand the features that we need and use them. However, there are many other options that we can use in the future, but that is a case-by-case analysis and the important point is to use what is needed and keep the configuration simple, just adding features or restrictions that are really needed for the environment. Many installations (for example, sites) have options and configurations in many systems that nobody knows why. This can be a security risk and a useless complexity for sure. Keep in mind that we need to know and understand every option we have in any configuration file, for any system under our management.
Joining the Debian 7 GNU/Linux into our Active Directory Domain
Now we can join our Debian 7 GNU/Linux system into our Active Directory Domain with the following command:
leal@debianclt:~$ sudo net ads join -U administrator
Enter administrator's password:
Tip
We need to remember to add the /usr/local/samba/sbin and /usr/local/samba/bin directories to our PATH variable, or we will need to use the absolute pathnames for commands such as the preceding one.
After providing our Domain administrator's password at the prompt, we would receive the following output after a few moments:
Using short domain name -- POA
Joined 'DEBIANCLT' to dns domain 'poa.msdcbrz.eall.com.br'
After this, our system becomes part of the Active Directory Domain as a Member Server, and we can start the winbindd daemon and perform some tests before going further and configuring the system files for the PAM and NSS. As soon as we validate that the Winbind is fully working, we will move on to the final tasks.
Just issue the following commands at the Debian 7 GNU/Linux client machine:
leal@debianclt:~$ sudo winbindd
[sudo] password for leal:
leal@debianclt:~$ wbinfo -u | head -9
mawallace
brshaft
chkoons
mawhitaker
juwinnfield
qumichael
spbennett
brcoolidge
cafreeman
The first of the preceding commands starts the Samba 4 Winbind daemon (winbindd), and if you are following our procedure in a lab and using our same users, you should see a similar output that shows you the first 10 users of our domain after the second command. In case you are implementing in a test environment (for example, a clone subset of your production), you should see the first nine users of your domain.
Let's try to enumerate our domain groups now:
leal@debianclt:~$ /usr/local/samba/bin/wbinfo -g | head
allowed rodc password replication group
enterprise read-only domain controllers
denied rodc password replication group
read-only domain controllers
group policy creator owners
ras and ias servers
domain controllers
enterprise admins
domain computers
cert publishers
With the output of the preceding commands, we confirm that our environment is in good shape and we can go ahead and configure the operating system to be aware of the AD DC users and groups, so as to be able to authenticate and authorize them onto our system.
Tip
Before starting the configuration of the PAM and NSS subsystems, it is a good idea to have more than one root shell on the machine (for example, the Debian 7 GNU/Linux client). So, in the case of any mistakes, we can use the other root shells to fix it or rollback the configuration.
To configure NSS, we need to edit the /etc/nsswitch.conf file. For that, we just need to add the winbind keyword after the compat directive in three lines, just like the following example:
# /etc/nsswitch.conf
#
# Example configuration of GNU Name Service Switch functionality.
# If you have the `glibc-doc-reference' and `info' packages installed, try:
# `info libc "Name Service Switch"' for information about this file.
passwd: compat winbind
group: compat winbind
shadow: compat winbind
The PAM architecture was created to provide us with a pluggable model for the authentication and for other tasks such as setting the password, managing the account and session; it also has some control flags (for example, required, optional, sufficient [2]). So, the different GNU/Linux distributions organize the files and configurations in a very specific way. For our Debian 7 system, we have four common files used by the majority of applications (for example, Secure Shell/SSH): common-auth, common-account, common-password, andcommon-session. All files are located in the directory: /etc/pam.d/.
Starting with the common-auth file, we need to add the following line before the standard authentication line that uses the pam_unix.so module:
auth sufficient pam_winbind.so
auth [success=1 default=ignore] pam_unix.so\
nullok_secure use_first_pass
Notice that we added an option to the auth line for pam_unix.so (use_first_pass) in the preceding commands. This is an option to actually use the same password that the user provided in the first interaction; in the others, authentication options are configured. Another important point is the flag sufficient we have used on our pam_winbind.so line from the PAM RFC.
With this flag, if the module succeeds, the PAM framework immediately returns success to the application without trying any other modules.
This is the behavior we need as we are saying, "If the user has the right credentials on our AD Domain Controller (for example, username/password), let him/her pass to the next PAM's validation on the stack."
For the common-password file, we add the following command (again, just before the pam_unix.so line):
password sufficient pam_winbind.so
password [success=1 default=ignore] pam_unix.so obscure sha512
This time, we don't add any options to the pam_unix.so line, and we are using the same sufficient flag. We do the same for the common-account file:
account sufficient pam_winbind.so
account [success=1 new_authtok_reqd=done default=ignore] pam_unix.so
The only file we will need to add to the two lines is in the common-session file. As we are not creating the users on our GNU/Linux systems, we do not have the home directories created beforehand. So, for our users to be able to log in, we need to make sure that he/she will have a home directory before allowing them to access the system. Notice that we use the following required flag for the pam_mkhomedir.so PAM module:
session required pam_mkhomedir.so skel=/etc/skel/ umask=0022
session required pam_winbind.so
session required pam_unix.so
If we have a problem creating the user home directory, then that module will return an error code. As the flag is required, PAM will understand that one step of the authorization process was broken (one that is required), and will deny the access.
Here is an excerpt about PAM RFC [ 2 ]: With this flag, the module failure results in the PAM framework that returns the error to the caller _after_ executing all other modules on the stack.
PAM is a powerful authentication framework and to cover it all is outside the scope of this book. However, there are many great sources of real good content on the Internet, apart from entire books about the subject. You can take a look at the manual page of your GNU/Linux distribution (for example, man PAM), as it's a very good starting point.
We have just edited important system files, and if anything is wrong, we can get stuck without being able to authenticate in our machine. So, it's important to validate and check that everything is right before leaving our root shell. It's a good advice to actually use a root shell and not sudo vi to do these tasks because if we did something wrong, maybe we will not be able to authenticate it again to fix it.
So, let's see if we are still able to log in to the system using our local user account (for example, leal), and become root:
leal@debianclt:~$ ssh localhost
leal@localhost's password:
Linux debianclt 3.2.0-4-686-pae #1 SMP Debian 3.2.46-1 i686
The programs included with the Debian GNU/Linux system are free software;
the exact distribution terms for each program are described in the
individual files in /usr/share/doc/*/copyright.
Debian GNU/Linux comes with ABSOLUTELY NO WARRANTY, to the extent
permitted by applicable law.
You have new mail.
Last login: Sat Jun 22 02:10:05 2013 from debian7.local
leal@debianclt:~$ sudo su
[sudo] password for leal:
root@debianclt:/home/leal#
Excellent! Now, we can perform some tests to validate whether our system can recognize our Domain users and groups, and after that, try to log in to the system using one of our Domain users. In a terminal in the Debian 7 GNU/Linux client machine, issue the following command:
leal@debianclt:~$ for x in `wbinfo -u`; do echo -n "User: $x `id$x`"; echo ""; done
We should see a long list with all our 50 users and some standard AD users (for example, guest). But we are actually listing the Unix information for them, and so let's see an excerpt of that output:
User: mawallace uid=101191(mawallace) gid=100513(domain users)groups=100513(domain users)
User: brshaft uid=101220(brshaft) gid=100513(domain users)groups=100513(domain users)
User: chkoons uid=101196(chkoons) gid=100513(domain users)groups=100513(domain users)
User: mawhitaker uid=101199(mawhitaker) gid=100513(domain users)groups=100513(domain users)
User: juwinnfield uid=101188(juwinnfield) gid=100513(domain users)groups=100513(domain users)
We can see the first five users, with their respective UIDs and GIDs, in the output of the preceding commands. As we know the formula that the idmap uses to do the translation of the IDs, let's take a look at the first one and see if it makes sense. Just type the following command in a terminal window:
leal@debianclt:~$ wbinfo -n mawallace
leal@debianclt:~$ S-1-5-21-721742975-1223580478-3920759553-1191\ SID_USER (1)
The idmap formulae is:
· ID = RID - BASE_RID + LOW_RANGE_ID
· ID = 1191 – 0 + 100000
· ID = 101191
Tip
BASE_RID is 0 by default and deprecated [1].
So far so good; now, let's look at a proper passwd entry (for example, getent), and see the NSS in action. Just type the following command at the terminal to see how Marsellus Wallace looks like:
leal@debianclt:~$ getent passwd mawallace
mawallace:*:101191:100513:Marsellus MW. Wallace:/home/POA/mawallace:\
/bin/bash
leal@debianclt:~$
This is exactly how a passwd structure should be, and Marsellus Wallace could now try to access the Debian 7 GNU/Linux client system, but before that, let's just take a look at the end of the passwd line of the preceding code. Notice that the home directory is defined as /home/POA at a high level, and we do not have the top-level directory for our Domain users just yet. So, before the user is actually able to access the system, we need to create the /home/POA top directory. We can issue the following command:
leal@debianclt:~$ sudo su –
Password:
root@debianclt:~# mkdir /home/POA && echo OK
OK
root@debianclt:~# exit
leal@debianclt:~$
Remember that we don't need to create the user's home directory (for example, mawallace) because our PAM stack at the session phase will use the pam_mkhomedir.so module to do that for us, if needed. So, Marsellus Wallace can now try to access the system using SSH:
leal@debianclt:~$ ssh localhost -l mawallace
mawallace@localhost's password:
You need to change your password now
Creating directory '/home/POA/mawallace'.
Linux debianclt 3.2.0-4-686-pae #1 SMP Debian 3.2.46-1 i686
The programs included with the Debian GNU/Linux system are free software;
the exact distribution terms for each program are described in the
individual files in /usr/share/doc/*/copyright.
Debian GNU/Linux comes with ABSOLUTELY NO WARRANTY, to the extent
permitted by applicable law.
WARNING: Your password has expired.
You must change your password now and login again!
Changing password for mawallace
(current) NT password:
Enter new NT password:
Retype new NT password:
passwd: password updated successfully
Connection to localhost closed.
leal@debianclt:~$
Perfect! Now we can see that the user was forced to change his/her password as it was the first login and we created all our users with the password expiration flag enabled. After the user was logged out automatically, let's see if the home directory was created with the right credentials:
leal@debianclt:~$ ls -ld /home/POA/mawallace
drwxr-xr-x 2 mawallace domain users 4096 Jun 22 17:35/home/POA/mawallace
leal@debianclt:~$
Tip
Take a look at the UMASK for the home directory creation in the common-session PAM configuration file, and you can configure it according to your domain's security standards/policies.
Let's see what happens if the user tries to log in again:
leal@debianclt:~$ ssh localhost -l mawallace
mawallace@localhost's password:
Linux debianclt 3.2.0-4-686-pae #1 SMP Debian 3.2.46-1 i686
The programs included with the Debian GNU/Linux system are free software;
the exact distribution terms for each program are described in the
individual files in /usr/share/doc/*/copyright.
Debian GNU/Linux comes with ABSOLUTELY NO WARRANTY, to the extent
permitted by applicable law.
Last login: Sat Jun 22 17:35:14 2013 from localhost
mawallace@debianclt:~$ pwd
/home/POA/mawallace
mawallace@debianclt:~$
As we can see, with this procedure, it is really simple to quickly integrate a GNU/Linux system into an Active Directory Domain, as in a few minutes we had a Member Server ready to be authenticated without any hurdle. In the rest of the chapters, we will learn how to create a highly available file server in more detail so that we can host our home directories in a central server and provide mobility and consistency to our users, when accessing different GNU/Linux machines.
Starting with the basic concepts for Group Policies on Samba 4
System administrators are always looking for ways to do more for their IT environment while spending as few of the organization's resources (for example, money and time) as possible. The main concern when we need to do any work is about the time we will spend on it, so we need to be efficient and effective in our actions to accomplish the right task at the right and minimum time. So, in the systems administration task, this challenge is more real than ever as there is a need to be efficient while managing dozens or thousands of users and at the same time controlling one or thousands of servers with the same level of availability and service features that our customers expect.
Any company's environment is a moving and evolving live organism where computers, services, and people have relationships that can quickly become highly complex. At the same time, the management of these assets needs to be scalable enough to provide and sustain these relationships, as they are a vital part of any organization. Samba 4 with its compliant Active Directory Domain Controller implementation, provides a central tool for configuration and change management for system administrators and managers to cope with demanding characteristics like the ones we just presented in the Group Policies.
Group Policies Objects (GPO) are settings or a set of rules that are applied for a group of users and computers, from logon/logoff scripts to shutdown/start up routines. The objective of this book is not to be an exhaustive guide about all the GPO features or the Active Directory functionalities, as there are whole other books for these specific subjects. However, it must provide you with a good starting point to understand its general characteristics while also trying to help you understand how the powerful Samba 4 Server becomes integrated with these features.
The implementation of Group Policies is very site dependent with regards to all the security rules and policies for each organization, the structure of the Active Directory implemented, and the experience of the system administrators. This is because GPOs are applied to users and/or computers and linked to the OUs, affecting all users and/or computers within one or more specific OUs. We will use some general examples and our Microsoft Windows 2008 machine to execute the administration tasks and create the GPOs at our Samba 4 Active Directory Domain Controller.
In the last chapter, we showed how to install the tool to manage the Active Directory users and computers, and here, we have used it to create the organizational units that we planned for our environment. Now we will add another important feature to our Active Directory management kit in the previously configured Microsoft Windows Server, which will give us the ability to perform the Group Policy management:
1. Log in to our Microsoft Windows 2008 machine, open the Server Manager, and choose the to add features option. Then, we check the Group Policy Management box as shown in the following screenshot:
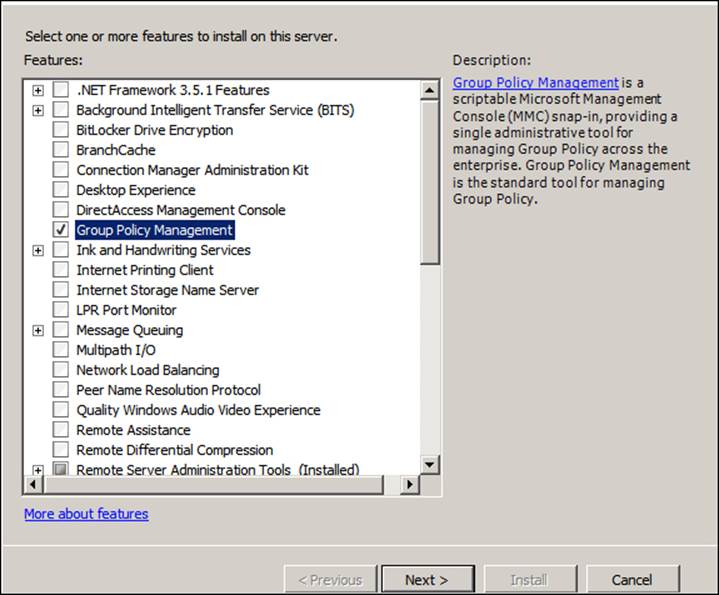
2. As we can see from the description displayed on the left side of the preceding screenshot, this is the standard tool to manage the Group Policy Framework. Just click on the Next button and then click on Install (note that the machine will need to be restarted to finish the installation).
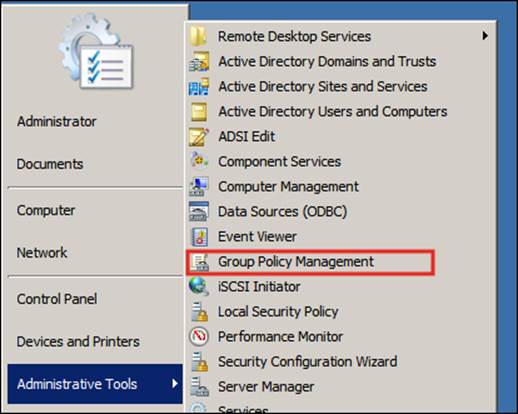
3. After the restart, we can navigate to Start | Administrative Tools | Group Policy Management to open the tool. Take a look at the following screenshot:
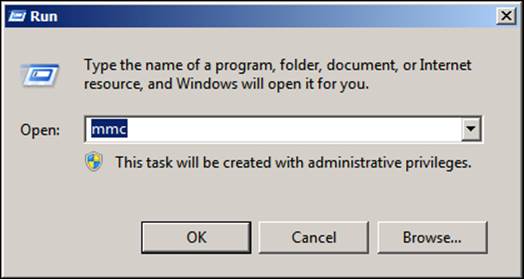
4. To facilitate our management work, to have all the tools we need in one place, and to have quick access to them, we will execute another procedure before we start working on the GPO. We will create a console with the two snap-ins that we have installed:Active Directory Users and Computers and Group Policy Management. Just press the Start button, click on Run, and execute the mmc console:
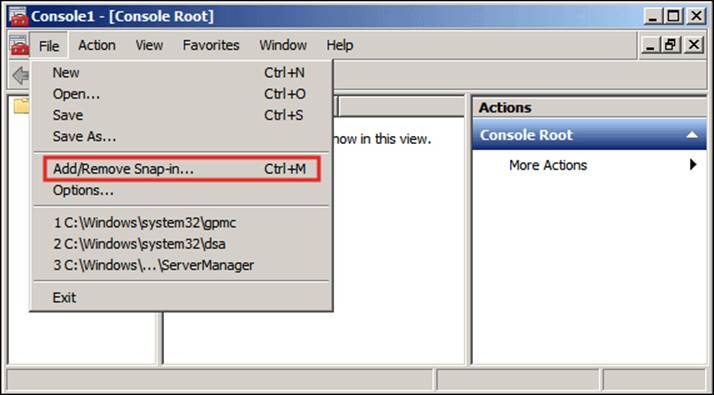
5. The console root will show up, and we can navigate to File | Add/Remove Snap-in… (or the shortcut Ctrl + M) to start creating our customized administration console. In the following screenshot, we can see these steps:
6. In the following screenshot, we will have the available features installed on our machine to add to our custom console. Let's first add the Users and Computers snap-in:
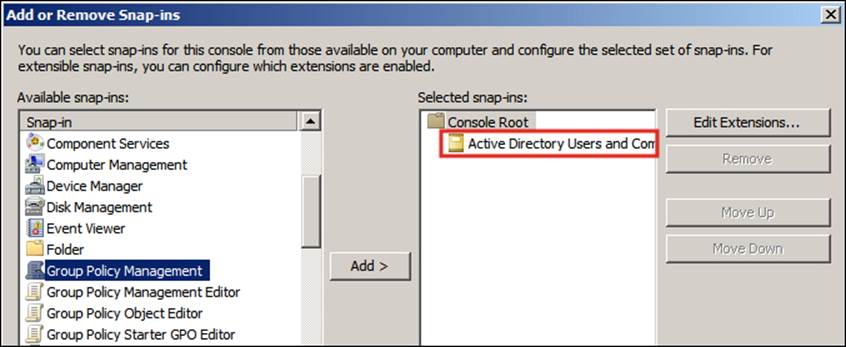
7. After this, we add the Group Policy Management snap-in:
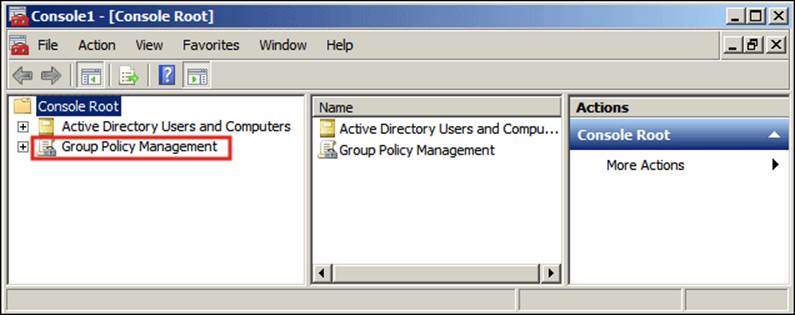
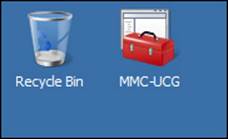
8. Now all we need to do is navigate to File | Save as and choose the destination of our custom console for quick access. In our example, we saved the custom console to the desktop, as shown in the following screenshot:
With this procedure, we have just created a custom console with our two main administrative tools that we need for now. Hold this process to use it later and save time switching applications, with all the management tools organized and quickly accessible. We can create as many customized consoles as we want, and as we add more snap-ins or features to our system, we can change our settings and save a newer version.
Tip
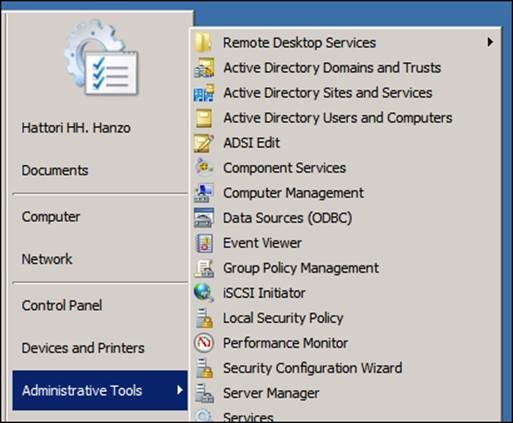
If we want, we can access all the different administrative tools separately through the Administrative Tools menu.
Let's launch our customized console and start the Group Policy management tool, so just double-click on the MMC-UCG icon from where you have saved it:

In the previous example, we have just expanded Active Directory Users and Computers and Group Policy Management as well as the Forest and Domain trees to show you the structure that we will work on. Notice that we have expanded our People OU and we are able to see these OUs: Power Users and Standard Users. Our objective is to separate one system administrator from the Standard Users OU (Django Fox), and move him to Power Users. So, we can give him administrative powers (for example, delegate him the Group Policies management on the Standard Users OU).
Allowing a user to create Group Policies
This task is divided into two procedures; first, we will add the permission for the user to create GPOs and after that, we will allow him to link them to the Standard Users OU. The user Django Fox (username: djfox) can open the Group Policy Management Console, but as we can see in the following screenshot, he is not able to create Group Policies:
Use the following steps to gain permissions to create Group Policies:
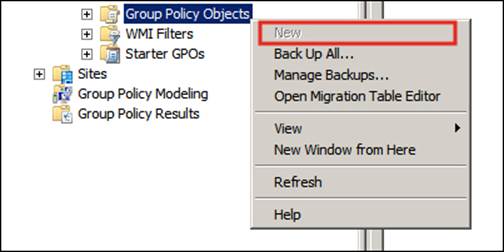
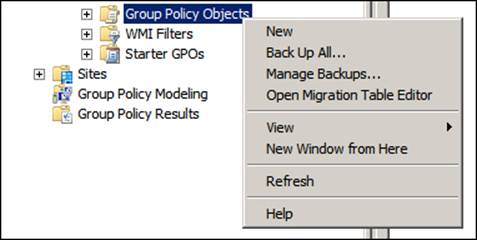
1. In the preceding screenshot, we can see that the New option that would be used to create a new GPO is disabled for this user. So, what we need to do is log in as the Domain Administrator and give Django Fox the right permissions. Just open the MMC-UCGcustomized console and click on Group Policy Objects as shown in the following screenshot:

2. After it is selected, look at the right pane and click on the Delegation tab. We should see a screen like the one shown in the following screenshot:
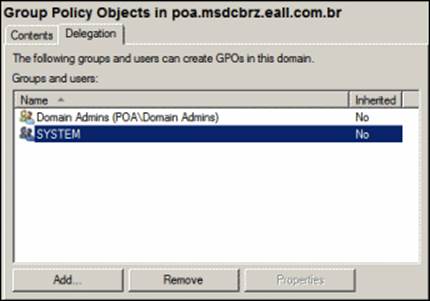
As we can see from the preceding screenshot, we have two groups that can create the GPOs in our Domain. We could do the same and create a group to manage our specific users that we plan to delegate a GPO creation to, but in this example, we will follow a different path as a learning opportunity.
3. To add our user djfox to that list, we just click on the Add... button at the bottom of the previous screen, and before we fill the username, let's click on the Object Types option. Take a look at the following screenshot:
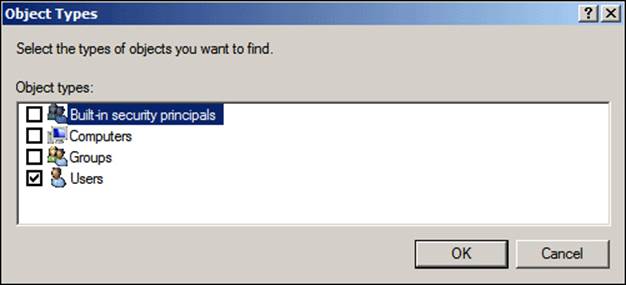
4. In the previous example, we checked just the Users box. In the following dialog box, we will write the username of our user and click on the Check Names button. We can see the result in the following screenshot:
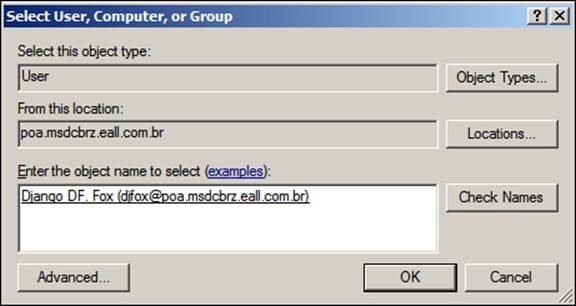
5. Automatically, the system will fill the full name and the location (for example, the domain) of our user. Just click on OK and the delegation screen for the GPO will be shown, now with the user Django Fox listed together with the prior two groups:
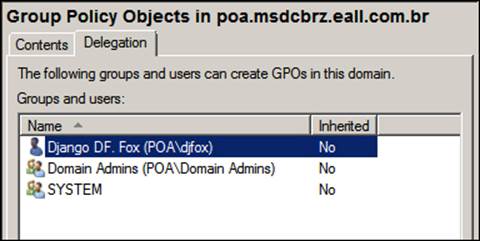
6. Now, the djfox user has the permission to create Group Policies in our domain. If the user djfox logs in and tries to create a GPO, the New option will now be enabled:
However, this permission is not sufficient, as shown in the following screenshot. To be effective, the user needs the ability to link the GPOs to one or more OUs. In our use case, we want him to be able to manage the GPOs for the Standard Users OU.
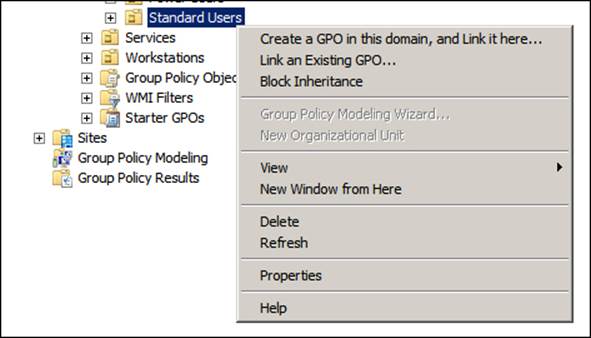
Notice what happens when the user djfox tries to right-click on the Standard Users OU to see what administrative options are available to him:
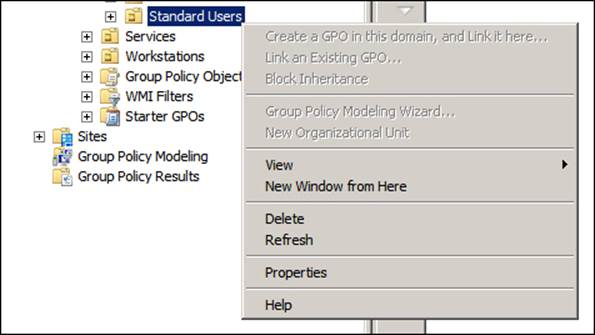
In the preceding screenshot, we can see that the Link an Existing GPO... option is disabled (the first option is disabled too because the first option is to create and link to this OU).
Allowing a user to link Group Policies to OUs
Back in our Domain Administrator's session, we can select the Standard Users OU. Take a look at the right pane (Delegation tab) of the following screenshot for the link GPOs permission:
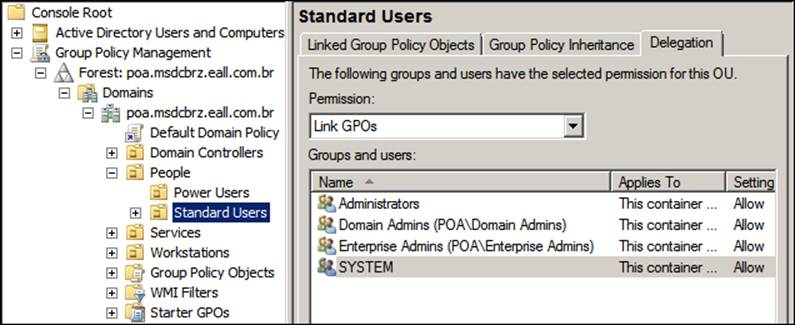
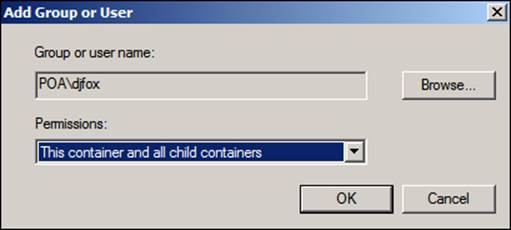
So, we need to add our user to the Delegation list, and we do so by clicking on the bottom of the screen in the Add... button. Fill the username djfox and click on Check Names. After our user's full name appears, we can click on OK, select This container and all child containers, and click on OK again:
After this, we will be able to see our user in the listing of the Standard Users delegation, for linking the GPOs to this OU:

Let's see this time what happens when the user, Django Fox, logs in and tries to check his administrative options at the OU of Standard Users again. We can check this in the following screenshot:
As we can see in the previous screenshot, the task is done. We can also see that now the user, Django Fox, can link GPOs to the Standard Users OU. Before we actually click on the first option and start to create a GPO, let's take a look at the Start menu for the user, Hattori Hanzo, (username: hahanzo) to see how it looks:
As we can see, the Administrative tools menu option is available, so all the tools are listed for the one user who is not an administrator and is on the Standard Users OU.
Creating a Group Policy
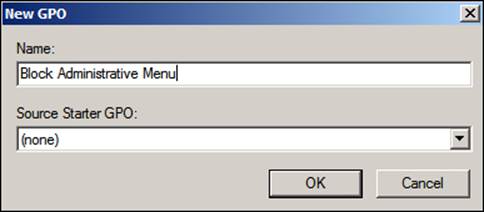
So, back in the Django Fox session, let's click on the first option, Create a GPO in this domain, and then click on Link it here... and create a Group Policy for the Standard Users OU. The GPO that the djfox user will create will be called Block Administrative Menu, so all users on the Standard Users OU will have the Administrative Tools menu hidden. Take a look at the following screenshot:
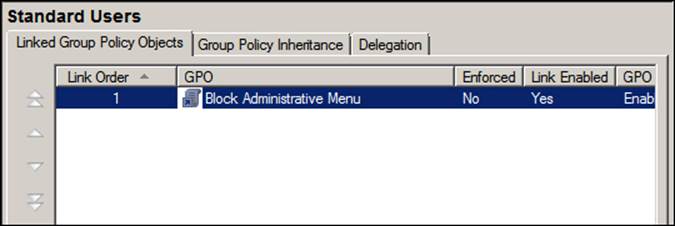
After we click on OK, we select the Linked Group Policy Objects tab on the right pane of the following screenshot and see that our brand new GPO is listed and enabled:
Right-click on it and click on Edit. The Group Policy Management Editor will open, and on the right pane, we navigate to User Configuration | Preferences | Control Panel. Right-click on the last item, Start Menu, and navigate to New | Start Menu. The following screenshot shows you these selections:
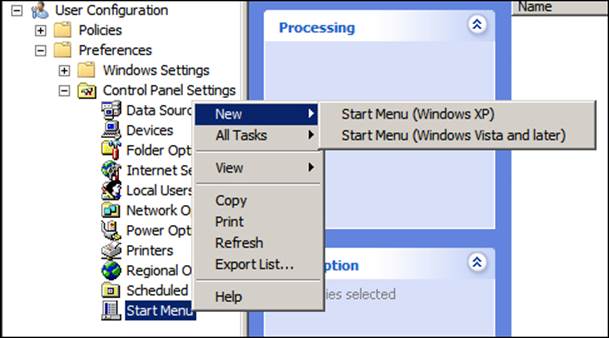
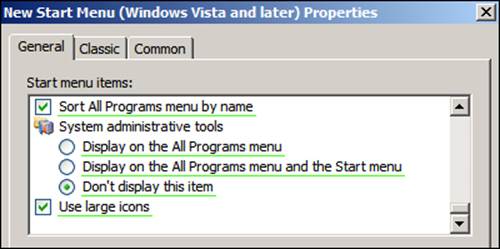
The following screenshot will be a dialog box that displays the properties of the Start Menu menu under the New tab. At the end of the list of Start menu items, we will see one item named System administrative tools. We need to check the Don't display this item option if it is not checked already. Take a look at the following screenshot to see how it must be configured:
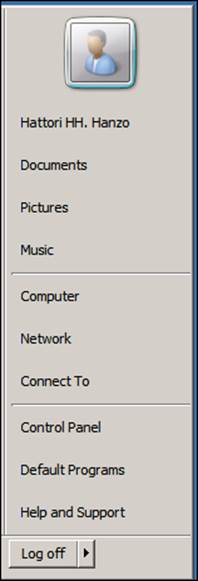
Just click on OK and we should have a new Start Menu menu in our GPO. Now we can close the editor and test our user again from the Standard Users OU (for example, hahanzo) to see if the administrative tools are still present or not. The following screenshot shows you a screenshot of the hahanzo user's desktop, where we can see that the Administration Tools menu option is absent:
Remember that Group Policies are complex subjects, and to actually prevent unauthorized users to have access to the administrative tools, we need to make more adjustments for the system and enhance our GPOs to make sure that we cover all the possibilities (for example, the customization of our user's menu) to actually have our policy fully applied.
Trust relationships and replication with Samba 4
Samba 4 is a brand new software that was released in 2013 and is already pretty stable and as we are learning, full of features. However, as this is a new release, there are many challenges and some of its components need to evolve. At the time of writing this book, the SysVol share has no replication currently implemented [3], and a workaround needs to be used to replicate the changes [4]. Trust relationships are not fully implemented, and as a result, Samba 4 can be trusted but it cannot trust [4].
All the directory replications are already implemented and fully functional. We will add another Domain Controller to our Debian 7 GNU/Linux Samba 4 Server AD DC, and verify if the replication of users, groups, and our GPO is properly synced.
Tip
The Samba 4 status for many different parts of the code can be checked at the following site:
https://wiki.samba.org/index.php/Samba4/Status
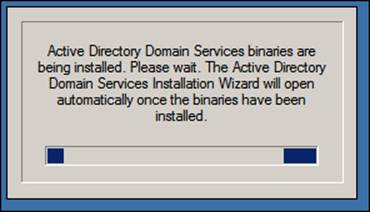
To add our Microsoft Windows Server 2008 as an additional Domain Controller, we just need to log in as a Domain Administrator and execute the dcpromo utility; just navigate to Start | Run and execute dcpromo. If the Active Directory Service binaries are not already installed in the system, we should be presented with a screen similar to the one shown in the following screenshot:
The preceding screenshot shows you that the operating system automatically installs the needed components and after that, it will start the AD DC installation wizard. When that process is finished, we will actually be presented with the wizard and the following message will be displayed: This wizard helps you install Active Directory Domain Services (AD DS) on this server, making the server an Active Directory domain controller. To continue, click Next. So we just need to click on Next twice, and we will be able to see the following screenshot:
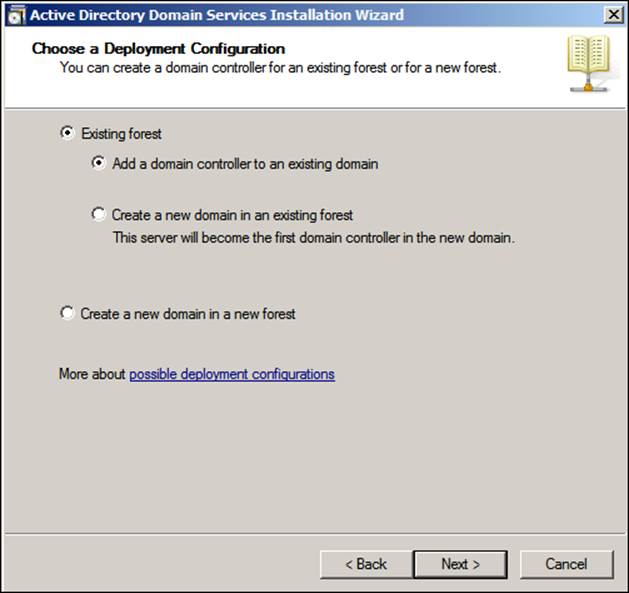
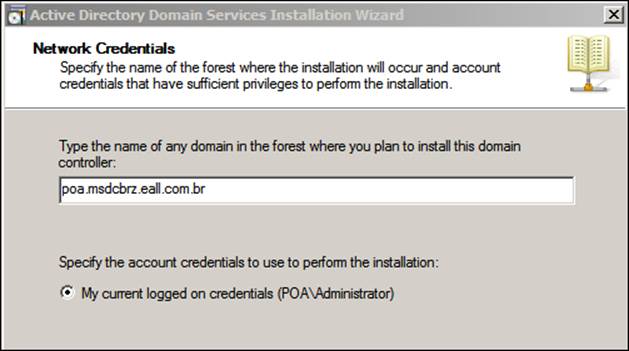
As we will add this new Domain Controller in an existing forest and to an existing domain, we choose the first option and click on Next. The following screen will ask for the credentials and confirm the domain that we want to join, so we just click on Next:
In the following two screenshots, we will just need to confirm our domain and site (we can click on Next twice without changing any option). Following this screen, we will be presented with the Additional Domain Controller Options screen:
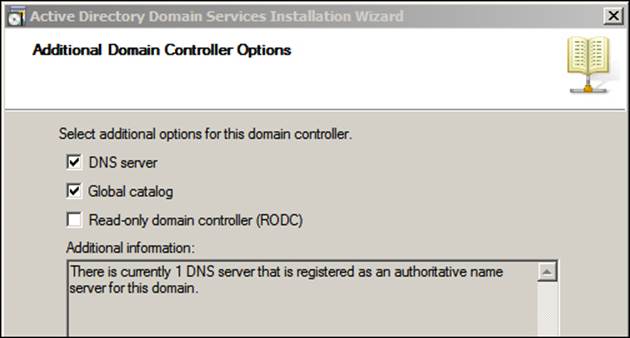
We will examine some of our DNS configuration, and in the following screenshot, we can change the path for the SysVol and log files, if we want. As we will use the default values, we just click on Next, and then we are presented with a screen to set the recovery mode administrator's account password:
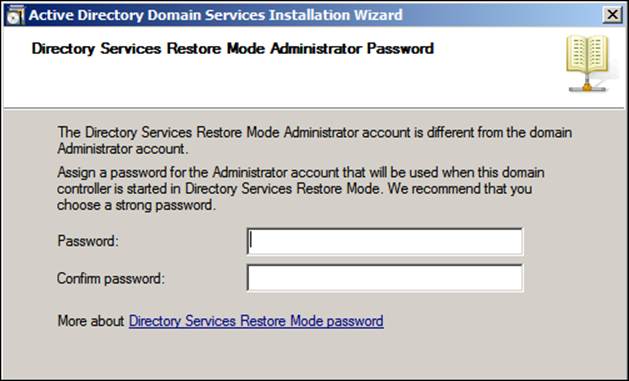
We need to choose a strong password as advertized and click on Next, review all our answers, and then click on Next for the last time. We will see the progress screen that shows us the process to be added to our new server as an additional Domain Controller to our Active Directory Domain:
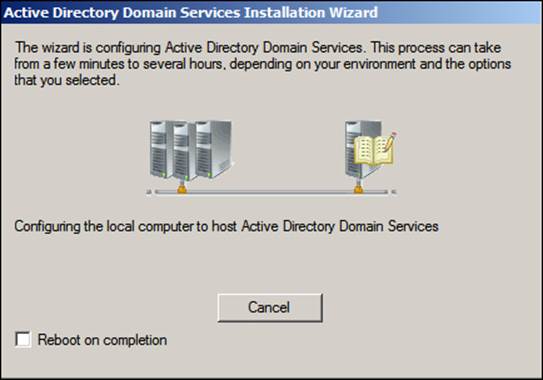
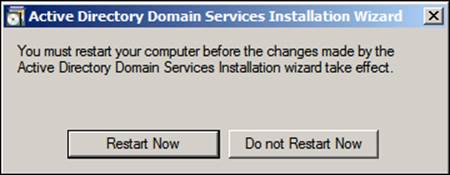
Just click on Finish in the last screen, and we'll need to restart the computer, as shown in the following screenshot:
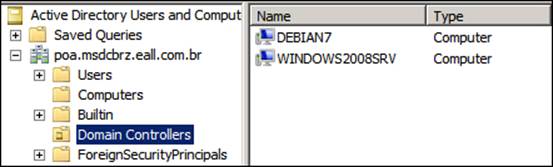
After the restart, open the Active Directory Users and Computers (dsa.msc) snap-in, and click on Domain Controllers. We should see both servers listed, as shown in the following screenshot:
Now let's open our Server Manager and navigate to our DNS Services and check whether our DNS configuration was replicated and whether everything is fine, as DNS is very important to our Active Directory Services. Take a look at the following screenshot:
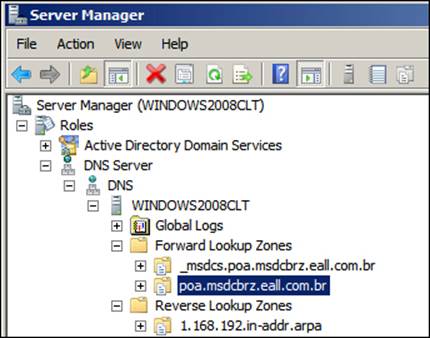
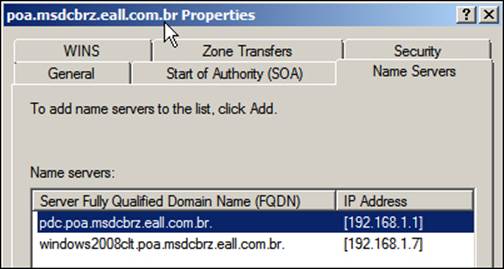
As we can see in the preceding screenshot, our Forward Lookup Zones and Reverse Lookup Zones folders are present, and if we right-click on our domain—which is poa.msdcbrz.eall.com.br—and click on Properties, we can check the Name Servers tab and check whether we have our two DNS Servers registered (PDC and WINDOWS2008CLT):
In the preceding screenshot, we can see that our new Active Directory Server was added perfectly to our domain, so we can use the repadmin command to verify that everything is up to date and the synchronization process between the two Domain Controllers is fine as shown in the following screenshot:
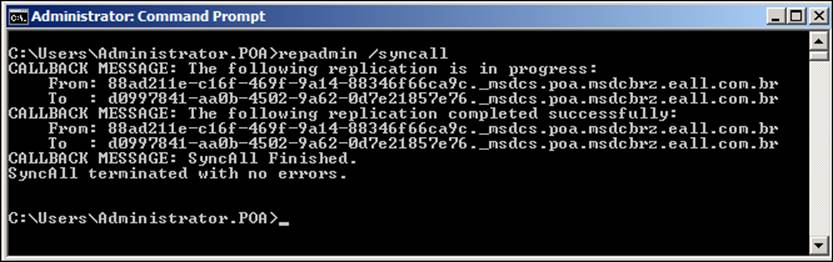
So, with this procedure, we can be sure that everything is updated and our Domain Controllers are in sync.
Tip
In a GNU/Linux system, we can use the dig utility to test our brand new DNS server and confirm that it is answering the DNS queries, issuing the following command:
dig poa.msdcbrz.eall.com.br mx @windows2008clt
Summary
In this chapter, we learned about the different roles that the Samba 4 Server can play on the network. We also learned how to basically manage the server using a Microsoft Windows Server 2008. We have installed the tools needed to manage it, and all the installation process was explained. The reader was introduced to the Group Policy feature and also learned how to implement the centralized change and configuration management for users and machines using this powerful administrative functionality. The reader also learned how to create a custom management console to have all the management tools that we have used until this point in one place.
We have learned how to get the authentication and authorization working on Samba 4 for GNU/Linux Systems using the Debian distribution as an example. We have seen how to configure two important subsystems from the GNU/Linux systems authentication and name resolution: Pluggable Authentication Modules (PAM) and the Name Service Switch (NSS). Also covered in this chapter were the status and current limitations of some replication code and the trust-relationship characteristics of the Samba 4 Server as an Active Directory Domain Controller. We also explained how to add a Microsoft Windows Server 2008 as an additional Domain Controller that shows you the directory/DNS replication feature.
In the next chapter, we will learn how to replace a Microsoft Windows Active Directory Server with a Samba 4 Server as well as the key points of consideration to have in mind before performing such a task.
All materials on the site are licensed Creative Commons Attribution-Sharealike 3.0 Unported CC BY-SA 3.0 & GNU Free Documentation License (GFDL)
If you are the copyright holder of any material contained on our site and intend to remove it, please contact our site administrator for approval.
© 2016-2026 All site design rights belong to S.Y.A.