Implementing Samba 4 (2014)
Chapter 6. Printing and File Services
This chapter will cover the file and printing services for the Samba 4 Server; we will discuss some differences between the file and printing capabilities of Samba Server Versions 3 and 4.
In this chapter, we will cover the following topics:
· SMB/CIFS (Common Internet File System) protocol versions and Samba 4
· Samba 4 file and print server daemons
· Microsoft Windows print driver Versions 3 and 4
· Configuring a printer on the Samba 4 Server host using CUPS
· Sharing the printer on a Microsoft AD network using Samba
· Microsoft Windows Point and Print Samba Server configuration
· File sharing with Samba 4
Introducing SMB/CIFS protocol versions and Samba 4
Starting from the first release of the Samba Server Version 4 (4.0.0), the software now supports the SMB file that serves the protocol Version 2.1 of Microsoft; it also provides preliminary support for the SMB protocol Version 3.0 [18]. The SMBv2.1 has been a great achievement for the Samba project since the introduction of the SMBv2.0 on Samba Version 3.6. Major improvements that Version 2.1 brings, as compared to Version 2.0 (from the Microsoft announcement), are mainly performance enhancements [19], listed as follows:
· Client oplock leasing model
· Large MTU support
· Improved energy efficiency for client computers
· Support for previous versions of SMB
Tip
You can read more about the changes between the protocol Versions 2.0 and 2.1 and more about each individual feature at the official Microsoft reference [19]: http://technet.microsoft.com/en-us/library/ff625695%28v=ws.10%29.aspx
The official Samba 4 release announcement has some important information about the continuous development towards the protocol SMB Version 3.0, which is a major version improvement with many new features. From the Microsoft support site, we can get a glimpse of the following features [20]:
· SMB Transparent Failover
· SMB Scale Out
· SMB Multichannel
· SMB Direct
· SMB Encryption
· VSS for SMB file shares
· SMB Directory Leasing
· SMB PowerShell
The reference [20] has great information about each of the preceding features, and the reader will understand why we really need to keep an eye on the development of the Samba 4 software and future 4.x releases.
Introducing the Samba 4 file and print server daemons
Prior to the beta2 release version of the Samba 4 software, the project was mainly investing the new NTVFS file server daemon [16]. However, the first stable release of Samba 4 used the old and very stable smbd daemon to act as the default file server for the brand new version of Samba 4.0.0.
The release notes, dated December 11, 2012, state that the project will still support and provide continued development on the new NTVFS file server to guarantee support to the users who are exploring this new daemon already (for example, the early adopters of the Samba 4 alpha releases).
The new NT-FSA architecture is planned to be the default architecture in the future as it is architected to match the requirements of the new Active Directory Domain Controller model. So, the smbd daemon should be replaced as the default Samba's file server in the long term [16] (presently, smbd is still the recommended file server).
Tip
Here is a very good thread about NTVFS vs S3 file server from December 8, 2011. The following link is a response from Stefan Metzmacher (from http://www.samba.org/), which provides us with a great overview about the development process and also tells us how these file servers and daemons were being architected:
https://lists.samba.org/archive/samba-technical/2011-December/080784.html
To follow the development process and to keep up to date with the features that are being integrated and tested on the Samba project, it is highly recommended that the reader participate in the mailing lists of the project. These are the best places to discuss the features, get help, learn about different configuration scenarios, and get in touch with the actual developers of the project as they are always present and willing to help.
Some of the mailing lists I would recommend for the reader to participate are as follows (https://lists.samba.org):
|
List |
Description |
|
samba |
General questions regarding Samba |
|
samba-announce |
Low volume list for Samba announcements |
|
cifs-protocol |
Discussions on the CIFS and related protocol |
|
samba-technical |
Discussions on Samba internals |
Just remember to take a look at the archives of the list before posting new threads that might have been answered already, and also remember to post them on the "right" list (for example, basic and general Samba questions should not be directed to the samba-technical mailing list).
Introducing Microsoft Windows print driver Versions 3 and 4
Basically, there are two types of print drivers: kernel mode and user mode [23]. To understand the different Microsoft Windows print drivers and how these two types of drivers impact the end user, we need to go back to the Microsoft Operating System (OS) history and talk a bit about the Microsoft Windows NT 4.0. People who had used the Microsoft OS might remember that printing was a task that could really bring the whole OS down just because of a printer driver failure. That's because NT 4.0 supported just the kernel-mode printer drivers [23], which ran on a privileged operating mode, so due to the failure, these drivers could hang the whole OS (these kinds of drivers are the ones that are there in Version 2).
Starting with Microsoft Windows 2000, a new Version 3 printer driver was introduced, and that printer driver ran on the user mode. The difference is that when running the printer driver on the user mode the error or bug on these drivers will not impact the OS itself, but will be like an ordinary application with very limited impact. Before Vista, this OS version from Microsoft and some others provided support for both types of printer drivers in the compatibility mode [23].
From Microsoft Windows Server 2012 and Microsoft Windows 8 OS onwards, a new printer driver model was designed—Version 4. This new model was architected to improve and fix the known issues with the previous Version 3 driver model [21].
The new Version 4 driver motivations were around a new design consideration for applications present on the Windows store were easier for printer sharing and driver development [21]. Samba 4 does not have support for this new printer driver model yet, but it supports Version 3 as all the other Microsoft Windows OS versions prior to the ones cited earlier, and the ones that are higher than Microsoft Windows 2000, also support this printer driver model.
Configuring a printer on the Samba 4 Server host using CUPS
The first important point to consider here is the fact that we will be configuring Samba to act as a print server for our Active Directory Network. So, we will configure Samba as a print server for the network, but at the backend, we have the Common UNIX Printing System (CUPS) software that uses the Internet Printing Protocol (IPP) to support printing to local and network printers [22]. Thus, we can look at this as Samba acting as a print server that uses CUPS as the backend spooling and printer management system. Or, we can look at this as a print server that provides CUPS print services to a Microsoft Network through Samba. Either way, this is a rock solid combination!
Another important fact to understand is that there are other printer management software (for example, LPD or LPRng), and Samba can be configured with those systems. As this is a practical book and CUPS is the standard and most prevalent software in many GNU/Linux and in many other OS distributions, we choose to work and show you example configurations with this printing system. We will not cover all the procedures to install and configure a CUPS server as this is out of the scope of this book; but, we will show you how to perform some tasks and, more importantly, how to integrate the CUPS system and configure it with Samba as a print server.
Tip
The official CUPS site has a lot of documents and examples, which can be found at http://www.cups.org
The final advice, before we start, is that the compilation of Samba 4 needs to have the CUPS libraries enabled. If you have followed our instructions on the installation of the dependencies and the Samba 4 compilation in this book, Samba should identify the presence of the required header and libraries for the CUPS printing system, and everything should be in place and ready to go.
Our procedure will show you how to make the printer drivers available for our Microsoft Windows network, and thus, each Windows machine that needs to print, will have the option to install the right driver (for the right OS architecture), do all the rendering, and control the format of the print job. When adding a printer to CUPS (actually a "queue"), we need to choose between a raw queue and a filtered one. We can have several queues for the same printer. So, if we need a filtered queue, we can have it. However, we need a raw queue for our Microsoft Windows machines for which we will provide the print services. As we said earlier, the Windows clients will use the specific printer driver and send a rendered job.
There are two options to add a printer queue to a CUPS system using the command line or the Web interface. In the case of a network printer, based on the protocol supported by the printer (for example, AppSocket, IPP, or LPD), we could add a printer queue by issuing the following command on our Samba 4 Server (from CUPS 1.7 documentation):
root@debian7:~# lpadmin -p devprt01 -v ipp://10.11.11.1 -L "Devel 001 PS/Gen 2nd Floor" -E && echo OK
OK
root@debian7:~#
Tip
To do the same configuration using the Web interface, we will use the following URL: http://debian7:631/admin
The preceding command has used the following four options (lpadmin):
· -p: This option defines the destination, named printer, or class
· -E: This option will enable the printer (queue) to accept jobs
· -v: This option sets the device URI for the new printer queue
· -L: This option defines the location (note that it is not a description, but it's intended to provide information about the physical location of the printer)
It is very important to note that the -E option, when used before the options -d, -p, or -x, forces encryption while connecting to the print/server. So, we need to pay attention to the position of this lpadmin option, it is a good practice to use it at the end to enable the queue at the time of the creation.
Now, we can use the following lpstat command to list our printers and see if our new printer is listed and our CUPS is aware of it:
root@debian7:~# lpstat -p devprt01
printer devprt01 is idle. enabled since Dom 26 May 2013 16:06:01 BRT
root@debian7:~#
Just before starting the configuration of Samba and actually making this new printer available on the network, it is a good idea to test it and see if everything is working, from our CUPS backend to the printer. As we will not test any filter- or driver-related features at this time, we just want to test the connectivity and check that our CUPS server and printer are working fine, and we can use a PS or text file to send to the devprt01 printer. From a shell on our server, we can use the System V command lp or the Berkeley lpr utility to send a test page to our printer [25], shown as follows:
root@debian7:~# lpr –P devprt01 simpletestpage.txt && echo OK
OK
root@debian7:~#
The preceding command has used the lpr utility to send the simpletestpage.txt file to the devprt01 printer, so we can be sure that the printer is configured and is working fine with our CUPS server. If the file is printed OK, we can go to the next step and work on the configuration of the Samba 4 Server, but in case of any issues, we need to check our CUPS configuration and the network connectivity before proceeding further.
Tip
The simpletestpage.txt file is just a very simple text file and can be created as follows:
echo test > simpletestpage.txt
Sharing the printer on a Microsoft AD network using Samba
The main directive that we need to have in our Samba 4 configuration file to start configuring it as a print server is the printers share. Thus, we need to add a section to our smb.conf (for example, /usr/local/samba/etc/smb.conf) file as shown in the following code:
…
[PRINTERS]
Comment = DEV Dep. Printers
path = /var/spool/samba
Printable = yes
Printing = CUPS
Tip
The /var/spool/samba directory should already be created, but if it is not created, we just need to create it and set the right permissions. Remember that you are required to set the sticky bit on the printing spool directory: chmod 1777 /var/spool/samba.
The preceding configuration is all we need for the Samba 4 Server to have access to our CUPS server's backend. The comment line is optional, but it is a good source of information for the clients and even system administrators. After adding the general [PRINTERS]share, we can add as many printers to our Active Directory network as we plan to share, and we can add them one by one in our smb.conf file.
Now, let's add the printer that we have previously configured in our CUPS server to our smb.conf file. For this, we just need to create a share with the Printer Name value that has the same name as our CUPS queue that we created and indicate the path for our Samba's spool:
[DEVPRT01]
comment = General DEV Printer
Printer Name = devprt01
path = /var/spool/samba/
printable = yes
browseable = yes
After this, we can reload our Samba configuration and make our brand new printer configuration live and available on our network. As a root user, type the following command in a shell on the debian7 Samba 4 Server:
root@debian7:/home/leal# smbcontrol all reload-config && echo OK
OK
root@debian7:/home/leal#
From now on, we will have a printer named devprt01 available on our network, and we can proceed to the configuration of our Point and Print feature, so the clients can automatically download and install the right driver and start using the print services.
Introducing Microsoft Windows Point and Print Samba Server configuration
Microsoft has a Point and Print feature [23] in the print subsystem of Microsoft Windows 2000 onwards. This technology enables the users on Microsoft client machines to actually send print jobs to remote printers without the need to manually install each printer driver to every new printer that is available on the network for him or her to use. This itself is a great functionality, but another important feature of the Point and Print technology is that it handles the installation of different drivers for different operating systems and architectures (for example, 32 bits or 64 bits). With the right user credentials, configuration can be made on these without explicit administrator intervention.
To start using this technology and provide this functionality to our Active Directory Domain, we first need to have a specific share on our Samba configuration to hold these drivers. The share name is fixed as the client machines will search for it, and for that reason, we need to configure it with this exact name [24]: print$.
Tip
To be able to use the Point and Print feature with different processor architectures, the appropriate driver needs to be installed on the print server [23].
So, to create the print$ share and be able to start to upload the drivers to the Samba 4 share, we just need to add the following lines of code to our smb.conf file:
[PRINT$]
path = /var/lib/samba/pointandprint
comment = Drivers for Dep. Printers
writeable = yes
Tip
The /var/lib/samba/pointandprint directory should be created, which can be accomplished with the following command:
mkdir –p /var/lib/samba/pointandprint
After we have this share configured on our Samba 4 installation, we can start the process of uploading the needed drivers to our print$ share. For the configuration of initial print network services, we may need to create a plan to enumerate the printers and the different architectures that we need to access the printer resource. One option is to pick a 64 bit OS version, and install all printer drivers for that Microsoft Windows version using the same machine. This way, both architectures (that is, 32 bit and 64 bit) will be available for installation from one single place.
Now, we will upload the driver (32 bit or 64 bit) for the printer that we have shared on our Samba 4 Server. Based on this example, we should be able to install any other driver that we need to make available to our client machines as we announce more printers on the AD network.
Depending on the Microsoft Windows OS, we have different ways to open the printer driver installation wizard. Have a look at the following procedures:
1. For Microsoft Windows 2003, for example, we can open a connection for our Samba 4 print server as shown in the following screenshot:
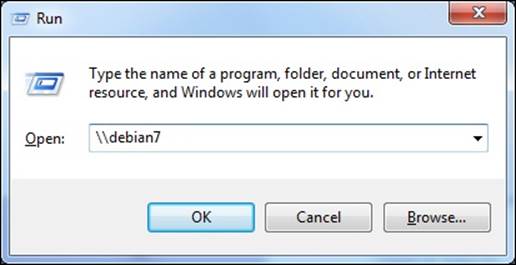
2. After clicking on OK, as shown in the preceding screenshot, we should be presented with a file explorer window as follows:
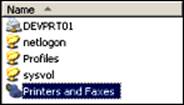
3. Now, we can double-click on Printers and Faxes and right-click on the following screen to be able to select the Server Properties option:
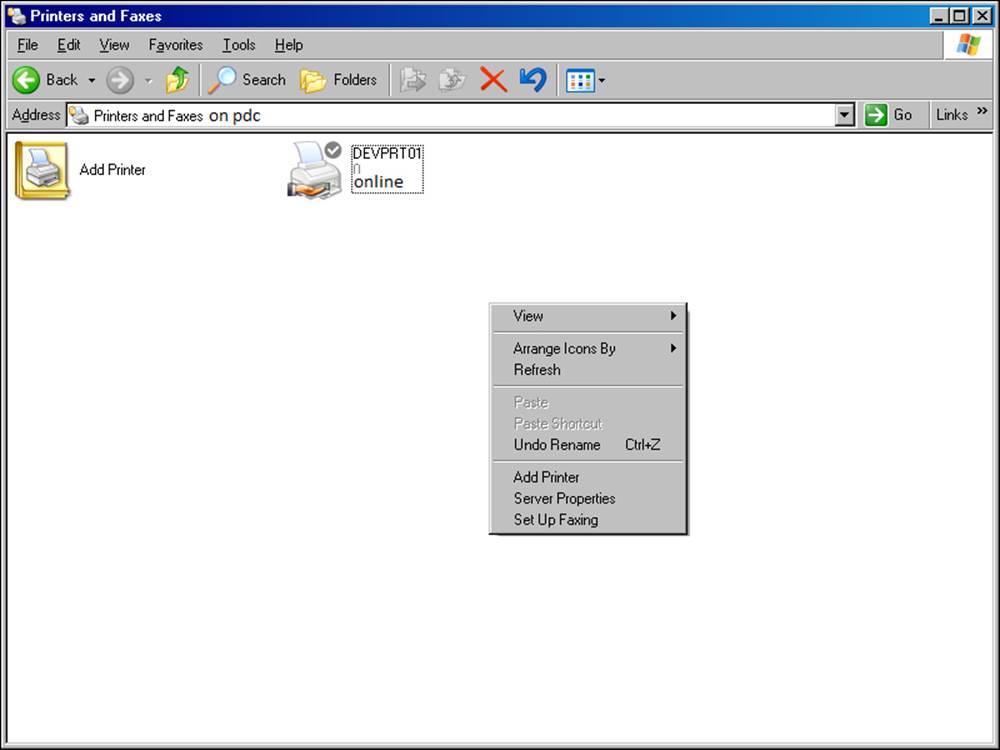
4. From the Server Properties window, we need to select the Drivers tab as shown in the following screenshot:

5. The next screen will show us an option where we can choose Add... to add new drivers, so we can follow the printer driver installation wizard. In the following screenshot, we can see a welcome screen for Add Printer Driver Wizard in a Microsoft Windows Server 2008 R2:
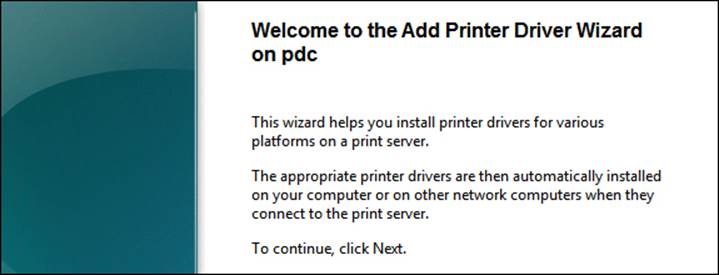
The preceding screenshot is important as it informs us that we can actually install printer drivers for various platforms on a print server. So, we can repeat this procedure to every printer on which we want to install the drivers, we just need to choose theoperating system.
6. After we click on Next, we have the following screen that will provide us with information on the printer driver type that we will be able to install (Type 3 - User Mode). It will also provide us with information on the architecture—x64 and/or x86 (64 bits and 32 bits respectively):
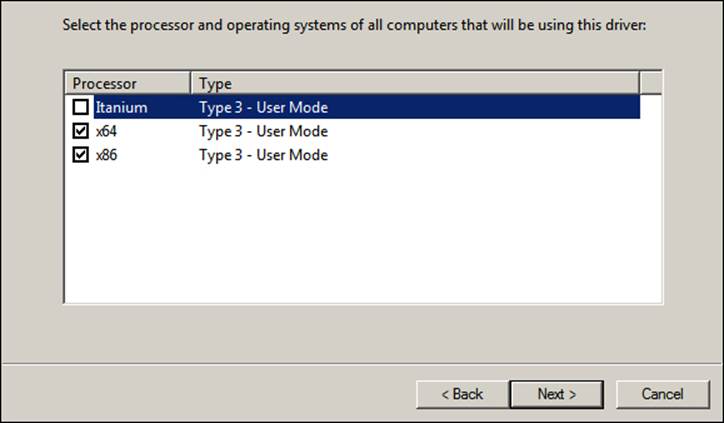
7. We chose both the architectures as we have 32 bit versions of this OS running on our network. After choosing the platform, the next step is to choose the printer driver—the manufacturer and printer models—as shown in the following screenshot:
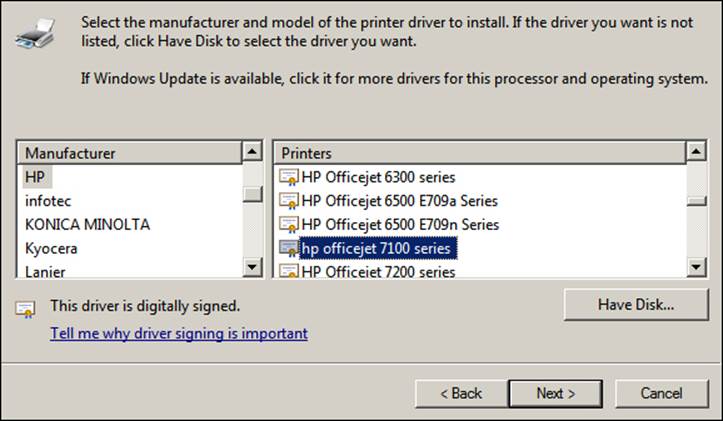
8. In the preceding screenshot, we selected a printer driver, and in the following screenshot, we will get a message about the drivers (and architectures) that will be installed:
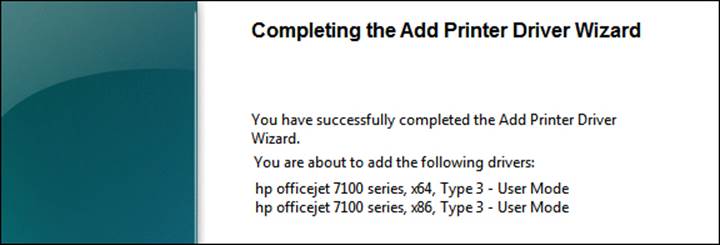
So, we should receive a status window that shows us the progress of the installation (for example, information on the files that are being copied). After this, the Drivers tab, which was empty at the beginning of this process, will now have two drivers listed (one printer driver for two platforms).
Another piece of important information in the preceding screenshot is the printer driver's name (hp officejet 7100 series); soon, we will use it to associate it with our printer, devprt01. So, we can take note of this name now, but we will show you how to list the drivers that we have registered and how to pick their names directly from our Samba 4 Server.
Looking at our Samba 4 Server, we can check our filesystem and list the files that were installed for the x64 version of the driver, as follows:
root@debian7:~# ls -1 /var/lib/samba/pointandprint/x64/3/
HPBMIAPI.DLL
HPBMINI.DLL
HPBOID.DLL
HPBOIDPS.DLL
HPBPRO.DLL
HPBPROPS.DLL
HPEACLHN.HPI
HPFIME50.DLL
HPFRES50.DLL
HPO5H83L.GPD
…
That's it! Remember that you can be required to provide the Microsoft Windows CD to install the 32 bit version of the printer driver. So, if we select both versions of the printer driver, the installation wizard might require the location to pick the x86 version (for example, when installing from a x64 Microsoft Windows version). It's a good idea to have a copy of the CD or the ISO in a folder or a file server.
The last step is the registration of the printer driver, associating it with our printer. As we said earlier, we have a way to list the drivers of the platforms that we have installed on the server, and for that, we just need to issue the following command:
root@debian7:~# rpcclient debian7 -U 'administrator%w1ndow$$!' -c 'enumdrivers'
…
[Windows x64]
Printer Driver Info 1:
Driver Name: [hp officejet 7100 series]
…
root@debian7:~#
The preceding command will list all the drivers that we have installed on our Samba 4 Server (for example, debian7) for all different platforms. In this example, we have highlighted just the one that we are interested in, and we can see that the name is the same as the one we have in our previous screenshot of the printer driver installation wizard. To associate this driver to our HP printer, we can use the following command [24]:
root@debian7:~# rpcclient debian7 -U 'administrator%window$$!' -c 'setdriver "devprt01" "hp officejet 7100 series"'
Successfully set devprt01 to driver hp officejet 7100 series.
root@debian7:~#
In the reference [24], there is an example that shows you how to associate the driver with the printer from a Microsoft Windows machine, but the drawback is that the procedure in Windows changes the printer's name. As described in the link, the administrator can rename it to the old name (but even so, we do not recommend this) after the procedure. In this same link on the Samba wiki, there is a section that describes how to preconfigure the printer and publish it on the Active Directory so that the users can easily find the printer. So, if you want to proceed with these configurations, we highly recommend that you take a look at the reference at the end of this book and actually explore the Samba wiki pages as it has a lot of useful information and how-tos.
Sharing files using Samba 4
One of the most powerful features of the Samba software is its share capabilities for the server-side and the client-side code. We will focus on the server-side features here, and we will also focus on how to make the shares available to our Active Directory environment, but we cannot forget that being able to access these shares from other operating systems (for example, GNU/Linux) is a very important feature too. Samba provides all this as an open source solution since Version 3 is in a very mature state.
Users and system administrators who used Version 3 and earlier versions of the Samba software will see that with the new Version 4, the file share capabilities are much easier to implement and manage. In the earlier versions, we had to basically perform all the configurations on the smb.conf file and control what was possible on the filesystem and/or the configuration file (for example, smb.conf).
File sharing with Samba 4 is a simple task. Basically, we just need to have a folder where a set of data will reside, and all the configuration around the users and groups who have access to this primary folder and subsequent subdirectories should be managed from a Microsoft Windows machine. The installation procedure used in this book covers the installation of all the features needed for the Samba 4 software to handle Access Control Lists (ACLs) and Extended Attributes (XATTR); so, for the next procedures, we will assume that our Samba 4 installation has all the features that are needed. In case you have any issues or lack of capabilities on the Samba binaries installed on your system, please review the Samba 4 installation procedure in the previous chapters.
We've already seen some examples of shares on Samba 4 in our previous topics, such as PRINTERS, PRINT$, and HOME directives, which are basically shares. Standard and special ones, in the end, are the shares configured on the smb.conf file and are available to our Microsoft Windows clients on the network. To create a regular share in order to provide cooperative work around files to users and groups in Samba 4 is as simple as performing the following tasks:
· Create the directory to be shared
· Add it to the smb.conf file
To create the directory, we can use a command prompt in our Samba 4 Server and execute the following command (assuming that the root of the directory tree exists):
root@debian7:~# mkdir /var/lib/samba/devcodds && echo OK
OK
root@debian7:~#
Add the directory to the smb.conf file:
[DEVCODDS]
comment = DEV COD DS
path = /var/lib/samba/devcodds
read only = No
We do not need to actually restart the whole server to reload the smb.conf file to apply the changes that we have made; we can use the smbcontrol command with the reload option as exemplified in the following code:
root@debian7:~# smbcontrol all reload-config && echo OK
OK
root@debian7:~#
At this time, we already have a new share available on our network, and we can access it using a Microsoft Windows machine in our domain (for example, as an administrator) and configure all the permissions we want, and users and groups can directly access the share from there. As Samba 4 is fully compatible with the Active Directory, we don't need to use any old model to restrict the user's access on the smb.conf file; we just edit the share permissions from a Microsoft Windows machine and manage its properties.
The following screenshot is an example of the POA's administrator that is editing the share permissions of DEVCODDS (Run \\debian7\devcodds, right-click on Properties, click on the Security tab, and click on Edit):
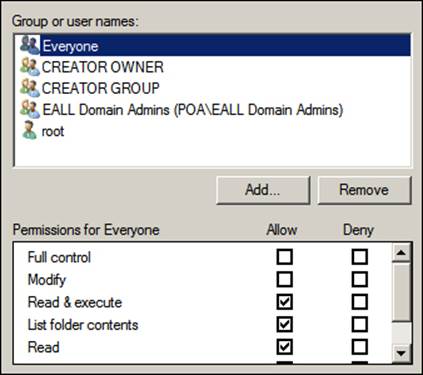
All standard permissions and management controls are available in Samba, and the system administrator can use the granularity he or she requires to control access to the share and subdirectories. This is a huge enhancement for the file shares' administration in Samba and is a feature that will really make the users more comfortable. Many system administrators are used to the integrations and easiness that the Microsoft operating system provides, and Samba being able to accommodate some is a big step forward.
Summary
In this chapter, we looked at the different SMB versions that Samba 4 supports, an overview of the main features of each one, and what to expect from the next Samba 4 releases. We have discussed the file and print daemons, what has changed from the alpha release to the final Samba 4 stable announcement, and learned about the different types of printer drivers in the Microsoft Windows operating systems.
This chapter also covered the installation of a printer/queue on the Samba host using CUPS, how to share that printer using Samba, and the configuration of the Point and Print feature for the Microsoft Windows machines. We explained how to perform the association of the printer driver to the shared printer, and pointed some reference links for further and specific configurations. Also, in this chapter, we explained how to create a file share and configure the permissions in an easy way using the graphical interface of a Microsoft Windows machine, making use of the fully compatible Active Directory capabilities of Samba 4.
In the next chapter, we will learn how to extend the Active Directory schema using Samba 4. We will use scripts and examples to understand the procedures based on a specific example application that makes use of some custom object class and attributes.
All materials on the site are licensed Creative Commons Attribution-Sharealike 3.0 Unported CC BY-SA 3.0 & GNU Free Documentation License (GFDL)
If you are the copyright holder of any material contained on our site and intend to remove it, please contact our site administrator for approval.
© 2016-2026 All site design rights belong to S.Y.A.