Adobe Creative Suite 6 Design and Web Premium All-in-One For Dummies (2012)
Book II
InDesign CS6
Chapter 2: Working with Text and Text Frames
In This Chapter
![]() Understanding text and frames in a publication
Understanding text and frames in a publication
![]() Adding and importing text
Adding and importing text
![]() Exploring text frame options
Exploring text frame options
![]() Changing paragraph settings
Changing paragraph settings
![]() Editing with text editors and spell checking
Editing with text editors and spell checking
![]() Working with tables
Working with tables
![]() Creating and editing text on a path
Creating and editing text on a path
Most of the documents you create contain text, so it’s important to know how to format, style, and control text in your layouts. Text is made up of characters, and the characters are styled in specific fonts. If you want to find out more about fonts and typefaces, check out Book I, Chapter 6.
This chapter explains how to create, edit, and style text by using InDesign. You get started by editing and manipulating text placed inside text frames — containers on the page that hold text content. The most important concepts you can take away from this chapter are how to add text to documents and then change the text so that it looks the way you want on the page. In Chapter 3 of this minibook, find out how to create effective layouts that contain both text and graphics so that your audience is encouraged to read everything you create.
Understanding Text, Font, and Frames
Text is usually integral to a publication because it contains specific information you want or need to convey to an audience. Understanding the terminology that appears in the following pages is important. Text and font are quite different from each other:
![]() Text: The letters, words, sentences, and paragraphs making up content in the text frames in your publication.
Text: The letters, words, sentences, and paragraphs making up content in the text frames in your publication.
![]() Font: The particular design forming a set of characters used to style text. You can find thousands of styles of fonts from many manufacturers, and many are included in the Creative Suite 6 when you install it on your computer.
Font: The particular design forming a set of characters used to style text. You can find thousands of styles of fonts from many manufacturers, and many are included in the Creative Suite 6 when you install it on your computer.
Frames resemble containers that are used to hold content. You can use two kinds of frames in a publication:
![]() Text: Contains text on the page in your InDesign document. You can link text frames so that text flows from one text frame to another, and you can have text wrap around graphic frames.
Text: Contains text on the page in your InDesign document. You can link text frames so that text flows from one text frame to another, and you can have text wrap around graphic frames.
![]() Graphic: Holds an image that you place in your publication.
Graphic: Holds an image that you place in your publication.
When you create frames using InDesign, they can contain either text or graphics — so the methods for creating both types of frames are identical. InDesign automatically changes frames to adapt to content, so you can use both the frame and shape tools for designing your layout and creating frames that will contain text or graphics.
Creating and Using Text Frames
Text frames contain any text you add to a publication. You can create a new text frame in many different ways. In InDesign, you can add text to creative shapes you draw, thereby changing them into text frames. Creating and using text frames in a publication is important because you typically use a lot of text. Throughout the following subsections, we show you how to create text frames in different but important ways using three different tools. If you need a guide to the tools, check out Chapter 1 of this minibook.
 Text frames are sometimes automatically created when you import text into a publication. You find out how to do this in the “Importing text” section, later in this chapter.
Creating text frames with the Type tool
You can use the Type tool to create a text frame. If you use the Type tool and click the page, nothing happens unless you’ve first created a frame to hold the text. Here’s how to create a text frame by using the Type tool:
1.  Select the Type tool in the Tools panel and place the tool over the page.
The Type tool cursor is an I-bar. Move the cursor to the spot where you want to place the upper-left corner of the text frame.
2. Drag diagonally to create a text frame.
When you click, the mouse has a cross-like appearance. When you drag, an outline of the text frame appears, giving you a reference to its dimensions, as shown in Figure 2-1.
Figure 2-1:Using the Type tool, drag to create a text frame.
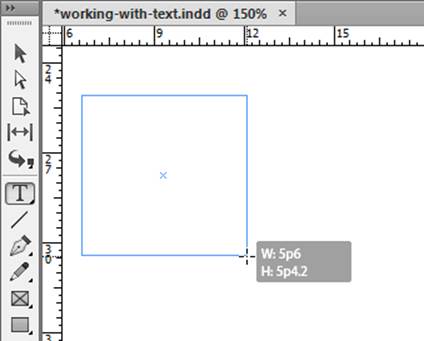
3. Release the mouse button when the frame is the correct size.
The text frame is created and an insertion point is placed in the upper left corner of the frame. You can start typing on the keyboard to enter text or import text from another source. (See the later section, “Importing text.”)
Creating text frames with the Frame tool
You can use the Frame tool to create frames that are rectangular, oval, or polygonal. Then, after you’ve placed the frame on the page, you can turn it into a text frame or use it as a graphic frame or simply a design object on the page. To create a new text frame with the Frame tool, follow these steps:
1. Choose the Frame tool from the Tools panel and drag diagonally to create a new frame.
A new frame is created on the page.
2. Select the Type tool and click inside the frame.
The X across the frame disappears, and the frame is now a text frame instead of a graphic frame.
3. Choose the Selection tool and use it to move the text frame.
You can move the text frame if you click within the frame using the Selection tool and drag it to a new location.
Creating text frames from a shape
If you have an interesting shape that you’ve created with the drawing tools or copied and pasted from Illustrator, you can easily change the shape into a text frame so that it can be filled with text. Just follow these steps:
1. Use the Pen tool, Pencil tool, or a Shape tool to create a shape with a stroke color and no fill. Or, copy and paste artwork from Illustrator.
A shape is created on the page that doesn’t have a solid color for the fill.
2. Select the Type tool from the Tools panel.
The Type tool becomes active.
3. Click inside the shape you created in Step 1 and enter some text or import text. (See the section “Importing text,” later in this chapter.)
This step changes the shape into a text frame. Notice how the text is confined within the shape as you type.
Adding Text to Your Publication
In the previous section’s step lists, you find out how to add text by simply clicking in the text frame and typing new content, but you can also add text to publications in other ways. Doing so is particularly useful when you use other applications to create and edit documents containing text.
Importing text
You can import text you’ve created or edited using other software, such as Adobe InCopy or Microsoft Word or Excel. Importing edited text is a typical workflow activity when creating a publication, because dedicated text- editing software is often used to edit manuscripts before layout.
To import text into InDesign, follow these steps:
1. Choose File⇒Place.
The Place dialog box opens. Choose an importable file (such as a Word document, an InCopy story, or a plain text file) by browsing your hard drive.
2. Select a document to import and click the Open button.
The Place Text icon, the cursor arrow, and a thumbnail image of the text appear. Move the cursor around the page to the spot where you want the upper-left corner of the text frame to be created when the document is imported.
3. Click to place the imported text.
This step creates a text frame and imports the text.
If you select a text frame before importing text, the text is automatically placed inside the text frame — so, in this case, you wouldn’t have to use the cursor to place the text. You can move the text frame anywhere on the page after the text is added or resize the frame, if necessary.
Controlling text flow
Control the flow of the text by using these simple modifier keys while placing text:
![]() Choose File⇒Place, select the file you want to import, and click Open. Hold down the Shift key and, when the loaded cursor turns into a curvy arrow, click the document. The text is imported and automatically flows from one column to another or from page to page until it runs out. InDesign even creates pages, if needed.
Choose File⇒Place, select the file you want to import, and click Open. Hold down the Shift key and, when the loaded cursor turns into a curvy arrow, click the document. The text is imported and automatically flows from one column to another or from page to page until it runs out. InDesign even creates pages, if needed.
![]() Choose File⇒Place, select the file you want to import, and click Open. Hold down the Alt (Windows) or Option (Mac) key. Then click and drag a text area. (Don’t release the Alt key or Option key!) As you continue clicking and dragging additional text frames, your text flows from one text frame to another until you run out of copy.
Choose File⇒Place, select the file you want to import, and click Open. Hold down the Alt (Windows) or Option (Mac) key. Then click and drag a text area. (Don’t release the Alt key or Option key!) As you continue clicking and dragging additional text frames, your text flows from one text frame to another until you run out of copy.
If you select the Show Import Options check box in the Place window, a second window appears in which you can choose to remove styles and formatting from text and tables. This action brings in clean, unformatted text to edit.
Adding placeholder text
Suppose that you’re creating a publication but the text you need to import into it isn’t ready to import into InDesign — perhaps the text is still being created or edited. Rather than wait for the final text, you can use placeholder text and continue to create your publication’s layout.Placeholder text is commonly used to temporarily fill a document with text. The text looks a lot like normal blocks of text, which is more natural than trying to paste the same few words repeatedly to fill up a text frame. However, placeholder text isn’t in any particular language, because it’s just being used as filler.
InDesign can add placeholder text into a text frame automatically. Here’s how:
1. Create a frame on the page by selecting the Type tool and dragging diagonally to create a text frame.
2. Choose Type⇒Fill with Placeholder Text.
The text frame is automatically filled with characters and words, similar to the one shown in Figure 2-2.
Figure 2-2: The text frame, filled with placeholder text.

Copying and pasting text
You can move text from one application into a publication by copying and pasting the text directly into InDesign. If you select and copy text in another program, you can paste it directly into InDesign from your computer’s Clipboard. Here’s how:
1. Highlight the text you want to use in your publication and press Ctrl+C (Windows) or ![]() +C (Mac) to copy the text.
+C (Mac) to copy the text.
When you copy text, it sits on the Clipboard (until it’s replaced by something new), and you can transfer this information into InDesign.
2. Open InDesign and press Ctrl+V (Windows) or ![]() +V (Mac) to create a new text frame and paste the text into it.
+V (Mac) to create a new text frame and paste the text into it.
A new text frame appears centered on the page with your selected text inside it.
You can also click in a text frame and press Ctrl+V (Windows) or ![]() +V (Mac) to paste text from the Clipboard directly into an existing frame. You can do the same thing with an image.
+V (Mac) to paste text from the Clipboard directly into an existing frame. You can do the same thing with an image.
All you need to do is double-click a text frame if you want to access or edit some text or type or paste it into the frame.
Looking at Text Frame Options
In the previous sections of this chapter, we show you how to create text frames and enter text into them. In the following sections, we show you how to organize text frames in your publication and achieve the results you need. Controlling text frames so that they do what you need them to do is a matter of knowing how they work after you put text in them.
InDesign gives you a lot of control over the text in your publications. Changing text frame options allows you to change the way text is placed inside a frame. Changing these kinds of settings is sometimes important when you’re working with particular kinds of fonts. (To read more about fonts, check out Book I, Chapter 6.)
The text frame contextual menu contains many options for working with the text frame. You use this menu to perform basic commands, such as copy and paste, fill the text frame with placeholder text, make transformations, add or modify strokes, and change the frame type. Access the text frame contextual menu by right-clicking (Windows) or Control-clicking (Mac) a text frame. You can also find most of these options on the Type and Object menus.
Changing text frame options
To change text frame options that control the look of the text within the frame, follow these steps:
1. Create a rectangular text frame on the page, select the frame, and choose Object⇒Text Frame Options.
You can also press Ctrl+B (Windows) or ![]() +B (Mac) or use the text frame’s contextual menu to open the Text Frame Options dialog box.
+B (Mac) or use the text frame’s contextual menu to open the Text Frame Options dialog box.
You can tell that a text frame is selected when it has handles around its bounding box.
The Text Frame Options dialog box appears, showing you the current settings for the selected text frame.
2. Select the Preview check box to automatically view updates.
Now any changes you make in the dialog box are instantly updated on the page, so you can make changes and see how they’ll look before you apply them.
3. In the Inset Spacing area of the dialog box, change the Top, Bottom, Left, and Right values.
These values are used to inset text from the edges of the text frame. The text is pushed inside the frame edge by the value you set.
You can also indent text, which we discuss in the section “Indenting your text,” later in this chapter. You can choose in this dialog box how to align the text vertically (Top, Center, Bottom, or Justify). You can align the text to the top or bottom of the text frame, center it vertically in the frame, or evenly space the lines in the frame from top to bottom (Justify).
4. When you finish making changes in this dialog box, click OK.
The changes you made are applied to the text frame.
Using and modifying columns
You can specify that the document contain a certain number of columns on the page when you create a new publication. Using columns allows you to snap new text frames to columns so that they’re properly spaced on the page. You can even modify the size of the gutter, which is the spacing between columns.
You can also create columns within a single text frame by using the Text Frame Options dialog box. You can add as many as 40 columns in a single text frame. If you already have text in a frame, it’s automatically divided among the columns you add. You can choose from three types of columns when creating a layout with text using InDesign:
![]() Use Fixed Number when you know exactly how many columns you want to appear in a text frame.
Use Fixed Number when you know exactly how many columns you want to appear in a text frame.
![]() Use Fixed Width when you know the exact width of columns that will appear in a text frame. If the text frame becomes larger or smaller, the number of columns may increase or decrease.
Use Fixed Width when you know the exact width of columns that will appear in a text frame. If the text frame becomes larger or smaller, the number of columns may increase or decrease.
![]() Use Flexible Width if you want the width of columns to vary depending upon the size of the text frame. With Flexible Width, InDesign adds or reduces the number of columns as needed depending upon the width of the text frame.
Use Flexible Width if you want the width of columns to vary depending upon the size of the text frame. With Flexible Width, InDesign adds or reduces the number of columns as needed depending upon the width of the text frame.
The following steps show you how to add columns to a text frame on a page:
1. Create a rectangular text frame on the page.
Use the Text or Frame tool to create the text frame. You can create columns in text frames that are rectangular, oval, or even freehand shapes drawn on the page.
2. After you create the text frame, the cursor is automatically placed inside of the frame, and you can now enter some text.
You can type some text, paste text copied from another document, or add placeholder text by choosing Type⇒Fill with Placeholder Text.
3. With the text frame still selected, choose Object⇒Text Frame Options.
In the Text Frame Options dialog box that opens, you may wish to select the Preview check box to immediately view the changes your settings make to the frame on the page.
4. In the Columns section, change the value in the Number text field.
In this example, we entered 2 in the Number text field. The selected text frame divides the text in the frame into two columns. If you selected the Preview checkbox, when you click in a different text field in the dialog box, the text frame updates on the page to reflect the new value setting.
5. Change the width of the columns by entering a new value in the Width text field.
The width of the columns is automatically set, depending on the width of the text frame you created. We entered 10 (picas) in the Width text field for this example. The text frame changes size depending on the width you set in this column.
6. Change the value in the Gutter text field.
The gutter value controls the amount of space between columns. If the gutter is too wide, change the value in the Gutter text field to a lower number. We entered 0p5 in the Gutter text field for this example to change the gutter width to half a point.
7. When you finish, click OK to apply the changes.
The changes are applied to the text frame you modified.
After you create columns in a text frame, you can resize the frame by using the handles on its bounding box, detailed in the later section “Resizing and moving the text frame.” The columns resize as necessary to divide the text frame into the number of columns you specified in the Text Frame Options dialog box. If you select the Fixed Column Width check box in the Text Frame Options dialog box, your text frames are always the width you specify, no matter how you resize the text frame. When you resize the text frame, the frame snaps to the designated fixed width.
You can also change the number of columns in the Control panel after selecting the text frame with the Selection tool, or by using the paragraph options in the Control panel while using the Type tool.
Modifying and Connecting Text Frames on a Page
Making modifications to text frames and then connecting them to other text frames in a publication so that the story can continue on a separate page is vital in most publications. You typically work with stories of many paragraphs that need to continue on different pages in the document.
When you have a text frame on the page, you need to be able to change the size, position, and linking of the frame. You need to link the frame to other frames on the page so that the text can flow between them — which is important if you’re creating a layout that contains a lot of text.
If you paste more text content than is visible in the text frame, the text still exists beyond the boundaries of the text frame — so if you have a text frame that’s 20 lines tall but you paste in 50 lines of text, the last 30 lines are cropped off. You need to resize the text frame or have the text flow to another frame in order to see the rest of the text you pasted. You can tell that the frame has more content when you see a small plus sign (+) in a special handle in the text frame’s bounding box.
Resizing and moving the text frame
When creating layouts, you regularly resize text frames and move them around the document while you figure out how you want the page layout to look. You can resize and move a text frame by following these steps:
1. Use the Selection tool to select a text frame on the page.
A bounding box with handles appears on the page. If the text frame has more text than it can show at the current size, a small red box with a red plus sign appears in the lower right corner of the bounding box.
2. Drag one of the handles to resize the text frame.
The frame updates automatically on the page while you drag the handles, as shown in Figure 2-3. Change the width or height by dragging the handles at the center of each side of the frame, or change the height and the width at the same time by dragging a corner handle.
Shift-drag a corner handle to scale the text frame proportionally.
3. When you’re finished resizing the text frame, click the middle of a selected frame and move it around the page.
If you click within the frame once and drag it, you move the frame around the page. An outline of the frame follows the cursor and represents the spot where the frame is placed if you release the mouse button. Simply release the frame when you finish moving it.
Figure 2-3:Resize a text frame by dragging its handles.

 If you’re using guides or grids on the page, the text frame snaps to them. Also, if you opened a document with columns, the text frame snaps to the columns when you drag the frame close to the column guidelines. You can find out about guides, grids, and snapping in Chapter 3 of this minibook.
You can also use the Transform panel to change the location and dimensions of a text frame. If the Transform panel isn’t already open, choose Window⇒Object and Layout⇒Transform to open it. Then follow these steps:
1. Change the values in the X and Y text fields.
Enter 1 in both the X and Y text fields to move the text frame to the upper-left corner of the page.
The X and Y coordinates (location) of the text frame update to 1,1. The small square in the middle or along the edge of the text is the reference point of the text frame: The X and Y coordinates you set match the position of this point.
 Change the reference point by clicking any point in the reference point indicator in the upper left corner of the control panel.
2. Change the values in the W and H text fields.
For this example, we entered 35 (picas) in the W and H text fields. The text frame’s width and height change to the dimensions you specify. Using the Transform panel to change the width and height is ideal if you need to set an exact measurement for the frame.
You can not only resize and move text frames but also change their shapes. Select a text frame and choose the Direct Selection tool from the Tools panel. You can then select the corners on the text frame and move them to reshape the text frame.
Threading text frames
Understanding how to thread text frames together is important if you plan to build page layouts with a lot of text. Threading occurs when text frames are arranged so that the text in one frame continues in a second text frame. Threading is useful for most layouts because you can’t always include all text in a single frame.
First, take a look at some of the related terminology because Adobe has given some special names to text frames that are linked. Figure 2-4 shows some of the icons we refer to in the following list:
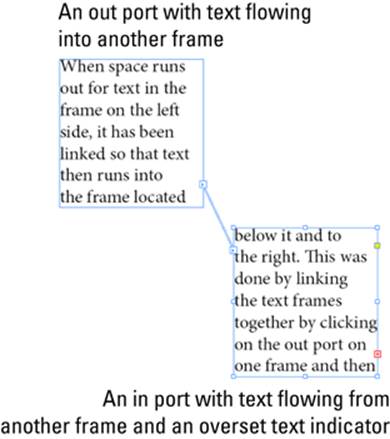
Figure 2-4:Threaded text between two linked text frames.
![]() Flowing: Describes text starting in one frame and continuing in a second frame.
Flowing: Describes text starting in one frame and continuing in a second frame.
![]() Threading: Describes two text frames that have text flowing from the first frame to the second.
Threading: Describes two text frames that have text flowing from the first frame to the second.
![]() Story: The name of a group of sentences and paragraphs in threaded text frames.
Story: The name of a group of sentences and paragraphs in threaded text frames.
![]() In port: An icon on the upper-left side of a text frame’s bounding box indicating that a frame is the first one in a story or has text flowing in from another frame. An In port icon has a story flowing into it if it contains a small arrow; otherwise, the In port icon is empty.
In port: An icon on the upper-left side of a text frame’s bounding box indicating that a frame is the first one in a story or has text flowing in from another frame. An In port icon has a story flowing into it if it contains a small arrow; otherwise, the In port icon is empty.
![]() Out port: An icon on the lower-right side of the text frame’s bounding box indicating that a frame has text flowing out of it. The Out port icon contains a small arrow if the frame is threaded to another frame; an empty Out port icon signifies that the frame isn’t connected to another text frame.
Out port: An icon on the lower-right side of the text frame’s bounding box indicating that a frame has text flowing out of it. The Out port icon contains a small arrow if the frame is threaded to another frame; an empty Out port icon signifies that the frame isn’t connected to another text frame.
If a text frame isn’t connected to another frame and has overset text (more text than can be displayed in a text frame), the Out port shows a small red plus sign (+) icon.
Find a block of text that you want to thread (for best results, use one that has formed sentences as opposed to placeholder text), and then follow these steps:
1. Copy some text on the Clipboard, such as from the InDesign Help files, a page loaded in a web browser window, or a Word, Notepad, or SimpleText document.
The type of content you’re pasting doesn’t matter. You only need to make sure the text is at least a few paragraphs long so that you have enough text to flow between frames.
In Figure 2-4, you can see the text thread represented by a line connecting one text frame to another. InDesign shows you text threads if you choose View⇒Extras⇒Show Text Threads.
2. Use the Type tool to create two text frames on a page.
The text frames can be above or beside one another, similar to the layout shown in Figure 2-5.
Figure 2-5:Two frames on the page; the first contains text.

3. Using the Text tool, click in the first text frame, which is above or to the left of the second text frame.
The blinking insertion point that appears in the first text frame lets you know that you can enter or paste text into the frame.
4. Press Ctrl+V (Windows) or ![]() +V (Mac) to paste the text into the text frame.
+V (Mac) to paste the text into the text frame.
The text you’ve copied to the Clipboard enters into the frame. If you’ve pasted enough text, you see the overset text icon (a red plus sign) on the lower right side of the text frame. (Refer to Figure 2-5.) If you don’t see the overset text icon, use the Paste command a second time so that more text is entered into the frame.
5. Click the overset text icon with the Selection tool.
The cursor changes to the loaded text icon so that you can select or create another text frame to thread the story.
6. Move the cursor over the second text frame and click.
The cursor changes to the thread text icon when it hovers over the second text frame. When you click the second text frame, the two frames are threaded because the text continues in the second frame.
You can continue creating frames and threading them. You can thread them on the same page or on subsequent pages.
You can unthread text as well, which means that you’re breaking the link between two text frames. You can rearrange the frames used to thread text, such as changing the page the story continues on when it’s threaded to a second text frame. Break the connection by double-clicking the In port icon or the Out port icon of the text frame that you want to unthread. The frame is then unthreaded (but no text is deleted).
If your document doesn’t have multiple pages in it, choose Layout⇒Pages⇒Insert Pages. Indicate the number of pages to add, and then click OK when you’re finished. Now you can click through the pages using the Page Field control at the bottom of the workspace and create a new text frame into which you can link your text.
Adding a page jump number
If your document has multiple pages, you can add a page jump number (text that indicates where the story continues if it jumps to a text frame on another page) to an existing file. Before you start, make sure that a story threads between text frames on two different pages, and then follow these steps:
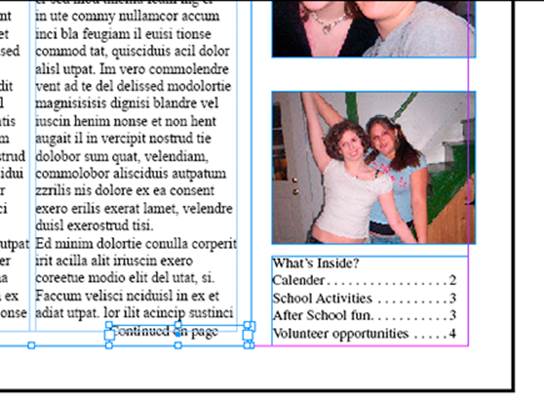
1. Create a new text frame on the first page and type continued on page.
2. Use the Selection tool to select the text frame you just created.
3. Move the text frame so that it slightly overlaps the text frame containing the story.
Let InDesign know what text frame it’s tracking the story from or to. Overlap the two text frames (and keep them overlapped), as shown in Figure 2-6, so that InDesign knows to associate these text frames (the continued-notice text frame and the story text frame) with each other.
Figure 2-6:Slightly overlap the two text frames when creating a page jump, so that the page jump is associated with a specific story.
You can then group these two text frames (so that they move together). Choose Object⇒Group with both text frames selected. (Shift-click with the Selection tool to select both text frames.)
4. Double-click the new text frame, which contains the text continued on page, to place the insertion point at the spot where you want the page number to be inserted.
The page number is inserted at the insertion point, so make sure that a space appears after the preceding character.
5. Choose Type⇒Insert Special Character⇒Markers⇒Next Page Number.
A number is added into the text frame. The number is sensitive to the location of the next threaded text frame, so if you move the second text frame, the page number updates automatically.
You can repeat these steps at the spot where the story is continued from — just choose Type⇒Insert Special Character⇒Markers⇒Previous Page Number in Step 5 instead.
Understanding Paragraph Settings
You can change the settings for an entire text frame or a single paragraph in a text frame in several ways. You can use the Paragraph panel to make adjustments to a single paragraph or to an entire text frame’s indentation, justification, and alignment. Open the Paragraph panel by choosing Window⇒Type & Tables⇒Paragraph.
If you want changes in the Paragraph panel to span across all text frames you create, don’t select any paragraph or text frame before making the changes; instead, first select the entire text frame or frames on the page. Then the selections you make in the Paragraph panel affect all paragraphs in the selected text frames, not just one paragraph. If you want the selections you make in the Paragraph panel to affect just one paragraph within a text frame, select that paragraph first by using the Type tool, and then make your changes.
Indenting your text
You can indent a paragraph in a story by using the Paragraph panel. Indentation moves the paragraph away from the edges of the text frame’s bounding box. Here’s how to modify indentation:
1. Create a text frame on the page and fill it with text.
You can fill the text frame by typing text, copying and pasting text, or inserting placeholder text by choosing Text⇒Fill with Placeholder Text.
2. Make sure that the insertion point is blinking in the text frame in the paragraph you want to change or use the Selection tool to select the text frame.
3. Choose Window⇒Type & Tables⇒Paragraph to open the Paragraph panel.
The Paragraph panel opens, showing the text frame’s current settings. See Figure 2-7 to find out the name of each setting control.
Figure 2-7: The Paragraph panel.

4. Change the value in the Left Indent text field and press Enter.
The larger the number, the greater the indent. You can specify the unit of measurement as you enter the text by entering in for inches or pt for points, using any forms of measurement InDesign supports.
5. Change the value in the First Line Left Indent text field and press Enter.
To change all paragraphs in a story, click the insertion point in a paragraph and choose Edit⇒Select All before changing settings.
Text alignment and justification
You can use the alignment and justification buttons in the Paragraph panel to format text frames:
![]() Align helps you left-, center-, or right-align text with the edges of the text frames.
Align helps you left-, center-, or right-align text with the edges of the text frames.
![]() Justification lets you space text in relation to the edges of the text frame, and it lets you justify the final line of text in the paragraph.
Justification lets you space text in relation to the edges of the text frame, and it lets you justify the final line of text in the paragraph.
To align or justify a block of text, click the Align or Justify button, respectively. (Refer to Figure 2-7 to see the Align and Justify buttons in the Paragraph panel.)
Saving a paragraph style
Do you ever go to all the trouble of finding just the right indent, font, or spacing to use in your copy, just to find that you have to apply those attributes a hundred times to complete your project? Or, have you ever decided that the indent is too much? Wouldn’t it be nice to change one indent text box and have it update all other occurrences? You can do this using paragraph styles in InDesign.
To create a paragraph style, follow these steps:
1. Create a text frame, add text, and apply a first-line indent of any size you want.
Select some text — you don’t have to select it all.
2. Choose Window⇒Styles⇒Paragraph Styles.
The Paragraph Styles panel opens.
3. From the Paragraph Styles panel menu, choose New Paragraph Style.
The New Paragraph Style dialog box opens. Note that every attribute, font, size, and indent is already recorded in this unnamed style. You don’t have to do anything at this point other than name the style.
4. Change the name from Paragraph Style 1 to something more appropriate, such as BodyCopy, and click OK.
Your style is created! After you click OK, the dialog box closes and the new style is added to the Paragraph Styles panel list. You can modify the settings by double-clicking the style name in the Paragraph Styles panel. You can apply the style to other text frames by selecting the frame and clicking the style in the Paragraph Styles panel.
 If you want to change an existing style, the New Paragraph Style dialog box has several different areas in a large list on the left side. Select an item in the list to view and change its associated paragraph properties on the right side of the dialog box to update all instances of that paragraph style.
You can import paragraph styles from other documents or from a file on your hard drive, which is particularly useful when you need to use a particular set of styles for a template. To import paragraph styles, choose Load Paragraph Styles from the Paragraph Styles panel menu. A dialog box prompts you to browse your hard drive for a file. Select the file to load and click OK.
Editing Stories
Your documents likely contain all sorts of text, and some of that text may need to be edited. InDesign has a built-in story editor for editing text. This feature can be useful when it’s inconvenient or impossible to open another text editor to make changes.
InDesign also integrates with another Adobe product: InCopy. It’s a text editor that’s similar to Microsoft Word but has integration capabilities with InDesign for streamlined page layout. If you work in IT or in editorial management and have some users who only write and others who only handle layout, you might want to have a look at InCopy as a possible text editor.
Using the story editor
The InDesign story editor lets you view a story outside tiny columns and format the text as necessary. To open the story editor to edit a piece of text, follow these steps:
1. Find a piece of text that you want to edit and select the text frame with the Selection tool.
A bounding box with handles appears around the text frame.
2. Choose Edit⇒Edit in Story Editor or use the keyboard shortcut Ctrl+Y (Windows) or ![]() +Y (Mac).
+Y (Mac).
The story editor opens in a new window directly in the InDesign workspace.
3. Edit the story in the window as necessary and click the Close button when you finish.
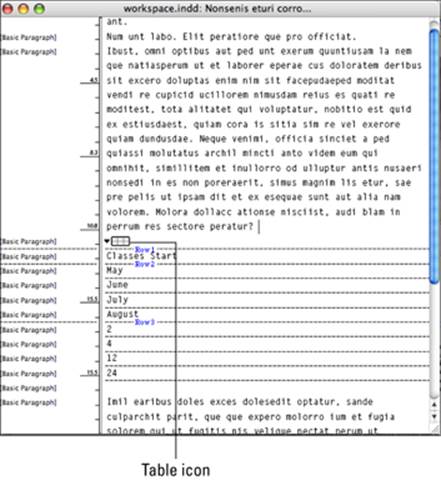
Your story appears in one block of text. Any paragraph styles you apply to the text in the story editor are noted in an Information pane on the left side of the workspace.
Notice in Figure 2-8 that you can see tables in the story editor. Click the small table icon to collapse and expand the table in the story editor.
Figure 2-8: You can see text and tables in the story editor.
If you want to make text edits but would like to keep the original text unchanged, you can choose Type⇒Track Changes⇒Track Changes in Current Story. The original text remains in the story editor along with your marked changes, but in layout mode only the edited text appears. Later you (or an editor) can use the Track Changes command to accept or reject text edits using the Story Editor.
Checking for correct spelling
Typos and spelling errors are easy to make. Therefore, you must check for incorrect spelling in a document before you print or export it to a PDF. Here’s how to check for spelling in InDesign:
1. Choose Edit⇒Spelling⇒Check Spelling.
2. In the Check Spelling dialog box that appears, choose a selection to search from the Search drop-down list, and then click the Start button.
The spell check automatically starts searching the story or document.
3. Choose from three options:
• Click the Skip button to ignore a misspelled word.
• Select a suggested spelling correction from the list in the Suggested Corrections pane and click the Change button.
• Click Ignore All to ignore any more instances of that word.
The spelling is corrected in the text frame and moves to the next spelling error.
4. Click the Done button to stop the spell check; otherwise, click OK when InDesign alerts you that the spell check is done.
Using custom spelling dictionaries
You can easily add words, such as proper nouns, to your dictionary by clicking the Add button.
You can create a user dictionary or add user dictionaries from previous InDesign versions, from files that others have sent you, or from a server. The dictionary you add is used for all your InDesign documents.
Follow these steps to create your own, custom dictionary:
1. Choose Edit⇒Preferences⇒Dictionary (Windows) or InDesign⇒Preferences⇒Dictionary (Mac).
The Preferences dialog box appears with the Dictionary section visible.
2. From the Language drop-down list, select the language of your dictionary.
3. Click the New User Dictionary button below the Language drop- down list.
4. Specify the name and location of the user dictionary, and then click OK.
If you want to see when a spelling error occurs without opening the Check Spelling dialog box, choose Edit⇒Spelling⇒Dynamic Spelling. Unknown words are then highlighted. To correct the spelling, right-click (Windows) or ![]() -click (Mac) and select the correct spelling from the contextual menu or add the word to your dictionary.
-click (Mac) and select the correct spelling from the contextual menu or add the word to your dictionary.
Using Tables
A table is made of columns and rows, which divide a table into cells. You see tables every day on television, in books and magazines, and all over the web. In fact, a calendar is a table: All the days in a month are shown down a column, every week is a row, and each day is a cell. You can use tables for many different tasks, such as listing products, employees, or events.
The following list describes the components of a table and how to modify them in InDesign:
![]() Rows: Extend horizontally across a table. You can modify the height of a row.
Rows: Extend horizontally across a table. You can modify the height of a row.
![]() Columns: Are vertical in a table. You can modify the width of a column.
Columns: Are vertical in a table. You can modify the width of a column.
![]() Cells: A text frame. You can enter information into this frame and format it like any other text frame in InDesign.
Cells: A text frame. You can enter information into this frame and format it like any other text frame in InDesign.
Creating tables
The easiest way to create a table is to have data ready to go. (Mind you, this isn’t the only way.) But flowing in existing data is the most dynamic way of seeing what InDesign can do with tables.
Follow these steps to experiment with the table feature:
1. Create a text area and insert tabbed copy into it.
The example uses dates for an event:
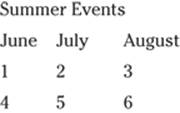
Notice that the text was simply keyed in by pressing the Tab key between every new entry. The text doesn’t even need to be lined up.
2. Select the text and choose Table⇒Convert Text to Table.
The Convert Text to Table Options dialog box appears. You can select columns there or let the tabs in your text determine columns. You can find out more about table styles in the later section “Creating table styles.”
You can assign a table style at the same time you convert text to a table.
3. Click OK to accept the default settings.
4. Hold down the Shift key and use your mouse to click and grab the outside right border to stretch the table in or out.
The cells proportionally accommodate the new table size.
5. Click and drag across the top three cells and then choose Table⇒Merge Cells to merge them together.
To create a new table without existing text, follow these steps:
1. Create a new text frame with the Type tool.
The insertion point should be blinking in the new text frame you create. If it isn’t blinking, or if you created a new frame another way, double-click the text frame so that the insertion point (I-bar) is active. You can’t create a table unless the insertion point is active in the text frame.
2. Choose Table⇒Insert Table.
3. In the Insert Table dialog box that opens, enter the number of rows and columns you want to add to the table in the Rows and Columns text fields, and then click OK.
For example, we created a table with six rows and three columns.
Editing table settings
You can control many settings for tables. InDesign lets you change the text, fill, and stroke properties for each cell or for the table itself. Because of this flexibility, you can create fully customized tables to display information in an intuitive and creative way. In this section, we show you some basic options for editing tables.
To start editing table settings, follow these steps:
1. Select the table you want to make changes to by clicking in a cell.
2. Choose Table⇒Table Options⇒Table Setup.
The Table Options dialog box opens with the Table Setup tab selected. The dialog box contains several tabs that contain settings you can change for different parts of the table.
From the Table Setup tab, you edit the columns and rows, border, and spacing and specify how column or row strokes are rendered in relation to each other. For example, we changed the number of rows and columns and changed the table border weight to a 3-point stroke.
3. Select the Preview check box at the bottom of the dialog box.
The Preview opens so that you can view the changes you make on the page while you’re using the dialog box.
4. Click the Row Strokes tab and change the options.
For this example, we selected Every Second Row from the Alternating Pattern drop-down list, changed the Table Border Weight option to 2, and changed the Color property for the first row to C=15, M=100, Y=100, K=0 (the CMYK equivalent of red).
This step causes every second row to have a red, 2-point stroke. You can also click the Column Strokes tab to change the properties for column strokes. The two tabs work the same way.
5. Click the Fills tab and change the options.
For this example, we selected Every Other Row from the Alternating Pattern drop-down list, changed the Color property to the same CMYK equivalent of red, and left the Tint at the default of 20 percent. This step changes the first row and every other row to a red tint.
6. Click OK.
The changes you made in the Table Options dialog box are applied to the table.
7. Click a table cell so that the insertion point is blinking.
The table cell is selected.
8. Find an image you can copy to the Clipboard and then press Ctrl+C (Windows) or ![]() +C (Mac) to copy the image.
+C (Mac) to copy the image.
9. Return to InDesign and paste the image into the table cell by pressing Ctrl+V (Windows) or ![]() +V (Mac).
+V (Mac).
The image appears in the table cell, and the height or width (or both) of the cell changes based on the dimensions of the image. Make sure that the insertion point is active in the cell if you have problems pasting the image.
You can not only change the table itself but also customize the cells within it. Choose Table⇒Cell Options⇒Text to open the Cell Options dialog box. You can also make changes to each cell by using the Paragraph panel. Similarly, you can change the number of rows and columns and their widths and heights from the Tables panel. Open the Tables panel by choosing Window⇒Type & Tables⇒Table.
InDesign lets you import tables from other programs, such as Excel. If you want to import a spreadsheet, choose File⇒Place. The spreadsheet is imported into InDesign as a table that you can further edit as necessary.
Creating table styles
If you’ve spent time customizing strokes, fills, and spacing for your table, you certainly want to save it as a style. Creating a table style lets you reuse your table setup for future tables. To create a table style, follow these steps:
1. Make a table look the way you want.
The easiest way to create a table style is to complete the table setup and make a table look the way you want it at completion.
2. Select the table.
Click and drag to select it with the text tool.
3. Choose Window⇒Styles⇒Table Styles.
The Table Styles panel appears.
4. Hold down the Alt (Windows) or Option (Mac) key and click the Create New Style button at the bottom of the Table Styles panel.
The New Table Style dialog box appears.
5. Name the style and click OK.
Your table attributes are saved as a style.
If you want to edit table style attributes, you can simply double-click the named style in the Table Styles panel. (Make sure nothing is selected.)
Looking at Text on a Path
You can create some interesting effects with text on a path. Using the Type On a Path tool, you can have text curve along a line or shape. This feature is particularly useful when you want to create interesting titling effects on a page.
To create text on a path, follow these steps:
1. Use the Pen tool to create a path on the page.
Create at least one curve on the path after you create it. (See Chapter 4 of this minibook to find out how to wield the Pen tool with confidence.)
2. Click and hold the Type tool to select the Type On a Path tool.
3. Move the cursor near the path you created.
When you move the cursor near a path, a plus sign (+) symbol appears next to the cursor, and you can click and start typing on the path.
4. Click when you see the + icon and type some text on the path.
An insertion point appears at the beginning of the path after you click, and you can then add text along the path. You select type on a path as you would normally select other text — by dragging over the text to highlight it.
To change properties for type on a path, you can use the Type On a Path Options dialog box, which you open by choosing Type⇒Type On a Path⇒Options. In the Type On a Path Options dialog box, you can use effects to modify the way each character is placed on the path. You can also flip the text, change character spacing, and change character alignment to the path in the Align drop-down list or to the stroke of the path in the To Path drop-down list. Play with the settings to see how they affect your type. Click OK to apply changes; to undo anything you don’t like, press Ctrl+Z or ![]() +Z.
+Z.
To hide the path while keeping the text visible, set the stroke weight for the path to 0 pt.
All materials on the site are licensed Creative Commons Attribution-Sharealike 3.0 Unported CC BY-SA 3.0 & GNU Free Documentation License (GFDL)
If you are the copyright holder of any material contained on our site and intend to remove it, please contact our site administrator for approval.
© 2016-2026 All site design rights belong to S.Y.A.