Adobe Creative Suite 6 Design and Web Premium All-in-One For Dummies (2012)
Book III
Illustrator CS6

Contents at a Glance
Chapter 1: What’s New in Illustrator CS6
Chapter 2: Discovering Illustrator CS6
Chapter 3: Using the Selection Tools
Chapter 4: Creating Basic Shapes
Chapter 5: Using the Pen Tool and Placing Images
Chapter 6: Using Type in Illustrator
Chapter 7: Organizing Your Illustrations
Chapter 8: Using Layers
Chapter 9: Livening Up Illustrations with Color
Chapter 10: Using the Transform and Distortion Tools
Chapter 11: Working with Transparency and Special Effects Tools
Chapter 12: Using Filters and Effects
Chapter 13: Using Your Illustrator Images
Chapter 1: What’s New in Illustrator CS6
In This Chapter
![]() Understanding the advantages of the new 64-bit processing
Understanding the advantages of the new 64-bit processing
![]() Exploring the new user interface
Exploring the new user interface
![]() Tracing images like a pro
Tracing images like a pro
![]() Using the new Pattern Options panel
Using the new Pattern Options panel
![]() Applying gradients to strokes
Applying gradients to strokes
Adobe Illustrator has changed its look for the better and has added some important new features. This chapter shows you all the latest and greatest features in Illustrator CS6, from its new tracing features and pattern options, to applying gradients on strokes, and much more.
Taking Advantage of the Processing Upgrade
Adobe Illustrator CS6 is now available with a 64-bit implementation on Windows. This means that general processing is faster, and more RAM (Random Access Memory) can be made available to Illustrator, which reduces the occurrences of out-of-memory errors and allows you to work faster.
Keep in mind that all modern Macintoshes are 64-bit, so Mac users can take advantage of this increased processing speed immediately. Windows users will have either a 32-bit or a 64-bit installation and should take care to install the proper version.
 Random Access Memory (RAM) is temporary memory that provides space for your computer to read and write data. It’s usually referred to as the computer’s memory. The more RAM you have in your computer, the better — more RAM reduces the number of times your computer must read data from your hard drive. Because RAM is many times faster than the memory on a hard drive, more RAM allows your computer to work considerably faster.
Working with the New User Interface
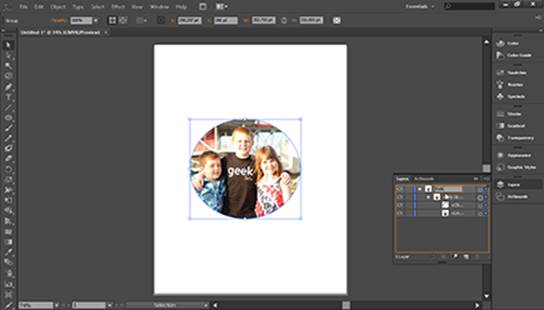
As with many of the other applications in the Creative Suite, Adobe developers improved the look of Illustrator by modernizing the style to create a new look and feel. First of all, note the new darker application interface, as shown in Figure 1-1. Note also that the text is much easier to read.
Figure 1-1: The new user interface in Adobe Illustrator CS6.
In addition, the new user interface now gives you the ability to change layer, swatch, and symbol names right in the panels, which takes redundant steps out of your workflow. Adobe developers have added several more improvements — we point them out to you as they arise in the rest of this minibook.
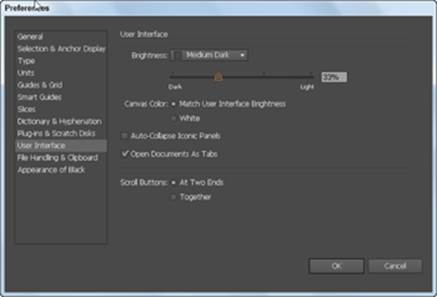
If the interface seems too dark for you, you can adjust the brightness by following these steps:
1. Choose Edit⇒Preferences⇒User Interface.
2. Select a brightness preset from the Brightness drop-down list or use the Brightness slider to adjust the brightness. (See Figure 1-2.)
 If you’re a seasoned Illustrator user who prefers to leave objects off the artboard (main page), you may want to select the White radio button in the Canvas Color area. Selecting this option gives you better visibility of the objects that are off the live artboard.
3. Click OK.
Figure 1-2:With the Brightness slider, you can control the lightness or darkness of your Illustrator user interface.
Tracing Bitmap Artwork Like Never Before
Because vector art is scalable, more precise, and generally smaller in file size, it has always been the preferred format for most graphic professionals. To help these professionals, Adobe added the tracing option several versions ago, which converted most bitmap (raster) artwork to vector art. The original implementation was successful, but it had some limitations: Text didn’t always convert to vector correctly, or an inordinate amount of anchor points were created during conversion. Now you can use the new and improved Image Trace feature in Illustrator CS6 to accurately convert your bitmap artwork into vector without these limitations.
After placing an image onto the Illustrator artboard, you have a choice of selecting default trace settings right in the Control panel, or you can access a vast array of options by choosing Window⇒Image Trace, as shown with the Advanced options expanded in Figure 1-3.
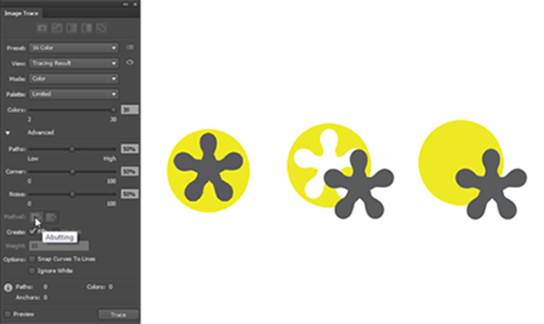
By using the Image Trace options, you can change the amount of detail, fidelity, control the color palette, and more. One of the biggest improvements is the ability to change the type of tracing from Abutting to Overlapping, allowing you to create close objects that can easily be repositioned later, as shown in Figure 1-4.
We tell you how to use the new Image Trace options in Chapter 5.
Figure 1-3:Convert bitmap objects to vector by using new and improved tracing options.
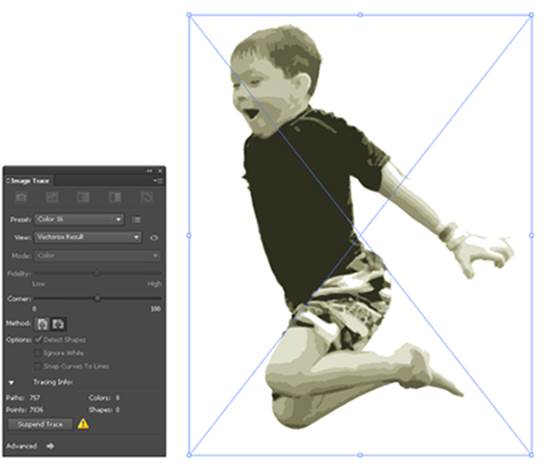
Figure 1-4:Change your method of tracing to Abutting or Overlapping by using the Image Trace options.
Using Pattern Options
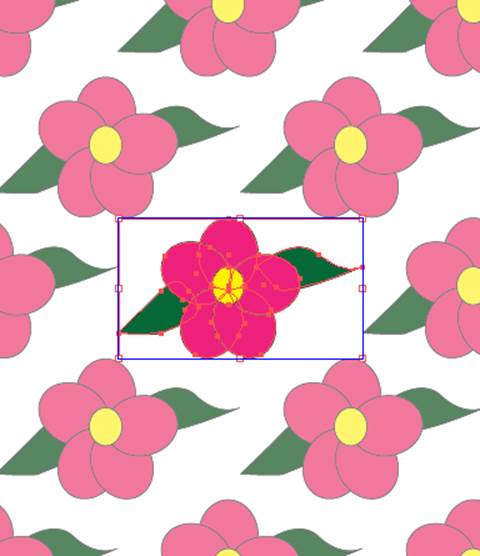
In previous versions of Adobe Illustrator, simple patterns were relatively easy to create. You could create objects that were to be part of a pattern, select and drag them into the Swatches panel, and then apply the pattern as an object’s fill or stroke. The difficulty would arise when you had a need to create a repeating pattern for fabric, wallpaper, or other objects requiring precise repeats. Pattern Options to the rescue! Using the new Pattern Options panel (see Figure 1-5), you can now test your pattern repeats in a separate pattern mode, as well as edit the contents. This method of testing offers you the opportunity to experiment quickly with your patterns until you see the results you’re looking for. See Figure 1-5, where the Tile Type has been changed to Brick by Row; the new pattern result is shown in Figure 1-6.
Figure 1-5:Create custom repeats and feel in control of the repeats using the new Pattern Options feature.
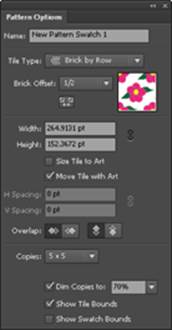
Figure 1-6:Experiment with offsets and even edit pattern contents in the Pattern Options mode.
The Pattern Options feature gives you the ability to change the tile bounds, change the type of repeating pattern from the standard stacking repeat to a brick or hexagonal repeat. This new feature is worth investing some time in because its capabilities will astound you. (We explain how to use the new pattern features in Chapter 9.)
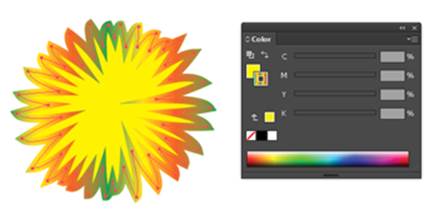
Applying Gradients to Strokes
Experienced Illustrator users have wanted the ability to apply gradients to strokes for years, and now the feature is included in Illustrator CS6. All you have to do is select Stroke from the Control panel and choose a gradient from your Swatches panel. (See Figure 1-7.)
Figure 1-7: You can now apply gradients to strokes.
Follow these steps to apply a gradient to a stroke:
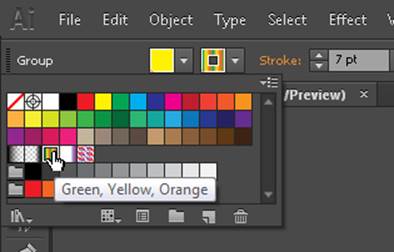
1. Select the object that you want to apply a stroke to, or select the Rectangle tool and click and drag a rectangle shape on the artboard.
2. Locate Stroke Weight in the Control panel and select a size that’s visible.
In this example, we selected 7 pts.
3. Using the Control panel, click on Stroke and select the Green, Yellow, Orange gradient as shown in Figure 1-8.
The gradient is applied to the stroke.
Figure 1-8:Applying the gradient to the stroke using the Stroke control.
4. Select Window⇒Gradient to change settings on your gradient. You can experiment in this window by changing the gradient to Radial or changing the angle and offset.
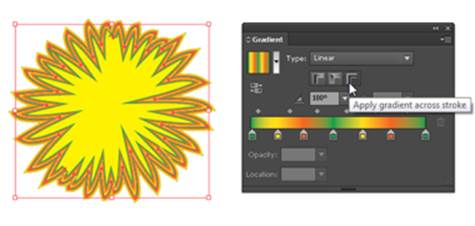
You can also use the Gradient window to change how the gradient is applied to the stroke as shown in Figures 1-9, 1-10, 1-11, and 1-12.
Keep in mind that at this time you can change the angle and distance of your gradient stroke only in the Gradient panel. The Gradient tool works fine for gradient fills, but not for strokes. (We explain more about using gradients in Adobe Illustrator in Chapter 9.)
Figure 1-9:Use the Gradient panel to customize how the gradient is applied to the stroke.
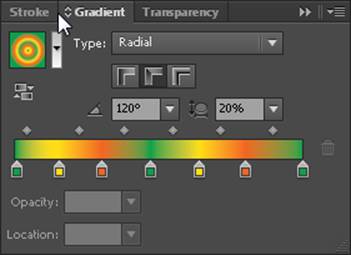
Figure 1-10:Applying gradient within stroke.
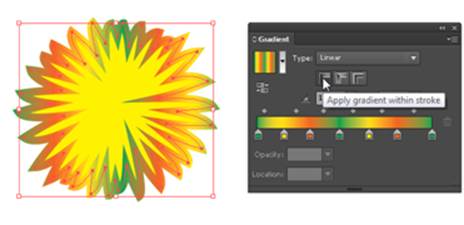
Figure 1-11:Applying gradient along stroke.
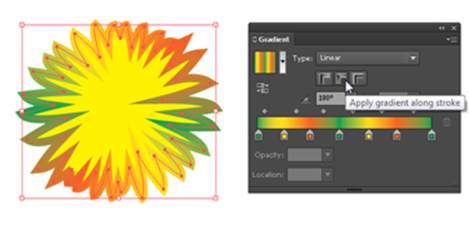
Figure 1-12:Applying gradient across stroke.
Discovering More New Features
Our objective is to show you not only what the new features in Illustrator CS6 are, but also how you can take advantage of them in your workflow. Many of the new features in Illustrator CS6 are discussed throughout the other chapters in this minibook, where we can show you how to use them.