Adobe Creative Suite 6 Design and Web Premium All-in-One For Dummies (2012)
Book I
Adobe Creative Suite 6 Basics
Chapter 3: Exploring Common Panels
In This Chapter
![]() Exploring the synchronized workspace
Exploring the synchronized workspace
![]() Manipulating panels in the workspace
Manipulating panels in the workspace
![]() Discovering different kinds of panels
Discovering different kinds of panels
![]() Getting to know the common panels in Adobe CS6
Getting to know the common panels in Adobe CS6
The panel is an integral part of working with most of the programs in Adobe Creative Suite 6 (CS6) because it contains many of the controls and tools you use when you’re creating or editing a document.
The basic functionality of panels is quite similar across the programs in Adobe Creative Suite, and the purpose of all panels is the same. Panels offer a great deal of flexibility in how you organize the workspace and the parts of it you use. The task you use each program for and the level of expertise you have may affect which panels you have open at a given moment. This chapter gives you an overview of how to work with the panels you find in Adobe CS6.
Understanding the Synchronized Workspace
One thing you immediately notice when opening applications in the Creative Suite is the synchronized workspace. All the applications look similar and have the same set of features to help you organize your workspace.
The tools in InDesign, Illustrator, and Photoshop appear on a space-saving, single-column toolbar, and panels (described in detail in the next section) are arranged in convenient, self-adjusting docks that you can widen to full size or narrow so that the panels are collapsed to icons.
Here are some pointers to help you navigate the workspace in the Creative Suite applications:
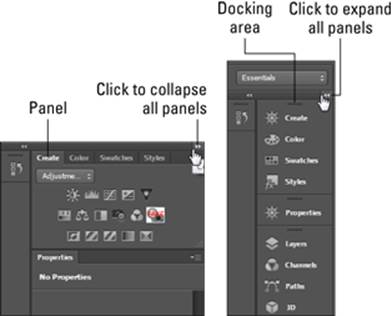
![]() To expand tools to two columns, click the right-facing double arrows on the gray bar at the top of the Tools panel, as you see in Figure 3-1
To expand tools to two columns, click the right-facing double arrows on the gray bar at the top of the Tools panel, as you see in Figure 3-1
![]() To collapse tools to a single column, click the left-facing double arrows on the gray bar at the top of the Tools panel.
To collapse tools to a single column, click the left-facing double arrows on the gray bar at the top of the Tools panel.
![]() To expand a docked panel, simply click the icon in the docking area, as shown in Figure 3-2. The panel you selected expands but goes away when you select a different panel.
To expand a docked panel, simply click the icon in the docking area, as shown in Figure 3-2. The panel you selected expands but goes away when you select a different panel.
If you have difficulty identifying the panel, you can choose the panel you want from the Window menu.
![]() To expand all docked panels, click the left-facing double-arrow icon at the top of the docking area; put away the panels by clicking the right-facing double-arrow icon in the gray bar above them.
To expand all docked panels, click the left-facing double-arrow icon at the top of the docking area; put away the panels by clicking the right-facing double-arrow icon in the gray bar above them.
![]() To undock a panel, simply click the tab (where the panel name is located) and drag it out of the docking area. You can re-dock the panel by dragging the panel back into the docking area.
To undock a panel, simply click the tab (where the panel name is located) and drag it out of the docking area. You can re-dock the panel by dragging the panel back into the docking area.
Figure 3-1:Click the arrows at the top of the Tools panel to show tools in two columns or one column.

Figure 3-2:Click an icon to collapse or expand the panel.
Using Panels in the Workspace
Panels are small windows in a program that contain controls, such as sliders, menus, buttons, and text fields, that you can use to change the settings or attributes of a selection or an entire document. Panels may also include information about a section or about the document itself. You can use this information or change the settings in a panel to modify the selected object or the document you’re working on.
Whether you’re working on a Windows machine or on a Mac, panels are similar in the way they look and work. Here are the basic instructions for working with panels:
![]() Open a panel: Open a panel in a Creative Suite program by using the Window menu: Choose Window and then select the name of a panel. For example, to open the Swatches panel (which is similar in many programs in the suite), choose Window⇒Swatches.
Open a panel: Open a panel in a Creative Suite program by using the Window menu: Choose Window and then select the name of a panel. For example, to open the Swatches panel (which is similar in many programs in the suite), choose Window⇒Swatches.
![]() Close a panel: If you need to open or close a panel’s tab or panel altogether, just choose Window⇒Panel’s Tab Name. Sometimes a panel contains a close button (an X button in Windows or the red button on a Mac), which you can click to close the panel.
Close a panel: If you need to open or close a panel’s tab or panel altogether, just choose Window⇒Panel’s Tab Name. Sometimes a panel contains a close button (an X button in Windows or the red button on a Mac), which you can click to close the panel.
![]() Organize the workspace: All Creative Suite programs now offer options for workspace organization. You can return to the default workspace, which restores panels to their original locations, by choosing Window⇒Workspace⇒Default. You can also open frequently used panels, position them where you want, and save a customized workspace by choosing Window⇒Workspace⇒Save (or New) Workspace. Name the workspace and click OK; the saved workspace is now a menu item that you can open by choosing Window⇒Workspace⇒Your Saved Workspace’s Name.
Organize the workspace: All Creative Suite programs now offer options for workspace organization. You can return to the default workspace, which restores panels to their original locations, by choosing Window⇒Workspace⇒Default. You can also open frequently used panels, position them where you want, and save a customized workspace by choosing Window⇒Workspace⇒Save (or New) Workspace. Name the workspace and click OK; the saved workspace is now a menu item that you can open by choosing Window⇒Workspace⇒Your Saved Workspace’s Name.
 You can also choose from a wide range of included presets designed for a variety of specialized tasks.
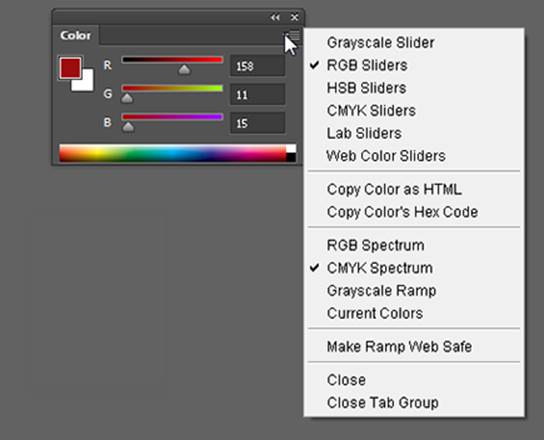
![]() Access the panel menu: Panels have a panel menu, which opens when you click the arrow in the upper-right corner of the panel, as shown in Figure 3-3. The panel menu contains a bunch of options you can select that relate to the selected tab when you click the panel menu. When you select an option from the panel menu, it may execute an action or open a dialog box. Sometimes a panel menu has just a few options, but particular panels may have a bunch of related functionality and therefore have many options on the panel menu.
Access the panel menu: Panels have a panel menu, which opens when you click the arrow in the upper-right corner of the panel, as shown in Figure 3-3. The panel menu contains a bunch of options you can select that relate to the selected tab when you click the panel menu. When you select an option from the panel menu, it may execute an action or open a dialog box. Sometimes a panel menu has just a few options, but particular panels may have a bunch of related functionality and therefore have many options on the panel menu.
![]() Minimize/maximize: All you need to do to minimize a selected panel is click the Collapse to Icons double-arrow button on the title bar of the panel (if it’s available). If the panel is undocked, you can also double-click the tab itself in the panel. This action either partially or fully minimizes the panel. If it only partially minimizes, double-clicking the tab again fully minimizes it. Double-clicking the active tab when it’s minimized maximizes the panel again.
Minimize/maximize: All you need to do to minimize a selected panel is click the Collapse to Icons double-arrow button on the title bar of the panel (if it’s available). If the panel is undocked, you can also double-click the tab itself in the panel. This action either partially or fully minimizes the panel. If it only partially minimizes, double-clicking the tab again fully minimizes it. Double-clicking the active tab when it’s minimized maximizes the panel again.
Panels that partially minimize give you the opportunity to work with panels that have differing amounts of information, which simplifies the workspace while maximizing your screen real estate.
Figure 3-3:Displaying the panel menu.
Most panels contain tabs, which help you organize information and controls in a program into groupings. Panel tabs contain a particular kind of information about a part of the program; a single panel may contain several tabs. The name on the tab usually gives you a hint about the type of function it controls or displays information about, and it’s located at the top of the panel. Inactive tabs are dimmed.
Moving panels
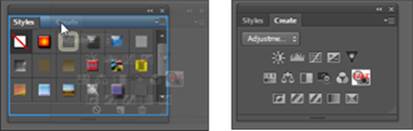
You can move panels all around the workspace, and you can add or remove single tabs from a panel. Each panel snaps to other panels, which makes it easier to arrange panels alongside each other. Panels can overlap each other as well. To snap panels to each other, drag the panel to a new location onscreen, as shown in Figure 3-4; you see the top bar of the panel become shaded, indicating that it’s becoming part of another panel’s group.
Figure 3-4: To move a panel, drag it by its tab.
Group similar tabs by moving them into a single grouped panel. Accessing different functions in your document becomes a lot easier because then you have less searching to do to find related functions for a task. If you want to return to the original workspace, you can choose Reset Workspace from the Window menu in the Workspace category.
You can hide all panels by pressing the Tab key. Press it again to reveal all panels you’ve hidden.
Looking at common panels
Many panels are similar across programs in the Creative Suite. Although not every panel has exactly the same content in every program it’s in, many have extremely similar content. You use these panels in similar ways, no matter which program or operating system you’re using.
 Acrobat doesn’t contain numerous panels, like other programs in the Creative Suite. Instead, Acrobat relies mainly (but not entirely) on a system of menus and toolbars filled with buttons and drop-down lists. In Acrobat, you can open dialog boxes that contain a bunch of settings you can enter for your documents.
The following panels are available in most, but not all, Creative Suite programs. This list describes what you can do with each one:
![]() Color: Select or mix colors for use in the document you’re working on. You can use different color modes and several ways of mixing or choosing colors in the Colors panel.
Color: Select or mix colors for use in the document you’re working on. You can use different color modes and several ways of mixing or choosing colors in the Colors panel.
![]() Info: See information about the document itself or a particular selection you’ve made. The Info panel includes information on the size, positioning, and rotation of selected objects. You can’t enter data into the Info panel: It only displays information without accepting it, so you have to use the Transform panel (described in this list) to make these modifications, if necessary.
Info: See information about the document itself or a particular selection you’ve made. The Info panel includes information on the size, positioning, and rotation of selected objects. You can’t enter data into the Info panel: It only displays information without accepting it, so you have to use the Transform panel (described in this list) to make these modifications, if necessary.
![]() Swatches: Create a swatch library, which can be saved and imported into other documents or other programs. You can store on the Swatches panel any colors and gradients you use repeatedly.
Swatches: Create a swatch library, which can be saved and imported into other documents or other programs. You can store on the Swatches panel any colors and gradients you use repeatedly.
![]() Tools: You use this important panel, sometimes called the toolbox (and not available in all Creative Suite programs), to select tools — such as the Pencil, Brush, or Pen — to use in creating objects in a document.
Tools: You use this important panel, sometimes called the toolbox (and not available in all Creative Suite programs), to select tools — such as the Pencil, Brush, or Pen — to use in creating objects in a document.
![]() Layers: Display and select layers, change the layer order, and select items on a particular layer.
Layers: Display and select layers, change the layer order, and select items on a particular layer.
![]() Align: Align selected objects to each other or align them in relation to the document itself so that you can arrange objects precisely.
Align: Align selected objects to each other or align them in relation to the document itself so that you can arrange objects precisely.
![]() Stroke: Select strokes and change their attributes, such as color, width/weight, style, and cap. The program you’re using determines which attributes you can change.
Stroke: Select strokes and change their attributes, such as color, width/weight, style, and cap. The program you’re using determines which attributes you can change.
![]() Transform: Display and change the shear (skew), rotation, position, and size of a selected object in the document. You can enter new values for each transformation.
Transform: Display and change the shear (skew), rotation, position, and size of a selected object in the document. You can enter new values for each transformation.
![]() Character: Select fonts, font size, character spacing, and other settings related to using type in your documents.
Character: Select fonts, font size, character spacing, and other settings related to using type in your documents.