Adobe Creative Suite 6 Design and Web Premium All-in-One For Dummies (2012)
Book IV
Photoshop CS6

Contents at a Glance
Chapter 1: Exploring New Features in Photoshop CS6
Chapter 2: Getting Into Photoshop CS6 Basics
Chapter 3: Messing with Mode Matters
Chapter 4: Creating a Selection
Chapter 5: Using the Photoshop Pen Tool
Chapter 6: Thinking about Resolution Basics
Chapter 7: Creating a Good Image
Chapter 8: Working with Painting and Retouching Tools
Chapter 9: Using Layers
Chapter 10: Saving Photoshop Images for Print and the Web
Chapter 1: Exploring New Features in Photoshop CS6
In This Chapter
![]() Using the new, darker interface
Using the new, darker interface
![]() Taking advantage of text styles
Taking advantage of text styles
![]() Getting creative with new brush tools
Getting creative with new brush tools
![]() Discovering new layer organizational features
Discovering new layer organizational features
![]() Exploring new and improved 3D features
Exploring new and improved 3D features
Adobe developers added numerous new features to Photoshop CS6. Many of these features are obvious as soon as you launch the product, but some are performance improvements that make certain tasks — such as warp, blur, and lighting effects — much faster. Two features, the Contact Sheet and the PDF presentation functionality, have returned after being absent (and missed greatly) in previous versions. Some of the new features are covered in this chapter, but many are integrated throughout the other chapters in this minibook.
Keep in mind that probably over 50 new features and production improvements have been added to Photoshop CS6. Look throughout this minibook for other references to these new features, or find them easily by choosing Window⇒Workspace⇒New in CS6. When you open this workspace, new features are highlighted throughout the menu applications to help you to identify them quickly.
Using the New Darker Interface
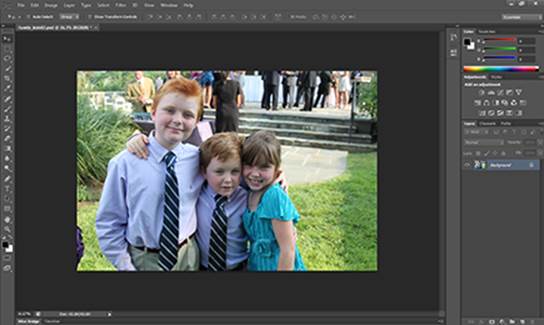
If you’re presently a Photoshop user, you only have to launch Photoshop CS6 to know that it’s very different. Don’t let the dark interface that you see in Figure 1-1 confuse you; this is Adobe’s way of creating consistency between Photoshop and Adobe’s other image-editing applications, such as Lightroom and After Effects. Almost all the tools and features are exactly where you expect them to be, along with some new ones.
Figure 1-1: The new dark interface in Adobe Photoshop CS6.
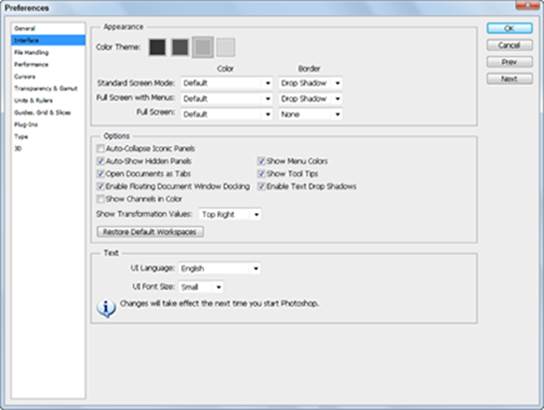
 If you would like to change the workspace color, you can choose Edit⇒Preferences⇒Interface (Windows) or Photoshop⇒Preferences⇒Interface (Mac OS), and change the Color and Appearance options in the Preference window. Although your color choices are relatively limited for the workspace — grey, grey, or a different shade of grey — you do have a little more customization control in the options for Standard Screen Mode, Full Screen with Menus, and Full Screen. Using these options, you can change the screen area between the image area and the start of the tools and panels. (See Figure 1-2.)
Figure 1-2: You can change the color of your workspace as well as the screen area behind your image.
Getting in Style with Text
The Photoshop text controls have taken a while to catch up to other applications such as InDesign and Illustrator, but now you have the ability to create and manage paragraph and character styles like never before right in Adobe Photoshop. Follow the steps defined in the next section carefully to take advantage of the style controls.
Creating a paragraph style in Photoshop
Paragraph styles save the attributes of the text, such as font style, size, and color, and also paragraph attributes, such as leading and the space before and after paragraphs, to name a few.
Most people find it easier to create styles by first taking a line or paragraph of text and experimenting with the text font, size, spacing, and so on. When they’re happy with the look and feel of the text, they can then save the attributes as a style. To create a new paragraph style, follow these steps:
1. Open any image, and then select the Type tool from the Tools panel.
2. Click and drag a new text area on the Photoshop artboard.
3. Create a paragraph of text.
If you don’t know what to type, you can find some samples of text in Photoshop files at the CS6 For Dummies website at www.agitraining.com/dummies. Use the text options at the top of the workspace if you want to change the text size, color font, and more. You can read more about changing text attributes in Chapter 9 of this minibook.
4. With the Text tool still selected, click and drag to select the text, or place the active cursor anywhere in the text.
5. From the Window menu, choose Paragraph Styles.
The Paragraph Styles panel appears.
6. From the Panel menu, choose New Paragraph Style, as shown in Figure 1-3. You can also click the Add New Style button at the bottom of the Paragraph Styles panel.
A new style is added to the Paragraph Styles panel.
7. Double-click the style that you added to the Paragraph Styles panel.
The Paragraph Style Options dialog box appears. Notice that the attributes that you applied to your text are recognized in the saved style.
Figure 1-3:Click the Panel menu in the Paragraph Styles panel and choose New Paragraph Style.

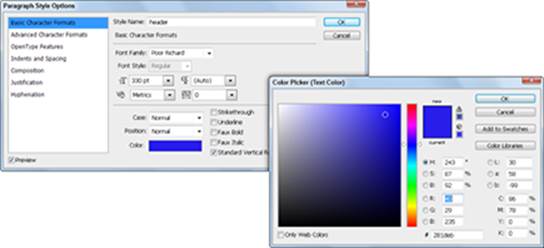
8. In the Paragraph Style Options dialog box, change the name to Header.
9. Click the Color swatch at the bottom, as shown in Figure 1-4, and then change the color by using the Color Picker that appears and click OK.
10. Click OK again to close the Paragraph Style Options window.
Figure 1-4:Change style attributes by using the Paragraph Style Options dialog box.
Creating a character style in Photoshop
By creating a character style, you can save the attributes of the text only, leaving out attributes for paragraphs such as leading and paragraph space before and after, indents, and so on. Character styles are useful when you want to make only selected words boldface or italic.
To create a character style, follow these steps:
1. Using the Type tool, select a word in the text that you created in the previous section.
2. Modify some of the attributes of the text — change the text to bold or italic — by using the Options bar at the top of the workspace.
3. Choose Windows⇒Character Styles to open the Character Style panel.
4. Click the Create New Character Style button at the bottom of the Character Style panel.
5. Double-click the Character Style 1 that was created.
The Character Style Options dialog box appears, as shown in Figure 1-5.
Figure 1-5:Double-click a character style in the Character Style panel to see and change its options.

6. Change the Style name to Bold and click OK.
Keep in mind that after you associate text with a paragraph style or a character style, you can apply that style to other text by highlighting that text and clicking the style name in the panel. When you want to make changes to the styles themselves, double-click the Paragraph or Character style to open the style options, make changes, and all instances will be automatically updated.
Overriding and redefining styles
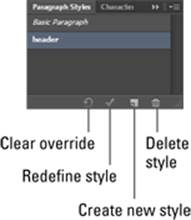
If you look at the Paragraph Style and Character Style panels, as shown in Figure 1-6, you see the following options at the bottom:
![]() Clear Override: By clicking the Override button, you can eliminate all the manual attributes that you may have applied intentionally or otherwise to the selected text. This would include attributes that are different than those specified in the style that has been applied to this text.
Clear Override: By clicking the Override button, you can eliminate all the manual attributes that you may have applied intentionally or otherwise to the selected text. This would include attributes that are different than those specified in the style that has been applied to this text.
![]() Redefine Style: By clicking the Redefine Style button, you can merge the manual attribute changes that you’ve made with the existing style. This feature is helpful when you decide that the spacing just isn’t working out or you quickly want to change colors.
Redefine Style: By clicking the Redefine Style button, you can merge the manual attribute changes that you’ve made with the existing style. This feature is helpful when you decide that the spacing just isn’t working out or you quickly want to change colors.
![]() Create New Style: Creates a new style. If you select this button when you have text selected, a new style named Paragraph Style is created. The attributes that have applied to the selected text are automatically recorded as part of that style. If you would like to see the Create New Style dialog box, so that you can more easily rename and investigate text attributes, hold down the Alt (Windows) or Option (Mac OS) key when you press this button.
Create New Style: Creates a new style. If you select this button when you have text selected, a new style named Paragraph Style is created. The attributes that have applied to the selected text are automatically recorded as part of that style. If you would like to see the Create New Style dialog box, so that you can more easily rename and investigate text attributes, hold down the Alt (Windows) or Option (Mac OS) key when you press this button.
![]() Delete Style: Deletes the selected style.
Delete Style: Deletes the selected style.
Figure 1-6: You can override manually applied styles or redefine your present style to update a saved style with new attributes.
When you select text, a plus sign (+) to the right of the style name in the Paragraph Style or Character Style panel indicates that you manually applied an attribute to the text. To eliminate that override, simply click the Clear Override button.
If you want to merge your manual attribute changes with the current Paragraph or Character style, click the Redefine (Paragraph or Character) Style button.
Working with the New and Improved Painting Features
With each version, Photoshop adds more tools and features that allow you to paint and create with more flexibility.
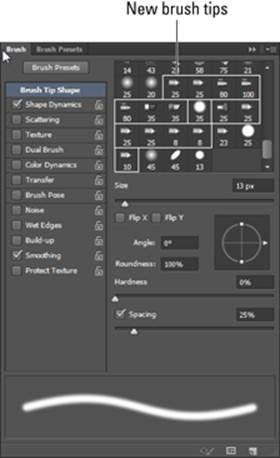
In Photoshop CS6, several new brush tips were added — the Erodible, Airbrush, and Static tips are accessible in the Brush panel, as shown in Figure 1-7.
Figure 1-7:New brush tips add to your painting capabilities.
You can use these new brush tips by following these steps:
1. Experiment with a new blank document by choosing File⇒New and selecting Default Photoshop Size from the Preset drop-down window. Then press OK. Leave as is.
2. When the artboard appears, select the Brush tool from the Tools panel, and then choose Window⇒Brushes.
3. Make sure that Brush Tip Shape is selected in the top-left side of the panel. Then scroll to the bottom of the Brush Tip window and select one of the Erodible brushes.
Erodible brushes let you wear your tip down as you use it, just like a pencil! If you want the effect to soften, or erode more, keep the softness down at a lower value. If you want to go back to the uneroded tip, press the Sharpen Tip button at any time.
4. Experiment with the Erodible brush and its settings by sketching with an erodible brush tip selected from the Brushes panel. Once in a while, press the Sharpen Tip button to resharpen the brush tip and start painting again. Change the softness to see how that setting can affect the tip, as well as the tip size.
If you want to try additional tips such as Airbrush and Static, simply hover over the brush tips to identify those brush tips. Unfortunately you cannot view brush tips in a list. Find out more about painting and editing tools in Chapter 8 of this minibook.
Discovering New Layer Features
Whether or not you’re a power Photoshop user, you’ll be happy to see the layer improvements that have been added to Photoshop CS6. Now you can search for layers by using the new filter capabilities and apply styles to entire groups of layers. Also, shape layers are now called Vector layers.
Applying styles to groups
You can now simultaneously apply drop shadows, beveled edges, glows, and more to multiple layers by applying styles to layer groups. Follow these steps to give this a try:
1. Start with a new file by choosing File⇒New. Select the Preset for the Default Photoshop Size, and then click OK.
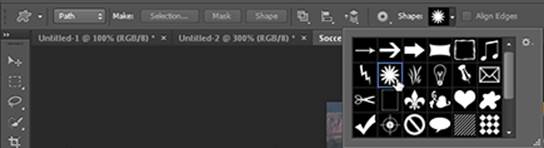
2. Click and hold on the Shape tool and select the hidden Custom Shape tool.
3. From the Options bar, click and hold on the Shape drop-down list, as shown in Figure 1-8, and select any shape.
In this example, we selected the Flower 5.
Figure 1-8:Click and hold on the Shape drop-down list to select a custom shape.
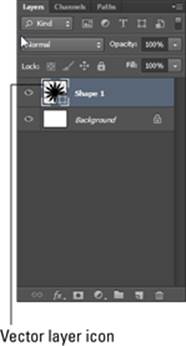
4. Click and drag the flower shape anywhere out on the artboard.
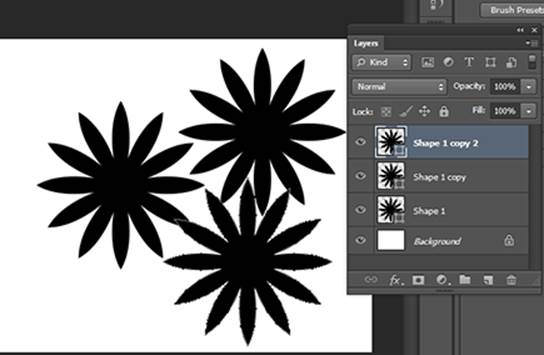
This step creates a layer. In the next few steps, you duplicate the new layer. In Photoshop CS6, a layer created from a vector shape is called a Vector layer and is designated by a little icon in the lower-right corner of the layer thumbnail, as shown in Figure 1-9.
Figure 1-9:Note that Shape layers are now referred to as Vector layers.
5. Select the Move tool and hold down your Alt (Windows) or Option (Mac OS) key and click the flower shape that you created on the artboard.
6. With the Alt/Option key still pressed, drag the flower to another location on the artboard.
You have duplicated the Vector layer.
7. Repeat the steps so that you have three Vector layers, as shown in Figure 1-10.
Don’t worry about the position for this exercise — you can find out much more about working with layers in Chapter 9 of this minibook.
Note: Keep in mind that if you make a mistake at any time that you can step backward (Undo) multiple times in Photoshop by pressing Alt+Ctrl+Z (Windows) or Option+Command+Z (Mac OS).
8. Select the topmost layer in the Layers panel by clicking it in the Layers panel, and then hold down the Shift key and click the bottom Vector layer (do not shift-click on the Background layer) to select all three of the Vector layers.
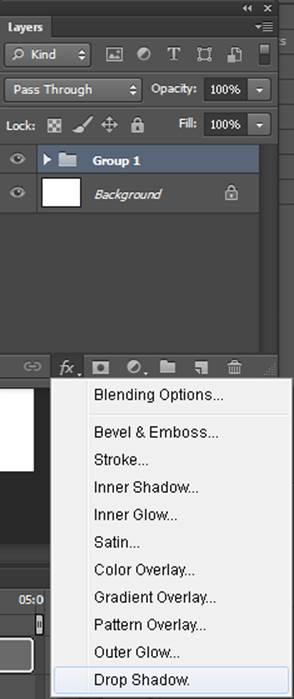
9. Press Ctrl+G (Windows) or ![]() +G (Mac OS) to Group all three layers into one folder.
+G (Mac OS) to Group all three layers into one folder.
Figure 1-10:Duplicate the shape layer so that you have three vector layers.
10. Click and hold on the Add a Layer Style button (fx) at the bottom of the layers panel and select Drop Shadow, as shown in Figure 1-11.
11. When the Layer Style window appears, click the artboard to move the drop shadow visually behind the shapes that you created.
You can change any other options that you want, too, but the point of this exercise is to show you how you can now apply a layer style to an entire group of layers, saving you lots of time and helping you keep your layers consistent.
Figure 1-11:With the group selected select the Drop Shadow layer style.
12. When you’re finished positioning the drop shadow, click OK.
Notice that Effects now appears underneath your group. You can now turn off and on the visibility by clicking the Eyeball icon to the left of Effects, or double-click Drop Shadow to edit the style further.
Filters to help you search layers
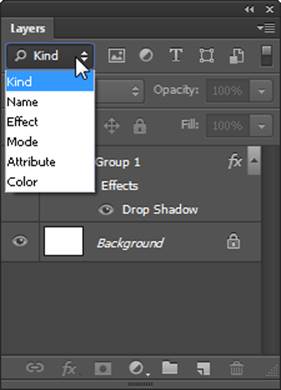
After you start working with layers, you may discover that you have so many that you can’t find the layer that you need when you want it. Fortunately Adobe has provided you help by adding a filter option to the layers panel. You can see it in Figure 1-12.
To use this filter, simply click on Kind. Note that you can find a layer based upon several properties:
![]() Kind: Options for the types of layers are selectable to the right of the drop-down list.
Kind: Options for the types of layers are selectable to the right of the drop-down list.
![]() Name: Enter a name for the layer in the text box that appears when you select this option.
Name: Enter a name for the layer in the text box that appears when you select this option.
![]() Effect: Select the effect applied to the layer from the drop-down list that appears when this option is selected.
Effect: Select the effect applied to the layer from the drop-down list that appears when this option is selected.
![]() Mode: This option allows you to select a layer based upon its blending mode.
Mode: This option allows you to select a layer based upon its blending mode.
![]() Attribute: This option allows you to find a layer based upon its attributes, such as whether it is a layer mask, whether it is locked or unlocked, and more.
Attribute: This option allows you to find a layer based upon its attributes, such as whether it is a layer mask, whether it is locked or unlocked, and more.
![]() Color: If you add color to a layer (to help you organize your layers), you can find all colored layers by using this option.
Color: If you add color to a layer (to help you organize your layers), you can find all colored layers by using this option.
Figure 1-12:There is no excuse for not finding your layers with the new layer filter feature.
You can find out more about layers in Chapter 9 of this minibook.
Exploring the New and Improved 3D Features
Adobe developers recognized that many new users weren’t quite sure how to take advantage of the incredible 3D features available in Photoshop. They addressed this dilemma by adding functionality that automatically converts the workspace to the 3D workspace as soon as a user opens any 3D file. This feature helps you find the tools easily and get right to work.
In this section, you find out about some of the new 3D features. However, be aware that the scope of this book doesn’t leave room to look into all the capabilities that you can use. Look at the For Dummies site at www. agitraining.com/dummies to find online tutorials and references that will help you maximize this feature.
Adobe developers have made many improvements to the Photoshop CS6 3D capabilities. Keep in mind that you cannot only create 3D objects in Photoshop, but by choosing File⇒Open, you can also open many existing 3D files right in Photoshop, including: .obj, .dae, .3Ds, .U3d, and more.
The following steps show you how to convert a 2D object to 3D so that you can see the new and improved workspace that has been added to Photoshop CS6. Keep in mind that you must have a video card and driver capable of using 3D in order to experiment in this section. If you want the latest requirements, go to www.adobe.com and type adobe +3d +“video card” into the Search text box. At this time of writing, the online requirements haven’t been updated for Photoshop CS6.
1. Choose Edit⇒Preferences⇒Performance (Windows) or Photoshop⇒Preferences⇒Performance (Mac OS) and select the Use Graphics Processor check box in the Graphics Processor Settings section.
If this check box is grayed out, you can’t go into the 3D workspace at this time.
2. Open any image in Photoshop CS6. Make sure that the image is made up of a layer, not a Background. If you see Background in the Layers panel, double-click it and click OK to convert it into Layer 0.
Note: You can also find images to use at the For Dummies site located at www.agitraining.com/dummies.
3. Choose 3D from the Windows menu.
The 3D panel appears.
4. Select the Mesh from Preset radio button, and then select a shape from the drop-down list.
In this example, we selected Cube.
5. Click Create to see your image wrapped around a cube shape.
6. Experiment with the 3D tools!
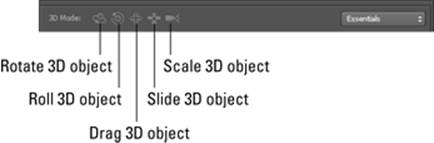
You can now take advantage of the 3D tools available on the Options bar, as shown in Figure 1-13. Using these tools, you can reposition your 3D object, spin it, and change the camera view by using the 3D tools available in the Photoshop 3D Workspace. Note that if you do not see the 3D options, switch to the Move tool.
Figure 1-13:Use the tools in the 3D workspace to reposition the 3D object or change its camera view.