Adobe Creative Suite 6 Design and Web Premium All-in-One For Dummies (2012)
Book IV
Photoshop CS6
Chapter 5: Using the Photoshop Pen Tool
In This Chapter
![]() Putting shape layers to work
Putting shape layers to work
![]() Working with a path as a selection
Working with a path as a selection
![]() Creating clipping paths
Creating clipping paths
The Pen tool is the ultimate method to make precise selections. You can also use it to create vector shapes and clipping paths (silhouettes). In this chapter, you see how to take advantage of this super multitasking tool. This chapter also shows you how to apply paths made with the Pen tool as shapes, selections, and clipping paths. If you’re interested in the fundamental principles of creating paths with the Pen tool in Illustrator, check out Book III, Chapter 5, where we cover the Pen tool in more detail.
We recommend that you use the Pen tool as much as you can to truly master its capabilities. If you don’t use it regularly, it will seem awkward, though it gets easier! Knowing how to effectively use the Pen tool puts you a grade above the average Photoshop user, and the quality of your selections will show it. Read Chapter 9 of this minibook to find out how to use the Pen tool, and look in Chapter 7 to find out how to create layer masks and adjustment layers.
Using Shape Layers
When you start creating with the Pen tool, Photoshop automatically, as a default, creates a path. But you can also choose to make a vector shape or, in the rare instance that you might need it, a fill (which essentially creates pixeled, nonvector shapes and paths). Select the Pen tool and note the default setting on the left side of the Options bar. You can select the following options from the Pick Tool Mode drop-down list:
![]() Shape: Creates a new shape layer, a filled layer that contains the vector path.
Shape: Creates a new shape layer, a filled layer that contains the vector path.
![]() Path: Creates a path only; no layer is created.
Path: Creates a path only; no layer is created.
![]() Pixels: Creates pixels directly on the image. No editable path or layer is created. This option may not be useful to new users, but some existing users prefer to use this method because it’s the only way to access the Line tool from earlier versions.
Pixels: Creates pixels directly on the image. No editable path or layer is created. This option may not be useful to new users, but some existing users prefer to use this method because it’s the only way to access the Line tool from earlier versions.
Shape layers can be very useful when the goal of your design is to seamlessly integrate vector shapes and pixel data. A shape layer can contain vector shapes that you can then modify with the same features of any other layer. You can adjust the opacity of the shape layer, change the blending mode, and even apply layer effects to add drop shadows and dimension. Find out how to do this in Chapter 9 of this minibook.
Create a shape layer with any of these methods:
![]()
![]() Create a shape with the Pen tool. With the Pen tool, you can create interesting custom shapes and even store them for future use. We show you how in the following section.
Create a shape with the Pen tool. With the Pen tool, you can create interesting custom shapes and even store them for future use. We show you how in the following section.
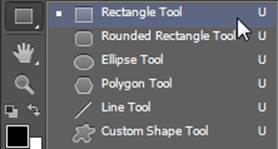
![]() Use a Vector Shape tool, as shown in Figure 5-1. Vector shapes are premade shapes (you can even create your own) that you can create by dragging the image area with a shape tool.
Use a Vector Shape tool, as shown in Figure 5-1. Vector shapes are premade shapes (you can even create your own) that you can create by dragging the image area with a shape tool.
![]() Import a shape from Illustrator. Choose File⇒Place and choose an .ai file; when the Options window appears, choose to place the file as a shape layer or a path. This action imports an Illustrator file as a shape layer or path into Photoshop.
Import a shape from Illustrator. Choose File⇒Place and choose an .ai file; when the Options window appears, choose to place the file as a shape layer or a path. This action imports an Illustrator file as a shape layer or path into Photoshop.
Figure 5-1: The Vector Shape tools.
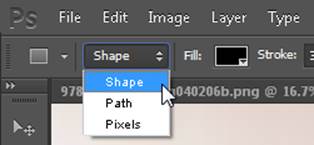
In Photoshop CS6, you can access the Vector shape and path tool options directly from the Options bar, as shown in Figure 5-2, when either the Pen tool or a vector shape tool is selected.
Figure 5-2: You can switch to the Vector shape tool with the Options bar.
Creating and using a custom shape
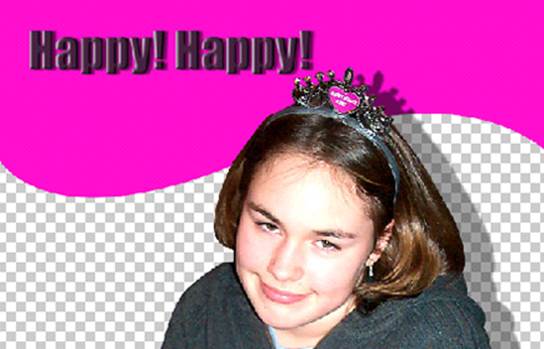
Perhaps you like the wave shape (see Figure 5-3) that’s been cropping up in design pieces all over the place.
Figure 5-3: A custom wave shape integrated with an image in Photoshop.
 You can copy and paste shapes directly from Illustrator CS6 into Photoshop CS6. Simply select a shape in Adobe Illustrator; choose Edit⇒Copy; switch to the Photoshop application; and, with a document open, choose Edit⇒Paste.
A dialog box appears, offering you the opportunity to place your path as a shape layer (vector shape), a path, or pixels.
You can create a wavy shape like that, too. With an image or blank document open, just follow these steps:
1. Select the Pen tool, and then select Shape from the Pick Tool Mode drop-down list on the Options bar. (Refer to Figure 5-2.)
2. Click and drag with the Pen tool to create a wavy shape.
Don’t worry about the size of the shape. The shape is a vector, so you can scale it up or down to whatever size you need without worrying about making jagged edges. Just make sure to close the shape (that is, return to the original point with the end point).
When you create the shape, it fills in with your foreground color. Try to ignore it if you can; the next section shows you how to change the fill color, and Chapter 8 of this minibook covers how to change it to a transparent fill.
3. With the shape still selected, choose Edit⇒Define Custom Shape, name the shape, and click OK.
After you save your custom shape, you can re-create it at any time. If you don’t like the shape, choose Windows⇒Layers to open the Layers panel, and then drag the shape layer you just created to the Trash Can in the lower-right corner of the panel. If you want to experiment with your custom shape now, continue with these steps.
4. Click and hold the Rectangle tool to access the other hidden vector tools; select the last tool, the Custom Shape tool.
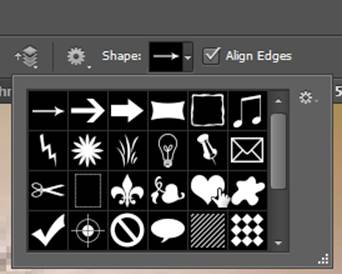
When the Custom Shape tool is selected, a Shape drop-down list appears on the Options bar at the top of the screen, as shown in Figure 5-4.
You have lots of custom shapes to choose from, including the one you’ve just created. If you just saved a shape, yours is in the last square; you may have to scroll down to select it.
Figure 5-4: A Shape drop-down list appears on the Options bar.
5. Click to select your custom shape; click and drag in the image area to create your shape.
You can make the shape any size you want.
6. To resize the shape, choose Edit⇒Free Transform Path, press Ctrl+T (Windows) or ![]() +T (Mac), grab a bounding box handle, and drag.
+T (Mac), grab a bounding box handle, and drag.
Shift+drag a corner handle to keep the shape proportional as you resize it.
Because a shape is created on its own layer, you can experiment with different levels of transparency and blending modes in the Layers panel. Figure 5-5 shows shapes that are partially transparent. Discover lots of other features you can use with shape layers in Chapter 9 of this minibook.
Figure 5-5:Experiment with blending modes and opacity changes on shape layers.

Changing the color of the shape
When you create a shape with a shape tool, the shape takes the color of the present foreground color. To change the color of an existing shape, open the Layers panel by choosing Window⇒Layers; notice that the Vector Shape tool creates a new layer for every shape you make. Creating a new layer is a benefit when it comes to creating special effects because the shape layer is independent of the rest of your image. (Read more about using layers in Chapter 9 of this minibook.)
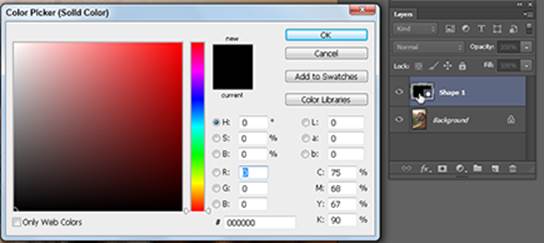
To change a shape’s color, double-click the color thumbnail in the shape layer, as shown in Figure 5-6, or click the Fill color box on the Options bar across the top of the Document window. The Color Picker appears. To select a new color, drag the Hue slider up or down or click in the large color pane to select a color with the saturation and lightness you want to use. Click OK when you’re done.
Figure 5-6:Double-click the Layer thumbnail to open the Color Picker.
With the Color Picker open, you can also move outside the picker dialog box and sample colors from other open images and objects.
Editing a shape
![]()
 Like Adobe Illustrator, Photoshop provides both a Path Selection tool and a Direct Selection tool. The Direct Selection tool is hidden under the Path Selection tool. To move an entire shape on a layer, choose the Path Selection tool and drag the shape.
To edit the shape, deselect the shape. (While using the Path Selection or Direct Selection tool, click outside the shape.) Then select the Direct Selection tool. With the Direct Selection tool, click individual anchor points and handles to edit and fine-tune the shape, as shown in Figure 5-7.
Figure 5-7: Edit individual anchor points with the Direct Selection tool.
Removing a shape layer
Because the Pen tool now has multiple options, you may unexpectedly create a shape layer. Delete a shape layer by dragging the layer thumbnail to the Trash Can in the lower-right corner of the Layers panel.
If you want to keep your path but throw away the shape layer, choose Window⇒Paths. Then drag the shape vector mask to the Create New Path icon, shown in Figure 5-8, which creates a saved path. Now you can throw away the shape layer.
Figure 5-8:Drag the shape path to the Create New Path icon.
Using a Path as a Selection
You can use the Pen tool to create precise selections that would be difficult to create using other selection methods. The Pen tool produces clean edges that print well and can be edited using the Direct Selection tool. Before using the Pen tool, make sure that you select Path from the Pick Tool Mode drop-down list on the Options bar.
To use a path as a selection (which is extremely helpful when you’re trying to make a precise selection), follow these steps:
1. Open any file or create a new, blank file.
2. With the Pen tool (make sure that Path is selected from the Pick Tool Mode drop-down list on the Options bar or else you’ll create a shape layer), click to place anchor points.
3. Drag to create a curved path around the image area you want selected and completely close the path by returning to the starting point. (See Figure 5-9.)
Use the techniques we discuss in Book III, Chapter 5 to perform this step. A circle appears before you click to close the path.
Figure 5-9:Make sure that you select the Paths button to create only the path, not a shape layer.

4. Choose Window⇒Paths.
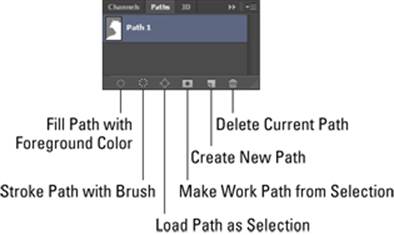
In the Paths panel, you can create new paths and activate existing paths, apply a stroke, or turn paths into selections by clicking the icons at the bottom of the panel. (See Figure 5-10.)
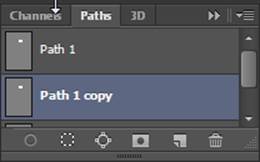
5. Click and drag the Work Path down to the Create New Path icon at the bottom of the Paths panel.
The path is now named Path 1 and is saved. You can also double-click to rename the file if you like.
Figure 5-10:The Paths panel and its options.
6. Click the Load Path as Selection icon.
The path is converted into a selection.
Use this quick and easy method for turning an existing path into a selection: Ctrl-click (Windows) or ![]() -click (Mac) the path thumbnail in the Paths panel.
-click (Mac) the path thumbnail in the Paths panel.
Clipping Paths
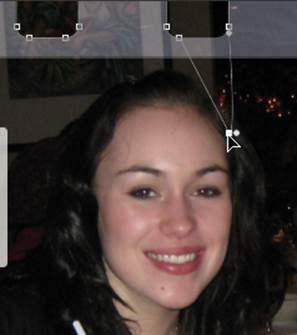
If you want to create a beautiful silhouette that transfers well to other applications for text wrapping (see Figure 5-11), create a clipping path. A clipping path is essentially a vector path that defines what part of the image is visible and what part is transparent. Typically a path is created around an object that you want to silhouette.
Figure 5-11:Clipping paths allow you to create silhouettes in other applications.

To create a clipping path follow these steps:
1. Use the Pen tool to create a path around the image area that will become the silhouette.
2. In the Paths panel, choose Save Path from the panel menu (click the triangle in the upper-right corner of the panel), as shown in Figure 5-12, and then name the path.
Figure 5-12:Convert your work path to a saved path.
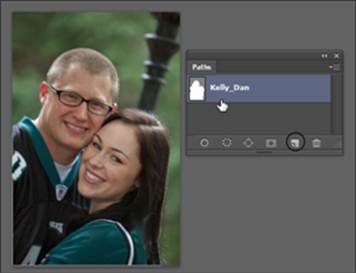
If Save Path is not visible, your path has already been saved; skip to Step 3.
3. From the same panel menu, choose Clipping Path.
4. In the Clipping Path dialog box, select your path from the drop-down list, if it’s not already selected; click OK.
Leave the Flatness Device Pixels text field blank unless you need to change it. The flatness value determines how many device pixels are used to create your silhouette. The higher the amount, the fewer points are created, thereby allowing for faster processing time. This speed comes at a cost, though: If you set the flatness value too high, you may see (if you look close) straight edges instead of curved edges.
5. Choose File⇒Save As and, from the Format drop-down list, select Photoshop EPS; in the EPS Options dialog box that appears, accept the defaults and click OK.
If you see PostScript errors when printing, choose Clipping Path from the panel menu and increase the value to 2 pixels in the Flatness Device Pixels text field. Keep returning to this text field and increasing the value until the file prints, or give up and try printing your document on another printer.
If you’re placing this file in other Adobe applications, such as InDesign, you don’t need to save the file as EPS; you can leave it as a Photoshop (.psd) file.
Here’s an even faster method you can use to create a clipping path that you can use in other Adobe applications, such as InDesign and Illustrator:
1. Create a path around the item you want to keep when you create the clipping path.
Make sure that you’re working on a layer and not on the Background layer. To convert the Background to a layer, hold down the Alt key (Windows) or the Option key (Mac) and double-click the Background layer. The Background layer is now Layer 0.
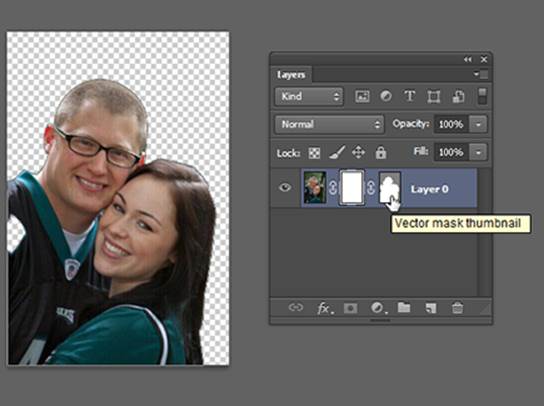
2.  In the Layers panel, click the Add Layer Mask button, and then click the Add Layer Mask button again.
A layer vector mask is created, and everything outside the path becomes transparent, as shown in Figure 5-13.
Figure 5-13:Creating a clipping path the easy way, with layers.
You can still edit the path by using the Direct Selection tool.
3. Save the file in the .psd format.
4. Choose File⇒Place to put the image, with its clipping path included, into other Adobe applications.