Adobe Creative Suite 6 Design and Web Premium All-in-One For Dummies (2012)
Book VIII
Fireworks CS6
Chapter 6: Hotspots, Slices, and CSS Layouts
In This Chapter
![]() Getting familiar with Fireworks layers
Getting familiar with Fireworks layers
![]() Hyperlinking with hotspots and image maps
Hyperlinking with hotspots and image maps
![]() Creating slices
Creating slices
![]() Exporting images and HTML as tables or CSS
Exporting images and HTML as tables or CSS
A simple method for organizing content and making a website dynamic is the use of hyperlinks, simple links from one location of a site to another. You can create a link by using a button, text, or even a move of the mouse pointer. By using layers in Fireworks, you can make those links dynamic and visually interesting.
In this chapter, you find out how Fireworks uses layers and then create navigational links by using the Slice feature.
Understanding Layers
Even if you’re an Adobe Photoshop or Illustrator user, the Layers panel in Fireworks may be somewhat of a mystery because it works differently from the way you might expect. Read on to find out how to take advantage of Fireworks layers. To see the Layers panel, choose Window⇒Layers.
Navigating the Layers panel
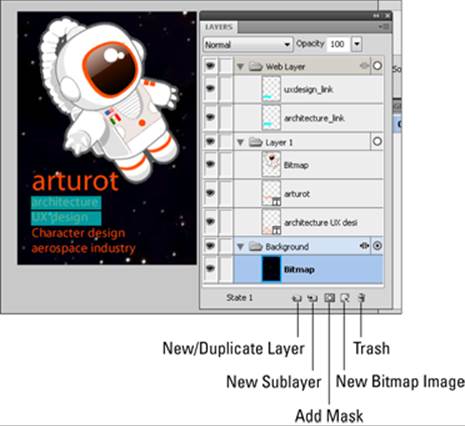
Figure 6-1 shows the two main components of the Layers panel:
![]() The Web Layer serves as a repository for anything code related, such as links and slices. In Figure 6-1, you see the links in the Web Layer section.
The Web Layer serves as a repository for anything code related, such as links and slices. In Figure 6-1, you see the links in the Web Layer section.
![]() The default Layer 1 includes sublayers that are created automatically for every object you add to the Fireworks canvas.
The default Layer 1 includes sublayers that are created automatically for every object you add to the Fireworks canvas.
Note that if you open an image from Photoshop that already has a Background layer, it carries through into Fireworks. (See Figure 6-1.)
Figure 6-1: The Layers panel in Fireworks.
Working with the Layers panel
Here are just some of the things you can do in the Layers panel to organize your artwork better:
![]() Hide and show layers: Click the Visibility (Eye) icon to hide or show a layer or sublayer.
Hide and show layers: Click the Visibility (Eye) icon to hide or show a layer or sublayer.
![]() Send objects forward and backward: Drag individual layers and sublayers to arrange objects on those layers in front of or behind each other.
Send objects forward and backward: Drag individual layers and sublayers to arrange objects on those layers in front of or behind each other.
![]() Rename layers: By double-clicking the layer or sublayer name, you can rename the layer, which can be a huge help later when you’re trying to find a specific object.
Rename layers: By double-clicking the layer or sublayer name, you can rename the layer, which can be a huge help later when you’re trying to find a specific object.
![]() Organize layers: Create appropriately named layers to house related sublayers, thereby gaining the ability to move, copy, or delete multiple layers at the same time.
Organize layers: Create appropriately named layers to house related sublayers, thereby gaining the ability to move, copy, or delete multiple layers at the same time.
![]() Keep web components separate: Use the Web Layer to keep track of hotspots and slices as well as control the visibility of those items.
Keep web components separate: Use the Web Layer to keep track of hotspots and slices as well as control the visibility of those items.
Creating Hotspots
Fireworks gives you lots of ways to take advantage of hyperlinks. In this section, you see how to create a hotspot — essentially, a simple link from text or a graphic to a URL (Universal Resource Locator) on the web. In Chapter 7 of this minibook, you find out how to create buttons that interact with the user.
Defining a hotspot
To link text or a graphic to a web URL, you must first define it as a hotspot. You can define a hotspot by using either of two methods:
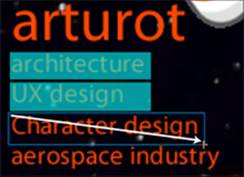
![]() Select the Hotspot tool in the Web section of the Tools panel and click and drag over the part of the image you want to create as the linked part of the image, as shown in Figure 6-2. Click and hold down the Rectangle Hotspot tool to see that you have a choice of creating a rectangular, circular, or polygon hotspot.
Select the Hotspot tool in the Web section of the Tools panel and click and drag over the part of the image you want to create as the linked part of the image, as shown in Figure 6-2. Click and hold down the Rectangle Hotspot tool to see that you have a choice of creating a rectangular, circular, or polygon hotspot.
Figure 6-2:Click and drag over an area with the Hotspot tool to incorporate a hyperlink into your Fireworks document.
![]() Select the item (text or graphics), right-click (Windows) or Control-click (Mac) the selected item, and choose Insert Hotspot from the contextual menu.
Select the item (text or graphics), right-click (Windows) or Control-click (Mac) the selected item, and choose Insert Hotspot from the contextual menu.
Linking a hotspot
After you define a hotspot, you can define the location (typically, a web page) that you want the hotspot to link to. Follow these steps:
1. Choose Window⇒URL.
The URL panel appears. (See Figure 6-3.)
Figure 6-3:Assign a link to a hotspot.
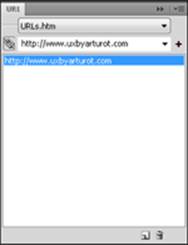
2. Type a URL address that you want the viewer to go to after selecting this region.
In Figure 6-3, a link to a fictitious external website (http://www. uxbyarturot.com) is referenced. Note that you can add your URL to a library for later use by clicking the plus sign to the right of the URL text box.
 When you reference pages beyond your website (external links), you must start the link with http://.
3. Choose Window⇒Layers to display the Layers panel if it isn’t already open.
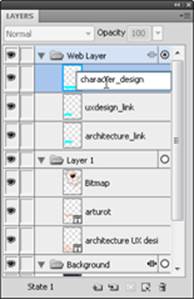
The hotspot you created appears as a separate sublayer of the Web Layer.
4. Double-click the name of this sublayer and give it a more appropriate name, as shown in Figure 6-4.
Figure 6-4: A new hotspot layer appears under the Web Layer.
In the next section, you discover options for working with multiple hotspots.
Working with Image Maps
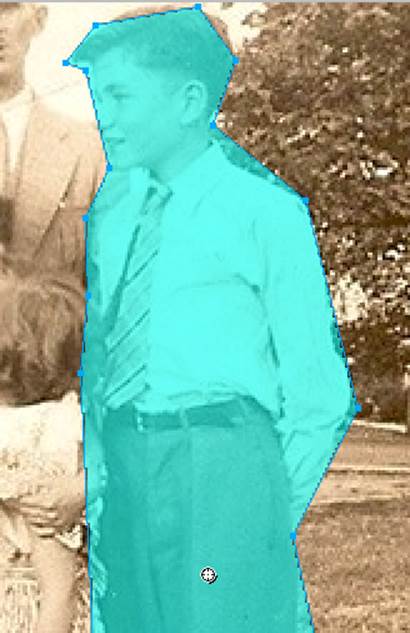
When you create a graphic and add multiple hotspots to it, it becomes an image map. In Figure 6-5, the image map was created with the Polygon Hotspot tool.
Figure 6-5:Use an image map to define clickable regions in an image.
Creating an image map
To create an image map of your own, follow these steps:
1. Open a graphic file that you want to assign multiple hotspots to.
2. Click and hold the Rectangle Hot Spot tool in the Web section of the Tools panel and choose one of the three hidden hotspot tools: Rectangle, Circle, or Polygon.
3. If you chose the Rectangle or Circle tool in Step 2, simply click and drag to define the hotspot. To create a region with the Polygon tool, simply click and release from point to point to create a custom region.
 If you didn’t get the shapes just right, don’t fret. You can use the Pointer and Subselection tools to move and resize the hotspots.
Linking an image map
After you create an image map, you can define hotspots on it and link those hotspots to URLs. For directions on both procedures, refer to the “Creating Hotspots” section, earlier in this chapter.
Here are some types of links other than URLs that you can use:
![]() E-mail address: Type mailto:youremail address in the URL text box to create a link that opens a message window, with your address already entered and ready to go!
E-mail address: Type mailto:youremail address in the URL text box to create a link that opens a message window, with your address already entered and ready to go!
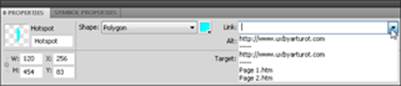
![]() Link to another page in your Fireworks document: Many people like to create prototypes of their websites in Fireworks and demonstrate the link from one page to another. You can use the Pages panel to add a page to your document and then use the Link drop-down list in the Properties panel, shown in Figure 6-6, to link from one page to another.
Link to another page in your Fireworks document: Many people like to create prototypes of their websites in Fireworks and demonstrate the link from one page to another. You can use the Pages panel to add a page to your document and then use the Link drop-down list in the Properties panel, shown in Figure 6-6, to link from one page to another.
To export multiple pages from Fireworks, choose File⇒Export and then select All Pages from the Pages drop-down list. You can test your links by opening the newly created HTML file in a browser.
Figure 6-6:Link from one Fireworks page to another.
![]() Non-HTML files on the server: You can type 2012/catalog.pdf, for example, to instruct the browser to open a PDF file named catalog that’s inside the 2012 folder.
Non-HTML files on the server: You can type 2012/catalog.pdf, for example, to instruct the browser to open a PDF file named catalog that’s inside the 2012 folder.
Repeat the process of defining hotspots and assigning URLs as many times as you like.
Testing and exporting an image map
After you’ve created and linked an image map, you’re ready to test and export it for use on your web page. Follow these steps:
1. Test your image map by choosing File⇒Preview in Browser.
2. If you’re happy with the results, close the browser window and return to Fireworks to export your file.
3. Choose File⇒Export.
The Export dialog box appears.
4. Type a name in the Name text box.
5. Select HTML and Images from the Export drop-down list.
6. Select Export HTML File from the HTML drop-down list.
7. Select None from the Slices drop-down list and click Save.
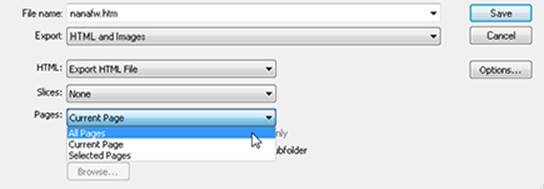
8. If you’ve created multiple pages in your Fireworks file, don’t forget to select All Pages from the Pages drop-down list, as shown in Figure 6-7.
Figure 6-7:Export multiple pages from Fireworks by using the All Pages option.
9. When you’re finished, click Save.
That’s it! Now you can choose File⇒Open in your browser and locate the HTML file to test your finished project or choose File⇒Open in a web-editing program (such as Adobe Dreamweaver) to modify the HTML file.
In Figure 6-8, you see the completed file in a web browser, along with the associated code that was created in Fireworks.
Slicing Up Your Art
Slicing is a technique for breaking large files into smaller packets so that they download faster on the web. It’s also a method for attaching URLs to different regions of an image, like image maps. Unlike image maps, however, slices are created in a grid pattern.
You can even use slices to optimize different parts of an image with separate settings. Perhaps you can get away with having one section of an image be of lower quality than another section.
A perfect candidate for sliced artwork is a navigation bar, such as the one shown in Figure 6-9. Each tab is an individual slice that, when clicked in a web browser, takes the viewer to a different location.
Figure 6-8: The finished image map, as viewed in a web browser (top) and the HTML code created for the image map (bottom).
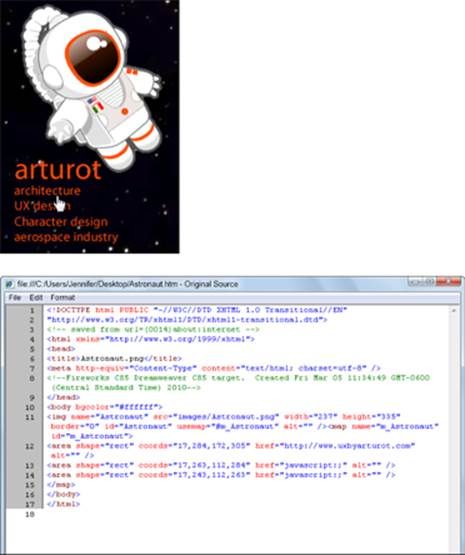
Figure 6-9:Use slices for navbars.
![]()
Creating the basic image
First, you create the basic image — a rectangle, for this example. Follow these steps:
1. Choose File⇒New to open the New Document dialog box.
2. Type 500 in the Width text box and 200 in the Height text box; then click OK.
The new, blank document opens. (Notice that it’s larger than the image you’re creating; you see how to modify it later in these steps.)
3. Select the Rectangle tool in the Vector section of the Tools panel and click and drag to create a rectangle.
For this example, any size is fine.
4. With the rectangle selected, click Fill Color in the Colors section of the Tools panel and choose a color.
For this example, we chose a light color (blue).
5. Choose Window⇒Info to open the Info panel.
6. Enter 300 in the W (Width) text box and 50 in the H (Height) text box, or use the Width and Height text boxes in the Properties panel to set this size.
The rectangle is resized.
7. With the Pointer tool, click anywhere in the canvas outside the rectangle to deselect the rectangle.
8. Right-click (Windows) or Control-click (Mac) and choose Modify Canvas⇒Fit Canvas from the contextual menu. (See Figure 6-10.)
The canvas adjusts to the size of the rectangle. (See Figure 6-11.)
Figure 6-10:Choose the Fit Canvas command.
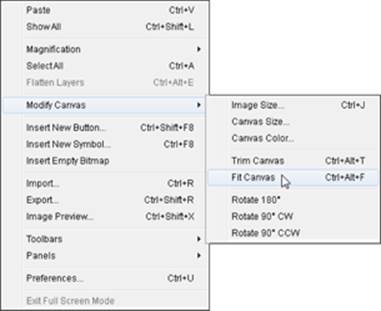
Figure 6-11:The canvas adjusts to fit your object.
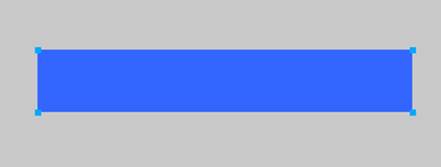
When you have no objects selected, you may also click the Fit Canvas button in the Properties panel.
Adding text
You can add some text areas to the navbar. Follow these steps:
1. Select the Text tool in the Vector section of the Tools panel.
2. Click Fill Color in the Colors section of the Tools panel and choose a color.
For this example, we chose a dark color (black).
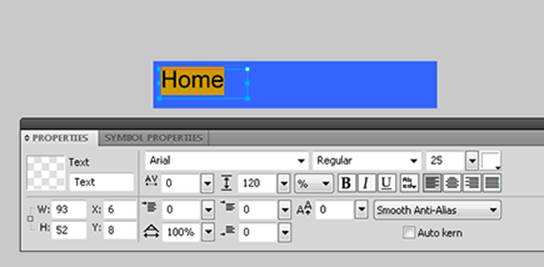
3. Set the font and font size in the Properties panel.
For this exercise, we changed the font to Arial and used the Font Size slider to change the size to 25.
4. Click the left half of the rectangle to position the insertion point wherever you want the text to begin, and type the text.
For this example, we typed Home, as shown in Figure 6-12.
Figure 6-12:Adding text to the navbar.
5. Click twice to the right of the text area to deselect the active text area and create a new one.
You can hold down the Alt+Shift (Windows) or Option+Shift (Mac) keys and drag the initial text box to the right to clone and align a new text box.
6. Type a word or two for your next navigation tab.
For example, we typed About.
7. Use the Pointer tool to reposition the text.
Doing the actual slicing and dicing
After you’ve prepared a simple but efficient navbar, use the Slice tool to create a couple of slices and then export them. Follow these steps:
1. Select the Slice tool in the Web section of the Tools panel; then click and drag from the upper-left corner of the Home section of the rectangle toward the lower-right corner, as shown in Figure 6-13.
Figure 6-13:Creating a slice.
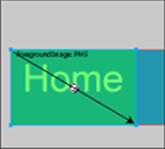
For this example, your drag doesn’t have to be exact.
If you’re going for perfection, choose View⇒Rulers to display the rulers. When the rulers are visible, you can click and drag guides out of them.
When you have an active slice, the Properties panel changes to offer you various slice options.
2. Change the format by making a choice from the Slice Export Settings drop-down list.
Select the GIF format if the artwork has lots of solid color, or select JPEG for images with lots of gradation of color.
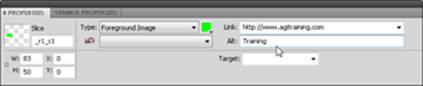
3. Enter a link in the Link text box.
For example, type http://www.agitraining.com.
4. Enter a brief description of the link in the Alt text box.
Alt text is the text that appears while a page is downloading. It also appears in place of the graphic if a viewer has turned off the graphics display in his web browser.
For example, type Training in the Alt text box, as shown in Figure 6-14.
Figure 6-14:Enter the URL and Alt text.
5. With the Slice tool, click and drag to surround the second half of the navbar.
6. Type http://www.adobe.com into the Link text box and type Adobe, Inc. into the Alt text box.
That is slicing in simple form. You can make the process as complicated as you want by creating entire sliced pages (because search engines like to search for text content) to navbars with many links and destinations.
In the next section, you find out how to get your navbar out of Fireworks and on a web page.
Exporting Slices
You can export finished slices for use on a web page.
Exporting slices as tables
To export sliced artwork as tables (for these steps, your test navbar), follow these steps:
1. Choose File⇒Export.
The Export dialog box appears.
2. Browse to the folder where you store your web files and make sure that you pick a file connected with the website you’re creating your images for.
3. In the File Name text box, enter a name.
For this example, we typed navbar.htm.
4. Select Export HTML and Images from the Export drop-down list.
5. Select Export Slices from the Slices drop-down list and click Save.
Now that you’ve exported the HTML code and the image, you can open the image in a web-editing program such as Dreamweaver and add elements or simply copy and paste it into an existing page or template. Find out more about Dreamweaver in Book VI.
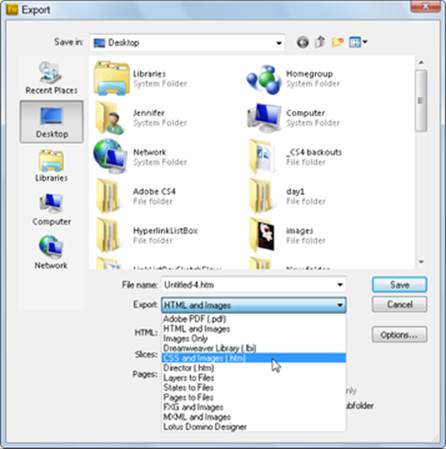
Changing the export format from table to CSS
If you want more control of your slices, you can change the code that Fireworks creates upon output.
In Figure 6-15, the selection for CSS and Images creates CSS (Cascading Style Sheets) rather than an HTML table when exported.
Typically, creating a layout of a page using CSS code is beneficial because the information is more accessible and flexible for the user.
Figure 6-15:You can choose to export slices as CSS.
All materials on the site are licensed Creative Commons Attribution-Sharealike 3.0 Unported CC BY-SA 3.0 & GNU Free Documentation License (GFDL)
If you are the copyright holder of any material contained on our site and intend to remove it, please contact our site administrator for approval.
© 2016-2026 All site design rights belong to S.Y.A.